Mono SE - Receiver Block - Free user manual and instructions
Find the device manual for free Mono SE Block in PDF.

| Product Type | Receiver |
| Brand | Block |
| Model | Mono SE |
| Color | Black |
| Dimensions (W x H x D) | 430 x 90 x 320 mm |
| Weight | 4.5 kg |
| Power Output | 50 W per channel (8 ohms) |
| Inputs | 2x HDMI, 1x Optical, 1x Coaxial, 2x RCA |
| Outputs | 1x Subwoofer, 1x Headphone, Speaker terminals |
| Supported Audio Formats | Dolby Digital, DTS, PCM |
| Bluetooth | Yes, version 4.2 |
| Wi-Fi | No |
| Remote Control | Included |
| Power Consumption | 200 W (max) |
| Standby Power Consumption | < 0.5 W |
| Maintenance | Clean with a soft, dry cloth. Do not use liquids. |
| Safety | Read manual before use. Do not open the device. Keep away from moisture. |
| Spare Parts Availability | Contact Block customer support for spare parts. |
| Warranty | 1 year |
Frequently Asked Questions - Mono SE Block
User questions about Mono SE Block
0 question about this device. Answer the ones you know or ask your own.
Ask a new question about this device
Download the instructions for your Receiver in PDF format for free! Find your manual Mono SE - Block and take your electronic device back in hand. On this page are published all the documents necessary for the use of your device. Mono SE by Block.
USER MANUAL Mono SE Block
Manual issued 07/2018
CONTENTS
PREFACE....3
IMPORTANT SAFETY INSTRUCTIONS ....4
TRANSPORT 5
UNPACKING 5
PACKAGE CONTENT ....5
FRONT PANEL and BOTTOM FEATURES ....6
BACK PANEL FEATURES ....7
INSTALLATION....8
Placement....8
Adjusting feet 8
Connecting the input cables....8
Connecting Your Loudspeakers....9
Connecting AC mains cable 9
System Remote Control (REM)....9
OPERATION.... 10
About CLASS-A / ECO Mode operation.... 10
Turning On/Off 10
Status LED 10
SELECT switch (Input Selector) 11
GAIN switch (Input Sensitivity) 11
CLASS-A / ECO MODE switch 11
AUTO ECO switch.... 11
AUTO OFF switch.... 11
GND LIFT switch.... 11
SURFACE CLEANING.... 12
WARRANTY 12
TROUBLESHOOTING 13
SPECIFICATIONS....14
NOTES 14
PREFACE
The BLOCKAUDIO team congratulates you on your purchase of this device. But before you start listening to your new Mono Block's, please read this manual carefully so you can use and enjoy all functions of this unique equipment without drawback on music quality.
IMPORTANT SAFETY INSTRUCTIONS
READ ALL INSTRUCTIONS: All the safety and operating instructions of your Block Audio device should be read before power is applied to the equipment.
RETAIN THIS OWNER'S MANUAL: This safety and operating instructions should be retained for future reference.
HEED WARNINGS: All warnings on the unit and in the operating instructions should be adhered to.
FOLLOW INSTRUCTIONS: All operating and use instructions should be followed.
CLEANING: Unplug the unit from the wall outlet before cleaning.
VENTILATION: Do not block any ventilation openings. Do not install near any heat sources such as radiators, heat registers, stoves, or other apparatus (including amplifiers). The unit should not be installed in a built-in location such as a bookcase or rack unless proper ventilation is provided.
GROUNDING: Do not defeat the safety purpose of the grounding-type plug. A grounding-type plug has two blades and a third grounding prong. The third prong is provided for your safety. If the provided plug does not fit into your outlet, consult an electrician for replacement of the obsolete outlet.
MAINS CABLE: Ensure that the mains cable (power supply cable) is not damaged. Never use the device if the mains cable is damaged. Protect the mains cable from being walked on or pinched particularly at plugs, convenience receptacles and the point where they exit from the apparatus.
LIGHTNING: Unplug this apparatus during lightning storms or when unused for long periods of time.
REPAIR: Any repairs or adjustment may only be performed by qualified personnel. The warranty will become void if the user attempts to open and repair the apparatus. Improper intervention may interfere with the electrical safety of the unit.
The manufacture assumes no liability for any accidents suffered by the user if the unit has been opened.
SERVICING: There are no user serviceable components inside this product. Servicing is required when the apparatus has been damaged in any way, such as if the power-supply cord or plug is damaged, liquid has been spilled inside the appliance or it has been exposed to moisture, the appliance does not operate normally, or has been dropped.
To reduce the risk of fire or electric shock, DO NOT expose this apparatus to rain or moisture.
Never push anything into holes or slots in the case - this could result in an electric shock and could cause damage of the set.
DO NOT connect any grounds (Input/Output) together, or to the chassis.
Only connect this amplifier to loudspeakers, and only one loudspeaker on the output of this amplifier.
DO NOT connect the output of this amplifier to another amplifiers outputs or inputs.
DO NOT touch the speaker terminals during operation, it may cause electric shock.
TRANSPORT
The amplifier is fairly heavy, the unit weights about 100 kg / 220 lbs. Be sure to use proper lifting techniques to avoid back strain and injury. Please transport the product only in the included package. Always use the provided foamed foil protection to prevent scratches on the housing.
Please allow the equipment to adapt to the climatic conditions in your listening room before you switch on the unit for the first time after transport.
UNPACKING
All Block Audio shipping boxes have been specially designed to protect their contents and special care has been taken to prevent damage under normal shipping conditions. Mishandling should be evident upon inspection of the shipping container.
At least two people are required to lift the Mono Block from its packing.
We strongly recommend to save all original packing to protect your component from damage should you wish to store it or ship it at a later date.
PACKAGE CONTENT
Enclosed you will find the following items:
√ The Mono Power Amplifier MONO BLOCK
√ The Owner's Manual (that you are currently reading)
√ One Detachable IEC Power Cord (with V-Lock)
√ One small bubble level
√ Cotton gloves
√ Dispatch Form & Final Test Certificate
FRONT PANEL AND BOTTOM FEATURES
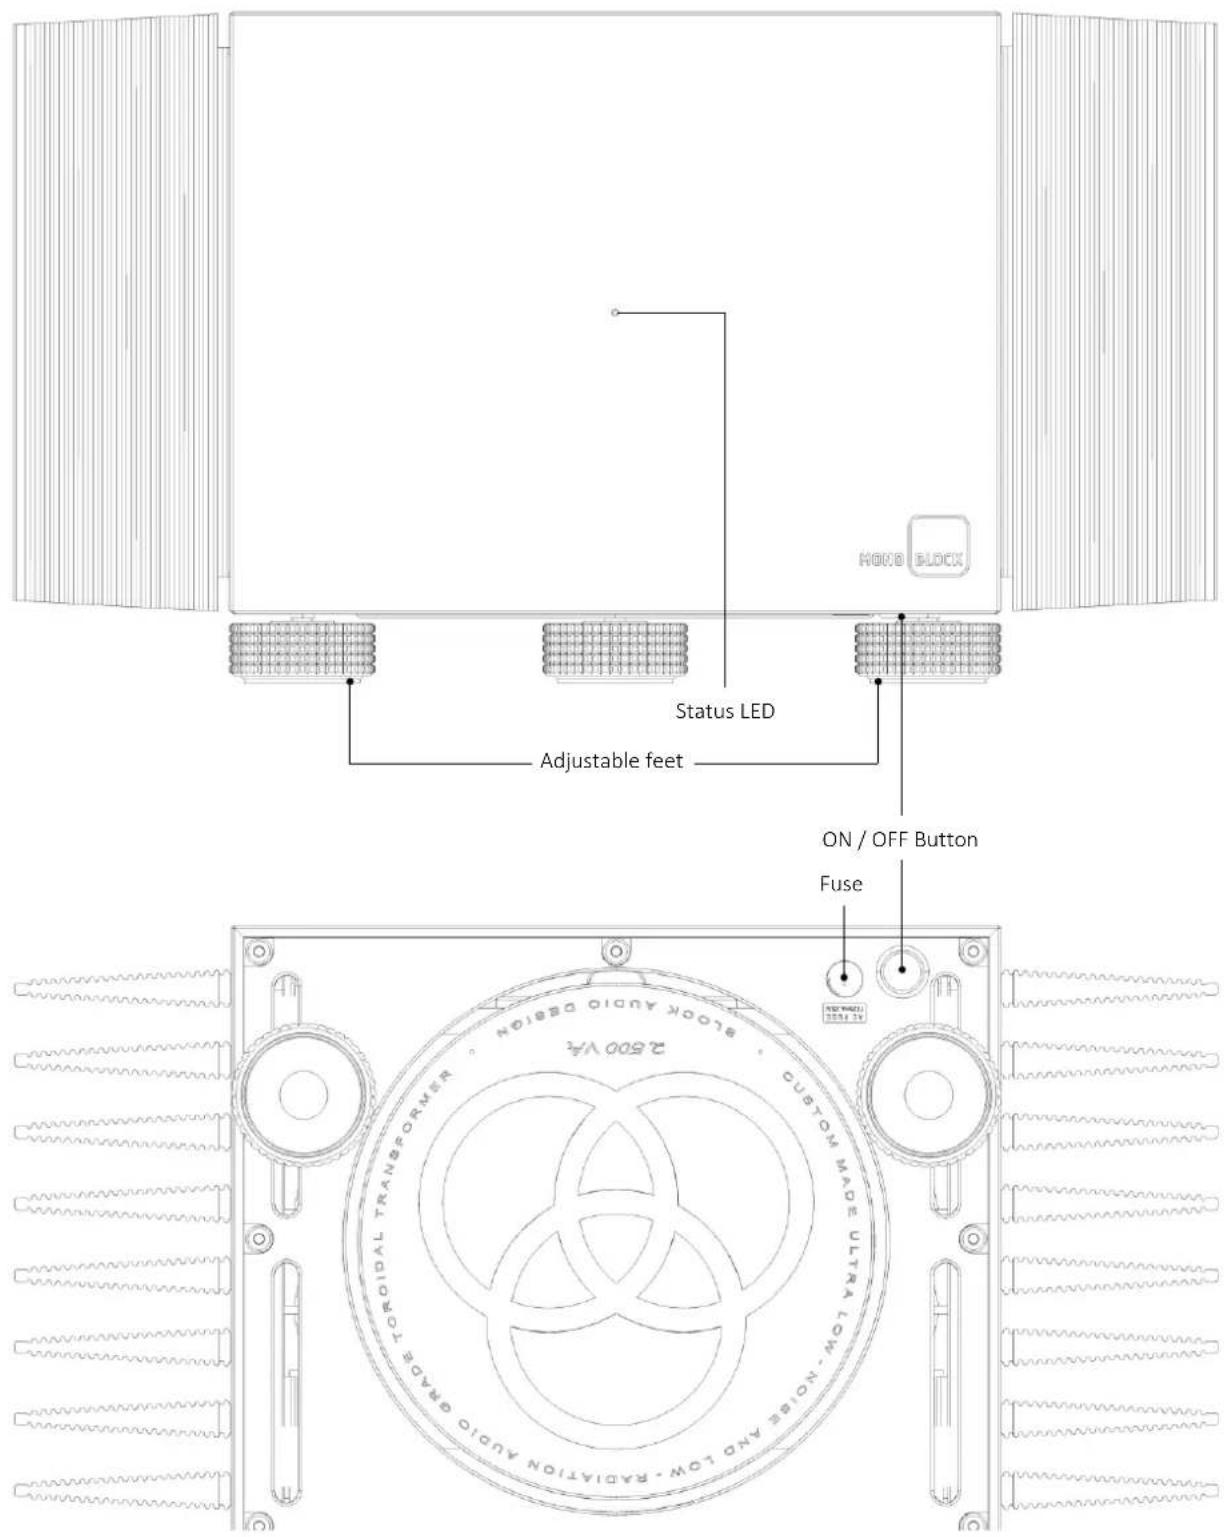
ON / OFF Button: Switches the unit on and off. See OPERATION section for details.
Status LED: Shows current status of the device:
- Steady light indicates normal operation - White: Class-A, Green: ECO mode
- Flashes during device is turning On/Off
• Red color indicates an error
• LED off: Device is switched off
Adjustable feet: For accurate setup of horizontal position. Only front two feet are adjustable! See INSTALLATION section for details.
Fuse: Mains/Line Fuse Holder.
CAUTION! Replace defective fuse always with one of the same type and rating: T125 mA / 230 VAC.
BACK PANEL FEATURES
RCA: Unbalanced (single-ended) input
XLR: Balanced (symmetrical) input
SELECT: Input selector. This switch allows you to choose between RCA and XLR input.
GAIN: Gain switch. “+26 dB” (up) for higher or “+20 dB” (down) for lower gain/sensitivity.
SPEAKER OUTPUT: The red pair of terminals (symbol \~) is the "Hot" output. The black pair (symbol ⊕) is the "Common/Ground" terminal.
AC MAINS INPUT: Mains supply input / 20 A power socket with V-Lock notch. Marking of the AC mains version.
REM: RJ45 connector for system remote control.
CLASS-A / ECO MODE: With this switch you can choose "Class-A" or "ECO Mode" Mono Block's operating mode. This function is disabled/replaced by connected system remote control.
GND LIFT / NORMAL: Ground lift switch. See OPERATION section for details.
AUTO ECO: This switch allows you to activate AUTO ECO mode. This function is disabled/replaced by connected system remote control.
AUTO OFF: This switch allows you to activate AUTO OFF mode. This function is disabled/replaced by connected system remote control.
STATUS: Green LED's inform about status of essential functions.
ERROR: Red LED's inform about activity of protection circuitry.
INSTALLATION
WARNING:
- Moving these components will require at least two people, as they are very heavy. Professional movers are recommended.
- Be sure to install it in a safe place from which it cannot fall or tip over.
- Provide adequate ventilation. Never cover the device or cooling fins. Do not operate on carpet or any other surface that might block air flow.
- The chassis will become warm in normal use!
- Do not allow the chassis to touch any metal parts, such as the frame of an equipment rack. This might create a parallel ground path that could degrade the sound of your system.
- Do not connect loudspeaker wires or other high voltage sources to the inputs.
Placement
The unpacked devices preferably place on low and stable base, or directly on the floor and make sure the cooling ribs on the sides of devices have the sufficient space for cooling air circulation.
Adjusting feet
The Mono Block is equipped with adjustable feet. After placing the Mono Block's to the desired place, it is possible to precisely adjust the horizontal position by rotating the front feet. A supportive bubble level is enclosed.
Connecting the input cables
Connect the Left Output of a preamplifier to the Input of the Left Mono Block unit and do the same for right channel.
You can use single ended RCA or balanced XLR cable for the connection.
For the best sound performance, we recommend using a balanced XLR cables, coming from a balanced outputs on your preamplifier.
In case you have a preamplifier with only RCA outputs, you can use the RCA input.
Remember to switch the input selector to RCA input position, when you use the RCA input.
Note: To release the XLR connectors press on the release button next to the XLR socket and pull the XLR plug out at the same time. Do not pull on the cable, only on the plug.
Connecting Your Loudspeakers
WARNING:
- This is a high-power amplifier. When driven, there is high voltage potential at the terminals. Connections should be made with the mains cord disconnected!
- The loudspeaker impedance must not be less than 2 Ohms! Recommended impedance is within a range of 4 to 8 Ohms.
Connect the speaker cables to the Speaker Output connectors: Red or + (plus) marked terminal of the speaker connect to the red Speaker Output terminal (symbol ⏻) and black, white or - (minus) marked terminal of the speaker connect to the black Speaker Output terminal (symbol ⏻).
Two sets of output connections are provided to enable easy Bi-wiring.
Either banana plug, bare wires or spade terminals can be used. If bare wire is used, be careful that no stray strands get loose that could cause a short-circuit. Bare wires and spade plugs must be tightened by rotating the connector screw clockwise.
For the best sound performance and reliable connection, we recommend spade terminals which accept 5 - 6 mm (0.20 - 0.24 inch) diameter binding posts. There is also provision for the use of banana plugs. However, banana plugs are proven to come loose over time which increases the contact resistance and distortion. We do NOT recommend the use of banana plugs at the speaker end, for these reasons.
Although input cables can be as long as necessary, it is suggested that speaker cables be as short as possible.
Connecting AC mains cable
If everything is connected, plug the mains cables from a wall outlet or Power distributor to the AC Mains Input socket.
Appropriate AC mains version (115 V/60 Hz or 230 V/50 Hz) is factory pre-configured and is marked on the back panel close to the AC mains socket.
The device connector of enclosed mains cord is equipped with V-Lock system. This may prevent accidental disconnection.
To release the device mains connector, press on the yellow release button and pull the plug out at the same time.
For best performance, try to route the power cord away from signal cables.
System Remote Control (REM)
The Mono Block is equipped as standard with an RJ45 plug for system remote control. If you own the Block Audio preamplifier, connect it to this. (Cable is enclosed by preamplifier)
OPERATION
WARNING:
- Do not touch the speaker terminals during operation, it may cause electric shock.
- Do not remove and connect input cables or speaker cables while the amplifier is running. Doing so risks damage to your loudspeakers or the amplifier.
- Your Mono Block should never be operated at a level which caused the front Status LED to illuminate red more or less constantly, the speakers could be damaged.
- If the system remote control cannot be applied, always remember to turn down the volume of the preamplifier before switching on or off the power amplifier.
- If the system remote control cannot be applied, always switch off the power amplifier first before switching off your preamplifier or any source.
- Do not operate the amplifier without a loudspeaker.
About CLASS-A / ECO Mode operation
CLASS-A mode provides Class-A bias to the output stage therefore ensuring the optimum performance of the amplifier during all listening events. During continuous Class-A operation the housing of amplifier will become quite hot. Ensure that you have left adequate space around the amplifier for ventilation.
ECO MODE produces very high sound quality, suitable for all occasions where critical listening is not a priority. A dual benefit exists in that this facility provides the user with a much cooler operating temperature and a much reduced demand on the mains electricity supply, particularly at idle while the amplifier is not reproducing music.
AUTO ECO mode is fully in Class-A operation mode during listening to music, but after 10 minutes without a music signal it switches to ECO Mode, thus saving energy. Once the music starts to play again resumes operation in the Class-A.
Turning On/Off
If the system remote control cannot be applied, use for On/Off switching the button located on the bottom below BLOCK logo. To switch the power amplifier on, press and hold the button longer than two seconds. To turn the power amplifier off, press the button briefly.
As with all high-fidelity products, the sound characteristic changes somewhat as it warms up. Best sound will be achieved after about 30 minutes of operation.
Status LED
The LED on the front panel shows the current status of the device:
• Lights White: Operation / Class-A
- Lights Green: Operation / ECO Mode
- Blinks: Status change (turning On or Off)
- Lights/Blinks Red: Error or Clipping (Overdriven)
- Off: device is switched off
The brightness of the LED is adjustable by system remote control.
SELECT switch (Input Selector)
Switcher is located on the back panel. Switch to "RCA" (left) for RCA input and to "XLR" (right) for XLR input.
GAIN switch (Input Sensitivity)
On the back panel is a switch marked Gain +26 dB and +20 dB.
You can choose the position, so that you get the best match for your preamplifier. (+26 dB is default)
CLASS-A / ECO MODE switch
If the system remote control cannot be applied, switching of the operation modes can be done by this switch on the back panel.
AUTO ECO switch
If AUTO ECO switch located on the back panel is ON (orange LED lights) and the device is operated in Class-A, the AUTO ECO mode will be activated. This function is disabled/replaced by connected system remote control.
AUTO OFF switch
If AUTO OFF switch located on the back panel is ON (orange LED lights) the device will switch off automatically after 30 minutes without audio signal. This function is disabled/replaced by connected system remote control.
GND LIFT switch
The ground lift switch, located on the back panel, can eliminate unwanted hum and buzz (50/100 Hz) by interrupting the ground loops between equipment, preventing current flow along the cable shield between two devices. Ideally only the source device remains grounded and, on the preamplifier and power amps. the ground switches are set to GND LIFT. You can try also other combinations and then leave on the set up with the best result.
SURFACE CLEANING
The cabinet outside is coated with a special paint that is resistant to spotting. However, from time to time you may wish to clean the surface of your Block Audio equipment to remove dust, or any material build up from the atmosphere or from common use. Therefore, we recommend only gently clean the dust off, eventually wiping the water moistening microfiber cleaning cloth while observing the following guidelines:
- As a safety precaution, always unplug the unit from the wall outlet before cleaning
• Always use a cloth that is soft and clean - Never use abrasives or polishing compounds anywhere on the unit
- Never apply liquid directly to the surface of the unit
- Apply only small amounts of cleaner to the cloth
- DO NOT rub the surface but wipe clean only. Excessive rubbing may wear the coating or screen-printed text.
WARRANTY
All Block Audio products are warranted against defects in material and workmanship for a period of two years from the date of purchase. (Longer warranty period is available and depends on local conditions provided by sales partner of Block Audio).
The warranty is void if the product has been subject to misuse or negligence or modified, repaired or opened by an unauthorized person, or the product was not operated in accordance with the instruction manual.
For the return transport to our premises, please use the original packaging. Transport damages are not covered by this warranty, Repairs will be charged. We recommend to conclude on effecting transport insurance.
If you do not have the original packaging, please contact your Block Audio dealer for advice or information about transport.
Basic repairs can be arranged by your local Block Audio dealer or distributor. Please apply your complaints on your local seller side first to secure the comfortable and fast solution of your eventual needs.
TROUBLESHOOTING
The Mono Block is equipped by dedicated circuitry to protect the device itself and the loudspeaker as well. The failure states are indicated by lighting/flashing red front status LED. The red indicators on the back plate show the kind of error. The corresponding LED will light up at the beginning of the switch-on phase of the device. In case of some troubles with your Mono Block, first check following points, or please contact your Block Audio dealer and inform about failure mode.
| PROBLEM | POSSIBLE CAUSE | ACTION |
| Amplifier does not start up and front status LED is flashing red. | The protective circuitry was activated and is preventing turn-on device. | Check error indicators on the back plate. |
| Amplifier does not start, “OVERHEATED” error LED lights up, or amplifier by oneself switches to ECO Mode. | Insufficient cooling. | Check/ensure ventilation around the unit. Try to switch on amplifier again after few minutes. |
| The ambient temperature is higher than +35°C / +95°F. | Switch operation to ECO mode. Try to switch on amplifier again after few minutes. | |
| Clipping, front status LED flashing red during music listening. | The output stage of the amplifier is driven into saturation. (overdriven) | Reduce a bit the volume. |
| Amplifier does not start, “SHORT CIRCUIT” error LED lights up | The load impedance is below 2 Ohms, short circuit at Speaker Output, or defective speaker. | Check impedance of connected speaker load. |
| Amplifier does not start, “DC VOLTAGE” error LED lights up. | The source device output signal contents too high DC voltage part. Defective preamplifier or source unit. | Check/change the signal source device. |
| Hum (50/100 Hz) comes from the speakers. | Ground loop between the individual components. | See capture GND LIFT switch. |
| No reaction on the On/Off button. | Mains cable is not properly connected. | Check mains cable connection. |
| Home circuit breaker is tripped. | Check home circuit breaker. | |
| Wrong or missing Mains voltage. | Have line voltage checked. | |
| A Mains/Line fuse placed on the bottom of amplifier can be blown. | Fuse failure may indicate a severe problem. Should the amplifier continue to exhibit mains fuse failure, contact your Block Audio dealer.The fuse fitted have to be rated as specified on the bottom. | |
| Poor stereo image and/or a lack of bass. | The loudspeaker wiring may not be connected correctly: By one of the speakers could be the polarity reversed. | Check the speaker polarity: Plus pole of the speaker connect to red speaker terminal ()Loudspeaker combination should be in phase. |
| Front LED lights white or green, but no sound on speaker. | No signal out to power amplifier. | Check audio source and connections to the Mono Block. |
| Wrong input selected. | Check input selector position on the back panel. |
SPECIFICATIONS
| Continuous RMS Output Power: | 500 W into 4 Ω, 250 W into 8 Ω, up to 200 W Class-A |
| Distortion: | THD+N <0.01 % at rated power, min. 0.002 %, IMD <0.003 % |
| Frequency Response: | DC - 300 kHz ±3 dB, DC - 20 kHz ±0.01 dB |
| Signal/Noise Ratio: | 120 dB A-weighted, 117 dB unweighted (related to rated power) |
| Damping Factor at 8 Ω: | >5 000, DC - 20 kHz |
| Voltage Gain: | +26 dB or +20 dB user-selectable |
| Input Sensitivity: | 2.25 Vrms at +26 dB gain |
| Input Impedance: | 20 kΩ balanced, 10 kΩ unbalanced |
| Inputs: | 1 balanced (XLR), 1 unbalanced (RCA) |
| Outputs: | 2 pairs binding posts |
| System Remote Control: | Yes*, Neutrik RJ45 |
| Power Consumption: | 1 200 W max., 500 W at idle, 50 W at idle ECO mode, 0 W in Standby |
| Mains Voltage: | 230 / 115 V AC ±10 %, 50 - 60 Hz (factory pre-configured) |
| Operating Temperature: | +15 to +35°C / +60 to +95°F |
| ECO mode Operating Temp.: | +15 to +40°C / +60 to +105°F |
| Dimensions: | 500(w) × 280(h) × 535(d) mm, 19.7(w) × 11.0(h) × 21.0(d) inch |
| Weight: | 90 kg / 198 lbs., ~110 kg / 240 lbs. shipping |
* works only in combination with the appropriate BLOCK AUDIO Preamplifier
NOTES