AA68MZ+Q3 - Motherboard BIOSTAR - Free user manual and instructions
Find the device manual for free AA68MZ+Q3 BIOSTAR in PDF.

| Product Type | Motherboard |
| Brand | Biostar |
| Model | AA68MZ+Q3 |
| Form Factor | Micro-ATX |
| Dimensions | 24.4 cm x 24.4 cm (9.6 in x 9.6 in) |
| Weight | Approximately 0.5 kg (1.1 lbs) |
| CPU Socket | FM2+ |
| Supported Processors | AMD A-series and Athlon (FM2+) |
| Chipset | AMD A68M |
| Memory Type | DDR3 |
| Memory Slots | 2 x DIMM, up to 32 GB |
| Storage Interfaces | 4 x SATA 3.0 (6 Gb/s) |
| Expansion Slots | 1 x PCIe 2.0 x16, 1 x PCIe 2.0 x1, 1 x PCI |
| USB Ports | 2 x USB 3.0, 4 x USB 2.0 (rear), additional via headers |
| Video Outputs | 1 x VGA, 1 x DVI, 1 x HDMI |
| Audio | Realtek ALC662, 6-channel HD Audio |
| LAN | Realtek RTL8106E, 100/10 Mbps |
| Power Connector | 24-pin ATX, 4-pin CPU |
| Operating Temperature | 0°C to 40°C (32°F to 104°F) |
| Maintenance | Clean with a soft, dry cloth; avoid liquids |
| Safety Precautions | Disconnect power before installation; keep away from moisture |
| Spare Parts | I/O shield, SATA cables (not included with all versions) |
| Repairability | Limited; board-level repair recommended by professionals |
Frequently Asked Questions - AA68MZ+Q3 BIOSTAR
User questions about AA68MZ+Q3 BIOSTAR
0 question about this device. Answer the ones you know or ask your own.
Ask a new question about this device
Download the instructions for your Motherboard in PDF format for free! Find your manual AA68MZ+Q3 - BIOSTAR and take your electronic device back in hand. On this page are published all the documents necessary for the use of your device. AA68MZ+Q3 by BIOSTAR.
USER MANUAL AA68MZ+Q3 BIOSTAR
There are three ways to update the BIOS:
BIOS Update Utility, BIOS Online Update Utility and BIOS Flasher.
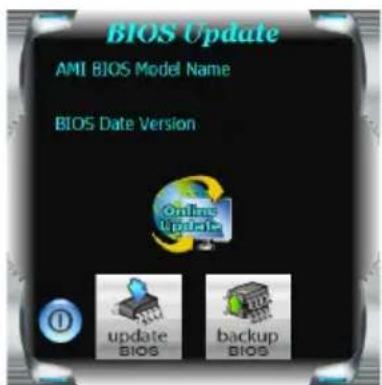
BIOS update utility
- Installing BIOS Update Utility from the DVD Driver.
- Download the proper BIOS from www.biostar.com.tw.
-
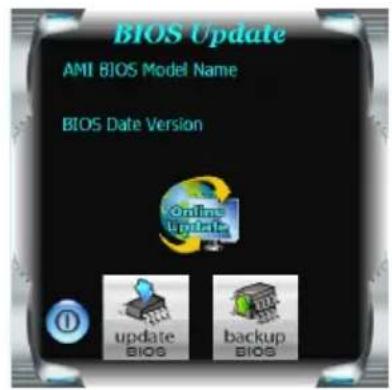
Open BIOS Update Utility and click the Update BIOS button on the main screen.
-
A warning message will show up to request your agreement to start the BIOS update. Click Yes to start the update procedure.
-
Choose the location for your BIOS file in the system. Please select the proper BIOS file, and then click on Open. It will take several minutes, please be patient.
-
After the BIOS Update process is finished, click on OK to reboot the system.
text_image
BIOS Update AMI BIOS Model Name BIOS Date Version Online Update update Bios backup Bios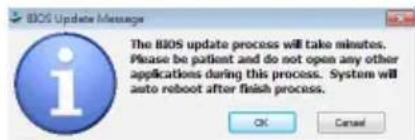
text_image
BIOS Update Message The BIOS update process will take minutes. Please be patient and do not open any other applications during this process. System will auto reboot after finish process. OK Cancel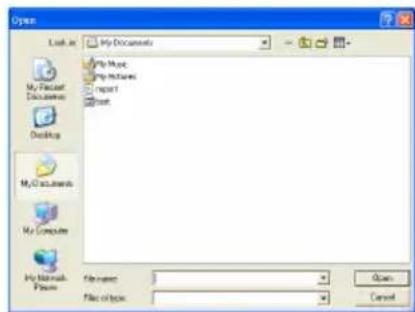
text_image
Open Look in: My Documents My Music My Music Report Next My Computer My Mac My Mac My Mac My Mac My Mac My Mac My Mac My Mac My Mac My Mac My Mac My Mac My Mac My Mac My Mac My Mac My Mac My Mac My Mac My Mac My Mac My Mac My Mac My Mac My Mac My Mac My Mac My Mac My Mac My Mac My Mac My Mac My Mac My Mac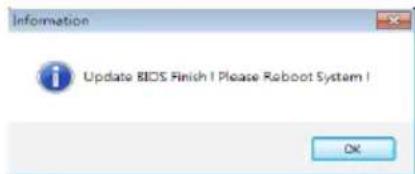
text_image
Information Update BIOS Finish | Please Roboot System | OK- While the system boots up and the full screen logo shows up, please press the Del
key to enter BIOS setup.
After entering the BIOS setup, please go to the Save & Exit, using the Restore Defaults function to load Optimized Defaults, and select Save Changes and Reset to restart the computer. Then, the BIOS Update is completed.
Backup BIOS
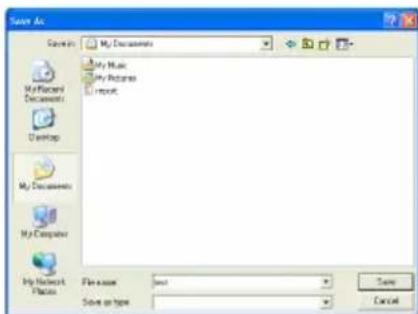
Click the Backup BIOS button on the main screen for the backup of BIOS, and select a proper location for your backup BIOS file in the system, and click Save.
text_image
Save As \% C:\My Documents My Music My Pictures My Computer My Network Place File name: Save as type: CancelOnline Update Utility
- Installing BIOS Update Utility from the DVD Driver.
- Please make sure the system is connected to the internet before using this function.
-
Open BIOS Update Utility and click the Online Update button on the main screen.
-
An open dialog will show up to request your agreement to start the BIOS update. Click Yes to start the online update procedure.
-
If there is a new BIOS version, the utility will ask you to download it. Click Yes to proceed.
-
After the download is completed, you will be asked to program (update) the BIOS or not. Click Yes to proceed.
-
After the updating process is finished, you will be asked you to reboot the system. Click OK to reboot.
text_image
BIOS Update AMI BIOS Model Name BIOS Date Version Online Update ① update BIOS backup BIOS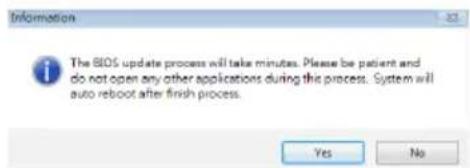
text_image
Information The BIOS update process will take minutes. Please be patient and do not open any other applications during the process. System will auto reboot after finish process. Yes No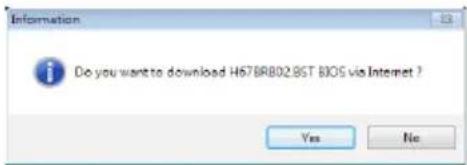
text_image
Information Do you want to download H678RB02.9ST BIOS via Internet ? Yes No
text_image
Information H078R802.BST Download Finish! Do you want to program 7 Yes No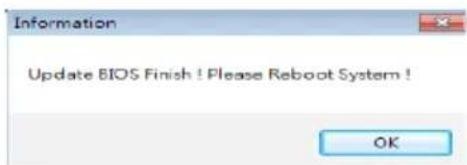
text_image
Information Update BIOS Finish ! Please Reboot System ! OK- While the system boots up and the full screen logo shows up, press Del
key to enter BIOS setup.
After entering the BIOS setup, please go to the Save & Exit, using the Restore Defaults function to load Optimized Defaults, and select Save Changes and Reset to restart the computer. Then, the BIOS Update is completed.
BIOSTAR BIOS flasher
BIOSTAR BIOS Flasher is a BIOS flashing utility providing you an easy and simple way to update your BIOS via USB pen drive.
Warning
- This utility only allows storage device with FAT32/16 format and single partition.
- Shutting down or resetting the system while updating the BIOS will lead to system boot failure.
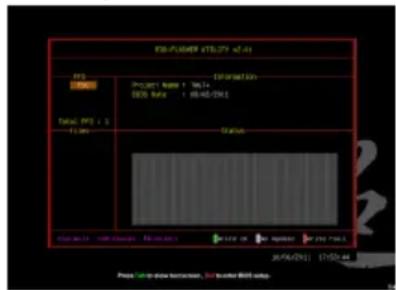
The BIOSTAR BIOS Flasher is built in the BIOS ROM. To enter the utility, press
Updating BIOS with BIOSTAR BIOS Flasher
- Go to the website to download the latest BIOS file for the motherboard.
- Then, copy and save the BIOS file into a USB flash (pen) drive.
- Insert the USB pen drive that contains the BIOS file to the USB port.
-
Power on or reset the computer and then press
during the POST process. -
After entering the POST screen, the BIOS-FLASHER utility pops out. Choose [fs0] to search for the BIOS file.
-
Select the proper BIOS file, and a message asking if you are sure to flash the BIOS file. Click Yes to start updating BIOS.
-
A dialog pops out after BIOS flash is completed, asking you to restart the system. Press the [Y] key to restart system.
text_image
IBM-POWER x75.072 42:41 ISS ITEMS Project Name: Mell SIDS Rate: 18.06/2011 Status Date: 18/06/2011 WIN NAME: IBM-033 TCP/IP Microsoft Windows FPGA 26/06/2011 17:52:44 Press to open the connection, but transfer IBM's data.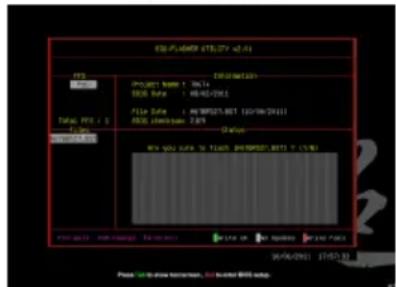
text_image
ESF-14098 275.07.01 Project Name: NDA SOS Data: 46-02-2013 File Date: 11/09/2013 (12/09/2013) SOS Minimum: 2.0V Onion View you sure to follow PRDMID: BTT 7 (1/8) Date: 03/06/2013 275.07.01 Price: $10 to show minimum, but lower MMS setup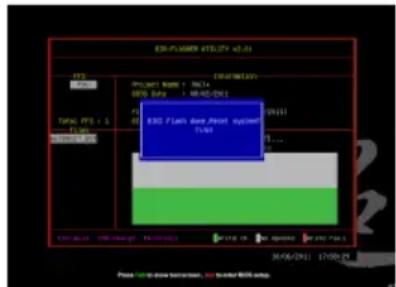
text_image
E3D-PLANNER ETL0174.4.01 Project Name: Delta 80% Data: 06/02/2014 E3D Plan Base Point System 13.00 ... Project Status: 13.00 (Start) 13.00 (End) File Date: 2015-06-29 Time: 06/02/2014 17:00:25 Press Start to save system, run to after E3D setup.- While the system boots up and the full screen logo shows up, press
key to enter BIOS setup.
After entering the BIOS setup, please go to the Save & Exit, using the Restore Defaults function to load Optimized Defaults, and select Save Changes and Reset to restart the computer. Then, the BIOS Update is completed.
Warning All the information and content above about the software are subject to be changed without notice. For better performance, the software is being continuously updated. The information and pictures described above are for your reference only. The actual information and settings on board may be slightly different from this manual.