
A960D+ - Motherboard BIOSTAR - Free user manual and instructions
Find the device manual for free A960D+ BIOSTAR in PDF.


| Product Type | Motherboard |
| Brand | Biostar |
| Model | A960D+ |
| Form Factor | Micro ATX |
| Dimensions (W x D) | 24.4 cm x 24.4 cm |
| Weight | 0.8 kg |
| CPU Socket | AM3+ |
| Supported CPU Series | AMD Phenom II / Athlon II / Sempron |
| Chipset | AMD 760G + SB710 |
| Memory Slots | 2 x DDR3 DIMM |
| Maximum Memory | 16 GB |
| Memory Type | DDR3 1066/1333/1600 (OC) |
| Expansion Slots | 1 x PCIe 2.0 x16, 1 x PCIe 2.0 x1, 2 x PCI |
| Storage Interfaces | 4 x SATA 3Gb/s (SB710), 1 x IDE |
| USB Ports (Rear) | 4 x USB 2.0 |
| Video Output | VGA, DVI (Integrated graphics) |
| Audio Codec | Realtek ALC662 6-Channel HD Audio |
| LAN Controller | Realtek RTL8105E 10/100 Mbps |
| Power Connectors | 24-pin ATX, 4-pin CPU |
| Operating Temperature | 0°C to 40°C |
| Maintenance | Keep vents clean; avoid moisture and dust |
| Cleaning | Use dry soft cloth; no liquid cleaners |
| Safety | Install in grounded case; handle with ESD precautions |
| Spare Parts & Repairability | Contact authorized service; no user-replaceable parts |
| General Information | Supports Windows 7/8/10; BIOS update via USB |
Frequently Asked Questions - A960D+ BIOSTAR
User questions about A960D+ BIOSTAR
0 question about this device. Answer the ones you know or ask your own.
Ask a new question about this device
Download the instructions for your Motherboard in PDF format for free! Find your manual A960D+ - BIOSTAR and take your electronic device back in hand. On this page are published all the documents necessary for the use of your device. A960D+ by BIOSTAR.
USER MANUAL A960D+ BIOSTAR
FCC Information and Copyright
This equipment has been tested and found to comply with the limits of a Class B digital device, pursuant to Part 15 of the FCC Rules. These limits are designed to provide reasonable protection against harmful interference in a residential installation. This equipment generates, uses, and can radiate radio frequency energy and, if not installed and used in accordance with the instructions, may cause harmful interference to radio communications. There is no guarantee that interference will not occur in a particular installation.
The vendor makes no representations or warranties with respect to the contents here and specially disclaims any implied warranties of merchantability or fitness for any purpose. Further the vendor reserves the right to revise this publication and to make changes to the contents here without obligation to notify any party beforehand.
Duplication of this publication, in part or in whole, is not allowed without first obtaining the vendor's approval in writing.
The content of this user's manual is subject to be changed without notice and we will not be responsible for any mistakes found in this user's manual. All the brand and product names are trademarks of their respective companies.

2004/108/CE, 2006/95/CE e 1999/05/CE
Short Declaration of conformity
We declare this product is complying with the laws in force and meeting all the essential requirements as specified by the directives
2004/108/CE, 2006/95/CE and 1999/05/CE
whenever these laws may be applied
Table of Contents
Chapter 1: Introduction...... 1
1.1 Before You Start 1
1.2 Package Checklist....1
1.3 Motherboard Features....2
1.4 Rear Panel Connectors .... 3
1.5 Motherboard Layout 4
Chapter 2: Hardware Installation.... 5
2.1 Installing Central Processing Unit (CPU)....5
2.2 Install a Heatsink 7
2.3 Fan Headers....8
2.4 Installing System Memory 9
2.5 Connectors and Slots 11
Chapter 3: Headers & Jumpers Setup.... 14
3.1 How to Setup Jumpers 14
3.2 Detail Settings....14
Chapter 4: Useful Help ...... 17
4.1 Driver Installation Note 17
4.2 Software....18
4.3 BIOS Setup....20
4.4 Troubleshooting....23
4.5 RAID Function 25
Appendix: SPEC In Other Languages 28
German 28
French....30
Italian....32
Spanish 34
Portuguese....36
Polish 38
Russian 40
Arabic 42
Japanese......44
CHAPTER 1: INTRODUCTION
1.1 B EFORE YOU START
Thank you for choosing our product. Before you start installing the motherboard, please make sure you follow the instructions below:
■ Prepare a dry and stable working environment with sufficient lighting.
■ Always disconnect the computer from power outlet before operation.
■ Before you take the motherboard out from anti-static bag, ground yourself properly by touching any safely grounded appliance, or use grounded wrist strap to remove the static charge.
■ Avoid touching the components on motherboard or the rear side of the board unless necessary. Hold the board on the edge, do not try to bend or flex the board.
■ Do not leave any unfastened small parts inside the case after installation. Loose parts will cause short circuits which may damage the equipment.
- Keep the computer from dangerous area, such as heat source, humid air and water.
■ The operating temperatures of the computer should be 0 to 45 degrees Celsius.
■ To avoid injury, be careful of:
Sharp pins on headers and connectors
Rough edges and sharp corners on the chassis
Damage to wires that could cause a short circuit
1.2 PACKAGE CHECKLIST
☑ Serial ATA Cable x2
☑ Rear I/O Panel for ATX Case x1
☑ Quick Installation Guide x1
☑ Fully Setup Driver DVD x1
Note: The package contents may be different due to the sales region or models in which it was sold. For more information about the standard package in your region, please contact your dealer or sales representative.
1.3 MOTHERBOARD FEATURES
| SPEC | ||
| CPU | Socket AM3 / AM3+AMD Sempron / Athlon II / Phenom II /FXprocessors (Maximum Watt: 125W) | AMD 64 Architecture enables 32 and 64 bit computingSupports Hyper Transport 3.0 |
| FSB | Support Hyper Transport 3.0Supports up to 4.4 GT/s Bandwidth | |
| Chipset | AMD 760GAMD SB710 | |
| Super I/O | ITE 8728F-BXProvides the most commonly used legacySuper I/O functionality | Low Pin Count InterfaceEnvironment Control initiativesH/W MonitorITE's "Smart Guardian" function |
| Main Memory | DDR3 DIMM Slots x 2Max Memory Capacity 16GBEach DIMM supports 512MB/1GB/2GB/4GB/8GB DDR3 | Dual Channel Mode DDR3 memory moduleSupports DDR3800/1066/1333/1600(OC)/1866(OC for AM3+ CPU only)Registered DIMM and ECC DIMM is not supported |
| Graphics | Integrated in AMD 760G Chipset Max Shared Video Memory is 1024MB | |
| SATA II | Integrated Serial ATA Controller | Data transfer rates up to 3 Gb/sSATA Version 2.0 specification compliant |
| LAN | Realtek RTL 8111F 10 / 100 / 1000 Mb/s auto negotiation | |
| Sound | ALC662 | 5.1 channels audio outHigh Definition Audio |
| Slots | PCI Express X16 slot x1 Supports PCI-E X16 expansion cardPCI Express X1 slot x1 Supports PCI-E X1 expansion cardPCI slot x1 Supports PCI expansion cards | |
| SATA Connector x4 Each connector supports 1 SATA deviceIDE Connector x1 Each connector supports 2 IDE deviceFront Panel Connector x1 Supports front panel facilities | ||
| On Board Connectors | Front Audio Connector x1 Supports front panel audio functionCPU Fan Header x1 CPU Fan power supply (with Smart Fan function)System Fan Header x1 System Fan Power supplyCMOS Clear Jumper x1 Restore CMOS data to factory default settingUSB Connector x2 Each connector supports 2 front panel USB portsPower Connector (24pin) x1 Connects to Power supplyPower Connector (4pin) x1 Connects to Power supplyPrinter Port Connector x1 Each connector supports 1 Printer port | |
| Back Panel I/O | PS/2 Keyboard x1PS/2 Mouse x1DVI port x1VGA port x1LAN port x1USB Port x4Audio Jack x3 | Connects to PS/2 KeyboardConnects to PS/2 MouseConnect to DVI-D monitorConnect to D-SUB monitorConnect to RJ-45 Ethernet cableConnect to USB devicesProvide Audio-In/Out and microphone connection |
| Board Size | 190 mm(W) x 235 mm(L) | |
| Special Features | RAID 0 / 1 / 10 support | |
| OS Support | Windows XP / Vista / 7 / 8 | Biostar reserves the right to add or remove support for any OS With or without notice. |
1.4 REAR PANEL CONNECTORS

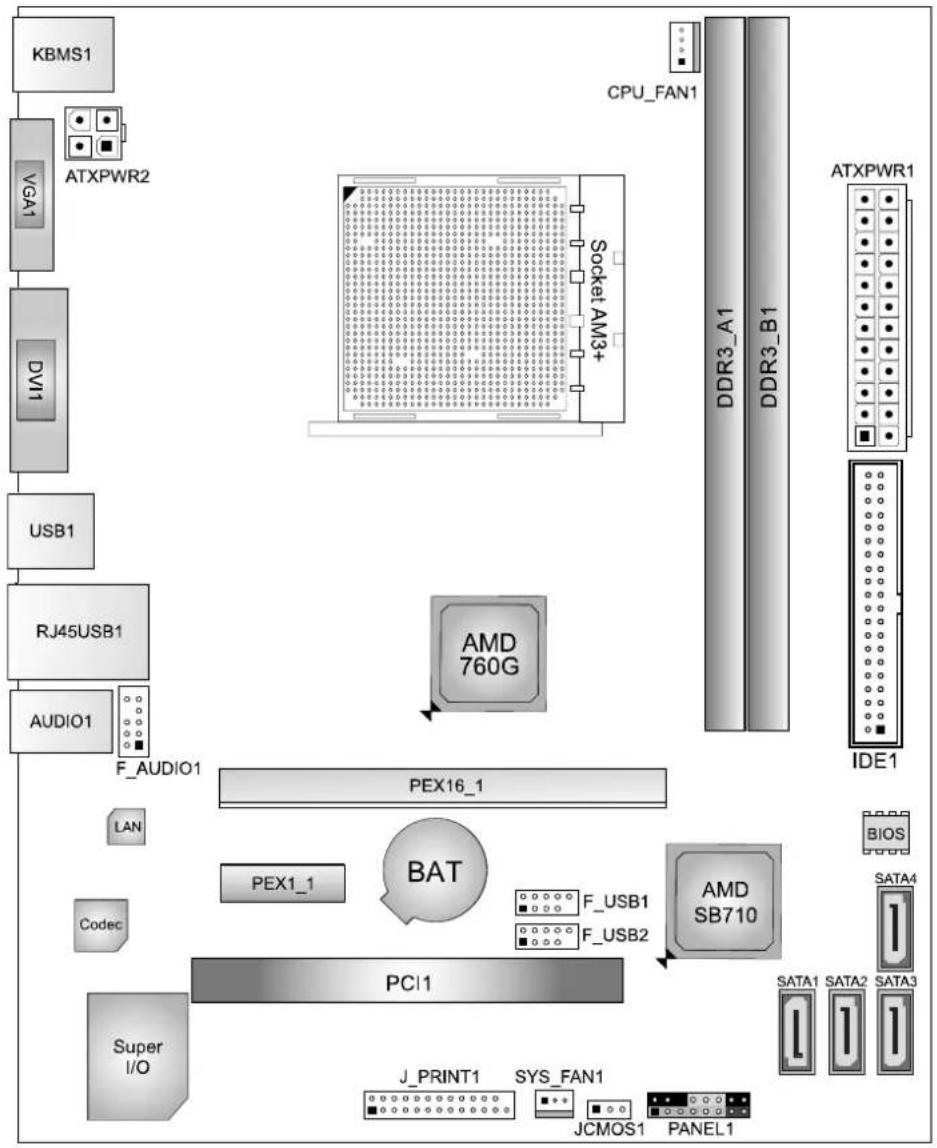
1.5 MOTHERBOARD LAYOUT
flowchart
graph TD
    A["KBMS1"] --> B["ATXPWR2"]
    B --> C["PCI1"]
    C --> D["Super I/O"]
    D --> E["Audio1"]
    E --> F["RJ45USB1"]
    F --> G["USB1"]
    G --> H["ICA1"]
    H --> I["ICA2"]
    I --> J["ICA3"]
    J --> K["ICA4"]
    K --> L["IDE1"]
    L --> M["DDR3_A1"]
    L --> N["DDR3_B1"]
    L --> O["CPU_FAN1"]
    P["PCI1"] --> Q["F_USB1"]
    P --> R["F_USB2"]
    S["PCI1"] --> T["F_PRINT1"]
    S --> U["SYS_FAN1"]
    V["PCI1"] --> W["J_PRINT1"]
    V --> X["SYS_FAN1"]
    Y["PCI1"] --> Z[J?).
Note: ■ represents the 1st pin.
CHAPTER 2: HARDWARE INSTALLATION
2.1 INSTALLING CENTRAL PROCESSING UNIT (CPU)
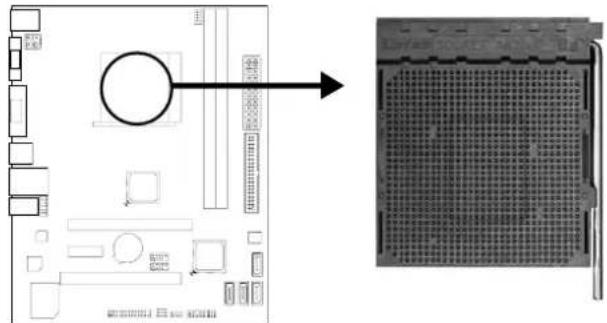
Step 1: Locate the CPU socket on the motherboard
Step 2: Pull the socket locking out from the socket and then raise the lever up to a 90-degree angel.

natural_image
Diagram showing a device with a 90-degree angle and its side view, no text or symbols present.Step 3: Look for the white triangle on socket, and the gold triangle on CPU should point towards this white triangle. The CPU will fit only in the correct orientation.

natural_image
Close-up of a finger pressing a component on a circuit board with a play button (no visible text or symbols)Motherboard Manual
Step 4: Hold the CPU down firmly, and then close the lever to locked the position.

natural_image
Diagram showing a wireless router connected to a microprocessor via an arrow (no text or symbols present)Note:
- This MB is designed for AMD 125W AM3/AM3+ CPU, pleases check the CPU TDP spec before you install it on MB AM3+ CPU TDP spec from below weblink: http://www.amd.com/us/products/desktop/processors/amdfx/Pages/amdfx-model-number-comparison.aspx
- AMD's product warranty does not cover damage caused by overclocking (even when overclocking is enabled via AMD OverDrive™ software). http://www.amd.com/us/products/desktop/processors/amdfx/Pages/amdfx.aspx
- Due to the AMD AM3+ CPU designation, we strongly recommend you use AMD original box CPU fan and add an extra system fan inside the chassis.
2.2 INSTALL A HEATSINK
Step 1: Place the heatsink and fan assembly onto the retention frame. Match the heatsink clip with the socket mounting-lug. Hook the spring clip to the mounting-lug.

natural_image
Close-up of a computer motherboard with CPU socket and cooling fan (no visible text or symbols)Step 2: On the other side, push the retention clip straight down to lock into the plastic lug on the retention frame, and then press down the locker until it stops.

natural_image
Close-up of a computer cooling fan with cooling button and cooling tower (no visible text or symbols)Note1: Do not forget to connect the CPU fan connector. Note2: For proper installation, please kindly refer to the installation manual of your CPU heatsink.
2.3 FAN HEADERS
These fan headers support cooling-fans built in the computer. The fan cable and connector may be different due to the fan manufacturer. Connect the fan cable to the connector while matching the black wire to pin#1.
CPU_FAN1: CPU Fan Header
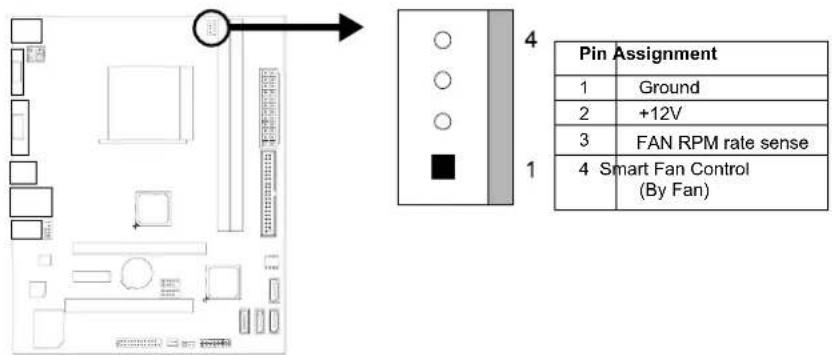
SYS_FAN1: System Fan Header

Note: CPU_FAN1, SYS_FAN1 support 4-pin and 3-pin head connectors. When connecting with wires onto connectors, please note that the red wire is the positive and should be connected to pin#2, and the black wire is Ground and should be connected to GND.
2.4 INSTALLING SYSTEM MEMORY
A. Memory Modules

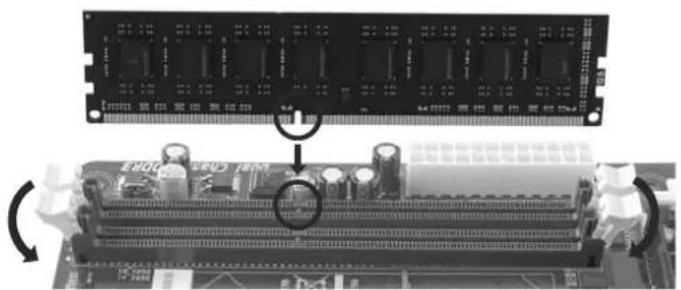
- Unlock a DIMM slot by pressing the retaining clips outward. Align a DIMM on the slot such that the notch on the DIMM matches the break on the Slot.
natural_image
Close-up of a computer RAM module showing internal components and a close-up view of its circuit board (no text or symbols visible)- Insert the DIMM vertically and firmly into the slot until the retaining chip snap back in place and the DIMM is properly seated.

natural_image
Close-up of a computer RAM module with multiple slots and memory chips, shown in a mechanical assembly (no visible text or labels)Note: If the DIMM does not go in smoothly, do not force it. Pull it all the way out and try again.
B. Memory Capacity
| DIMM Socket Location | DDR3 Module | Total Memory Size |
| DDR3_A1 | 512MB/1GB/2GB/4GB/8GB | Max is 16GB. |
| DDR3_B1 | 512MB/1GB/2GB/4GB/8GB |
C. Dual Channel Memory installation
Please refer to the following requirements to activate Dual Channel function:
Install memory module of the same density in pairs, shown in the table.
| Dual Channel Status | DDR3_A1 | DDR3_B1 |
| Disabled | O | |
| Disabled | X | |
| Enabled | O |
(O means memory installed, X means memory not installed.)
Note: The DRAM bus width of the memory module must be the same (x8 or x16)
2.5 CONNECTORS AND SLOTS
SATA1\~SATA4: Serial ATA Connectors
The motherboard has a PCI to SATA Controller with 4 channels SATA interface, it satisfies the SATA 2.0 spec and with transfer rate of 3Gb/s.

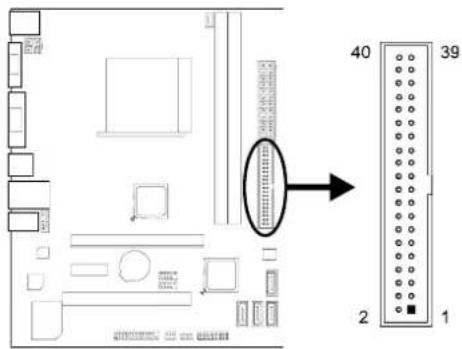
IDE1: Hard Disk Connector
The motherboard has a 32-bit Enhanced PCI IDE Controller that provides PIO Mode 0\~4, Bus Master, and Ultra DMA 33/66/100/133 functionality.
ATXPWR2: ATX Power Source Connector
This connector provides +12V to CPU power circuit.

ATXPWR1: ATX Power Source Connector
This connector allows user to connect 24-pin power connector on the ATX power supply.
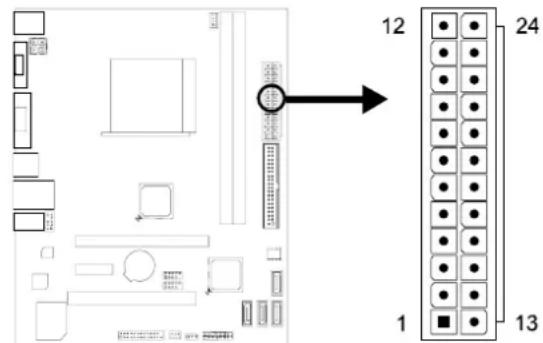
| Pin | Assignment | Pin | Assignment | |
| 13 | +3.3V | 1 | +3.3V | |
| 14 | -12V | 2 | +3.3V | |
| 15 | Ground | 3 | Ground | |
| 16 | PS_ON | 4 | +5V | |
| 17 | Ground | 5 | Ground | |
| 18 | Ground | 6 | +5V | |
| 19 | Ground | 7 | Ground | |
| 20 | NC | 8 | PW_OK | |
| 21 | +5V | 9 | Standby | Voltage+5V |
| 22 | +5V | 10 | +12V | |
| 23 | +5V | 11 | +12V | |
| 24 | Ground | 12 | +3.3V | |
Note1: Before you power on the system, please make sure that both ATXPWR1 and ATXPWR2 connectors have been plugged-in.
Note2: Insufficient power supplied to the system may result in instability or the peripherals not functioning properly. Use of a PSU with a higher power output is recommended when configuring a system with more power-consuming devices.
PEX16\_1: PCI-Express Gen2 x16 Slot
- PCI-Express 2.0 compliant.
- Maximum theoretical realized bandwidth of 8GB/s simultaneously per direction, for an aggregate of 16GB/s totally.
- PCI-Express Gen2 supports a raw bit-rate of 5.0Gb/s on the data pins.
PEX1\_1: PCI-Express Gen2 x1 Slot
- PCI-Express 2.0 compliant.
- Data transfer bandwidth up to 500MB/s per direction; 1GB/s in total
PCI1: Peripheral Component Interconnect Slot
This motherboard is equipped with 1 standard PCI slot. PCI stands for Peripheral Component Interconnect, and it is a bus standard for expansion cards.

Install an Expansion Card
You can install your expansion card by following steps:
- Read the related expansion card's instruction document before install the expansion card into the computer.
- Remove your computer's chassis cover, screws and slot bracket from the computer.
- Place a card in the expansion slot and press down on the card until it is completely seated in the slot.
- Secure the card's metal bracket to the chassis back panel with a screw.
- Replace your computer's chassis cover.
- Power on the computer, if necessary, change BIOS settings for the expansion card.
- Install related driver for the expansion card.
CHAPTER 3: HEADERS & JUMPERS SETUP
3.1 HOW TO SETUP JUMPERS
The illustration shows how to set up jumpers. When the jumper cap is placed on pins, the jumper is "close", if not, that means the jumper is "open".

Pin1-2
closed
3.2 DETAIL SETTINGS
JCMOS1: Clear CMOS Jumper
Placing the jumper on pin2-3 allows user to restore BIOS safe setting and CMOS data. Pease carefully follow the procedures to avoid damaging the motherboard.

Clear CMOS Procedures:※
- Remove AC power line.
- Set the jumper to "Pin 2-3 close".
- Wait for five seconds.
- Set the jumper to "Pin 1-2 close".
- Power on the AC.
- Load Optimal Defaults and save settings in CMOS.
PANEL1: Front Panel Header
This 16-pin connector includes Power-on, Reset, HDD LED, Power LED, and speaker connection. It allows user to connect the PC case's front panel switch functions.

natural_image
Floor plan layout with room layouts and a directional arrow (no text or labels)
| Pin | Assignment | Function | Pin | Assignment | ||
| 1 | +5V | 9 | N/ASpeakerConnector | N/A | ||
| 2 | N/A | 10 | ||||
| 3 | N/A | 11 | N/A | |||
| 4 | Speaker | 12 Power LED (+) | Power LED | |||
| 5 | HDD LED (+) | 13 Power LED | Hard driveLED | |||
| 6 | HDD LED (-) | 14 Power LED (-) | ||||
| 7 | Ground | 15 | PowerReset button | button | Power-on button | |
| 8 | Reset | control | 16 Ground | |||
Function
F\_USB1/F\_USB2: Headers for USB 2.0 Ports at Front Panel
These headers allow user to connect additional USB cable on the PC front panel, and also can be connected with internal USB devices, like USB card reader.

| Pin | Assignment |
| 1 | +5V (fused) |
| 2 | +5V (fused) |
| 3 | USB- |
| 4 | USB- |
| 5 | USB+ |
| 6 | USB+ |
| 7 | Ground |
| 8 | Ground |
| 9 | NC |
| 10 | Key |
F\_AUDIO1: Front Panel Audio Header
This header allows user to connect the front audio output cable with the PC front panel. This header allows only HD audio front panel connector; AC'97 connector is not acceptable.
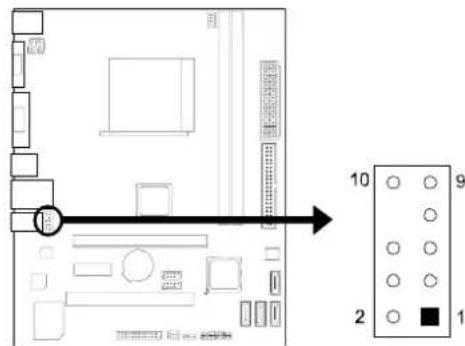
| Pin Assignment | |
| 1 Mic Left in | |
| 2 | Ground |
| 3 Mic Right in | |
| 4 | GPIO |
| 5 Right line in | |
| 6 | Jack Sense |
| 7 | Front Sense |
| 8 | Key |
| 9 Left line in | |
| 10 | Jack Sense |
J\_PRINT1: Printer Port Connector
This header allows you to connector printer on the PC.
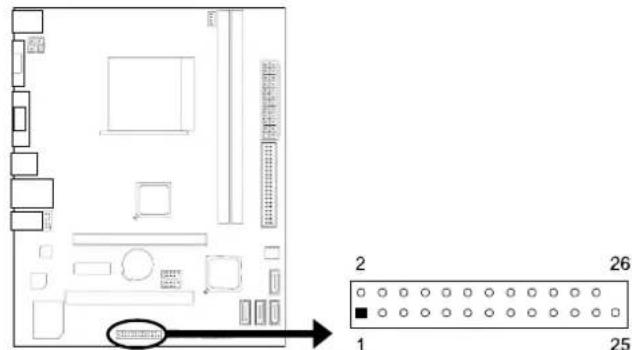
| Pin | Assignment | Pin | Assignment | ||
| 1 | -Strobe | 14 | Ground | ||
| 2 | -ALF | 15 | Data 6 | ||
| 3 | Data 0 | 16 Ground | |||
| 4 | -Error | 17 | Data 7 | ||
| 5 | Data 1 | 18 Ground | |||
| 6 | -Init | 19 | -ACK | ||
| 7 | Data 2 | 20 Ground | |||
| 8 | -Scltin | 21 | Busy | ||
| 9 | Data 3 | 22 Ground | |||
| 10 | Ground | 23 | PE | ||
| 11 | Data 4 | 24 | Ground | ||
| 12 | Ground | 25 | SCLT | ||
| 13 | Data 5 | 26 | Key | ||
CHAPTER 4: USEFUL HELP
4.1 DRIVER INSTALLATION NOTE
After you installed your operating system, please insert the Fully Setup Driver DVD into your optical drive and install the driver for better system performance.
You will see the following window after you insert the DVD
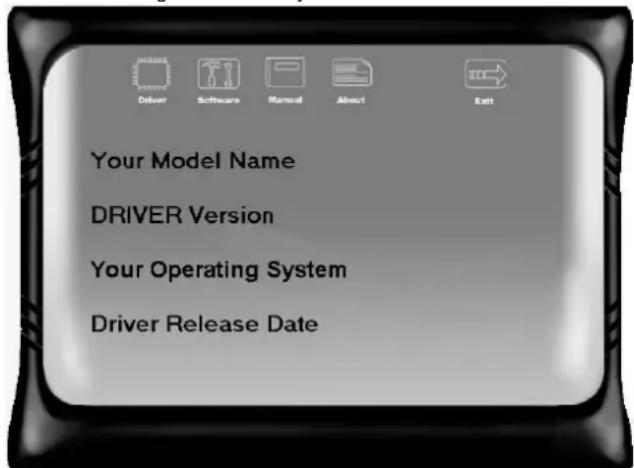
The setup guide will auto detect your motherboard and operating system.
Note: If this window didn't show up after you insert the Driver DVD, please use file browser to locate and execute the file SETUP.EXE under your optical drive.
A. Driver Installation
To install the driver, please click on the Driver icon. The setup guide will list the compatible driver for your motherboard and operating system. Click on each device driver to launch the installation program.
B. Software Installation
To install the software, please click on the Software icon. The setup guide will list the software available for your system, click on each software title to launch the installation program.
C. Manual
Aside from the paperback manual, we also provide manual in the Driver DVD. Click on the Manual icon to browse for available manual.
Note: You will need Acrobat Reader to open the manual file. Please download the latest version of Acrobat Reader software from http://get.adobe.com/reader/
4.2 SOFTWARE
Installing Software
- Insert the Setup DVD to the optical drive. The drivers installation program would appear if the Autorun function has been enabled.
- Select Software Installation, and then click on the respective software title.
- Follow the on-screen instructions to complete the installation.
Note1: All the information and content about following software are subject to be changed without notice. For better performance, the software is being continuously updated. Note2: The information and pictures described below are for your reference only. The actual information and settings on board may be slightly different from this manual.
Launching Software
After the installation process, you will see the software icon "eHOT Line" / "BIOS Update" appears on the desktop. Double-click the icon to launch the utility.
eHot-Line (Optional)
eHot-Line is a convenient utility that helps you to contact with our Tech-Support system. This utility will collect the system information which is useful for analyzing the problem you may have encountered, and then send these information to our tech-support department to help you fix the problem.
Note: Before you use this utility, please set Outlook Express as your default e-mail client application program.

After filling up this information, click "Send" to send the mail out. A warning dialog would appear asking for your confirmation; click "Send" to confirm or "Do Not Send" to cancel.

If you want to save this information to a .txt file, click "Save As..." and then you will see a saving dialog appears asking you to enter file name.
Enter the file name and then click "Save". Your system information will be saved to a .txt file.


Open the saved .txt file, you will see your system information including motherboard/BIOS/CPU/video/device/OS information. This information is also concluded in the sent mail.
4.3 BIOS SETUP
BIOS Update is a convenient utility which allows you to update your motherboard BIOS under Windows system.
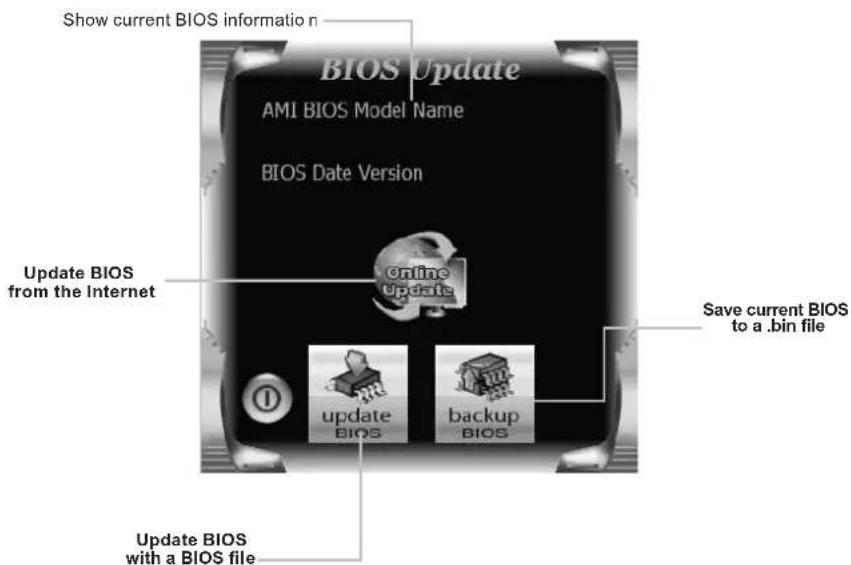
Once click on this button, the saving dialog will show. Choose the position to save file and enter file name. (We recommend that the file name should be English/number and no longer than 7 characters.) Then click Save.

Before doing this, please download the proper BIOS file from the website.

Then click Update BIOS button, a dialog will show for asking you backup current BIOS. Click Yes for BIOS backup and refer to the Backup BIOS procedure; or click No to skip this procedure.
After the BIOS Backup procedure, the open dialog will show for requesting the BIOS file which is going to be updated. Please choose the proper BIOS file for updating, then click on Open.


The utility will update BIOS with the proper BIOS file, and this process may take minutes. Please do not open any other applications during this process.
After the BIOS Update process, click on OK to restart the system.
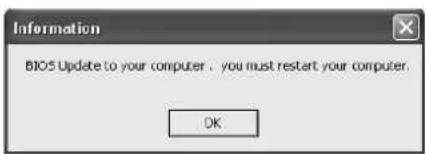
While the system boots up and the full screen logo shows, press
In the BIOS setup, use the Load Optimized Defaults function and then Save and Exit Setup to exit BIOS setup. BIOS Update is completed.
BIO-Flasher
BIO-Flasher is a BIOS flashing utility providing you an easy and simple way to update your BIOS via USB pen drive or floppy disk.
The BIO-Flasher is built in the BIOS chip. To enter the utility, press
Updating BIOS with BIO-Flasher
-
Go to the website to download the latest BIOS file for the motherboard.
-
Then, save the BIOS file into a USB pen drive or a floppy disk.
-
Insert the USB pen drive or the floppy disk that contains the BIOS file to the USB port or the floppy disk drive.
-
Power on or reset the computer and then press
during the POST process. A select dialog as the picture on the right appears. Select the device contains the BIOS file and press to enter the utility.


-
The utility will show the BIOS files and their respective information. Select the proper BIOS file and press
then to perform the BIOS update process. -
After the update process, the utility will ask you to reboot the system. Press
to proceed. BIOS update completes.

- This utility only allows storage device with FAT32/16 format and single partition.
- Shutting down or resetting the system while updating the BIOS will lead to system boot failure.
4.4 TROUBLESHOOTING
| Probable | Solution |
| 1. There is no power in the system.Power LED does not shine; the fan of the power supply does not work2. Indicator light on keyboard does not shine. | 1. Make sure power cable is securely plugged in.2. Replace cable.3. Contact technical support. |
| System is inoperative. Keyboard lights are on, power indicator lights are lit, and hard drives are running. | Using even pressure on both ends of the DIMM, press down firmly until the module snaps into place. |
| System does not boot from a hard disk drive, but can be booted from optical drive. | 1. Check cable running from disk to disk controller board. Make sure both ends are securely plugged in; check the drive type in the standard CMOS setup.2. Backing up the hard drive is extremely important. All hard disks are capable of breaking down at any time. |
| System only boots from an optical drive. Hard disks can be read, applications can be used, but system fails to boot from a hard disk. | 1. Back up data and applications files.2. Reformat the hard drive.Re-install applications and data using backup disks. |
| Screen message shows “Invalid Configuration” or “CMOS Failure.” | Review system’s equipment. Make sure correct information is in setup. |
| System cannot boot after user installs a second hard drive. | 1. Set master/slave jumpers correctly.2. Run SETUP program and select correct drive types. Call the drive manufacturers for compatibility with other drives. |
CPU Overheated
If the system shutdown automatically after power on system for seconds, that means the CPU protection function has been activated.
When the CPU is over heated, the motherboard will shutdown automatically to avoid a damage of the CPU, and the system may not power on again.
In this case, please double check:
- The CPU cooler surface is placed evenly with the CPU surface.
- CPU fan is rotated normally.
- CPU fan speed is fulfilling with the CPU speed.
After confirmed, please follow steps below to relief the CPU protection function.
- Remove the power cord from power supply for seconds.
- Wait for seconds.
- Plug in the power cord and boot up the system.
Or you can:
- Clear the CMOS data.
(See "Close CMOS Header: JCMOS1" section) - Wait for seconds.
- Power on the system again.
4.5 RAID FUNCTION
Operating System
Supports Windows Vista, Windows 7 and Windows 8.
Raid Arrays
RAID supports the following types of RAID arrays:
RAID 0: RAID 0 defines a disk striping scheme that improves disk read and write times for many applications.
RAID 1: RAID 1 defines techniques for mirroring data.
RAID 10: RAID 10 combines the techniques used in RAID 0 and RAID 1.
RAID Definitions
RAID 0:
The controller “stripes” data across multiple drives in a RAID 0 array system. It breaks up a large file into smaller blocks and performs disk reads and writes across multiple drives in parallel. The size of each block is determined by the stripe size parameter, which you set during the creation of the RAID set based on the system environment. This technique reduces overall disk access time and offers high bandwidth.
Features and Benefits
- Drives: Minimum 1, and maximum is up to 6 or 8. Depending on the platform.
- Uses: Intended for non-critical data requiring high data throughput, or any environment that does not require fault tolerance.
- Benefits: provides increased data throughput, especially for large files. No capacity loss penalty for parity.
- Drawbacks: Does not deliver any fault tolerance. If any drive in the array fails, all data is lost.
- Fault Tolerance: No.

flowchart
graph TD
    A["AMD SB710"] --> B["Block 1"]
    A --> C["Block 3"]
    A --> D["Block 5"]
    A --> E["Block 2"]
    A --> F["Block 4"]
    A --> G["Block 6"]
Motherboard Manual
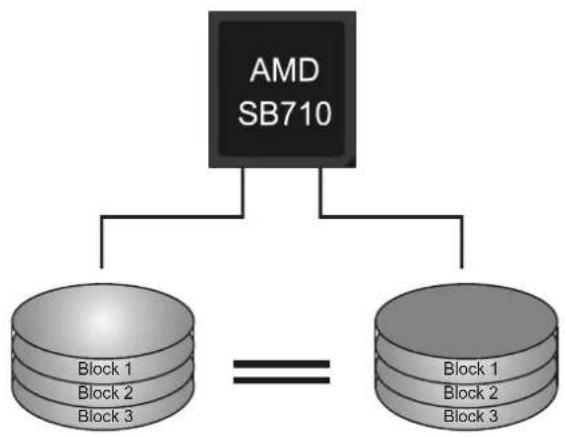
RAID 1:
Every read and write is actually carried out in parallel across 2 disk drives in a RAID 1 array system. The mirrored (backup) copy of the data can reside on the same disk or on a second redundant drive in the array. RAID 1 provides a hot-standby copy of data if the active volume or drive is corrupted or becomes unavailable because of a hardware failure.
RAID techniques can be applied for high-availability solutions, or as a form of automatic backup that eliminates tedious manual backups to more expensive and less reliable media.
Features and Benefits
- Drives: Minimum 2, and maximum is 2.
- Uses: RAID 1 is ideal for small databases or any other application that requires fault tolerance and minimal capacity.
- Benefits: Provides 100% data redundancy. Should one drive fail, the controller switches to the other drive.
- Drawbacks: Requires 2 drives for the storage space of one drive. Performance is impaired during drive rebuilds.
- Fault Tolerance: Yes.
flowchart
graph TD
    A["AMD SB710"] --> B["Block 1"]
    A --> C["Block 2"]
    A --> D["Block 3"]
    B --> E["Block 1"]
    B --> F["Block 2"]
    B --> G["Block 3"]
    C --> H["Block 1"]
    C --> I["Block 2"]
    C --> J["Block 3"]
    style A fill:#999,stroke:#333
    style B fill:#ccc,stroke:#333
    style C fill:#ccc,stroke:#333
    style D fill:#ccc,stroke:#333
    style E fill:#ccc,stroke:#333
    style F fill:#ccc,stroke:#333
    style G fill:#ccc,stroke:#333
    style H fill:#ccc,stroke:#333
    style I fill:#ccc,stroke:#333
    style J fill:#ccc,stroke:#333
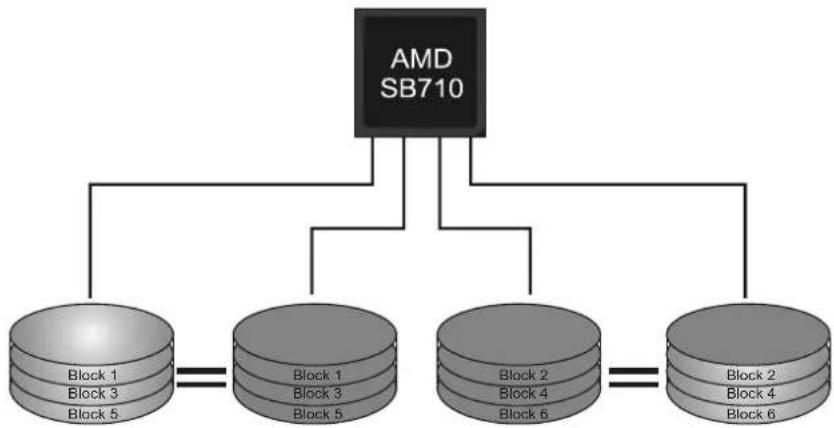
RAID 10:
RAID 1 drives can be stripped using RAID 0 techniques. Resulting in a RAID 10 solution for improved resiliency, performance and rebuild performance.
Features and Benefits
- Drives: Minimum 4, and maximum is 6 or 8, depending on the platform.
- Benefits: Optimizes for both fault tolerance and performance, allowing for automatic redundancy. May be simultaneously used with other RAID levels in an array, and allows for spare disks.
- Drawbacks: Requires twice the available disk space for data redundancy, the same as RAID level 1.
- Fault Tolerance: Yes.
flowchart
graph TD
    A["AMD SB710"] --> B["Block 1\nBlock 3\nBlock 5"]
    A --> C["Block 1\nBlock 3\nBlock 5"]
    A --> D["Block 2\nBlock 4\nBlock 6"]
    A --> E["Block 2\nBlock 4\nBlock 6"]
APPENDIX: SPEC IN OTHER LANGUAGES
GERMAN

- FCC Information and Copyright
- Table of Contents
- Chapter 1: Introduction...... 1
- Chapter 2: Hardware Installation.... 5
- Chapter 3: Headers & Jumpers Setup.... 14
- Chapter 4: Useful Help ...... 17
- Appendix: SPEC In Other Languages 28
- CHAPTER 1: INTRODUCTION
- B EFORE YOU START
- PACKAGE CHECKLIST
- REAR PANEL CONNECTORS
- CHAPTER 2: HARDWARE INSTALLATION
- INSTALLING CENTRAL PROCESSING UNIT (CPU)
- Motherboard Manual
- Note:
- INSTALL A HEATSINK
- FAN HEADERS
- INSTALLING SYSTEM MEMORY
- Dual Channel Memory installation
- CONNECTORS AND SLOTS
- SATA1\~SATA4: Serial ATA Connectors
- IDE1: Hard Disk Connector
- ATXPWR2: ATX Power Source Connector
- ATXPWR1: ATX Power Source Connector
- PEX16\_1: PCI-Express Gen2 x16 Slot
- PEX1\_1: PCI-Express Gen2 x1 Slot
- PCI1: Peripheral Component Interconnect Slot
- Install an Expansion Card
- CHAPTER 3: HEADERS & JUMPERS SETUP
- HOW TO SETUP JUMPERS
- DETAIL SETTINGS
- JCMOS1: Clear CMOS Jumper
- Clear CMOS Procedures:※
- PANEL1: Front Panel Header
- F\_USB1/F\_USB2: Headers for USB 2.0 Ports at Front Panel
- F\_AUDIO1: Front Panel Audio Header
- J\_PRINT1: Printer Port Connector
- CHAPTER 4: USEFUL HELP
- DRIVER INSTALLATION NOTE
- Driver Installation
- Software Installation
- Manual
- SOFTWARE
- Installing Software
- Launching Software
- eHot-Line (Optional)
- BIOS SETUP
- BIO-Flasher
- Updating BIOS with BIO-Flasher
- CPU Overheated
- RAID FUNCTION
- Operating System
- Raid Arrays
- RAID Definitions
- RAID 0:
- Features and Benefits
- RAID 1:
- RAID 10:
- APPENDIX: SPEC IN OTHER LANGUAGES
Brand : BIOSTAR
Model : A960D+
Category : Motherboard