DALPUR2/SS - Faucet Caple - Free user manual and instructions
Find the device manual for free DALPUR2/SS Caple in PDF.


| Product Type | Kitchen Faucet with Filtered Water |
| Brand | Caple |
| Model | DALPUR2/SS |
| Material | Stainless Steel |
| Finish | Satin Stainless Steel |
| Installation Type | Deck-Mounted (Sink or Worktop) |
| Number of Handles | 2 (Hot and Cold) |
| Connection Size | 3/8" Braided Hoses |
| Water Supply | Hot and Cold Mains Water |
| Filter Compatibility | Under-sink filter system (bracket and adaptors included) |
| Flow Rate | Approximately 6 L/min (estimated for kitchen faucet) |
| Warranty | Standard 1-year (check retailer for details) |
| Included Components | Faucet body, braided hoses, diverter tee, filter bracket, adaptors, flexible tubing |
| Maintenance | Clean with mild soap and water; replace filter as recommended |
| Safety Notes | Ensure water supply shut off before installation; check for leaks regularly |
| Spare Parts | Filter cartridge, hoses, diverter tee available from Caple |
Frequently Asked Questions - DALPUR2/SS Caple
User questions about DALPUR2/SS Caple
0 question about this device. Answer the ones you know or ask your own.
Ask a new question about this device
Download the instructions for your Faucet in PDF format for free! Find your manual DALPUR2/SS - Caple and take your electronic device back in hand. On this page are published all the documents necessary for the use of your device. DALPUR2/SS by Caple.
USER MANUAL DALPUR2/SS Caple
caple PURITI
INSTALLATION PREPARATION
Remove all the components from the packing, check for transport damage and that all the parts are present.
Shut off the mains cold water and hot water supplies to the existing tap (if present) and drain the pipe work in the property to below the area of the pipes that require altering.
Remove the old tap and prepare a hole for the new tap as shown in the fitting instructions provided with the tap.
Prepare the existing hot and cold pipe work so it terminates in the area below the new tap. As flexible connections are provided, the pipes don't have to terminate directly below the new tap however, ensuring the pipe runs smooth is good practice.
INSTALLING THE TAP
- Please refer to the dedicated installation instructions for fixing the tap to a sink or worktop.
- Screw each of the braided hoses into the base of the tap, making sure that you remember which hose is for hot, cold and filtered connections. Do not over-tighten the hoses into the base of the tap.
- Connect the 'hot water' braided hose to the 15mm copper supply (fitting not included).
- Connect the diverter tee to the cold mains water supply (fitting not included) and then to the braided hose leading to the cold water inlet of the tap (see diagram).
- Wrap PTFE around the threads of the filtered water tube adaptor and tighten it into the remaining braided hose that leads to the filtered inlet on the tap.
- Using the screw provided, fix the filter bracket to the wall of the cupboard at a point between the valved branch of
the tee and the push fit inlet of the filtered water tube adaptor. Fit the filter into the bracket with the flow arrow pointing towards the filtered inlet of the tap.
- Push the two 3/8"x 3/8" adaptors firmly onto each end of the filter. To remove the adaptors during a filter change, simply push down on the grey ring (collet) whilst pulling the body of the fitting.
- Unwind the 3/8" flexible tubing and push one end (firmly) into the valved outlet on the side of the diverter tee. Run the tubing in a smooth flow path and cut it to length where it will enter the inlet of the filter (see diagram). Push the cut end of the tubing into the fitting on the inlet of the filter.
- Push one end of the remaining tube into the fitting on the filtered water inlet of the tap and run it in a smooth flow path to the fitting on the outlet of the filter. Cut the tube to length and push it in firmly.
START UP
Slowly turn on the hot and cold water supplies to the new tap, check for leaks and rectify as required.
Open the valve on the branch of the diverter tee slowly and open the filtered outlet on the tap. Allow the supply to run for a short while to clear any air and carbon fines (discoloured water is normal during the start up). Close the filtered outlet on the tap, check for leaks and rectify as required.
For best results from the filtered water outlet, the supply should be run until the water is cool to the touch.
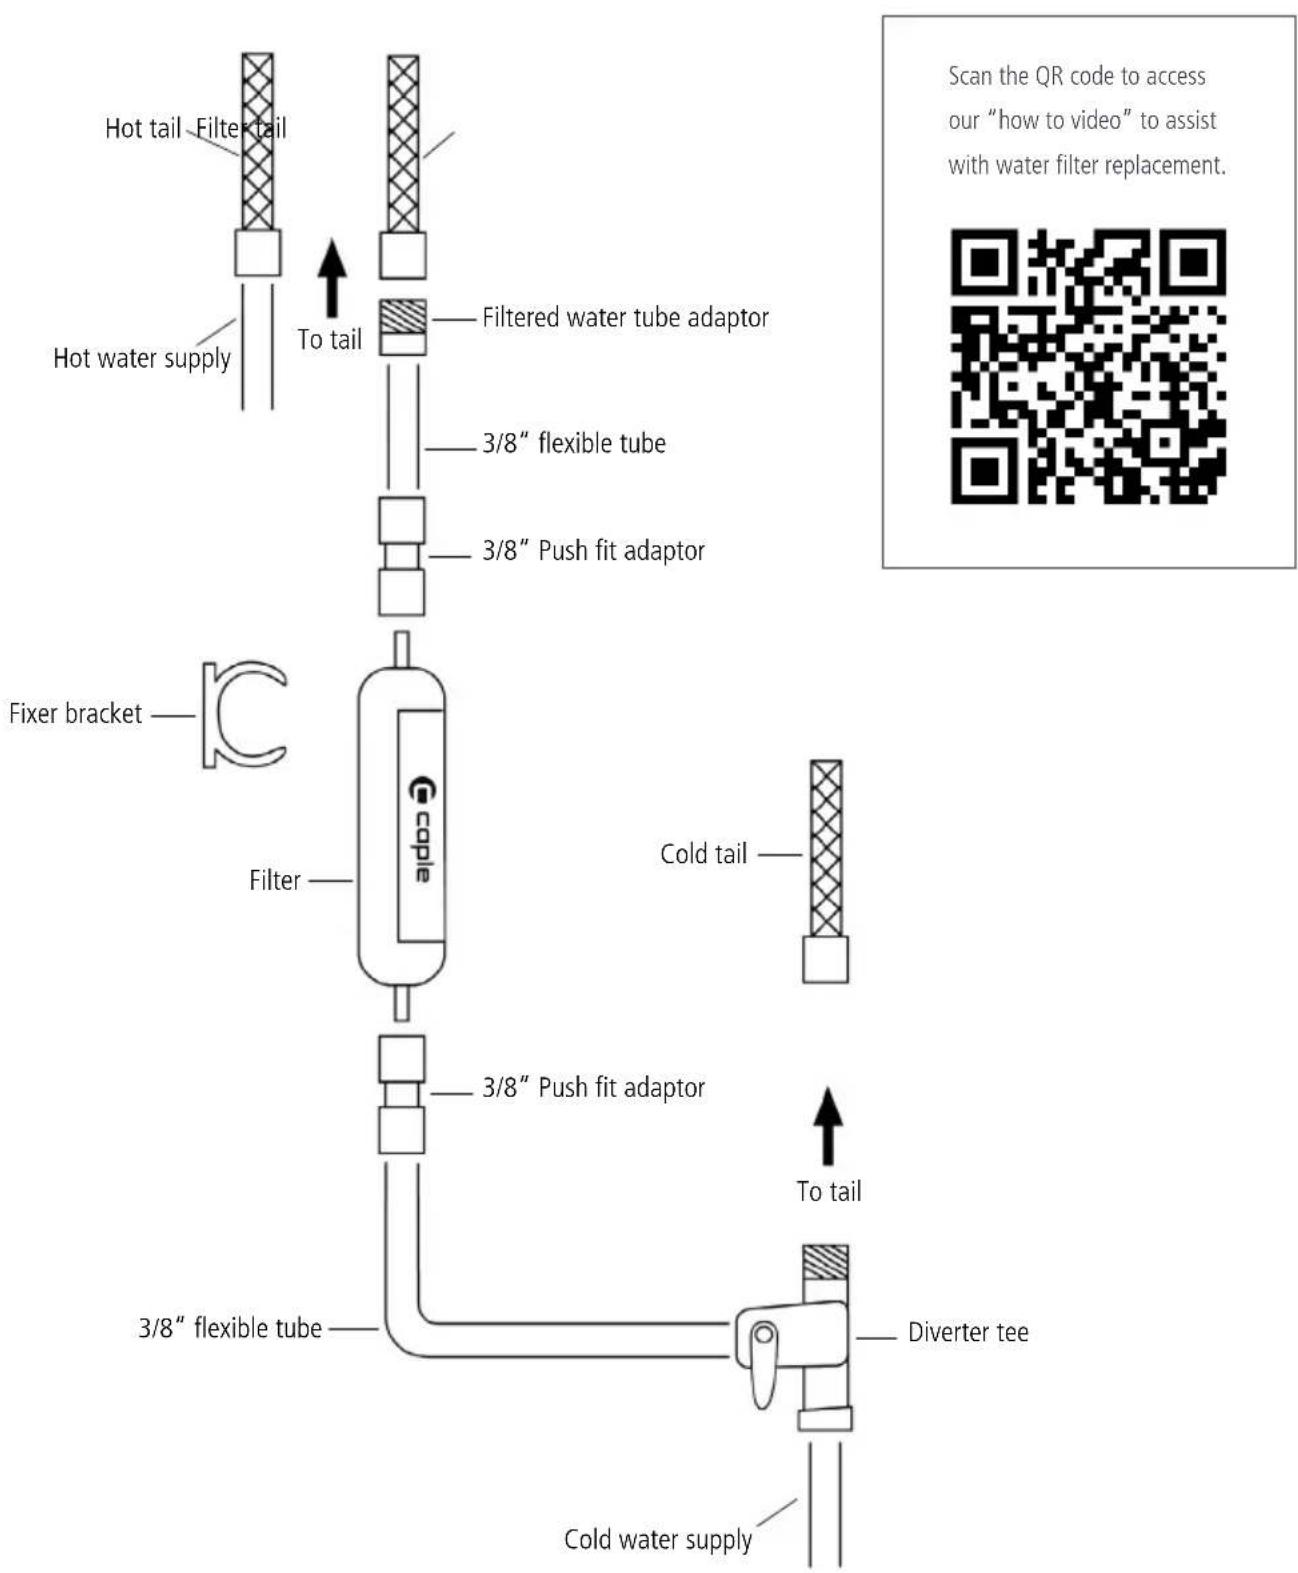
flowchart
```mermaid
graph TD
    A["Hot water supply"] --> B["Hot tail - Filter tail"]
    B --> C["To tail"]
    C --> D["Filtered water tube adaptor"]
    D --> E["3/8" flexible tube"]
    E --> F["3/8" Push fit adaptor"]
    F --> G["Filter"]
    G --> H["coke"]
    H --> I["Cold tail"]
    I --> J["3/8" Push fit adaptor"]
    J --> K["3/8" flexible tube"]
    K --> L["Diverter tee"]
    L --> M["Cold water supply"]
    N["Fixer bracket"] --> O["Coke"]
    O --> P["To tail"]
    Q["Scan QR code to access our "how to video" to assist with water filter replacement."]
Brand : Caple
Model : DALPUR2/SS
Category : Faucet