
EMB/BRI/BK - Faucet Caple - Free user manual and instructions
Find the device manual for free EMB/BRI/BK Caple in PDF.


| Product Type | Kitchen Mixer Faucet |
| Brand | Caple |
| Model | EMB/BRI/BK |
| Finish | Brushed Nickel (BRI) / Black (BK) |
| Material | Brass body, stainless steel hose |
| Spout Height | Approx. 350 mm |
| Spout Reach | Approx. 200 mm |
| Flow Rate | 1.5 GPM (5.7 L/min) at 60 psi |
| Valve Type | Ceramic disc cartridge |
| Mounting Type | Deck mount, 1 or 3 hole with escutcheon |
| Handle Type | Single lever |
| Installation | Professional installation recommended |
| Clean & Care | Wipe with damp cloth; avoid abrasive cleaners |
| Warranty | 5 years (limited) |
| Safety | Lead-free compliant, max water temperature 80°C |
| Spare Parts | Cartridge, aerator, handles available from Caple |
| Repairability | Cartridge replaceable; DIY-friendly with basic tools |
| Compliance | CE, WRAS (UK regulations) |
Frequently Asked Questions - EMB/BRI/BK Caple
User questions about EMB/BRI/BK Caple
0 question about this device. Answer the ones you know or ask your own.
Ask a new question about this device
Download the instructions for your Faucet in PDF format for free! Find your manual EMB/BRI/BK - Caple and take your electronic device back in hand. On this page are published all the documents necessary for the use of your device. EMB/BRI/BK by Caple.
USER MANUAL EMB/BRI/BK Caple
STAINLESS STEEL DUAL CONTROL TAP CARE, INSTALLATION AND GUARANTEE INFORMATION
MODEL CODES: EMB/BRI/BK & EMB/BRI/SS

natural_image
Modern stainless steel faucet with handle and flanges (no text or symbols visible)
INSTALLATION GUIDE
Thank you for purchasing your Caple tap.
These taps have been manufactured and inspected to exacting standards and are guaranteed to give years of trouble
free operation providing our care and installation guidelines have been followed.
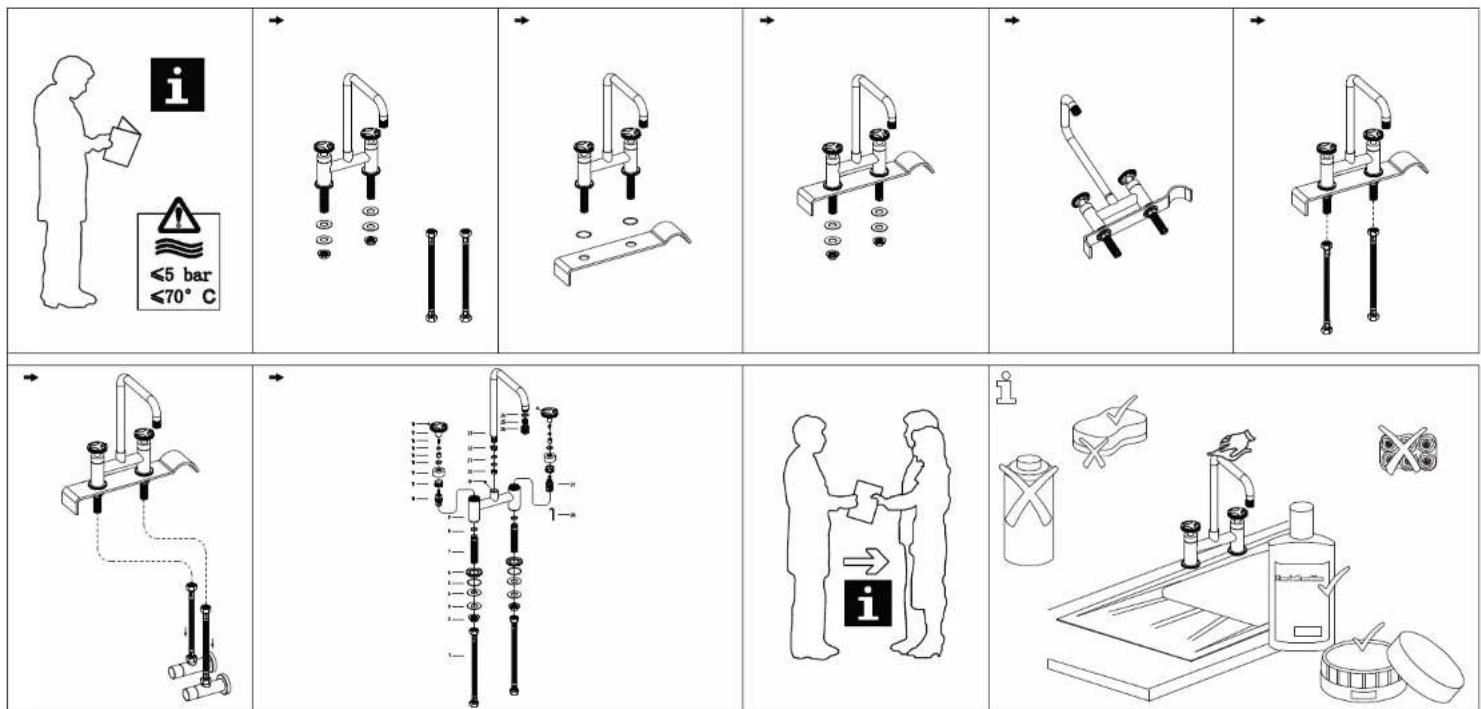
NOTE: Please see back page for installation instructions

INSTALLATION GUIDE EMBER INSTALLATION GUIDE EMBER future reference
Please keep this instruction manual for future reference

CHANGING THE ACCESSORIES
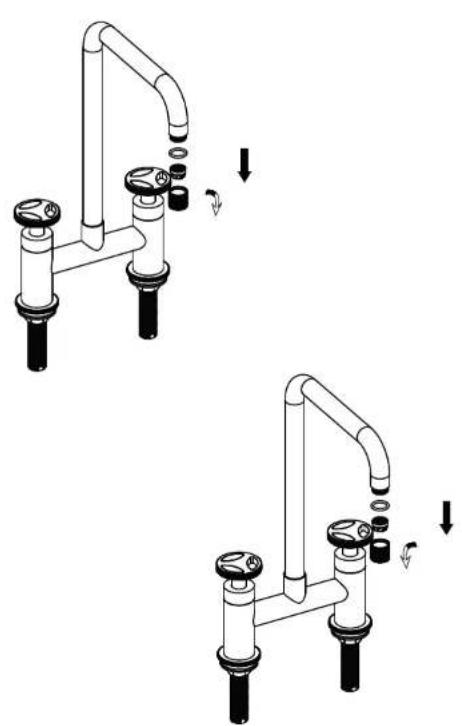
AERATOR COVER
Unscrew the existing cover to remove. Take the aerator and washer from the existing cover and place inside the new cover before fixing into place.
natural_image
Two identical diagrams of a faucet mechanism with arrows indicating force or movement, no text or symbols present.HANDLES
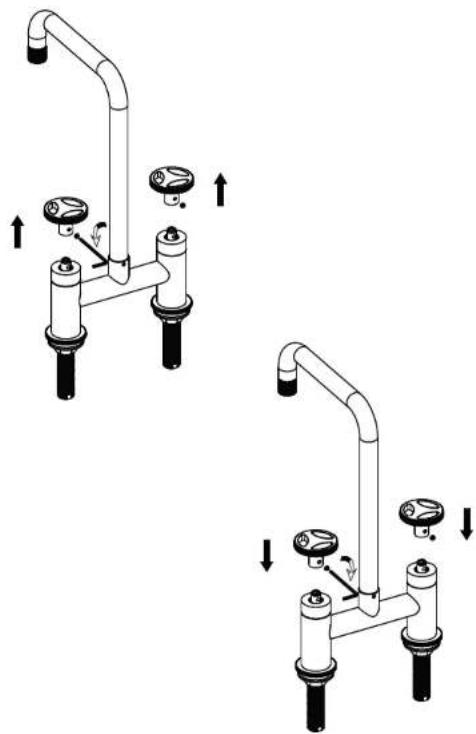
Loosen the grub screw at the back of the handle. Lift off the handle, replace with chosen colour and tighten the grub screw to secure in place.
natural_image
Diagram showing two variations of a pipe valve mechanism with adjustment arrows (no text or labels)
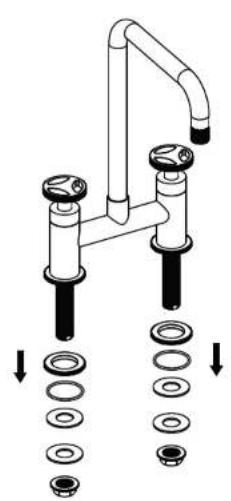
BASE RING
Unscrew the fixing bracket and remove along with the gaskets. Replace the base ring and secure in place for completing these steps in reverse. Once the ring is changed go on to install the tap.
natural_image
Diagram of a faucet assembly with multiple circular components and downward arrows indicating assembly or disassembly (no text or symbols present)
natural_image
Diagram of a faucet assembly with multiple circular components and upward arrows indicating assembly or movement (no text or labels)
natural_image
Three black plumbing fittings with handles and fittings, arranged vertically (no text or symbols visible)INSTALLATION INSTRUCTIONS
- Turn the spout and body so the tap is facing forwards, the screw on the spout indicates the rear of the body. The hot water connection should be on the left of the tap.
- Ensure the hot and cold pipes are thoroughly flushed to remove any debris.
- A 26mm hole is required in either the sink or worktop.
- The fixing bolt must be screwed into the tap base, ensuring the threads of the bolt are not damaged in the process.
- Pass the nylon washer over the fixing bolt flush to the bottom of the tap base, then pass the bolt through the sink or worktop (ensuring the nylon washer remains directly under the tap base).
- Pass the rubber washer and then the metal washer (on the underside of the sink/worktop) over the fixing bolt and fix using the fixing nut.
- Screw the flexi-tail pipes into the base of the tap, ensuring the pipes threads are not damaged in the process. If the flexi-tails are already inserted into the tap base, please ensure these are screwed in tightly to prevent any leaks.
- Finally connect the flexi-tail pipes to the hot and cold supplies ensuring they are connected to the correct supplies.
CARE OF YOUR TAPS
- Only clean your taps with soap or mild liquid detergent and clean water then dry using a soft cloth
- Do not use chemical cleaners, or bleach based solutions to clean your tap, contact could affect the finish of your tap.
- Do not use abrasive cleaners, liquids, powders or pads. These will damage the finish of your tap and void the guarantee.
- Provided all of the above points are adhered to the surface finish of your Caple Tap is guaranteed for 5 years.
PRE INSTALLATION CHECKS
- The temperature of the hot water supply must not exceed 70^ C.
- Water pressure requirements: minimum required pressure varies dependent on model, maximum pressure 5 bar.
- Always seek advice from a qualified installer to ensure your installation and water supply to your taps comply with the water regulation (WRAS) requirements and good plumbing practice.
- It is good practice to ensure that both hot and cold water supplies to your tap are of an equal pressure to provide a consistent flow. If supplies are not of equal pressure then a non return valve should be fitted on the hot inlet.
- Supplies of water should be from a common source (mains or tank fed).
- We recommend that a service valve is installed in the supply lines to the tap to enable water isolation if required.
POST INSTALLATION POINTS
- We suggest when connecting screw connections that PTFE tape is used before the joints are fully tightened.
- Before use correctly check the installation for leaks, and turn the hot and cold water on to thoroughly flush any small particles that may have been dislodged during the tap installation.
THESE INSTRUCTIONS ARE INTENDED AS A GUIDE, IF IN ANY DOUBT ENSURE YOU SEEK ADVICE FROM A CERTIFIED PLUMBER.
GUARANTEE
-Your Caple tap is guaranteed for 5 years.
- Should you have any defects as detailed above during the appropriate guarantee period we guarantee to repair or replace the defective products or parts, or, at our option refund the purchase price assuming we were advised immediately of any claim in writing.
- It is important that you keep a proof of purchase (such as your receipt) to facilitate your guarantee.
TERMS AND CONDITIONS
- Guarantee conditions are only valid if the Care guidelines listed above are followed.
- Our obligation under the guarantee is to the original purchaser, and may not be transferred.
- The guarantee is valid for UK domestic installations only and relates to defects in manufacture, materials and workmanship only.
- Issues that arise due to normal wear and tear (for example valves, discs or washers), poor installation, improper use or accidental damage are not covered by the Caple guarantee. Spare parts can be purchased from our Customer care helpline 0117 938 1900.
- No liability is accepted for consequential damage to other household fixtures, fittings or furnishings relating to any claim – even if attached to the product.
- If it is more economically viable a replacement tap will be supplied, this tap might vary from the original design should range changes of occurred since the initial supply.
- We reserve the right to inspect any tap before committing to support under the guarantee conditions.


- STAINLESS STEEL DUAL CONTROL TAP CARE, INSTALLATION AND GUARANTEE INFORMATION
- INSTALLATION GUIDE
- CHANGING THE ACCESSORIES
- INSTALLATION INSTRUCTIONS
- CARE OF YOUR TAPS
- PRE INSTALLATION CHECKS
- POST INSTALLATION POINTS
- THESE INSTRUCTIONS ARE INTENDED AS A GUIDE, IF IN ANY DOUBT ENSURE YOU SEEK ADVICE FROM A CERTIFIED PLUMBER.
- GUARANTEE
- TERMS AND CONDITIONS
Brand : Caple
Model : EMB/BRI/BK
Category : Faucet