
DWB-601473B - Washing machine Vivax - Free user manual and instructions
Find the device manual for free DWB-601473B Vivax in PDF.


| Brand | Vivax |
| Model | DWB-601473B |
| Product Type | Freestanding Dishwasher |
| Capacity | 14 place settings |
| Dimensions (H x W x D) | 815 x 595 x 550 mm (with door closed) |
| Depth with door open 90° | 1150 mm |
| Energy Efficiency Class | Not specified (ECO program: 0.951 kWh per cycle) |
| Water Consumption (ECO) | 10.0 L per cycle |
| Program Duration (ECO) | 230 min |
| Programs | Auto, Intensive, Universal, ECO, Glass, 90 min, Rapid |
| Functions | Extra Cleaning, Extra Drying, Half Load (Upper/Lower Basket), Delay Start (up to 24h) |
| Water Softener | Adjustable (levels H1-H6) |
| Rinse Aid Setting | Adjustable (levels D1-D5) |
| Noise Level | Not specified |
| Electrical Rating | See rating label; recommended fuse 10/13/16A |
| Water Pressure (min/max) | 0.04 MPa / 1 MPa |
| Installation Type | Freestanding or built-in (integrated model available) |
| Spare Parts Availability | 7 years for key components, 10 years for door hinges, seals, spray arms, filters, racks |
| Safety Features | Child lock not specified; aqua-stop safety hose optional; automatic shut-off after 15 min standby |
Frequently Asked Questions - DWB-601473B Vivax
User questions about DWB-601473B Vivax
0 question about this device. Answer the ones you know or ask your own.
Ask a new question about this device
Download the instructions for your Washing machine in PDF format for free! Find your manual DWB-601473B - Vivax and take your electronic device back in hand. On this page are published all the documents necessary for the use of your device. DWB-601473B by Vivax.
USER MANUAL DWB-601473B Vivax
![graph LR A["Hand holding a salt container"] --> B["Add salt to a container"] B --> C["Salt being poured into a container with a label 'SALT'"] C --> D["Hand pouring liquid into a container with a label 'SALT'"] D --> E["Back to the container"]](/content/2026/05/1043095/images/99322a154d816d262ad841fa9db34fbb1e3c45fdf40ad714222779598b190532.jpg)
- Odstranite donju košaru i odvijte čep spremnika.
-
Postavite kraj lijevka (ako postoji) u rupu i ulijte otprilike 1.5 kg soli za perilicu posuđa.
-
Napunite posudu za soli do maksimalne razine vodom. Normalno je da malo vode izađe iz spremnika soli.
-
Nakon punjenja posude, vratite i čvrsto zavijte čep.
-
Svjetlo za upozorenje na nedostatak soli isključit će se nakon što je posuda napunjena.
-
Odmah nakon stavljanja soli u posudu trebalo bi pokrenuti program pranja (predlažemo korištenje kratkog programa). U suprotnom, sustav filtera, pumpe ili drugih važnih dijelova stroja može oštetiti slana voda. Ovo nije pokriveno jamstvom.

NAPOMENA:
- Posuda za sol smije se puniti ponovno samo kada se uključi oznaka upozorenja ( ) na kontrolnoj ploči. Ovismo o tome koliko se dobro sol otopila, oznaka može ostati uključena neko vrijeme čak i u slučaju punog spremnika. Ako na kontrolnoj ploči ne postoji ova oznaka (kao kod nekih modela), možete procijeniti kada trebate dodati sol u posudu prema broju ciklusa koje je perilica obavila.
- Ako se sol prolila van posude, pokrenite program ispiranja ili brzi program da ju odstranite.

1 Da biste povisili gornju košaru, jednostavno ju podignite na sredini svake strane dok se ne zaključa u mjestu u gornjem položaju. Nije potrebno podizati ručku za prilagodbu.

2 Da biste spustili gornju košaru, podignite ručke za prilagodbu na svakoj strani da biste spustili košaru i spustite ju u niži položaj.
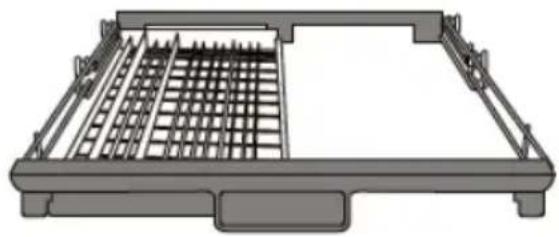
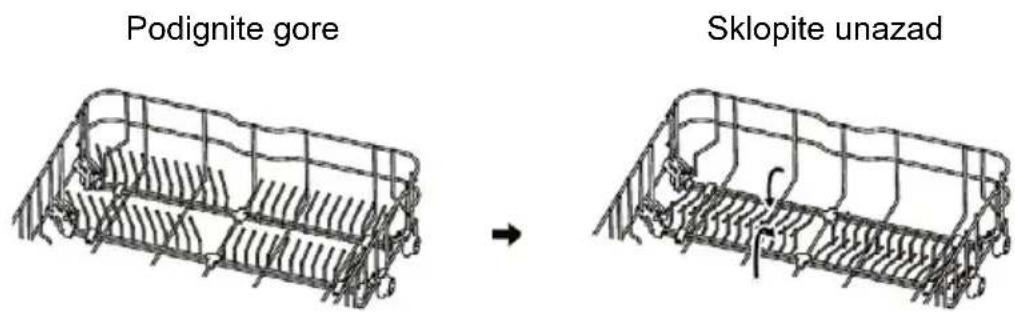
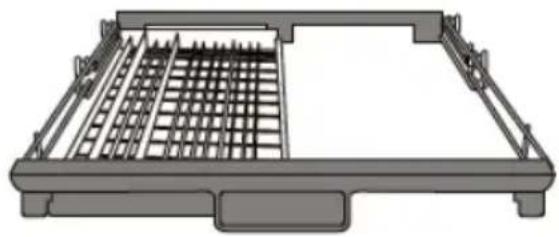
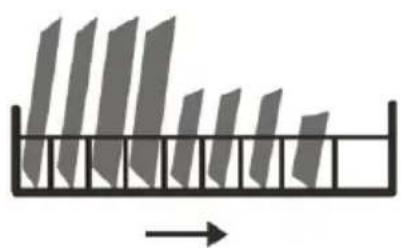
Preklapanje polica za šalice
Prklapanje stalaža
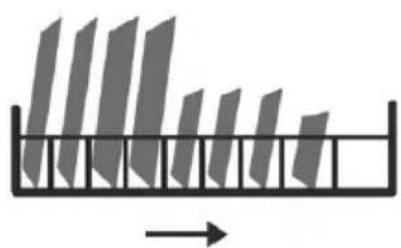
- Šiljci donje košare koriste se za držanje tanjura i posuda. Može ih se spustiti da bi se napravilo mjesta za više posuđa.

ODRŽAVANJE I ČIŠĆENJE
Vanjsko održavanje
Vrata i brtva vrata
Redovito čistite brtve vrata mekom i vlažnom krpom da biste odstranili nakupine hrane ili masnoče. Kada se perilica posuđa puni, ostatci hrane i pića mogu kapati na bočne strane vrata. Ove su površine izvan prostora za pranje i do njih ne dolazi voda iz prskalica. Sve nakupine potrebno je obrisati prije zatvaranja vrata.
Kontrolna ploča
3 Veći ostatci hrane mogu se očistiti ispiranjem filtera pod tekućom vodom. Za detaljnije čišćenje koristite meku četku za čišćenje.
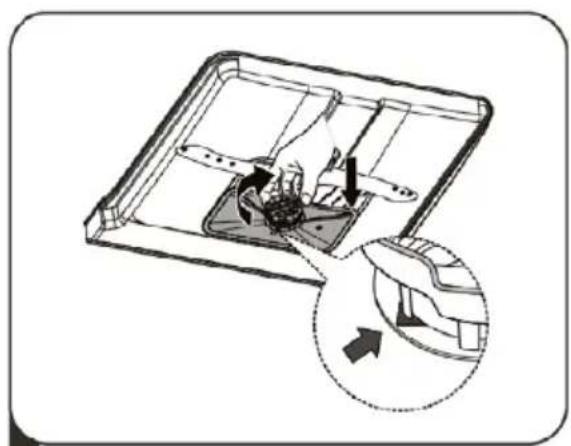
4 Ponovno sklopite filtere obrnutim redoslijedom od rastavljanja, vratite umetak filtera i rotirajte u smjeru kazaljke na satu za zaključavanje.

Upozorenje
- Nemojte previše zatezati filtere. Stavite filtere natrag redom na siguran način jer u suprotnom se tnečistoće mogu nakupljati u sustavu pumpe i izazvati neispravnost i blokadu.
- Nikada nemojte koristiti perilicu posuđa bez filtera. Neprimjerena zamjena filtera može umanjiti učinkovitost rada uređaja i oštetiti posuđe i pribor.
Prskalice
Potrebno je redovno čistiti prskalice jer će u suprotnom kemikalije iz vode začepiti mlaznice i ležajeve.
Da bi očistili prskalice sljedite donje upute:

1 Da biste odstranili gornju prskalicu, rukom uhvatite maticu mlaznice u sredini i rotirajte prskalicu suprotno od kazaljke na satu.

2 Da biste odstranili donju prskalicu, povucite prskalicu prema gore.
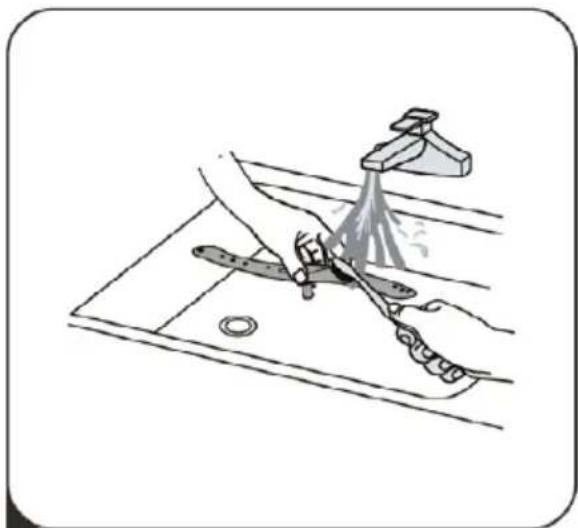
3 Operite prskalice deterđentom i toplom vodom i koristite meku četku za čišćenje mlaznica.
- Opasnost od električnog udara
Korak 2. Dimenzija i instalacija prednje ukrasne ploče

Slijedite specifične upute za instalaciju za spajanje ploče vrata.
Polu ugradbeni model

Korak 4. Koraci za instalaciju perilice posuđa

Molimo da pogledate specifične korake za instalaciju na skicama.
↓
Odlaganje, EU deklaracija o sukladnosti
Dio II
KORIŠTENJE PERILICE POSUĐA
Kontrolna ploča
Omekšivač vode
Priprema i stavljanje posuđa
Funkcija sredstva za ispiranje i deterdženta
1 Instaliranje perilice posuđa
(Molimo da konzultirate Odjeljak 5 „UPUTE ZA INSTALACIJU“ Dijela )

2 Odstranite veće nečistoče s posuđa
4 Napunite dozator deterđentom i sredstvom za ispiranje (sjajilom)

5 Odaberite program i pokrenite perilicu posuđa
UPOTREBA PERILICE POSUĐA
Kontrolna ploča
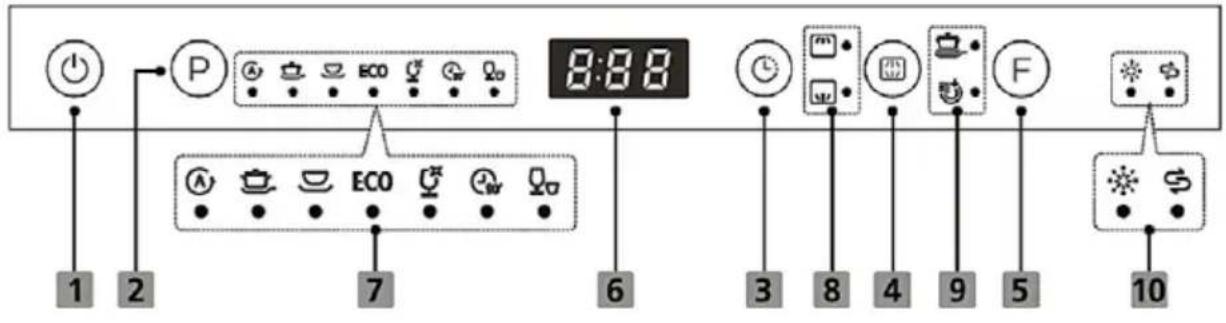
Kontrolna ploča
| 1. Uključenje | Pritisnite ovu tipku za uključenje perilice. Zaslon se uključuje. |
| 2. Program | Odaberite željeni program pranja. Indikator odabranog programa će zasvjetliti. |
| 3. Odgoda pranja | Pritisnite tipku za ugađanje vremena početka pranja perilice |
| 4. Pola punjenja (gornja ili donja košara) | Pristisnite za odabira punjenja gornje ili donje košare Kada imate otprilike pola pune perilice ili manje, možete odabrati ovu funkciju da biste uštedjeli energiju i vodu |
| 5. Funkcija | Pritisnite za odabir funkcija |
| 6. Zaslon | Prikaz preostalog vremena programa i vremena odgode pranja, kodova pogreške itd |
| 7. Program indikator |  AUTOPranje sa automatskim senzorom zaprljanosti, koristite za lagano, normalno ili jako zaprljano posuđe, sa ili bez osušene hrane. AUTOPranje sa automatskim senzorom zaprljanosti, koristite za lagano, normalno ili jako zaprljano posuđe, sa ili bez osušene hrane. INTENSIVE (INTENZIVNO PRANJE)Za najprljavije posuđe i normalno zaprljane posude, tave, posuđe itd. Sa osušenom hranom. INTENSIVE (INTENZIVNO PRANJE)Za najprljavije posuđe i normalno zaprljane posude, tave, posuđe itd. Sa osušenom hranom. UNIVERSALZa normalno zaprljane posuđe, poput lonaca, tanjura, čaša i lagano zaprljane tave.ECO ECOOvo je standardni program, prikladan je za pranje normalno zaprljanog posuđa i to je najučinkovitiji program u smislu njegove kombinirane potrošnje energije i vode za tu vrstu stolnog posuđa. UNIVERSALZa normalno zaprljane posuđe, poput lonaca, tanjura, čaša i lagano zaprljane tave.ECO ECOOvo je standardni program, prikladan je za pranje normalno zaprljanog posuđa i to je najučinkovitiji program u smislu njegove kombinirane potrošnje energije i vode za tu vrstu stolnog posuđa. GLASS (ČAŠE)Za lagano zaprljano posuđe i staklo. GLASS (ČAŠE)Za lagano zaprljano posuđe i staklo. 90 MINZa normalno zaprljane posuđe kojima je potrebno brzo pranje. 90 MINZa normalno zaprljane posuđe kojima je potrebno brzo pranje. RAPID (BRZO)Kraće pranje za lagano zaprljano posuđe RAPID (BRZO)Kraće pranje za lagano zaprljano posuđe |
| 8. Oznake punjenja gornje ili donje košare |  Gornja košaraKad odaberete Gornju košaru, samo posuđe u gornjoj košari biti će oprano. Sustav raspršivanja vode za donju košaru neće raditi.[MDGY] Donja košaraKad odaberete Donju košaru, samo posuđe u donjoj košari biti će oprano. Sustav raspršivanja vode za gornju košaru neće raditi. Gornja košaraKad odaberete Gornju košaru, samo posuđe u gornjoj košari biti će oprano. Sustav raspršivanja vode za donju košaru neće raditi.[MDGY] Donja košaraKad odaberete Donju košaru, samo posuđe u donjoj košari biti će oprano. Sustav raspršivanja vode za gornju košaru neće raditi. |
| 9. Oznake funkcija |  Dodatno pranjeZa pranje vrlo prljavog posuđa koje se teško čisti. (Može se koristiti samo s programom: Intensive, Universal, ECO, Čaše, 90 min) Dodatno pranjeZa pranje vrlo prljavog posuđa koje se teško čisti. (Može se koristiti samo s programom: Intensive, Universal, ECO, Čaše, 90 min) Dodatno sušenjeZa bolji rezultat sušenja. (Može se koristiti samo sa programima: Intenzivno, Universal, ECO, Čaše, 90 min) Dodatno sušenjeZa bolji rezultat sušenja. (Može se koristiti samo sa programima: Intenzivno, Universal, ECO, Čaše, 90 min) |
| 10. Indikatori upozorenja | Dodavanje Sredstva za ispiranje (Sjajila)Ako je indikator “uključen, to znači da u perilici postoji još malo sredstva za ispiranje i potrebno je ponovno punjenje.Nedostatak soliAko je indikator “uključen, to znači da u perilici postoji još malo soli i da je potrebno dopuniti sol. |
Omekšivač vode
Upozorenje
Punjenje donje košare
Predlažemo da veće i prljavije predmete postavite u donju košaru: to su lonci, tave, poklopci, posude za serviranje, kao što je prikazano na ilustraciji. Bolje je postaviti posude za serviranje i poklopce na bočne strane rešetki da bi se izbjeglo blokiranje rotacije gornje ruke prskalice.
Maksimalni promjer koji se savjetuje za tanjure ispred dozatora deterdženta je 19 cm da se ne bi blokiralo otvaranje dozatora.
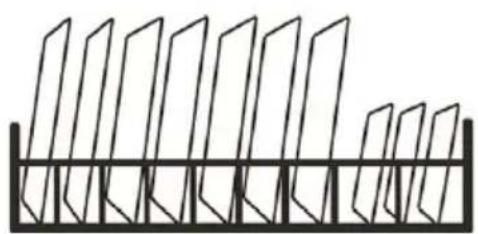
Punjenje košare za pribor
Pribor bi se trebao postaviti u košaru zasebno jedan od drugog u primjerenom položaju i trebali biste se pobrinuti da se pribor ne dodiruje, budući da to može uzrokovati lošu učinkovitost pranja.

Upozorenje

Nemojte dozvoliti da nijedan predmet viri s dna košare. Uvijek stavljajte oštar pribor oštricom prema dolje!

1 Odstranite čep spremnika podizanjem ručke.
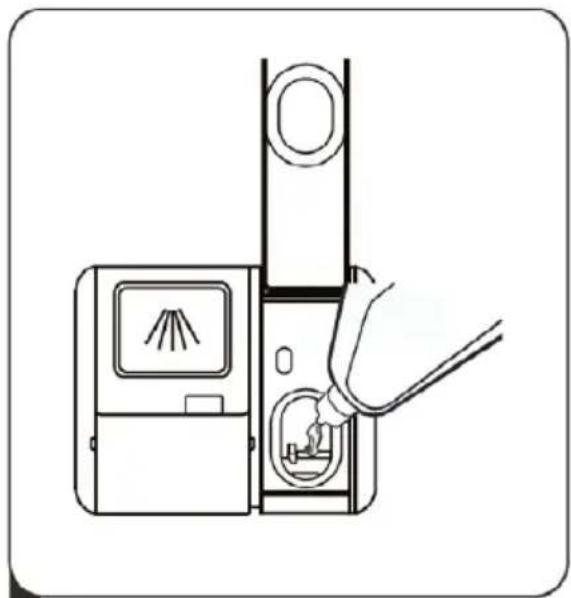
2 Ulijte sredstvo u spremnik i pazite da ga ne prepunite.

3 Zatvorite čep.
1 Molimo odaberite način otvaranja poklopca dispenzera, ovisno o vašem modelu.
3 Zatvorite poklopac dispenzera.
PROGRAMIRANJE PERILICE POSUĐA
Tablica ciklusa pranja

Molimo da proverite poglavlje 1 "Omekšivač vode" Deo II: Posebno izdanje, ako trebate uputstvo za podešavanje omekšivača vode.
Stavljanje soli u korpa

1 Izvucite gornju korpu. Skinite gornju korpu.

3 Ponovno vratite gornju korpu na gornje ili donje vođice.

4 Ugurajte gornju korpu.
Način 2:

1 Da biste povisili gornju korpu, jednostavno uhvatite na sredinu obe strane i podignite dok se ne zaključa u gornjem položaju. Nije potrebno podizati ručku za podešavanje.

2 Da bi ste spustili gornju korpu, podignite ručke za podešavanje na obe strane korpe i spustite je u niži položaj.
Sklapanje stalaža
- Šiljci donje korpe koriste se za držanje tanjira. Možete ih spustiti da bi se napravilo mesta za više posuđe.
ODRŽAVANJE I ČIŠĆENJE
1 Držite grubi filter i rotirajte ga suprotno od smera kazaljke na satu da biste ga otključali. Podignite nagore i izvadite iz mašine.

2 Fini filter može se izvući sa dna sklopa filtera. Grubi filter je moguće izvaditi iz glavnog filtera nežnim stiskanjem ivica pri vrhu i izvlačenjem.

4 Ponovno sklopite filtere obrnutim redosledom od rastavljanja, postavite uložak filtera i rotirajte u smeru kazaljke na satu da biste zatvorili.

Upozorenje
- Nemojte previše zatezati filtere. Stavite filtere nazad redom na siguran način jer u suprotnom se talog može nakupiti u mašini i prouzrokovati blokadu.
- Nikada nemojte koristiti mašinu za pranje sudova bez filtera. Neodgovarajuća zamena filtera može smanjiti kvalitet rada uređaja i oštetiti posuđe i pribor.
Prskalice
Potrebno je redovno čistiti prskalice jer će u suprotnom hemikalije iz vode začepiti mlaznice i ležajeve.
Da bi ste očistili prskalice sledite uputstvo dole:
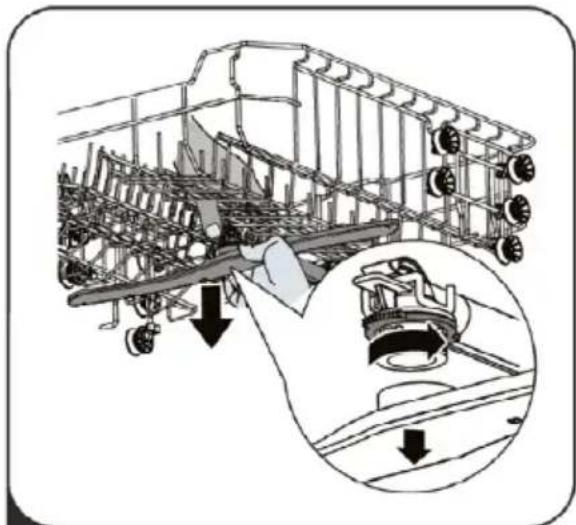
1 Da biste odstranili gornju prskalicu, držite maticu u središtu i rotirajte prskalicu suprotno od kazaljke na satu.
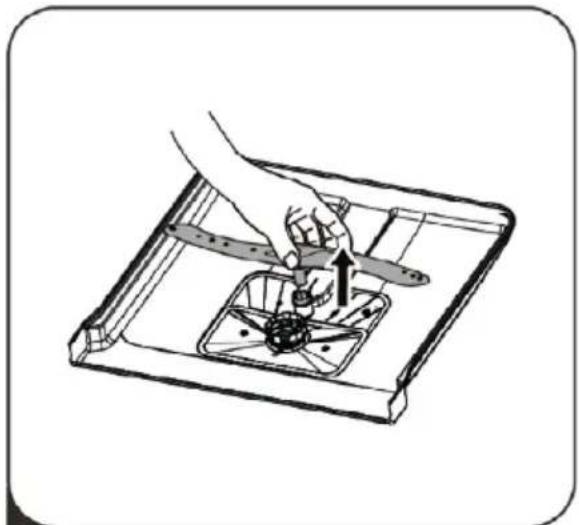
2 Da biste odstranili donju prskalicu, povucite prskalicu prema gore.

3 Operite prskalice sapunastom i toplom vodom i koristite meku četku da biste očistili mlaznice.
Održavanje mašine za pranje sudova
Mere protiv mraza
Molimo da preduzmete mere opreza protiv mraza za zaštitu mašinu tokom zime. Svaki put nakon ciklusa pranja, molimo da učinite sledeće:
- Isključite dovod struje prema mašini za sudove na izvoru.
- Isključite dovod vode i iskopčajte crevo za dovod vode sa ventila za vodu.
- Ispustite vodu iz ulazne creva i ventila vode (koristite posudu za sakupljanje vode).
- Ponovno povežite cev za dovod vode sa ventilom.
- Odstranite sistem filtera na dnu mašine i koristeći sunder sakupite vodu uz posude sistema filtera.
Nakon svakog pranja
Nakon svakog pranja isključite dovod vode prema uređaju i ostavite vrata malo otvorenima neko vreme da bi vlaga i mirisi isparili.
Odstranite utikač
- Opasnost od strujnog udara


Korak 3. Podešavanje zategnutosti opruge vrata
-
Opruge vrata podešene su u fabrici na potrebnu zategnutost za spolašnja vrata. Ako se instalira dekorativna ploča, moraćete podesiti zategnutost opruge vrata. Rotirajte vijak za podešavanje da biste zategnuli ili popustili čeličnu oprugu.
-
Zategnutost opruge vrata je ispravna kada vrata ostaju horizontalno u potpuno otvorenom položaju, a podignu se uz lagano guranje prstom.
Korak 4. Koraci za instalaciju mašine za pranje sudova

Molimo da pogledate specifične korake za instalaciju na skicama.
-
Stavite kondenzacijsku traku ispod radne ploče ili kuhinjskog elementa. Molimo da se pobrinete da kondenzacijska traka ide uz ivicu radne ploče (korak 2).
-
Povežite dovodno crevo sa priključkom za vodu.
-
Povežite odvodno crevo.
-
Povežite strujni kabl.
-
Postavite mašinu za pranje sudova na odgovarajuće mesto.
-
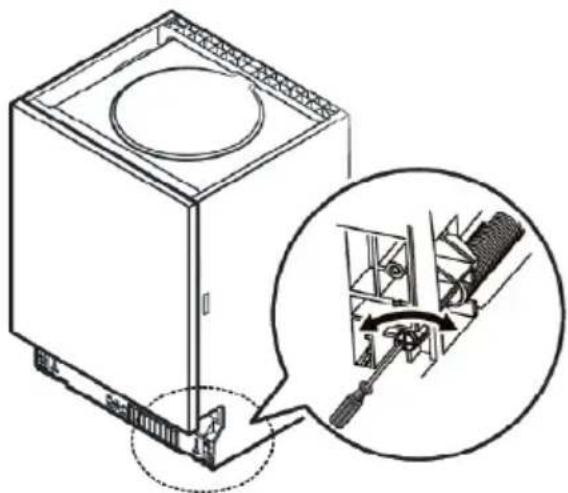
Poravnajte mašinu za pranje sudova. Zadnja se noga može podesiti sa prednje strane mašine, okretanjem vijka u sredini na dnu mašine pomoću krstastog odvijača. Da biste podesili visinu prednjih nogica, koristite ravni odvijač i okrećite prednje nogice dok ne poravnate mašinu (korak 5 i 6).
-
Instalirajte dekorativna vrata kuhinje na vrata mašine(samo ugradni modeli).
-
Podesite zategnutost opruga vrata pomoću krstastog odvijača okretanjem u smeru kazaljke na satu da biste zategnuli levu i desnu oprugu vrata. Ukoliko to ne učinite, moguća su oštećenja mašine za pranje sudova (Korak 11).
-
Mašina za sudove mora biti pričvršćena na mestu ugradnje.
Korak 5. Poravnavanje mašine za pranje sudova
Mašina za sudove sudova mora biti poravnata da bi dobro funkcionisala.
- Postavite libelu na vrata i vodilicu korpe unutar kade mašine kao što je prikazano, da biste bili sigurni da je Mašina za sudove poravnata.
- Poravnajte mašinu za pranje podešavanjem svake nogice zasebno.
- Kada poravnavate mašinu za pranje, molimo da pripazite da se ne prevrne.


NAPOMENA: Maksimalna visina koja se može podesiti je 50 mm.
SAVETI ZA REŠAVANJE PROBLEMA
| Pozicija | Vrsta posuđa |
| 1 | Šolje manje |
| 2 | Tanjurić |
| 3 | Čaše |
| 4 | Šolja |
| 5 | Mali lonac |
2. Gornja korpa:

| Pozicija | Vrsta posuđa |
| 6 | Plitka cinija za rernu |
| 7 | Desertni tanjiri |
| 8 | Plitki tanjiri |
| 9 Duboki tanjiri | |
| 10 | Ovalni tanjir |
| 11 | Melaminski desertni tanjiri |
| 12 Melaminske posude | |
| 13 Staklena činije | |
| 14 | Desertne činije |
↓
Odlaganje u otpad stare električne i elektronske opreme

Proizvodi označeni ovim simbolom pripadaju grupi električne i elektronske opreme (EE proizvodi) i ne smeju da se odlažu zajedno sa kućnim otpadom. Kad postane neupotrebljiv, ovaj proizvod bi trebalo predati u najbliži centar za prikupljanje i reciklažu električnog i elektronskog otpada. Na taj način sprečavamo negativne posledice na okolinu i zdravlje i čuvamo prirodne
resurse.
Za detaljne informacije o sakupljanju EE otpada obratite se prodavcu kod kojeg ste kupili uređaj ili pogledajte na stranici www.ereciklaza.com.
Sadržaj Deo II
KORIŠĆENJE MAŠINE ZA PRANJE SUDOVA
Kontrolna ploča
Omekšivač vode
Priprema i ubacivanje sudova
Funkcija pomoći pri ispiranju i deterdženta
Punjenje rezervoara sredstva za pomoć pri ispiranju (Sredstvo za sjaj)
1
2
Odstranjivanje većeg taloga sa pribora
3
Punjenje korpi

4
Punjenje dozatora

5
Izbor programa i pokretanje mašine
UPOTREBA MAŠINE ZA PRANJE SUDOVA
Kontrolni Panel

Kontrolna ploča
| 1. Uključenje | Pritisnite ovaj taster da biste uključili svoju mašinu za pranje sudova. Ekran se uključuje. |
| 2. Program | Odaberite odgovarajućii program pranja. Indikator odabranog programa će se uključiti. |
| 3. Odgoda pranja | Pritisnite taster za podešavanje vremena početka pranja mašine. |
| 4. Pola punjenja (gornja ili donja košara) | Pristisnite za odabira punjenja gornje ili donje korpe Kada imate otprilike pola pune mašine ili manje, možete odabrati ovu funkciju da biste uštedili energiju i vodu |
| 5. Funkcija | Pritisnite za odabir funkcija |
| 6. Ekran | Prikaz preostalog vremena programa i vremena odgode pranja, kodova greške itd |
| 7. Program indikator |  AUTOPranje sa automatskim senzorom, lagano, normalno ili jako zaprljano posuđe, sa ili bez sasušenih ostataka hrane. AUTOPranje sa automatskim senzorom, lagano, normalno ili jako zaprljano posuđe, sa ili bez sasušenih ostataka hrane. INTENSIVEZa najprljavije posuđe i normalno prljave lonce, tiganje, tanjire itd. sa sasušenim ostatcima hrane. INTENSIVEZa najprljavije posuđe i normalno prljave lonce, tiganje, tanjire itd. sa sasušenim ostatcima hrane. UNIVERSALZa normalno zaprljano posuđe, poput lonaca, tanjira, čaša i lagano zaprljanih tiganja.ECO ECOOvo je standardni program odgovarajući za standardno prljavo posuđe poput lonaca, tanjira, čaša i lagano uprljanih tiganja. UNIVERSALZa normalno zaprljano posuđe, poput lonaca, tanjira, čaša i lagano zaprljanih tiganja.ECO ECOOvo je standardni program odgovarajući za standardno prljavo posuđe poput lonaca, tanjira, čaša i lagano uprljanih tiganja. GLASSZa lagano zaprljano posuđe i staklo. GLASSZa lagano zaprljano posuđe i staklo. 90 MINZa standardno prljavo posuđe koje treba brzo pranje. 90 MINZa standardno prljavo posuđe koje treba brzo pranje. RAPIDKratko pranje za lagano uprljano posuđe koje se ne mora sušiti RAPIDKratko pranje za lagano uprljano posuđe koje se ne mora sušiti |
| 8. Oznake punjenja gornje ili donje korpe |  Gornja korpaKad odaberete Gornju korpu, samo posuđe u gornjoj korpi biti će oprano. Sustav raspršivanja za donju korpu neće raditi. Gornja korpaKad odaberete Gornju korpu, samo posuđe u gornjoj korpi biti će oprano. Sustav raspršivanja za donju korpu neće raditi. Donja korpaKad odaberete Donju korpu, samo posuđe u donjoj korpi biti će oprano. Sustav raspršivanja za gornju korpu neće raditi. Donja korpaKad odaberete Donju korpu, samo posuđe u donjoj korpi biti će oprano. Sustav raspršivanja za gornju korpu neće raditi. |
| 9. Oznake funkcija |  Dodatno čiščenjeZa pranje vrlo prljavog posuđa koje se teško čisti. (Može se koristiti samo s programima: intenzivno, univerzalno, ECO, staklo, 90 min)[STW] Dodatno sušenjeZa bolji rezultat sušenja. (Može se koristiti samo sa programima: Intenzivno, univerzalno, EKO, staklo, 90 min) Dodatno čiščenjeZa pranje vrlo prljavog posuđa koje se teško čisti. (Može se koristiti samo s programima: intenzivno, univerzalno, ECO, staklo, 90 min)[STW] Dodatno sušenjeZa bolji rezultat sušenja. (Može se koristiti samo sa programima: Intenzivno, univerzalno, EKO, staklo, 90 min) |
| 10. Indikatori upozorenja | Dodavanje Sredstva za ispiranje (Sjajila)Ako je indikator “uključen, to znači da u mašini postoji još malo sredstva za sjaj i potrebno je ponovno punjenjeNedostatak soliAko je indikator “uključen, to znači da u mašini postoji još malo soli i da je istu potrebno dopuniti. |
Omekšivač vode
Upozorenje
Punjenje donje korpe
Predlažemo da veće i prljavije predmete postavite u donju korpu: to su lonci, tiganji, poklopci, posude za serviranje, kao što je prikazano na ilustraciji. Bolje je postaviti posude za serviranje i poklopce na bočne strane rešetki da bi se izbeglo blokiranje rotacije gornje prskalice.
Punjenje korpe za pribor
Pribor bi se trebao postaviti u korpu zasebno jedan od drugog u odgovarajućem položaju i trebali biste se pobrinuti da se pribor ne dodiruje, budući da to može prouzrokovati lošu efikasnost pranja.

Upozorenje

1 Odstranite čep rezervoara podizanjem ručke.

2 Nalijte sredstvo u rezervoar i pazite da ga ne prepunite.
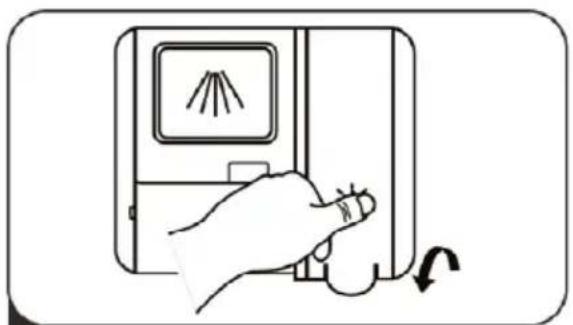
3 Zatvorite čep.
Podešavanje količine upotrebe sredstva za sjaj
Da biste postigli bolje sušenje sa ograničenom količinom sredstva za sjaj, Mašina za sudove je dizajnirana za podešavanje potrošnje od strane korisnika. Pratite dole navedene korake.
- Otvorite vrata i uključite uređaj.
- U roku od 60 sekundi nakon prvog koraka pritisnite taster Program i držite duže od 5 sekundi i zatim pritisnite taster za pola punjenja da biste ušli u mod za podešavanje, a indikator sjaja treptaće će kao 1Hz frekvencija.
- Pritisnite taster Program da biste izdabrali podešavanje prema svojim željama. Nivoi se menjaju prema sledećem redosledu: D1->D2->D3->D4->D5->D1. Što je veći broj, to će više sredstva za sjaj uređaj da koristi.
- Pritisnite taster za Uključenje da biste završili mod podešavanja.
Punjenje rezervoara za deterdžent
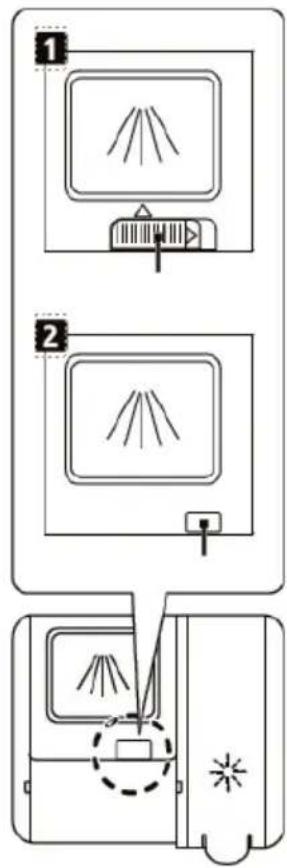
1 Otvorite poklopac na jedan od ponuđenih načina.
- Otvorite pomeranjem klizača-osigurača kao na slici 1.
- Otvorite pritiskom na klizač-osigurač, kao na slici 2.
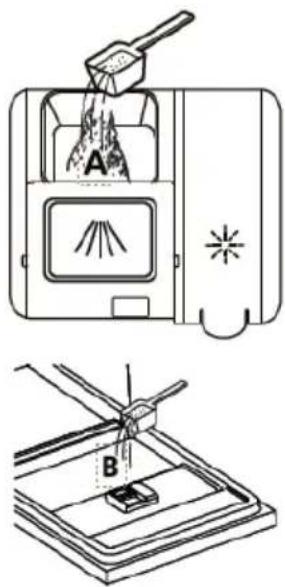
2 Dodajte deterdžent u rezervoar (A) za glavni ciklus pranja.
Za bolji rezultat čišćenja, posebno ako imate vrlo prljave predmete, dodjte malu količinu deterdženta na vrata (B). Dodatni deterdžent aktiviraće se tokom faze predpranja.

3 Zatvorite poklopac tako što ćete ga pomeriti napred, a zatim pritisnuti.
PROGRAMIRANJE MAŠINE ZA PRANJE SUDOVA
Tablica ciklusa pranja
Dole navedena tablica prikazuje koji su programi najbolji prema zaprljanosti posuđa i koliko je deterdženta potrebno. Pokazuju i razne podatke o programima.
Zaboravili ste nešto da dodate?
Zaboravljeni tanjir i sl. može biti dodan u bilo kojem trenutku pre nego što se dozator deterdženta otvori. Ukoliko želite to, pratite dole navedene uputstvo:
- Oprezno otvorite vrata.
- Dodajte zaboravljeno posuđe.
- Zatvorite vrata
- Nakon 10 sekundi mašina se pokreće.
![graph LR A["Container"] --> B["Processing Step"] B --> C["Output"]](/content/2026/05/1043095/images/5be36331c0a0a6abf81d5391b037dfcd111c9afbf635c1ee968e597e2ab98f98.jpg)

Upozorenje
Opasno je otvoriti vrata usred ciklusa, jer vas zbog toga para može opeći.
KODOVI GREŠAKA
![graph LR A["Hand mixing water in a container"] --> B["Add salt"] B --> C["SALT being poured into a container"] C --> D["Heating salt from a container"] D --> E["Final mixing with salt"]](/content/2026/05/1043095/images/90ad224b24af5693a6906d655000e541294d7d56b303737664799dada84908a0.jpg)

↓
Содржина дел II
■ КОРИСТЕЊЕ НА МАШИНАТА ЗА МИЕЊЕ НА САДОВИ
Контролна плоча
Омекнувач на вода
NOTE: Very small items should not be washed in the dishwasher as they could easily fall out of the basket.


Rm.1503A,15/F,Shun Kwong Commercial Bldg.,No.8 Des Voeux Road West,Sheu Wan, Hong Kong
Rm.1503A,15/F,Shun Kwong Commercial Bldg.,No.8 Des Voeux Road West,Sheu Wan, Hong Kong
Subjekti i deklaratës:
Produkt: LAVASTOVILJE
member of M SAN Grupa
KOMPANI

![graph LR A["Hand mixing water"] --> B["Add salt"] B --> C["SALT in container"] C --> D["Heating salt"] D --> E["Final container with arrow indicating rotation"]](/content/2026/05/1043095/images/29a7699b9794f289dc11b3676f6231467490ff1ff4645a2ac04f0aa2aa0239f0.jpg)
orten e sipërme

Hape
• Dëmet e goditjes/ shokut elektrik


| Numri | Artikulli |
| 1 | Gotat/ Filxhanat |
| 2 Pjatat | |
| 3 Gotat | |
| 4 | Filxhanat |
| 5 Tenxheret e vogla |
2.Shporta e Poshtme:
↓
Përmbajtja Pjesa II
■ PËRDORIMI I ENËLARËSES SUAJ
Paneli i Kontrollit
Zbutësi i Ujit
3 Mbushja/ ngarkimi i shportave

Warning
Forget To Add a Dish?
UPORABA PRALNEGA STROJA
rnjo košaro.

2 Če želite spustiti zgornjo košaro, dvignite nastavitveni ročaji na vsaki strani, da spustite košaro in jo spustite v spodnji položaj.
Sestavljanje polic za skodelice
Sestavljanje polic
4 Filtre znova namestite v obratnem vrstnem redu razstavljanja, zamenjajte vložek filtra in ga zavrtite v smeri urnega kazalca, da ga

Opozorilo
1 Če želite odstraniti zgornjo brizgalko, držite matico v sredini in zavrtite brizgalko v nasprotni smeri urnega kazalca, da jo odstranite.
3 Brizgalke operite z milom in toplo vodo ter šobe očistite z mehko krtačo.
- Nevarnost zaradi elektrošoka
Samostoječa namestitev
Namestitev med obstoječe omarice
Pod obstoječim pultom

↓

Vsebina II. Del
■ UPORABA POMIVALNEGA STROJA
Nadzorna plošča
Mehčalec vode
3 Polnjenje košar
5 Izbira programa in zagon pomivalnega stroja
UPORABA POMIVALNEGA STROJA
Nadzorna plošča

Delovanje (tipka)
Opozorilo
Polnjenje spodnje košare
Polnjenje košare za pribor
Opozorilo
1 Odstranite pokrov rezervoarja, tako da dvignete ročaj.

2 Izdelek nalijte v posodo in pazite, da ga ne prenapolnite.

3 Zaprite pokrovček.
3 Zaprite loputo tako, da jo potisnete od spredaj in nato pritisnete navzdol.
PROGRAMIRANJE POMIVALNEGA STROJA
Tabela ciklov pranja
Opozorilo
SAFETY WARNINGS
■ PRODUCT OVERVIEW
■ USING YOUR DISHWASHER
Loading The Salt Into The Softener
Basket Loading Tips
Switch off for long periods of time
■ MAINTENANCE AND CLEANING
External Care
Internal Care
Caring For The Dishwasher
INSTALLATION INSTRUCTION
Power Connection
Water Supply And Drain
Connection Of Drain Hoses
Positioning The Appliance
Free Standing Installation
Built-In Installation (for the integrated model)
TROUBLESHOOTING TIPS
Availability Of Spare Parts
■ DISPOSAL, EU Declaration of Conformity
DEAR CUSTOMER:
Thank you for buying this dishwasher. To ensure that you get the best results from your new dishwasher, please take time to read through the simple instructions in this booklet.
Please ensure that the packing material is disposed of in accordance with the current environmental requirements.
When disposing of any dishwasher equipment please contact your local waste disposal department for advice on safe disposal.
This appliance must be only used for its intended purpose.
Please read these instructions carefully before installing and powering the dishwasher. The manufacturer is not responsible for improper device usage.
Follow the instructions for use. Dispose your instructions to the known and safe place to keep them in case of reused.
SAFETY INFORMATION
Meaning of safety warning symbols

Warning symbol
The symbols indicate matters to pay attention to, and these behaviors shall be specially noted. Due precautions are needed or serious or moderate injuries or damages of the product will be caused.

Caution symbols
The symbols indicate prohibited matters, and those behaviors are forbidden. Non-compliance with the instructions may result in product damages or endanger the personal safety of users.

Note
The symbols indicate matters that must be followed, and those behaviors must be strictly executed in line with the operation requirements. Non-compliance with the instructions may result in product damages or endanger the personal safety of users.
The Electric Shock!
- If the supply cord is damaged, it must be replaced by the manufacturer, its service agent or similarly qualified persons in order to avoid a hazard.
- The new hose-sets supplied with the appliance are to be used and that old hose-sets should not be reused.
- Before any maintenance the device, unplug the appliance from the mains.
- Always unplug the machine and turn off the water supply after use. The max. inlet water pressure, in pascals. The min. inlet water pressure, in pascals.
- To ensure your safety, power plug must be inserted into an earthed three-pole socket. Check carefully and make sure that your socket is properly and reliably earthed.
-
Make sure that the water and electrical devices must be connected by a qualified technician in accordance with the manufacturer's instructions and local safety regulations.
-
This appliance can be used by children aged from 8 years and above and persons with reduced physical, sensory or mental capabilities or lack of experience and knowledge if they have been given supervision or instruction concerning use of the appliance in a safe way and understand the hazards involved.
• Children shall not play with the appliance. - Cleaning and user maintenance shall not be made by children unless they are supervised.
- This appliance is not intended for use by persons (including children) with reduced physical, sensory or mental capabilities, or lack of experience and knowledge, unless they have been given supervision or instruction concerning use of the appliance by a person responsible for their safety. (For IEC60335-1)
- Packaging material could be dangerous for children!
- This appliance is for indoor household use only.
- To protect against the risk of electrical shock, do not immerse the unit, cord or plug in water or other liquid.
- This appliances is intended to be used in household and similar applications such as:
Staff kitchen areas in shops, offices and others working environments;
Farm houses;
by clients in hotels, motels and other residential type environments;
Bed and breakfast type environments.
Earthing Instructions
- This appliance must be earthed. In the event of a malfunction or breakdown, earthing will reduce the risk of an electric shock by providing a path of least resistance of electric current. This appliance is equipped with an earthing conductor plug.
-
The plug must be plugged into an appropriate outlet that is installed and earthed in accordance with all local codes and ordinances.
-
Improper connection of the equipment-earthing conductor can result in the risk of an electric shock.
- Check with a qualified electrician or service representative if you are in doubt whether the appliance is properly grounded.
- Do not modify the plug provided with the appliance if it does not fit the outlet.
- Have a proper outlet installed by a qualified electrician.
- Do not abuse, sit on, or stand on the door or dish rack of the dishwasher.
- Do not operate your dishwasher unless all enclosure panels are properly in place.
- Open the door very carefully if the dishwasher is operating, there is a risk of water squirting out.
- Do not place any heavy objects on or stand on the door when it is open. The appliance could tip forward.
- When loading items to be washed:
1) Locate sharp items so that they are not likely to damage the door seal;
2) Warning: Knives and other utensils with sharp points must be loaded in the basket with their points facing down or placed in a horizontal position. - Some dishwasher detergents are strongly alkaline. They can be extremely dangerous if swallowed. Avoid contact with the skin and eyes and keep children away from the dishwasher when the door is open.
- Check that there are no detergent residues after completion of the wash cycle.
- Do not wash plastic items unless they are marked “dishwasher safe” or the equivalent.
- For unmarked plastic items not so marked, check the manufacturer's recommendations.
- Use only detergent and rinse agents recommended for use in an automatic dishwasher.
- Never use soap, laundry detergent, or hand washing
detergent in your dishwasher.
- The door should not be left open, since this could increase the risk of tripping.
- During installation, the power supply must not be excessively or dangerously bent or flattened.
- Do not tamper with controls.
- The appliance needs to be connected to the main water valve using new hose sets. Old sets should not be reused.
- To save energy, in stand by mode, the appliance will switch of automatically after 15 minutes without any user interaction.
- The maximum number of place settings to be washed is 14.
- The maximum permissible inlet water pressure is 1MPa.
- The minimum permissible inlet water pressure is 0.04MPa.
PRODUCT OVERVIEW
IMPORTANT:
- To get the best performance from your dishwasher, read all operating instructions before using it for the first time.

NOTE: Pictures are only for reference, different models may be different.
USING YOUR DISHWASHER
Before using your dishwasher :
- Set the water softener
- Loading the salt Into the softener
- Loading the basket
- Fill the detergent or tablet to dispenser


Please check the section 1 "Water Softener" of PART II: II: Special Version, Special Version, If you need to set the water softenerIf you need to set the water softener
Loading The Salt Into The Softener

NOTE: If your model does not have any water softener, you may skip this section. Always use salt intended for dishwasher use. The salt container is located beneath the lower basket and should be filled as explained in the following:

Warning
- Only use salt specifically designed for dishwashers use!
Every other type of salt not specifically designed for dishwasher use, especially table salt, will damage the water softener. In case of damages caused by the use of unsuitable salt the manufacturer does not give any warranty nor is liable for any damages caused.
- Only fill with salt before running a cycle.
This will prevent any grains of salt or salty water, which may have been spilled, remaining on the bottom of the machine for any period of time, which may cause corrosion.
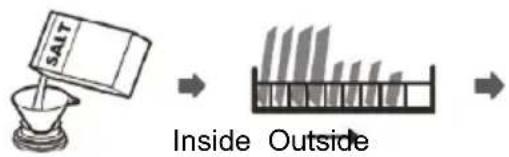
Please follow the steps below for adding dishwasher salt:
![graph LR A["Hand mixing water"] --> B["Add salt"] B --> C["SALT"] C --> D["Add salt into container"] D --> E["Water being poured into container"]](/content/2026/05/1043095/images/29c7526b0da7758b0454426d92fe3fba5b0677ab306f871d0555beabebe55363.jpg)
- Remove the lower basket and unscrew the reservoir cap.
-
Place the end of the funnel (if supplied) into the hole and pour in about 1.5 kg of dishwasher salt.
-
Fill the salt container to its maximum limit with water, It is normal for a small amount of water to come out of the salt container.
-
After filling the container, screw back the cap tightly.
-
The salt warning light will turn off after the salt container has been filled with salt.
-
Immediately after filling the salt into the salt container, a washing program should be started (We suggest to use a short program). Otherwise the filter system, pump or other important parts of the machine may be damaged by salty water. This is out of warranty.

NOTE: The salt container must only be refilled when the salt warning light (⇐) in the control panel comes on. Depending on how well the salt dissolves, the salt warning light may still be on even though the salt container is filled. If there is no salt warning light in the control panel (for some models), you can estimate when to fill the salt into the softener by the cycles that the dishwasher has run.
■ If salt has spilled, run a soak or quick program to remove it.
Basket Loading Tips
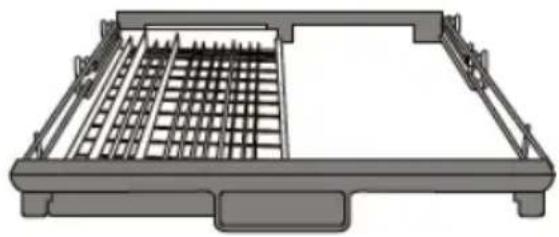
Adjusting the upper basket
Type 1:
The height of the upper basket can be easily adjusted to accommodate taller dishes in either the upper or lower basket.
To adjust the height of the upper rack, follow these steps:
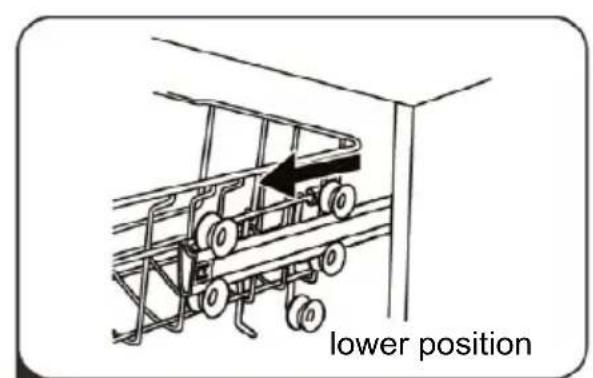
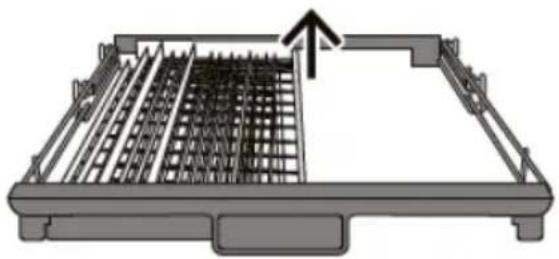
1 Pull out the upper basket. Remove the upper basket.

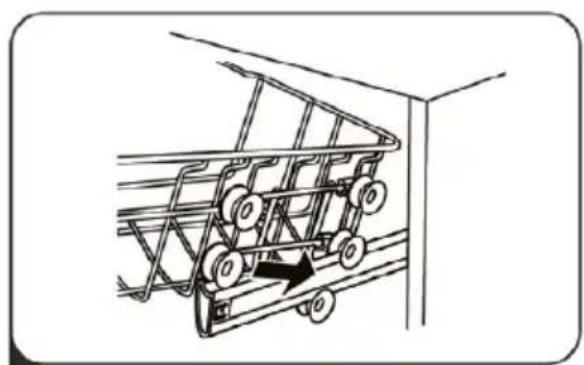
3 Re-attach the upper basket to upper or lower rollers.

4 Remove the upper basket.
Type 2:
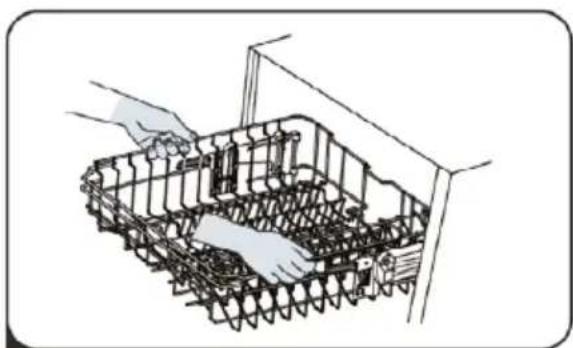
To raise the upper basket, just lift the upper basket at the center of each side until the basket locks into place in the upper position. It is not necessary to lift the adjuster handle.
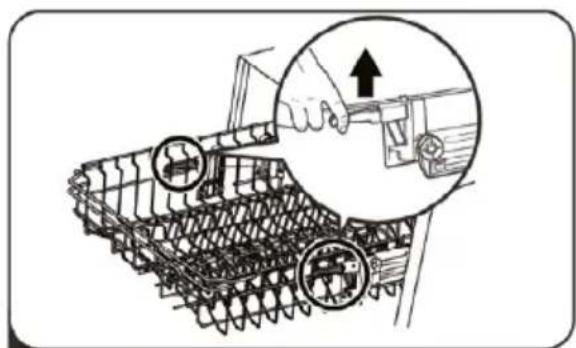
2 To lower the upper basket, lift the adjust handles on each side to release the basket and lower it to the lower position.
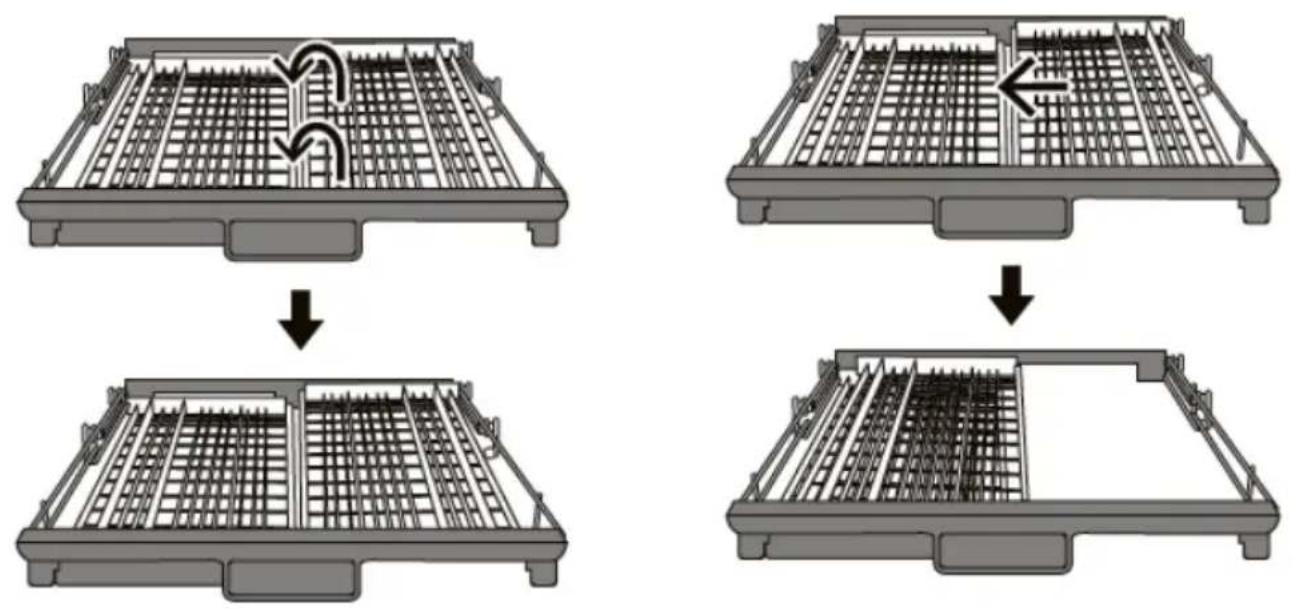
Folding back the cup shelves
- To make room for taller items in the upper basket, raise the cup rack upwards. You can then lean the tall glasses against it.
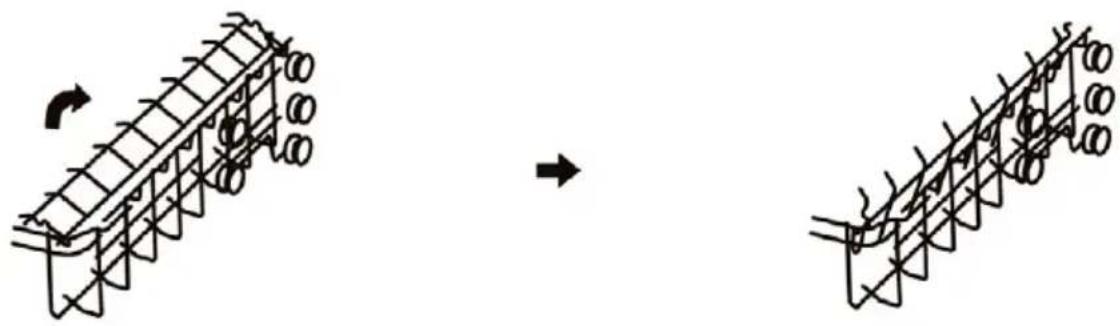
Folding back the rack shelves
- The spikes of the lower basket are used for holding plates and a platter. They can be lowered to make more room for large items.

MAINTENANCE AND CLEANING
External Care
The door and the door seal
Clean the door seals regularly with a soft damp cloth to remove food deposits. When the dishwasher is being loaded, food and drink residues may drip onto the sides of the dishwasher door. These surfaces are outside the wash cabinet and are not accessed by water from the spray arms. Any deposits should be wiped off before the door is closed.
The control panel
If cleaning is required, the control panel should be wiped with a soft damp cloth only.

Warning
- To avoid penetration of water into the door lock and electrical components,
- Never use abrasive cleaners or scouring pads on the outer surfaces because they may scratch the finish. Some paper towels may also scratch or leave marks on the surface.
Internal Care
Filtering system
The filtering system in the base of the wash cabinet retains coarse debris from the washing cycle, including foreign objects such as tooth picks or shards. The collected coarse debris may cause the filters to clog. Check the condition of the filters regularly, carefully remove foreign objects and clean the parts of the filtering system if necessary with water. Follow the steps below to clean the filter.

NOTE: Pictures are only for reference, different models of the filtering system and spray arms may be different.

1 Hold the coarse filter and rotate it anticlockwise to unlock the filter. Lift the filter upwards and out of the dishwasher.

2 The fine filter can be pulled off the bottom of the filter assembly. The coarse filter can be detached from the main filter by gently squeezing the tabs at the top and pulling it away.

3 Larger food remnants can be cleaned by rinsing the filter under running water. For a more thorough clean, use a soft cleaning brush.

4 Reassemble the filters in the reverse order of the disassembly, replace the filter insert, and rotate clockwise to the close arrow.

Warning
- Do not over tighten the filters. Put the filters back in sequence securely, otherwise coarse debris could get into the system and cause a blockage
- Never use the dishwasher without filters in place. Improper replacement of the filter may reduce the performance level of the appliance and damage dishes and utensils.
Spray arms
It is necessary to clean the spray arms regularly for hard water chemicals will clog the spray arm jets and bearings.
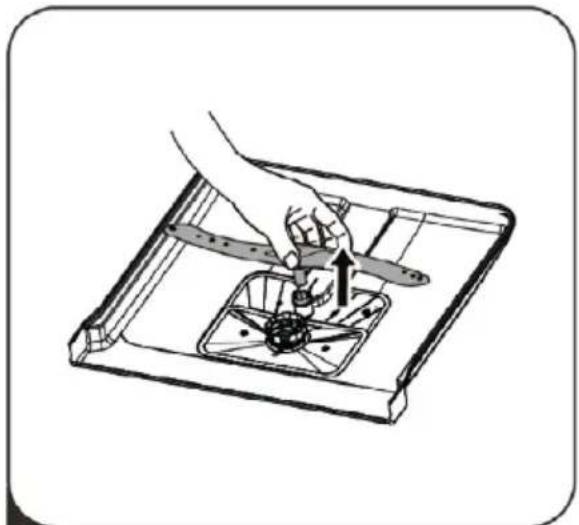
To clean the spray arms, follow the instructions below:
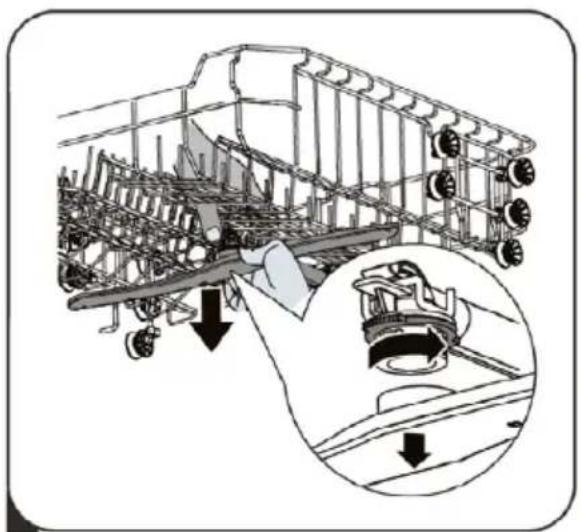
1 To remove the upper spray arm, hold the nut in the center still and rotate the spray arm counterclockwise to remove it.

2 To remove the lower spray arm, pull out the spray arm upward.
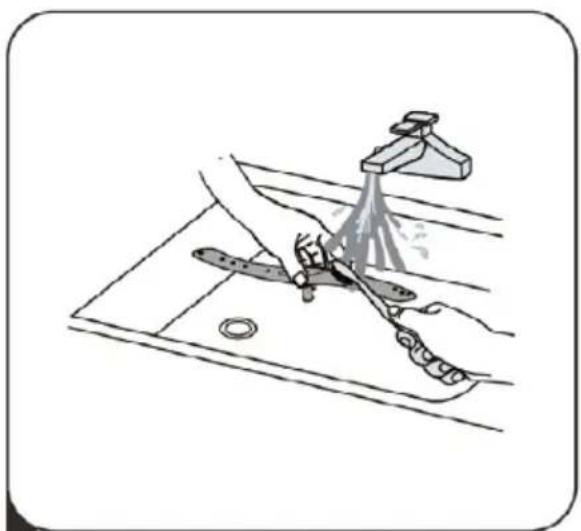
3 Wash the arms in soapy and warm water and use a soft brush to clean the jets.
Caring For The Dishwasher
Frost precaution
Please take frost protection measures on the dishwasher in winter. Every time after washing cycles, please operate as follows:
- Cut off the electrical power to the dishwasher at the supply source.
- Turn off the water supply and disconnect the water inlet pipe from the water valve.
- Drain the water from the inlet pipe and water valve. (Use a pan to gather the water)
- Reconnect the water inlet pipe to the water valve.
- Remove the filter at the bottom of the tub and use a sponge to soak up water in the sump.
After every wash
After every wash, turn off the water supply to the appliance and leave the door slightly open for a while so that moisture and odors are not trapped inside.
Remove the plug
Before cleaning or performing maintenance, always remove the plug from the socket.
No solvents or abrasive cleaning
To clean the exterior and rubber parts of the dishwasher, do not use solvents or abrasive cleaning products. Only use a cloth with warm soapy water. To remove spots or stains from the surface of the interior, use a cloth dampened with water an a little vinegar, or a cleaning product made specifically for dishwashers.
When not in use for a long time
It is recommend that you run a wash cycle with the dishwasher empty and then remove the plug from the socket, turn off the water supply and leave the door of the appliance slightly open. This will help the door seals to last longer and prevent odors from forming within the appliance.
Moving the appliance
If the appliance must be moved, try to keep it in the vertical position. If absolutely necessary, it can be positioned on its back.
Seals
One of the factors that cause odours to form in the dishwasher is food that remains trapped in the seals. Periodic cleaning with a damp sponge will prevent this from occurring.
INSTALLATION INSTRUCTION

Warning

• Electrical Shock Hazard
Disconnect electrical power before installing dishwasher.
Failure to do so could result in death or electrical shock.

Attention
The installation of the pipes and electrical equipments should be done by professionals.
About Power Connection

Warning
For personal safety:
- Do not use an extension cord or an adapter plug with this appliance.
- Do not, under any circumstances, cut or remove the earthing connection from the power cord.
Electrical requirements
Please look at the rating label to know the rating voltage and connect the dishwasher to the appropriate power supply. Use the required fuse 10A/13A/16A, time delay fuse or circuit breaker recommended and provide separate circuit serving only this appliance.
Electrical connection
Ensure the voltage and frequency of the power being corresponds to those on the rating plate. Only insert the plug into an electrical socket which is earthed properly. If the electrical socket to which the appliance must be connected is not appropriate for the plug, replace the socket, rather than using a adaptors or the like as they could cause overheating and burns.

Ensure that proper earthing exists before use
Water Supply And Drain
Cold water connection
Connect the cold water supply hose to a threaded 3/4(inch) connector and make sure that it is fastened tightly in place.
If the water pipes are new or have not been used for an extended period of time, let the water run to make sure that the water is clear. This precaution is needed to avoid the risk of the water inlet to be blocked and damage the appliance.
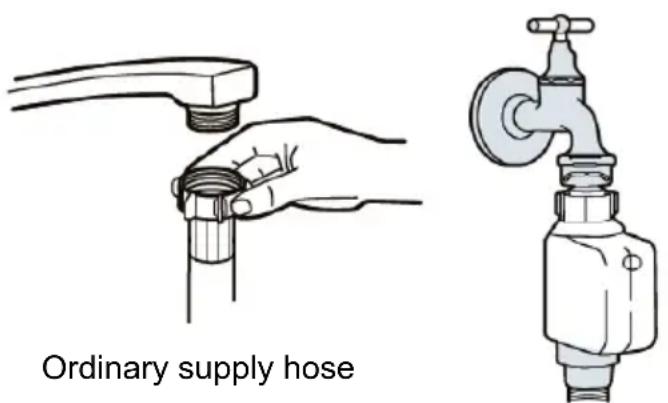
Aqua-Stop safety supply hose (option)
About the safety supply hose
The safety supply hose consists of the double walls. The system guarantees its intervention by blocking the flow of water in case of the supply hose breaking and when the air space between the supply hose itself and the outer corrugated hose is full of water.

Warning
A hose that attaches to a tap can burst if it is installed on the same water line as the dishwasher. If your sink has one, it is recommended that the hose be disconnected and the hole plugged.
How to connect the safety supply hose
- Pull the safety supply hoses out from storage compartment located at rear of dishwasher.
- Tighten the screws of the safety supply hose to the faucet with thread 3/4inch.
- Turn the water fully on before starting the dishwasher.
How to disconnect the safety supply hose
- Turn off the water.
- Unscrew the safety supply hose from the faucet.
Connection Of Drain Hoses
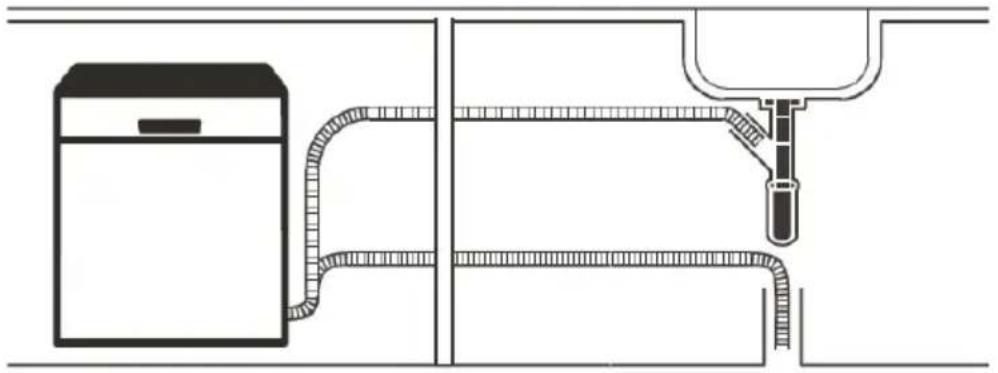
Insert the drain hose into a drain pipe with a minimum diameter of 4 cm, or let it run into the sink, making sure to avoid bending or crimping it. The height of drain pipe must be less than 1000 mm. The free end of the hose must not be immersed in water to avoid the back flow of it.

Please securely fix the drain hose in either position A or position B

How to drain excess water from hoses
If the connection to the drain pipe is positioned higher than 1000 mm, excess water may remain in the drain hose. It will be necessary to drain excess water from the hose into a bowl or suitable container that is held outside and lower than the sink.
Water outlet
Connect the water drain hose. The drain hose must be correctly fitted to avoid water leaks. Ensure that the water drain hose is not kinked or squashed.
Extension hose
If you need a drain hose extension, make sure to use a similar drain hose.
It must not be longer than 4 meters, otherwise the cleaning effect of the dishwasher could be reduced.
Syphon connection
The waste connection must be at a height less than 1000 mm (maximum) from the bottom of the dishwasher.
Positioning The Appliance
Position the appliance in the desired location. The back should rest against the wall behind it, and the sides, along the adjacent cabinets or walls. The dishwasher is equipped with water supply and drain hoses that can be positioned either to the right or the left sides to facilitate proper installation.
Levelling the appliance
Once the appliance is positioned for levelling,
the height of the dishwasher may be altered via adjustment of the screwing level of the feet. In any case, the appliance should not be inclined more than 2 .°

Free Standing Installation
Fitting between existing carbinets
The height of the dishwasher, 845 mm, has been designed in order to allow the machine to be fitted between existing cabinets of the same height in modern fitted kitchens.
The laminated top of the machine does not require any particular care since it is heatproof, scratchproof and stainproof.
Underneath existing work top
(When fitting beneath a work top)
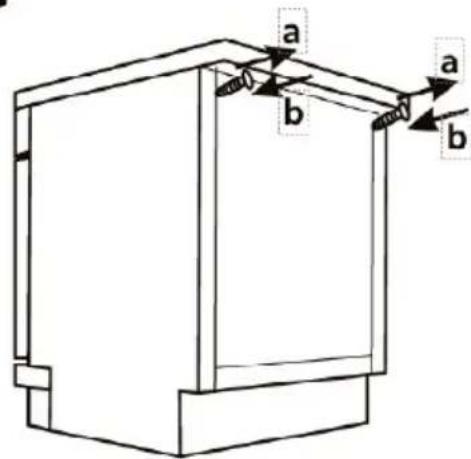
In most modern fitted kitchens there is only one single work top under which cabinets and electrical appliances are fitted. In this case remove the work top of the dishwasher by unscrewing the screws under the rear edge of the top (a).

After removing the work top, the screws must be screwed again under the rear edge of the top (b).


Built-In Installation (for the integrated models)
Step 1. Selecting the best location for the dishwasher
The installation position of the dishwasher should be near the existing inlet and drain hose and power socket.
Illustrations of cabinet dimensions and installation position of the dishwasher.
- Less than 5 mm between the top of dishwasher and cabinet and the outer door aligned to cabinet.
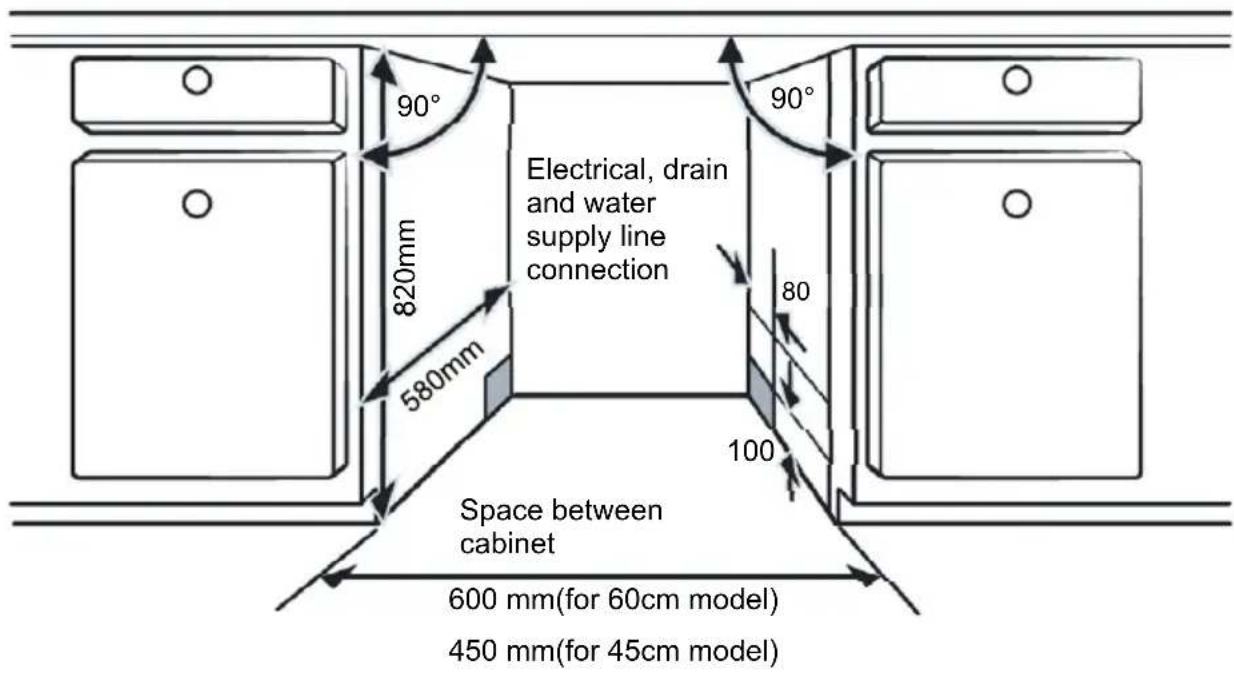
- If dishwasher is installed at the corner of the cabinet, there should be some space when the door is opened.


NOTE: Depending on where your electrical outlet is,
you may need to cut a hole in the opposite cabinet side.
Step 2. Aesthetic panel's dimensions and installation

Follow the specific installation instruction for attaching the aesthetical door panel.aesthetical door panel.
Semi-integrated model
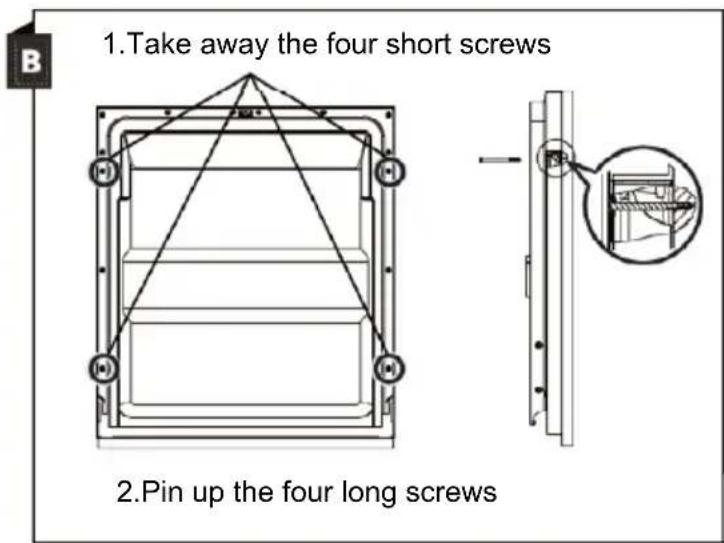
Separate velcro stripe A and velcro stripe B and attach velcro stripe A on the inner side of the aesthetic panel. Attach the felted velcro stripe B on the outer door of dishwasher (see figure A). After positioning of the panel, fix the panel onto the outer door by screws and bolts (See figure B).


Fully-integrated model
Install the hook on the aesthetic panel and put the hook into the slot of the outer door of dishwasher (see figure A). After positioning of the panel, fix the panel onto the outer door by screws and bolts (See figure B).


Step 3. Tension adjustment of the door spring
-
The door springs are set at the factory to the proper tension for the outer door. If aesthetic panel are installed, you will have to adjust the door spring tension. Rotate the adjusting screw to drive the adjustor to strain or relax the steel cable.
-
Door spring tension is correct when the door remains horizontal in the fully opened position, yet rises to a close with the slight lift of a finger.
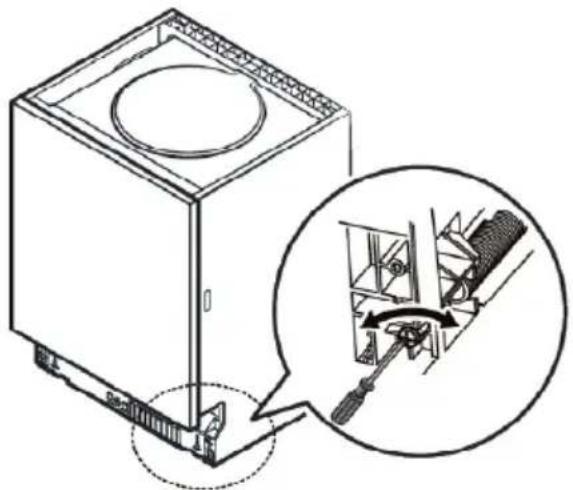
Step 4. Dishwasher installation steps

Please refer to the specific installation steps in the installation drawings.drawings.
-
Affix the condensation strip under the work surface of cabinet. Please ensure the condensation strip is flush with edge of work surface. (Step2)
-
Connect the inlet hose to the cold water supply.
-
Connect the drain hose.
-
Connect the power cord.
-
Place the dishwasher into the cabinet.
-
Level the dishwasher. The rear foot can be adjusted from the front of the dishwasher by turning the Philips screw in the middle of the base of dishwasher use a Philips screw driver. To adjust the front feet, use a flat screw driver and turn the front feet until the dishwasher is level. (Step 5 to Step 6)
-
Install the furniture door to the outer door of the dishwasher. (Step 7 to Step 10)
-
Adjust the tension of the door springs by using a Philips screw driver turning in a clockwise motion to tighten the left and right door springs. Failure to do this could cause damage to your dishwasher. (Step 11)
-
The dishwasher must be secured in place. There are two ways to do this:
A. Normal work surface: Put the installation hook into the slot of the side plane and secure it to the work surface with the screws.
B. Marble or granite work top: Fix the side with screws.
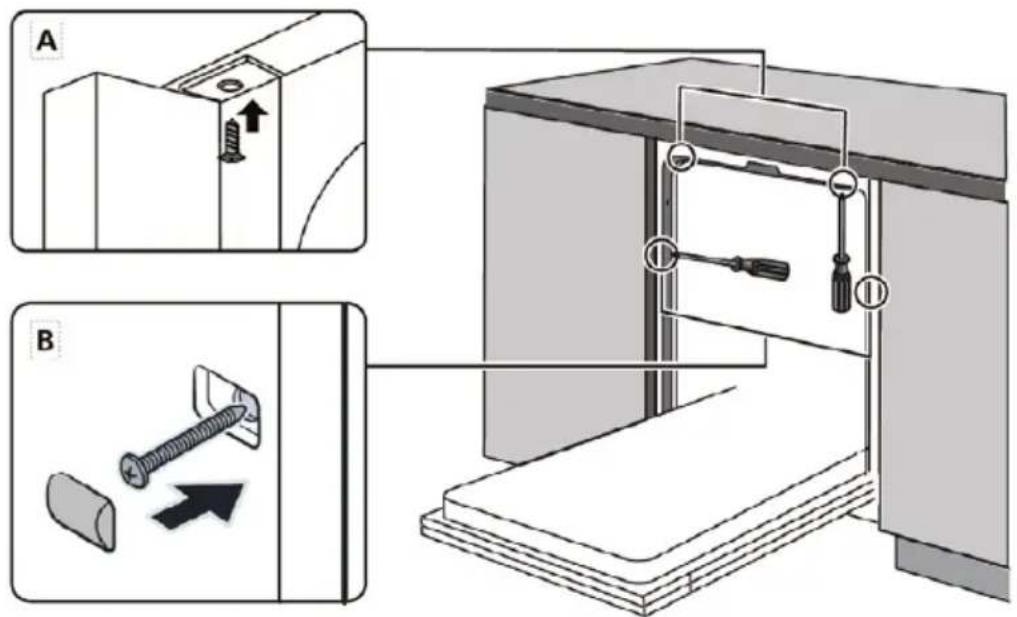
Step 5. Levelling the dishwasher
Dishwasher must be level for proper dish rack operation and wash performance.
- Place a spirit level on door and rack track inside the tub as shown to check that the dishwasher is level.
- Level the dishwasher by adjusting the three levelling feet individually.
- When level the dishwasher, please pay attention not to let the dishwasher tip over
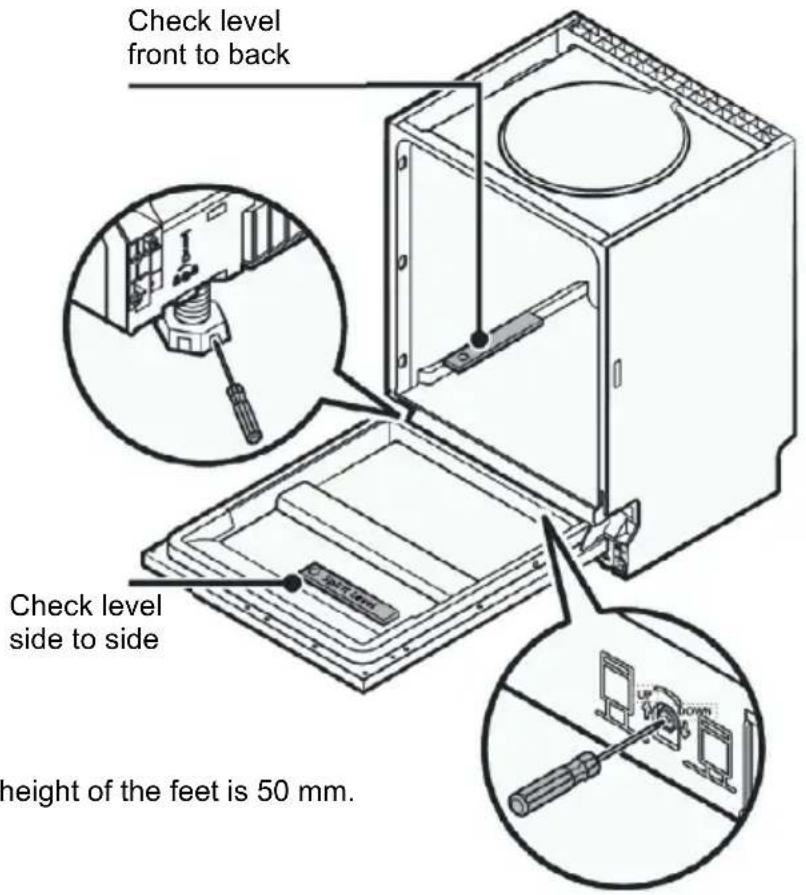

NOTE:
The maximum adjustment height of the feet is 50 mm.
TROUBLESHOOTING TIPS
Before Calling For Service
Reviewing the charts on the following pages may save you from calling for service.
| Problem Possible Causes | What To Do | |
| Dishwasher doesn't start | Fuse blown, or the circuit break tripped. | Replace fuse or reset circuit breaker.Remove any other appliances sharing the same circuit with the dishwasher. |
| Power supply is not turned on. | Make sure the dishwasher is turned on and the door is closed securely.Make sure the power cord is properly plugged into the wall socket. | |
| Water pressure is low Check that the water supply is connected properly and the water is turned on. | ||
| Door of dishwasher not properly closed. | Make sure to close the door properly and latch it. | |
| Water not pumped form dishwasher | Twisted or trapped drain hose. | Check the drain hose. |
| Filter clogged. Check the filter system. | ||
| Kitchen sink clogged. Check the kitchen sink to make sure it is draining well. If the problem is the kitchen sink that is not draining, you may need a plumber rather than a serviceman for dishwashers. | ||
| Foam in the tub Wrong detergent. Use only the special dishwasher | ||
| detergent to avoid suds. If this occurs, open the dishwasher and let suds evaporate. Add 1 liter of cold water to the bottom of the dishwasher.Close the dishwasher door, then select any cycle. Initially, the dishwasher will drain out the water. Open the door after draining stage is complete and check if the suds have disappeared.Repeat if necessary. | ||
| Spilled rinse aid. | Always wipe up rinse aid spills immediately. | |
| Stained tub interior Detergent with colourant may have been used. | Make sure that the detergent has no colourant. | |
| White film on inside surface | Hard water minerals. To clean the interior, use the damp soft cloth with dishwasher detergent and wear rubber gloves. Never use any other cleaner than dishwasher detergent otherwise, it may cause foaming or suds. | |
| There are rust stains on cutlery | The affected items are not corrosion resistant. | Avoid washing items that are not corrosion resistant in the dishwasher. |
| A program was not run after dishwasher salt was added. Traces of salt have gotten into the wash cycle. | Always run a wash program without any crockery after adding salt. Do not select the Turbo function (if present), after adding dishwasher salt. | |
| The lid of the softer is loose. | Check the softener lid is secure. | |
| Knocking noise in the dishwasher | A spray arm is knocking against an item in a basket | Interrupt the program and rearrange the items which are obstructing the spray arm. |
| Rattling noise in the dishwasher | Items of crockery are loose in the dishwasher. | Interrupt the program and rearrange the items of crockery. |
| Knocking noise in the water pipes | This may be caused by on-site installation or the cross-section of the piping. | This has no influence on the dishwasher function. If in doubt, contact a qualified plumber. |
| The dishes are not clean | The dishes were not loaded correctly. | See PART II “Preparing And Loading Dishes”. |
| The program was not powerful enough. | Select a more intensive program. | |
| The dishes are not clean. | Not enough detergent was dispensed. | Use more detergent, or change your detergent. |
| Items are blocking the movement of the spray arms. | Rearrange the items so that the spray can rotate freely. | |
| The filter combination is not clean or is not correctly fitted in the base of wash cabinet.This may cause the spray arm jets to get blocked. | Clean and/or fit the filter correctly. Clean the spray arm jets. | |
| Cloudiness on glassware. | Combination of soft water and too much detergent. | Use less detergent if you have soft water and select a shorter cycle to wash the glassware and to get them clean. |
| White spots appear on dishes and glasses. | Hard water area can cause limescale deposits. | Check water softener settings or fill status of salt container. |
| Black or grey marks on dishes | Aluminium utensils have rubbed against dishes | Use a mild abrasive cleaner to eliminate those marks. |
| Detergent left in dispenser | Dishes block detergent dispenser | Re-loading the dishes properly. |
| The dishes aren't drying | Improper loading Use gloves if detergent residue can be found on dishes to avoid skin irritations. | |
| Dishes are removed too soon | Do not empty your dishwasher immediately after washing. Open the door slightly so that the steam can come out. Take out the dishes until the inside temperature is safe to touch. Unload the lower basket first to prevent the dropping water from the upper basket. | |
| The dishes aren't drying | Wrong program has been selected. | With a short program, the washing temperature is lower, decreasing cleaning performance. Choose a program with a long washing time. |
| Use of cutlery with a low-quality coating. | Water drainage is more difficult with these items. Cutlery or dishes of this type are not suitable for washing in the dishwasher. | |

Warning
Self-repair or non-professional repair may cause serious risks to the safety of the user of the appliance and impact warranty.
Availability Of Spare Parts
- Seven years after placing the last unit of the model on the market:
Motor, circulation and drain pump, heaters and heating elements, including heat pumps (separately or bundled), piping and related equipment including all hoses, valves, filters and aqua stops, structural and interior parts related to door assemblies (separately or bundled), printed circuit boards, electronic displays, pressure switches, thermostats and sensors, software and firmware including reset software.
- Ten years after placing the last unit of the model on the market:
Door hinge and seals, other seals, spray arms, drain filters, interior racks and plastic peripherals such as baskets and lids.
LOADING THE BASKETS
- Loading the dishwasher to its full capacity will contribute to energy and water savings.
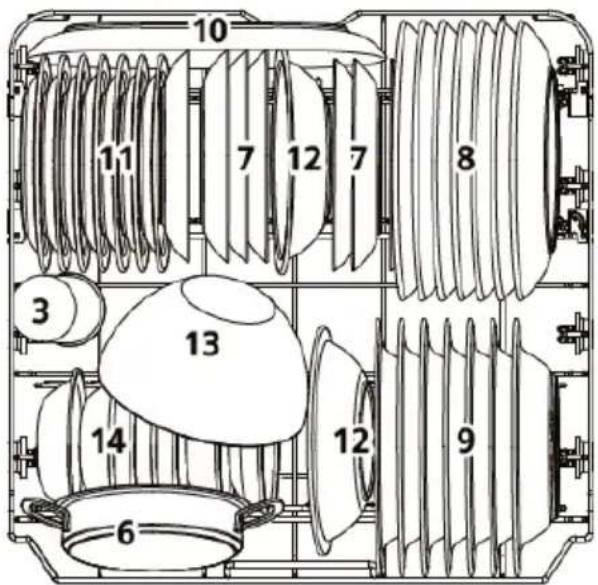
1. Upper basket:
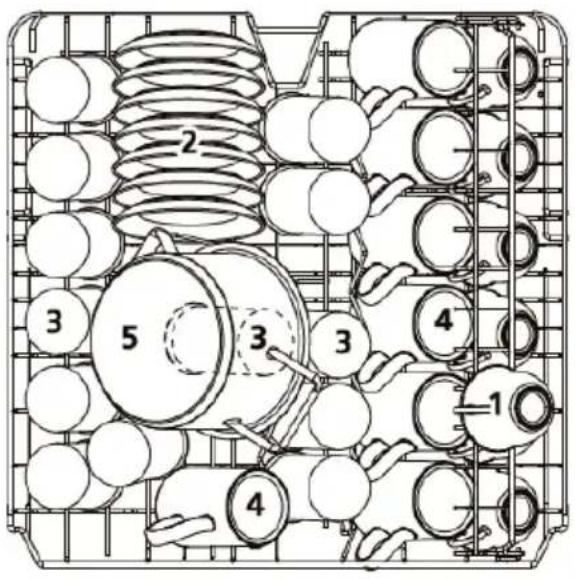
| Number | Item |
| 1 | Cups |
| 2 | Saucers |
| 3 | Glasses |
| 4 | Muggs |
| 5 | Small pot |
2. Lower basket:
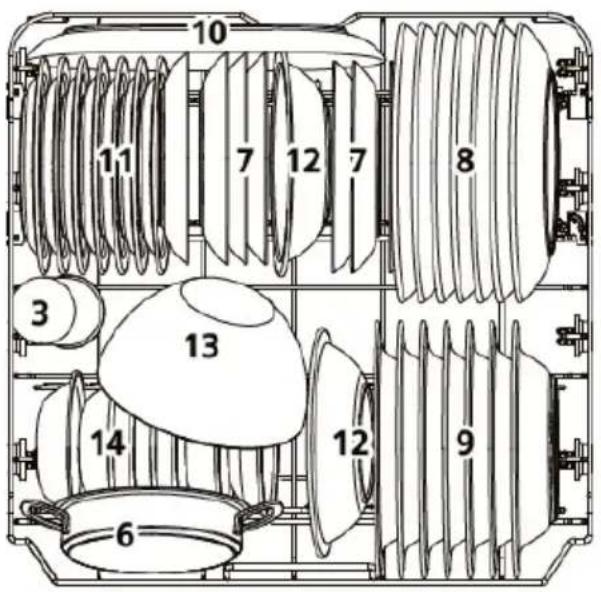
| Number | Item |
| 6 Oven pot | |
| 7 Dessert plates | |
| 8 Dinner plates | |
| 9 Soup plates | |
| 10 Oval platter | |
| 11 Melamine dessert plates | |
| 12 Melamine bowls | |
| 13 Glass bowl | |
| 14 Dessert bowls | |
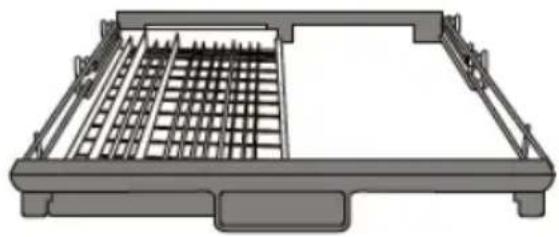
3.Cutlery rack:
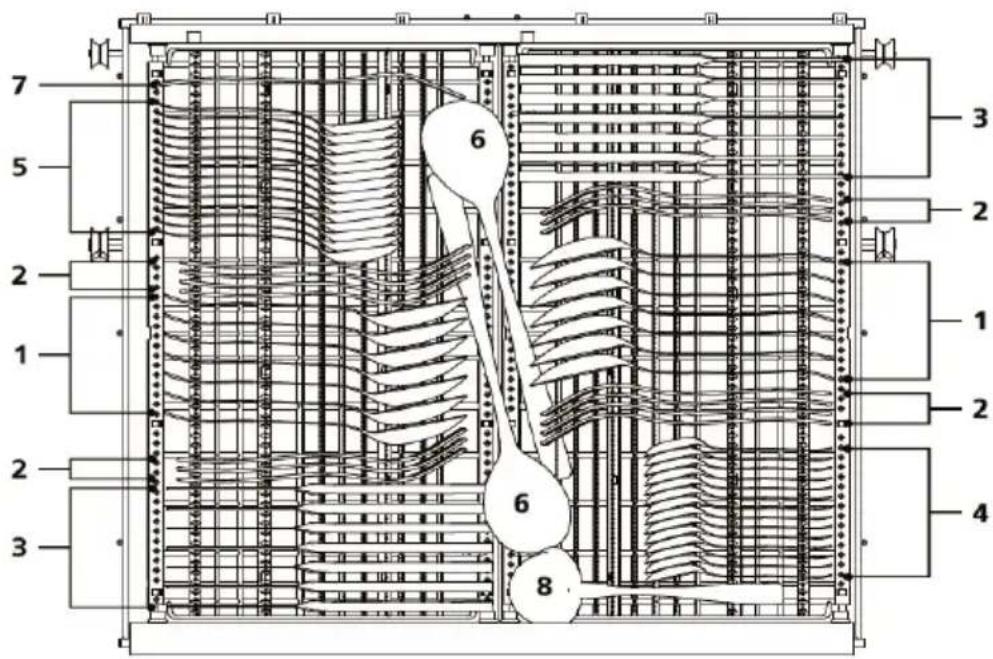

NOTE: Please place the light flat wares on the shelf. The maximum loading weight is 1.5kg.

Information for comparability
tests in accordance with EN60436 Capacity:
14 place settings
Position of the upper basket: lower position
Program: ECO
Rinse aid setting: Max
Softener setting: H3
| Number | Item |
| 1 | Soup spoons |
| 2 | Forks |
| 3 | Knives |
| 4 | Tea spoons |
| 5 | Dessert spoons |
| 6 | Serving spoons |
| 7 | Serving fork |
| 8 | Gravy ladle |
Cutlery Rack used Tips
↓

Disposal, EU Declaration of Conformity
Disposal of electrical and electronic equipment

To protect our environment and to recycle the raw materials used as completely as possible, the consumer is asked to return unserviceable equipment to the public collection system for electrical and electronic.
The symbol of the crossed indicates that this product must be returned to the collection point for electronic waste to feed it by recycling the best possible raw material recycling.
By ensuring this product you will prevent possible negative effects on the environment and human health, which could otherwise be caused due to improper disposal of that product. The recycling of materials from this product, you will help to preserve a healthy environment and natural resources.
For detailed information about the collection of EE products contact M SAN Grupa dd or the dealer where you purchased the product.
EU Declaraton of Conformity
This device is manufactured in accordance with the applicable European standards and in accordance with all applicable Directives and Regulations.
EU declaration of conformity can be downloaded from the following link: www.msan.hr/dokumentacijaartikala

Product information sheet
Product Information sheet data entered into the EPREL database For more info and Product Information sheet, please scan QR code or visit Vivax web site: www.vivax.hr

Contents Part II
■ USING YOUR DISHWASHER
Control Panel
Water Softener
Preparing And Loading Dishes
Function Of The Rinse Aid And Detergent
Filling The Rinse Aid Reservoir
Filling The Detergent Dispenser
■ PROGRAMMING THE DISHWASHER
Wash Cycle Table
Starting A Cycle Wash
Changing The Program Mid-cycle
Forget To Add A Dish?
ERROR CODES
■ TECHNICAL INFORMATION

NOTE:
- If you cannot solve the problems by yourself, please ask for help from a professional technician.
- The manufacturer, following a policy of constant development and updating of the product, may make modifications without giving prior notice.
- If lost or out-of-date, you can receive a new user manual from the manufacturer or responsible vendor.
QUICK USER GUIDE
Please read the corresponding content on the instruction manual for detailed operating method.
1 Install the dishwasher
(Please check the section 5 "INSTALLATION INSTRUCTION" of PART I: Generic Version.)

2 Removing the larger residue on the cutlery
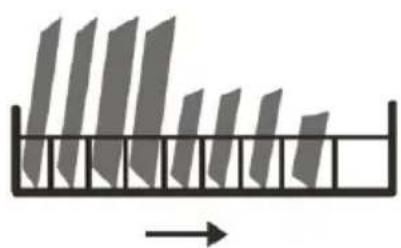
3 Loading the baskets
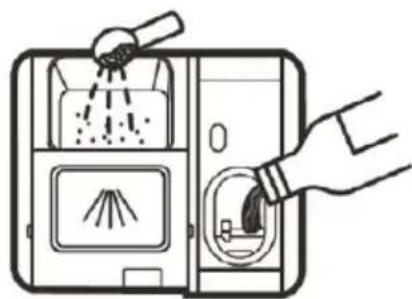
4 Filling the dispenser Selecting a program and 5unning the dishwasher

USING YOUR DISHWASHER
Control Panel

Operation (Button)
| 1. Power | Press this button to turn on your dishwasher |
| 2. Program | Press this button to select the appropriate washing program, the program indicator will be lit |
| 3. Delay | Press the button to increase the delay start time. Delay a cycle for up to 24 hours in one-hour increments. |
| 4. Alt | Press the button to select either upper basket or lower basket loaded, and the corresponding indicator will light up. |
| 5. Function | Press the button to select a function, corresponding indicator will be lit. |
| 6. Screen | To show the remaining program time and delay time, error code etc. |
| 7. Program indicator |  AUTOAuto sensing wash, lightly, normally or heavily soiled crockery, with or with out dried-on food. AUTOAuto sensing wash, lightly, normally or heavily soiled crockery, with or with out dried-on food. INTENSIVEFor the heaviest soiled crockery, and normally soiled pots, pans, dishes etc. With dried-on food. INTENSIVEFor the heaviest soiled crockery, and normally soiled pots, pans, dishes etc. With dried-on food. UNIVERSALFor normally soiled loads, such as pots, plates, glasses and lightly soiled pans.ECO ECOThis is standard program, it is suitable to clean normally soiled tableware and it is the most efficient program in terms of its combined energy and water consumption for that type of tableware. UNIVERSALFor normally soiled loads, such as pots, plates, glasses and lightly soiled pans.ECO ECOThis is standard program, it is suitable to clean normally soiled tableware and it is the most efficient program in terms of its combined energy and water consumption for that type of tableware. GLASSFor lightly soiled crockery and glass.[90 MIN] For normally soiled loads that need quick wash. GLASSFor lightly soiled crockery and glass.[90 MIN] For normally soiled loads that need quick wash. RAPIDA shorter wash for lightly soiled loads that do not need drying. RAPIDA shorter wash for lightly soiled loads that do not need drying. |
| 8. Alt indicator |  Upper basketWhen you select Upper basket, only the dishes in the upper rack will be washed. The spray system of the lower basket will not operate. Upper basketWhen you select Upper basket, only the dishes in the upper rack will be washed. The spray system of the lower basket will not operate. Lower basketWhen you select Lower basket, only the dishes in the Lower rack will be washed. The spray system of the upper basket will not operate. Lower basketWhen you select Lower basket, only the dishes in the Lower rack will be washed. The spray system of the upper basket will not operate. |
| 9. Function indicator |  Extra cleaningTo wash very dirty, hard to clean dishes. ( It can only be used with Intensive, Universal, ECO, Glass, 90 min )Extra dryingFor better drying result. ( It can only be used with Intensive, Universal, ECO, Glass, 90 min ) Extra cleaningTo wash very dirty, hard to clean dishes. ( It can only be used with Intensive, Universal, ECO, Glass, 90 min )Extra dryingFor better drying result. ( It can only be used with Intensive, Universal, ECO, Glass, 90 min ) |
| 10. Warning indicator | Rinse AidIf the “Indicator is lit, it means the dishwasher is lowWarning on dishwasher rinse aid and requires a refill.SaltIf the “Indicator is lit, it means the dishwasher is low on dishwasher salt and needs to be refilled. |
Water Softener
The water softener must be set manually, using the water hardness dial.
The water softener is designed to remove minerals and salts from the water, which would have a detrimental or adverse effect on the operation of the appliance. The more minerals there are, the harder your water is.
The softener should be adjusted according to the hardness of the water in your area. Your local Water Authority can advise you on the hardness of the water in your area.
Adjusting salt consumption
The dishwasher is designed to allow for adjustment in the amount of salt consumed based on the hardness of the water used. This is intended to optimise and customise the level of salt consumption.
Please follow the steps below for adjustment in salt consumption.
- Open the door and Switch on the appliance;
- Press the Program button for more than 5 seconds to start the water softener set model within 60 seconds after the appliance was switched on;
- Press the Program button to select the proper set according to your local environment, the sets will change in the following sequence: H1->H2->H3->H4->H5->H6;
- Press the Power button to end the set up model.
| WATER HARDNESS | Water softener level | Salt consumption (gram/cycle) | |||
| German dH | French fH | British Clarke | Mmol/l | ||
| 0 - 5 0 - 9 | 0 - 6 0 - 0.94 H | 1->Rapid light bright 0 | |||
| 6 - 11 | 10 - 20 | 7 - 14 | 1.0 - 2.0 | H2->90 mins light bright | 9 |
| 12 - 17 | 21 - 30 | 15 - 21 | 2.1 - 3.0 | H3->Rapid, 90 mins light bright | 12 |
| 18 - 22 | 31 - 40 | 22 - 28 | 3.1 - 4.0 | H4->ECO light bright | 20 |
| 23 - 34 | 41 - 60 | 29 - 42 | 4.1 - 6.0 | H5->ECO, Rapid light bright | 30 |
| 35 - 55 | 61 - 98 | 43 - 69 | 6.1 - 9.8 | H6->ECO, 90 mins light bright | 60 |
1°dH = 1.25°Clarke = 1.78°fH = 0.178mmol / l
The manufactory setting: H3
Contact your local water board for information on the hardness of your water supply.

Please check the section 3 “Loading The Salt Into The Softener” of PART of PART I: I: Generic Version, If your dishwasher lacks salt.

NOTE: If your model does not have any water softener, you may skip this section. Water SoftenerThe hardness of the water varies from place to place. If hard water is used in the dishwasher, deposits will form on the dishes and utensils. The appliance is equipped with a special softener that uses a salt container specifically designed to eliminate lime and minerals from the water.
Preparing And Loading Dishes
Consider buying utensils which are identified as dishwasher-proof.
For particular items, select a program with the lowest possible temperature. To prevent damage, do not take glass and cutlery out of the dishwasher immediately after the program has ended.
For washing the following cutlery/dishes
Are not suitable
- Cutlery with wooden, horn china or mother-of-pearl handles Plastic items that are not heat resistant
- Older cutlery with glued parts that are not temperature resistant Bonded cutlery items or dishes
- Pewter or cooper items Crystal glass
• Steel items subject to rusting Wooden platters - Items made from synthetic fibres
Are of limited suitability
• Some types of glasses can become dull after a large number of washes
• Silver and aluminum parts have a tendency to discolor during washing
- Glazed patterns may fade if machine washed frequently
Recommendations for loading the dishwasher
Scrape off any large amounts of leftover food. Soften remnants of burnt food in pans. It is not necessary to rinse the dishes under running water.
For best performance of the dishwasher, follow these loading guidelines.
(Features and appearance of baskets and cutlery baskets may vary from your model.)
Place objects in the dishwasher in following way:
Scrape off any large amounts of leftover food. Soften remnants of burnt food in pans. It is not necessary to rinse the dishes under running water.
- For best performance of the dishwasher, follow these loading guidelines. (Features and appearance of baskets and cutlery baskets may vary from your model.)
- Place objects in the dishwasher in following way:
- Items such as cups, glasses, pots/pans, etc. are faced downwards.
- Curved items, or ones with recesses, should be loaded aslant so that water can run off.
- All utensils are stacked securely and can not tip over.
- All utensils are placed in the way that the spray arms can rotate freely during washing.
- Load hollow items such as cups, glasses, pans etc. With the opening facing downwards so that water cannot collect in the container or a deep base.
- Dishes and items of cutlery must not lie inside one another, or cover each other. To avoid damage, glasses should not touch one another.
- The upper basket is designed to hold more delicate and lighter dishware such as glasses, coffee and tea cups.
- Long bladed knives stored in an upright position are a potential hazard!
- Long and / or sharp items of cutlery such as carving knives must be positioned horizontally in the upper basket.
- Please do not overload your dishwasher. This is important for good results and for reasonable consumption of energy.

*NOTE: Very small items should not be washed in the dishwasher as they could easily fall out of the basket.
Removing the dishes
To prevent water dripping from the upper basket into the lower basket, ecommend that you empty the lower basket first, followed by the upper basket.

Warning

Items will be hot! To prevent damage, do not take glass and cutlery out of the dishwasher for around 15 minutes after the program has ended.
Loading the upper basket
The upper basket is designed to hold more delicate and lighter dishware such as glasses, coffee and tea cups
and saucers, as well as plates, small bowls and shallow pans (as long as they are not too dirty). Position the
dishes and cookware so that they will not get moved by the spray of water.

Loading the lower basket
We suggest that you place large items and the most
difficult to clean items are to be placed into the lower basket: such as pots, pans, lids, serving dishes and bowls,
as shown in the figure below. It is preferable to place serving dishes and lids on the side of the racks in order to

avoid blocking the rotation of the top spray arm.
The maximum diameter advised for plates in front of the detergent dispenser is of 19 cm, this not to hamper the opening of it.
Loading the cutlery basket
Cutlery should be placed in the cutlery rack separately from each other in the appropriate positions, and do make sure the utensils do not nest together, this may cause bad performance.

Warning

Do not let any item extend through the bottom.
Always load sharp utensils with the sharp point down!

For the best washing effect, please load the baskets refer to standard loading options on last section of PART loading options on last section of PART I : I : Generic VersionGeneric Version
Function Of The Rinse Aid And Detergent
The rinse aid is released during the final rinse to prevent water from forming droplets on your dishes, which can leave spots and streaks. It also improves drying by allowing water to roll off the dishes. Your dishwasher is designed to use liquid rinse aids.

Warning
Only use branded rinse aid for dishwasher. Never fill the rinse aid dispenser with any other substances (e.g. Dishwasher cleaning agent, liquid detergent). This would damage the appliance.
When to refill the rinse aid
When to refill the rinse aid
The regularity of the dispenser needing to be refilled depends on how often dishes are washed and the rinse aid setting used.
- The Low Rinse Aid indicator (※) will be lit when more rinse aid is needed.
- Do not overfill the rinse aid dispenser.
Function of detergent
The chemical ingredients that compose the detergent are necessary to remove, crush and dispense all dirt out of the dishwasher. Most of the commercial quality detergents are suitable for this purpose.

Warning
• Proper Use of Detergent
Use only detergent specifically made for dishwashers use. Keep your detergent fresh and dry.
Don't put powdered detergent into the dispenser until you are ready to wash dishes.

Dishwasher detergent is corrosive! Keep dishwasher detergent out of the reach of children.
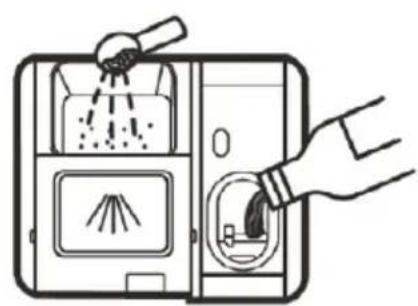
Filling The Rinse Aid Reservoir

1 Remove the rinse reservoir cap by lifting up the handle.

Pour the rinse aid into the dispenser, being careful not to overfill.

3 Close the cap after all.
Adjusting the rinse aid reservoir
To achieve a better drying performance with limited rinse aid, the dishwasher is designed to adjust the consumption by user. Follow the below steps.
- Open the door and switch on the appliance.
- Within 60 seconds after step 1, press the Program button more than 5 seconds, and then press the half-load button to enter the set model, the rinse aid indication blinks as 1Hz frequency.
- Press the Program button to select the proper set according to your using habits, the sets will change in the following sequence: D1->D2->D3->D4->D5->D1. The higher the number, the more rinse aid the dishwasher uses.
- Press the Power button to end the set up model.
Filling The Detergent Dispanser
![graph TD A["Step 1: Lighting"] --> B["Step 2: Ventilation"] B --> C["Step 3: Air Conditioning"] C --> D["End"]](/content/2026/05/1043095/images/f85162dc5a543b483db63b4adabdf9d03af2d7f536771249052b48e414ea9f90.jpg)
1 Please choose an open way according to the actual situation.
- Open the cap by sliding the release catch.
- Open the cap by pressing down the release catch.

2 Add detergent into the larger cavity (A) for the main wash cycle.
For better cleaning result, especially if you have very dirt items, pour a small amount of detergent onto the door. The additional detergent will activate during the pre-wash phase.

3 Close the flap by sliding it to the front and then pressing it down.
PROGRAMMING THE DISHWASHER
Wash Cycle Table
The table below shows which programs are best for the levels of food residue on them and how much detergent is needed. It also show various information about the programs.
(●)Means: Need to fill rinse into the Rinse-Aid Dispenser.
| Program | Description Of Cycle | Detergent Pre/Main | Running Time(min) | Energy (kWh) | Water (L) | Rinse Aid |
Auto  | Pre-wash(45°C)Wash(55-65°C)RinseAuto Rinse(65°C)Drying | 4/18g(2 tabs) | 85-150 | 0.921 – 1,302 | 10,0-15,0 | ● |
Intensive  | Pre-wash(50°C)Wash(65°C)RinseRinseRinse(65°C)Drying | 4/18g(2 tabs) | 205 1.579 | 18,0 | ● | |
Universal  | Pre-wash(45°C)Wash(55°C)RinseRinse(65°C)Drying | 4/18g(2 tabs) | 175 1,268 | 13,8 | ● | |
 (*EN60436) (*EN60436) | Wash(45°C)RinseRinse(60°C)Drying | 22g(1 tab) | 230 0,951 | 10,0 | ● | |
Glass  | PrewashWash(50°C)RinseRinse(65°C)Drying | 4/18g(2 tabs) | 120 1,094 | 14,1 | ● | |
90 mins  | Wash(60°C)RinseRinse(65°C)Drying | 22g(2 tabs) | 90 1,079 | 11,7 | ● | |
Rapid  | Wash(45°C)RinseRinse(45°C) | 20g(1 tab) | 30 0,731 | 11,2 | ○ |

NOTE:
ECO program is suitable to clean normally soiled tableware, that for this use, it is the most efficient program in terms of its combined energy and water consumption, and it is used to assess compliance with the EU ecodesign legislation.
Saving Energy
- Pre-rinsing of tableware items leads to increased water and energy consumption and is not recommended.
- Washing tableware in a household dishwasher usually consumes less energy and water in the use phase than hand dishwashing when the household dishwasher is used according to the instructions.
Starting A Cycle Wash
- Draw out the lower and upper basket, load the dishes and push them back. It is commended to load the lower basket first, then the upper one.
- Pour in the detergent.
- Insert the plug into the socket. The power supply refer to last page "Product fiche". Make sure that the water supply is turned on to full pressure.
- Open the door, Press the Power button.
- Choose a program, the response light will turn on. Then close the door, the dishwasher will start its cycle.
Changing The Program Mid-cycle
A program can only be changed if it has been running only for a short period of time, otherwise the detergent may have already been released or the wash water with detergent has already been drained. If this is the case, the dishwasher needs to be reset and the detergent dispenser must be refilled. To reset the dishwasher, follow the instructions below:
- Open the door a little to stop the dishwasher, after the spray arm stopped working, you can open the door completely.
- Press Program button more than three seconds the machine will be in program selection mode.
- You can change the program to the desired cycle setting.
![graph LR A["Container"] -->|3 sec| B["Finger Icon"] B --> C["ECO"]](/content/2026/05/1043095/images/fce4b13bb9379292fc6f6a4d1b3ed4e755e9ecbfe140e9fa6ec85e15e3827209.jpg)
Forget To Add a Dish?
A forgotten dish can be added any time before the detergent dispenser opens. If this is the case, follow the instructions below:
- Open the door a little to stop the washing.
- After the spray arms stopped working, you can open the door completely.
- Add the forgotten dishes.
- Close the door, the dishwasher will continued to run after 10 seconds.

It is dangerous to open the door mid-cycle, as hot steam may scald you.
ERROR CODES
If there is a malfunction, the dishwasher will display error codes to identify these:
| Codes Meanings | Possible Causes | |
| E1 Longer inlet time. | Faucets is not opened, or water intake is restricted,or water pressure is too low. | |
| E3 | Not reaching required temperature. | Malfunction of heating element |
| E4 Overflow. | Some element of dishwasher leaks . | |
| Ed | Failure of communication between main PCB with display PCB. | Open circuit or break wiring for the communication. |

Warning
If overflow occurs, turn off the main water supply before calling a service.
If there is water in the base pan because of an overfill or small leak, the water should be removed before restarting the dishwasher.
TECHNICAL INFORMATION

| Height (H) | 815mm |
| Width (W) | 595mm |
| Depth (D1) | 550mm (with the door closed) |
| Depth (D2) | 1150mm (with the door opened 90°) |
JAMSTVENI LIST
VIVAX
HR
MODEL UREĐAJA
SERIJSKI BROJ
DATUM PRODAJE
BROJ RAČUNA PRODAVATELJA
POTPIS I PEČAT PRODAVATELJA
POTPIS I PEČAT PRODAVATELJA
GARANCIJSKA IZJAVA
-
Ovom garancijom garantira proizvođač proizvoda, preko KIM TEC d.o.o., kao uvoznika i davatelja garancije u Bosni i Hercegovini besplatan popravak istog u skladu s važećim propisima i u skladu s uvjetima opisanim u ovom garantnom listu. Ovom garancijom garantiramo da će predmet ove garancije raditi bez greške uzrokovane eventualnom lošom izradom i lošim materijalom izrade. Svi eventualno nastali kvarovi biti će besplatno otklonjeni u ovlaštenom servisu u garantnom roku.
-
UVJETI GARANCIJE: Garantni rok počinje teći od dana kupnje proizvoda i traje:
| 60 MJESECI (5 godina) | HLADNJACI,VERTIKALNE I HORIZONTALNE ŠKRINJE |
| 36 MJESECI (3 godine) | ŠTEDNJACI, PERILICE I SUŠILICE RUBLJA, PERILICESUĐA, KUHINJSKE NAPE, UGRADBENE PEĆNICE IPLOČE, GRIJALICE VODE |
- U slučaju kvara na proizvodu koji je predmet ove garancije, obavezujemo se da ćemo isti popraviti u najkraćem mogućem roku, a najkasnije u roku od 45 dana. Ako se proizvod ne može popraviti ili se ne popravi u roku od 45 dana, biti će zamijenjen novim.
- Garancija se priznaje samo uz račun o kupnji, te uz ovaj garantni list koji mora biti ispravno popunjen odnosno mora sadržavati datum prodaje, pečat i potpis prodavatelja.
- Davalac garancije osigurava servis i rezervne dijelove 7 godina od datuma kupnje.
GARANCIJA NE OBUHVAĆA:


- NAPOMENA
- PREKLAPANJE POLICA ZA ŠALICE
- PRKLAPANJE STALAŽA
- ODRŽAVANJE I ČIŠĆENJE
- VANJSKO ODRŽAVANJE
- VRATA I BRTVA VRATA
- KONTROLNA PLOČA
- UPOZORENJE
- PRSKALICE
- OPASNOST OD ELEKTRIČNOG UDARA
- KORAK 2. DIMENZIJA I INSTALACIJA PREDNJE UKRASNE PLOČE
- POLU UGRADBENI MODEL
- KORAK 4. KORACI ZA INSTALACIJU PERILICE POSUĐA
- ODLAGANJE, EU DEKLARACIJA O SUKLADNOSTI
- DIO II
- KORIŠTENJE PERILICE POSUĐA
- 1 INSTALIRANJE PERILICE POSUĐA
- UPOTREBA PERILICE POSUĐA
- OMEKŠIVAČ VODE
- PUNJENJE DONJE KOŠARE
- PUNJENJE KOŠARE ZA PRIBOR
- PROGRAMIRANJE PERILICE POSUĐA
- TABLICA CIKLUSA PRANJA
- STAVLJANJE SOLI U KORPA
- NAČIN 2
- SKLAPANJE STALAŽA
- ODRŽAVANJE MAŠINE ZA PRANJE SUDOVA
- MERE PROTIV MRAZA
- NAKON SVAKOG PRANJA
- ODSTRANITE UTIKAČ
- OPASNOST OD STRUJNOG UDARA
- KORAK 3. PODEŠAVANJE ZATEGNUTOSTI OPRUGE VRATA
- KORAK 4. KORACI ZA INSTALACIJU MAŠINE ZA PRANJE SUDOVA
- KORAK 5. PORAVNAVANJE MAŠINE ZA PRANJE SUDOVA
- SAVETI ZA REŠAVANJE PROBLEMA
- GORNJA KORPA
- ODLAGANJE U OTPAD STARE ELEKTRIČNE I ELEKTRONSKE OPREME
- SADRŽAJ DEO II
- KORIŠĆENJE MAŠINE ZA PRANJE SUDOVA
- 1
- 2
- 3
- 4
- 5
- UPOTREBA MAŠINE ZA PRANJE SUDOVA
- KONTROLNI PANEL
- PUNJENJE DONJE KORPE
- PUNJENJE KORPE ZA PRIBOR
- PODEŠAVANJE KOLIČINE UPOTREBE SREDSTVA ZA SJAJ
- PUNJENJE REZERVOARA ZA DETERDŽENT
- PROGRAMIRANJE MAŠINE ZA PRANJE SUDOVA
- ZABORAVILI STE NEŠTO DA DODATE
- KODOVI GREŠAKA
- СОДРЖИНА ДЕЛ II
- КОРИСТЕЊЕ НА МАШИНАТА ЗА МИЕЊЕ НА САДОВИ
- DËMET E GODITJES/ SHOKUT ELEKTRIK
- 2.SHPORTA E POSHTME
- PËRMBAJTJA PJESA II
- PËRDORIMI I ENËLARËSES SUAJ
- WARNING
- FORGET TO ADD A DISH
- UPORABA PRALNEGA STROJA
- SESTAVLJANJE POLIC ZA SKODELICE
- SESTAVLJANJE POLIC
- OPOZORILO
- NEVARNOST ZARADI ELEKTROŠOKA
- SAMOSTOJEČA NAMESTITEV
- NAMESTITEV MED OBSTOJEČE OMARICE
- POD OBSTOJEČIM PULTOM
- VSEBINA II. DEL
- UPORABA POMIVALNEGA STROJA
- POLNJENJE SPODNJE KOŠARE
- POLNJENJE KOŠARE ZA PRIBOR
- PROGRAMIRANJE POMIVALNEGA STROJA
- TABELA CIKLOV PRANJA
- DEAR CUSTOMER
- SAFETY INFORMATION
- MEANING OF SAFETY WARNING SYMBOLS
- THE ELECTRIC SHOCK
- EARTHING INSTRUCTIONS
- PRODUCT OVERVIEW
- IMPORTANT
- USING YOUR DISHWASHER
- BEFORE USING YOUR DISHWASHER
- LOADING THE SALT INTO THE SOFTENER
- PLEASE FOLLOW THE STEPS BELOW FOR ADDING DISHWASHER SALT
- BASKET LOADING TIPS
- TYPE 1
- TYPE 2
- FOLDING BACK THE CUP SHELVES
- FOLDING BACK THE RACK SHELVES
- MAINTENANCE AND CLEANING
- EXTERNAL CARE
- THE DOOR AND THE DOOR SEAL
- THE CONTROL PANEL
- INTERNAL CARE
- FILTERING SYSTEM
- SPRAY ARMS
- CARING FOR THE DISHWASHER
- FROST PRECAUTION
- AFTER EVERY WASH
- REMOVE THE PLUG
- NO SOLVENTS OR ABRASIVE CLEANING
- WHEN NOT IN USE FOR A LONG TIME
- MOVING THE APPLIANCE
- SEALS
- INSTALLATION INSTRUCTION
- ELECTRICAL SHOCK HAZARD
- ATTENTION
- ABOUT POWER CONNECTION
- ELECTRICAL REQUIREMENTS
- ELECTRICAL CONNECTION
- WATER SUPPLY AND DRAIN
- COLD WATER CONNECTION
- ABOUT THE SAFETY SUPPLY HOSE
- HOW TO CONNECT THE SAFETY SUPPLY HOSE
- HOW TO DISCONNECT THE SAFETY SUPPLY HOSE
- CONNECTION OF DRAIN HOSES
- HOW TO DRAIN EXCESS WATER FROM HOSES
- WATER OUTLET
- EXTENSION HOSE
- SYPHON CONNECTION
- POSITIONING THE APPLIANCE
- LEVELLING THE APPLIANCE
- FREE STANDING INSTALLATION
- FITTING BETWEEN EXISTING CARBINETS
- UNDERNEATH EXISTING WORK TOP
- BUILT-IN INSTALLATION (FOR THE INTEGRATED MODELS)
- STEP 1. SELECTING THE BEST LOCATION FOR THE DISHWASHER
- STEP 2. AESTHETIC PANEL'S DIMENSIONS AND INSTALLATION
- SEMI-INTEGRATED MODEL
- FULLY-INTEGRATED MODEL
- STEP 3. TENSION ADJUSTMENT OF THE DOOR SPRING
- STEP 4. DISHWASHER INSTALLATION STEPS
- STEP 5. LEVELLING THE DISHWASHER
- TROUBLESHOOTING TIPS
- BEFORE CALLING FOR SERVICE
- AVAILABILITY OF SPARE PARTS
- LOADING THE BASKETS
- UPPER BASKET
- LOWER BASKET
- 3.CUTLERY RACK
- CUTLERY RACK USED TIPS
- DISPOSAL, EU DECLARATION OF CONFORMITY
- DISPOSAL OF ELECTRICAL AND ELECTRONIC EQUIPMENT
- EU DECLARATON OF CONFORMITY
- PRODUCT INFORMATION SHEET
- CONTENTS PART II
- PROGRAMMING THE DISHWASHER
- ERROR CODES
- TECHNICAL INFORMATION
- NOTE
- QUICK USER GUIDE
- 1 INSTALL THE DISHWASHER
- CONTROL PANEL
- OPERATION (BUTTON)
- WATER SOFTENER
- ADJUSTING SALT CONSUMPTION
- PREPARING AND LOADING DISHES
- FOR WASHING THE FOLLOWING CUTLERY/DISHES
- ARE NOT SUITABLE
- ARE OF LIMITED SUITABILITY
- RECOMMENDATIONS FOR LOADING THE DISHWASHER
- REMOVING THE DISHES
- LOADING THE UPPER BASKET
- LOADING THE LOWER BASKET
- LOADING THE CUTLERY BASKET
- FUNCTION OF THE RINSE AID AND DETERGENT
- WHEN TO REFILL THE RINSE AID
- FUNCTION OF DETERGENT
- FILLING THE RINSE AID RESERVOIR
- ADJUSTING THE RINSE AID RESERVOIR
- FILLING THE DETERGENT DISPANSER
- WASH CYCLE TABLE
- SAVING ENERGY
- STARTING A CYCLE WASH
- CHANGING THE PROGRAM MID-CYCLE
- JAMSTVENI LIST
- VIVAX
- MODEL UREĐAJA
- SERIJSKI BROJ
- DATUM PRODAJE
- BROJ RAČUNA PRODAVATELJA
- POTPIS I PEČAT PRODAVATELJA
- GARANCIJSKA IZJAVA
- GARANCIJA NE OBUHVAĆA
Brand : Vivax
Model : DWB-601473B
Category : Washing machine