
DH40SC - Rotary hammer HiKOKI - Free user manual and instructions
Find the device manual for free DH40SC HiKOKI in PDF.


| Product Type | Rotary Hammer |
| Brand | HiKOKI |
| Model | DH40SC |
| Power Input | 1050 W |
| No-Load Speed | 0 – 400 min⁻¹ |
| Impact Energy (EPTA) | 8.0 J |
| Bit Shank | SDS-Max |
| Drilling Capacity (Concrete) | 40 mm (1-9/16 in) |
| Drilling Capacity (Steel) | 13 mm (1/2 in) |
| Drilling Capacity (Wood) | 32 mm (1-1/4 in) |
| Weight (without cord) | 8.5 kg (18.7 lbs) |
| Overall Length | 490 mm (19-5/16 in) |
| Power Supply | Corded, 120 V or 230 V (depending on region) |
| Vibration Control | Built-in anti-vibration system |
| Safety Clutch | Yes, torque limiting clutch |
| Variable Speed | Yes, with speed dial |
| Reversing | Yes, forward/reverse switch |
| Service and Maintenance | Regular cleaning and lubrication recommended; refer to manual for details |
| Spare Parts Availability | Available through authorized HiKOKI service centers |
| Included Accessories | Side handle, depth stop, grease, carrying case (may vary) |
Frequently Asked Questions - DH40SC HiKOKI
User questions about DH40SC HiKOKI
0 question about this device. Answer the ones you know or ask your own.
Ask a new question about this device
Download the instructions for your Rotary hammer in PDF format for free! Find your manual DH40SC - HiKOKI and take your electronic device back in hand. On this page are published all the documents necessary for the use of your device. DH40SC by HiKOKI.
USER MANUAL DH40SC HiKOKI
natural_image
Line drawing of a mechanical drill bit with threaded shaft and handle, enclosed in a circular frame (no text or symbols)保留备用
Keep for future reference

natural_image
Technical line drawing of a twist drill bit (no text or symbols)● 钻头(六角柄)
| 外径 | 总长 | |||
| 280 mm 400 mm 505 mm 550 mm | ||||
| 代码号 代码号 代码号 代码号 | ||||
| 16 mm 98 | 5721 985720 985722 991330 | |||
| 18 mm -- | -991331 | |||
| 19 mm 98 | 5724 985723 985725 991332 | |||
| 20 mm -- | -991333 | |||
| 22 mm 98 | 5727 985726 985728 991335 | |||
| 25 mm 98 | 5730 985729 985731 991336 | |||
| 28 mm 98 | 5733 985732 985734 991337 | |||
| 30 mm -- | -991338 | |||
| 32 mm 98 | 5736 985735 985737 991339 | |||
| 35 mm -- | -991340 | |||
| 38 mm 98 | 5739 985738 985740 991341 | |||
| 40 mm 31 | 3322--- | |||
2. 锚栓孔钻(旋钻+锤击)

+

● 钻头(锥柄)
锥柄转接器
natural_image
Line drawing of a hand using a drill bit with a screwdriver (no text or symbols)图 4
natural_image
Line drawing of a hand operating a drill bit with a tool, no text or symbols present图 5
natural_image
Line drawing of a hand operating a mechanical tool with a screwdriver inserted (no text or symbols)图7
- 锚栓附加器的使用方法
natural_image
Diagram of a mechanical or fluidic device with a tool interacting with a submerged object, showing motion arrows (no text or symbols)图 11
- 如何使用钻头(锥柄)和锥柄转接器
natural_image
Illustration of a hand using a drill bit to drive a mechanical component (no text or symbols)图 17

图 18
更换润滑油
中文
ROTARY HAMMER SAFETY WARNINGS ....20
ADDITIONAL SAFETY WARNINGS 21
SYMBOLS 21
SPECIFICATIONS....22
STANDARD ACCESSORIES 22
OPTIONAL ACCESSORIES (sold separately)....23
APPLICATIONS....25
GREASE REPLACEMENT ....30
MAINTENANCE AND INSPECTION 30
SERVICE PARTS LIST 32
GENERAL POWER TOOL SAFETY WARNINGS

WARNING
Read all safety warnings and all instructions.
Failure to follow the warnings and instructions may result in electric shock, fire and/or serious injury.
Save all warnings and instructions for future reference.
The term “power tool” in the warnings refers to your mains-operated (corded) power tool or battery-operated (cordless) power tool.
1) Work area safety
a) Keep work area clean and well lit.
Cluttered or dark areas invite accidents.
b) Do not operate power tools in explosive atmospheres, such as in the presence of fl ammable liquids, gases or dust.
Power tools create sparks which may ignite the dust or fumes.
c) Keep children and bystanders away while operating a power tool.
Distractions can cause you to lose control.
2) Electrical safety
a) Power tool plugs must match the outlet.
Never modify the plug in any way.
Do not use any adapter plugs with earthed (grounded) power tools.
Unmodified plugs and matching outlets will reduce risk of electric shock.
b) Avoid body contact with earthed or grounded surfaces, such as pipes, radiators, ranges and refrigerators.
There is an increased risk of electric shock if your body is earthed or grounded.
c) Do not expose power tools to rain or wet conditions.
Water entering a power tool will increase the risk of electric shock.
d) Do not abuse the cord. Never use the cord for carrying, pulling or unplugging the power tool.
Keep cord away from heat, oil, sharp edges or moving parts.
Damaged or entangled cords increase the risk of electric shock.
e) When operating a power tool outdoors, use an extension cord suitable for outdoor use.
Use of a cord suitable for outdoor use reduces the risk of electric shock.
f) If operating a power tool in a damp location is unavoidable, use a residual current device (RCD) protected supply.
Use of an RCD reduces the risk of electric shock.
3) Personal safety
a) Stay alert, watch what you are doing and use common sense when operating a power tool.
Do not use a power tool while you are tired or under the influence of drugs, alcohol or medication.
A moment of inattention while operating power tools may result in serious personal injury.
b) Use personal protective equipment. Always wear eye protection.
Protective equipment such as dust mask, non-skid safety shoes, hard hat, or hearing protection used for appropriate conditions will reduce personal injuries.
c) Prevent unintentional starting. Ensure the switch is in the off position before connecting to power source and/or battery pack, picking up or carrying the tool.
Carrying power tools with your finger on the switch or energising power tools that have the switch on invites accidents.
d) Remove any adjusting key or wrench before turning the power tool on.
A wrench or a key left attached to a rotating part of the power tool may result in personal injury.
e) Do not overreach. Keep proper footing and balance at all times.
This enables better control of the power tool in unexpected situations.
f) Dress properly. Do not wear loose clothing or jewellery. Keep your hair, clothing and gloves away from moving parts.
Loose clothes, jewellery or long hair can be caught in moving parts.
g) If devices are provided for the connection of dust extraction and collection facilities, ensure these are connected and properly used.
Use of dust collection can reduce dust-related hazards.
4) Power tool use and care
a) Do not force the power tool. Use the correct power tool for your application.
The correct power tool will do the job better and safer at the rate for which it was designed.
English
b) Do not use the power tool if the switch does not turn it on and off.
Any power tool that cannot be controlled with the switch is dangerous and must be repaired.
c) Disconnect the plug from the power source and/or the battery pack from the power tool before making any adjustments, changing accessories, or storing power tools.
Such preventive safety measures reduce the risk of starting the power tool accidentally.
d) Store idle power tools out of the reach of children and do not allow persons unfamiliar with the power tool or these instructions to operate the power tool.
Power tools are dangerous in the hands of untrained users.
e) Maintain power tools. Check for misalignment or binding of moving parts, breakage of parts and any other condition that may affect the power tool's operation.
If damaged, have the power tool repaired before use.
Many accidents are caused by poorly maintained power tools.
f) Keep cutting tools sharp and clean.
Properly maintained cutting tools with sharp cutting edges are less likely to bind and are easier to control.
g) Use the power tool, accessories and tool bits etc. in accordance with these instructions, taking into account the working conditions and the work to be performed.
Use of the power tool for operations different from those intended could result in a hazardous situation.
5) Service
a) Have your power tool serviced by a qualified repair person using only identical replacement parts.
This will ensure that the safety of the power tool is maintained.
CAUTION
Keep children and infi rm persons away.
When not in use, tools should be stored out of reach of children and infirm persons.
ROTARY HAMMER SAFETY WARNINGS
- Wear ear protectors.
Exposure to noise can cause hearing loss.
- Use auxiliary handle(s), if supplied with the tool.
Loss of control can cause personal injury.
- Hold power tool by insulated gripping surfaces, when performing an operation where the cutting accessory may contact hidden wiring or its own cord.
Cutting accessory contacting a “live” wire may make exposed metal parts of the power tool “live” and could give the operator an electric shock.
ADDITIONAL SAFETY WARNINGS
- Do not touch the bit during or immediately after operation. The bit becomes very hot during operation and could cause serious burns.
- Before starting to break, chip or drill into a wall, floor or ceiling, thoroughly confirm that such items as electric cables or conduits are not buried inside.
-
Always hold the body handle and side handle of the power tool firmly. Otherwise the counterforce produced may result in inaccurate and even dangerous operation.
-
Wear a dust mask.
Do not inhale the harmful dusts generated in drilling or chiseling operation. The dust can endanger the health of yourself and bystanders.
- Mounting the tool
To prevent accidents, make sure to turn the switch off and disconnect the plug from the receptacle.
When using tools such as bull points, drill bits, etc., make sure to use the genuine parts designated by our company.
○ Clean the shank portion of the drill bit. Then smear the shank portion with the grease or machine oil.
-
The rotation speed cannot be changed by pressing the rotation speed selector switch while the motor is rotating. To change speeds, switch off the tool first.
-
RCD
The use of a residual current device with a rated residual current of 30 mA or less at all times is recommended.
SYMBOLS
WARNING
The following show symbols used for the machine. Be sure that you understand their meaning before use.
| To reduce the risk of injury, user must read instruction manual. | n_0 | No-load speed | ||
| V | Rated voltage | --s/--s | Running Time / Down Time | |
| A | Current | ---/min | revolutions per minute | |
| W | Watt Class II tool | |||
SPECIFICATIONS
| Model | DH40SC |
| Voltage 220 V | ~ |
| Power input 1100 W | |
| No-load speed 620 /min | |
| Full-load impact rate 2800 /min | |
| Capacity | Drill bit: 40 mmCore bit: 120 mm |
| Weight 7.2 kg |
STANDARD ACCESSORIES
See the list below to check the accessories for DH40SC.
| Case (Molded plastic)(Code No. 371122) |  | 1 |
| Side Handle |  | 1 |
| Stopper(Code No. 971786) | 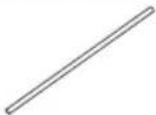 | 1 |
| Hammer Grease A(Code No. 981840) |  | 1 |
OPTIONAL ACCESSORIES (sold separately)
1. Through-hole drilling (Rotation + Hammering)

● Drill bit (hexagon shank)
| External dia. | Overall length | |||
| 280 mm 400 | mm 505 mm 550 mm | |||
| Code No. Code | No. Code No. | Code No. | ||
| 16 mm 985 | 721 985720 98572 | 2 991330 | ||
| 18 mm --- | 991331 | |||
| 19 mm 985 | 724 985723 98572 | 5 991332 | ||
| 20 mm --- | 991333 | |||
| 22 mm 985 | 727 985726 98572 | 8 991335 | ||
| 25 mm 985 | 730 985729 98573 | 1 991336 | ||
| 28 mm 985 | 733 985732 98573 | 4 991337 | ||
| 30 mm --- | 991338 | |||
| 32 mm 985 | 736 985735 98573 | 7 991339 | ||
| 35 mm --- | 991340 | |||
| 38 mm 985 | 739 985738 98574 | 0 991341 | ||
| 40 mm 313 | 322 --- | |||
2. Anchor hole drilling (Rotation + Hammering)

+

● Drill bit (taper shank)
| Drill bit (taper shank) | ||
| External dia. Morse Taper Code No. | ||
| 11.0 | 944460 | |
| 12.3 9444 | 61 | |
| 14.3 9444 | 62 No. 1 | |
| 14.5 9445 | 00 | |
| 17.5 9444 | 63 | |
| 21.5 No. 2 | 944464 | |
● Taper shank adapter
| Taper shank adapter Code No. |
| Morse Taper No. 1 981911 |
| Morse Taper No. 2 981912 |

- Cotter
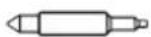
Code No. 944477
English
- Large dia. hole boring (Rotation + Hammering)

● Guide plate
● Center pin

Core bit

● Core bit shank (hexagon shank)
| Code No. |
| 985388 |
| 955169 |
| Code No. |
| 955165 |
| External dia. |
| 50 mm |
| 120 mm |
| Code No. |
| 955163 |
- Anchor work (for Automatic boring anchors)

● Anchor adapter (for Rotation + Hammering)
| Anchor size Code No. |
| W1/4 (No. 20) 985756 |
| W5/16 (No. 25) 985757 |
| W3/8 (No. 30) 985758 |
| W1/2 (No. 40) 985759 |
| W5/8 (No. 50) 985760 |
● Anchor adapter (for Hammering)
| Anchor size Code No. |
| W3/8 (No. 30) 981929 |
| W1/2 (No. 40) 981930 |
| W5/8 (No. 50) 981931 |
+

- Drift key
Code No. 944574
- Crushing (Hammering)

● Bull point
| Overall length Shank type Code No. | |
| 280 mm | Round 981922 |
| Hexagon 980752 | |
| 450 mm | Round 981923 |
| Hexagon 980753 | |
- Groove digging and edging (Hammering)

● Cold chisel
| Overall length Code No. |
| 280 mm 981925 |
| 450 mm 981926 |
7. Asphalt cutting (Hammering)

- Cutter
| Overall length Width Code No. | |
| 280 mm 45 mm 981924 |
8. Digging
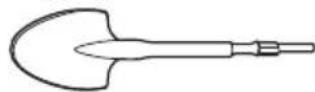
- Scoop
Code No. 956126
9. Surface Roughing (Hammering)

- Bushing Tool
Code No. 955183


- Shank
Overall length Code No.
250 mm 955186
APPLICATIONS
○ Drilling anchor holes
○ Drilling holes in concrete
○ Crushing concrete, chipping, digging, and squaring
(Some applications need optional accessories)
PRIOR TO OPERATION
- Power source
Ensure that the power source to be utilized conforms to the power requirements specified on the product nameplate.
- Power switch
Ensure that the power switch is in the OFF position. If the plug is connected to a receptacle while the power switch is in the ON position, the power tool will start operating immediately, which could cause a serious accident.
- Extension cord
When the work area is removed from the power source, use an extension cord of sufficient thickness and rated capacity. The extension cord should be kept as short as practicable.
- Check the receptacle
If the receptacle only loosely accepts the plug, the receptacle must be repaired.
Contact a licensed electrician to make appropriate repairs.
If such a faulty receptacle is used, it may cause overheating, resulting in a serious hazard.
English
- Confirming condition of the environment
Confirm that the work site is placed under appropriate conditions conforming to prescribed precautions.
- How to install tool
CAUTION
For tools such as a drill bit and a bull point, use only HiKOKI genuine parts.
(1) Clean, then smear the tool shank with the grease provided in the green tube (Fig. 1).
(2) Press the push button, slightly lift the tool retainer in the direction of arrow Ⓐ as shown in Fig. 2 to hook the tool retainer edge with the push button and engage the push button.
(3) Release your finger from the push button and further lift the tool retainer in the direction of arrow Ⓐ.
NOTE
First time when the tool retainer is lifted, remove your finger from the push button. If the push button is kept pressed, the edge of the tool retainer comes in contact with your finger and the tool retainer cannot be lifted.
(4) Fully insert the tool shank into the hexagonal hole in the front cover.
(5) Return the tool retainer to secure the tool.
(6) Pull the tool to make sure it is locked completely.
NOTE
Remove in the reverse order of installation.

Fig. 1
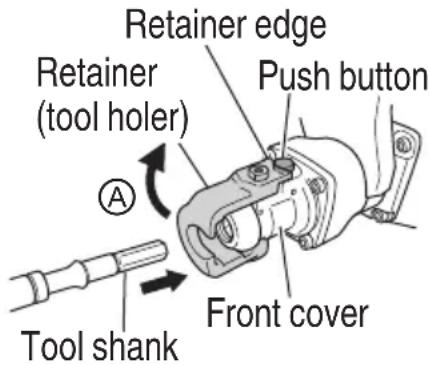
Fig. 2
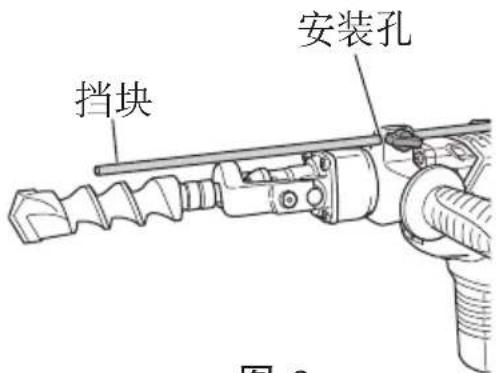
WHEN THE PUSH BUTTON DOES NOT OPERATE SMOOTHLY
When the push button does not operate smoothly, please remove dirt from the inside through the outlet using a wire, etc. Then lubricate lubricating oil and push the push button several times to make it operate smoothly. (Fig. 3)
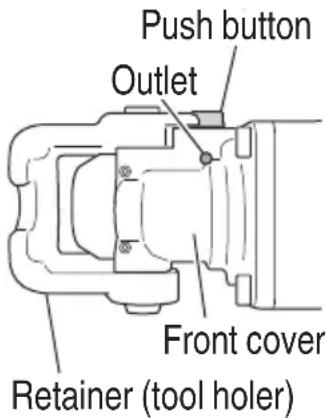
Fig. 3
HOW TO USE
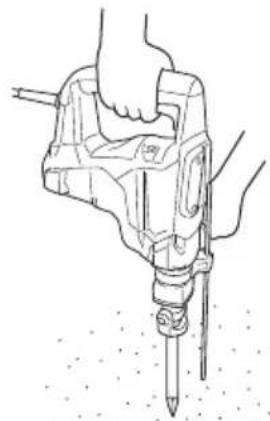
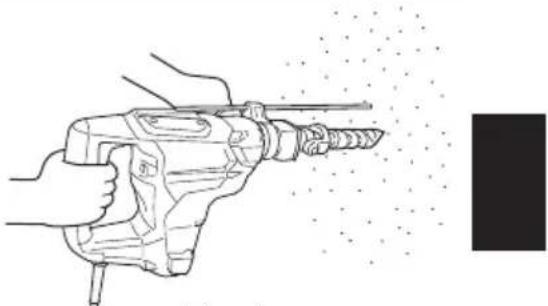
1. How to drill holes (Fig. 4)
(1) Pull the switch trigger after applying the drill bit tip to the drilling position.
(2) It is unnecessary to forcibly press the rotary hammer main body. It is sufficient to slightly press the rotary hammer to an extent that clips are freely discharged.
CAUTION
Although this machine is equipped with a slip clutch, if the drill bit becomes bound in concrete or other material, the resultant stoppage of the drill bit could cause the machine body to turn in reaction. Ensure that the main handle and side handle are gripped firmly during operation.
2. How to chisel or demolish (Fig. 5)
By applying the tool tip to the chiseling or demolishing position, operate the rotary hammer by utilizing its own weight.
Forcible pressing or thrusting is unnecessary.
3. Install the stopper (Fig. 6)
(1) Loosen the wing bolt, and insert the stopper into the mounting hole on the side handle.
(2) Adjust the stopper position according to the depth of the hole and tighten the wing bolt securely.
4. Warming up (Fig. 7)
The grease lubrication system in this unit may require warming up in cold regions.
Position the end of the bit so makes contact with the concrete, turn on the switch and perform the warming up operation. Make sure that a hitting sound is produced and then use the unit.
CAUTION
When the warming up operation is performed, hold the side handle and the main body securely with both hands to maintain a secure grip and be careful not to twist your body by the jammed drill bit.
natural_image
Line drawing of a hand using a power tool to spray particles (no text or symbols)Fig. 4

natural_image
Line drawing of a hand using a drill bit to lift a tool, with no visible text or symbolsFig. 5

Fig. 6

natural_image
Line drawing of a hand operating a mechanical tool with a screwdriver inserted (no text or symbols)Fig. 7
English
5. How to use the anchor adapter
(1) Install the automatic boring anchor in the anchor adapter (Fig. 8).
(2) Turn ON the switch and drill a base hole with the automatic boring anchor. (Fig. 9)
At the start of the hole-drilling slightly tilt the rotary hammer to determine the hole position.
(3) After cleaning out dust with a syringe, attach the plug to the anchor tip and drive in the anchor with a manual hammer.
(4) After driving in the anchor, use the drift key to separate the anchor. (Fig. 10)
(5) By employing a manual hammer or pliers, snap off the tapered portion of the anchor. (Fig. 11)
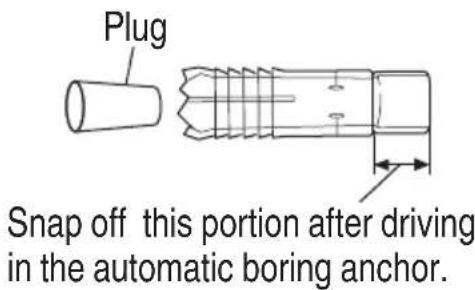
Fig. 8
CAUTION
Since the snapped-off tapered portion will fly about, pay attention to the snapping direction.

Fig. 9

Fig. 10

natural_image
Diagram of a hand using a tool to lift a test tube into a liquid, with an arrow indicating motion (no text or symbols present)Fig. 11
- How to use the drill bit (taper shank) and the taper shank adaptor.
(1) Install drill bit with taper shank in the taper shank adaptor. (Fig. 12)
(2) Turn the power on and drill a base hole.
(3) After cleaning out dust with a syringe, attach the plug to the anchor tip and drive in the anchor with plug to the anchor tip and drive in the anchor with a manual hammer.
(4) To remove the drill bit with taper shank, insert a cotter into the slot of the taper shank adaptor, place supports under the Rotary Hammer and tap the cotter with a manual hammer. (Fig. 13)

Fig. 12

Fig. 13
HOW TO USE THE CORE BIT
When boring penetrating large holes use the core bit. At that time use with the center pin and the core bit shank provided as optional accessories.
1. Mounting
CAUTION
Be sure to turn power OFF and disconnect the plug from the receptacle.
(1) Mount the core bit to the core bit shank (Fig. 14).
Lubricate the thread of the core bit shank to facilitate disassembly.
(2) Mount the core bit shank to the rotary hammer (Fig. 15).
(3) Insert the center pin into the guide plate until it stops.
(4) Engage the guide plate with the core bit, and turn the guide plate to the left or the right so that it does not fall even if it faces downward (Fig. 16).
2. How to bore (Fig. 17)
(1) Connect the plug to the receptacle.
(2) A spring is installed in the center pin.
Push it lightly to the wall or the floor straight.
Connect all over the surface of the core bit tip and start operating.
(3) When boring about 5 mm in depth the position of the hole will be establish. Bore after that removing the center pin and the guide plate from core bit.
(4) Application of excessive force will not only expedite the work, but will deteriorate the tip edge of the drill bit, resulting in reduced service life of the rotary hammer.
CAUTION
When removing the center pin and the guide plate, turn OFF the switch and disconnect the plug from the receptacle.
- Dismounting (Fig. 18)
Remove the core bit shank from the rotary hammer and strike the head of the core bit shank strongly two or three times with a manual hammer holding the core bit, then the thread becomes loose and the core bit can be removed.


Fig. 16

natural_image
Line drawing of a hand operating a drill bit with a threaded drill bit (no text or symbols)Fig. 17
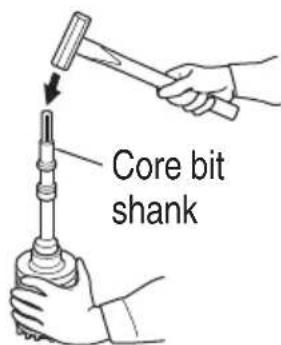
Fig. 18
GREASE REPLACEMENT
This Rotary Hammer is of full air-tight construction to protect against dust and to prevent lubricant leakage.
Therefore, this Rotary Hammer can be used without lubrication for long periods. Replace the grease as described below.
Grease Replacement Period
After purchase, replace grease after every 6 months of usage. Ask for grease replacement at the nearest authorized Service Center.
MAINTENANCE AND INSPECTION
WARNING
Be sure to switch power OFF and disconnect the plug from the receptacle during maintenance and inspection.
- Inspecting the tool bits Since use of a dull tool will cause motor malfunctioning and degraded efficiency, replace the tool bit with new ones or resharpen them without delay when abrasion is noted.
- Inspecting the mounting screws
Regularly inspect all mounting screws and ensure that they are properly tightened. Should any of the screws be loose, retighten them immediately. Failure to do so could result in serious hazard.
WARNING
Using this Rotary Hammer with loosen screws is extremely dangerous.
- Maintenance of the motor
The motor unit winding is the very “heart” of the power tool. Exercise due care to ensure the winding does not become damaged and/or wet with oil or water.
- Inspecting the carbon brushes: (Fig. 19)
The motor employs carbon brushes which are consumable parts. When they become worn to or near “wear limit”, it could result in motor trouble. When an auto-stop carbon brush is equipped, the motor will stop automatically. At that time, replace both carbon brushes with new ones which have the same carbon brush Nos. shown in the figure. In addition, always keep carbon brushes clean and ensure that they slide freely within the brush holders.

Fig. 19
CAUTION
Using this Rotary Hammer with a carbon brush which is worn in excess of the wear limit will damage the motor.
○ Replacing carbon brushes:
Loosen the two set screws and remove the tail cover. Remove the brush caps and carbon brushes.
After replacing the carbon brushes, tighten the brush caps securely and to install the tail cover with securely tightening two set screws.
- Replacing supply cord
If the replacement of the supply cord is necessary, this has to be done by the manufacturer of this agent in order to avoid a safety hazard.
- Service parts list
CAUTION
Repair, modification and inspection of HiKOKI Power Tools must be carried out by a HiKOKI Authorized Service Center.
This Parts List will be helpful if presented with the tool to the HiKOKI Authorized Service Center when requesting repair or other maintenance. In the operation and maintenance of power tools, the safety regulations and standards prescribed in each country must be observed.
SERVICE PARTS LIST
DH40SC
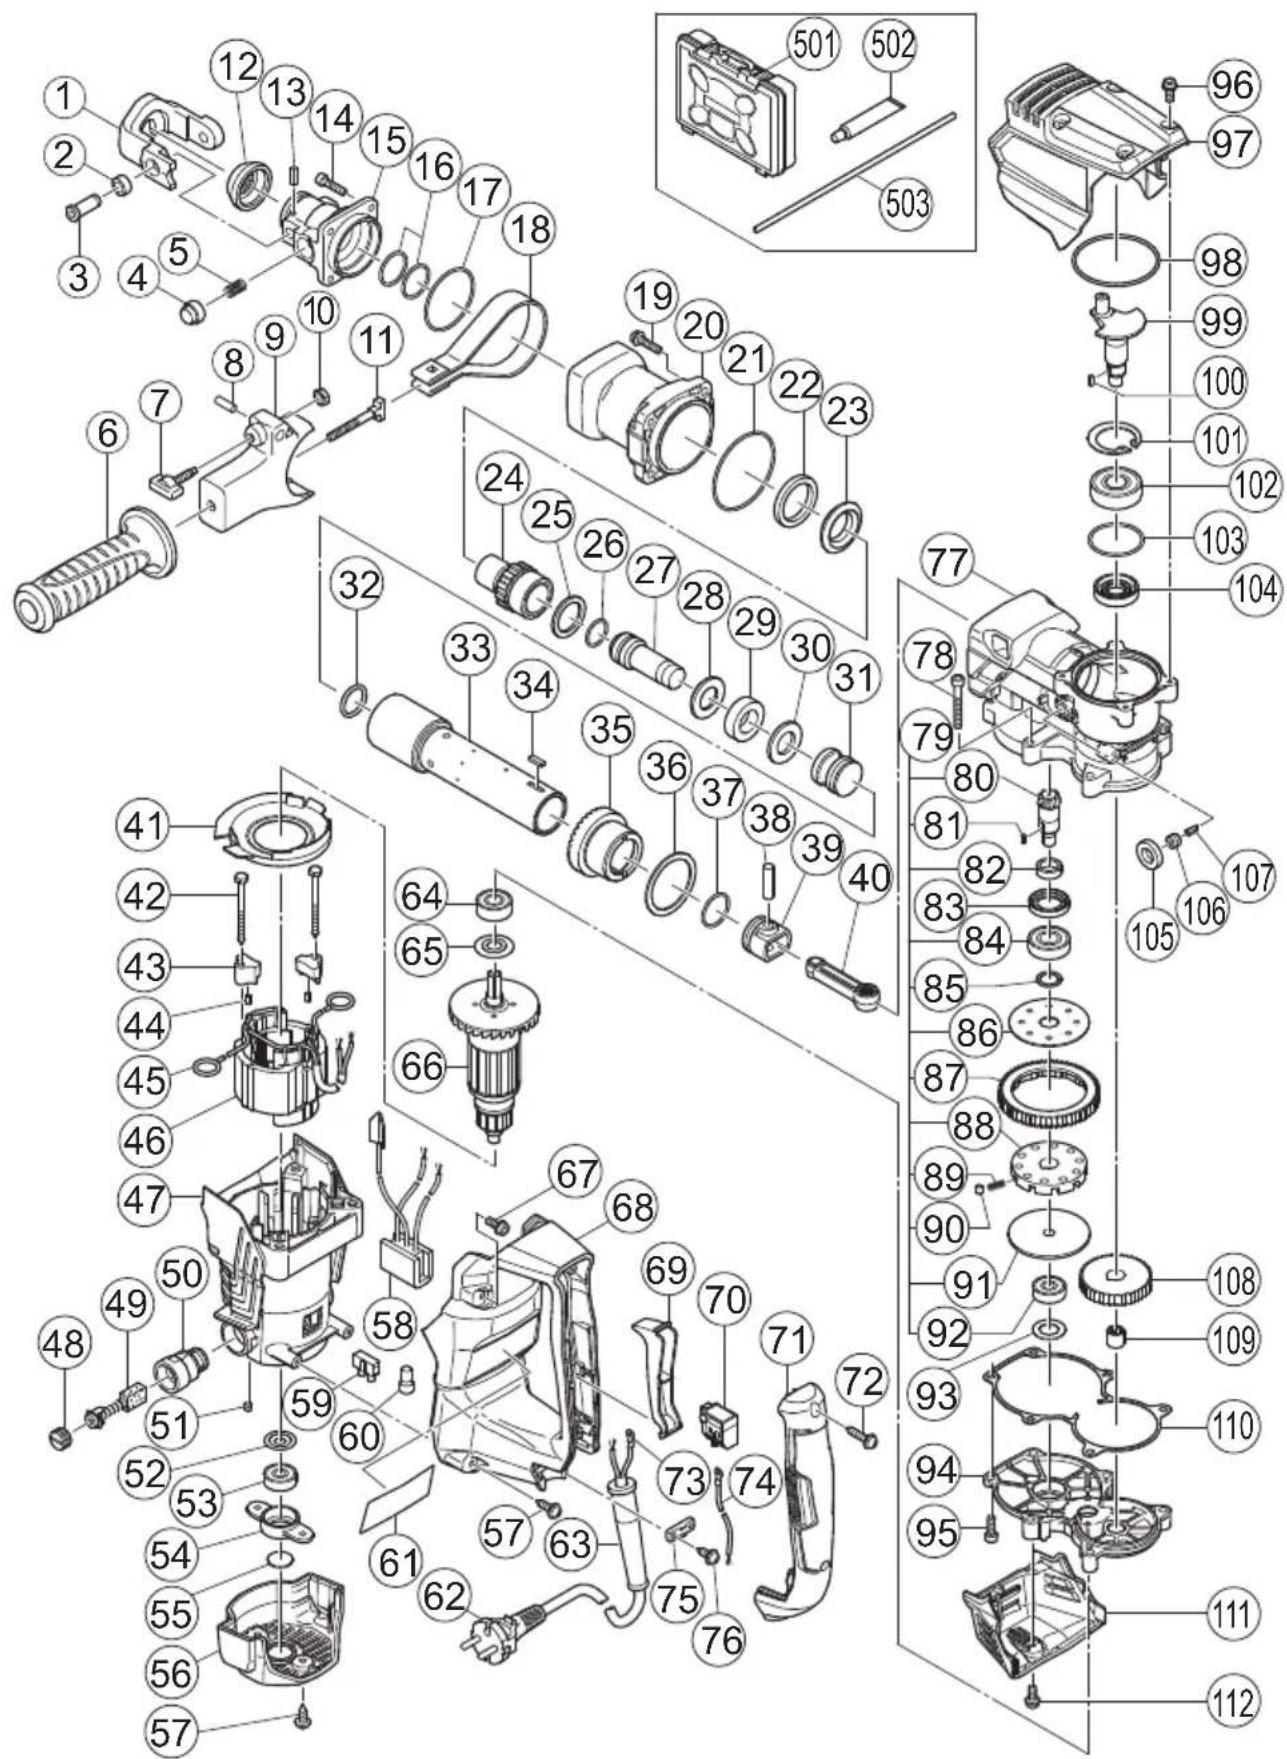
| ITEM NO. | PART NAME Q'TY | |
| 1 RETAINER 1 | ||
| 2 DAMPER (B) 2 | ||
| 3 RETAINER PIN 2 | ||
| 4 PUSHING BUTTON 1 | ||
| 5 SET SPRING 1 | ||
| 6 SIDE HANDLE 1 | ||
| 7 WING BOLT 1 | ||
| 8 ROLL PIN D2×8 1 | ||
| 9 MOUNT 1 | ||
| 10 NUT M6 (10 PCS.) 1 | ||
| 11 HANDLE BOLT 1 | ||
| 12 DUST COVER 1 | ||
| 13 ROLL PIN D4×20 2 | ||
| 14 | SEAL LOCK HEX. SOCKET HD. BOLT M6×25 | 4 |
| 15 FRONT COVER | 1 | |
| 16 O-RING | 2 | |
| 17 O-RING | 1 | |
| 18 BAND | 1 | |
| 19 | HEX. SOCKET HD. BOLT (W/FLANGE) M6×25 | 4 |
| 20 CYLINDER CASE | 1 | |
| 21 O-RING (1AS-60) | 1 | |
| 22 DAMPER (B) 1 | ||
| 23 DRIVER HOLDER | 1 | |
| 24 DRIVER | 1 | |
| 25 DRIVER WASHER | 1 | |
| 26 O-RING (C) | 1 | |
| 27 SECOND HAMMER | 1 | |
| 28 DAMPER WASHER 1 | ||
| 29 DAMPER | 1 | |
| 30 DAMPER HOLDER | 1 | |
| 31 STRIKER | 1 | |
| 32 O-RING | 1 | |
| 33 CYLINDER 1 | ||
| 34 CYLINDER KEY | 2 | |
| 35 BEVEL GEAR | 1 | |
| ITEM NO. | PART NAME Q'TY | |
| 36 | THRUST WASHER | 1 |
| 37 | O-RING | 1 |
| 38 | PISTON PIN 1 | |
| 39 | PISTON 1 | |
| 40 | CONNECTING ROD | 1 |
| 41 | FAN GUIDE | 1 |
| 42 | HEX. HD. TAPPING SCREW D5×55 | 2 |
| 43 | STATOR HOLDER | 2 |
| 44 | RUBBER BUSH 2 | |
| 45 | BRUSH TERMINAL | 2 |
| 46 | STATOR ASS'Y 220V | 1 |
| 47 | HOUSING ASS'Y 1 | |
| 48 | BRUSH CAP | 2 |
| 49 | CARBON BRUSH (1 PAIR) | 1 |
| 50 | BRUSH HOLDER | 2 |
| 51 | HEX. SOCKET SET SCREW M5×8 | 2 |
| 52 | WASHER (A) 1 | |
| 53 | BALL BEARING 1 | |
| 54 | BEARING HOLDER 1 | |
| 55 | DUST SEAL | 1 |
| 56 | TAIL COVER | 1 |
| 57 | TAPPING SCREW (W/FLANGE) D5×20 | 4 |
| 58 | NOISE SUPPRESSOR (V) | 1 |
| 59 | PILLAR TERMINAL | 1 |
| 60 | CONNECTOR 50092 | 1 |
| 61 | NAME PLATE | 1 |
| 62 | CORD | 1 |
| 63 | CORD ARMOR D10.7 | 1 |
| 64 | BALL BEARING 6201DDCMPS2L | 1 |
| 65 | DUST WASHER (B) | 1 |
| 66 | ARMATURE 220V | 1 |
| 67 | HEX. SOCKET HD. BOLT (W/FLANGE) M5×16 | 2 |
| 68 | HANDLE | 1 |
English
| ITEM NO. | PART NAME Q'TY | |
| 69 TRIGGER 1 | ||
| 70 SWITCH 1 | ||
| 71 HANDLE COVER 1 | ||
| 72 | TAPPING SCREW(W/FLANGE) D4x25 | 2 |
| 73 TERMINAL 1 | ||
| 74 INTERNAL WIRE 1 | ||
| 75 CORD CLIP 1 | ||
| 76 | TAPPING SCREW(W/FLANGE) D4x16 | 2 |
| 77 CRANK CASE 1 | ||
| 78 | SEAL LOCK HEX. SOCKET HD. BOLT M6x45 | 4 |
| 79 SLIP CLUTCH ASS'Y 1 | ||
| 80 BEVEL PINION 1 | ||
| 81 FEATHER KEY 3x3x8 1 | ||
| 82 COLLAR 1 | ||
| 83 OIL SEAL (A) 1 | ||
| 84 | BALL BEARING6002DDCMPS2L | 1 |
| 85 WASHER 1 | ||
| 86 WASHER (A) 1 | ||
| 87 SECOND GEAR 1 | ||
| 88 GEAR HOLDER | 1 | |
| 89 SPRING (C) | 10 | |
| 90 NEEDLE | 10 | |
| 91 SPACER | 1 | |
| 92 BALL BEARING 629VV | 1 | |
| 93 BEARING WASHER (C) | 1 | |
| 94 GEAR COVER | 1 | |
| 95 | SEAL LOCK HEX. SOCKET HD. BOLT M6x20 | 2 |
| 96 | HEX. SOCKET HD. BOLT(W/FLANGE) M5 | 4 |
| 97 CRANK COVER | 1 | |
| 98 CYLINDER O-RING | 1 | |
| 99 CRANK SHAFT | 1 | |
| 100 | FEATHER KEY 3x3x8 1 | |
| ITEM NO. | PART NAME Q'TY | |
| 101 | RETAINING RING FOR D40 HOLE | 1 |
| 102 | BALL BEARING 6203DDCMPS2L | 1 |
| 103 | O-RING (S-40) | 1 |
| 104 | OIL SEAL (B) 1 | |
| 105 | FELT PACKING (A) | 1 |
| 106 | CAP SCREW | 1 |
| 107 | VALVE | 1 |
| 108 | FIRST GEAR | 1 |
| 109 | NEEDLE BEARING | 1 |
| 110 | SEAL PACKING | 1 |
| 111 | HOOD | 1 |
| 112 | HEX. SOCKET HD. BOLT (W/FLANGE) M5×12 | 1 |
| 501 | CASE | 1 |
| 502 | GREASE (A) FOR HAMMER. HAMMER DRILL (30G) | 1 |
| 503 | STOPPER ROD | 1 |

natural_image
Line drawing of a quill pen in an inkwell (no text or symbols)服务中心
工机商业(中国)有限公司
- ● 钻头(六角柄)
- 锚栓孔钻(旋钻+锤击)
- ● 钻头(锥柄)
- 锥柄转接器
- 更换润滑油
- GENERAL POWER TOOL SAFETY WARNINGS
- WARNING
- English
- CAUTION
- ROTARY HAMMER SAFETY WARNINGS
- ADDITIONAL SAFETY WARNINGS
- SYMBOLS
- STANDARD ACCESSORIES
- OPTIONAL ACCESSORIES (sold separately)
- Through-hole drilling (Rotation + Hammering)
- Anchor hole drilling (Rotation + Hammering)
- Asphalt cutting (Hammering)
- Digging
- Surface Roughing (Hammering)
- APPLICATIONS
- PRIOR TO OPERATION
- For tools such as a drill bit and a bull point, use only HiKOKI genuine parts.
- NOTE
- WHEN THE PUSH BUTTON DOES NOT OPERATE SMOOTHLY
- HOW TO USE
- How to drill holes (Fig. 4)
- How to chisel or demolish (Fig. 5)
- Install the stopper (Fig. 6)
- Warming up (Fig. 7)
- How to use the anchor adapter
- HOW TO USE THE CORE BIT
- Mounting
- Be sure to turn power OFF and disconnect the plug from the receptacle.
- When removing the center pin and the guide plate, turn OFF the switch and disconnect the plug from the receptacle.
- GREASE REPLACEMENT
- Grease Replacement Period
- MAINTENANCE AND INSPECTION
- SERVICE PARTS LIST
Brand : HiKOKI
Model : DH40SC
Category : Rotary hammer