PLMR2DNBK - Car radio Pyle - Free user manual and instructions
Find the device manual for free PLMR2DNBK Pyle in PDF.


| Product Type | Marine Stereo Receiver with Speaker Kit |
| Brand | Pyle |
| Model | PLMR2DNBK |
| Chassis Size | Double DIN |
| Display | LCD with White Backlight, RGB Night Illumination |
| Max Power Output | 4 x 75 Watts (300 Watts Total) |
| Radio Bands | AM/FM Stereo, PLL Electronic Tuning |
| Preset Stations | 30 (6 per band, 5 bands) |
| Bluetooth Version | 4.2 with A2DP and Hands-Free Profile |
| USB Support | Up to 64GB, MP3/WMA playback |
| Auxiliary Input | 3.5mm front AUX-IN |
| RCA Outputs | 2 Pair (Front/Rear) with ISO Connector |
| Audio Controls | Treble, Bass, Balance, Fader, EQ Presets (Flat/Pop/Rock/Class/Jazz/Off) |
| Loudness | On/Off |
| Stereo/Mono Selectable | Yes |
| Local/Distant Reception | Switchable (DX/LOC) |
| USA/Europe Frequency Selectable | Yes (by software) |
| Clock Display | 12/24 Hour Selectable |
| Color Illumination | 7 Colors (Auto, Blue, Red, Cyan, Green, Purple, Yellow, White) |
| Remote Control | Included, Battery: CR2025 (3V Lithium) |
| Included Speakers | 1 Pair Marine Grade (Model PLMR60B) |
| Power Supply | DC 12V, Negative Ground |
| Current Consumption | 10A |
| Dimensions (W x H x D) | 7.1 x 2.7 x 3.9 inches |
| Weight | Approx. 2.5 lbs (with speakers) |
| Wiring Harness | ISO 4 Pin Power & 8 Pin Speaker |
| Package Contents | Stereo Receiver, Wiring Harness, Trim Ring, Remote Control, 1 Pair Marine Speakers PLMR60B |
Frequently Asked Questions - PLMR2DNBK Pyle
User questions about PLMR2DNBK Pyle
0 question about this device. Answer the ones you know or ask your own.
Ask a new question about this device
Download the instructions for your Car radio in PDF format for free! Find your manual PLMR2DNBK - Pyle and take your electronic device back in hand. On this page are published all the documents necessary for the use of your device. PLMR2DNBK by Pyle.
USER MANUAL PLMR2DNBK Pyle
PLR2DN
Stereo Receiver Power Amplifier
AM/FM/MP3/BT/USB/AUX, Stereo Receiver, Double DIN, 30 Preset Memory Stations, LCD Display with Remote Control
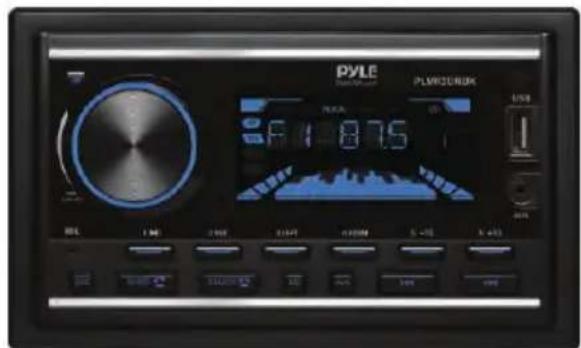
PLMR2DNBK
Marine Stereo Receiver Power Amplifier & Speaker Kit
AM/FM/MP3/BT/USB/AUX, Marine Stereo Receiver, Double DIN, 30 Preset Memory Stations, LCD Display with Remote Control and 1 Pair of PLMR60B

PLMR3DNWT
Marine Stereo Receiver Power Amplifier & Speaker Kit
AM/FM/MP3/BT/USB/AUX, Marine Stereo Receiver, Double DIN, 30 Preset Memory Stations, LCD Display with Remote Control and 1 Pair of PLMR60W
USER GUIDE
To ensure correct operation and avoid damage, please read this user manual carefully before using this product.
INSTALLATION
Installation Procedures
First complete the electrical connections and then check for correctness.
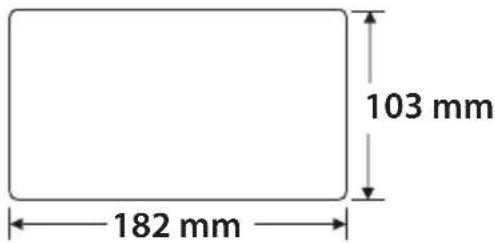
Installation Opening
This unit can be installed in any dashboard having an opening as shown below.
To Install the Car Radio
Be sure you test all connections first, and then follow these steps to install this unit.
- Make sure the ignition is turned off, and then disconnect the cable from the vehicle battery's negative (-) terminal.
- Disconnect the wire harness and the antenna.
- Attach the "L" brackets (2pcs) on the both sides of the car receiver with screws (M5.5 x 7) as shown as the below figure. The others fixing screws that fix the other terminal of the "L" metal bracket, please buy from your dealer according to the drilling of holes size.

- Consult with you nearest dealer if installation requires the drilling of holes or other modifications of the vehicle.
- Install this car receiver in the dashboard.
- Make wiring connections, as illustrated in the "Wiring Diagram."
- Install the plastic outer trim ring.
INSTALLATION
Connect all wiring harness and slide the head unit into the mounting collar until it clicks into place.
Wiring Connections
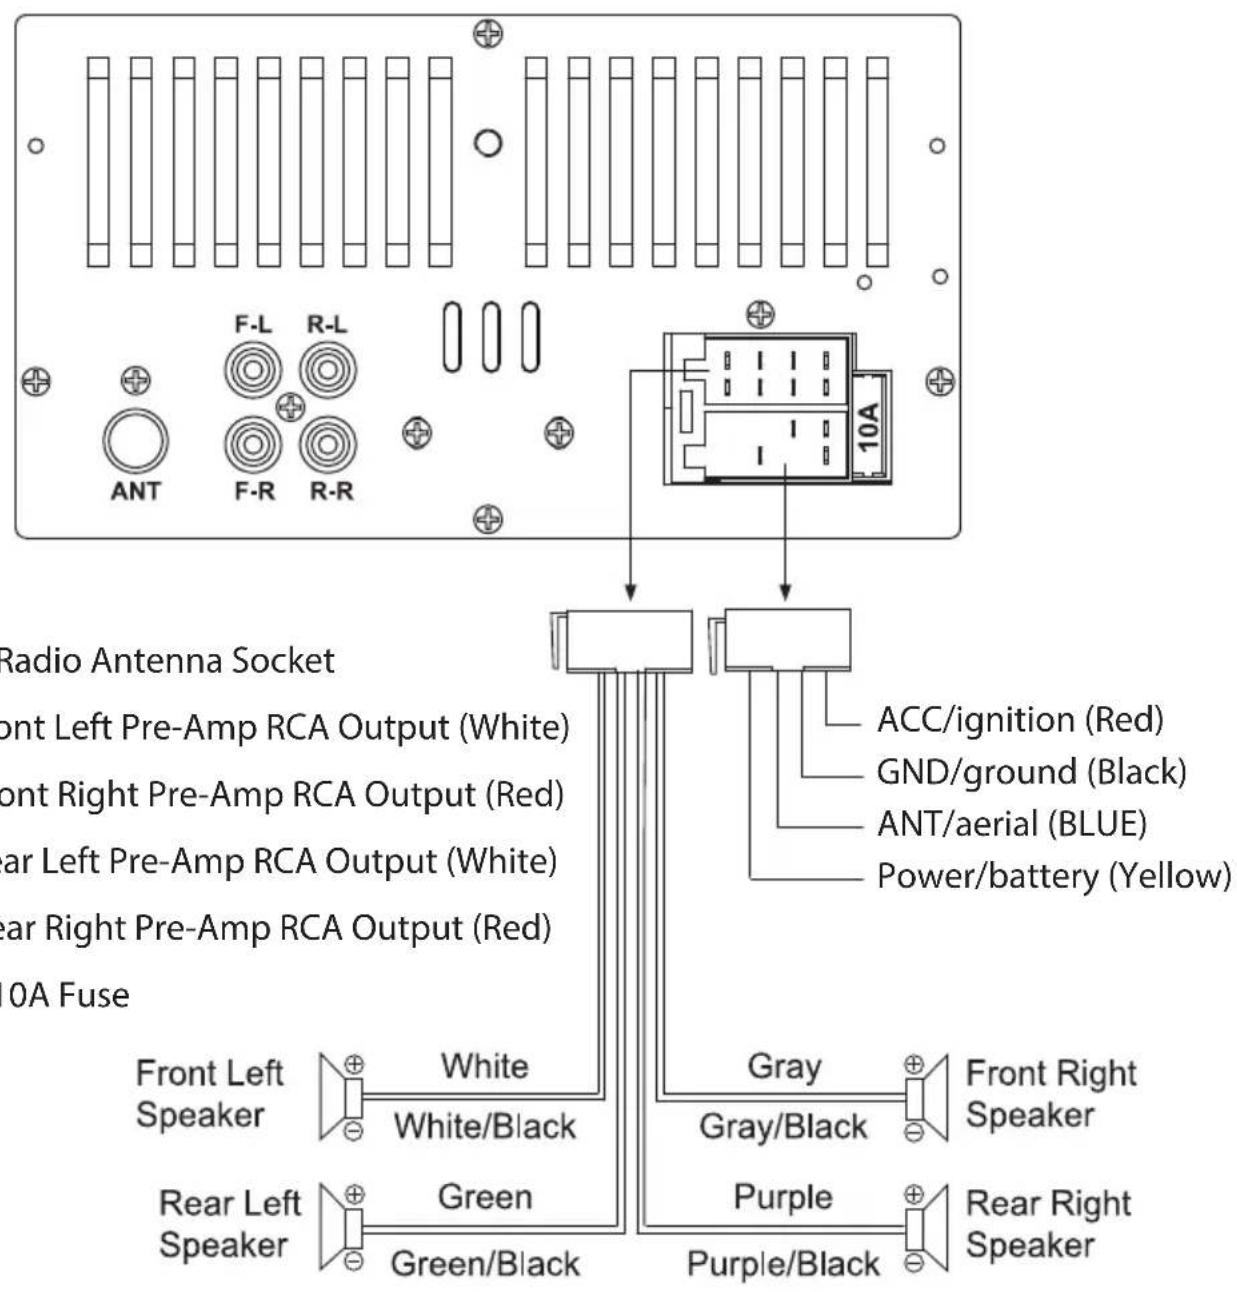

- +12V DC Negative Ground.
- Only use speakers with 4 ohms impedance.
- The maximum current of the Amp remote trigger is 200mA.
OVERVIEW OF THE CONTROLS

- ⏻ (power)/Volume knob and SEL (select/menu) button
- SRC (source) button
- BAND (band) button, 📄 (answer call) button
- AMS (automatic store/preset station scan, automatic music search) button
- ▶II (pause/play), Preset station1 button
- INT (intro), Preset station 2 button
- RPT (repeat), Preset station 3 button
- RDM (random), Preset station 4 button
- -10 (previous 10 tracks), Preset station 5 button
- +10 (next 10 tracks), Preset station 6 button
- CLOCK (clock setting) button, 📞 (end call) button
- (tune down, seek down, previous, fast reverse) button
- ▶(tune up, seek up, next track, fast forward)button
- (MUTE) button
- EQ (Equalizer)
- IR remote sensor
- LCD Display
- USB Port
- AUX IN (auxiliary input) jack
- Hands-free Microphone
- Reset button
GENERAL OPERATION
Turn Unit ON/OFF, Change the Source
- Press any button to turn on the unit.
- Press the power (⏻) button to turn the unit off.
Adjust the volume (VOL)
Rotate the VOL knob on the front panel or press the VOL+ ▲/VOL- ▼ button on the remote control to increase or decrease the volume level.
Adjust Menu Options (SEL)
- Press the SEL button on the front panel or on the remote control repeatedly to cycle through the following adjustable audio functions: BASS, TREBLE, BALANCE, FADER, EQ OFF, CLASS/ROCK/POP/ FLAT, LOUD ON/OFF, DX/LOC, STEREO/MONO, CLOCK 12/24, AREA US/EU, AUTO/BLUE/RED/CYAN/GREEN/PURPLE/YELLOW/WHITE.
- Rotate the VOL knob on the front panel or press the VOL+ ▲/VOL-▼ button on the remote control to adjust the selected item.
• BASS/TREBLE: -7, -6, \~, -1, 0, +1, \~, +6, +7
• BALANCE: L7, L6, \~, L1, 0, R1, \~, R6, R7
- FADER: R7, R6,\~, R1, 0, F1,\~, F6, F7
• EQ (Equalizer) Setting: OFF, CLASS, ROCK, POP, FLAT
- Loudness: LOUD ON/OFF
- DX/LOCAL: Enables or disables the local broadcast mode (LOCAL).
- Stereo/Mono: Switches between MONO and STEREO reception mode for radio frequencies.
- CLOCK 12/24: Select between 12 hours and 24 hours display.
Note: If 12 hour display is selected, AM= Morning; PM= Afternoon
- AREA US/EU: This car radio is equipped the USA / Europe frequency.
Rotate the volume knob to switch between USA and Europe frequency. The system will change the frequency setting in about 3 seconds.
- 7 color-changing illumination in buttons:
This car radio device is equipped 7 color-changing illumination in buttons. The illumination color can be preset Auto (color automatically change one by one), Blue, Red, Cyan, Green, Purple, Yellow, White.
Setting the Clock (CLOCK)
- To display clock time, press the CLOCK button.
- To set clock time, press and hold the CLOCK button and the hour digits will flash on the display.
- Rotate the VOL knob to adjust the hour.
- Press the CLOCK button again, the minute digits will flash on the display.
- Rotate the VOL knob to adjust the minute.
- Press the CLOCK button to confirm time settings.
Change the Source (MODE)
Press the SRC button to switch between RADIO, USB (with USB device inserted), AUX-IN (auxiliary input) and BT modes.
Mute ON/OFF
In power on mode, briefly press the MUTE button to toggle mute on or off.
USB Port
The USB port of this car radio is designed for media playback from flash memory devices and charging for iPhone/android mobile phone. The USB port also support USB charging, the charging ability is 5V/1A.
AUX IN (Auxiliary Input) Jack
Reset Button
Push the RESET button with a thin object with a pointed end to reset the unit.
RADIO OPERATION
Switch Between USA area and Europe area Frequency
In radio mode, press the SEL button to enter the switch state of the EU (europe) and US(USA) frequency, then rotate it to switch between EU and US (USA) frequency. The system will change the frequency setting in about 3 seconds.
Change Bands
In radio mode, shortly press the BAND button to switch between the FM1 (F1), FM2 (F2), FM3 (F3), AM1(A1), AM2 (A2) bands.
To Store/Recall Preset Stations
The radio can be stored 6 preset stations for each band (FM1, FM2, FM3, AM1 and AM2) for atotal of 30 preset stations.
- To memorize a station: Press and hold the desired preset buttons (1-6) to save a radio station.
- To recall a preset station: Briefly press the respective station button (1-6) to recall the corresponding preset station.
Manual Tuning
In the radio mode:
Press and hold the ▶▶or ◀◀button to enter the manual tuning mode.
In manual tuning mode, briefly press the ▶▶or ◀◀button to search the next or previous frequency step by step.
Seek Tuning
In radio mode, press the ▶▶or ◀◀button, the automatic search will start, it will search upward or downward for the strong signal radio station within the cuttent band. The auto searching will stop until find a station.
Automatic Store Preset station (AMS)
Press and hold the AMS button to store 18 FM and 12 AM preset stations automatically.
Automatic Preset Scan
Briefly press the AMS button to recall each preset station that stored in the memories in each band.
LOCAL/DX
Press the LOC button on the remote control to choose local or distant reception mode.
STEREO/MONO
Press the ST button on the remote control to choose FM STEREO or MONO audio effect.
USB OPERATION
To insert USB
- Play MP3/WMA music inside a USB stick. Insert the USB stick with MP3/WMA musics into the USB port, it will play automatically.
- The USB port also support USB charging, the charging ability is 5V/1A.
Select Next Track or Previous Track
In the USB mode, briefly press the ▶▶or ◀◀ button to play the next or previous track.
Fast Forward/Reverse
Press and hold the ▶▶ or ◀◀ button to fast forward or reverse a track.
Play/Pause
Press the ▶ button to interrupt the playback of a music (pause function). Press this button again to continue the playback.
Introduction Scan
Press the INT button to play the first 10 seconds of all track.
Press again to stop the introduction scan, and play the current track.
Repeating the track
Press the RPT button to toggle between RPT ALL (Play all track), RPT ONE (Continuously repeat current track) and RPT FLR (Continuously repeat all tracks in current folder).
Playing all tracks in random
Press the RDM button. A random playback of all tracks will start.
Press the button again to set the normal playback.
Track/Folder Navigation
- Press the -10/+10 buttons to jump 10 tracks backward or forward.
- Press and hold the -10/+10 button to select the previous or the next folder.
Select the track or file for playback in MP3 format
a. Press the AMS button to enter track search mode.
First "TRK0000" will appear on the display.
b. Rotate the VOL knob to select the number of your favorite track with high speed.
c. When the desired track number appears, confirm your selection by pressing SEL button. If no any operation in 5 seconds, it will play the current track.
Before using a Wireless BT device for the first time, it must be paired and connected.
- This head unit broadcasts the pairing signal constantly when no devices are connected. User can complete the pairing steps from your Wireless BT device. Refer to owner's manual for your device for more details.
- When the phone finds the car audio system, the "Pyle" name will be displayed. Choose the "Pyle" from the device list to pair and connect with the car audio system. Upon confirming, the BT logo will stop flashing.
Making a Call
• To make a call, dial the call directly from the paired mobile phone.
• To make a call with this bluetooth handsfree system:
a. When linking up the Wireless BT enabled mobile phone to this BT handsfree system, press the button to access the dial telephone number mode. Then press the "0\~9", *and # button on remote control to input the telephone number, the entered number will be shown on the LCD display.
b. If a number has been incorrectly inputted, press the 📞 button or press the DEL button on the remote cotnrol to delete it.
c. Press the button to make outgoing call.
Answer a Call
When the mobile phone is called, the incoming telephone number displays on the LCD display. Press the 📋 button on front panel or the button on the remote control to answer the incoming phones.
Redial Last Dialed Number
Press and hold the 📋 button on the front panel or ⚙ button on the remote control to redial the last dialed phone number.
Reject or End a Call
Press the 🔒 button on the front panel or 🔒 button on the remote control to reject or end the call.
Switch Audio Between Car Audio and mobile Phone
During a call, press the VOL knob/button to switch the audio source from the car audio system back to your mobile phone.
Adjust Call Volume
During a talk, use VOL knob or VOL+ ▲/VOL-▼ button to adjust the call volume level.
Audio Streaming (A2DP)
This head unit supports A2DP (advanced audio distribution profile) wireless streaming audio from a Wireless BT mobile device directly to your head unit.
The following functions can be used to control the music playback.
- Skip to Next music
Press the ▶▶ button to play the next music in the mobile phone.
- Skip to Previous music
Press the ◀◀ button to previous music in the mobile phone.
- PLAY/PAUSE
Press the ▶ button to pause or restore the music playback.
AUXILIARY OPERATION
Using this socket, it is possible to hear the sound of other playback devices such as MP3 players, CD players etc. through the car loudspeaker.
- Please connect the external device with a 3.5 mm stereo jack plug to the AUX socket.
- Press the MODE button repeatedly until "AUX IN" appears in the display.
- You hear the playback from the external device via the loudspeakers.
You can adjust the volume of the external device to a comfortable level with the volume control of this device.
REMOTE CONTROL
- ⏻ (Power on/off) button
- SEL (Audio/Menu) button
3/15.◀◀ (Tune down, seek down/ Track down, Fast reverse) button.
▶▶I (Tune up, seek up/Track up, Fast forward) button
4/14. VOL+ (volume increase) button, VOL- (volume decrease) button
-
MUTE button, DEL (Delete) button
-
INT (intro), Preset station 2, Keypad 2
-
▶II (pause/play), Preset station 1, Keypad 1
-
-10 (previous 10 tracks), previous folder, Preset station 5, Keypad 5
-
RDM (random), Preset station 4, Keypad 4
-
LOUD (Loudness), Keypad 8
-
STEREO/MONO, Keypad 7
-
MODE button, Keypad *
-
Band button, ⊆ (answer call) button
-
CLK (Clock setting), 📞 (end call) button
-
RPT (repeat), Preset station 3, Keypad 3
-
+10 (next 10 tracks), next folder, Preset station 6, Keypad 6
-
AMS (auto store / preset station scan, auto music search), Keypad 9
-
EQ (Equalizer Preset), Keypad #0
-
LOC (Local)/DX (Distant) Reception, Keypad #
Note:
When using the remote control for the first time, you must pull out the portective plastic tab from the battery compartment found on the back of the remote control.

This product can expose you to a chemical or group of chemicals, which may include "Di (2-ethylhexyl) phthalate (DEHP)" which is known in the state of California to cause cancer, birth defects, or other reproductive harm. For more info, go to https://www.p65warnings.ca.gov/.

PLR2DN
Stereo Receiver Power Amplifier
AM/FM/MP3/BT/USB/AUX, Stereo Receiver, Double DIN, 30 Preset Memory Stations, LCD Display with Remote Control
Features:
• AM/FM/MP3/BT/USB/AUX Stereo Receiver
- Double DIN
• LCD Display with Remote Control
• AM/FM Stereo Radio, 30 Station Memory
- Wireless BT Audio Ability
- Front Aux-in, Front USB, No SD Card Reader
• Aux (3.5mm) Input Connector Jack
- Connect & Stream Audio from External Devices
• MP3 Digital Audio File Playback
• LCD Display Black Panel
• Electronic Volume Control (Treble, Bass, Balance, Fader)
• Memory/Repeat/Random/Intro Play
• EQ / Mute / Clock Control, English ID3
• ID3 Tag Song Readout for Artist Name/Song Title
• VA LCD/White Back-Light, Night Illumination: RGB
• 2 Pair RCA Output, ISO Connector Line Out
• Equalizer (EQ) Electronic Audio Configuration
• Automatic Memory Preset Store/Scan Mode
- Repeat/Random Song Functions
Technical Specs:
- Remote Control Battery Operated, Requires (1) Coin-Type Battery
- Battery Type: 3V Lithium Bat. 240mAh Capacity
• Night illumination: RGB
• MAX. Power: 4x75W (300 Watts) - PLL Electronic Tuning Radio Tuner
• ISO with 4 Pin/8 Pin Wire Connector - Stereo/Mono Mode Selectable
• Audio Control: Treble, Bass, Balance, Fader - Preset EQ: Flat/Pop/Rock/Class/Jazz/Off
- Switchable USA/Europe Tuner Frequencies by Software
• Max. USB Support: 64GB - Power: DC 12V
• Current Consumption: 10A - Product Dimension: 2.7" x 7.1" x 3.9" - inches
PLMR2DNBK
Marine Stereo Receiver Power Amplifier & Speaker Kit
AM/FM/MP3/BT/USB/AUX, Marine Stereo Receiver, Double DIN, 30 Preset Memory Stations, LCD Display with Remote Control & 1 Pair of PLMR60B
Features:
• AM/FM/MP3/USB/AUX Marine Stereo Receiver
- Black Panel with 1 Pair of PLMR60B
- Double DIN
• LCD Display with Remote Control
• Marine Stereo Receiver System
• AM/FM Stereo Radio, 30 Station Memory
- Wireless BT Audio Ability
• Aux (3.5mm) Input Connector Jack
- Connect & Stream Audio from External Devices
• MP3 Digital Audio File Playback
- LCD Display Panel
- Front Aux-in, Front USB, No SD Card Reader
- Electronic Volume Control (Treble, Bass, Balance, Fader) Memory/Repeat/ Random/Intro Play
• EQ / Mute / Clock Control, English ID3
• ID3 Tag Song Readout for Artist Name/Song Title
• VA LCD/White Back-Light, Night Illumination: RGB
• 2 Pair RCA Output, ISO connector Line Out
• Equalizer (EQ) Electronic Audio Configuration
• Automatic Memory Preset Store/Scan Mode
- Repeat/Random Song Functions
Technical Specs:
- Remote Control Battery Operated, Requires (1) Coin-Type Battery
- Battery Type: 3V Lithium Bat. 240mAh Capacity
• Night illumination: RGB
• MAX. Power: 4 x 75W (300 Watts)
- PLL Electronic Tuning Radio Tuner
• ISO with 4 Pin/8 Pin Wire Connector
- Stereo/Mono Mode Selectable
• Audio Control: Treble, Bass, Balance, Fader
- Preset EQ: Flat/Pop/Rock/Class/Jazz/Off
- Switchable USA/Europe Tuner Frequencies by Software
• Max. USB Support: 64GB
• Power: DC 12V
• Current Consumption: 10A
- Product Dimension: 2.7" x 7.1" x 3.9" - inches
PLMR3DNWT
Marine Stereo Receiver Power Amplifier & Speaker Kit
AM/FM/MP3/BT/USB/AUX, Marine Stereo Receiver, Double DIN, 30 Preset Memory Stations, LCD Display with Remote Control & 1 Pair of PLMR60W
Features:
• AM/FM/MP3/USB/AUX Marine Stereo Receiver
- Double DIN
- White / Grey button Panel, with 1 Pair PLMR60W
• LCD Display with Remote Control
• Marine Stereo Receiver System
• AM/FM Stereo Radio, 30 Station Memory
• Wireless BT Audio Ability
• Aux (3.5mm) Input Connector Jack
- Connect & Stream Audio from External Devices
• MP3 Digital Audio File Playback
- LCD Display Panel
- Front Aux-in, Front USB, No SD Card Reader
- Electronic Volume Control (Treble, Bass, Balance, Fader) Memory/Repeat/ Random/Intro Play
• EQ / Mute / Clock Control, English ID3
• ID3 Tag Song Readout for Artist Name/Song Title
• VA LCD/White Back-Light, Night Illumination: RGB
• 2 Pair RCA Output, ISO connector Line Out
• Equalizer (EQ) Electronic Audio Configuration
• Automatic Memory Preset Store/Scan Mode
- Repeat/Random Song Functions
Technical Specs:
- Remote Control Battery Operated, Requires (1) Coin-Type Battery
- Battery Type: 3V Lithium Bat. 240mAh Capacity
• Night illumination: RGB
• MAX. Power: 4 x 75W (300 Watts) - PLL Electronic Tuning Radio Tuner
• ISO with 4 Pin/8 Pin Wire Connector - Stereo/Mono Mode Selectable
• Audio Control: Treble, Bass, Balance, Fader - Preset EQ: Flat/Pop/Rock/Class/Jazz/Off
- Switchable USA/Europe Tuner Frequencies by Software
• Max. USB Support: 64GB
• Power: DC 12V
• Current Consumption: 10A - Product Dimension: 2.7" x 7.1" x 3.9" - inches
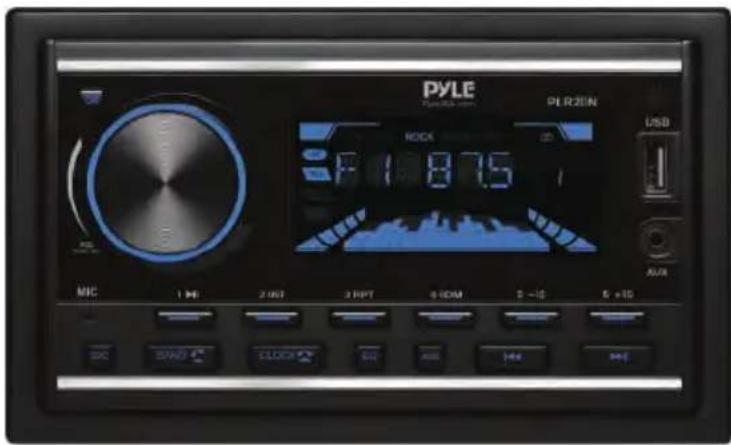
PLR2DN
What's in the Box:
- Stereo Receiver
• ISO 4 Pin Power & 8 Pin Speaker Wiring Harness - Outer Trim frame Cover
- Remote Control

PLMR2DNBK
What's in the Box:
- Stereo Receiver
• ISO 4 Pin Power & 8 Pin Speaker Wiring Harness - Outer Trim frame Cover
• 1 Pair of Marine Grade Speakers PLMR60B - Remote Control
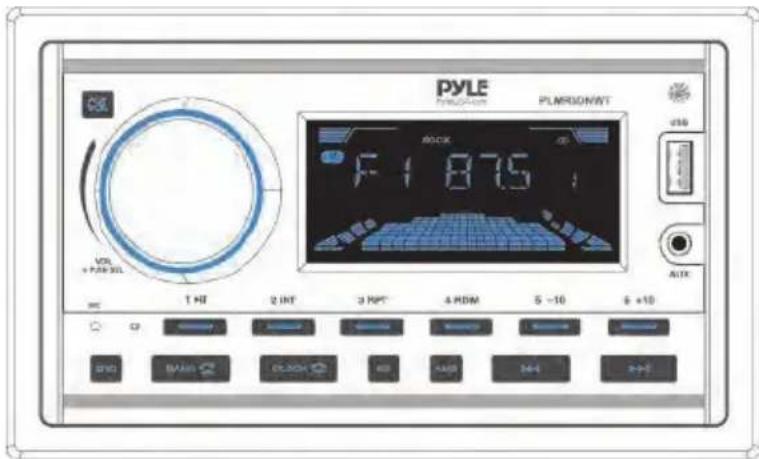
PLMR3DNWT
What's in the Box:
- Stereo Receiver
• ISO 4 Pin Power & 8 Pin Speaker Wiring Harness - Outer Trim frame Cover
• 1 Pair of Marine Grade Speakers PLMR60W - Remote Control
WIRELESS BT CONNECTIVITY:
• Built-in BT for Wireless Music Streaming
• Built-in Microphone for Hands-Free Calling
- Conveniently Reject/Answer Incoming Calls
- Compatible with All of Your Favorite Wireless BT Devices (iPhone, Androids, Smartphones, iPad, Tablets, etc.)
- Wireless BT Version: 4.2
PYLE
PyleUSA.com

natural_image
Illustration of a laptop with a red checkmark on screen, next to a keyboard (no text or symbols)VISIT US ONLINE:
Have a question?
Need service or repair?
Want to leave a comment?
PyleUSA.com/ContactUs

Questions? Issues?
We are here to help!
Phone: (1) 718-535-1800
Email: support@pyleusa.com
- To ensure correct operation and avoid damage, please read this user manual carefully before using this product.
- INSTALLATION
- Installation Procedures
- Installation Opening
- To Install the Car Radio
- GENERAL OPERATION
- Turn Unit ON/OFF, Change the Source
- Adjust the volume (VOL)
- Adjust Menu Options (SEL)
- Setting the Clock (CLOCK)
- Change the Source (MODE)
- Mute ON/OFF
- USB Port
- AUX IN (Auxiliary Input) Jack
- Reset Button
- RADIO OPERATION
- Switch Between USA area and Europe area Frequency
- Change Bands
- To Store/Recall Preset Stations
- Manual Tuning
- In the radio mode:
- Seek Tuning
- Automatic Store Preset station (AMS)
- Automatic Preset Scan
- LOCAL/DX
- STEREO/MONO
- USB OPERATION
- To insert USB
- Select Next Track or Previous Track
- Fast Forward/Reverse
- Play/Pause
- Introduction Scan
- Repeating the track
- Playing all tracks in random
- Track/Folder Navigation
- Select the track or file for playback in MP3 format
- Before using a Wireless BT device for the first time, it must be paired and connected.
- Making a Call
- Answer a Call
- Redial Last Dialed Number
- Reject or End a Call
- Switch Audio Between Car Audio and mobile Phone
- Adjust Call Volume
- Audio Streaming (A2DP)
- AUXILIARY OPERATION
- REMOTE CONTROL
- Note:
- PLR2DN
- Stereo Receiver Power Amplifier
- Features:
- Technical Specs:
- PLMR2DNBK
- Marine Stereo Receiver Power Amplifier & Speaker Kit
- PLMR3DNWT
- What's in the Box:
- WIRELESS BT CONNECTIVITY:
- PYLE
- PyleUSA.com
- VISIT US ONLINE:
Brand : Pyle
Model : PLMR2DNBK
Category : Car radio