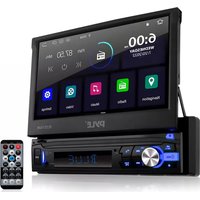
PLTS73UB - Car radio Pyle - Free user manual and instructions
Find the device manual for free PLTS73UB Pyle in PDF.


| Product Type | Car Stereo |
| Brand | Pyle |
| Model | PLTS73UB |
| Dimensions (W x H x D) | 7.1 x 2.0 x 6.1 inches (Standard DIN) |
| Weight | 2.2 lbs |
| Power Supply | 12V DC, negative ground |
| Max Power Output | 4 x 50 Watts |
| RMS Power Output | 4 x 18 Watts |
| Audio Playback | CD, CD-R, CD-RW, MP3, WMA |
| Inputs | Front USB, SD/MMC card slot, 3.5mm Aux |
| Radio Tuner | FM/AM with 30 presets |
| Display | LCD with blue backlight |
| Equalizer | Preset EQ modes (Classic, Rock, Pop, Flat) |
| Remote Control | Included wired remote |
| Supported File Systems | FAT16, FAT32 for USB/SD |
| Cleaning | Use a soft dry cloth; avoid solvents |
| Safety | Fuse rating: 10A; replace with same type |
| Spare Parts & Repairability | Contact Pyle customer service for replacement parts |
| General Information | Designed for dashboard mount; compatible with most vehicles |
Frequently Asked Questions - PLTS73UB Pyle
User questions about PLTS73UB Pyle
0 question about this device. Answer the ones you know or ask your own.
Ask a new question about this device
Download the instructions for your Car radio in PDF format for free! Find your manual PLTS73UB - Pyle and take your electronic device back in hand. On this page are published all the documents necessary for the use of your device. PLTS73UB by Pyle.
USER MANUAL PLTS73UB Pyle
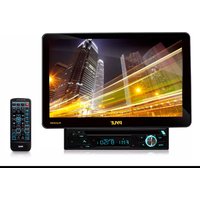
with Multimedia Player, BT Wireless Streaming, Hands-Free Talking, Motorized Fold-Out 7" Touchscreen Display, MP4/MP3/USB/SD/AM/FM Radio, Single DIN
USER GUIDE
CONTENTS
Safety Information 3
Precautions 3
Installation 4
Control Panel 6
Remote Control 8
Set Up Operations 10
Radio Operations 13
USB/SD Card Device Operations 14
Wireless BT Operations 16
Android Phone Link Operations 17
Features 19
Technical Specs 20

Download the "Phonelink" Apk from Google Play Store
IMPORTANT:
- Do not operate this digital video player while the vehicle is moving.
- This is a safety feature to prevent driver distraction.
- It's illegal in most country for the driver to view video while the vehicle is moving.
- The digital video functions will only be operated when vehicle is parked and the parking brake is engaged.
To establish a safe level:
Start your volume control at a low setting.
- Slowly increase the sound until you can hear it comfortably and clearly, and without distortion.
- Once you have established a comfortable sound level, set the dial and leave it there.
Precautions:
- To reduce the risk of fire, electric shock, and interference, do not attempt to repair this product yourself. Refer all servicing to a qualified technician.
- Do not switch ON this digital video player for a long time when the vehicle's motor is switched off. This could cause the vehicle's battery to discharge and battery may not be able to provide enough power to fire up the engine
- Do not apply strong mechanical stress like drop, shock or any force to the TFT LCD. Do not hard hit, press or rub the TFT LCD display surface. If the display surface is dirty, please wipe the surface softly with cotton swab or clean cloth.
- Never place any foreign objects into the openings of this product such as USB port, SD slot, AUX IN jack. Otherwise you might damage the slots and connectors.
- Do not throw the battery cell of remote control into fire as this may cause an explosion. Keep battery cells out of reach of children.
INSTALLATION:
Before Installation:
• We recommend you to let a professional technician install the unit in the vehicle.
- Disconnect negative battery terminal of vehicle.
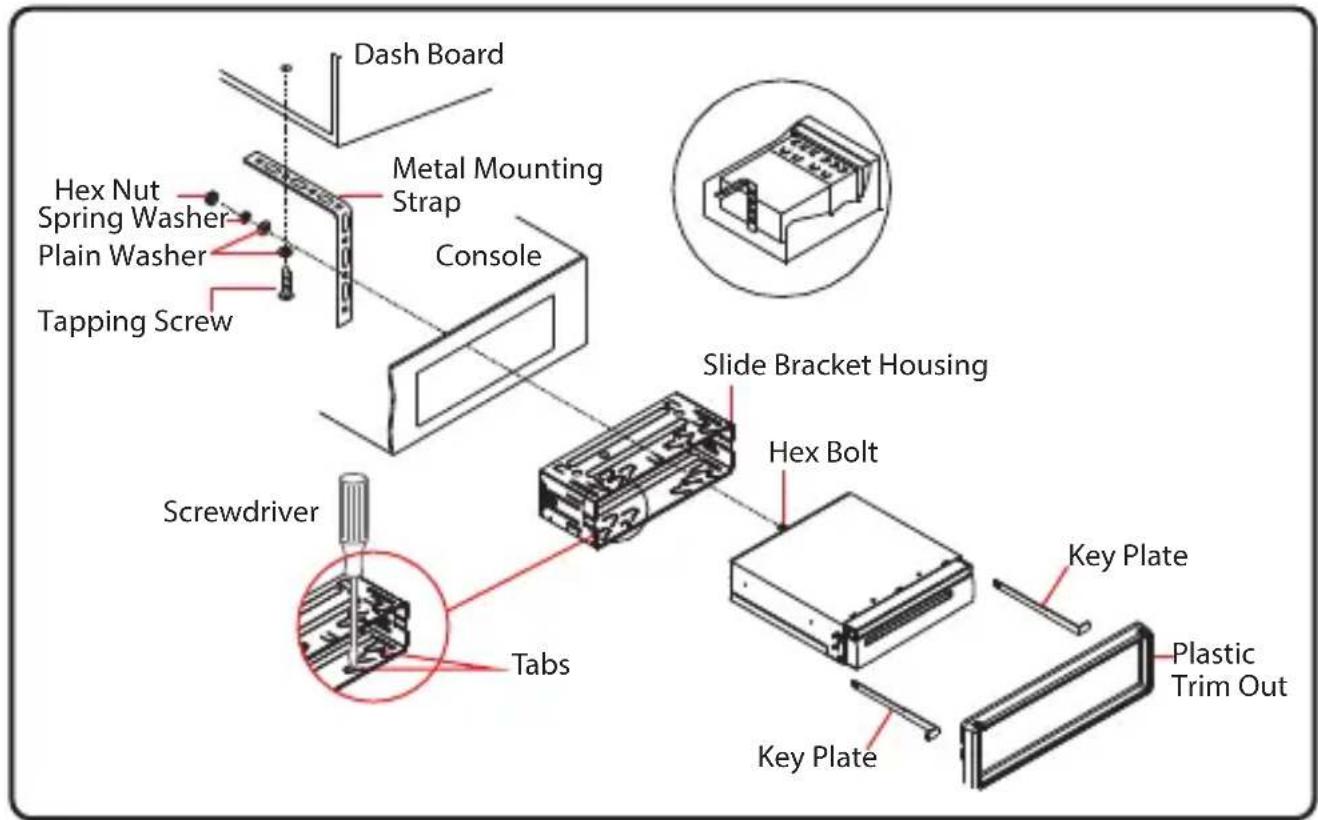
Installation Process:
- Carefully remove the existing head unit.
- Before finally installing this product, connect wiring harness temporarily and make sure it's all connected up properly and test the head unit if it can work properly. (Consult a qualified technician if you unsure)
- Lift the left or right top corner of the plastic outer trim ring then pull it off to remove it.
- Insert the two bracket keys into the left and right side of the chassis to separate the chassis from the housing.
- Insert the mounting sleeve into the dashboard and bend the mounting tabs out with a screwdriver. Make sure that the lock lever is flush with the mounting sleeve and it dose not project beyond it.
- Slide the digital video player carefully into the already fixated mounting sleeve till it clicks into place.
- Use a metal strap to fix the rear part of the chassis.
- Connect wires as illustrated in the "wiring diagram".
• Install the plastic outer trim ring.
Note: If you need other screws to fix other terminal, please buy from your dealer according to the drilling of holes size.
Wiring Connections:

Audio/Video I/O Connections
- Rear Camera Video Input (Yellow)
- Front Camera Video Input (Yellow)
- Subwoofer Output (Green)
- Video Input (Yellow)
- Audio Input Left CH (White)
- Audio Input Right CH (Red)
- Video Output (Yellow)
- Left RCA Output (White)
- Right RCA Output (Red)
Speaker/Power Connections

Note: the ground connection cable (parking brake B-) must be connected in order for pictures to be played back to the monitor. If the cable has not been correctly connected, warning message appears on the monitor.
Control Panel Buttons:

1. OPEN/ BUTTON
- Briefly press this button to slide the monitor out of slot.
• Repeatedly press this button to tilt up and down the monitor. - Press and hold this button to slide the monitor inside of the slot.
2. /MODE BUTTON
In power off mode, press it to turn ON the unit. Long press to turn off the unit. In power on mode, short press it repeatedly to select one mode of the RADIO, USB, SD Card, Phonelink, Bluetooth and AUX IN(AV IN).
3. Volume KNOB / SELECT BUTTON
Rotate the VOL knob to increase or decrease the volume level.
Press the SEL button to turn to audio settings: Volume, Dimmer, Balance, Fader, Lound On/off, EQ Standard/Pop/Classic/Rock/Jazz.
4. Handsfree Microphone
Uses the bluetooth handsfree system to receive your voice when calling.
5. IR REMOTE SENSOR
6. BAND, Make a Call, Reject and End Call (☐)
In radio model, press BAND to select between FM1, FM2, FM3, AM1 and AM2 bands.
In BT mode, press to reject an income call or end a call.
7. Tune Previous/ Skip Previous track,
In Radio mode, press to scan strong singal radio station downward step by step. Press and hold it to tune radio frequency downward one step at a time.
In USB/SD card/BT music playback, press this button to skip previous track.
Press and hold to fast backward playback.
8. Tune Next/ Skip Next track
In Radio mode, press it to scan strong singal radio station upward step by step.
Press and hold it to tune radio frequency upward one step at a time.
In USB/Micro SD card/BT music playback, press to skip next track.
Press and hold to fast forward playback.
9. MUTE ON/OFF,
In power on mode, press the MUTE button to toggle mute on or off.
10. Receive and Redial Last Call ( )
In BT phone mode, press the ↗ button to make a call / receive a call / redial the last dialed phone number.
11. ▶ (PLAY/PAUSE) /CH 1-6 (PRESET RADIO STATION)
In USB/SD card/BT music playback mode
Press this button to pause playback, touch again to resume playback.
In Radio Mode
Press repeatedly to preset radio station. With this system a total of 30 stations can be stored in the memory. Each band store up to six preset stations.
The stations might be FM1, FM2, FM3, AM1 (MW1) and AM2 (MW2) band.
To retrieve a preset station
Press repeatedly this button to recall the preset stations which had been stored in the memory in advance.
12. USB PORT
Open the cover for USB device use.
The USB port is designed for media playback from flash memory devices and
1 Amp charging for most iPhone / andriod mobile phone.
13. Micro SD Card Slot
This Micro SD card slot is designed for media playback from Micro SD card.
14. AUXILIARY INPUT JACK
Insert an external device to this 3.5mm auxiliary jack in order to have audio output of the device through the unit.
15. RESET SYSTEM
The RESET button is used to reset all parameters to factory default settings. This function may be used when the LCD does not display normally or sound is distorted, or when any of controls are disabled. Gently press the RESET button to reset your system with a thin object with a pointed end.
REMOTE CONTROLS:

1. OPEN /
Briefly press this button to slide the monitor out of slot.
Repeatedly press this button to tilt up and down the monitor.
Press and hold this button to slide the monitor inside of the slot.
2. Power ON/OFF, MODE
Press it to turn the unit ON, press and hold to turn the unit OFF.
During power on, press it briefly to select between RADIO, USB, SD Card,
Phonelink, Bluetooth and AUX IN(AV IN).
3 & 7. ▶▶/ ◀◀
In USB/SD Playback mode, press each one to fast forward and fast backward playback with X2, X4, X8, X16 speed.
In Radio mode, press each one to select the next or the previous preset station.
4. AS /
In Radio mode, press and hold AS for more than 2 seconds to store 18 FM stations and 12 AM stations automatically. Press it briefly to recall each preset station that stored in memories in each band.
Press the ↗ button to make a call / receive a call / redial the last dialed phone number.
5. ▶ (Play/Pause)
In USB/SD/BT music playback mode, press to pause playback. Press again to start where playback stopped.
6 & 17. / ▶.
In USB/SD/BT music playback, press both buttons to skip next or previous track. In Radio mode, press each one to seek tuning down or up.
Tap and hold each one to enter manual scan mode, then short tap this button to move radio frequency down or up one step at a time.
8. TITLE: Not Available
9. RPT (Repeat playback) / 2
In USB/SD playback mode, press and hold the RPT button to enter different repeat playback modes: Repeat Track, Repeat All, Repeat Cancell. In radio mode, press to store or recall the preset station 2.
10. DISP / 1
In video playing mode, press and hold the DISP to show information such as Title number, Chapter number, Track number, elapsed time, remain time etc.. In radio mode, press to store or recall the preset station 1.
11. AUDIO / 5
In video playing mode, press and hold the AUDIO button repeatedly to switch the language of audio if the video is recorded with multi-languages. In radio mode, press to store or recall the preset station 5.
12. MENU / 4
MENU: Not Available In radio mode, press to store or recall the preset station 4.
13 & 21. VOL+/VOL
Use both controls to adjust the volume level.
14. SEL
Press to turn to Volume, Dimmer, Balance, Fader, Lound On/off, EQ Standard/Pop/Classic/Rock/Jazz.
15. MUTE
In power on mode, press the MUTE button to toggle mute on or off.
16. BAND /
Press the BAND button to select between FM1, FM2, FM3, AM1 and AM2 bands. In BT mode, press to reject an income call or end a call.
18. EQ
Press repeatedly to cycle through the different equalizer curve presets you may wish to use.
19. RDM / 3
In USB/SD Playback mode, press and hold the RDM button to play tracks in random order, press again to cancel the RDM function. In radio mode, press to store or recall the preset station 3.
20. SUB-T/6
SUB-T: Not Available In radio mode, press to store or recall the preset station 6.
Setup Operations:
Main Menu:
In each mode, touch the 📄 icon to enter the main menu as below image. In the main menu screen, press the desired icon to enter each of the following settings: Radio, Bluetooth (Phone & Music), USB, SD Card, Phonelink, AUX In (AV In), F. CAM (Front View Camera), Setup.

In main menu, touch the 📁 icon to enter the setup menu, as below images. Then user can set up or adjust the general settings for this multimedia player.


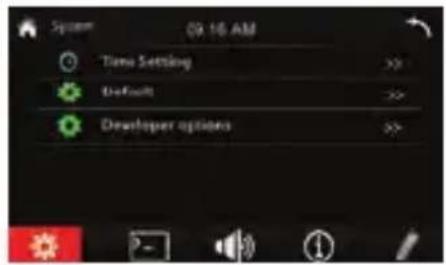
A. System: Logo Setting, Radio Area, OSD Language, Screensaver Mode, Beep, Parke Control, Camera Mirror Image, Auto Front Camera On/Off, SWC, RGB LED Setting, Time Setting, Default.
- Logo Setting: To set a logo as the splash screen for this multimedia player.
- Radio Area: To choose the radio area: EUROPE, Northen America, South America, Russia, Japan, Asia.
- OSD Language: English, Chinese, Arabic, Greek, Thai, Hebrew, Turkish, Russian, French, German, Spanish, Persian, Indonesian, Portuguese, Italian.
- Screensaver Mode: Enables or Disables the screensaver of this multimedia player.
- Beep: Enables or Disables the beep buzzer signal to confirm use.
- Parke control: Enables or Disables the brake detection.
This safety feature to prevent driver distraction. We recommend user to enable this brake detection function. When enable this function, user were forbidden to watch video from this unit while this system is not detect the brake signal of the parking brake.
- Camera Mirror Image: Enables or Disables the camera mirror image.
- Auto Front Camera: Allows you to preset the duration of the front view camera video: Off, 5 seconds, 10 seconds, 15 seconds.
• SWC(Steering Wheel Control)
Tap "SWC" to enter the study operation menu. First, make sure the SWC connecting wires have been connected to this unit.
Before study, tap the 📁 icon to clear all previous settings.
Press and hold a steering wheel button, at the same time, tap the function button on touch screen that you want to set on to the steering wheel.

- RGB LED (Key Lights):
To preset the color of button illumination: Red, Blue, Purple, Green, Yellow, Cyan, White, Auto(color automatically change one by one), LED Off.
- Time Setting:
Tap the "Time Setting" to enter the time setting interface, tap the ▲ and ▼ button to adjust Year, Month, Day, Hour, Minute.
Tap the 📄 button to preset 12 or 24 Hours format as sytem clock time format.
Tap the 📄 button to preset date format.
- Default
Tap this item to restore to all parameters to factory default settings.

B. Screen(Video Settings)
Tap the 📄 icon to set up the video parameter of screen:
- Adjust(Video Parameter Settings)
Tap this item to set the Brightness, Contrast, Hue, Saturation, Sharpness of this TFT screen.
- Brightness: 00, \~, 36
- Contrast: 00, \~, 36
- Hue: 00, \~, 36
- Saturation: 00, \~, 36
- Sharpness: 00, \~, 36


Tap the 📞 icon to clear all previous settings.
- Touch Calibration
Touch this item to enter touch screen calibration mode, tap the cursor "+" continuously until it move to next position. Follow the cursor to finish the calibration of touch screen.
• Wallpaper: To change the wallpaper.
C. Audio Settings
Tap the icon to enter the audio setting:
Tap the "car" icon to enter the sound effect mode, tap the EQ button to enter EQ setting.
- Sound effect:
Tap the FL, FR, RL, RR, ALL button to preset the sound effect in car. Move the blue circle at the middle of "car inside" interface to quick preset sound effect for driver, front seat passenger, left back passenger, right back passenger and all passengers in the car.
- Tap the "💡" button to clear all the audio settings.
- Tap the "D" button to exit from the audio setting.
- EQ Presets:
- User can preset EQ: Standard -> POP -> Classic -> Rock -> Jazz.
- Tap LOUD button to enables or disables loudness.
- Tap SUB button to enables or disables subwoofer output.


D. Version (System information)
Tap this item to view the software version.
E. Version (Factory Setup):
Tap this item to enter factory setup.
Radio Operations:
Press MODE button on the control panel or on the remote control, or tap the "Radio" icon on touch screen until Tuner is selected.
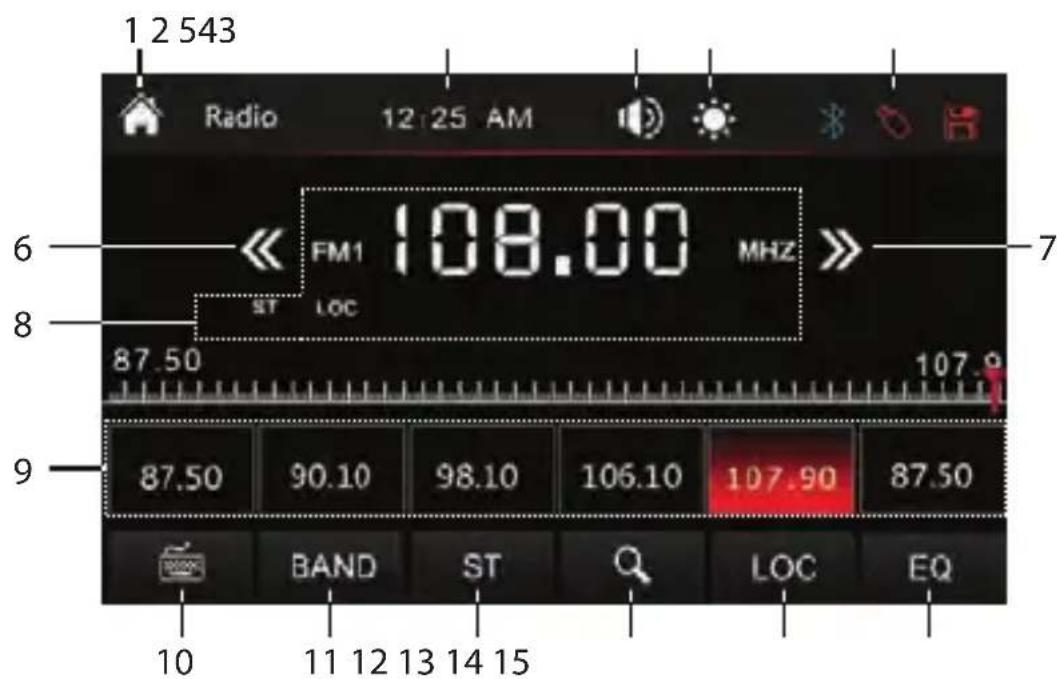
- Home Page
- Clock Time
- Volume Level Adjust
- TFT Screen Backlight brightness Adjust
- Active Media
6/7. Tune/Seek Down & Tune/Seek Up
Tap this button to seek tuning down or up.
Tap and hold this button to move radio frequency down or up one step at a time.
-
Current Radio Reception State
-
Preset Stations
Tap and hold one of preset station touch buttons to store the preset station.
Tap one of preset station touch buttons to recall the preset station.
-
Input a specific radio frequency
-
Band Selector
- Stereo/Mono Reception
-
(Automatic Store Preset Stations, Automatic Scan Preset station)
Tap and hold this button for more than 2 second to store station automatically.
Tap this button to recall each preset station that stored in the memories. -
DX/LOC Reception
- EQ/Audio Setting
USB/SD Card Operations:
USB Connection, Mini SD Card Slot
The USB port is designed for media playback from a flash memory device.
The mini SD card slot is designed for media playback from mini SD card.
If you would like to play video/song/photo files contained in a USB flash memory device or SD card, please insert the USB flash memory device into the USB port or insert a mini SD into the mini SD card slot. The unit will play automatically video/song/photo files.
Note: This USB port is also designed for charging for iPhone/android mobile phone. The charging current consumption is 1 ampere.
- Music Playback
Press the MODE button on the remote control, or tap the "USB" or "SD" icon on home page of to switch music playback from a USB flash memory device.


- Home Page
- Clock Time
- Volume Level Adjust
- TFT Screen Backlight Brightness Adjust
- Active Media
- Previous Track / Fast backward
- Play/Pause
- Next Track / Fast forward
- Sort the List of the Folders and Files
-
View the Music File List
-
Next Page
- Previous Page
- Repeat Playback
- Random Playback
- Audio Settings
- View the Root Directory
- View the Music Files/Folders
- View the Video Files/Folders
- View the Photo Files/Folders
- Return
USB/SD Card Operations:
- Movie Playback:

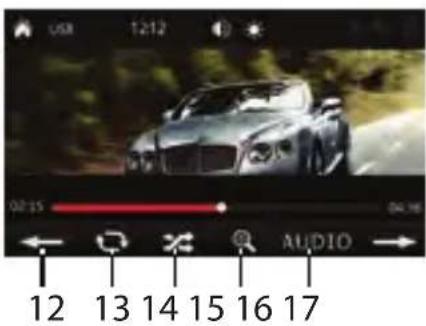

- Home Page
- Clock Time
- Volume Level Adjust
- TFT Screen Backlight Brightness Adjust
- Active Media
- Previous Movie / Fast backward
- Play/Pause
- Next Movie / Fast forward
-
Sort the List of the Folders and Files
-
View the Movie File List
- Next Page
- Previous Page
- Repeat Playback
- Random Playback
- Zoom In/ Zoom Out
- Multi-Audio Language
- Multi-Subtitle Language
- Audio Settings
- Photo Playback:

5
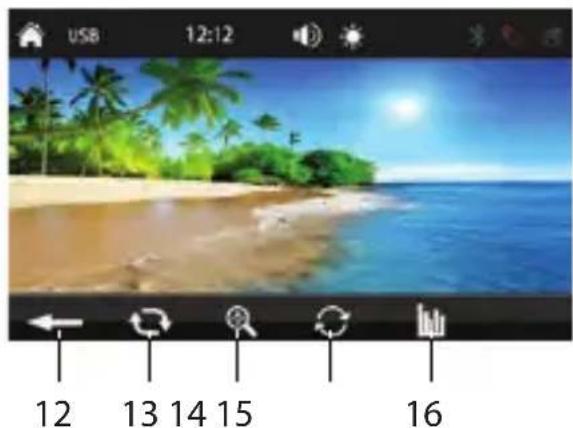
- Home Page
- Clock Time
- Volume Level Adjust
- TFT Screen Backlight Brightness Adjust
- Active Media
- Previous Photo
- Play/Pause
-
Next Photo
-
Sort the List of the Folders and Files
- View the Photo File List
- Next Page
- Previous Page
- Repeat Playback
- Zoom In/ Zoom Out
- Rotate Photo
- Audio Settings
Wireless BT Operations:
Pairing and Connecting
Before using a Wireless BT phone with this unit, the phone must be paired and connected. The Wireless BT signal of the unit will broadcast when the power is on. This multimedia player will displayed as "PyleUSA" on your phone. When prompted, enter the pass code "0000" on your phone. Once paired, the BT phone should automatically connect this unit whenever the unit is in range.
Make a call
Input the phone number by using the keypad in Wireless BT mode.
Making and Ending a Call
Tap 📞 to make a call, and tap 🏠 to end a call.
Redial last dialed number
Tap to redial the last dialed phone number.
Transferring Audio
Tap 📄 icon to transfer audio between this car BT hands-free system and mobile phone.

Disconnect or reconnect Wireless BT connection
Tap to disconnect the BT connection.
Tap to reconnect the BT connection.

Viewing Recent Call List
Tap 📋 icon to view the income calls.
Tap 📋 icon to view the outgoing calls.
Tap 📞 icon to view the missed calls.
Tap 📄 icon to refresh the recent call list.

Contacts List (Phonebook)
Tap 📄 icon to view the contacts(phonebook).
Tap 📄 icon to refresh the phone book.
Tap 🔒 icon to and input a key-letter to retrieve the specified contacts.

Streaming Audio
In Wireless BT phone mode, tap icon to change to BT music (A2DP) mode.
Tap 🔊 icon to skip to the previous track.
Tap ▶ icon to play or pause the music.
Tap 📋 icon to advance to the next track.
Setup
Tap 📄 icon to set auto connect, auto answer and Pin Code.
Audio Settings
Tap 📄 icon to set sound effect and EQ settings.
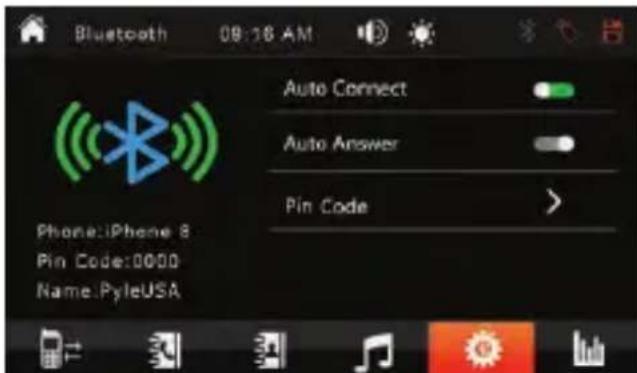
Android Phone Link Operations:
Phone link allows you to mirror the screen of certain Android smartphones on the screen of this car DVD player. Simply connect your device to the USB port and you're ready to see your favorite smartphone apps directly on the screen.
- Android phone link:
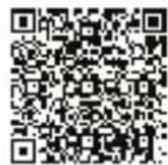
1) Please scan one of QR code on right side to download the "Phonelink" app and install it to your smartphone.
AMAZON
GOOGLE
2) Connect the original cable of your Smartphone, first to the car DVD player in the USB port, and then connect it to your phone.
3) Now the car DVD player's screen will do the mirror function with your smartphone and you will be able to run any application or function of your smartphone.
Using of the Icons:
- ← : Return to the previous step
- △ : Return to home page of smart devices
- ☐ : Landscape mode (Rotate the screen)
- ☐ : Exit the phone link mode

Note:
a. To unlink your smartphone from the car DVD player, just disconnect the USB cable again.
b. For Android smart devices, this unit support two-way control (both by the car DVD player and connected smart devices).
c. For Android smart devices, the Wireless BT must be connected, to have sound output.
d. Some phones do not support Landscape mode on the home screen.

natural_image
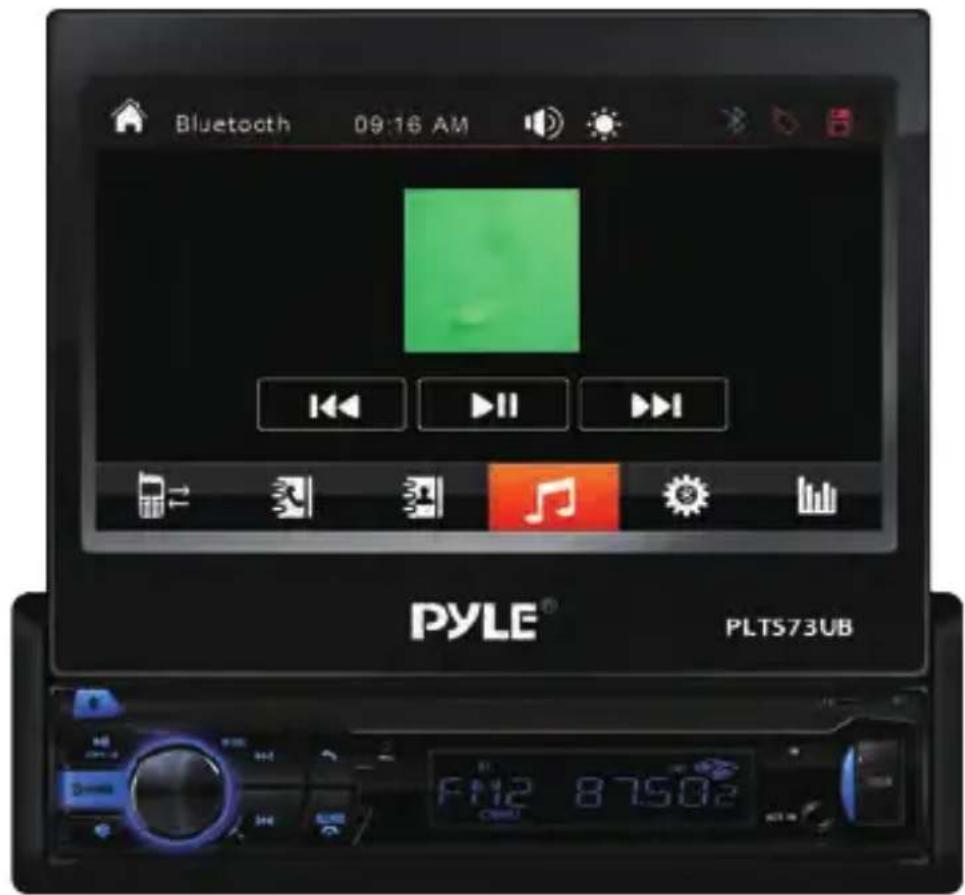
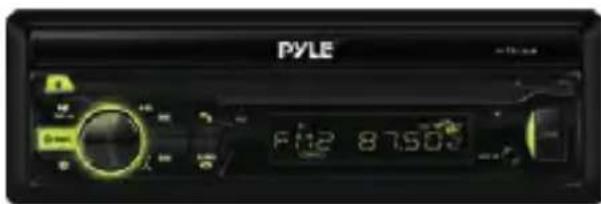
Abstract colorful fan-like design with rainbow gradient petals (no text or symbols)Multi-Color Receiver Display


Features:
• Multimedia Stereo Radio Receiver
- 7" -inch HD Video Display
• Wireless BT Music Streaming
• Built-in Microphone for Hands-Free Talking
- CD/DVD Player
- Touchscreen Control
- User-Friendly Control Interface
• AM/FM Radio with LCD Display
- Connect & Stream Audio from External Devices
• MP3 Digital Audio File Playback
- Front Panel Aux (3.5mm) Jack
- Motorized Fold-Out Video Screen Display Panel
- Backup Camera Support: Rear Camera/Parking Video Input
• Multi-Color Receiver Illumination Display
Wireless BT Connectivity:
• Built-in wireless BT for Wireless Music Streaming
- Hands-Free Calling Ability with Built-in Microphone
- Compatible with All of Your Favorite Wireless BT Devices (iPhone, Androids, Smartphones, iPad, Tablets, etc.)
- Convenient Contact List Import Ability
• Digital Phone Dial Pad Display
- Wireless BT Version: 4.1
- Wireless BT Network Name: 'PyleUSA'
• Wireless BT Network Password: '0000'
- Wireless Range: 15' ft.
California Prop 65 Warning

WARNING:
This product contains Di (2-ethylhexyl) phthalate (DEHP) which is known to the state of California to cause cancer birth defects and other reproductive harm. Do not ingest.
For more info go to: www.P65warnings.ca.gov
What's in the Box:
- Single DIN Receiver
- Remote Control
• Power & Wiring Harness
Technical Specs:
- Single DIN Size Universal Standard
• Power Output: 4 x 80 Watt (320 Max.) - Wide Screen TFT - LCD Display
- Pixel Resolution: 800 x 480 Pixels
- Brightness: 400 Nits
- Aspect Ratio 16:9 High Definition
• Video System: NTSC/PAL (Auto Recognition) - Response Time: Up 30 ms, Down 50 ms
• AM/FM-MPX 2 Band Radio - Auto Store, Preset, Scan
• Wireless BT A2DP, AVRCP Support - Impedance: 4 Ohm
• Signal to Noise Ratio: 70dBA
• Frequency Response: 20Hz - 20kHz - PLL Synthesizer Tuner - 30 Station Memory
- ESP (Electronic Shock Protection) - Anti-Shock Mechanism
• Anti-Shock Mechanism-ESP Function
• LO/DX & ST/MO Selector - PLL Synthesizer Tuner
- Clock - Mute - Preset EQ
- Treble/Bass/Balance/Fader/Encoder Volume
- Connection Interface: AV (RCA) Inputs/Outputs - Subwoofer
- File Compatibility: JPEG, MP3, MP4, AVI, WAV and More
• Working Voltage: DC 12V - Chassis Dimensions (W x H X D): 7.01" x 1.98" x 6.54"-inches
PYLE
PyleUSA.com

natural_image
Illustration of a laptop with a red checkmark on the screen (no text or symbols)VISIT US ONLINE:
Have a question?
Need service or repair?
Want to leave a comment?
PyleUSA.com/ContactUs
Questions? Issues?
We are here to help!
Phone: (1) 718-535-1800
Email: support@pyleusa.com
- CONTENTS
- IMPORTANT:
- To establish a safe level:
- Start your volume control at a low setting.
- Precautions:
- INSTALLATION:
- Before Installation:
- Installation Process:
- Wiring Connections:
- Audio/Video I/O Connections
- Speaker/Power Connections
- Control Panel Buttons:
- OPEN/ BUTTON
- /MODE BUTTON
- Volume KNOB / SELECT BUTTON
- Handsfree Microphone
- IR REMOTE SENSOR
- BAND, Make a Call, Reject and End Call (☐)
- Tune Previous/ Skip Previous track,
- Tune Next/ Skip Next track
- MUTE ON/OFF,
- Receive and Redial Last Call ( )
- ▶ (PLAY/PAUSE) /CH 1-6 (PRESET RADIO STATION)
- In USB/SD card/BT music playback mode
- In Radio Mode
- To retrieve a preset station
- USB PORT
- Micro SD Card Slot
- AUXILIARY INPUT JACK
- RESET SYSTEM
- REMOTE CONTROLS:
- OPEN /
- Power ON/OFF, MODE
- & 7. ▶▶/ ◀◀
- AS /
- ▶ (Play/Pause)
- & 17. / ▶.
- TITLE: Not Available
- RPT (Repeat playback) / 2
- DISP / 1
- AUDIO / 5
- MENU / 4
- & 21. VOL+/VOL
- SEL
- MUTE
- BAND /
- EQ
- RDM / 3
- SUB-T/6
- Setup Operations:
- Main Menu:
- Screen(Video Settings)
- Audio Settings
- Radio Operations:
- USB/SD Card Operations:
- USB Connection, Mini SD Card Slot
- - Music Playback
- - Movie Playback:
- - Photo Playback:
- Wireless BT Operations:
- Pairing and Connecting
- Make a call
- Making and Ending a Call
- Redial last dialed number
- Transferring Audio
- Disconnect or reconnect Wireless BT connection
- Viewing Recent Call List
- Contacts List (Phonebook)
- Streaming Audio
- Setup
- Audio Settings
- Android Phone Link Operations:
- - Android phone link:
- Using of the Icons:
- Note:
- Features:
- Wireless BT Connectivity:
- California Prop 65 Warning
- WARNING:
- What's in the Box:
- Technical Specs:
- PYLE
- PyleUSA.com
Brand : Pyle
Model : PLTS73UB
Category : Car radio