M12HP - Cooker Magic Chef - Free user manual and instructions
Find the device manual for free M12HP Magic Chef in PDF.

User questions about M12HP Magic Chef
0 question about this device. Answer the ones you know or ask your own.
Ask a new question about this device
Download the instructions for your Cooker in PDF format for free! Find your manual M12HP - Magic Chef and take your electronic device back in hand. On this page are published all the documents necessary for the use of your device. M12HP by Magic Chef.
USER MANUAL M12HP Magic Chef
Commercial Gas Hot Plate
E-Series
User's Manual

natural_image
Line drawing of a four-tiered gas stove with cooling fans and side legs (no text or symbols)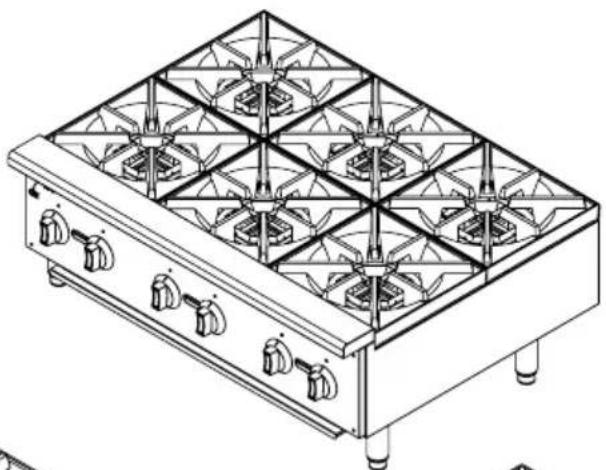
natural_image
Line drawing of a rectangular kitchen appliance with multiple heat sinks and grid-patterned top panel (no text or symbols)
natural_image
Line drawing of a four-tiered industrial gas stove with heat sinks and cooling fans (no text or labels)Model: M12HP / M24HP / M36HP
PLEASE READ THIS MANUAL CAREFULLY BEFORE USING YOUR COMMERCIAL GAS HOT PLATE AND KEEP IT FOR FUTURE REFERENCE.

Magic Chef®
COMMERCIAL E-SERIES
PRODUCT REGISTRATION
Thank you for purchasing a Magic Chef Commercial product. The first step to protect your new product is to complete the product registration on our website: www.mcappliance.com/register. The benefits of registering your product include the following:
- Registering your product will allow us to contact you regarding a safety notification or product update.
- Registering your product will allow for more efficient warranty service processing when warranty service is required.
- Registering your product could act as your proof of purchase in the event of insurance loss.
Once again, thank you for purchasing a Magic Chef Commercial product.
CONTENTS
PRODUCT REGISTRATION 2
PRECAUTIONS 4
IMPORTANT SAFETY INSTRUCTIONS 5
SPECIFICATIONS....7
INSTALLATION INSTRUCTIONS 8
OPERATING INSTRUCTIONS.... 10
CARE AND MAINTENANCE....13
TROUBLESHOOTING 14
LIMITED WARRANTY 15
PRECAUTIONS
EXPLANATION OF SYMBOLS
WARNING
Hazards or unsafe practices which COULD result in severe personal injury or death.
CAUTION
Hazards or unsafe practices which COULD result in minor personal injury or property damage.
⚠ WARNING: Read and understand all safety precautions. Failure to follow all instructions described in this user manual may result in electric shock, fire and/or serious personal injury. The warnings, cautions and instructions discussed in this user manual cannot cover all possible conditions and situations that may occur.
⚠ WARNING: If information in this manual is not followed exactly, a fire or explosion may result causing property damage, personal injury or death. DO NOT store or use gasoline or other flammable vapors and liquids in the vicinity of this or any other appliance.
WARNING: Gas Leak
• Gas leaks cannot always be detected by smell.
- Gas suppliers recommend that you use a gas detector approved by UL or CSA.
- For more information, contact your gas supplier.
- If a gas leak is detected, follow the "What to Do If You Smell Gas" section below.
⚠ WARNING: What to Do If You Smell Gas
• DO NOT try to turn on any appliance.
• DO NOT touch any electrical switch.
- DO NOT use any phones in the building.
- If the gas supplier cannot be reached, call the fire department.
- Installation and service must be performed by a qualified installer or service agency.
- Immediately call your gas supplier from a phone outside of the building. (Ex: Go to a neighbor's to call your gas supplier or fire department.)
IMPORTANT SAFETY INSTRUCTIONS
⚠ WARNING: When using gas appliances, basic safety precautions should be followed, including the following:
- Read all instructions before using the appliance.
- The appliance must be installed in accordance with required codes:
• In the United States:
State and local codes, or in the absence of local codes:
National Fuel Gas Code, ANSI-Z223.1/NFPA #54 (latest edition).
Copies may be obtained from The American Gas Association Accredited Standards Committee Z223, @ 400 N. Capital St. NW, Washington, DC 20001 or the Secretary Standards Council, NFPA, 1 Batterymarch Park, Quincy, MA 02169-7471.
NFPA Standard #96 Vapor Removal from Cooking Equipment, latest edition, available from the National Fire Protection Association, Batterymarch Park, Quincy, MA.
• In Canada:
Local codes:
CAN/CSA-B149.1 Natural Gas Installation (latest edition).
CAN/CSA-B149.2 Propane Installation Code (latest edition), available from the Canadian Gas Association 178 Rexdale Blvd., Etobicoke, Ontario Canada M9W 1R3.
- ▲ WARNING: If you smell gas, please keep away from fire. DO NOT light up any device or touch an electric switch. DO NOT use any phone in the building. Close the main gas valve immediately and call a professional service technician to check the unit.
- ⚠ CAUTION: High temperatures may cause scalding. DO NOT touch the appliance surface with hands directly due to high temperature during or after operation.
- Installation and maintenance should only be performed by certified professionals. Improper installation could result in serious harm or death and may void your warranty.
- Any self-modification, improper installation, adjustment or maintenance can lead to property loss or casualty. Please contact the manufacturer for any adjustment or maintenance, and have the work done by a trained & qualified person.
- DO NOT dismantle or modify the device. Any modification may cause casualty and void the warranty.
- Remove packing materials and check appliance for damage. If you have any questions or if there are any problems, call a maintenance person and DO NOT use the item. Keep packing material away from children.
- The appliance should only be used with low-pressure gas regulating valves. Use of other regulating valves may lead to loss and casualty.
- DO NOT place the appliance by any liquid, gas or object that is flammable or explosive.
- If the appliance is placed near walls, partitions, kitchen furniture, etc., be sure that they are made of non-combustible heat resistant materials, and follow all fire regulations.
- The appliance should be installed in a well-ventilated area with exhausting facilities to ensure that any gases produced are properly vented.
- This appliance should not be operated by anyone that is not able to follow proper safety procedures or does not have experience with this type of equipment, unless under close supervision.
-
Keep children away from the device.
-
Operating by the appliance incorrectly or improper maintenance may lead to gas leak or deflagration. The manufacturer is not responsible for fire or accidents resulting from by improper operation or maintenance.
- DO NOT put any flammable objects or materials on or near the burners.
- When first using, it may take a little longer to light due to the air existing in the new pipe. If the pilot cannot be lit, turn off the gas supply for 3-5 minutes to prevent deflagration.
- ALWAYS turn off when not using.
- This device is for commercial use only, not for use in any other application.
- This product is a commercial machine that needs to be operated by trained cooks and is not intended for home use.
- DO NOT put any heavy objects onto the appliance. Abnormal operation may cause damage.
- DO NOT put any object in the exhaust vent. Doing so may block the gas flue and cause harm.
- DO NOT use the appliance if nothing is on the burners.
- DO NOT damage the control panel with hard or sharp objects.
- DO NOT spray water directly to the appliance. Clean the stainless steel surface regularly to prevent damage caused by rust and chemical reactions.
- Keep this manual. When passing on/selling the device to a third party, the manual must be handed over along with the device. All users must operate the device complying with the user's manual and related safety guidelines.
- The manufacturer is not responsible for fire or accidents resulting from by improper operation or maintenance.
READ AND FOLLOW THIS SAFETY INFORMATION CAREFULLY SAVE THESE INSTRUCTIONS
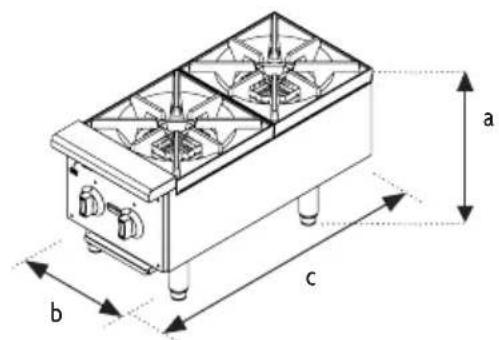
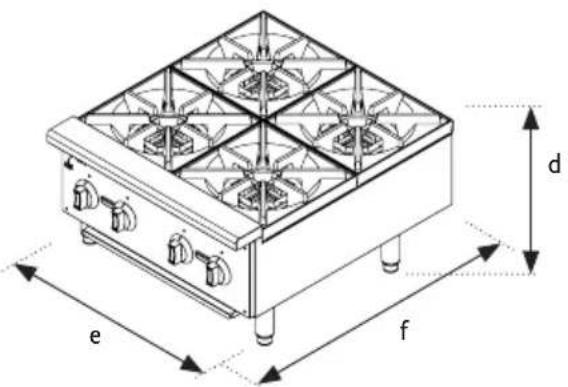
Figure 1
▲
Model M12HP
△
Model M24HP

△
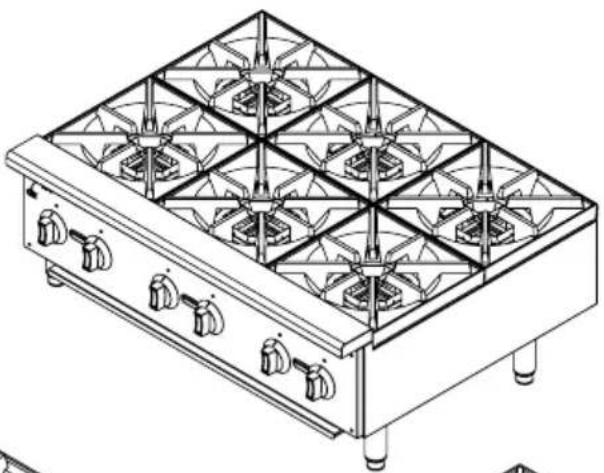
Model M36HP
a. 15.3" (389 mm)
b. 12.0 (305 mm)
c. 27.3" (693 mm)
d. 15.3" (389 mm)
e. 24.0" (610 mm)
f. 27.3" (693 mm)
g. 15.3" (389 mm)
h. 36.0" (914 mm)
i. 27.3" (693 mm)
| Model | Dimensions (H x W x D) | Thermal Power (BTU/KW) | Burners Net Weight | |
| M12HP | 15.3" x 12.0" x 27.3" | 50,000 | 2 | 95.0 lbs. (43.1 kg) |
| M24HP | 15.3" x 24.0" x 27.3" | 100,000 | 4 | 154.0 lbs. (69.9 kg) |
| M36HP | 15.3" x 36.0" x 27.3" | 150,000 | 6 | 220.0 lbs. (99.8 kg) |
INSTALLATION INSTRUCTIONS
TRANSPORTATION AND STORAGE
During transportation, the cooking equipment should be carefully handled. DO NOT place it upside down. The equipment should be stored in a well ventilated warehouse away from corrosive gas. If it needs to be stored outside temporarily, make sure it does not come in contact with rain.
INSTALLATION NOTE
Before installing, verify that the type of gas (natural or propane) matches the specifications on the data plate, which is located on the back or side of the appliance. Make sure the device is configured for the proper elevation.
Record your model and serial numbers for future reference in the space provided below. This information can be found on the data plate.
Model No: ____ Serial No: ____
- Installation should be performed by certified technicians.
- Connection of the device should conform to provisions of gas safety, installation and usage.
- Installation from the outlet end of the gas flow meter or service regulator to the gas pipe of the device should be performed by trained professional technicians. They should also test the cooking equipment first and make any adjustments.
- The device can be used only when four legs are installed correctly.
- This appliance should be installed on a stable, level and non-combustible surface (e.g. cement, ceramic tile, terrazzo or metal surface). Verify all local regulations. Make sure to leave clearance for proper ventilation.
- The appliance should have a minimum clearance of 0" (0cm) from non-combustible substance (e.g. walls, windows etc.), and 4"(10 cm) from combustible materials.
- The installation should allow for proper air flow for combustion and should not block exhaust and ventilation.
- Make sure the exhaust does not interfere with the air intake of the device.
- After installation, level the device and keep stable. DO NOT move or tilt the device during operation.
- Make sure that the gas supplied to the unit is the same as what the device is designed to use. If not, DO NOT use.
- According to local requirement standards and strong recommendation of the manufacturer, a gas shut-off valve may be needed between the gas supply pipeline and gas-pressure regulator. Whether the installation of a gas shut-off valve has any local requirements should be judged by the gas installation professional.
- Coat some dedicated pipe sealant for gas pipeline in all the pipe joints. The sealant should be rated for use with and resistant to the action of gas.
- The gas pressure should be set according to the type and pressure listed on the rating label. If the gas supply pressure is 10% higher or lower than the rated pressure, please install a pressure regulator to adjust the gas pressure.
- After connecting the appliance to the gas system, check for leaks at joints and pipe fittings; to do so, use soapy water or a specific leak detector (spray).
-
DO NOT block or interfere with the ventilation needed during normal operation.
-
Verify the gas type and pressure, and make sure that they conform to those marked on the rating label. If incorrect gas type/pressure is connected, it may affect the performance of the device and create safety hazards.
OPERATING INSTRUCTIONS
CLEANING BEFORE USE
New units are wiped down at the factory to remove any visible signs of dirt, oil, grease, etc. remaining from the manufacturing process. Before any food preparation, thoroughly wipe protective oil from all surface parts with hot soapy water to remove any film residue and dust or debris.
▲ NOTE: DO NOT use chlorine or sulfate/sulfide cleaners.
NOTE: Wash any accessories shipped with unit.
▲ NOTE: Rinse accessories thoroughly.
NOTE: Wipe unit completely dry with a soft, clean cloth.
LIGHTING THE PILOT
- Verify that the gas supply to the appliance matches that listed on the label.
- Make sure the control knobs are in the "OFF" position.
- Open the main gas supply valve.
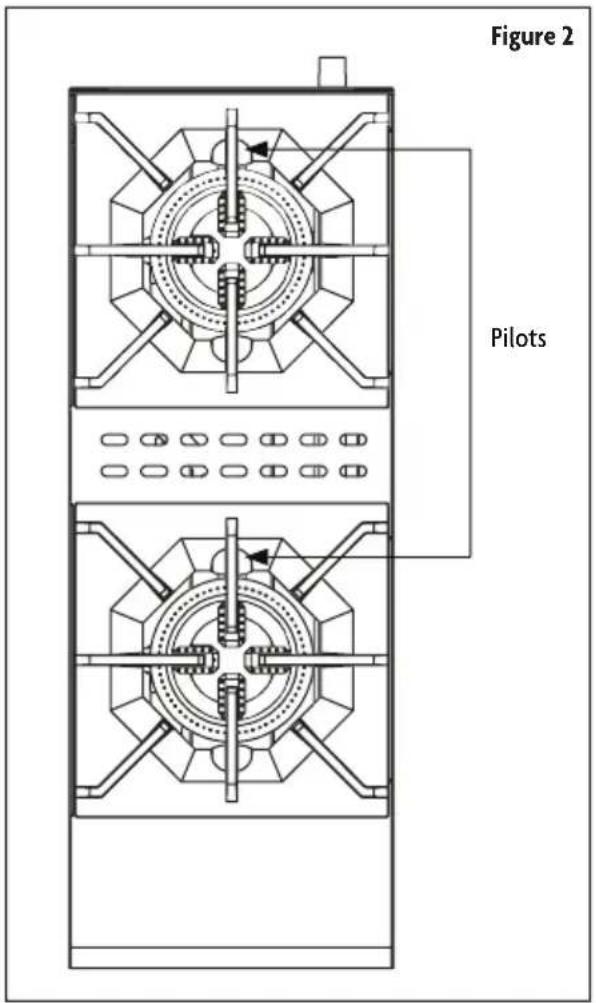
- Using a long match or grill lighter, light the pilots located just to the rear of each burner (see illustration).
⚠ WARNING: ALWAYS light the pilots immediately after opening main gas supply valve.
- Turn the burner control knobs counter-clockwise to turn on and control the burners. 90° is fully open.
-
When finished, turn the control knobs clockwise to the "OFF" position.
-
When done using, close the main gas supply valve.
▲ NOTE: ALWAYS be sure to turn burners OFF when not in use.
▲ NOTE: There may be some smoke at the initial startup as the result of rust prevention coatings burning off. This is normal. Please allow at least a 15 minute burn in period before using for the first time.
Before operation, please read the user's manual carefully. If the appliance has been immersed in water, please stop using and call the technicians to check and repair or replace all the components that are immersed in the water. Before using this appliance, please make sure that the main burner, pilot light burner and oil receiver are in correct installation.
- Before igniting the pilot light, ensure there is no gas odor around the device. When first using or after cutting off the gas supply, it may take several minutes to ignite the pilot light due to the air existing in the pipeline or clearance of the inlet pipe.
- Turn off all gas control knobs.
- Turn on control valve and light all pilots.
- The pilot burner must be lit from the top. Hold an ignition source and light the pilot. When the flame is stable, remove ignition source.
- Turn off the main gas valve to shut down the equipment.
NOTE: Control knobs of the burners can be operated manually only. DO NOT rotate it with tools. If it cannot be rotated manually, DO NOT rotate or repair it with force. Force or improper maintenance may cause fire or explosion.
NOTE: There may be some smoke at the initial startup as the result of rust prevention coatings burning off. This is normal. Please allow at least a 15 minute burn in period before using for the first time.
DAILY INSPECTION
It is necessary to check the cooking equipment daily to avoid serious accidents. Stop using if user feels that there are some problems in the circuit or machine. Check the condition of the machine before or after using every day. Before using, make sure the cooking equipment is not tilted and that the control panel is intact. While using, ensure there are no strange smells, light back, flameouts or vibrating noises and that the burner flame is normal.
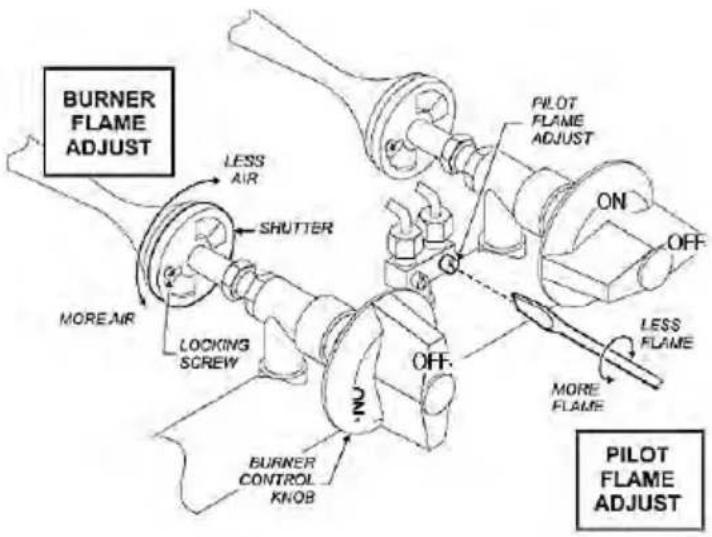
ADJUSTING THE PILOT LIGHT
The pilot flame on the equipment has been factory adjusted. When adjustment is necessary, adjust the pilot flames as small as possible but high enough to light the burner immediately when the burner valve is.
NOTE: There may be some smoke at the initial startup as the result of rust prevention coatings burning off. This is normal. Please allow at least a 15 minute burn in period before using for the first time.
ADJUSTING THE BURNER FLAME
- Remove all the control knobs, front panel, grates, and the heat radiant panel.
- Turn on a single burner and unscrew the lock screw on the baffle.
- Rotate the baffle to increase or reduce the ventilation volume according to the requirement.
- Regulate the air baffle to make majority of the flame become blue. Then screw the lock screw tightly.
- Before using, install the grate, front panel, heat radiant panel and all the knobs back.
CARE AND MAINTENANCE
ROUTINE INSPECTION
Before using, make sure that the device is level and there is no visible damage. Check for any odors or vibrations, and that the burner flames are normal. If any problems are noted, stop using and have service done on the appliance.
CLEANING AND MAINTENANCE
- ALWAYS turn off the appliance and make sure it is cool before doing any maintenance or cleaning.
- Clean the front panel and drip tray at least twice a day or as needed.
- Clean the burners at least once a week or as needed.
- Clean the stainless steel surfaces with warm soapy water every day, and rinse completely with clean water. (Do not spray water directly at the appliance during cleaning.)
- DO NOT clean stainless steel surfaces with abrasive cleaners, brushes, scrapers, etc. Doing so may cause rust. ALWAYS wipe in the same direction as the finish.
- DO NOT use chlorine products (bleach, hydrochloric acid, etc.) on stainless surfaces.
- DO NOT modify the ventilation for the burners.
- After cleaning, clear any liquid or debris out of the fire holes of the burner with a thin wire to prevent gas leakage.
- When not in use, make sure gas supply to the appliance is turned off.
- If not in use for a long period, thoroughly clean all parts of the hotplate and store in a well ventilated area.
- The hotplate should have a complete inspection done at least once a year by a service technician.
- Please be aware that most parts of the appliance can be recycled, and it should be disposed of properly according to all local standards.
TROUBLESHOOTING
| PROBLEM | POSSIBLE CAUSES |
| Pilot burner will not light | Manual gas valve not turned on. |
| Obstructed pilot orifice. (Call for service) | |
| Pilot gas turned off at pilot. Adjust pilot to allow gas flow. | |
| Low gas pressure. (Call for service) | |
| Too much top heat | Burner valves adjusted too high |
| Faulty ventilation | |
| Overrated gas pressure | |
| Improperly adjusted burner | |
| Uneven heating | Burner valves improperly adjusted |
| Improperly adjusted burner | |
| Appliance is not level | |
| Faulty Ventilation | |
| Pilot outage | Pilot flame is set too low. Adjust pilot to allow for gas flow |
| Obstruction in pilot orifice | |
| Low gas pressure |

Magic Chef®
COMMERCIAL E-SERIES
LIMITED WARRANTY
MC Appliance Corporation warrants each new Commercial Gas Hot Plate to be free from defects in material and workmanship, and agrees to remedy any such defect or to furnish a new part(s), at the company's option, for any part(s) of the unit that has failed during the warranty period. Parts and labor expenses are covered on this unit for a period of one year from the date of purchase. A copy of the dated sales receipt or invoice is required to receive warranty service, replacement or refund.
In the event the unit requires replacement or refund under the terms of this warranty, the consumer is responsible for all transportation expenses to return the unit to our factory prior to receiving a replacement unit or refund. A copy of the dated sales receipt/invoice is required to receive warranty service, replacement or refund. A refund or replacement will be issued at the discretion of MC Appliance Corporation.
This warranty covers appliances in use within the contiguous United States, Alaska, Hawaii and Puerto Rico. This warranty does not cover the following:
- Damages due to shipping damage or improper installation.
• Damages due to misuse or abuse.
- Content losses due to failure of the unit.
- Inside components such as turntable, roller guide, light bulbs, etc.
• Repairs performed by unauthorized service agents.
- Service calls that do not involve defects in material and workmanship such as instructions on proper use of the product or improper installation.
- Replacement or resetting of house fuses or circuit breakers.
- Failure of this product if used for other purposes than its intended purpose.
- Disposal costs for any failed unit not returned to our factory.
- Any delivery/installation costs incurred as the result of a unit that fails to perform as specified.
- Expenses for travel and transportation for product service if your appliance is located in a remote area where service by an authorized service technician is not available.
- The removal and reinstallation of your appliance if it is installed in an inaccessible location or is not installed in accordance with published installation instructions.
• Refunds for non repairable products are limited to the price paid for the unit per the sales receipt.
- This warranty is non transferable. This warranty applies only to the original purchaser and does not extend to any subsequent owner(s).
LIMITATIONS OF REMEDIES AND EXCLUSIONS:
Product repair in accordance with the terms herein, is your sole and exclusive remedy under this limited warranty. Any and all implied warranties including merchantability and fitness for a particular purpose are hereby limited to one year or the shortest period allowed by law. MC Appliance Corporation is not liable for incidental or consequential damages and no representative or person is authorized to assume for us any other liability in connection with the sale of this product. Under no circumstances is the consumer permitted to return this unit to the factory without the prior written consent of MC Appliance Corporation.
Some states prohibit the exclusion or limitation of incidental or consequential damages, or limitations on implied warranties. This warranty gives you specific legal rights, and you may also have other rights which vary from state to state.
Model
M12HP
M24HP
M36HP
Parts & Labor Type of Service
One Year In Field Service
One Year In Field Service
One Year In Field Service
For Service or Assistance please call 888-775-0202 or visit us on the web at www.mcappliance.com to request warranty service or order parts.

Magic Chef®
COMMERCIAL E-SERIES
CNA International, Inc. d/b/a MC Appliance Corporation. All rights reserved. Magic Chef® logo is a registered trademark of CNA International, Inc.
www.mcappliance.com Printed in China

Magic Chef®
COMMERCIAL E-SERIES
Hornilla a gas comercial
E-Series
Manual del usuario
natural_image
Line drawing of a rectangular kitchen appliance with multiple gridded metal fixtures and side-mounted handles (no text or symbols)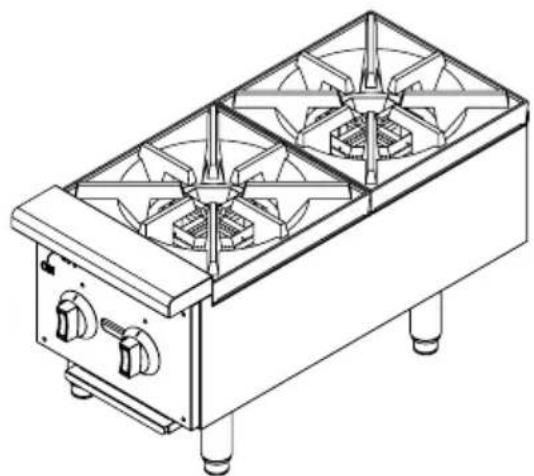
natural_image
Line drawing of a four-tiered gas stove with cooling fans and side legs (no text or symbols)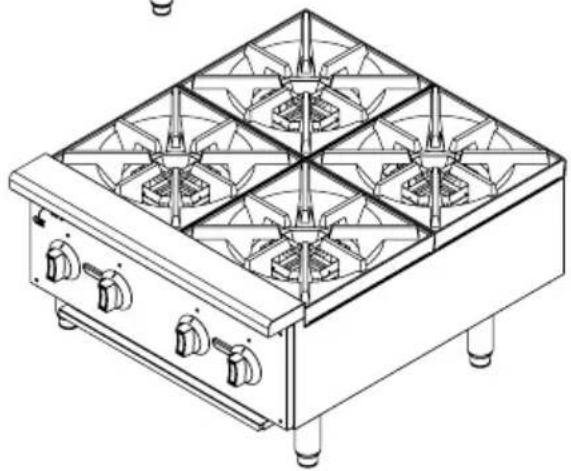
natural_image
Line drawing of a four-tiered gas stove with heat sinks and fan-shaped vent grilles (no text or symbols)Modelos: M12HP / M24HP / M36HP
POR FAVOR LEA CUIDADOSAMENTE ESTE MANUAL ANTES DE USAR SU HORNILLA A GAS Y CONSÉRVELO PARA FUTURAS REFERENCIAS.

Magic Chef®
COMMERCIAL E-SERIES