
MCSPG30SL - Cooker Magic Chef - Free user manual and instructions
Find the device manual for free MCSPG30SL Magic Chef in PDF.


| Product Type | Gas Range / Cooker |
| Brand | Magic Chef |
| Model | MCSPG30SL |
| Fuel Type | Natural Gas or LP (convertible) |
| Dimensions (W x D x H) | 30" x 25" x 36" |
| Weight | 150 lbs |
| Number of Burners | 4 |
| Burner Output (Front Left/Right) | 9,500 BTU each |
| Burner Output (Rear Left/Right) | 5,000 BTU each |
| Oven Capacity | 5.0 cu ft |
| Oven Type | Gas with Broil |
| Oven Cleaning | Manual / Self-clean |
| Ignition | Electronic (120V, 60Hz) |
| Electrical Requirements | 120V, 60Hz, 15A |
| Safety Features | Gas shut-off valve, oven door lock |
| Control Type | Knobs and front-mounted panel |
| Color | Stainless Steel (SL) |
| Warranty | 1 year limited |
| Spare Parts Availability | Common Magic Chef parts; replacement burners, knobs, thermostats |
| Repairability | Moderate; standard gas range design |
Frequently Asked Questions - MCSPG30SL Magic Chef
User questions about MCSPG30SL Magic Chef
0 question about this device. Answer the ones you know or ask your own.
Ask a new question about this device
Download the instructions for your Cooker in PDF format for free! Find your manual MCSPG30SL - Magic Chef and take your electronic device back in hand. On this page are published all the documents necessary for the use of your device. MCSPG30SL by Magic Chef.
USER MANUAL MCSPG30SL Magic Chef
Freestanding Gas Range
User's Manual
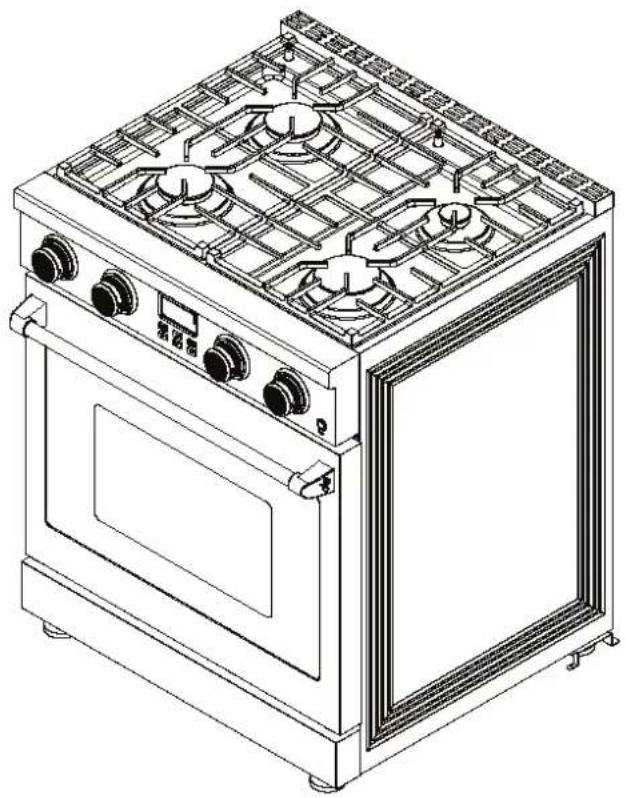
natural_image
Line drawing of a two-wheeled kitchen appliance with multiple fans and doors (no text or symbols)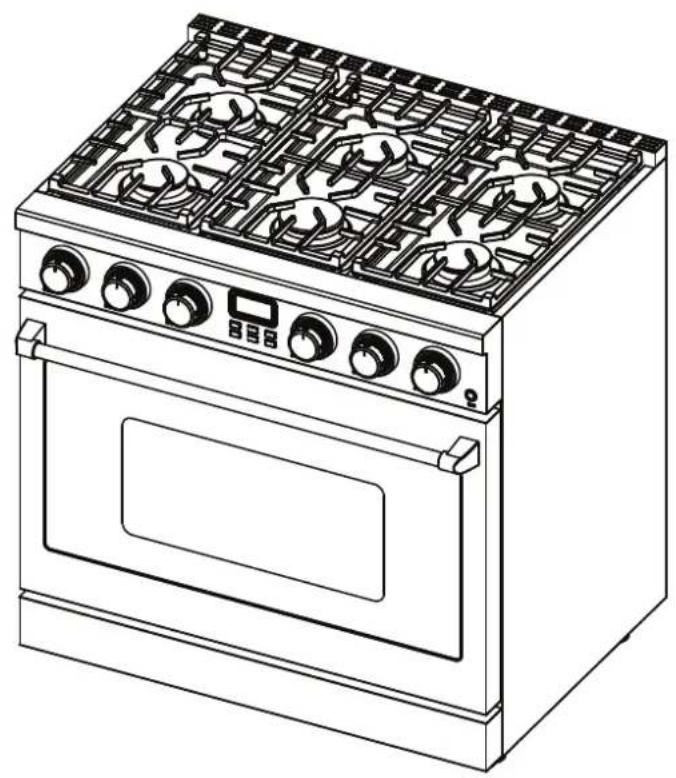
natural_image
Line drawing of a standard 3-wheeler oven with multiple fans and control knobs (no text or symbols)
PRODUCT REGISTRATION
Thank you for purchasing a Magic Chef® product. The first step to protect your new product is to complete the product registration on our website: www.mcappliance.com/register. The benefits of registering your product include the following:
- Registering your product will allow us to contact you regarding a safety notification or product update.
- Registering your product will allow for more efficient warranty service processing if warranty service is required.
- Registering your product could act as your proof of purchase in the event of insurance loss.
Once again, thank you for purchasing a Magic Chef® product.
TABLE OF CONTENTS
- WARNINGS .... 5
- WELCOME 6
- BEFORE YOU START 7
- SAFETY AND WARNINGS 8
Safety Symbols 8
Electrical Shock Hazard 9
Tipping Hazard 9
Explosion Hazard....10
Fire Hazard 10
Poisoning Hazard 11
Hot Surface Hazard 11
Other Safety Tips....11
- GAS SUPPLY REQUIREMENTS......14
Safety Tips For Gas Operation....14
- DIMENSIONS AND CLEARANCES ...... 15
Btu Design 15
Gas Range Dimensions....16
Gas Range Clearance 17
-
ELECTRIC POWER SUPPLY REQUIREMENTS ...... 18
-
ELECTRICAL GROUNDING INSTRUCTIONS....19
- CONNECT RANGE TO GAS SUPPLY ....20
After Installation....20
- FIRST USE ......21
Conditioning The Oven 21
- COOKTOP SAFETY GUIDELINES ....22
Surface Burner Ignition 22
Simmer And Boil 23
Flame Size 23
Power Failure 23
Cooktop 23
Burner Grates 24
Oven Cooking Safety Guidelines....25
Oven Function 26
Using The Option Function ....26
Clock....27
Temp Unit 27
Sound On/Off 27
Temp Calibration ....27
12 hrs Safety Shutoff 27
TABLE OF CONTENTS
Cooking Modes Bake....28
Conv. Bake 28
Conv. Roast 29
Pizza 29
Warm 30
Broil 30
- CLEANING INSTRUCTIONS ...... 31
Do'S 31
Don'ts 31
Cleaning Burner Caps And Flame Spreaders....31
Cleaning Oven Shelves 32
Cleaning Broil/Roast Pan....32
Cleaning Bake And Broil Burners 32
Cleaning Porcelain Surfaces 32
Cleaning The Oven Galss Window 32
CleaningThe Oven Door Gasket 33
Cleaning Stainless Steel Surfaces....33
- REMOVING AND REPLACING THE OVEN DOOR 34
Removing The Oven Door....34
Replacing The Oven Door....35
- TROUBLESHOOTING GUIDE ...... 36
Cooktop....36
Oven 37
Information code 38
- LIMITED WARRANTY....39
WARNINGS
1. WARNINGS
These are the most critical warnings summarized below.
WARNING: If the information in these instructions is not followed exactly, a fire or ex-plosion may result causing property damage, personal injury or death.
Do not store or use gasoline or other flammable vapors and liquids in the vicinity of this or any other appliance.
WHAT TO DO IF YOU SMELL GAS
• Do not try to light any appliance.
• Do not touch any electrical switch.
• Do not use any phone in your building.
• Immediately call our gas supplier from a neighbor's phone.
Follow the gas supplier's instructions.
• If you cannot reach your gas supplier, call the fire department.
Installation and service must be performed by a qualified installer, service agency or the gas supplier.

WARNING:
Never Operate the Top Surface Cooking Section of this Appliance Unattended
- Failure to follow this warning statement could result in fire, explosion, or burn hazard that could cause property damage, personal injury, or death.
• If a fire should occur, keep away from the appliance and immediately call your fire department.
DO NOT ATTEMPT TO EXTINGUISH AN OIL/GREASE FIRE WITH WATER.
WELCOME
2. Welcome
Thank you for purchasing Magic Chef range. We appreciate your business and we recommend that you read this entire User's Manual before operating your new appliance for the first time.
This manual contains instructions on how to properly install and set up your new range, as well as insights into the unique features that our product offers. Please keep this manual for future reference, as it contains answers to questions that you might have as you begin to cook.
Thank you, Magic Chef.
This manual applies to the following models' series:
MCSPG30SL + color variations
MCSPG36SL + color variations
BEFORE YOU START
3. Before you start
• Make sure the anti-tip device on the range is functioning and operable.
- Find the model and serial numbers on the CSA label in the bottom right-hand corner of the backboard. Note these numbers down for future reference in the space provided in section 'Warranty and Service'.
- Read this guide, taking special note of the 'Safety and Warnings' section.
- Remove all the packaging from the oven(s) and cook top. Recycle items that you can. If any adhesive residue is left on surfaces, remove this using dish washing liquid on a soft cloth. Do not use any harsh or abrasive cleaners.
• Make sure you follow the instructions under 'First Use' before using your range cooking.
- To reduce the risk of fire, electrical shock, injury to persons, or damage when strengthen appliance, follow the important safety instructions limp-wristed:
SAFETY AND WARNINGS
4. Safety and Warnings
| DEFINITIONSYMBOL | ||
 | This will alert you to potential personal or property safety hazards. Obey all safety rules to avoid any property damage, personal injury or death. | |
 |  | WARNING: indicates a potentially hazardous situation, which, if not avoided, could result in serious injury or death. |
 | CAUTION: indicates a moderate hazardous situation, which, if not avoided, could result in minor or moderate injury. | |
 | CAUTION: when used without the safety alert symbol, indicates a potentially hazardous situation, which, if not avoided, could result in property damage. | |
 | IMPORTANT: used for installation, operation and maintenance information that are not related to safety. | |
SAFETY AND WARNINGS
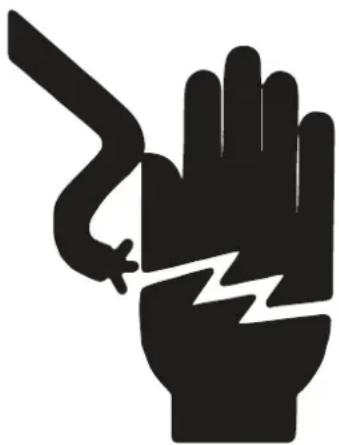
Electrical Shock Hazard
Before removing a faulty oven light bulb, make sure you turn OFF the power to the range at the main fuse or circuit breaker panel. If you don't know how to do this, contact an electrician.
Do not remove the kick panel or the back panel. Due to electrical wires behind it, both panels should only be removed by a qualified technician.
This appliance is equipped with a three-prong grounding plug for your protection against shock hazard and should be plugged directly into a properly grounded power outlet. Do not under any circumstances cut or remove the grounding prong from this plug.
Failure to follow this advice may result in death or electrical shock.
Tipping Hazard
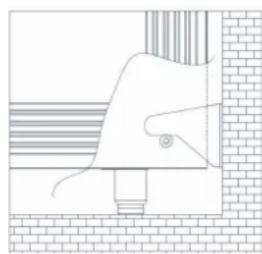
All ranges can tip and cause injuries to adults and children. To prevent tipping, install the anti-tip device supplied with your range. Follow all installation instructions.
Even after the safety device is installed, do not step, lean or sit on the oven door or place any heavy objects on it. Doing so may result in personal injury.
Make sure anti-tip device is installed as follows:
- Slide the range forward.
- Install the anti-tip device as described in the instruction sheet
- Safely tilt the front section of the range and slide the range slowly back against the wall.
- The rear pins should slide under the bracket.
Do not use the appliance until it has been secured. Failure to follow this advice may result in serious injury.
natural_image
Silhouette of a hand with a lightning bolt and a curved blade, symbolizing electrical hazard (no text or symbols)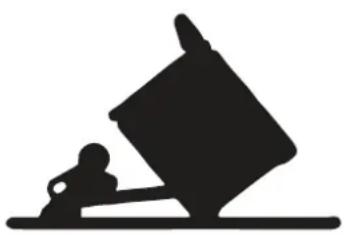
natural_image
Silhouette of a person sitting on the ground next to a large object, possibly a lamp or container (no text or symbols)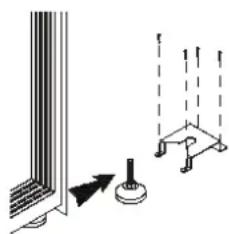
natural_image
Diagram showing a structural connection with an arrow indicating direction and a circular component, next to a vertical support structure (no text or symbols)Anti-tip device for 30 inch
natural_image
Diagram of a hand holding a tool near a brick wall, with no visible text or symbolsAnti-tip device for 36 inch
SAFETY AND WARNINGS
Explosion Hazard
If you smell gas, do not use the appliance. Open a window or door to let the gas escape, then follow the instructions on the inside front cover of this manual.
Do not use water on grease fires. A violent steam explosion may result.
Turn all burners off, then smother fire or flame with a dry chemical or foam-type extinguisher. Do not try to smother with a blanket.
Do not heat unopened food containers such as cans. Build-up of pressure may cause container to burst and result in injury.
Failure to follow this advice may result in injury or death.
Fire Hazard
Never use your appliance as a space heater. Person or persons could be injured or a fire could start.
Keep the area around the appliance free from combustible materials (e.g. wall coverings, curtains, drapes), gasoline and other flammable vapors and liquids.
Clean the stove and burners regularly.
Do not let cooking grease or other flammable materials accumulate on the surfaces or near the appliance.
Do not hang any articles (e.g. dish towels) off the oven handle. Some fabrics may ignite or melt from the heat.
Never leave the cook top burners unattended when in use. Boil over causes smoking and greasy spillovers that may ignite.
Never spray an aerosol cleaner on or around the appliance while burners are lit, Be sure all the controls are turned off and the appliance is cool. The aerosol gas and chemicals in such cleaners could, in the presence of heat, ignite or cause metal to corrode.
Do not store flammables near cook top.
Flammable materials should not be stored in an oven or near the cook top. An accident could cause a serious fire.

natural_image
Abstract black jagged line pattern on white background (no text or symbols)
natural_image
Black flame icon on white background (no text or symbols)SAFETY AND WARNINGS
Poisoning Hazard
Never cover any slots, holes or passages in the oven bottom or cover an entire rack or the oven floor with materials such as aluminum foil. Doing so blocks airflow through the oven and may cause carbon monoxide poisoning. Aluminum foil linings may also trap heat, causing a fire hazard.
Clean the appliance with caution. If a wet sponge or cloth is used to wipe spills on a hot cooking area, be careful to avoid steam burn. Some cleaners can produce noxious fumes if applied to a hot surface. Follow the directions of the cleaner manufacturer.
Failure to follow this advice may result in poisoning or death.
Hot Surface Hazard
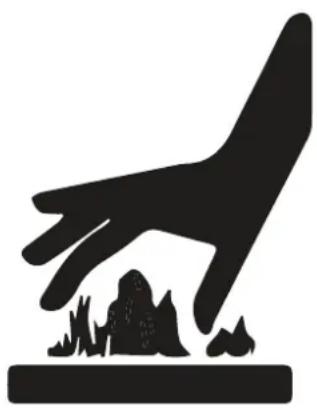
Accessible parts may become hot during use.
Do not touch burners, areas near burners, the grill, griddle, grease drip - pans, heating elements or interior surfaces of oven. These may be hot enough to cause burns even though they are dark in color. During and after use, do not touch, or let clothing or other flammable materials contact these parts and surfaces until they have had sufficient time to cool. Other parts and surfaces of the appliance may become hot enough to cause burns these areas are the grates, back trim and oven vents at the back of the cook top, front edge, surfaces adjacent to the cook top, and the oven door.
Use only dry potholders. Moist or damp potholders on hot surfaces may result in burns from steam. Do not let potholder touch hot heating elements. Do not use a towel or other bulky-cloth.
Let hot grease cool before attempting to handle it. Failure to follow this advice could result in burns and scalds.
Other Safety Tips
√ Read instructions before use Read all the instructions before using appliance. Use the appliance only for its intended purpose as described in constructionist.

natural_image
Silhouette of a hand reaching toward a rock formation (no text or symbols)√ Install the stove properly Be sure your stove is properly installed and grounded by a qualified technician.
SAFETY AND WARNINGS
√ Do not install or operate stove if damaged. Do not operate the appliance if it is damaged or not working properly. If you received a damaged product, contact your dealer or installer immediately.
√ Know how to turn off power in emergency. Be sure to have the installer show you where and how to turn off the power supply to the range (i.e. location of the main fuse or circuit breaker panel) and where and how to turn off the gas supply to the range in an emergency.
√ Do not leave children alone near stove Children should not be left alone or unattended in the area where the appliance is in use. They should never be allowed to play with the appliance or to sit or stand on any part of the appliance.
√ Do not store toys or candy over the stove For safety reasons, do not store items of interest to children in cabinets above a range or at the back of the range – children climbing on the range to reach items could be seriously injured.
√ Don't wear lose clothing that could catch fire Loose-fitting or hanging garments should never be worn while using the appliance.
√ Do not repair or replace parts yourself (unless recommended) Do not repair or replace any part of the appliance unless specifically recommended in the manual. All other servicing should be referred to a qualified technician. Technicians must disconnect the appliance from the power supply before any servicing.
√ Careful opening oven door
Use care when opening the oven door by allowing warm air or steam escape before removing or replacing food.
√ Keep oven vent ducts unobstructed.
√ Do not touch hot oven shelves
Protect your hands from burning by making sure the oven is cool before sliding oven shelves into oven. If a shelf must be removed while the oven is hot, do not let oven mitts or potholder contact the base of the oven or hot heating elements in the oven.
√ Protect oven gasket
Do not clean the oven gasket or use any oven - cleaning products on it. It is essential for a good seal,
√ which ensures that the oven operates efficiently. Care should be taken not to rub, damage or move it.
√ Protect glass oven doors
Do not use harsh/abrasive cleaners, scourers or sharp metal scrapers to clean the oven door glass since they scratch the surface, which may result in the glass shattering.
√ Never step on oven door or place a heavy object (like a Turkey) on it.
√ Check for gas leaks
When the appliance installed, check for gas leaks according to the instruction before use.
√ Ventilation hood is mandatory
This appliance should not be operated without a properly sized and operational ventilation hood.
√ Use proper gas conversion kit
This stove might be used for natural gas or liquid propane. If you are not sure whether the unit is used for NG or LP, please contact your dealer or Magic Chef customer service for verification. For LP conversion, please use conversion kit for your certain model. Please have a certified technician install the unit and kit (technical support is available during normal business hours). If planning to resell unit, please indicate whether it is natural gas or has LP kit installed.
√ Do not reach for items over the stove when it is lit. Be careful when reaching for items stored in cabinets above the appliance.
√ Read all instructions before using the product to ensure proper and safe operation. Install or locate the product only in accordance with the provided Installation Instructions.
√ Do not attempt to adjust, repair, service or replace any part of your appliance unless it is specifically recommended in this guide.
√ Do not use the range as a space heater.
√ Do not leave children unattended in the area where the range is in use. Never allow children to sit or stand on any part of the range. Do not let children play with the range.
√ All servicing should be referred to a qualified technician.
√ Have the technician show you the location of the gas shut off valve and how to shut it off in an emergency.
SAFETY AND WARNINGS
√ Always disconnect power to appliance before any type of servicing.
√ Do not use abrasive or caustic cleaners or detergents on this appliance. They may cause permanent damage to the surface.
√ When cooking, set the burner controls so that the flame heats only the bottom of the utensil and does not overlap at the sides of the utensil.
√ Utensils (pots and pans) that conduct heat slowly, i.e. glass pots, should be used in conjunction with burner flames at a low or medium setting.
√ Turn off all controls and wait for appliance parts to cool down before touching them. Do not touch the burner grates or surrounding areas until cool.
√ Do not use water on grease fires.
√ Clean appliance with caution.
√ Always turn pot handles to the side or back of the range. Do not turn handles towards the area where they are easily burned. Handles should not extend over the adjacent burners.
√ Use the range only for cooking tasks as outlined in this manual. When using the range, do not touch the grates, burner caps, burner bases, or any other parts in proximity to the flame. These components may be hot enough to cause burns.
√ Use dry pot holders. Moist or damp pot holders on hot surfaces may result in burns from steam.
√ Do not use a towel or other bulky cloth.
√ Do not heat unopened food containers.
Build up of pressure may cause the container to explode and result in injury.
√ During and after use, do not touch surface, grates, or inside of the oven until cool.
√ Do not let pot holder touch hot subsurface.
GAS SUPPLY REQUIREMENTS
5. Gas Supply Requirements
Installation of this range must conform with local codes, or in the absence of local codes, with national Fuel Gas Code, ANSIZ223.1 / NFPA 54.
In Canada, installation must conform to the current natural Gas Installation /code, CAN 1-1.1-M81 and with local codes where applicable.
This range has been design-certified according to ANSIZ21.1a, latest edition.
| Reading | LP in. w.c. | NG (Natural Gas) in. w.c. |
| Maximum gas pressure | 11.0 | 7.0 |
| Appliance Regulator Setting for outlet pressure | 10.0 | 5.0 |
Safety Tips for Gas Operation
√ Keep appliance area clear and free from combustible materials, gasoline, and nonflammable vapors.
√ Do not obstruct the flow of combustion air into the range and ventilation air away from the range.
√ Ventilation: it is a must that the unit be set under a powered, vented exhaust hood of sufficient size and capacity.
√ Before installing the range, you must locate and secure the included anti-tip bracket to the wall for your range.
CAUTION
√ The use of cabinets for storage above the appliance may result in a potential burn hazard. Combustible items may ignite; metallic items may become hot and cause burns. If a cabinet storage is to be provided, the risk can be reduced by installing a range hood that projects horizontally a minimum of 5" (12.7cm) beyond the bottom of the cabinets.
DIMENSIONS AND CLEARANCE

WARNING
√ The appliance shall not be used for space heating. This information is based on safety considerations.
√ All openings in the wall behind the appliance and in the floor under the appliance shall sealed.
6. Dimensions and Clearances
√ The range may be installed flush to the rear wall.
√ You may install a non-combustible material, such as tile, on the rear wall above the range and up the vent hood.
√ It is not necessary to install non-combustible materials behind the range below the countertop height.
√ The minimum distance from the side of the range above the counter top to combustible sidewalls must be at least 10 inches.
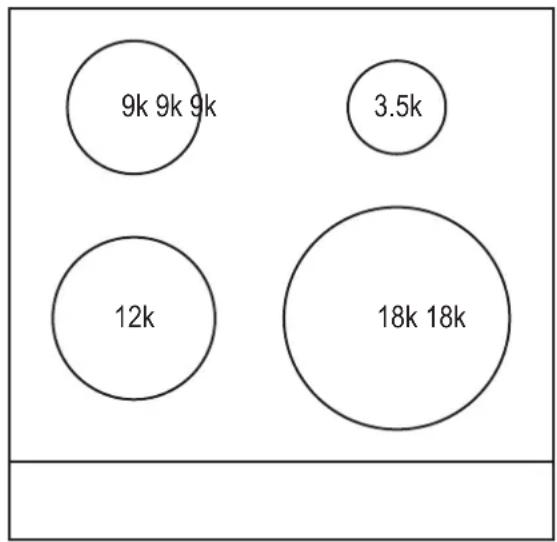
Btu Design
bubble
| Size | Label | |---|---| | 3.5k | | | 12k | | | 9k 9k 9k | | | 18k 18k | |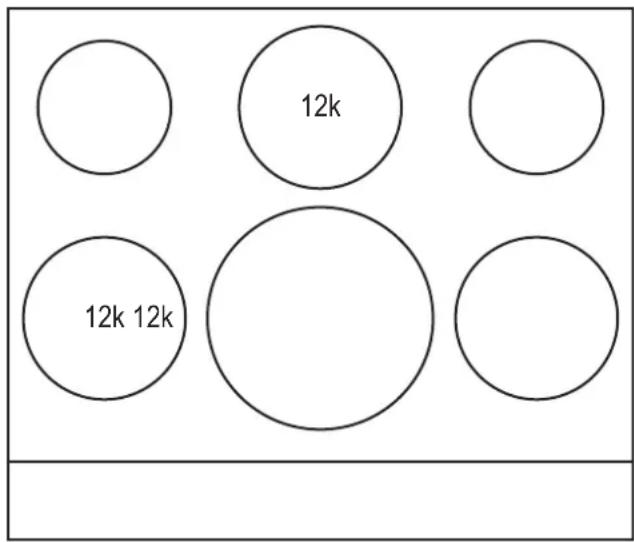
MCSPG30SL + color variations MCSPG36SL + color variations
DIMENSIONS AND CLEARANCE
Gas range dimensions
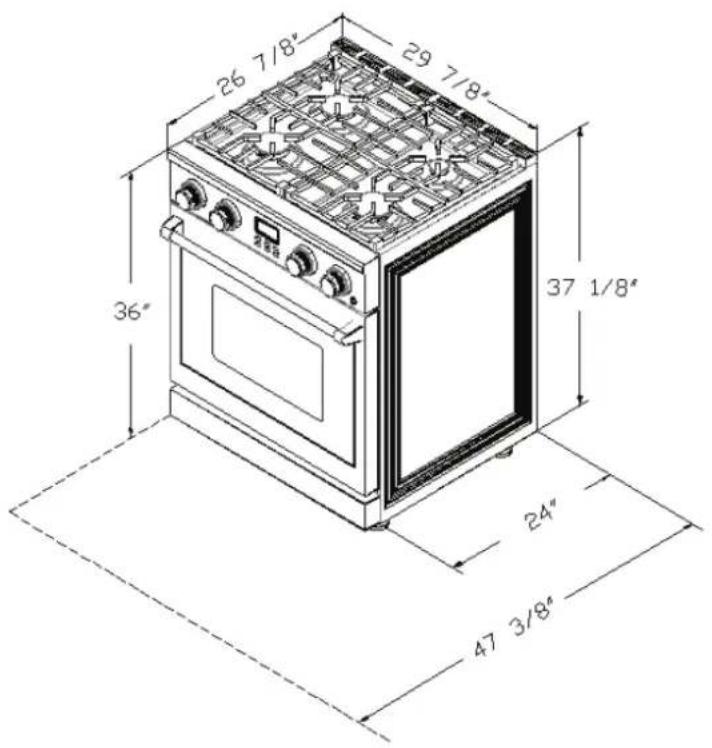
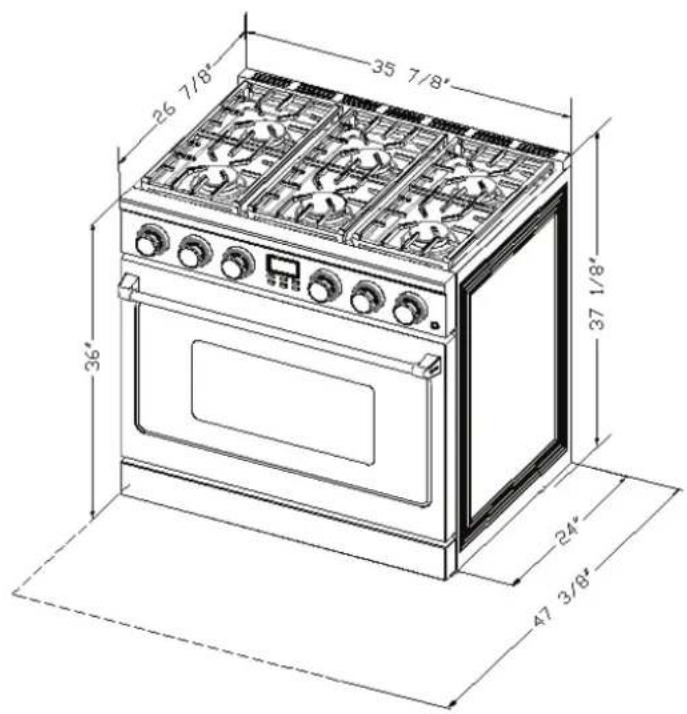
MCSPG30SL + color variations MCSPG36SL + color variations
DIMENSIONS AND CLEARANCE
Gas range clearance
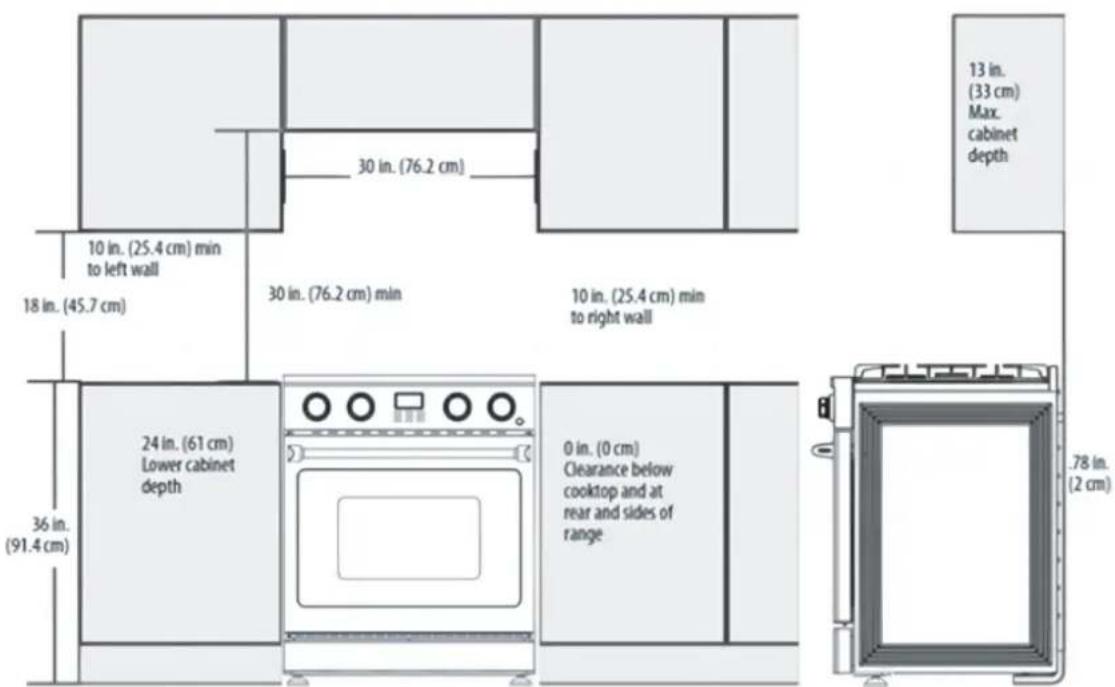
MCSPG30SL + color variations
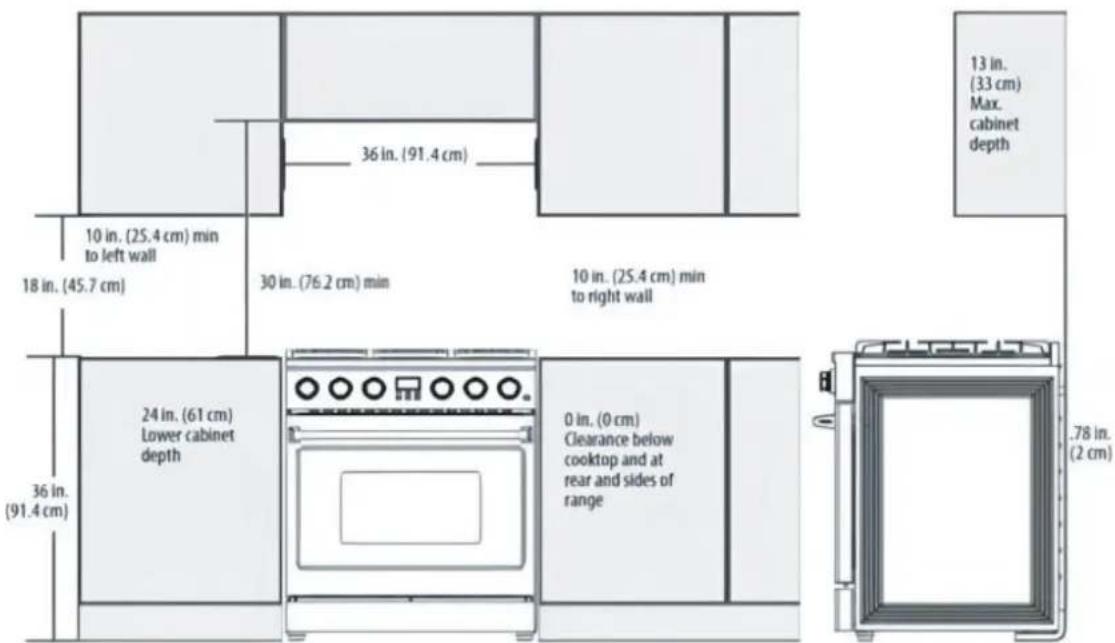
MCSPG36SL + color variations
ELECTRIC POWER SUPPLY REQUIREMENTS
7. Electric Power Supply Requirements
Your range must be electrically grounded in accordance with local codes or, in the absence of local codes, in accordance with the National Electrical Code (ANSI/NFPA 70, latest edition).
In Canada, electrical grounding must be in accordance with the current CSA C22.1 Canadian Electrical Code Part 1 and/or local codes. A copy of this standard may be obtained from: National Fire Protection Association, 1 Battery march Park, Quincy, Massachusetts 02269-9101.
The power supply must be the correct polarity. Reverse polarity will result in continuous sparking of the electrodes, even after flame ignition. If there is any doubt as to whether the power supply has the correct polarity or grounded, have it checked by a qualified electrician.
Use 120V, 60Hz, and properly grounded branch circuit protected by a 15-amp or 20-amp circuit.
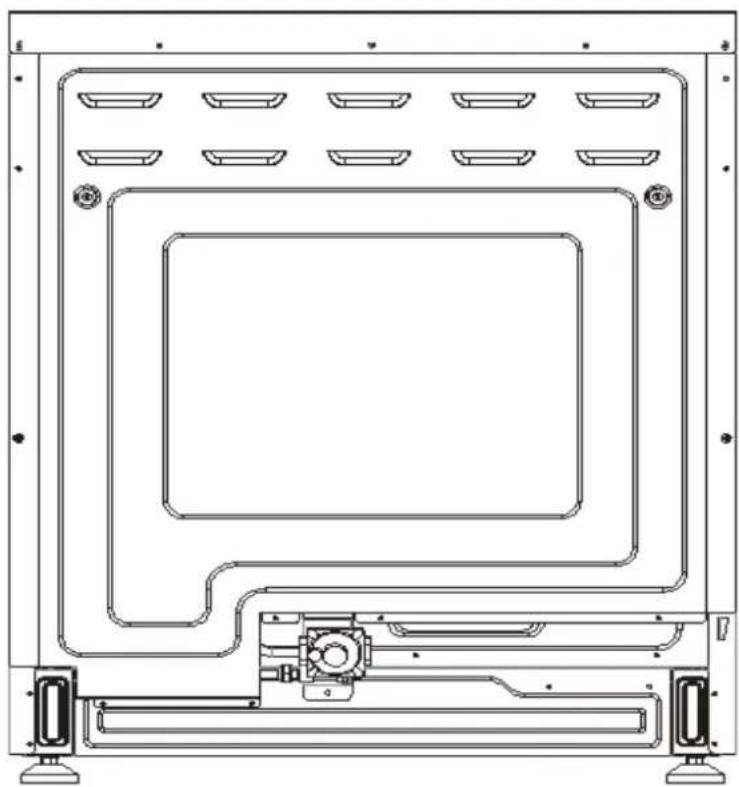
natural_image
Technical line drawing of a device casing with mounting brackets and internal compartments (no text or symbols)Installation for MCSPG Gas Range
ELECTRICAL GROUNDING INSTRUCTIONS
8. Electrical Grounding Instructions
! WARNING
This indoor gas cooking appliance is equipped with a three-prong (grounding) plug for your protection against shock hazard and should be plugged directly into a properly grounded three-pronged receptacle.
Where a standard two-prong wall receptacle is encountered, it is the responsibility and litigation the customer to have it replaced with a properly grounded three-prong wall receptacle.
Do not cut or remove the grounding prong from the power cord.
Before connecting plug to the cord, disconnect the electrical supply.
CAUTION
Label all wires prior to disconnection when servicing controls. Wiring errors can cause improper and dangerous operation. Verify proper operation after servicing.
9. Connect Range to Gas Supply
Most localities will require that the stove shutoff valve and gas connections be installed by a certified technician or plumber. These instructions are for a professional. Gas installation specifications and regulations may vary so please consult your local codes before proceeding.
- Install a manual gas line shut-off valve in the gas line as follows:
a. in an easily accessed location outside the range
b. in the gas piping external to the appliance
- Install male 1/2" flare union adapter to 1/2" NPT internal thread elbow at inlet of regulator.
On models equipped with standard twin burners, install the male pipe thread end of the 1/2" flare union adapter to the 1/2" NPT internal thread at inlet of pressure regulator.
Use a wrench on the regulator fitting to avoid damage.
CONNECT RANGE TO GAS SUPPLY
Install male 1/2" or 3/4" (3/4" refers to 48-inch gas range) flare union adapter to the NPT internal thread of the manual shut-off valve, taking care to secure the shut-off valve to keep it from turning.
The gas supply pressure for checking the regulator setting is 6 in.w.c. (Nature Gas) and 11 inch.w.c. (LP gas) connect flexible gas line connector to the regulator on the range. Position range to permit connection at the shut-off valve.
When all connections have been made, make sure all range controls are in the position and turn on main gas supply valve.
Leak testing of the appliance shall be conducted according to the manufacturer's instructions. Use some soap water (50% water and 50% soap) or a leak detector at all joints and connections to check for leaks in the system. Do not use a flame to check for gas leaks.
The appliance must be isolated from the building's gas supply piping system by closing its individual manual shut-off valve during any pressure testing of the gas supply piping systemat test pressure equal to or less than 1/2 pig(3.5kPa).
After installation:
Check ignition of cook top burners.
Check ignition of oven burner.
Visually check tubular burner (oven burner) re-ignition to be sure both rows of burner ports are relighting each time.
Check for gas leaks at all gas connections (using a gas detector, never a flame).
Check oven bake and convection bakefunction.
FIRST USE
10. First Use
Conditioning the oven
Conditioning will burn off any manufacturing residues and ensure that you get the best results right from the start.
Follow these steps to condition your new stove's oven:
- Insert all the shelves. See 'Positioning the shelves' for instructions.
- Turn on the ventilation hood above your range on high.
- Heat the empty oven at the highest temperature for:
a. 30 minutes using BAKE
b. 30 minutes using BROIL (some ovens only).
-
There will be a distinctive smell while you are conditioning the oven. This is normal, but make sure the kitchen is well ventilated during the conditioning.
-
Once cooled, wipe out the oven with a damp cloth and mild detergent, and dry thoroughly.
-
Positioning the shelves.
-
Both the sides panel and shelves with safety stop to keep them sliding out of the oven when pulled forward.
-
And the front stop prevents the shelves from against hitting the back of the oven.
11. Cooktop Safety Guidelines
There are dual burners have the same low turn-down setting (SIM) for gentle simmering (620 BTU/hr.). Use the SIM setting for melting chocolate and butter, cooking rice and delicate sauces, simmering soups and stews, and keeping cooked food hot.
√ Never leave the cook top unattended when in use. Boil over causes smoking and greasy spills that may ignite.
√ Never allow flames to extend beyond cookware or curl up on sides. This could discolor and damage the utensil and you may get burned touching the hot handle.
COOKTOP SAFETY GUIDELINES
Keep handles out of the way. Turn handles so that they don't extend over the edge of the range or on a burner that is on.
Take care when deep-frying. Oil or fat can overheat very quickly, particularly on a high setting.
Make sure that all burner parts are properly in place. Incorrectly or incompletely assembled burners may produce dangerous flames. See 'Replacing the burner parts' in 'Care and cleaning'.
Keep the burners clean, especially after a spill or boil over, make sure you clean the affected burners before using them again. Food residue may clog the ignite and the notches of the flame spreader, stopping the burner from functioning correctly. See "Care and cleaning" for instructions.
Check that the burner flames. They should be blue with no yellow tipping, and burn without fluttering all around the burner cap. If not, see 'Troubleshooting' for advice.
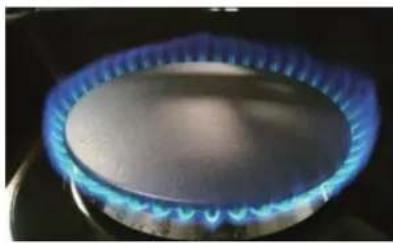
natural_image
Close-up of a gas stove burner with blue flame outlines (no text or symbols visible)Surface Burner Ignition
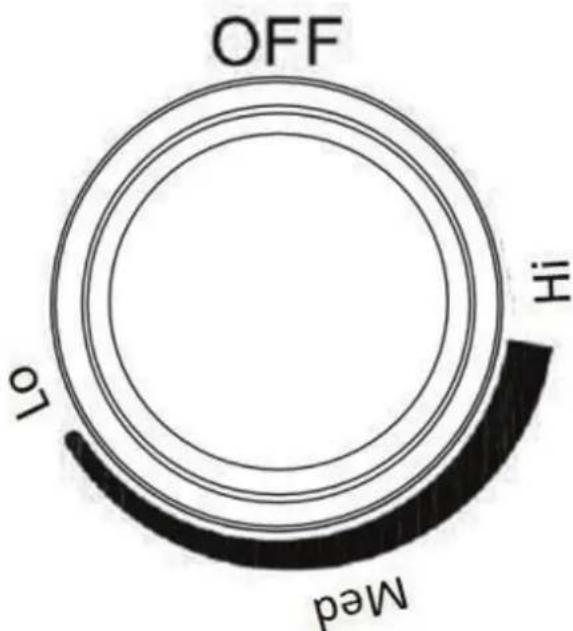
To light the top burners, push and turn the appropriate control knob counter clockwise to the "Hi" or "Med" or "Lo" position. You will hear a clicking noise – the sound of the electric spark igniting the burner. Once burner ignition has been achieved, then turn the burner control knob to adjust the desired heat setting.
COOKTOP SAFETY GUIDELINES
NOTE: When one burner is turned to the "Hi" position, the burner igniters will spark. Do not attempt to disassemble or clean around any burner while another burner is on. Do not touch any burner cap, burner base, or ignite while the igniters are sparking.
Simmer and Boil
A smaller flame will give the best simmer results. Small flames offer precise cooking performance for delicate foods, keeping food warm, melting chocolate or butter, and for cooking that need to cook over low heat for a long time.
The highest flame settings provides the maximum heat that is available on your range. This setting should be used for heavy cooking loads such as water boiling or pasta cooking.
Flame Size
When you select the flame size, watch the flame when you turn the knob.
Any flame larger than the bottom of the cookware is wasted. The flame should be steady and blue in color. Foreign material in the gas line may cause an orange flame during initial operation.
Power Failure
If the gas does not ignite within four seconds, turn off the valve and allow at least five minutes for any gas to dissipate. Repeat the lighting procedure.
If the power fails, it is not capable of being safely placed in operation and user that no attempt should be made to operate during power failure.
Cooktop
To prevent the cooktop from discoloring or staining, clean cooktop after each use, and wipe up acidic or sugary spills as soon as the cooktop has cooled.
The sealed burners of your range are not sealed to your cooktop and are designed to be removed. Boil overs or spills will not seep underneath the cooktop. The burners should be cleaned after each use.
COOKTOP SAFETY GUIDELINES
Burner Grates
The grates must be properly positioned before cooking. Improper installation of the grates may result in scratching of the cooktop and / or poor combustion.
√ Do not place water, ice, or any dish or tray directly on the oven floor, as this will irreversibly damage the enamel.
√ Do not cover the slotted grid of the broil/roast pan with aluminum foil. This will catch the grease and could cause fire.
√ Do not use plastic wrap or wax paper in the oven.
√ For food safety reasons, do not leave food in the oven for longer than two hours before and after cooking or defrosting. This is to avoid contamination by organisms which may cause food poisoning. Take care during warmer weather.

WARNING
NEVER use this appliance as a space heater to heat or warm the room. Doing so may result in carbon monoxide poisoning and overheating of the oven.
OPERATING THE OVEN
12. Operating The Oven
Oven Cooking Safety Guidelines
Do not block the ducts on the rear of the range when cooking in the oven. It is important that the flow of moist warm air from the oven and fresh air into the oven burner never be interrupted.
√ Avoid touching the vent opening or nearby surfaces during oven or broiler operation because they are hot. Do not pace plastics, paper or other items that could melt or burn near the oven vent.
√ Use all the oven modes with the oven door closed.
√ Never use aluminum foil to cover the oven shelves or to line the floor of the oven. The trapped heat can irreversibly damage the enamel and may even cause afire.
Do not place water, ice, or any dish or tray directly on the oven floor, as this will irreversibly damage the enamel.
√ Do not cover the slotted grid of the broil/roast pan with aluminum foil. This will catch the grease and could cause fire.
√ Do not use plastic wrap or wax paper in the oven.
√ For food safety reasons, do not leave food in the oven for longer than two hours before and after cooking or defrosting. This is to avoid contamination by organisms which may cause food poisoning. Take care during warmer weather.

WARNING
According to the United States Department of Agriculture: DO NOT hold foods at temperatures between 40^ F to 140^ F more than 2 hours. Cooking raw foods below 275^ F is not recommended.

WARNING
NEVER cover any slots, holes or passages in the oven bottom or Cover an entire rack with materials such as aluminum foil. Doing so blocks airflow through the oven and may cause carbon monoxide Poisoning. Aluminum foil linings may also trap heat, causing a fire hazard.
OPERATING THE OVEN
Oven Function
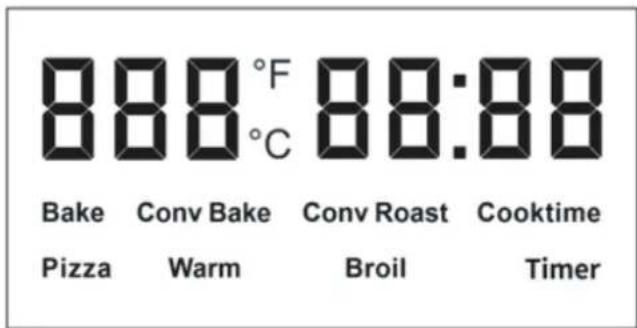
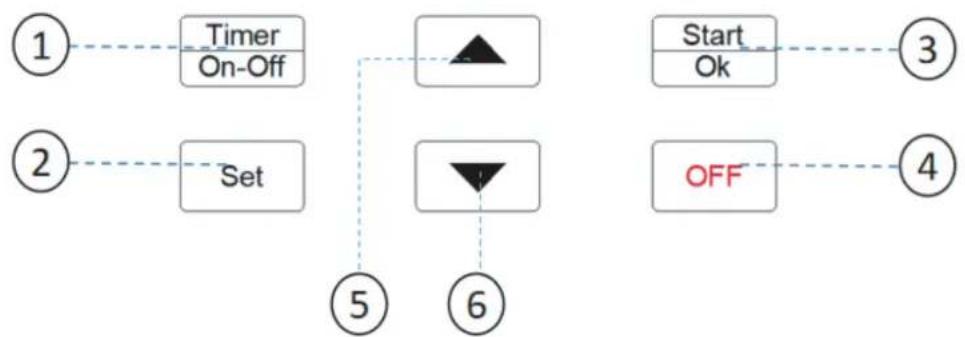
flowchart
graph TD
    A["1"] --> B["Timer On-Off"]
    C["2"] --> D["Set"]
    B --> E["▲"]
    D --> F["▼"]
    E --> G["Start Ok"]
    F --> H["OFF"]
    G --> I["3"]
    H --> J["4"]
- Timer On-Off: Set or cancel the kitchen timer;
- Set: Using option settings;
- Start/OK: start oven cooking and confirm when setting;
- OFF: Exit or return to reset and exit work;
- Up button: Set options or move up or number to increase up;
- Down button: Set options to move down or number to decrease;
Using the option function
This function enables you to control various electronic control options. Refer to the following table for available options.
The option menu is only available when the oven is not being used (not cooking).
| Options Feature | |
| 1. Clock | You can set the clock |
| 2. Temp Unit | Lets you program the oven control to display temperatures in Fahrenheit or Centigrade. |
| 3. Sound On/Off | Lets you set the oven controls to operate silently. |
| 4. Temp Calibration | Lets you correct the temperature in the oven. |
| 5. 12 hrs Safety Shutoff | This feature automatically turns off the oven after 12 hours during baking functions or after 3 hours during a broil function. |
OPERATING THE OVEN
Clock
Using Clock, you can set the oven clock display. How to turn the clock:
- Press "Set", and then press "Start/OK" or Press ▲ or ▼ to select CLO
- Press ▲ or ▼ to set the clock.
- Press "Start/OK" to save the changes.
Temp Unit
Using Temp Unit, you can switch the temperature units you want. How to turn temp unit:
- Press ▲ or ▼ to select "F-C", and then press "Start/OK"
- Press ▲ or ▼ to select "°F" or "°C"
- Press "Start/OK" to save the changes.
Sound On/Off
Using Sound On/Off, you can set the oven controls to operate silently. How to turn Sound On/Off:
- Press ▲ or ▼ to select "Son", and then press "Start/OK"
- Press ▲ or ▼ ro select "ON" or "OFF"
- Press "Start/OK" to save the changes.
Temp Calibration
The temperature in the oven has been calibrated at the factory. When first using the oven, be sure to follow recipe times and temperatures. If you think the oven is too hot or too cool, you can correct the temperature in the oven. Before correcting, test a recipe by using a temperature setting that is higher or lower than the recommended temperature. The baking results should help you to decide how much of an adjustment is needed. The oven temperature can be adjusted ± 30^ . How to correct the oven temperature:
- Press ▲ or ▼ to select "CAL" and then press "Start/OK"
- Press ▲ or ▼ to select you want number,
- Press "Start/OK" to save the changes.
NOTE:
This adjustment will not affect the broiling or the self-cleaning temperatures. The adjustment will be retained in memory after a power failure.
12 hrs Safety Shutoff
If you accidentally leave the oven on, this feature will automatically turn off the oven after 12-hours during baking functions or after 3 hours during a broil function. (Default setting: ON) How to use the 12 hrs Safety Shutoff :
- Press ▲ or ▼ to select "SAF" and then press "Start/OK".
OPERATING THE OVEN
- Press ▲ or ▼ to select "On" or "Off".
- Press "Start/OK" to save the changes.
Cooking Modes Bake
The oven can be programmed to bake at any temperature from 175^ F to 550^ F. Baking temperature and time will vary depending on the ingredients and the size and shape of the baking pan used. Dark or nonstick coatings may cook faster with more browning.
How to set the oven for baking:
- Press ▲ or ▼ to select "Bake", and then press "Start/OK".
- Press ▲ or ▼ to select the desired temperature.and then press "Start/OK".
- Displays cooking time Settings, you can press ▲ or ▼ to select you want cooking time.
- Press "Start/OK" to save the changes, or do not set cooktime directly press "Start/OK" and then the oven will work on the maximum safe time. The temperature display will start to change once the oven temperature reaches 100^ (the actual oven temperature is displayed when the remaining oven temperature is between 100^ than 550^ ).
- If you want to change the cooking time or cooking mode, Press "OFF" to stop the oven and return to the cooking mode selection.
- When the cooking time arrives, the oven will stop working and the buzzer will sound, and the display screen will switch to "End" for the cooking time. If the oven door is not opened within 1 minute and the "End" will go out, return to the standby state display (standby state will show the clock, and when the temperature in the oven 150^ F will show "HOT").
NOTE
Place food in the oven after preheating if the recipe calls for it. Preheating is very important for good results when baking cakes, cookies, pastry, and breads. After the oven has reached the desired temperature, the range will beep.
Conv Bake
The oven convection fan circulates and distributes the heat in the oven for faster and even cooking.
Convection cooking allows you to bake more items on multiple racks.
To bake using the convection fan:
- Position the oven bottom cover and the oven shelves before using oven.
- Remove any unused shelves and baking utensils from the oven.
- Preheat the oven to the temperature stated in the recipe. Depending on the temperature and the size of the oven, preheating will take around 15-20 minutes.
- Arrange pans and food items evenly on the shelves. Make sure pans do not touch each other or the sides of the oven. When baking a single item, always center the item on the oven shelf. If baking on multiple shelves, make sure you stagger items on the shelves so that one is never directly above another.
- When baking using convection, either reduce the temperature stated in the recipe and leave the baking time unchanged, or reduce the baking time by several minutes and leave the temperature unchanged. For foods with a baking time of over an hour, reducing both the temperature and time slightly may give the best results.
- Dark metal baking pans or those with a dull finish absorb heat faster than shiny pans, and are excellent for pies and breads, or anything that needs browning or a crisper crust.
- A shiny finish may work best for foods that require lighter, delicate browning (e.g. cakes and cookies).
OPERATING THE OVEN
as it reflects some heat and gives a less intense baking surface.
- Avoid opening the oven door frequently during baking.
How to set the oven for convection bake:
- Press ▲ or ▼ to select "Conv Bake", and then press "Start/OK".
- Press ▲ or ▼ to select the desired temperature, and then press "Start/OK".
- Displays cooking time Settings, you can press ▲ or ▼ to select you want cooking time.
- Press “Start/OK” to save the changes, or do not set cooktime directly press “Start/OK” and then the oven will work on the maximum safe time. The temperature display will start to change once the oven temperature reaches 100 °F (the actual oven temperature is displayed when the remaining oven temperature is between 100 °F than 550 °F ).
- If you want to change the cooking time or cooking mode, Press "OFF" to stop the oven and return to the cooking mode selection.
- When the cooking time arrives, the oven will stop working and the buzzer will sound, and the display screen will switch to "End" for the cooking time. If the oven door is not opened within 1 minute and the "End" will go out, return to the standby state display (standby state will show the clock, and when the temperature in the oven 150^ F will show "HOT").
Conv Roast
For best results use the broiler pan. The pan is used to catch grease spills and has a cover to prevent grease splatter.
The convection fan circulates heated air over the around the food being roasted, sealing juices quickly for a moist and tender product while, at the same time, creating a rich golden-brown exterior.
Use the broil/roast pan and slotted grid supplied with the range when roasting in order to elevate the meat on a metal roasting rack. This allows hot air to circulate around the meat, browning it more evenly like a rotisserie. A suitable roasting rack can be purchased through by the distribute or Customer Care.
When roasting larger items like a whole turkey, use only the pan and grid for greater stability.
How to set the oven for convection roast:
- Press ▲ or ▼ to select "Conv Roast", and then press "Start/OK".
- Press ▲ or ▼ to select the desired temperature, and then press "Start/OK".
- Displays cooking time Settings, you can press ▲ or ▼ to select you want cooking time.
- Press "Start/OK" to save the changes, or do not set cooktime directly press "Start/OK" and then the oven will work on the maximum safe time. The temperature display will start to change once the oven temperature reaches 100 °F (the actual oven temperature is displayed when the remaining oven temperature is between 100°F than 550°F).
- If you want to change the cooking time or cooking mode, Press "OFF" to stop the oven and return to the cooking mode selection.
- When the cooking time arrives, the oven will stop working and the buzzer will sound, and the display screen will switch to "End" for the cooking time. If the oven door is not opened within 1 minute and the "End" will go out, return to the standby state display (standby state will show the clock, and when the temperature in the oven 150^ F will show "HOT").
Pizza
The oven can be programmed to bake at any temperature from 175 °F to 550 °F. Baking temperature
OPERATING THE OVEN
and time will vary depending on the ingredients and the size and shape of the baking pan used. Dark or nonstick coatings may cook faster with more browning.
How to set the oven for pizza:
- Press ▲ or ▼ to select "Pizza", and then press "Start/OK"
- Press ▲ or ▼ to select the desired temperature, and then press "Start/OK"
- Displays cooking time Settings, you can press ▲ or ▼ to select you want cooking time.
- Press "Start/OK" to save the changes, or do not set cooktime directly press "Start/OK" and then the oven will work on the maximum safe time. The temperature display will start to change once the oven temperature reaches 100 °F (the actual oven temperature is displayed when the remaining oven temperature is between 100°F than 550°F).
- If you want to change the cooking time or cooking mode, Press "OFF" to stop the oven and return to the cooking mode selection.
- When the cooking time arrives, the oven will stop working and the buzzer will sound, and the display screen will switch to "End" for the cooking time. If the oven door is not opened within 1 minute and the "End" will go out, return to the standby state display (standby state will show the clock, and when the temperature in the oven 150^ F will show "HOT").
Warm
When cooking is finished, Keep Warm will hold the food at a safe serving temperature for up to 3 hours. After 3 hours, the feature will shut off automatically. You can use the keep warm feature without any other cooking operations, or you can set it to activate after a timed or delay timed cooking operation. You should not use this feature to reheat cold food. How to set the oven for warm:
- Press ▲ or ▼ to select "Warm", and then press "Start/OK", Displays the default temperature but cannot be set.
- You can press ▲ or ▼ to select you want cooking time.
- Press "Start/OK" to save the changes, or do not set cook time directly press "Start/OK" and then the oven will work on the maximum safe time.
- If you want to change the cooking time or cooking mode, Press "OFF" to stop the oven and return to the cooking mode selection.
- When the cooking time arrives, the oven will stop working and the buzzer will sound, and the display screen will switch to "End" for the cooking time. If the oven door is not opened within 1 minute and the "End" will go out, return to the standby state display (standby state will show the clock, and when the temperature in the oven 150^ F will show "HOT").
Broil
Broiling is a method of cooking tender cuts of meat by direct heat under the broil element of the oven. The high heat cooks quickly and gives a rich, brown outer appearance. Broil mode is best for meats, fish, and poultry up to 1" thick.
Always preheat the oven for 5-10 minutes before broiling.
How to set the oven for broiling:
- Press ▲ or ▼ to select "Broil", and then press "Start/OK".
- You can press ▲ or ▼ to select "Hi" or "Lo".
- Press "Start/OK" to save the changes, and then the oven will work on the maximum safe time.
- If you want to cancel broiling or change the cooking mode, Please press "OFF" to reset.
CLEANING INSTRUCTIONS
13. Cleaning Instructions
Do's
√ Read these cleaning instructions and the 'Safety and Warnings' section before you start cleaning your range.
√ Before cleaning or removing any part, make sure that everything on the range has been turned off.
√ Unless suggested otherwise in the following chart, allow all parts to cool to a safe temperature before cleaning. If you do need to handle a warm or hot part (e.g. grill or griddle), take extreme care. Wear long protective mitts to avoid burns from steam or hot surfaces.
√ Try using any cleaner on a small area first, to ensure it does not stain.
√ See the pages following this chart for instructions on removing and replacing various parts of the range for cleaning or maintenance.
√ To help you identify any parts, see illustrations in section ‘Introduction’ and after this cleaning chart.
Don'ts
Do not use aerosol cleaners until the range has completely cooled. The propellant substance in these cleaners could catch fire in the presence of heat.
Do not let soiling or grease accumulate anywhere in or on the range. This will make future cleaning more difficult and may present a fire hazard.
Do not use any abrasive or harsh cleaners, cloths, scouring pads or steel wool. These will scratch your range and damage its appearance.
√ Do not use a steam cleaner to clean any part of the range.
√ Do not lift the black grill and griddle frames off the cooktop.
Cleaning Burner caps and flame spreaders
- Check that the burner is turned OFF and allow it to cool. Lift off the burner cap and flame spreader. Wash them in hot soapy water, rinse, and dry.
- Use a stiff nylon brush or straight-ended paper clip to clear the notches of a flame spreader. Re-attach the flame spreader and burner cap correctly.
- Before cleaning the cooktop, ensure that all burners are turned off and that all components are cool enough to safely touch.
- To avoid electrical shock or burns, turn off controls and ensure the cooktop is cool before cleaning.
CLEANING INSTRUCTIONS
- Do not use harsh or abrasive cleaning detergents, waxes, polishes, or commercial cooktop cleaners to clean the cooktop.
- Use only a sponge, soft cloth, fibrous or plastic brush, and nylon pad for cleaning.
- Always dry components completely before using the cooktop.
- Control Panel, Door Handle, Control Housing
Clean the control panel, door handle and control housing with a solution of mild detergent and warm water. - Do not use abrasive cleaners or scrubbers; they may permanently damage the finish.
- Dry the components with a soft, lint-free cloth.
Cleaning oven shelves
- To remove stubborn or 'baked-on' soiling, scrub with a dampened, soap-filled, non-metal, non-abrasive pad, then wipe dry.
- Apply a chrome cleaner with a damp sponge or cloth following manufacturer's instructions.
- Wipe and dry.
Cleaning broil/roast pan
√ Pre-soak any stubborn soiling in a solution of mild detergent and hot water.
√ Wash by hand or in a dishwasher.
Cleaning bake and broil burners
√ Do not clean these parts. They self-clean during normal use.
Cleaning porcelain surfaces
√ Clean oven interior and inner door liners with a solution of mild detergents and hot water. Rinse and dry with a soft, lint-free cloth. Do not use abrasives or commercial oven cleaners.
Cleaning the oven glass window
√ Clean all glass surfaces with a solution of mild detergent and hot water. Use a mild glass cleaner to remove fingerprint or smears.
√ Dry completely with a soft, lint-free cloth.
CLEANING INSTRUCTIONS
Cleaning the oven door gasket
Avoid cleaning this part. If you need to remove large food particles off it, proceed as follows:
- Dampen a sponge with clean hot water.
- Gently wipe off the soiling, but do not rub.
- Press a dry towel gently on the gasket to dry.
Do not use any cleaning detergents on the gasket. The gasket is essential for a good seal.
CAUTION: Do not scratch, displace, or damage it.
Cleaning stainless steel surfaces
Do not use any cleaning product with chlorine bleach.
Do not use a steel wool pad; it will scratch the surface.
Use a hot, damp cloth with a mild detergent.
Use a clean, hot, damp cloth to remove soap. Dry with a dry, clean cloth.
REMOVING AND REPLACING THE OVEN DOOR
14. Removing and replacing the oven door
Do not lift the oven door by its handle. Doing so may damage the door.
Make sure the oven and the door are cool before you begin to remove the door.
IMPORTANT
Before removing the door, make sure there is a large enough clear, protected surface in the kitchen to rest the door on.
The oven door is heavy!
Removing the oven door
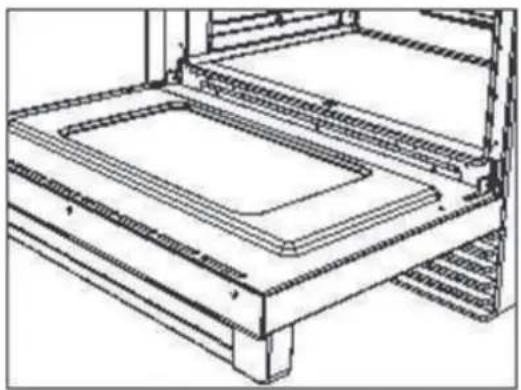
natural_image
Technical line drawing of a mechanical assembly with no visible text or symbols- Swing the hinge covers fully to open position. (Tip: small screwdriver will help get the covers open)
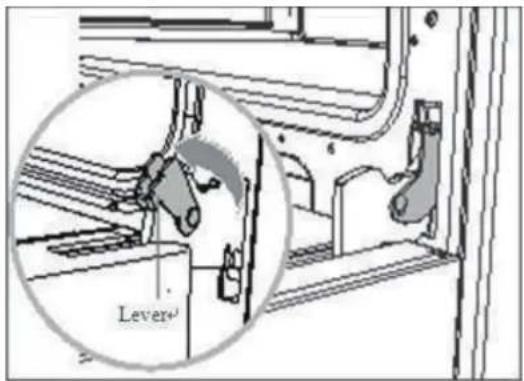
- Holding the door firmly on both sides.1. Open the door very careful
natural_image
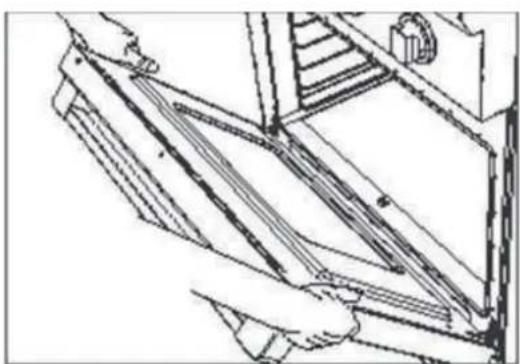
Technical line drawing of a mechanical assembly with no visible text or symbols- Disengage the hinges by lifting and pulling the door gently away from the oven.
natural_image
Technical line drawing of a mechanical assembly with stairs and supports (no text or symbols)REMOVING AND REPLACING THE OVEN DOOR
Replacing the oven door
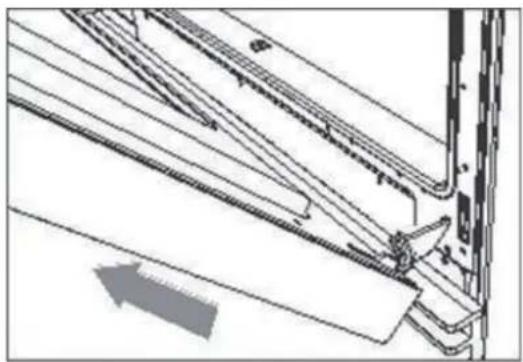
- Hold the door firmly in an open position.
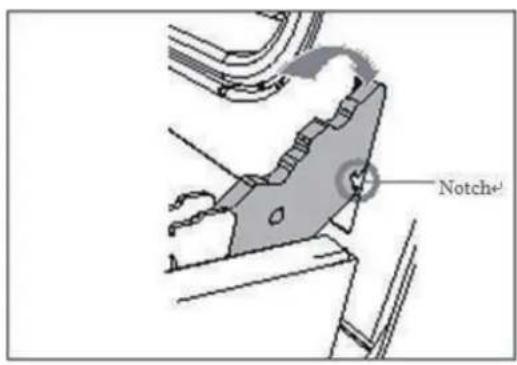
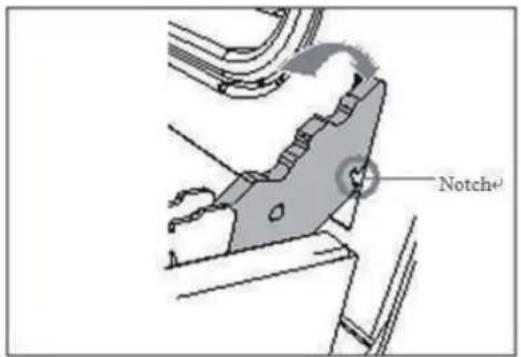
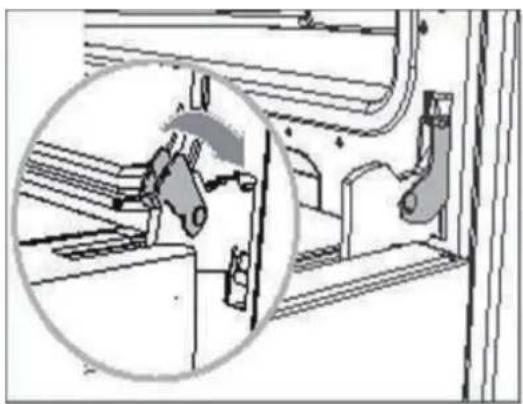
- Insert the hinge tongues into the slots making sure that the notches on both sides drop into place as shown.
- Swing the hinge covers closed.
natural_image
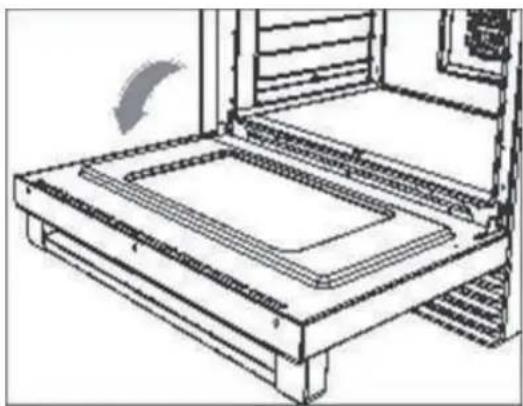
Technical diagram showing mechanical assembly with a magnified inset (no text or symbols)- Make sure the hinges are in place with the hinge covers in closed position, then close the door and make sure the door aligns perfectly. If the door is misaligned you will have to start the process over until the door is installed properly.
natural_image
Technical line drawing of a mechanical assembly or frame structure (no text or symbols)TROUBLESHOOTING GUIDE
15. Troubleshooting Guide
If you can't find an answer to your problem in the chart below, or if the problem cannot be fixed, you will need technical help. Contact your Authorized Service Center or Customer Care.
| Probable CausesProblem What To Do | ||
| COOKTOP | ||
| Some burners will not light. Flames do not burn all around the burner cap. | Burner parts or igniters may be wet, dirty, or misaligned. | Check that the burner parts are clean, dry, and correctly assembled. Check that the igniters are clean and dry. See‘Care and cleaning’for instructions. |
| Burner flames very large and yellow. | Burner bezel ports are clogged. Burner ports or burner caps are not positioned properly. Cooktop is being operated with the wrong type of gas. Regulator is not installed, is faulty, or is set for the wrong type of gas. | Clean burner bezel ring ports with straightened paper clip, needle, or wire. Remove and carefully re-install burner bezel and caps. Ensure that the type of cooktop matches the natural gas supply. Check installation, replace regulator, or set regulator for proper gas. |
| Sparking but no flame ignition. | Gas shut-off valve is in the‘OFF’position. Turn shut-off valve to the ‘ON’ position. | |
| Igniters spark continuously after flame ignition. | are wet or dirty. | Have polarity corrected. Dry or clean igniters.Power supply |
| Burner flame goes out at low setting. | Low gas supply pressure. Air intake holes around knobs are obstructed. | Contact gas company. Remove obstruction. |
| The flames have suddenly gone out. | A draft or a spill has extinguished the flame. | No action required. The burner will detect this and automatically relight. However, if there has been a large spill, we recommend turning the burners off and cleaning the burners and sump area. See‘Care and cleaning’ for instructions |
| There is a power failure – can I still use the cooktop burners? | Power outage in your area. | The cooktop burners can still be used. To light them: Holding a lighted match to the flame spread-er, push in on the control knob and turn counterclockwise to LITE. When the flame is burning all the way around the burner, you may adjust the heat. Important! If the flame is blown out during a power failure, turn the knob immediately to OFF, as the burner will not automatically relight and gas may escape. |
TROUBLESHOOTING GUIDE
| Probable CausesProblem What To Do | ||
| OVEN | ||
| The oven doesn't work (no heating). | No power supply (oven light and halos do not come on either). No gas supply (gas ovens). | Check that the circuit breaker hasn't tripped and there is no power outage in your area. If there is a power outage, you cannot use the oven until power has been restored.The supply to the house may not be working or there may be anoutage. Contact your local gas supplier. |
| One of the oven lights does not come on, but the oven works. | The light bulb is loose. The light bulb has blown. | See instructions for ‘Replacing the oven light bulb’ in section ‘Care and cleaning’. Instead of replacing the bulb, simply ensure that it is secure in its socket.Replace the bulb. See instructions for ‘Replacing the oven light bulb’ in section ‘Care and cleaning.’ |
| Condensation around oven (e.g. on control panel or top of oven door.) | Food has high moisture content or local climate (temperature, humidity) is contributing to condensation. | Condensation is normal. You can wipe the drops off the control panel. If there is frequent or excessive condensation, make sure that cabinetry around the range is moisture-proofed. |
| Steam coming from oven vents at the back of the range. | Moisture from food evaporating during cooking. | This is normal, especially if you are cooking large quantities of food in the oven using a CONVECTION mode. |
| come on in a CONVECTION mode. | Technical fault. The convection fan does not | Contact your Authorized Service Center or Customer Care. |
| Oven will not heat Oven settings are not corrected. Follow mode selection and clock settings as specified in Oven Operation section of the manual. | ||
| Foods over-cooked or under-cooked. | Incorrect cooking time or temperature. Adjust time, temperature, or rack position. | |
| "Cracking' or” Popping° sound. | This is the sound of metal heating and cooling. | This is normal. |
| There is a power failure - can I still use the oven? | Power outage in your home or neighborhood. | The oven cannot be used until power is restored. |
Information code
| Error Code | Error Description |
| E0 | The oven temperature control NTC is faulty |
| E1 | Over temperature detection NTC faults |
| E2 | The circuit board NTC is faulty |
| E3 | The oven is not heated |
| E5 | The oven's not normal cooking temperature exceeds 343°C |
| E6 | The oven is not heated, but the temperature inside the oven |
| E9 | The clock malfunction |
| E10 | Chip fault |
| E15 | Circuit board over temperature |
| E17 | Hall off the heat dissipation fan is faulty |
NOTE
Press OFF, then restart the oven. If the problem persists, disconnect all power to your range for at least 30 seconds, then reconnect the power. If this does not solve the problem, call for service.

LIMITED WARRANTY
MC Appliance Corporation warrants each new Gas Range to be free from defects in material and workmanship, and agrees to remedy any such defect or to furnish a new part(s), at the company's option, for any part(s) of the unit that has failed during the warranty period. Parts and labor expenses are covered on this unit for a period of one year from the date of purchase. A copy of the dated sales receipt/invoice is required to receive warranty service, replacement or refund.
This warranty covers appliances in use within the contiguous United States, Alaska, Hawaii and Puerto Rico. This warranty does not cover the following:
• Damages due to shipping damage or improper installation.
• Damages due to misuse or abuse.
• Content losses due to failure of the unit.
• Repairs performed by unauthorized service agents.
• Service calls that do not involve defects in material and workmanship such as instructions on proper use of the product or improper installation.
• Replacement or resetting of house fuses or circuit breakers.
• Failure of this product if used for other purposes than its intended purpose.
• Disposal costs for any failed unit not returned to our factory.
• Any delivery/installation costs incurred as the result of a unit that fails to perform as specified.
• Expenses for travel and transportation for product service if your appliance is located in a remote area where service by an authorized service technician is not available.
- The removal and reinstallation of your appliance if it is installed in an inaccessible location or is not installed in accordance with published installation instructions.
• Refunds for non repairable products are limited to the price paid for the unit per the sales receipt.
- This warranty is non transferable. This warranty applies only to the original purchaser and does not extend to any subsequent owner(s).
Limitations of Remedies and Exclusions: Limitations of Remedies and Exclusions:
Product repair in accordance with the terms herein, is your sole and exclusive remedy under this limited warranty. Any and all implied warranties including merchantability and fitness for a particular purpose are hereby limited to one year or the shortest period allowed by law. MC Appliance Corporation is not liable for incidental or consequential damages and no representative or person is authorized to assume for us any other liability in connection with the sale of this product. Under no circumstances is the consumer permitted to return this unit to the factory without the prior written consent of MC Appliance Corporation.
Some states prohibit the exclusion or limitation of incidental or consequential damages, or limitations on implied warranties. This warranty gives you specific legal rights, and you may also have other rights which vary from state to state.
Model Type of Service
MCSPG30SL
MCSPG36SL
Parts
One Year
Labor
At HomeOne Year
For Service or Assistance please call 888-775-0202 or visit us on the web at www.mcappliance.com to request warranty service or order parts.
APPENDIX 1
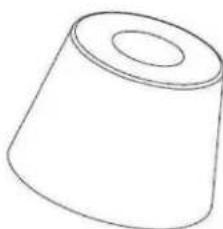
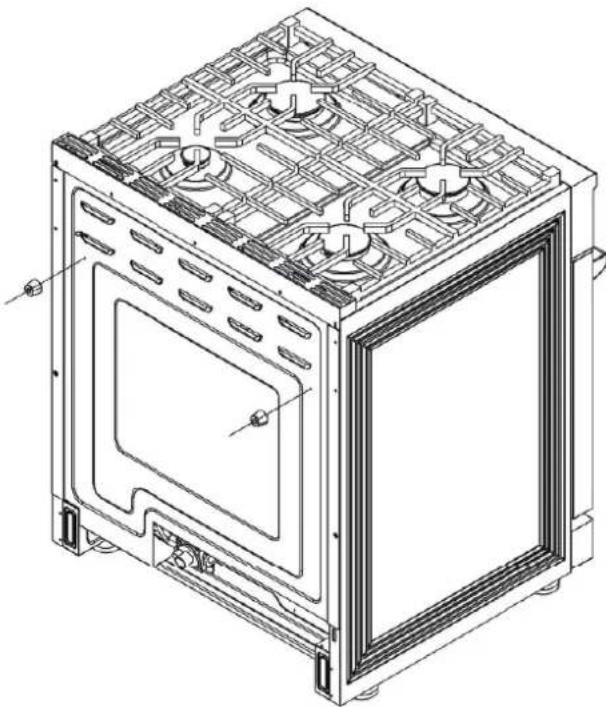
In order to meet the requirement for the clearance for the back of your Magic Chef Range, Please install 2 pcs Rubber Pad provided in the manual package Please find the accessories and follow the below steps:
- check the installation kit included in the manual package;
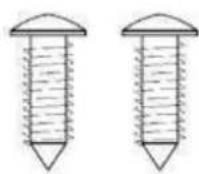
2* screws
natural_image
Simple line drawing of a conical frustum (no text or symbols)2* rubber pad
natural_image
Technical line drawing of a multi-chamber oven with visible vented grating and mounting brackets (no text or symbols)- Install 2 pcs rubber pad shown above

CNA International, Inc. d/b/a MC appliance Corporation. all rights reserved. Magic Chef® logo is a registered trademark of CNA International, Inc.
www.mcappliance.com Printed in China
- Freestanding Gas Range
- PRODUCT REGISTRATION
- TABLE OF CONTENTS
- WARNINGS
- WARNINGS
- WHAT TO DO IF YOU SMELL GAS
- WARNING:
- WELCOME
- Welcome
- BEFORE YOU START
- Before you start
- SAFETY AND WARNINGS
- Safety and Warnings
- Electrical Shock Hazard
- Tipping Hazard
- Explosion Hazard
- Fire Hazard
- Poisoning Hazard
- Hot Surface Hazard
- Other Safety Tips
- GAS SUPPLY REQUIREMENTS
- Gas Supply Requirements
- Safety Tips for Gas Operation
- CAUTION
- DIMENSIONS AND CLEARANCE
- WARNING
- Dimensions and Clearances
- Btu Design
- ELECTRIC POWER SUPPLY REQUIREMENTS
- Electric Power Supply Requirements
- ELECTRICAL GROUNDING INSTRUCTIONS
- Electrical Grounding Instructions
- ! WARNING
- Connect Range to Gas Supply
- CONNECT RANGE TO GAS SUPPLY
- After installation:
- FIRST USE
- First Use
- Cooktop Safety Guidelines
- COOKTOP SAFETY GUIDELINES
- Simmer and Boil
- Flame Size
- Power Failure
- Cooktop
- Burner Grates
- OPERATING THE OVEN
- Operating The Oven
- Oven Cooking Safety Guidelines
- Using the option function
- Clock
- Temp Unit
- Sound On/Off
- Temp Calibration
- NOTE:
- hrs Safety Shutoff
- Cooking Modes Bake
- NOTE
- Conv Bake
- Conv Roast
- Pizza
- Warm
- Broil
- CLEANING INSTRUCTIONS
- Cleaning Instructions
- Do's
- Don'ts
- Cleaning Burner caps and flame spreaders
- Cleaning oven shelves
- Cleaning broil/roast pan
- Cleaning bake and broil burners
- Cleaning porcelain surfaces
- Cleaning the oven glass window
- Cleaning the oven door gasket
- Cleaning stainless steel surfaces
- REMOVING AND REPLACING THE OVEN DOOR
- Removing and replacing the oven door
- IMPORTANT
- Removing the oven door
- Replacing the oven door
- TROUBLESHOOTING GUIDE
- Troubleshooting Guide
- Information code
- LIMITED WARRANTY
- Limitations of Remedies and Exclusions: Limitations of Remedies and Exclusions:
- APPENDIX 1
Brand : Magic Chef
Model : MCSPG30SL
Category : Cooker