
SR-482 - Alarm Clock Clas Ohlson - Free user manual and instructions
Find the device manual for free SR-482 Clas Ohlson in PDF.


| Product Type | Alarm clock radio |
| Brand | Clas Ohlson |
| Model | SR-482 |
| Dimensions (approx.) | 220 x 130 x 90 mm |
| Weight (approx.) | 0.8 kg |
| Power Supply | AC 230V ~ 50Hz or 2 x AAA batteries (backup) |
| Display | LED digital clock with dimmer |
| Radio Bands | FM/MW (AM) |
| Alarm Modes | Radio or buzzer with snooze function |
| Sleep Timer | Yes, adjustable up to 90 minutes |
| Additional Features | Dual alarm, alarm set indicator, battery backup for clock |
| Care & Cleaning | Wipe with dry cloth; do not use liquids or abrasive cleaners |
| Safety | Keep away from moisture; unplug during thunderstorms or if not used for long periods |
| Spare Parts & Repairability | Contact Clas Ohlson customer service for accessories or repairs; no user-serviceable parts inside |
| General Information | Designed for indoor use; operating temperature: 0°C to 40°C |
Frequently Asked Questions - SR-482 Clas Ohlson
User questions about SR-482 Clas Ohlson
0 question about this device. Answer the ones you know or ask your own.
Ask a new question about this device
Download the instructions for your Alarm Clock in PDF format for free! Find your manual SR-482 - Clas Ohlson and take your electronic device back in hand. On this page are published all the documents necessary for the use of your device. SR-482 by Clas Ohlson.
USER MANUAL SR-482 Clas Ohlson
Please read the entire instruction manual before using the product and save it for future reference. We apologise for any text or photographic errors and any changes of technical data. If you have any questions concerning technical problems please contact our Customer Service Department (see address on reverse).
- Clock radio with time, calendar, weather, temperature (min and max), humidity and moon phase-display.
• Radio: FM 88 – 108 MHz and AM 540 – 1600KHz - Background light
• Alarm with AM/FM radio or buzzer
1. Description

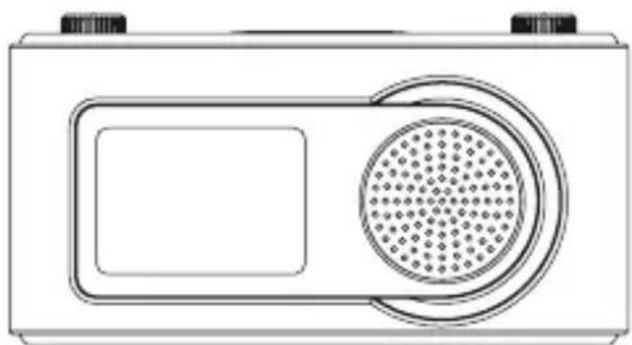
natural_image
Line drawing of a portable radio with a circular button and two tabs (no text or symbols)
Sunny

Slightly cloudy

Rainy

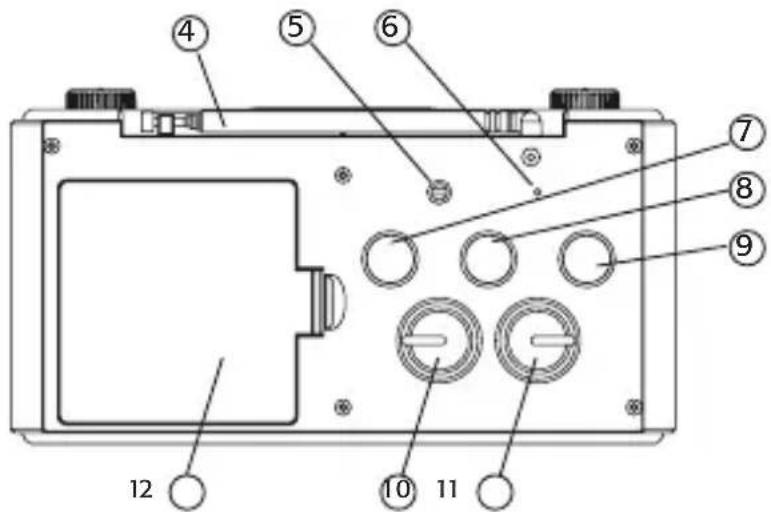
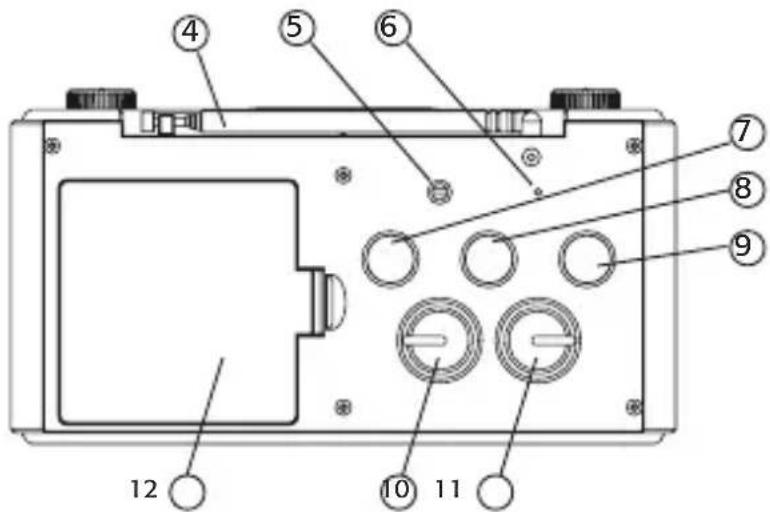
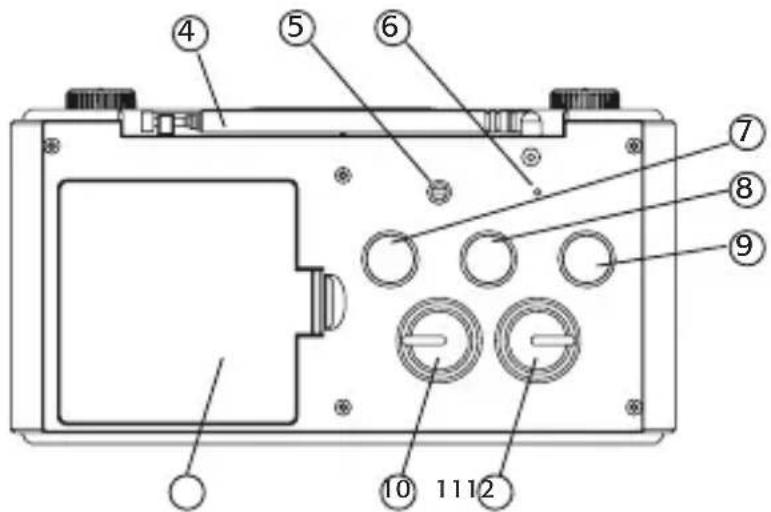
- [SNOOZE/LIGHT] Turns off alarm or activates snooze and light
- [VOLUME] Volume control for radio
- [TUNING] Tuner
- [ANTENNA] Telescopic antenna
- [SENSOR] Sensor for temperature and humidity
- [RESET] Reset to manufacturer's settings
- [MODE] Choose type of display or setting
- [ADJUST] Settings: Increase, continue up
- [SET] Open settings mode, confirm setting
- [RADIO ON...] Control for alarm and radio
- [FM - AM] Choose band
- Batterilucka Battery cover
2. Batteries
Batteries (not included)
The clock radio operates on 4x R6 batteries (2 for the radio, 2 for the clock), the lower row of batteries in the compartment are for the radio and the upper row are for the clock. The batteries for the clock last for approx. one year, the life length for the batteries to the radio depends on frequency of use, change batteries when the signal becomes weak. Change the clock's batteries when the display and light is getting weak.
Battery change:
1) Squeeze the sides of the battery cover and remove it.
2) Insert 4x LR6 batteries (not included), according to the markings in the battery compartment.
3) Close the battery cover.
N.B: Remove used batteries (those for the radio are generally replaced first) to avoid leakage and damage to the clock radio.
Handle used batteries according to your local regulations for waste disposal.
Do not mix uncharged/charged batteries or different types of batteries.
3. Setting the time
When the batteries are inserted AM 12.00, temperature, and weather symbol are displayed.
1) Push and hold [SET] (9) to enter the setup mode.
2) Choose 12 or 24 hour display by pushing [ADJUST] (8), push and hold [SET] (9) to confirm setting.
3) Push [ADJUST] (8) to set hours, push [SET] (9) to confirm setting.
4) Push [ADJUST] (8) to set minutes, push [SET] (9) to confirm setting.
5) Push [MODE] (7) to exit and save the settings.
4. Setting the alarm
1) Push [MODE] (7) until ALM is shown on the bottom of the display.
2) Push and hold [SET] (9) until the first digit (hours) starts flashing.
3) Push repeatedly on [ADJUST] (8) to set alarm hour, push [SET] (9) to confirm setting, push repeatedly on [ADJUST] (8) to set minutes.
4) Push [MODE] (7) to confirm the setting.
Setting the calendar
1) Push [MODE] (7) until the calendar is shown, push and hold [SET] until the year starts flashing.
2) Push [ADJUST] (8) to set year, push [SET] (9) to confirm setting, MONTH flashes,
3) Set the correct month by repeatedly pushing [ADJUST] (8), push [SET] (9) to confirm setting.
4) DATE flashes, set the correct date by repeatedly pushing [ADJUST] (8), push [MODE] (7) to confirm setting.
5. Activating/shut-off alarm and hourly chime
1) Push [MODE] (7) repeatedly until ALM is shown on the bottom of the display.
2) Push repeatedly on [ADJUST] (8) to activate/de-activate the alarm clock or hourly chime function.
- Press once to activate the alarm. ( will display)
- Press twice to activate the hourly chime. ( 📄 will display)
- Press three times to activate both the alarm and the hourly chime. (and will display)
- Press again to de-activate all functions (no icon display)
- Select the mode RADIO OFF/BUZZER if you want the buzzer alarm.
3) Push [MODE] (7) to return to normal time display. The alarm symbols are shown on the display (if alarm is activated).
4) Remember to set the control [RADIO ON...] (10) in mode RADIO ALARM if you want radio wakeup. The radio will be on the same station as when it was last shut off.
6. Snooze
Push [SNOOZE/LIGHT] (1) quickly to temporarily shut off the alarm buzzer or the radio wakeup until the next wakeup signal. The snooze function can be used four times until the alarm is shut off until the next day.
Work Light
Push [SNOOZE/LIGHT] (1) to turn the light on for a few seconds.
7. Radio
- Pull out the clock radio's telescopic antenna for best reception.
- Turn on the radio by setting the control (10) to ON.
- Set a radio station with the TUNING control (3).
- Adjust the volume with the VOLUME control (2).
N.B: The radio frequency is NOT shown on the display.
8. Thermometer and hygrometer:
Push [SET] to switch the thermometer's display between CELSIUS and FAHRENHEIT.
Push [ADJUST] to see MAX and MIN temperatures, hold the button to reset the memory.
The hygrometer displays the humidity between 20-95% relative humidity, if under 20% LL (for low humidity) is shown on the display.
9. Care
- Avoid high temperatures. The clock radio's casing can be damaged e.g. in direct sunlight, near heating elements or if left in the car during summer.
- Avoid placing the clock radio in places that are damp, dusty or exposed to strong vibrations.
- Clean the clock radio's exterior with a lightly moistened wash cloth. Use a little dish detergent if necessary. Never use strong detergents or solvents.
- Protect the clock radio against damp and water.
- Do not mix different types of batteries or both strong and weak batteries, remove weak batteries immediately since they may start leaking and damage the clock radio.
- Remove the batteries from the clock radio if it is not to be used for an extended time.
Reset
Insert a thin object (e.g. a safety pin) in the RESET hole (6) to reset, or remove the batteries and replace them again.
10. Specifications
Size W x H x D: 169 x 90 x 39,5 mm
Battery type: 4 x R6
Klockradio
Artikelnummer: 38-2922 • Modell: SR-482
natural_image
Line drawing of a portable radio with a circular button and rectangular side panel (no text or symbols)
Soligt

Delvis molnigt

Regn
6. Snooze (repetitionsalarm)
natural_image
Line drawing of a portable radio with a circular button and two tabs (no text or symbols)
Sol

Delvis skyet

Regn
Reset (tilbakestilling):
natural_image
Line drawing of a portable radio with a circular button and rectangular side panel (no text or symbols)
Aurinkoista

Puolipilvistä

Sadetta
For consumer contact, please visit
www.clasohlson.co.uk and click on
customer service.
INTERNET www.clasohlson.co.uk



- Description
- Batteries
- Batteries (not included)
- Battery change:
- Setting the time
- Setting the alarm
- Setting the calendar
- Activating/shut-off alarm and hourly chime
- Snooze
- Work Light
- Radio
- Thermometer and hygrometer:
- Care
- Reset
- Specifications
- Klockradio
- Artikelnummer: 38-2922 • Modell: SR-482
- Snooze (repetitionsalarm)
- Reset (tilbakestilling):
Brand : Clas Ohlson
Model : SR-482
Category : Alarm Clock