AWM-660 - Radio SANYO - Free user manual and instructions
Find the device manual for free AWM-660 SANYO in PDF.

| Product Type | Radio |
| Brand | Sanyo |
| Model | AWM-660 |
| Dimensions (H x W x D) | 200 x 120 x 80 mm |
| Weight | 0.5 kg |
| Power Supply | AC 230V, 50Hz or DC 6V (4 x AA batteries) |
| Frequency Bands | AM (530-1710 kHz), FM (87.5-108 MHz) |
| Tuning Type | Analog (dial) |
| Speaker Size | 3.5 inch (8 cm) full-range |
| Output Power | 1W (RMS) |
| Audio Features | Volume control, tone control |
| Controls | On/Off, Volume, Tuning, Function selector |
| Display | Analog frequency scale |
| Connectivity | 3.5mm headphone jack |
| Antenna | Built-in FM antenna, external AM loop |
| Battery Life | Approximately 30 hours (with alkaline batteries) |
| AC Adapter Included | Yes |
| Color | Black/Silver |
| Material | Plastic and metal |
| Warranty | 1 year limited |
Frequently Asked Questions - AWM-660 SANYO
User questions about AWM-660 SANYO
0 question about this device. Answer the ones you know or ask your own.
Ask a new question about this device
Download the instructions for your Radio in PDF format for free! Find your manual AWM-660 - SANYO and take your electronic device back in hand. On this page are published all the documents necessary for the use of your device. AWM-660 by SANYO.
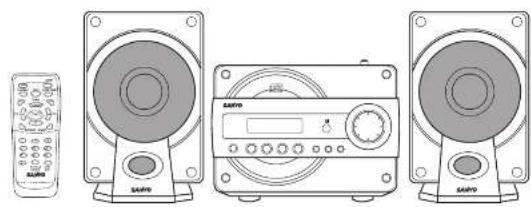
USER MANUAL AWM-660 SANYO
natural_image
Two horizontal color swatches with grayscale shades and a small crosshair in the center (no text or symbols)SANYO
INSTRUCTION MANUAL
AWM-660
Micro Component System
natural_image
Illustration of four audio equipment models including two speakers and a front-mounted device (no text or symbols visible)CONTENTS
| Warranty | E1 |
| Accessories | E2 |
| Safety certification | E3 |
| Connections | E3 |
| For safe and efficient operation | E5 |
| Controls | E5 |
| Remote control | E6 |
| Adjusting the clock | E7 |
| Before operation | E7 |
| Compact disc preparations | E8 |
| CD play | E8 |
| Listening to the radio | E10 |
| Listening to the tapes | E11 |
| Before recording | E12 |
| Recording | E12 |
| Timer operation | E13 |
| Remote control operation | E14 |
| Troubleshooting guide | E15 |
| Maintenance | E15 |
| Specifications | E16 |
SANYO'S HELP-LINE
Call the toll-free number below if you have any difficulties operating this product. 1-800-813-3435 (Weekdays: 7:30 AM - 4:00 PM Central Time)
1AD6P1F1925-HB AWM-660, Issue Number 3
English
(2) = (50.08 x 1) Page 41654.5-07 PMI


For assistance in obtaining repairs and operational information, please contact the following Toll Free Number:
DIAL TOLL FREE: 1-800-813-3435
Weekdays: 7:30 AM - 4:00 PM Central Time
Also, you may write to SANYO Manufacturing Corporation, 3333 Sanyo Road, Forrest City, Arkansas 72335.
Limited Warranty
LABOR 1 YEAR PARTS 1 YEAR CARRY-IN ONLY
THIS WARRANTY IS VALID ONLY ON SANYO PRODUCTS PURCHASED FROM A WAL-MART STORE AND USED IN THE UNITED STATES OF AMERICA, EXCLUDING HAWAII AND ALL U.S. TERRITORIES AND PROTECTORATES. THIS WARRANTY APPLIES ONLY TO THE ORIGINAL RETAIL PURCHASER AND DOES NOT APPLY TO PRODUCTS USED FOR ANY INDUSTRIAL, PROFESSIONAL OR COMMERCIAL PURPOSE.
Subject to the OBLIGATIONS and EXCLUSIONS below, SANYO Manufacturing Corporation ("SANYO") warrants this SANYO product against defects in materials and workmanship for the periods of LABOR and PARTS specified above. SANYO will repair or replace (at its option) the product and any of its parts which fail to conform to this warranty with new or refurbished products or parts. The warranty period commences on the date the product was first purchased at retail from a Wal-Mart Store.
OBLIGATIONS
In order to obtain warranty service, the product must be delivered to and picked up from a Wal-Mart Store at the original retail purchaser's expense. The original dated bill of sale, or sales slip from a Wal-Mart Store must be submitted to a Wal-Mart Store at the time warranty service is requested.
EXCLUSIONS
- This warranty does not cover (A) the adjustment of customer-operated controls as explained in the appropriate model's instruction manual, or (B) the repair of any product whose serial number has been altered, defaced or removed.
- This warranty shall not apply to the cabinet or cosmetic parts, broken or damaged video heads, batteries or routine maintenance.
- This warranty does not apply to uncrating, setup, installation, removal of the product for repair or reinstallation of the product after repair.
- This warranty does not apply to repairs or replacements necessitated by any cause beyond the control of SANYO including, but not limited to, any malfunction, defect or failure caused by or resulting from unauthorized service or parts, improper maintenance, operation contrary to furnished instructions, shipping or transit accidents, modification or repair by user or any third party, abuse, misuse, neglect, accident, incorrect line voltage, fire, flood or other Acts of God, or normal wear and tear.
The foregoing is in lieu of all other express warranties and SANYO does not assume or authorize any party to assume for it any other obligation or liability.
THE DURATION OF ANY WARRANTIES WHICH MAY BE IMPLIED BY LAW (INCLUDING THE WARRANTIES OF MERCHANTABILITY AND FITNESS) IS LIMITED TO THE TERM OF THIS WARRANTY. IN NO EVENT SHALL SANYO OR THE MANUFACTURER OF THE PRODUCT BE LIABLE FOR SPECIAL INCIDENTAL OR CONSEQUENTIAL DAMAGES ARISING FROM OWNERSHIP OR USE OF THIS PRODUCT. OR FOR ANY DELAY IN THE PERFORMANCE OF ITS OBLIGATIONS UNDER THIS WARRANTY DUE TO CAUSES BEYOND ITS CONTROL.
SOME STATES DO NOT ALLOW LIMITATIONS ON HOW LONG AN IMPLIED WARRANTY LASTS AND/OR DO NOT ALLOW THE EXCLUSION OR LIMITATION OF CONSEQUENTIAL DAMAGES, SO THE ABOVE LIMITATIONS AND EXCLUSIONS MAY NOT APPLY TO YOU.
THIS WARRANTY GIVES YOU SPECIAL LEGAL RIGHTS. YOU MAY HAVE OTHER RIGHTS, WHICH VARY FROM STATE TO STATE.
R03/12/18 (M)
For your protection in the event of theft or loss of this product, please keep the following information with a sales receipt in a safe place.
Model No.
Serial No.
Date of Purchase
Purchase Price
Where Purchased
SANYO
SANYO Manufacturing Corporation
SNX-650768 203 page 41694.500 PM2
-E1-

natural_image
Two horizontal bar designs with grayscale shades and a central crosshair (no text or symbols)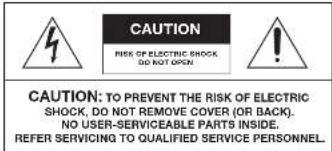
WARNING: TO PREVENT FIRE OR SHOCK HAZARD, DO NOT EXPOSE THIS APPLIANCE TO RAIN OR MOISTURE.

WARNING: UNAUTHORIZED RECORDING OF COPYRIGHTED MATERIAL MAY VIOLATE APPLICABLE COPYRIGHT LAWS. THE MANUFACTURER ASSUMES NO RESPONSIBILITY FOR UNAUTHORIZED DUPLICATION, USE OR OTHER ACTS WHICH INFRINGE UPON THE RIGHTS OF COPYRIGHT OWNERS.
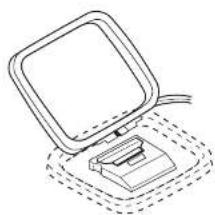
ACCESSORIES
RB-MCR60 wireless remote control
natural_image
Line drawing of a desktop computer with monitor and keyboard (no text or symbols)AM loop antenna

Need help? Call 1-800-813-3435
-E2-
(2) = (50.08 x 1) Page 41654.5-07 PM3


SAFETY CERTIFICATION
This unit is made and tested to meet exacting safety standards. It meets UL, CSA and FCC requirements and complies with safety performance standards of the U.S. Department of Health and Human Services.
CAUTION - USE OF CONTROLS OR ADJUSTMENTS OR PERFORMANCE OF PROCEDURES OTHER THAN THOSE SPECIFIED HEREIN MAY RESULT IN HAZARDOUS RADIATION EXPOSURE.
THIS UNIT SHOULD NOT BE ADJUSTED OR REPAIRED BY ANYONE EXCEPT PROPERLY QUALIFIED SERVICE PERSONNEL.

FCC INFORMATION
This device complies with Part 15 of the FCC Rules.
Operation is subject to the following two conditions: (1) This device may not cause harmful interference, and (2) this device must accept any interference received, including interference that may cause undesired operation.
CAUTION:
Changes or modifications not expressly approved by Sanya may void the user's authority to operate this equipment.
NOTE:
This equipment has been tested and found to comply with the limits for a Class B digital device, pursuant to Part 15 of the FCC Rules. These limits are designed to provide reasonable protection against harmful interference in a residential installation. This equipment generates, uses and can radiate radio frequency energy and, if not installed and used in accordance with the instructions, may cause harmful interference to radio communications. However, there is no guarantees that interference will not occur in a particular installation. If this equipment does cause harmful interferences to radio or television reception, which can be determined by turning the equipment off and on. The user is encouraged to try to correct the interference by one or more of the following measures:
- Reorient or relocate the receiving antenna.
- Increase the separation between the equipment and receiver.
- Connect the equipment into an outlet on a foot to which the recipient is connected
- Consult the dealer or an experienced radio/TV technician for help.
CONNECTIONS
Antennas
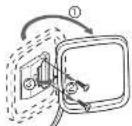
FM antenna
The FM indoor antenna lead wire (see the back of the unit) is sufficient to receive most local FM broadcasts.
Unwind the antenna lead wire, then extend it as straight as possible and, while listening to the sound from the system, secure it in a position where the best FM reception is found.
AM antenna
The AM loop antenna is sufficient to receive most local AM broadcasts. Assemble the loop antenna.
Unwind the antenna wires. Then connect them to the AM LOOP terminals. Place the loop antenna in a position① which yields the best AM reception, or attach it to a wall or other surface as shown.
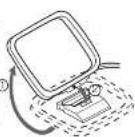


Screws (not supplied)
NOTE:
To minimize noise.
- Keep the speaker wires, power cord and all other system con-
nection cables away from the loop antenna.
• Do not place the antenna close to the speaker.
-E3-

(2) = (50.08 x 1) [1] = 47654.50 PPM


natural_image
Two horizontal color swatches with a central crosshair (no text or symbols)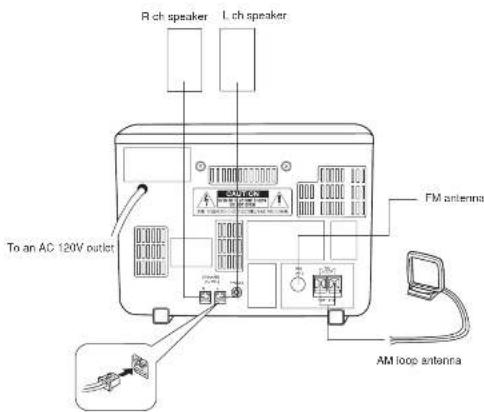

Connect the connector of the right speaker cable to the SPEAK-ERS B jack. ATTENTION:
If you have difficulty inserting the speaker cable connector, turn it over and reinsert it. POUR ÉVITER LES CHOC ÉLECTRIQUES,
Headphones jack (PHONES)
Connect a pair of stereo headphones with miniplug (not available from SANYO) to the PHONES jack (the back of the unit) for monitoring or for private listening. The speakers are automatically disconnected when headphones are connected.
CAUTION:
TO PREVENT ELECTRIC SHOCK, MATCH WIDE BLADE OF PLUG TO WIDE SLOT, FULLY INSERT.
ATTENTION:
POUR ÉVITER LES CHOC ÉLECTRIQUES, INTRODUIRE LA LAME LA PLUS LARGE DE LA FICHE DANS LA BORNE CORRESPONDANTE DE LA PRISE ET POUSSER JUSQU' AU FOND.
PHONES

Power supply
Connect the power cord to a 120V AC 60Hz outlet. This unit is equipped with a polarized plug. If you have difficulty inserting the plug, turn it over and reinsert it. If the unit will not be used for a long time, disconnect the AC plug from the AC outlet. NOTES:
• Before plugging the power cord into an AC outlet, make sure that all the connections have been made.
- The system is not disconnected from the AC power unless the power cord is unplugged from the AC outlet.

Need help? Call 1-800-813-3435
-E4-
(2) = (50.08 x 1) Page 41654.5-07 PMS
[NO TEXT]

1


- Do not damage the power cord.
- When not in use, disconnect the power cord from the bullet. Grasp the plug, not the cord, when disconnecting the unit
- If water should enter the unit, electrical shock or a malfunction may result. Use in an area where there is low humidity and little dust.
- Do not disassemble or alter the unit in any way.
- Do not use the unit in areas where extremes in temperature occur (below 40°F or exceeding 95°F), or where it may be exposed to direct sunlight.
- Because of the CD player's extremely low noise and wide dynamic range, there is a tendency to set the volume on the amplifier higher than necessary. Doing so may produce an excessively high output from the amplifier which can cause damage to your speakers. Please be careful in this regard.
- Sudden changes in the surrounding temperature can cause dew to form on the optical pickup lens inside the unit. Under this condition the unit may be unable to operate properly. If this should occur, remove the disc and allow the CD player to adjust to the surrounding temperature.
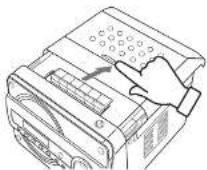
WHAT TO DO IF ...
If the operation of the unit or display is not normal even though the appropriate buttons have been pressed.
- Press [ON] to turn the power off
-
While pressing [ ] on the unit, press [ >vIII ] on the unit for at least 1 second.
-
Press (10)ON] to turn the power on. NOTE: If the unit still does not operate correctly, please contact your nearest SANYO Authorized Service Center.
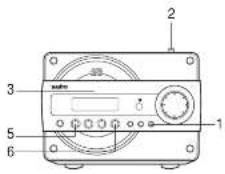
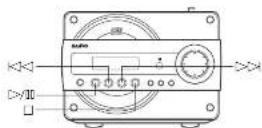
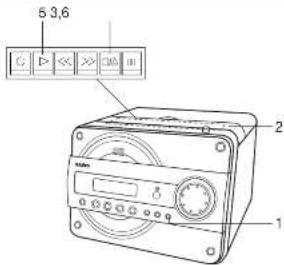
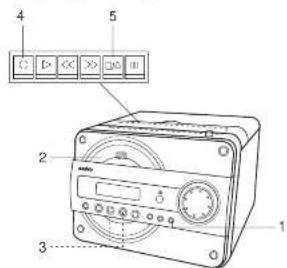
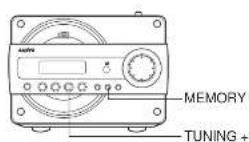
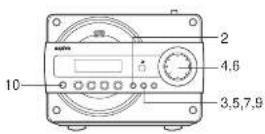
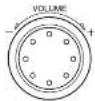
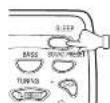
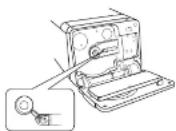
CONTROLS

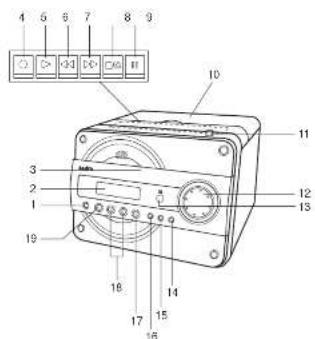
- Power button (L+ON)
- Display
- CD compartment
- Record button (REC)
- Play button (PLAY)
- Rewind button (REW)
- Fast forward button (FFWD)
- Stop/Eject button (STOP/EJECT)
- Pause button (PAUSE)
- Cassette door/Cassette holder
- Open button for CD door (CD DOOR OPEN)
- Volume control (VOLUME)
- Heimple sensor [IR]
14 Function button (FUNCTION) - Memory button (MEMORY
- Clock/Timer button (CLOCK/TIMER)
- Stop button (L)
- Skip/Search Tuning buttons (K) TUNING -, DXTUNING +
- Play/Pause button [D>10]

Need help? Call 1-800-813-3435
-E5-

202-630.08 201 Page 471654.5-07 PMB


natural_image
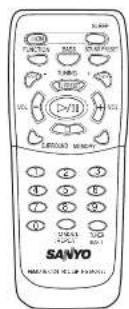
Two horizontal color swatches with grayscale shades and a central crosshair (no text or symbols)REMOTE CONTROL
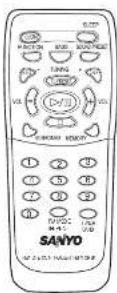
Controls
Inserting batteries
1.2.
Two 'AAA' batteries (not supplied)
NOTE:
Remove the batteries if the remote control is not to be used for a month or more. Batteries left in the unit may leak and cause damage.
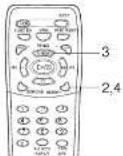
IMPORTANT NOTE:

1. Power button (L/ON)
2. Sleep button (SLEEP)
3. Sound preset button (SOUND PRESET)
4. Preset tuning button(TU PRESET)
5. Volume buttons (VOL, VO
6. Memory button |MEMOR
7. Number buttons (1-9, 0)
8. Tuner function/Band select button (TUNER/BAND)
9. FM mode/Repeat button [FM MODE/REPEAT]
10. Surround button (SURROUND)
1. Stop button (1-9)
12. Play/Pause button (3×11)
3. Skip/Search/Tuning buttons (
4. Function button (FUNCTION)
15. Bass expander button (BASS)
Number buttons (1-9, 0)
These buttons are used to select the track numbers on a disc or preset radio stations.
If the function is "CD", the buttons select the track numbers on a disc.
If the function is "TUNER", the buttons select preset radio stations.
With any other function, this button will not function. Two buttons must always be pressed.
20 DUTIONS Exemode
Example. To select No. 3 press [2], then [3].
To select No. 5, press [6], then [9].
To select No. 25, press [1], then [5].
Remote control range
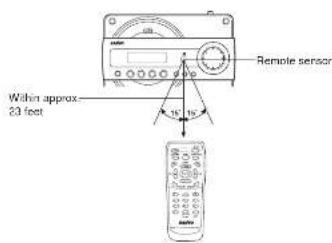
Operation
By using the remote control, you can operate the system in the same way as with the controls on the main unit.
-E6-
(2) = (50.08 × 10^3)

41504,530PM
ADJUSTING THE CLOCK
NOTE:
When the unit is first connected to the AC power line, the clock display blinks on the display.
Example: To Set "PM 6:30"
Use the main unit for this operation.
-
First, press [LxON] to turn the power off. Only the clock display blinks.
-
Press [CLOCK-TIMER] for at least 2 seconds. * * * blinks on the display.
CLOCK/TIMER

① AQ
12:00
- Press [MEMORY]
The "hours" display blinks.
MEMORY

图
12:00
- Tum [VOLUME] to set the "hours".

1
6:00
- Press [MEMORY]
The "minutes" display blinks.
MEMORY

J FHI
5:00
- Turn [VOLUME] to set the 'minutes'.

2
6:30
- Press [MEMORY]. The clock starts:
MEMORY
[Non-Text]
17
6:30
- The time can be set accurately by pressing [MEMORY] when a time signal is hoard.
- To display the clock during operation, press [CLOCK/TIMER] briefly. After a few seconds, the original display returns.
- If a power failure occurs or the power cord is disconnected, the clock display blinks. Reset the clock again.
BEFORE OPERATION
Turning the power on and off
Press [dʒON]. The display lights.
To turn the power off, press [WON]
again. The clock display terrains it. : When the power card is connected
In the AC outlet, the unit will
to the NC butler, the unit will respond to commands from the
respond to commands from the remote control.
If the following buttons are pressed when the power is turned off,
the unit turns on automatically and the selected function is
activated.
CD section 2511 Remote control: TUNERBAND
Remote control, SII, TUNER/BAND
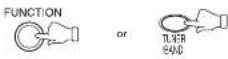
Selecting the function
Press [FUNCTION] to select the desired
function. Each time the button is
pressed, the display changes as follows:

FUNCTION

Cd → Tuner (FM) → Tuner (AM) → TAPE → Cd → ...
The function is automatically selected when CD play is started or when [TUNER/BAND] on the remote control has been pressed (except during recording).
- When the function selection is opened, CD play in automati
- When the function solution is changed, CD play is automatically stopped
Adjusting the volume
Turn [VOLUME]. or press [VOL +] or [VOL
-] on the remote control. The volume level
appears by numbers (VOL 0 - VOL 24) on
the display.
Bass expander system
(Remote control only)
Press [BASS] to enhance the bass sound.
"BA5S" appears on the display.
Surround sound system
(Remote control only)
Press [SURROUND]. "SURR" appears
on the display and a "Wide" effect is
created.
Selecting the sound mode
(Remote control only)
Press [SOUND PRESET] to select the
sound mode matching the music to be
listened to. Each time the button is
pressed, the display changes as shown
below.
POP: Pops, etc.
CLAS: Classical music, etc.
ROCK: Rock music, etc.
JAZZ: Jazz, etc.


SOUND PRESET

-E7-
(2) = (50.08 x 1) page 41654.5-07 PWB


COMPACT DISC PREPARATIONS
- This unit is designed to play compact discs bearing the identification logo below. Discs that do not carry this logo may not conform to the CD standard and may not play properly.

• Fingerprints and dust should be carefully wiped from the signal surface of the disc (glossy side) with a soft cloth. Wipe in a straight motion from the center to the outside of the disc.
- Never use chemicals such as record cleaning sprays, antislastic sprays or fluids, bonzone or thinner to clean compact discs. These chemicals will permanently damage the plastic surface of the disc.
• Always place the compact disc on the disc turntable with the label facing toward you. Compact discs can be played on only one side.
• To remove a disc from its storage case, press down on the center of the case and lift the disc out, holding it carefully by the edges.
- Discs should be returned to their cases after use to protect them from dust and scratches.
• To prevent warping the disc, do not expose it to direct sunlight, high humidity or high temperatures for extended periods of time.
Do not apply paper or write anything on either side of the compact disc. Sharp writing instruments, or the inks used in some felt-tip pens, may damage the surfaces of the disc. - This unit can play back the CD-R/RW that have recorded music data as well. However, some CD-R/RWs can not be played back depending on the recording conditions.
IMPORTANT INFORMATION
Sanyo CD players have built-in error compensation circuits to correct for minor manufacturing defects in a disc. There are limits, however, to the amount of correction possible.
In some cases, the CD player may skip some tracks on a disc during play. This problem may be caused by defects (such as scratches) in the disc being played, which are too large for the error compensation circuits to handle. If you encounter this problem, check the operation of the CD player as follows, before having the unit serviced. Play a now disc. If the CD player operates normally, the skipping problem is most likely due to a defective disc.
CD PLAY
NOTES:
- Never place anything except a compact disc on the disc tumtable. Foreign objects can damage the unit.
• Discs must be placed on the disc turntable one at a time.
If a disc is loaded, you can turn the unit on and begin play immediately by pressing [>>11].
BASIC CD PLAY
- Press [FUNCTION] to select the "CD" function.
- Press [CD DOOR OPEN], "OPEN" appears. The CD door opens.

CAUTION:
Please do not place anything in front of the unit, in such a case the object in front of the unit may fall over or be knocked down.
- Place the disc with the label facing toward you on the disc turntable. (Place only one disc at a time.)
For 5-inch (12cm) or 3-inch (6cm) CD
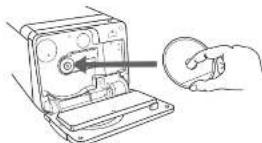
-
Push the CD door back into position until it "clicks" into place. The total number of tracks and total playing time on the disc appear. NOTE: If the disc is loaded with the label facing toward the unit, or if a badly scratched disc is loaded, "Cd" appears. If this occurs, load the disc correctly or replace the damaged disc.
-
Press [D>100]. Play starts from the first track.

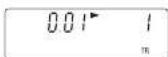
The current track number and elapsed playing time are displayed.
- Press [LI] to end disc play When the last track has been played, the player stops automatically.
-E8-
(2) = (50.08 x) page 41654.547 PMB

IMPORTANT NOTE:
Opening the CD door while a disc is playing could scratch the disc. Always press [☐] and wait for the disc to stop rotating before opening the CD door.
To start play from the desired track
Select the track by using [D>0] or [<0], then press [|>1].
Using the remote control
Press two number buttons within 2 seconds to select the track (Examples were [0], both [1]).
- Example: Cross [6], then [5].
Temporarily stopping play
Press [2-11]. ▶ blinks on the display. To resume play, press the button again.
Skip play
Example:
To skip to track 6 while track 3 is playing, press [▶▶▶] repeatedly until '6" appears (in the track section) on the display. To skip back to track 3 while track 6 is playing, press [▶▶▶] repeatedly until "3" appears
- The number buttons on the remote control can also be used for skip play. To skip to track 6 while one track is playing, press [0], then [6].
TUNING +


Search (forward/reverse)
If [D>1] or [K>1] is pressed during play, the player will search at high speed in the forward or reverse direction while the button is being pressed. When the button is released, normal play will continue.
Repeat play (Remote control only)
Press [FM MODE/REPEAT]
The player will play all the tracks or all the programmed tracks repeatedly. “☐” appears on the display.
To cancel repeat play, press [FM MODE/REPEAT] again. * disappears.


Need help? Call 1-800-813-3435
PROGRAMMED PLAY
Up to 20 tracks on a disc can be programmed for play in any order.
- First, select the "CD" function and load a disc that you want to program.
• The tracks must be programmed in the stop mode.
- The same truck can be programmed more than once.
- Press [MEMORY].

- Select a track by using [D] or [K]
- The number buttons on the remote control can also be used.
- TUNING +


- Press [MEMORY].

-
Repeat steps 2 - 3 to program additional tracks.
-
Press [DV00] to start programmed play.


When all programmed tracks have been played, the player stops automatically. "0.00" appears on the display. • The program contents are retained in memory
- The maximum number of selections that can be programmed is 20. If you try to enter more selections, "FULL" appears on the display.
- The program contents are retained even if the function selection is changed.
+ To cancel programmed play, press [ ] twice.
Checking the program
Each time [MEMORY] is pressed in the stop mode, the programmed details sequentially appear on the display.
Changing a program
To add a new track to a program: 1. In the stop mode, press [MEMORY] repeatedly until “...” is displayed.
-
Select a track as explained above.
-
Press [MEMORY]
-
In the stop mode, press [MEMORY] repeatedly until the selection to be replaced is displayed.
-
Select a track as explained above
-
Press [MEMORY].
Programmed tracks cannot be deleted individually.
-E9-
(58-610.08 20) Page 41654 5-07 PM10
[NO TEXT]

natural_image
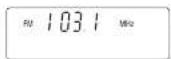
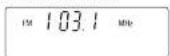
Two horizontal color swatches with grayscale shades and a central crosshair (no text or symbols)- Press [FUNCTION] (or [TUNER/BAND] on the remote control) to select AM or FM. The radio frequency appears.
2. Press [TUNING +] or [TUNING -] for at least 1 second to tune in a station. The unit will scan up or down the band and receive the next receivable station. Press the button again to continue.
• The [TUNING +] or [TUNING -] on the remote control can also be used.
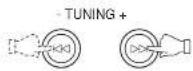
Manual tuning
-
Press [FUNCTION] to select AM or FM.
-
Press [TUNING -] or [TUNING -] continuously until you are close to the desired frequency, then press it briefly until the desired frequency is displayed. Each time the button is pressed, the frequency changes in 200 kHz steps for FM and 10 kHz steps for AM.

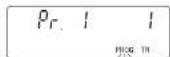
TO PRESET STATIONS (Remote control only)
Up to 20 FM and 12 AM stations can be preset.
1. Tune in the station to be preset as described above.
- Press [MEMORY].

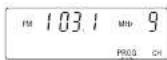
- Press [TU PRESET] to select the channel number to be preset.

-
The number buttons on the remote control can also be used.
Two buttons must always be pressed.
Example:
To select No. 9, press [0], then [9].
To select No. 10, press [7], then [0]. -
Press [MEMORY].
-
If using the number buttons on the remote control, this step is not necessary.
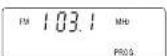
- In this example, "100.1 MHz" FM station is preset on FM channel number 9.

NOTE:
If the next step is not taken within 10 seconds while performing steps 2 - 4, "PROG." disappears and the preset operation is canceled. Press (MEMORY) to continue.
-
Repeat the steps above to add more preset stations.
-
When preselling a new station, the previously preset station on
the same program number of the same band is cleared. • The preset stations will be retained in the memory even if the unit is turned off. - If the memory contents are lost due to a power failure or other condition, program the stations again.
-E10-
x=650.08 m^2
1
41504,530PM

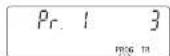
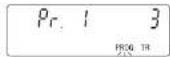
LISTENING TO PRESET STATIONS
Program stations as described in "TO PRESET STATIONS".
Preset tuning (Remote control only)
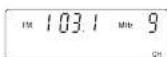
- Press [TUNER/BAND] to select AM or FM.

- Press [TU PRESET] to select the desired program number. The selected channel number appears.

- The number buttons on the remote control can also be used. Press two buttons within 2 seconds.
Preset scan tuning (Remote control only)
-
Press [TUNER/BAND] to select AM or FM.
-
Press and hold down [TU PRESET] for at least 1 second. • The preset stations are selected in sequence for approximately five seconds each.
-
Press [TU PRESET] when the desired station has been selected. Preset scanning will stop.
NOTES:
• To receive an FM stereo broadcast, make sure that "MONO" is not displayed. If "MONO" appears, press [FM MODE/REPEAT] on the remote control to turn the "MONO" indication off. "ST" appears when an FM stereo broadcast is received.
• If the signal from an FM stereo stations is weak and reception is poor, press [FM MODE/REPEAT] on the remote control to change to monaural reception. (*ST* is replaced by 'MONO' in the display.)
Changing the reception frequencies
It is not necessary to perform this procedure in the U.S. and Canada.
- Select the band to be changed.
- While pressing [☐] on the front panel, press [TUNING -] on the front panel for at least 1 second.
AM: 520 - 1710 kHz (10 kHz steps) 522 - 1710 kHz (9 kHz steps)
FM: 87.9 \~ 107.9 kHz (200 kHz stops) 87.5 \~ 108.0 MHz (50 kHz stops)
LISTENING TO THE TAPES
- Press [FUNCTION] to select "TAPE".

- Side the cassette door backward to operate the cassette buttons.
- Press [STOP:EJECT] to open the cassette holder.

- Load the cassette. After loading the cassette, press the cassette holder back into position.
- Don't push the cassette door forward before pressing the cassette holder down.
- Press [PLAY] to begin playback.

- Pross [STOP:EJECT] to stop playback at any time. When the end of the tape has been reached, automatic stop will be activated.
-E11-
(2) = (50.08 m) [m] 41654.50 PM12

natural_image
Two horizontal bar designs with grayscale shades and a central crosshair (no text or symbols)NOTES:
- Always close the cassette door if the cassette isn't be used for a long time.
• Use normal tapes (TYPE 1). - Endless tapes cannot be used.
- Do not use C-100 (or longer) tapes. They may jam in the mechanism.
Pause
Press [PAUSE] to temporarily stop playback or recording. Press it again to resume operation.

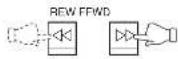
Fast forward and Rewind
Press [FFWD] or [REW]. When the desired location has been reached, press [STOP/EJECT]. The tape stops automatically at the end of the tape.
BEFORE RECORDING
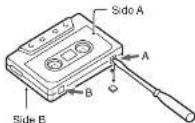
Accidental erasure prevention tabs
(for protecting valuable recordings)
Accidental erasure can be prevented by breaking out the tape on the end of the cassette tape (where the tape is not exposed) using a screwdriver or similar implement.
If a tab is broken out in error and you wish to re-record the tape, simply block the tab hole using adhesive tape and the tape can be used for recording again.
Break out tab A for side A.
Break out tab B for side B.
RECORDING
Preparation
Load a blank cassette into the cassette holder.
Recording compact discs (Synchronous recording)
- Select the "CD" function
- Load the disc to be recorded.
- For programmed recording, program the material in advance (as described under "PROGRAMMED PLAY").
- Select the track number to be recorded if required.
-
For programmed recording, this step is unnecessary
-
Press (REC). CD recording starts.

- When you want to record music as you listen, press [REC] Recording starts automatically from the beginning of the track.
- Press [STOP/EJECT] at any time to stop recording. When the end of the tape is reached, the CD player and deck stop automatically.
Recording from the tuner
- Tune in the radio station to be recorded
- Press [REC] to start recording
- Press [STOP/EJECT] at any time to stop recording.
When beat is heard
Beat [a high pilched noise] may sometimes be heard during the recording of radio broadcasts. If this occurs, while pressing [MEMORY] down, press [TUNING+] for at least 1 second to select "bo-1" or "bo-2". Select the setting that gives the best result.
-E12-
202-610.08 30) page 41654 5:00 PM13
[NO TEXT]

1

natural_image
Two horizontal color swatches with grayscale shades and a small circular icon on the right (no text or symbols)TIMER OPERATION
Before setting the timer, make sure that the clock is set to the present time. See "ADJUSTING THE CLOCK".
Use the main unit for timer operation.
Set the wake-up time, source to be heard and volume level. At the set time, the selected source will be heard. The sound will be gradually increased from minimum to the selected volume setting (fade in). The wake-up timer will function every day unless it is released.
Example:
Waking up 7:30 AM every day and listening to music until 8:15 AM
- Load a compact disc or select "TUNER"
- If "TUNER" is selected, select the desired station first. - Adjust the volume level as desired.
- Press [CLOCK-TIMER] for at least 2 seconds.
The previous wake-up time setting appears.
CLOCK/TIMER


- Press | MEMORY| within 10 seconds.
ON' and 'hour' display blink
MEMORY


- Turn [VOLUME] to set the "hour" display.


- Press [MEMORY]
ON and minute display blink.


- Turn [VOLUME] to set the "minute" display.


- Press [MEMORY].
MEMORY


This completes the selling of the ON time.
- Set the OFF time by following steps 4 to 6 above.


- Press [MEMORY]
MEMORY

- Press [L-ON] to turn the power off.
The present time display remains.
(2) remains it.

When the timer ON time arrives, the power is turned on automatically and the unit starts playing with the preset function selected. The volume factor is from minimum to the preset volume level.
• * - E* blinks wall timer operation is engaged.
- When the timer OFF time arrives, the power turns off and the timer is set to the standby mode. Timer operation repeats this cycle every day.
- If (EVON) is pressed during timer operation, the power is turned off and the timer is set to the standby mode.
To release the timer
After turning the power on, press [CLOCK/TIMER] twice, disappears.
To set the timer again with the same setting
- Press [CLOCK/TIMER] repeatedly to display ②
- Press [DVON] to turn the power off.
NOTE
The timer operation is released if a power failure occurs.
-E13-
(5) = (50.08 × 10^3)
M

Need help? Call 1-800-813-3435
[NO TEXT]
41604,341PM

USING THE SLEEP TIMER (Remote control only)
This timer automatically switches off the power alter a preset time has elapsed. The volume will gradually be reduced (fade-out) during the 1-minute period before the unit turns off. There are 12 time periods available: 120, 110, 100, 90, 80, 70, 60, 50, 40, 30, 20, and 10 minutes.
Press [SLEEP] to select the desired sleep time. "SLEEP" blinks and the selected time appears on the display. After several seconds, the original display returns. "SLEEP" blinks.
To check the remaining sleep time
Press [SLEEP] only once. The remaining time is displayed. After
several seconds, the original display returns.
To release the sleep timer while in operation
Press [SLEEP] repeatedly until "SLEEP" disappears. The timer is
also released if the power is switched off.
Timer priorities
The SLEEP timer has priority over the WAKE UP timer. The power is switched off by the SLEEP timer.
The buttons on the remote control perform similar functions to similarly marked buttons on the front panel.
Operation
(Common section)
Power On/Off-LON
Select function FUNCTION
Adjust volume VOL - or VOL
Set surround sound SURROUND
Enhance bass BASS
Select sound presets SOUND PRESET
Set Check sleep time SLEEP
(Tuner section)
Select TUNER and/or Select band TUNER/BAND
Tunc in a station TUNING - or TUNING +
Present stations
TUNER-BAND — MEMORY — TU PRESET (or Number buttons) — MEMORY
Select preset station in TUNE mode TU PRESET or Number buttons
Select FM mode FM MODE/REPEAT
(CD player section)
Start play [v]
Select the desired track
Programmed play
In CD mode
In CD mode
or ▷(or Number buttons)
MEMORY — KPC or DCS (or Number buttons) — MEMORY
Temporarily stop play
Skip play
Search
Repeat play
Stop
During play
During play
During play
FM MODE/REPEAT
□
11
or (press once) or Number buttons
or (press continuously)
AT
-E14-
(5) = (50.08 × 10^3)
15
41504,531PM


TROUBLESHOOTING GUIDE
If you have followed the instructions and are having difficulty operation the unit, locate the SYMPTOM in the left column below. Check the corresponding POSSIBLE CAUSE and CORRECTIVE ACTION columns to locate and remedy the problem.
| SYMPTOM | POSSIBLE CAUSE | CORRECTIVE ACTION |
| No power when [1/ON] is set to on. | No power plug connection at the AC outlet. | Insert the power plug into the AC outlet. (See page E4.) |
| No sound. | Volume control is set to minimum. | Turn up the volume. (See page E7.) |
| The wrong function is selected. | Select the correct function. | |
| No sound from any function. | Faulty speaker connections. | Connect the connector firmly to the speaker terminals. (See page E4.) |
| The CD player will not operate. | The disc is loaded with the label toward the unit. | Load the disc on the disc tray with the label facing toward you. (See pages E8.) |
| The sound from the CD player skips. | The compact disc is dirty. | Clean the disc. (See page E6.) |
| The compact disc is scratched. | Replace the disc. (See page E8.) | |
| Abnormal CD or display operation with the correct button settings. | The memory must be reset. | 1. Press [0/ON] to turn the power off.2. While pressing [T] on the unit, press [0/1] on the unit for at least 1 second.3. Press [0/ON] to turn the power on. (See page E6.) |
| Incorrect FM frequency. | Incorrect reception frequency setting. | Change the reception frequency setting. (See page E11.) |
| Flickering "ST" | Weak signal. | Press [FM MODE/REPEAT] to display "MONO". (See page E11.) |
| Reorient the FM antenna lead wire or install an outdoor FM antenna. (See pages E3) | ||
| Poor sound quality during playback. | Dirty heads, pinch roller or capstan. | Clean the tape path. (See page E15.) |
| Record mode does not operate. | The guard tabs have been removed from the cassette. | Place tape over the guard tabs. (See page E12.) |
SERVICING:
Should this product require service, refer to the SANYO audio limited warranty.
If you do not have a convenient SANYO service station nearby, contact the SANYO dealer where you purchased the unit. Be sure to give the model number and explain the problem. The dealer will advise you how to obtain service.
MAINTENANCE
WARNING:
FOR YOUR PERSONAL SAFETY, BE SURE TO DISCONNECT THE AC POWER CORD BEFORE PROCEEDING WITH ANY MAINTENANCE OR CLEANING.
Cleaning the cabinet
Use a clean soft cloth moistened with plain lukewarm water and wrung dry. Never use benzol, benzene or other strong chemical cleaners since these could damage the finish of your unit. It is important that no liquid reaches the inside of the unit.
Cleaning the CD player lens
The lens should never be touched. If dust is on the lens, blow it off using a camera lens blower. (Consult your dealer.)
Cleaning the tape heads and tape path
To ensure continued high performance, use a cleaning tape (availabel from your local audio dealer) to clean the head block of the deck after every 10 hours of use.

natural_image
Two horizontal color swatches with grayscale shades and a central crosshair (no text or symbols)SPECIFICATIONS
| AMPLIFIER SECTION | |
| Sound preset: | 4 electronic prospects |
| Bass expander: | +9 dB (70 Hz) |
| PHONES: | 6 ~ 32 phms |
| TUNER SECTION(FM) | |
| Frequency range: | 67.9 MHz - 107.9 MHz (200 kHz steps) |
| Usable sensitivity:(AM) | 13.2 dBi (mono) |
| Frequency range: | 520 kHz - 1710 kHz (10 kHz steps) |
| Sensitivity: | 500 = V/m (AM Loop antenna) |
| CASSETTE DECK SECTION | |
| Track system: | 4 track, 2-channel stereo |
| Frequency response: | 60 Hz - 13.5 kHz (Normal tape) |
| Signal to noise ratio: | 40 dB |
| Wow and flutter: | 0.15% (WRMS) |
| Tape speed: | 1-7/8 i.p.s. (4.75 cm/sec) |
| Fast forward and Rewind time: | Approx. 110 sec. (C-50) |
| CD PLAYER SECTION | |
| Channels: | 2-channel stereo |
| Sampling frequency: | 44.1 kHz |
| Pick-up: | Optical 3-beam semiconductor laser |
| Frequency response: | 20 Hz - 20 kHz |
| Signal to noise ratio: | 90 dB |
| Wow and flutter: | Below measurable limits |
| GENERAL | |
| Power requirements: | 120 V AC, 60 Hz |
| Power consumption: | 18 Watts |
| Dimensions (W x H x D): | Approx. 8.2" x 6.6" x 8.5" |
| Weight: | Approx. 5.3 lbs. |
| RB-MCR60 WIRELESS REMOTE CONTROL | |
| Power requirements: | 2 "AAA" batteries |
| Dimensions (W x H x D): | Approx. 1.6" x 4.8" x 0.8" |
| Weight: | Approx. 1.4oz. (without batteries) |
| AWM-660SP SPEAKER SYSTEM | |
| Typo: | Bass reflex |
| Drivers: | Full range |
| Maximum power-handling capacity: | 6 Watts (peak) |
| Nominal impedance: | 4 ohms |
| Dimensions (W x H x D): | Approx. 5.6" x 10" x 6.4" |
| Weight: | Approx. 2.8 lbs./speaker |
IMPORTANT INFORMATION
Because its products are subject to continuous improvement, SANYO reserves the right to modify product designs and specifications without notice and without incurring any obligation.
-E16-
SNX-650708 zng page 41694.561 PMI7

-E17-
SANYO
SANYO Electric Co., Ltd. Printed in china
(2) = (30.08 ± 1) [page 41654.5-1]