GKI 1110 - Coffee maker GRUNDIG - Free user manual and instructions
Find the device manual for free GKI 1110 GRUNDIG in PDF.

User questions about GKI 1110 GRUNDIG
0 question about this device. Answer the ones you know or ask your own.
Ask a new question about this device
Download the instructions for your Coffee maker in PDF format for free! Find your manual GKI 1110 - GRUNDIG and take your electronic device back in hand. On this page are published all the documents necessary for the use of your device. GKI 1110 by GRUNDIG.
USER MANUAL GKI 1110 GRUNDIG
natural_image
Interior view of a coffee machine with open lid and control panel (no visible text or symbols)
FOR A GOOD REASON
GRUNDIG
Please read this user manual first!
Dear Customer,
thank your purchasing this Grundig product. We hope that you get the best results from your product which has been manufactured with high quality and state-of-the-art technology.
Therefore, please read this entire user manual and all other accompanying documents carefully before using the product and keep it as a reference for future use. If you handover the product to someone else, give the user manual as well. Follow all warnings and information in the user manual. Remember that this user manual is also applicable for several other models. Difference between models will be identified in the manual.
Please visit the "Support" section on the Grundig website at www.grundig.co.uk to register your 5 year warranty.
Grundig Helpline
0845 603 1234
0345 603 1234
1 SAFETY INSTRUCTIONS AND PRECAUTIONS 2
Usage safety....2
Technical safety....3
Correct use....3
2 INSTALLATION 4
3 DESCRIPTION AND OPERATION 6
Technical data....6
Front view and overall view....6
Control buttons and display panel....6
4 IMPORTANT INSTRUCTIONS FOR USE 7
Switch-on....7
Filling the water tank....7
Filling the coffee bean container....7
Setting 1 or 2 coffees....8
Selecting the type of espresso....8
Washing cycle....8
Adjusting the espresso dose....8
Preparing cappuccino....8
Steam....8
Water....8
Deactivate Steam and water (child lock)....8
Coffee beans....9
Ground coffee....9
Single serving pods....10
Compatible coffee capsules....10
Programming the machine....11
6 CARE AND CLEANING 12
Water tank....12
Steam dispenser....12
7 DESCALING THE MACHINE 13
8 TROUBLE-SHOOTING 13
9 DISPOSAL OF ELECTRICAL APPLIANCES 14
10 GUARANTEE 14
11 SERVICE 14
1 SAFETY INSTRUCTIONS AND WARNINGS
This machine complies with the safety regulations currently in force. Incorrect use of the machine may lead to personal injury and damage to objects. Please read all the instructions carefully before using the machine as they contain important information on safety and the use and maintenance of the machine. This will protect you and prevent damage to the machine.
USAGE SAFETY
Warning! Danger of burning! The liquids that come out of the dispensers are extremely hot!
• This appliance can be used by aged from 8 years and above if they have been given supervision or instruction concerning use of the appliance in a safe way and if they understand the hazards involved.
• Cleaning and user maintenance shall be made by children unless they are older than 8 and supervised.
- Keep the appliance and its cord out of children aged less than 8 years.
• Children's skin is more sensitive to high temperatures. Danger of burning!
- Remember, too, that espresso coffee is not a suitable beverage for children.
• Appliances can be used by persons reduced physical, sensory or mental capabilities or lack of experience and knowledge if they have been given supervision or instruction concerning use of the appliance in a safe way and understand the hazards involved.
• Children shall not play with the appliance.
- Danger of suffocation. Packaging, e.g. plastic wrappings, must be kept out of the reach of babies and children. Whilst playing, children could become entangled in packaging or pull it over their head and suffocate.
- This appliance is intended to be used in household and similar applications such as: – staff kitchen areas in shops, offices and other working environments; – farm houses; – by clients in hotels, motels and other residential type environments;
- bed and breakfast type environments.
- The first time the machine is put into operation, it is necessary to rinse the pipes to eliminate any deposits and to ensure hygiene.
- Fill the water tank only with room temperature or cold drinkable water. Hot or boiling water or any other liquid can damage the operation of the machine. We recommend changing the water daily to prevent the germ proliferation.
- Place only whole coffee beans in the coffee container. Ground coffee poured into the container can damage the operation of the grinder.
children Sugar damages the machine!
Never use coffee beans that are treated with caramel, sugar, or other similar substances, instant coffee, or any substances containing sugar.
- Boiling water and steam can cause all not burning; therefore, please use these functions with the utmost attention. Do not turn the steam dispenser towards any parts of reach of your body. Danger of burning!
• Always make sure that the steam selector is disengaged when steam is not needed. Otherwise, steam could be dispensed inadvertently. Danger of burning! - The steam dispenser becomes very hot with during use. Grasp the dispenser only by the coupling. Danger of burning!
- Depending on the lime content of the water, the machine should be descaled regularly. In zones where the water is very hard, it will be necessary to descale the water pipes more often. Follow the mixture ratio indicated on the package of the descaling product; otherwise the machine could be damaged.
- Do not put weight on the open drawer the coffee machine, as this could damage the machine.
The manufacturer declines all responsibility for any damage caused by failure to follow the safety instructions and precautions.
TECHNICAL SAFETY
- Before connecting the machine to power mains, check carefully to make sure that the voltage and frequency ratings shown on the rating plate correspond to those of the electrical system. These values must absolutely correspond in order to avoid damage to the machine. In case of doubt, contact a qualified electrician.
• The electrical safety of the m guaranteed only if it is connected to a standard earth conductor. It is very important to verify this information with the utmost attention, and in case of doubt have the electrical system checked by a qualified electrician. The manufacturer declines all responsibility for any damage caused to people or things due to the lack or malfunction of the earth conductor (for example: risk of electrocution). - Put the machine into operation only after complete installation in order to avoid contact with the electrical components. Before carrying out assembly, disassembly, or daily maintenance of the machine, always make sure to disconnect the power cable from the electrical outlet.
- The connection of the machine to the power mains must not be made using extension cables, as they do not guarantee the necessary safety of the machine (for example: risk of overheating).
- The machine can also be flush-mounted in a wall unit (special accessory). It is not suitable for outdoor use. Considering the heavy weight of the machine, it is essential for the unit to be adequately secured to the adjacent wall.
- If the power cable is damaged, it must be replaced by the manufacturer, its technical service, or by a qualified electrician, in order to prevent any risk.
- All installation, maintenance, and repair operations must be carried out by qualified personnel only. Incorrect installation, maintenance, and repairs may lead to serious dangers to the user, for which the manufacturer declines all responsibility.
•The machine is disconnected from the power mains only when:
-the main switch of the electrical system is switched off;
-the fuse of the home electrical system is completely disconnected;
-the power plug of the machine is completely removed from the electrical foutlet.
- To disconnect the machine from the power machines, grasp the plug and remove; do not pull on the power cable.
- Do not open the machine casing for reason. Touching the voltage cables or modifying the electrical or mechanical structure may lead to electrocution. This could also cause disturbance in the operation of the machine. The manufacturer declines all responsibility towards persons or things due to failure to observe the instructions above.
• In the event that the machine has to installed in combination with another appliance, it must be separated from the other appliance by a solid intermediate shelf.
CORRECT USE
This machine is designed solely for preparing espresso (short, medium or long) and cappuccino. Other types of use are not permitted and may prove dangerous.
The manufacturer will not be held liable for any damage caused by incorrect use of the machine.
Please put only fresh coffee beans into the tank to get the best aroma. The beans can remain in the grinder and only require grinding when needed.
natural_image
Industrial coffee machine with inset images showing coffee beans and two circular components (no text or symbols visible)The coffee dispenser has to be used with ground coffee, single serving pods, capsules for the preparation of espresso coffee, cappuccino, tea and more.
2 INSTALLATION
IMPORTANT NOTE
The installation of the appliance must be carried out exclusively by qualified personnel in compliance with the regulations in force. Considering the heavy weight of the machine, it is essential that the furniture unit be suitably secured to the wall.
- Check to make sure that the opening for housing the machine has the correct dimensions (Fig.1).
The manufacturer declines any responsibility towards persons or objects, as well as for the proper operation of the machine, due to failure to follow the instructions given.
text_image
120 mm (12"½") 558.5 mm (21"½") 448 mm (17"½") 595 mm (23"½") 19 mm (½)
text_image
Min 450 mm (17°") Min 350 mm (13°) 560 mm 600 mmFig.1
natural_image
Close-up of a black cable with a warning sign and safety symbol on the wall (no readable text or symbols)- Connect the plug to power outlet following the safety regulations in force. Important: The power outlet must be accessible after the machine has been installed.
• Tighten the electric to the basement with the available cable tie as showed in the picture until being able to stretch the machine completely forward.

text_image
the able2) Screw the base on the case (using the x6 screws provided)
natural_image
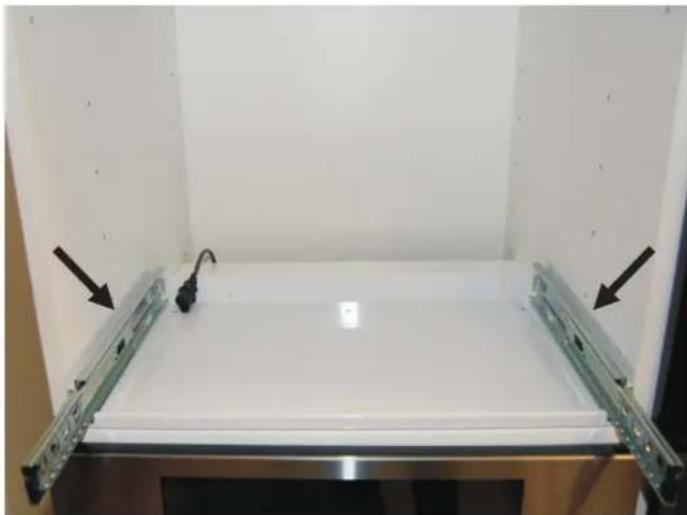
Interior view of a white studio lighting fixture with adjustable metal frame and black arrows pointing to the base panel (no text or symbols visible)1) Put the base on the case, left and right side in contact by the panel

natural_image
Close-up of a hand using a screwdriver to adjust or install a device on a metal rack (no visible text or symbols)3) Screw the base to the sides (using the x4 screws provided) Note: if the sides of the base are not flush with the sides of the unit, fold the flaps to the outside.
ATTENTION
Install the base so that the guide rails are perfectly vertical

text_image
YES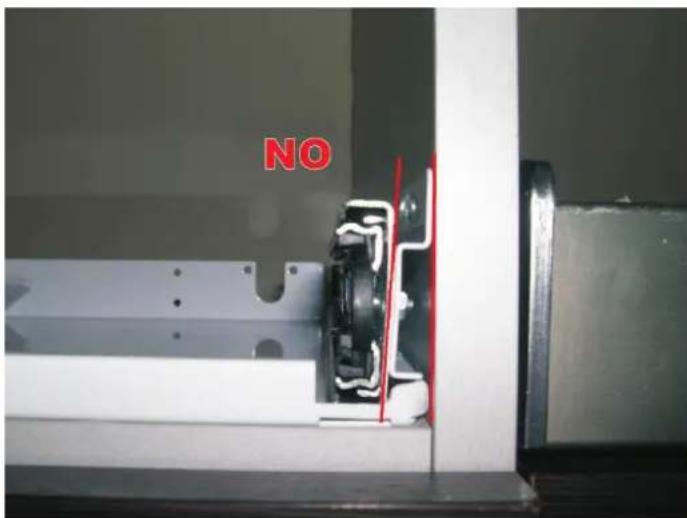
text_image
NO4) Before mounting the unit to the sliding rails, ensure that the bars with the sliding ball bearings are positioned at the front of the rail as shown in the image below. Failure to do this may result in damage to the sliding rails.

natural_image
Close-up of a metallic mechanical component with multiple circular holes and a black connector, resting on a brown surface (no visible text or symbols)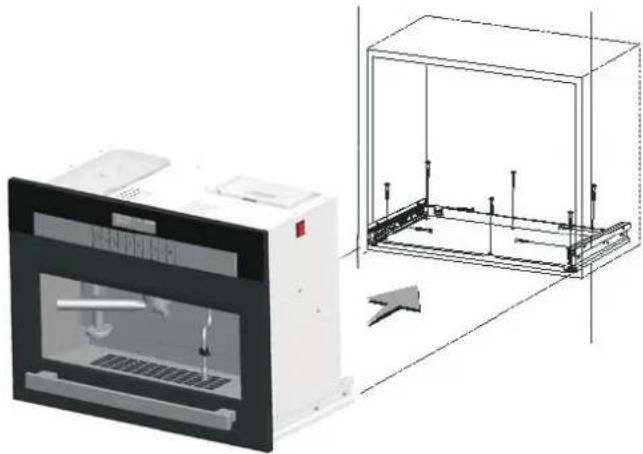
natural_image
Technical illustration of a laboratory instrument and its internal frame structure (no text or symbols)5) Mounting the machine to the base.
The machine has to fit correctly to the sliding rails otherwise damage may occur to the sliding rails and force out the ball bearings.
• Due to the weight of the machine it is recommended that the operation is carried out by two people.
- Position the unit to the sliding rails and slide back inside kitchen cabinet housing. If any restriction is felt or it moves more easily on one side pull the machine out and ensure the sliding rails fit correctly.
- Once fitted correctly to the rails the machine will slide smoothly and a "click" will be heard as the machine locks correctly to the sliding rails.
- Leave sufficient space to access and insert the power cord. - Turn the power switch on the side of the unit to the ON posit - Push the machine all the way back on its sliding rails to locate fully within the cabinet housing.
6) If you have to pull out the machine, lift the drawer and pull out.
• If you have to remove the machine from the base unhook it fi the lateral guides using the levers, raising the lever of the right-hand guide and lowering the lever of the left-hand guide (2).

text_image
Diagram showing airflow direction and component placement with numbered label 2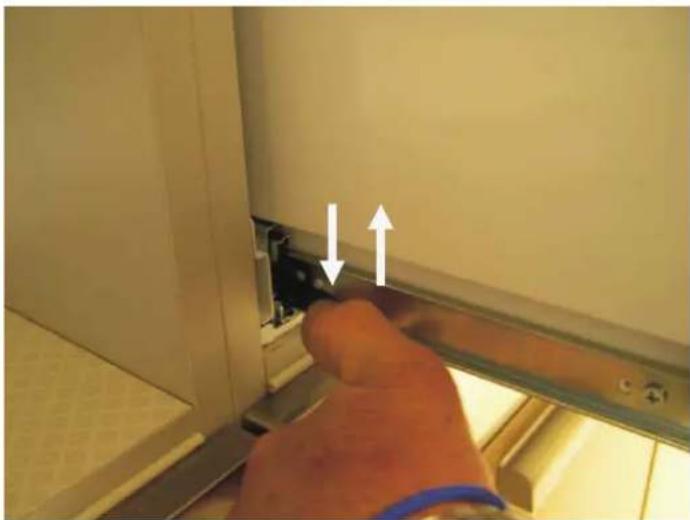
natural_image
Close-up of a hand inserting a small component into a wall, with two white arrows indicating direction (no text or symbols visible)3 DESCRIPTION AND OPERATION
The coffee machine has only one water heater, for the steam, water and for the coffee. In this espresso machine the beans can remain in the grinder and only require grinding when needed. This provides the best aroma of the coffee because it is freshly ground.
If the container used, glass or cup, has a smaller volume than the dosage programmed by the machine, coffee dispensing can be interrupted at any time by pressing key '15', allowing the user to decide on the preferred dose. The steam from the dispenser can also be used for pre-heating the cups.
TECHNICAL DATA
• Type: professional coffee machine
• Material: stainless steel 304 and PMMA
• Main colour: black
• Other colours available: on request
• Outside dimensions: H 448xW 595xD 320 mm
• Built in dimensions: H 450xW 560xD 350 mm
• Appliance weight: 25 Kg
• Package dimensions: H 550xW 700xD 455 mm
• Gross weight: 29 Kg
Voltage (transformer and heater): 220-240 V / 50/60 Hz
Pump pressure: 15 bar
Pump consumption: 48 watt
Coffee and steam boiler consumption: 1000 W
Grinder consumption: 100 W
Maximun consumption: 1100 W
Water tank capacity: 2,5 L
Beans tank capacity: 350 g
Coffee boiler heating time: 3 minutes
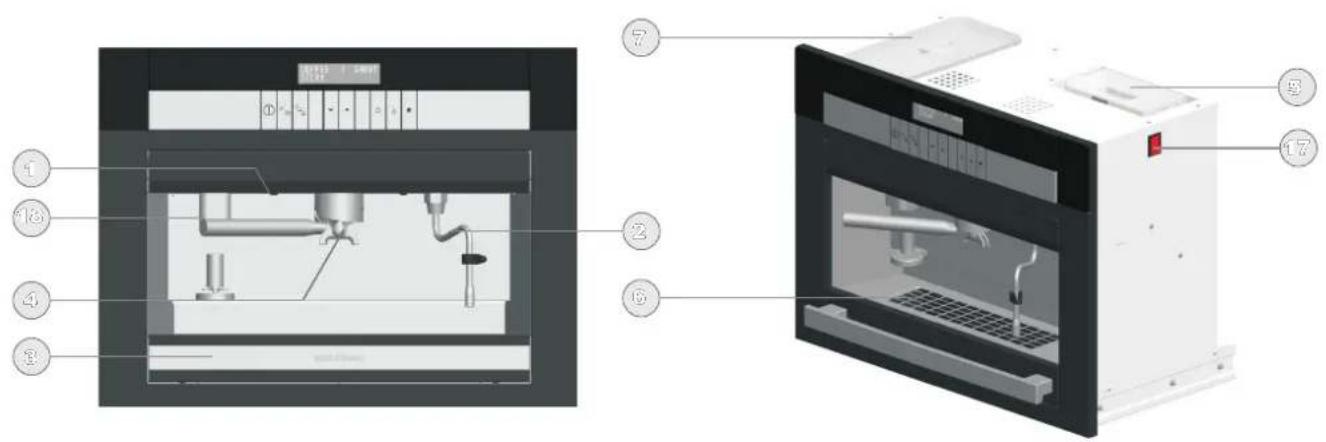
FRONT AND OVERALL VIEW
text_image
Technical diagram of a laboratory instrument with numbered parts, showing internal components and labeled parts.- Lighting
- Steam dispenser
- Drawer
- Coffee dispenser
- Water tank
- Drip tray
- Container for coffee beans
- Display
-
On/Off button
-
1 cup/2 cups selector
- Grinder button
- selector function down
- selector function up
- Short, medium or long coffee selector
- Dispensing button
- Steam/Hot water selector
- Main switch
- Ground coffee dispenser
CONTROL BUTTONS AND DISPLAY PANEL
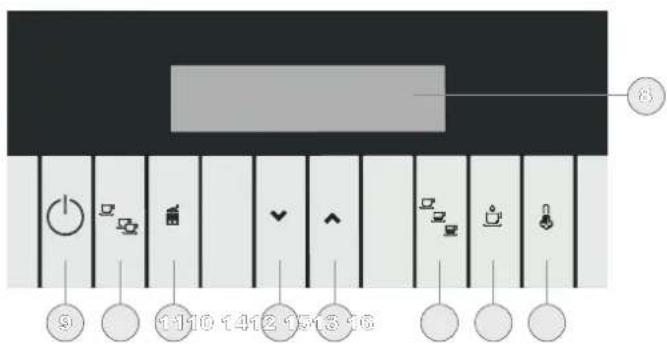
text_image
Diagram showing a musical instrument with labeled buttons and icons, including keyboard, time signature, and keyframe controls.4 IMPORTANT INSTRUCTIONS FOR USE
SWITCH-ON
• Extract the machine by lifting the drawer and pulling it towards you.
• Fill the water tank and the coffee container following the instructions.
• Supply power to the machine using the main switch (17) located in the upper part of the right side of the machine.
- Close the machine.
• Switch on the machine using the key
GOODMORNING
COFFEE1 SHORT
STEAM
During the heating phase, the words COFFEE and STEAM/WATER (or WARMING) flash. The machine is ready for use only when they have stopped flashing. The display also shows the type of coffee selected (short/medium/long) as well as the choice of making one or two coffees at the same time.
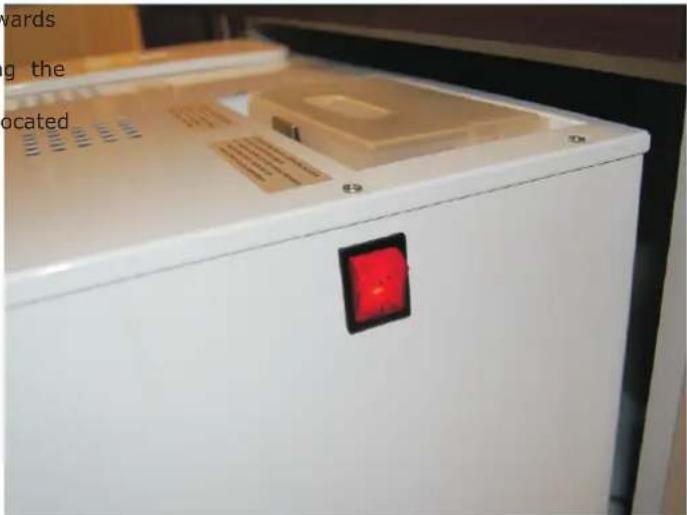
natural_image
Close-up of a white refrigerator with a red indicator light on the front panel (no visible text or symbols)If a failure is signalled, turn the main switch off and back on to help the water circuit to fill up.
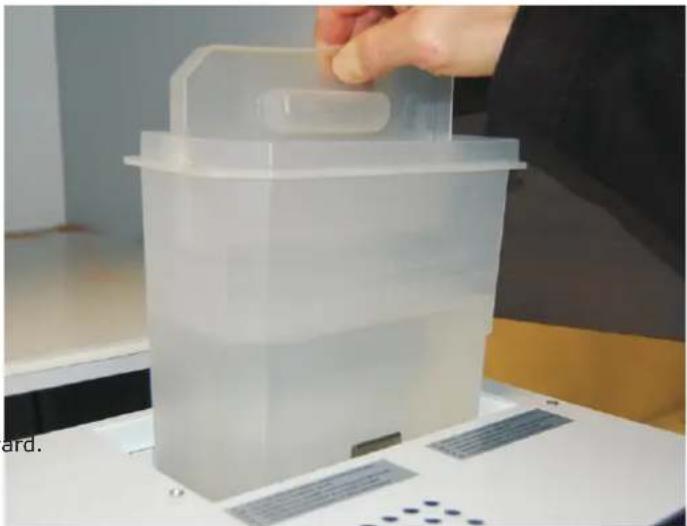
FILLING THE WATER TANK
• To ensure the best result in making espresso, in addition to using good quality coffee, it is also essential to use good water. We therefore recommend emptying the water tank frequently and refilling it with fresh water. Avoid leaving the water in the tank for excessively long periods.
When the water tank is almost empty, the message "WATER MISSING" will appear on the display panel. Note: the tank can be removed for cleaning (see CARE AND CLEANING).
COFFEE
WATER
MISSING
IMPORTANT: Use only drinkable water
• Open the machine by raising the drawer and pulling outward.
• Extract and fill the tank.
- Replace properly the water tank and close the machine.
natural_image
Transparent plastic container with a handle, placed on a white surface with a patterned ruler and a hand adjusting it (no visible text or symbols)FILLING THE COFFEE BEAN CONTAINER
• Fill the coffee bean container using only beans for espresso
coffee. Any other substance, including ground coffee, can damage the coffee grinder. Do not use beans treated with caramel, sugar, or similar substances, instant coffee, or any beverage containing sugar. Sugar can damage the machine.
When the container is almost empty, the message "COFFEE MISSING" will appear on the display panel:
COFFEE
MISSING
WATER
• Open the machine by raising the drawer and pulling outward.
- Remove the lid of the coffee bean container.
• Fill the container with beans up to 2 cm from the top.
• Put the lid back on the container.
- Close the machine.
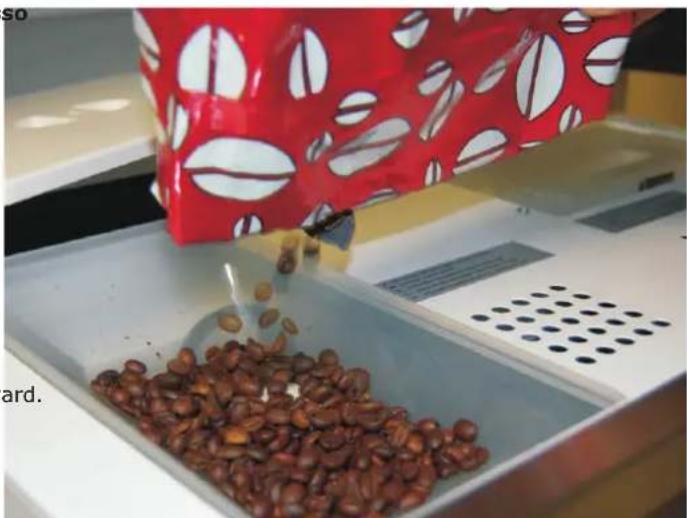
natural_image
Close-up of coffee beans being poured into a white tray with a red patterned bag (no visible text or symbols)SETTING 1 OR 2 COFFEE
With this machine you can prepare a single coffee or 2 coffees simultaneously.
Make your selection using the key
SELECTING THE TYPE OF ESPRESSO
Using the key ☐ you can select three types of espresso dose:
SHORT - MEDIUM - LONG
WASHING CYCLE
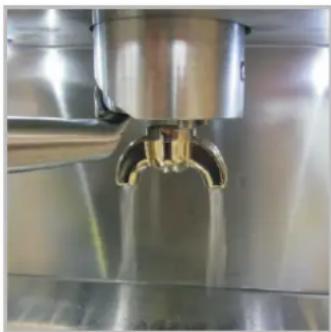
natural_image
Close-up of a stainless steel faucet dispensing liquid into a glass container (no text or symbols visible)It is recommended to carry out a washing cycle (just press
button 15 without filling the coffee holder) on the unit every day before making the first cup of coffee (the machine warms up properly) and after dispensing last coffee (it keeps the filters clean).
ADJUSTING THE ESPRESSO DOSE
To change and memorize the quantity of coffee, proceed as follows:
- During the infusion, press and hold the key until the desired quantity (coffee dose) is reached. The display shows the message "MEMO ?"
COFFEE 1 SHORT
MEMO?
If you want to memorize the dosage of coffee just made, proceed as follows:
- To memorize, as soon as the infusion is finished, use the key to select the type of coffee (short, medium, or long) on which to memorise the new setting.
- Press and hold the key again until you hear the beep of confirmation. Now the new quantity of coffee is memorized and associated with the type of coffee selected.
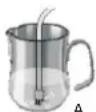
PREPARING CAPPUCCINO
- Select the steam function using the key - Before positioning the container under the steam nozzle to flush out the water remaining in the pipes.
• Prepare a medium coffee in a cappuccino cup. • Fill a jug milk with about 100 ml of milk. This is the quantity for preparing one cappuccino. We recommend preparing frothed milk for one cappuccino at a time.
- Introduce the steam nozzle into the milk container so that the spout is positioned on the bottom of the container (Fig. A).
- Press the steam button to release the steam and heat the milk for a few seconds.
• Important: Do not heat the milk excessively. Overheated milk no longer produces froth.
• After a few seconds, position the spout of the nozzle at surface of the milk (Fig. B).
- When the desired froth is obtained release the steam button. - Pour the milk delicately into the cup previously filled with
coffee.

STEAM
- Switch on the steam for preparing steam using the key and wait till the word "STEAM" has stopped flashing.
1 SHORT COFFEE STEAM
• Position the cup or other container under the nozzle.
• Press the steam button to dispense the steam
WATER
- If you need hot water please hold the key ⚡ and ⏻ to change the «steam» function in «water» function.
The display shows:
1 SHORT COFFEE WATER
- Switch on the water for preparing water using the key and wait till the word "WATER" has stopped flashing.
• Position the cup or other container under the nozzle.
• Press the steam/water button to dispense hot water
Warning! Danger of burning! The liquids that come out of the dispensers are extremely hot!
NOTE:
Always use the handle to move the steam/water spout!
DEACTIVATE STEAM AND WATER (CHILD LOCK)
Press and hold the key and press
till the display shows:
1 SHORT COFFEE
The functions «steam» and «water» are deactivated. Any hot liquid will not come out from the nozzle.
Your machine is extremely versatile.
You can get a great espresso or other beverages using:
- coffee beans
- ground coffee
- single serving pods (for coffee or other beverages)
- compatible coffee capsules Lavazza Espresso point and the Illy, Nespresso and others with similar dimension (for coffee or other beverages)
COFFEE BEANS

natural_image
Close-up of a hand operating a stainless steel industrial machine with a cooling fan (no visible text or symbols)
natural_image
Close-up of a metal mechanical presser pressing a cylindrical component (no visible text or symbols)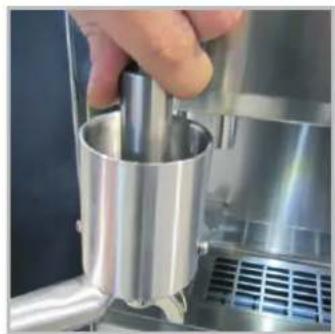
natural_image
Close-up of a hand using a metallic cylindrical tool to press or adjust a metal component, with no visible text or symbols.
text_image
1 SHORT COFFEE STEAM• If the machine is used to grind the coffee beans provided.
contained in the tank:
• put the coffee dispenser on the holder for grinding;
• activate it by pressing the
please use the coffee press press strongly the ground coffee inside.
select one or two coffee by ssing
• select short / medium / long coffee by pressing
key ☐; fill the coffee dispenser completely.

natural_image
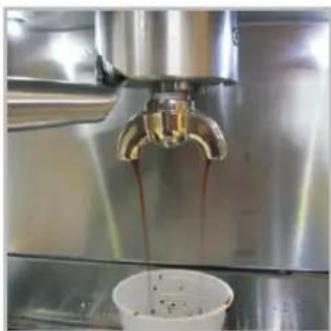
Close-up of a stainless steel robotic arm pouring liquid into a white cup (no text or symbols visible)- insert the coffee dispense into the central compartment through a pressure and rotation until it stops;
- press: the machine starts to brew coffee.

natural_image
Close-up of a metallic tool applying material to a black surface, no visible text or symbols• before using the machine again, please empty the coffee dispenser reversing the contents in the coffee grounds container.
GROUND COFFEE

natural_image
Industrial mixing machine with a metal container filled with orange granular material, pouring powder from a ladle (no visible text or symbols)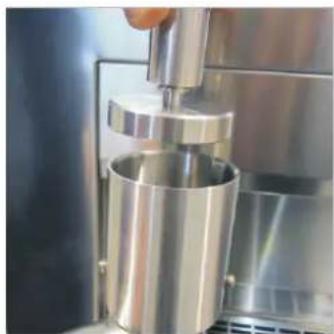
natural_image
Close-up of a metallic mechanical press or press device with a hand operating the component (no visible text or symbols)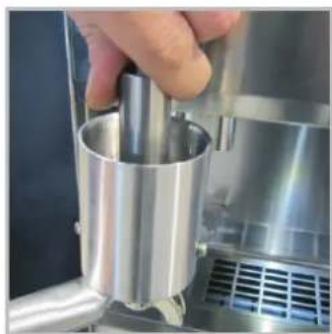
natural_image
Close-up of a hand pressing a metallic cylindrical component on a stainless steel industrial machine (no visible text or symbols)
text_image
1 SHORT COFFEE STEAM- put the ground coffee inside the coffee dispenser, provided.
• fill the coffee dispenser completely.
please use the coffee press press strongly the ground coffee inside.
select one or two coffee by ssing □ select short / medium / long
natural_image
Close-up of a stainless steel coffee machine with a hand pouring liquid into a cup (no visible text or symbols)- insert the coffee dispenser into the central compartment through a pressure and rotation until it stops;
- press: the machine starts to brew coffee.
natural_image
Close-up of a metallic tool interacting with a black surface, no visible text or symbols• before using the machine again, please empty the coffee dispenser re vers i ng the contents in the coffee grounds container.
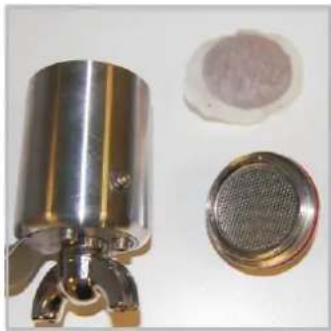
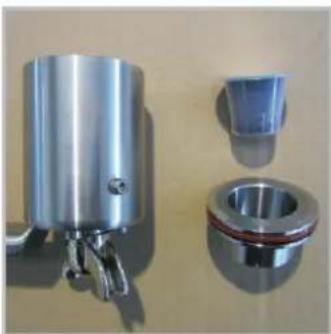
SINGLE SERVING PODS
natural_image
Close-up of a metallic cylindrical device with attached mesh and plastic cover (no text or symbols visible)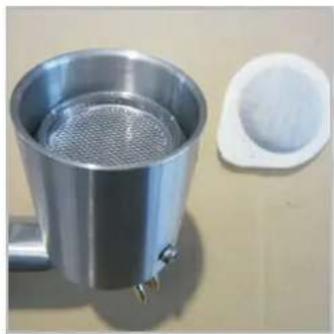
natural_image
Metal stainless steel water heater with mesh filter and adjacent white plastic lid (no text or symbols visible)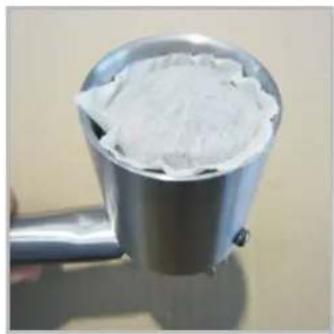
natural_image
Close-up of a metallic tool holder containing white powder, no visible text or symbols
natural_image
Close-up of a stainless steel coffee machine pouring dark liquid into a white cup (no visible text or symbols)• the machine can be with single serving pods (44 mm ESE).
used insert in the dispenser the special adapter for single serving pods.
- f fee press the pod into the filter. - select short / medium / lant
coffee by pressing
insert the coffee dispenser the central compartment ing an upward pressure and tion until it stops
and press
• the machine starts to brew coffee or other beverage.
COMPATIBLE COFFEE CAPSULES LAVAZZA ESPRESSO POINT & ILLY, and others with similar dimensions

natural_image
Close-up of metallic mechanical components including a cylindrical housing, a bearing, and a small inset showing a red powder (no text or symbols visible)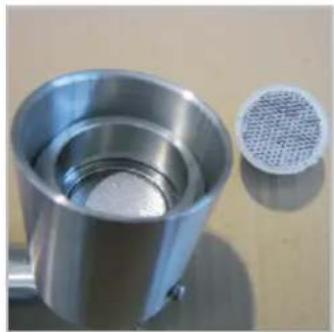
natural_image
Close-up of a metallic cylindrical container with a mesh filter inset, no visible text or symbols
natural_image
Close-up of a stainless steel hairdryer with mesh grille and handle (no text or symbols visible)
natural_image
Close-up of a stainless steel coffee machine pouring dark liquid into a white cup (no visible text or symbols)• the machine can be used insert in the with compatible coff dispenser the special adapter capsules Lavazza Espresso for these coffee capsules Point, Illy, and others with similar dimensions.
coffee insert the selected capsule.
select short / medium / lango the
insert the coffee dispenser
ingo the central compartment
using an upward pressure and rotation until it stops
coffee by pressing
and press
• the machine starts to brew coffee or other beverage.
COMPATIBLE COFFEE CAPSULES NESPRESSO and others with similar dimensions
natural_image
Exterior view of a stainless steel water dispenser with three additional compartments (no text or symbols visible)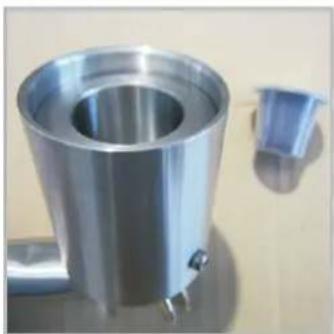
natural_image
Metallic industrial container with a side view showing a small blue plastic component (no text or symbols visible)
natural_image
Close-up of a metallic showerhead with a circular top and two small metal pins (no text or symbols visible)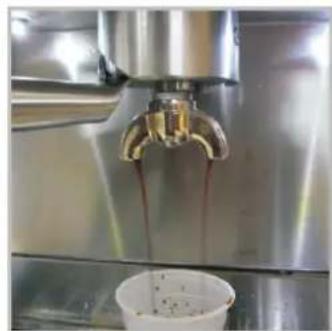
natural_image
Close-up of a stainless steel coffee machine with a glass faucet pouring liquid into a white cup (no visible text or symbols)• the machine can be used insert in the with compatible coff dispenser the special adapter capsules Nespresso and others for these coffee capsules with similar dimensions.
coffee insert the selected capsule.
select short / medium / long to the
insert the coffee dispenser
into the central compartment using an upward pressure and rotation until it stops
coffee by pressing
and press
the machine starts to brew
coffee or other beverage.
To remove the adapters from the coffee dispenser, tap the coffee dispenser on a wooden surface (such as a sturdy chopping board) to loosen them for removal. The adapters need to be tight in order to direct the water flow through the coffee. They will loosen slightly through regular use.
The brands Lavazza, Illy and Nespresso are registered trademarks of their respective companies. They are not the property of this company or anyone else connected to it. These marks and the reference of their models are mentioned only to indicate their compatibility with this machine.
5 OPERATION AND USE
PROGRAMMING THE MACHINE
The machine is ready to be used once the heating phase has completed, however there are additional advanced programmes which can be accessed if required.
Various functions can be adjusted and programmed, as indicated below: to enter programming mode, with the machine OFF press
the key ⏻ for 3 seconds until the display panel shows:
PROGRAMMING
Use the keys ☐ to select the functions to be programmed (these keys will allow you move up and down through the programme menu), which are, in order of appearance:
CLOCK
Pressing the key ☐ the display panel shows:
20:30
Use the keys ♥ to set the hour. Initially the two digits related to the hour flash.
After setting the hour, press the key The two digits related to the minutes flash.
Set the minutes by pressing the keys
To set AM or PM press the key about 3 seconds.
AUTOMATIC SWITCH-ON
Press the key and the display panel shows:
AUTO ON
07:30
Use the keys ♥ ∧ to set the time you want the machine to switch on automatically.
Your machine will be ready to dispense coffee at the time selected without waiting for the heater to warm up.
Automatic switch-on can be activated or de-activated by pressing
the key ⏻ (with the machine off).
The display will show an* after the clock time indication when the automatic switch-on function is activated.
AUTOMATIC SWITCH-OFF
Press the key □ and the display panel shows:
AUTO OFF
22:10
Use the keys ♥^ to set the time you want the machine to switch off automatically.
AUTO SHUT DOWN
Press the key and the display panel shows:
AUTO SHUT DOWN
15 min
Use the keys ⬇ ∧ to set the minutes (15-30-45-60-75-90 min) after which the machine switches off automatically. 0=OFF.
POWER SAVING
Press the key 2 and the display panel shows:
POWER SAVING
15 min
Use the keys to set the minutes (15,30,45,60,75,90 min) after which the machine goes into "energy savings" mode. In this phase, the temperature of the heater is lowered to reduce consumption (at about 50^ ).
Press the key 🔔 to restore the machine to a ready status quickly.
DISPLAY LANGUAGE
Press the key and the display panel shows:
DISPLAY
ENGLISH
Use the keys to select your language.
WATER HARDNESS
Press the key and the display panel shows:
WATER HARDNESS
00°dh
Use the keys to set the hardness of the water after using the special measuring kit to establish the correct number (0,5,10,15,20,25°dh) to be entered.


DESCALING
DESCALING
20Lt 50%
The display shows the number of litres of water that have been dispensed and the theoretical level of lime scale build-up expressed as a percentage (100% indicates that you need to carry out descaling).
This parameter is calculated based on the water hardness and the number of litres of water dispensed. The lime scale indicator will reset after a descaling cycle has been carried out.
COFFEE COUNTER
Press the key and the display panel shows:
COFFEE
00018
The display indicates the number of coffees that have been made since the first use.
Press the key and the display panel shows:
GROUND COFFEE
8.0 sec
Using the keys you can change the grinding time.
If you are not in the programming mode you can change the grinding time keeping the key 🔒 held until to obtain the desired amount of ground.
GRINDING
When you leave the key, the grinding stops and time is saved by the machine.
GRINDER SET
Press the key 📄 and the display panel shows:
GRINDER SET
[0]
Using the keys ▼▲ you can change the grinding set.
- Increase the grinder set (+) for a coarser coffee powder
- Decrease the grinder set (-) for a finer coffee powder
COFFEE TEMPERATURE
Press the key and the display panel shows:
TEMPERATURE
COFFEE 90°C
Using the keys ▼▲ you can change and set the temperature.
STEAM TEMPERATURE
Press the key and the display panel shows:
TEMPERATURE
STEAM 120°C
Using the keys you can change and set the temperature of the steam.
Press the key ⏻ to exit the programming function.
⑥ CARE AND CLEANING
IMPORTANT: The container must be emptied regularly to prevent the formation of mould and bacteria.
• Open the drawer A.
- Remove the grille B.
- Extract and empty the coffee grounds container C and the water container D. - D# not use steam appliances for cleaning the machine.
• Place the two containers and the grille back in their seats.
- Close the drawer.
• Now the machine is ready for use again.

text_image
Labeled diagram of an industrial machine showing internal components A, B, C, and D with visible internal structure.It is recommended to carry out a washing cycle
(just press button 15 without filling the coffee holder) on the unit every day before making the first cup of coffee (the machine warms up properly) and after dispensing last coffee (it keeps the filters clean).
The appliance must not be immersed in water or other liquids for cleaning.
Let the coffee machine cool down before proceeding with cleaning.
Danger of burning!
Do not use steam appliances for cleaning the machine.
Do not use any detergent substances containing soda, acids, or chlorides! These substances will ruin the surface of the machine.
Regular cleaning guarantees the efficient operation and long life of your espresso coffee machine.
Remove the grille and tray from the machine and clean both the front panel and the inside compartments with a soft sponge dampened with a sanitising detergent solution.
Dry with a soft cloth to avoid scratching.
WATER TANK
It is preferable to empty the water tank daily and refill it, when possible just before preparing coffee, with cold drinkable water. Wash the water tank by hand using a sanitising detergent solution. If while washing the water tank the float level sensor should drop out of its rail, please slot it in again making sure that the magnet is in its lower position.
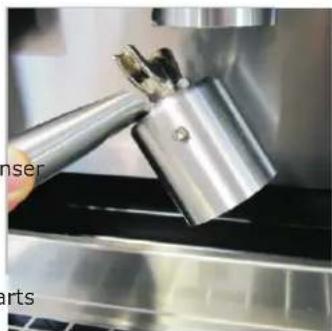
STEAM DISPENSER
Clean the steam dispenser with a soft sponge using only water, preferably hot water. To remove any incrustations, we recommend washing the components in the dishwasher. The steam spout can be unscrewed for washing in the dishwasher. When it is used for frothing milk, it is advisable to release some steam first to flush out any remaining residues of milk or froth.
7 DESCALING THE MACHINE
When the message "DESCALING" appears on the display with the machine off, it is time to descale your machine using specific products that are appropriate for coffee machines.
Attention - Very Important!
Do not use lemon-based products for descaling. These products contain citric acid, which in contact with calcium at high temperatures forms a chemical reaction, creating calcium citrate that could lead to the total obstruction of the water circuits.
Proceed as follows:
Open the drawer and remove the water from the tray and any coffee grounds from the container. Re-close the drawer without replacing the grille, and position the steam nozzle so that the water that comes out of it falls into the tray.
- Switch on the machine and wait till the word STEAM stopped flashing.
• Switch off the machine and go into programming mode by
pressing the key ⏻ for 3 seconds until the displays shows "PROGRAMMING".
- Select the descaling function using the keys and "DESCALING" appears on the display panel.
• Press and hold the two keys

together and then
The machine prepares for descaling. When you hear the beep of confirmation, the message DESCALING STEP 01 appears on the display.
DESCALING STEP 01:
Fill the tank halfway full with the descaling product then press .
DESCALING STEP 02:
keep the button 📋 pressed.
DESCALING STEP 03:
machine starts to delivery water from nozzles, keep the button 📋 pressed till the end of the cycle.
DESCALING STEP 04:
empty and clean the water tank, then refill it with over 1 litre of fresh water, then press.
CLEANING STEP 05:
keep the button 📋 pressed until 1 litre of water is dispensed from the machine, wait for the end of the cycle. Fill the tank with water and wait until the coffee and water temperatures are reached.
The manufacturer declines all responsibility for any damage caused by failure to carry out descaling.
8 TROUBLE - SHOOTING
The machine does not switch on
- The main switch is off
- No electricity
The coffee does not come out or comes out in slow drips
- Coffee grind too fine (increase the grinder set)
- Coffee machine pipes obstructed: press ☐ without coffee dispenser, some water comes out from the central part.
- or do a new descaling cycle.
The coffee comes out too fast and is not creamy
- Coffee too old
- Coffee too thick (decrease the grinder set)
- Chose a more creamy blend
The milk froth does not form
- Check that the flow of steam is suitable
- Do not heat the milk excessively
Loud noise of the pump when dispensing
- Keep the STEAM button pressed till it starts or press ☐ without coffee dispenser
The machine does not go on PROGRAMMING mode
- To create mass by touching the handle of the machine and keep press on/off button
AUTO-DIAGNOSTICS
The electronic circuits manage and recognize various alarms and operating anomalies.
These are indicated on the display panel.
ALARMS
The display panel could shows these alarms signs:
SERVICE 0
Solution: it is a generic alarm; before calling the technical service, please try to switch off and switch on the machine.
WATER PRESSURE 1
Solution: before calling the technical service,
check the water tank and press the key and reset the machine by pressing the key

GRINDER LOCK 2
Solution: before calling the technical service, check for the presence of foreign bodies in the grinder (stones, impurities, other foreign bodies). If necessary use a vacuum cleaner to suck up all the beans. Then reset the machine by pressing the key
SERVICE 3
Solution: there is a problem with the coffee heater; before calling the technical service, please try to switch off and switch on the machine.
If the display shows:
MAINTENANCE CALL SERVICE
THE MACHINE IS WORKING PROPERLY BUT WARNS OF THE NEED TO BE SERVICED IN ORDER TO KEEP THE GUARANTEE.
For any operating anomaly, contact your nearest service center.
9 DISPOSAL OF ELECTRICAL APPLIANCES
This product complies with EU WEEE Directive (2012/19/EU). This product bears a classification symbol for waste electrical and electronic equipment (WEEE). This product has been manufactured with high quality parts and materials which can be reused and are suitable for recycling. Do not dispose of the waste product with normal domestic and other wastes at the end of its service life. Take it to the collection center for the recycling of electrical and electronic equipment. Please consult your local authorities to learn about these collection centers.
Compliance with RoHS Directive: The product you have purchased complies with EU RoHS Directive (2011/65/EU). It does not contain harmful and prohibited materials specified in the Directive. Package information: Packaging materials of the product are manufactured from recyclable materials in accordance with our National Environment Regulations. Do not dispose of the packaging materials together with the domestic or other wastes. Take them to the packaging material collection points designated by the local authorities.
10 GUARANTEE
Guarantee for Refrigeration, Cooking Appliances, Washing Machines & Dishwashers
Your new Grundig product is guaranteed against the cost of breakdown repairs for 5 years from the date of the original purchase.
"Please visit the "support" section on the Grundig website at www.grundig.co.uk to register your 5 year warranty.»
What is covered?
• Repairs necessary as a result of faulty materials, defective components or manufacturing defect.
• The cost of functional replacement parts, but excluding consumable items.
• The labour costs of a Grundig approved repairer to carry out the repair.
• Transit, delivery or accidental damage or misuse and abuse.
• Cabinet or appearance parts, including knobs, flaps, handles or container lids.
• Accessories or consumable items including but not limited to, ice trays, scrapers, cutlery baskets, filters and light bulbs.
- Repairs required as a result of unauthorised repair or inexpert installation that fails to meet the requirements contained in the user instruction book.
• Repairs to products used on commercial or non-residential household premises.
- Loss of frozen food in freezers or fridge/freezers.(Food loss insurance is often included within your household contents insurance policy, or may be available separately from your retailer.)
What is not covered?
Important notes
- Your Grundig product is designed and built for domestic household use only.
• The guarantee will be void if the product is installed or used in commercial or non-residential domestic household premises. - The product must be correctly installed, located and operated in accordance with the instructions contained in the User Instructions Booklet provided.
• Professional installation by a qualified Electrical Domestic Appliance Installer is recommended for all Washing Machines, Dishwashers and Electric Cookers.
• Gas Cookers must only be installed by a Gas Safe (or BORD GAIS) registered Gas Installer.
• The guarantee is given only within the boundaries of the United Kingdom and the Republic of Ireland.
• The guarantee is applicable only to new products and is not transferable if the product is resold.
• Grundig disclaims any liability for incidental or consequential damages.
• The guarantee does not in anyway diminish your statutory or legal rights.
Should you experience any difficulty in obtaining service please contact the Grundig Customer Help-Line.
Tel: 0845 603 1234 - 0345 603 1234 - e-mail:service@Grundig.co.uk
11 SERVICE
Please keep your purchase receipt or other proof of purchase in a safe place; you will need to have it should the product require attention under guarantee.
You should also complete the details below; it will help us assist you when requesting service. (The model number is printed on the Instruction Booklet and the serial number is printed on the Rating Label affixed to the appliance)
Model No:
Serial No:
Retailer:
Date of purchase:
For service under guarantee simply telephone the appropriate number below UK Mainland & Northern Ireland
0845 603 1234
0345 603 1234
Republic of Ireland
All Refrigeration, All Cookers
Washing Machines and Dishwashers
01 862 3411
Before requesting service please check the trouble-shooting guide in the Operating Instructions as a charge may be levied where no fault is found even though your product may still be under guarantee. Service once the manufacturers guarantee has expired. If you have purchased an extended guarantee please refer to the instructions contained within the extended guarantee agreement document. Otherwise please call the appropriate number above where service can be obtained at a charge.
Grundig, 1 Greenhill Crescent, Watford Herts WD18 8QU
FOR A GOOD REASON
GRUNDIG
