
KM 6330 - Coffee maker GRUNDIG - Free user manual and instructions
Find the device manual for free KM 6330 GRUNDIG in PDF.


| Product type | Drip coffee maker |
| Brand | Grundig |
| Model | KM 6330 |
| Power supply | 220-240 V~, 50-60 Hz |
| Power | 1000 W |
| Water tank capacity | 1,8 L (max) |
| Display | LCD with clock |
| Delayed programming | Yes, up to 24 hours |
| Automatic shut-off | After 40 minutes |
| Keep warm | Yes, via hot plate |
| Anti-drip system | Yes |
| Water level indicator | Yes, with MAX mark |
| Filter type | Swivel filter (paper or permanent) |
| Carafe | Glass carafe with handle, capacity 1,8 L |
| Included accessories | Coffee measuring spoon |
| Housing material | Plastic |
| Cleaning of removable parts | Dishwasher (top rack) or soapy water |
| Recommended descaling | At least 4 times per year |
| Safety | Automatic shut-off, non-slip surface, overheating protection |
Frequently Asked Questions - KM 6330 GRUNDIG
User questions about KM 6330 GRUNDIG
0 question about this device. Answer the ones you know or ask your own.
Ask a new question about this device
Download the instructions for your Coffee maker in PDF format for free! Find your manual KM 6330 - GRUNDIG and take your electronic device back in hand. On this page are published all the documents necessary for the use of your device. KM 6330 by GRUNDIG.
USER MANUAL KM 6330 GRUNDIG
natural_image
Simple black-and-white icon of a mug with a handle, resembling a beer mug or mug (no text or symbols)KM 6330
DE - EN - FR - TR - HR
DEUTSCH 04-13
ENGLISH 14-21
FRANÇAIS 22-31
TÜRKÇE 32-42
HRVATSKI 43-50
Please read this instruction manual thoroughly prior to using this device! Follow all safety instructions in order to avoid damage due to improper use!
Keep the instruction manual for future reference. Should this appliance be given to a third party, than this instruction manual must also be handed over.
■ This appliance is intended for private domestic use only and is not suitable for professional-catering purposes. It should not be used for commercial use.
- Do not use the appliance in the bathroom.
- Check if the mains voltage on the rating label corresponds to your local mains supply. The only way to disconnect the appliance from the mains is to pull the plug from the wall socket.
■ For additional protection, this device should be connected to a household current fault protection circuit breaker of no more than 30 mA. Consult an electrician for advice.
- Do not immerse the appliance, power cord, or power plug in water or any other liquids. Do not hold under running water and do not clean any parts in the dishwasher. Only the swivel filter holder and glass jug can be cleaned safely in the upper shelf of the dishwasher or with water and washing-up liquid.
■ Disconnect the power plug after using the appliance, before cleaning the appliance, before leaving the room, or if a fault occurs.
■ Do not disconnect the plug by pulling on the cord.
- Do not squeeze or bend the power cord and do not rub it on sharp edges in order to prevent any damage.
■ Do not use an extension cord with the appliance.
■ Never use the appliance if the power cord or the appliance is damaged.
- Our GRUNDIG Household Appliances meet applicable safety standards, thus if the appliance or power cord is damaged, it must be repaired or replaced by the dealer, a service centre or a similarly qualified and authorized service person to avoid any dangers. Faulty or unqualified repair work may cause danger and risks to the user.
- Do not dismantle the appliance under any circumstances. No warranty claims are accepted for damage caused by improper handling.
■ Always keep the appliance out of the reach of children.
■ This appliance can be used by children aged from 8 years and above and persons with reduced physical, sensory or mental capabilities or lack of experience and knowledge if they have been given supervision or instruction concerning use of the appliance in a safe way and understand the hazards involved. Children shall not play with the appliance.
Cleaning and user maintenance shall not be made by children without supervision.
■ Before using the appliance for first time, clean all parts which come into contact with water carefully. Please see full details in the “Cleaning and Care” section.
■ Dry the appliance and all accessories before connecting it to mains supply and before attaching any parts.
■ Never operate or place any part of this appliance on or near hot surfaces such as a gas burner, electric burner or heated oven.
- Do not use the appliance for anything other than its intended use. The coffee maker is designed for preparing coffee. Do not use the appliance to heat any other liquids or tinned, jarred, and bottled foods.
■ Never use the appliance in or near to combustible or inflammable places and materials.
■ Operate the appliance only with the delivered parts.
■ Do not use the appliance with damp or wet hands.
■ Always use the appliance on a stable, flat, clean, dry, and non-slip surface.
■ Make sure that there is no danger that the power cord could be accidentally pulled or that someone could trip over it when the appliance is in use.
■ Position the appliance in such a way that the plug is always accessible.
- Avoid contact with hot surfaces and hold the glass jug by the handle only as there is the danger of burning. The glass jug becomes hot during use.
- Do not move the appliance while there is hot liquid in the glass jug or if the appliance is still hot.
■ Do not open the cover or swivel filter holder during the brewing process.
■ Never fill the appliance above the maximum level indicator. If it is filled above the maximum level, water flows out of the appliance through safety drainage.
■ Never operate the appliance if brewing or keeping the coffee hot is not required.
■ Only fill the appliance with cold and fresh drinking water.
■ Only put water in the tank when the device has been unplugged.
■ The appliance should not be operated with an external clock timer or separate remote control system.
■ Pour water in the water tank carefully.
■ In case of any water splashes during water pouring, ensure that glass jug and heating platform are dry.
- Do not place the empty glass jug on the warm heating platform.
■ Use the glass jug only in combination with the coffee maker.
■ Never operate the appliance without water inside.
Dear Customer,
Congratulations on the purchase of your new GRUNDIG Coffee Maker KM 6330.
Please read the following user notes carefully to ensure you can enjoy your quality GRUNDIG product for many years to come.
Meanings of the symbols
Following symbols are used in the various section of this manual:

Important information and useful hints about usage.

WARNING: Warnings for dangerous situations concerning the safety of life and property.

Materials are intended to be in contact with food.
Controls and parts
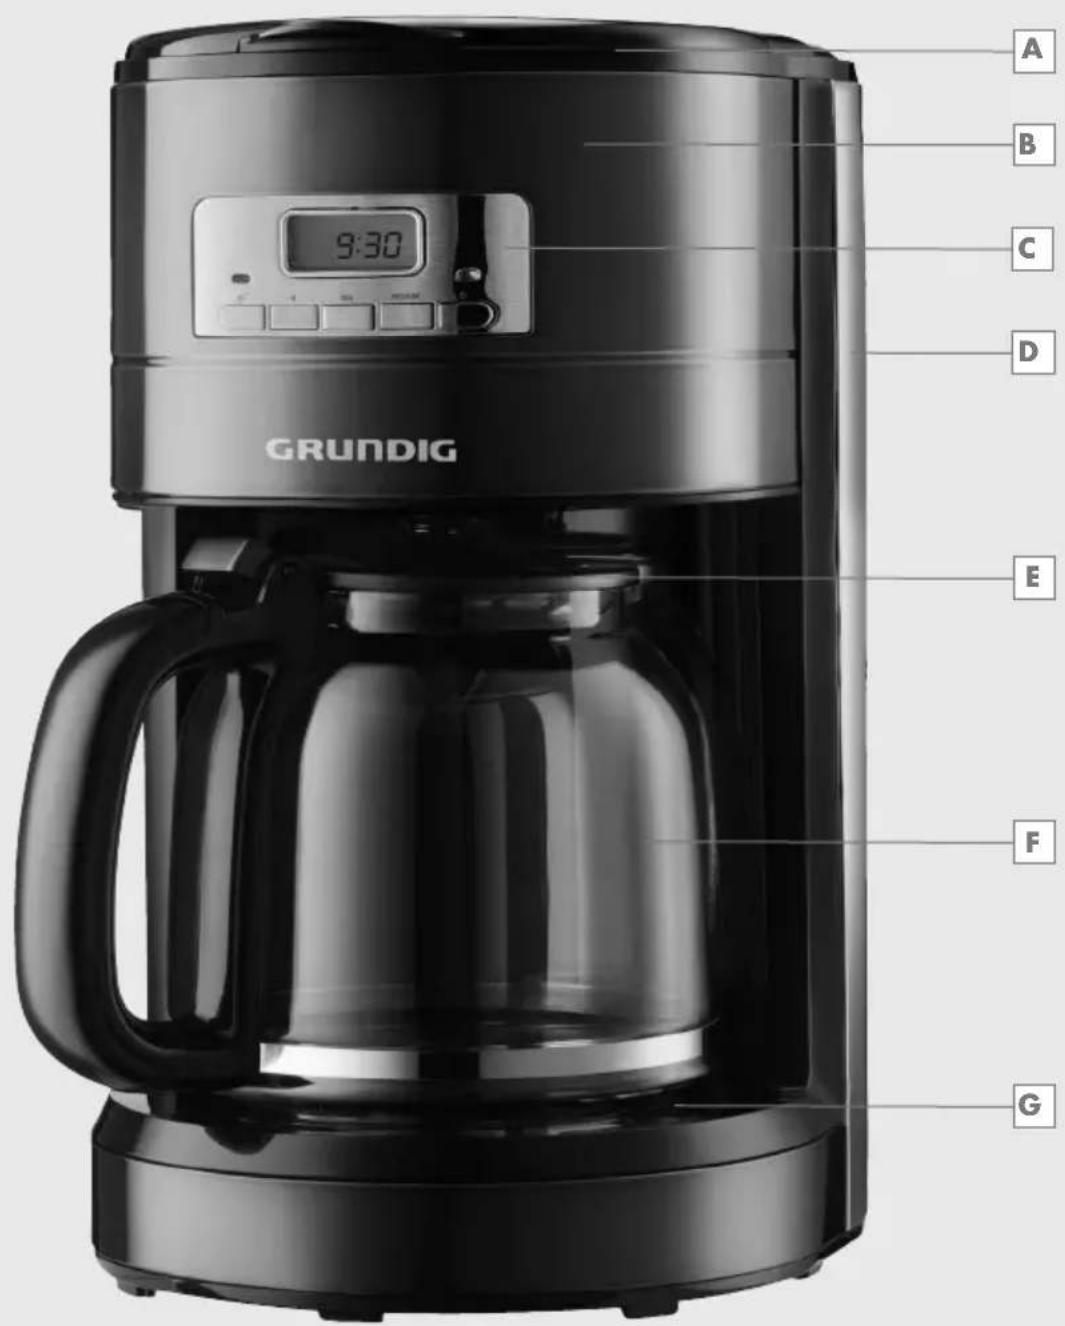
See the figure on page 3.
A Water tank cover
B Water tank
c Control panel
D Water gauge
E Lid
F Glass jug
G Warming plate
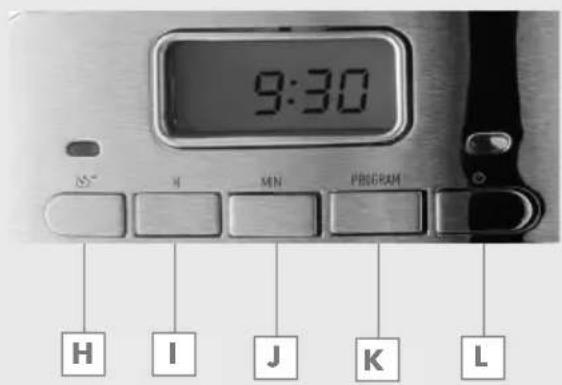
H Delay button
Hour button
J Minute button
K Program button
L On/Off button
Accessories
Coffee measuring spoon
Preparation:
1 Remove all packaging and stickers and dispose them according to applicable legal regulations.
2 Before using the appliance for first time, clean all parts which come into contact with water carefully. Please see full details in the "Cleaning and Care" section.
3 Make sure that the appliance is placed in an upright position and on a stable, flat, clean, dry, and non-slip surface.
Setting the clock
1 Connect the plug to the wall socket. The LCD will display 12:00 o clock with flashing blue light
2 Press program buttonK. The word "Clock" appears in the top right corner.
3 To set the time, hold down the buttons "H" □ and "MIN" □.
Note
■ The time cycle is 24 hours.
Brewing Coffee
1 Open the water tank cover A and fill the water tank B with drinking water. The water should not exceed the max. level marked on the water gauge D with the required amount of water, but do not fill past the "MAX" mark.
Note
■ Use only clean, cold, and fresh drinking water.
2 Add coffee powder into filter. Usually a cup of coffee need a level spoon of coffee powder but you may adjust according to personal taste. Then close the water tank cover A.
3 Place the glass jug F on the warming plate G.
4 Press the On/Off button. And the brewing process begins.
Caution:
If the swivel filter holder is not closed or the glass jug F is not placed accurately, the drip - stop function will not function properly. It could cause hot water or hot coffee to overflow.
5 Remove out glass jug F to serve when finish brewing (about one minute later after the coffee stops dripping out).
Notes
■ Even after the process has finished can you keep the appliance energized. The coffee will be kept warm G. The coffee machine has a stay-warm function and can keep the brewed coffee warm for up to 40 minutes when the machine is switched on.
■ For an optimum coffee taste, serve it after brewing.
■ The brewing process can be stopped at any time by pressing the On/Off button.
The appliance is equipped with a drip-stop located underneath the swivel filter holder and enables you to briefly remove the glass jug F to pour coffee before the water has finished running through the machine.
Caution
■ Make sure to place the glass jug F on the warming plate G quickly (max. 30 seconds). Otherwise the brewed coffee from the filter could overflow. If you want to use the glass jug F for more than 30 seconds, switch off the appliance.
■ Never open the swivel filter holder during the brewing process, even if no water is draining from the filter. Extremely hot water or coffee can spill out from the swivel filter holder and cause injury. If water or coffee is not draining from the swivel filter holder, immediately unplug the appliance and wait 10 minutes before opening and checking the swivel filter holder.
- When the brewing process ends and the water level indicator with MAX marking is empty, there will still be hot liquid in the swivel filter holder. Wait a few minutes for the rest of the liquid to drip into the glass jug F.
6 To turn the appliance off, press the L button.
7 Disconnect the appliance from the wall socket.
Note
If you want to continue the brewing process, repeat the procedure from 1 to 7. Let the appliance cool down at least 15 minutes between each brewing process.
Hints and Tips
■ Use softened or filtered water to prevent lime build-up.
■ Store unused coffee powder in a cool, dry place. After opening a package of coffee, reseal it tightly to maintain its freshness.
- Do not reuse the coffee sediment in the filter since this will reduce the flavour.
■ Reheating coffee is not recommended as coffee is at its peak flavour immediately after brewing.
Automatic Brewing Function
If you do not want the appliance starting immediately, you can set up the automatic start function.
Setting the clock
1 Connect the plug to the wall socket. The LCD will display 12:00 o clock with flashing blue light.
2 Press program button K. The word "Clock" appears in the top right corner.
3 To set the time, hold down the buttons "H" and "MIN".
Note
■ The time cycle is 24 hours
Setting the brew function
1 Press the "program" button again until the word "timer" appears on the display.
2 Set the requested starting time by pressing the "H" □ and "MIN" □ buttons.
3 After you set up the timer press the H button. The indicator left will light up green.
4 On the regulated time the left green light will go out and the right blue light will go on. The brewing process starts now.
Caution:
■ The appliance will be cut off power automatically after 40 minutes if it has not been manually disconnected at the completion of brewing.
5 Remove out glass jug F to serve when finish brewing (about one minute later after the coffee stops dripping out).
Note
Even after the process has finished can you keep the appliance energized. The coffee will be kept warm H. The coffee machine has a stay-warm function and can keep the brewed coffee warm for up to 40 minutes when the machine is switched on.
Cleaning and care
Caution
■ Never use petrol, solvents, abrasive cleaners, or metal objects and hard brushes to clean the appliance.
■ Never put the appliance or power cord into water or any other liquid.
1 Turn the appliance off and disconnect it from the wall socket.
2 Allow the appliance to cool down.
3 Remove the glass jugF.
4 Clean all detachable parts after each use in hot, sudsy water.
5 Use a damp soft cloth and some mild cleaner to clean the exterior of the appliance.
6 Place the glass jug F onto warming plate G.
Note
■ Before using the appliance after cleaning, dry all parts carefully with a soft cloth or paper towel.
Descaling the appliance
Descaling extends the life of your appliance. Descale your coffee machine at least 4 times per year. The period depends on the water hardness in your area. The harder the water is, the more often the appliance needs to be descaled.
1 Purchase a suitable descaler from a speciality store. Please ask naming the device.
2 Prior to commencing the descaling process, thoroughly read the manufacturer's package insert for the descaler. Should the manufacturer's instructions differ from the ones listed below, then follow the manufacturer's instructions.
Storage
If you do not plan to use the appliance for a long period of time, please store it carefully.
■ Make sure the appliance is unplugged and completely dry.
■ Store the appliance in a cool, dry place. Make sure the appliance is kept out of the reach of children.
Compliance with the WEEE Directive and Disposing of the Waste Product:
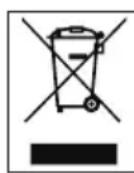
This product complies with EU WEEE Directive (2012/19/EU). This product bears a classification symbol for waste electrical and electronic equipment (WEEE).
This symbol indicates that this product shall not be disposed with other household wastes at the end of its service life. Used device must be returned to official collection point for recycling of electrical and electronic devices. To find these collection systems please contact to your local authorities or retailer where the product was purchased. Each household performs important role in recovering and recycling of old appliance. Appropriate disposal of used appliance helps prevent potential negative consequences for the environment and human health.
Compliance with RoHS Directive
The product you have purchased complies with EU RoHS Directive (2011/65/EU). It does not contain harmful and prohibited materials specified in the Directive.
Package information

Packaging materials of the product are manufactured from recyclable materials in accordance with our National Environment Regulations. Do
not dispose of the packaging materials together with the domestic or other wastes. Take them to the packaging material collection points designated by the local authorities.
Technical data

Power supply: 220 - 240 V \~, 50-60 Hz
Power: 1000 W
Max. water volume: 1.8 L
Technical and design modifications reserved.
- Meanings of the symbols
- Controls and parts
- Accessories
- Preparation:
- Setting the clock
- Note
- Brewing Coffee
- Caution:
- Notes
- Caution
- Hints and Tips
- Automatic Brewing Function
- Setting the brew function
- Cleaning and care
- Descaling the appliance
- Storage
- Compliance with the WEEE Directive and Disposing of the Waste Product:
- Compliance with RoHS Directive
- Package information
- Technical data
Brand : GRUNDIG
Model : KM 6330
Category : Coffee maker