Fono DS 300 - Mobile Phone AEG - Free user manual and instructions
Find the device manual for free Fono DS 300 AEG in PDF.

User questions about Fono DS 300 AEG
0 question about this device. Answer the ones you know or ask your own.
Ask a new question about this device
Download the instructions for your Mobile Phone in PDF format for free! Find your manual Fono DS 300 - AEG and take your electronic device back in hand. On this page are published all the documents necessary for the use of your device. Fono DS 300 by AEG.
USER MANUAL Fono DS 300 AEG
natural_image
Front view of a silver flip phone with a circular lens and ventilation grille (no visible text or symbols)
natural_image
Exterior view of a modern office building (no signage)Inhaltsverzeichnis
| GSM frequencies: Dual-Band operation GSM 900/1800 | |
| SIM cards: Dual SIM, dual standby: both SIM Cards are active but only one can be used for calling at a time | |
| Talk time: up to 4 hours | |
| Standby time: up to 300 hours | |
| Display: TFT colour display, 34 x 42 mm, 220 x 176 Pixel, 65.000 colours | |
| Camera: VGA (0.3 M, GIF/JPEG/BMP) | |
| Ringtone / Vibration: 20 different polyphonic ringtones (MIDI/WAV/MP3/AMR), vibration alarm | |
| Bluetooth: Bluetooth® 2.0, works with both SIM cards | |
| Phone features: Re-Dial and call log for the last 20 numbers, integrated hands-free, Mute, Keypad lock, Quick dial, Conference | |
| SMS / MMS messaging: 160 characters per SMS, text input help, MMS max. size 100 kB (JPEG/GIF89a/WBMP/GIF87) | |
| WAP: WAP Push, WAP download (ringtones, pictures) | |
| Multimedia: FM radio, Media Player (Audio & Video) | |
| Organizer features: Phonebook with 300 entries (+ external memory), calendar, stopwatch, clock with alarm (works also when phone is switched off ), calculator, time zones, to-do-list, memo-function | |
| Extras: 2 Games, E-Book reader, voice recorder | |
| Languages supported: | German, English, Dutch and Turkish (more to come) |
| Dimensions: approx. 106 x 46 x 14 mm | |
| Weight: approx. 80 g (with battery) | |
| Connectors: Mini USB connector for headset and charging, phone can be used as USB memory, T-Flash slot (max. 1 GB, optional) | |
| Package content: AEG fono DS 300 Dual SIM GSM phone, 900 mAh Li-Ion battery, stereo headset with micro, 100-240 AC adapter, manual | |
1. Safety information
Use the mobile telephone only in places where its use is not forbidden or could not pose a danger: Do not use the telephone in airplanes, in hospitals, at fuelling stations, in demolition ranges or in an automobile whilst you yourself are driving. Observe the valid laws and prohibitions and remember that they may change from time to time.
Use only authorised accessories and in particular approved batteries. In-compatible accessories and faulty batteries can cause damages, even explosions.
2. General information
This mobile telephone has been developed for operation in EGSM 900 and 1800 networks or US 850/1900 networks – further information on the services in these networks are available from your mobile communications provider. On direction of the mobile communications provider certain functions of this mobile telephone may have been deactivated or modified. For further information, please contact your mobile communication provider.
This mobile telephone is not water proof – therefore keep it away from liquids.
Keep the telephone, the power pack, the SIM cards and other accessories out of the reach of children. Small parts might come loose that may be swallowed.
When disconnecting cables, always pull it by the plug and never by the cable.
This telephone may be serviced and repaired only by authorised dealers.
3. Inserting of SIM Cards, Memory Card and battery
This mobile phone can be used with two SIM cards. You can be called on two different phone numbers and you can dial out or send messages with two different phone numbers. This function is quite useful, to operate a business and a private number at the same time or if you want to use an less expensive pre-paid SIM abroad in combination with your standard SIM.
This phone operates as Dual SIM / Dual Standby phone: Both SIM cards are active at the same time but you can only use one SIM card at a time to make calls or send messages. When you are on a call on one SIM card and you are called on the second SIM the caller will receive a message that this phone is temporarily not available. If you are not on a call you can receive calls no matter on what SIM you are called. For dialing out or messages (SMS, MMS) you can choose what SIM card you want to use for it. Calls on different SIM cards cannot be connected to each other.
Before using the mobile telephone you also need to insert at least one SIM card. Disconnect the mobile telephone from the power source for that and switch off the mobile telephone. Take off the back cover and please install your SIM card according to the figure below.
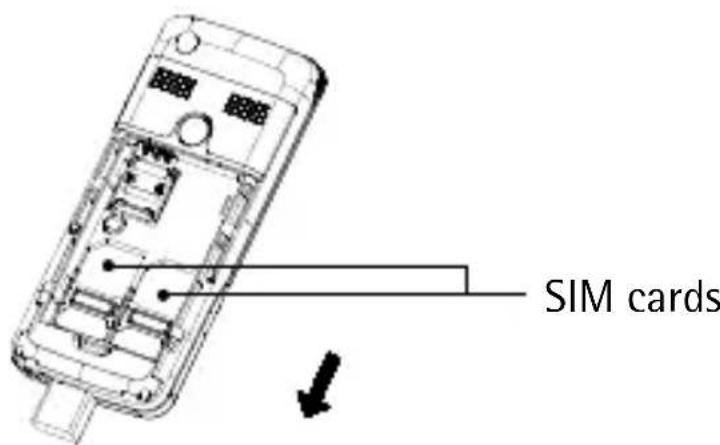
This cell phone supports T-Flash card as the expansion storage space as an additional memory for pictures, videos, music and others. The T-Flash slot supports capacities of maximum 1 GB and is installed according to the figure below.

To protect the battery during transport it is not inserted in the mobile telephone. In case the dealer from whom you purchased the telephone has not already inserted the battery, follow the following steps.
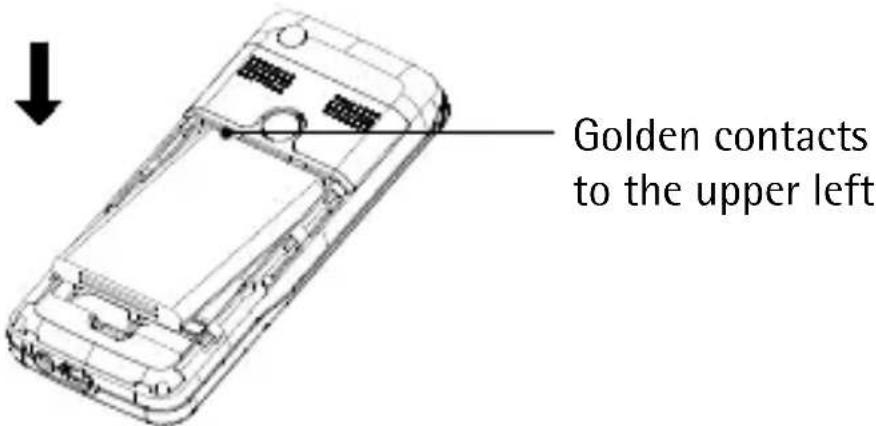
The battery should be fully charged before starting up the mobile phone. Use only the supplied power pack for that or the approved vehicle charging adapter.
Use only the supplied battery or the approved substitute type. Appropriate instructions are available from your dealer or from the service hotline.
The usage of other charging adapters or batteries may possibly invalidate the authorisation or guaranty/warranty and may have dangerous consequences.
Connect the mobile telephone to the AC charger.
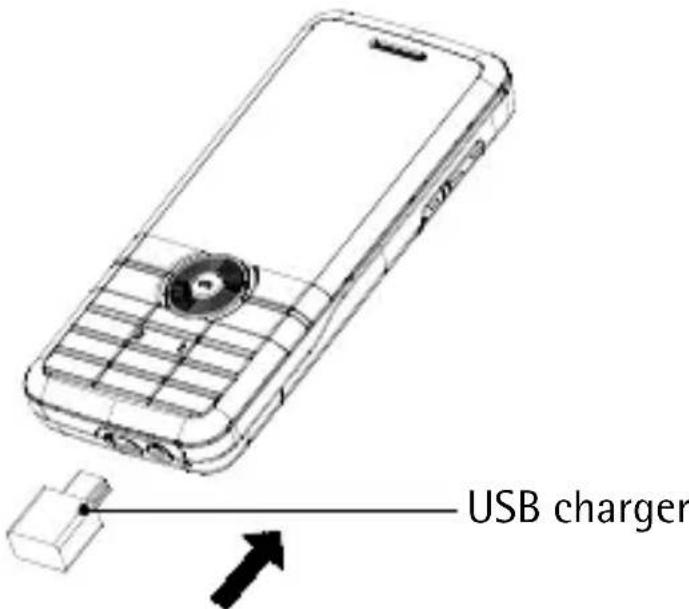
If the battery is completely discharged, it may take a few minutes before the telephone indicates that it is being charged and that it can be used for calls.
The telephone will indicate when the charging process has been completed.
4. Keys and connections
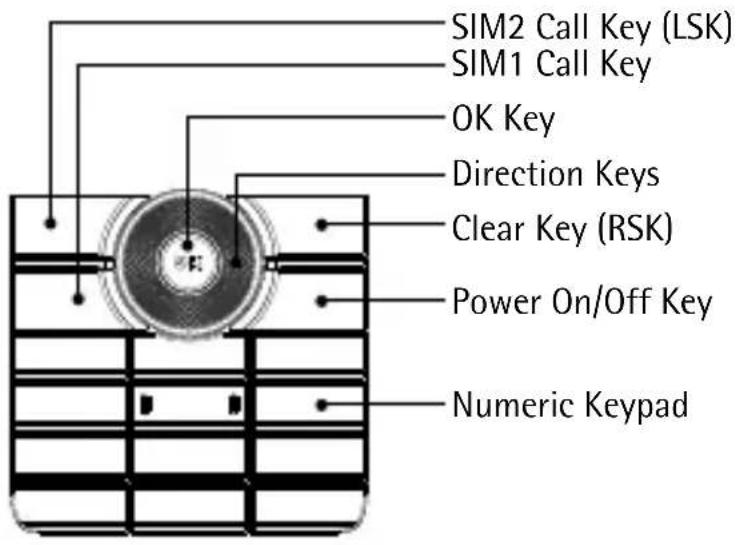
4.1 SIM1 Call Key
Make a call with SIM1 or answer an incoming call; in standby state, press this key to display Dialed Call log.
4.2 SIM2 Call Key (Left Soft-Key, LSK)
Make a call with SIM2 or answer an incoming call; in standby state, press this key to display Main Menu.
4.3 OK Key
With this key you can confirm entered data or menu selections.
4.4 Direction Keys
Used to move the selection bar or cursor. Under standby status, you may use the direction key to access the designated shortcut function.
4.5 Clear Key (Right Soft-Key, RSK)
Used to clean out the selection mistake content, in standby state, such keys showing phonebook, in the menu condition, it has the backtrack functions.
4.6 Power On/Off Key
Under Power On status, you may hold down this key to turn off the cell phone. Under Power Off status, you may hold down this key to turn on the cell phone.
4.7 Numeric Keypad
Used to enter numbers and messages.
If you are not on a call you can start the following functions by pressing the respective key for longer than two seconds:
Key 1: Quick dial to voice mailbox »
Keys 2-9: Quick dial for often used numbers » (how to set see 8.3.1.2)
Key #: Mute / Unmute »
To place an international call you need to press a „+“ before the country code, which you get by pressing the „*“ key twice.
Some foreign telephone networks have extension lines that cannot be dialled as dial-through, but need to be entered by the key pad. To dial these directly as well, press the „*“ key quickly three times in a row after the telephone number. The „p“ character appears and then you can enter the dial extension.
4.8 Volume Up/Down
You can increase or decrease the volume by pressing such keys when calling or playing music or the call in ringing.
4.9 Camera Key
If you press the Camera Key for a longer while, the phone will start the camera mode. To take then pictures press the Camera Key quickly again.
5. Status displays
See below the symbols that are shown to display the status of the phone or incoming messages.

Signal Strength

Alarm on

SIM1 SMS received

SIM2 SMS received

Battery Indicator

Ring

Vibration then ring

Vibration and ring

Vibration only

SIM1: Missed calls

SIM2: Missed calls

Keypad locked

MMS

Service Inbox

GPRS

Divert all calls of SIM1

Divert all calls of SIM2
This mobile phone is provided with Soft Keys which are the two keys on the right and left below the display. Depending on the phone status and menu position, options and functions will be displayed above these keys. The keys are named RSK (Right Soft-Key) and LSK (Left Soft-Key) in this manual.
6. Switching on and off, key lock, emergency call functions
At least one SIM card has to be inserted before using the mobile phone. Refer to chapter 3.
Press the On/Off Key until the phone switches itself on. You are then requested to enter the telephone code and/or the SIM code. Confirm the SIM code pressing the OK key. Do not use the LSK.
The telephone code can be issued by you as you wish and protects the telephone from unauthorised use. The telephone code is 1122 at delivery and does not need to be entered the first time it is switched on.
With the PIN code that you get together with the SIM cards you can protect the SIM card from use by unauthorised persons. The PIN2 code that you get together with certain SIM cards is needed for accessing certain services. In case you enter the PIN or PIN2 code erroneously three times in a row, you are requested to enter the PUK or the PUK2 code. Contact your mobile communications provider if you do not know these codes.
In any country where digital GSM is used, you can make an emergency call if you are in the range covered by the network (you can know about this by checking the signal intensity indicator bar at the upper corner of the display of the cell phone). If your network supplier does not provide roaming service in that area, the screen will display "Emergency Calls Only", telling you that you can make this kind of call only. If you are in the range covered by the network, you can make an emergency call even if you don't
have a SIM card.
Note: In some areas, the service 112 (emergency call) is a service provided by the network operator. In case of anything abnormal, you can consult the network operator!
To switch off the mobile telephone press the On/Off Key as well until the telephone switches itself off.
6.1 Key lock
The key lock prevents the accidental activating of keys or the making of calls for example when carrying the mobile telephone in your pants pocket.
The key lock is activated by pressing the „*“ key (bottom left) for about three seconds. The key lock is indicated then by the symbol in the display's status line.
The key lock can also be activated automatically when the telephone is not used for a certain duration. This duration can be specified in the menus.
To lift the key lock, quickly press RSK and „*“ keys in succession.
7. Call functions
7.1 Making calls
Enter the telephone number with the prefix and if necessary the coun- + try code as well.
Redial: Press the SIM1 Call Key to view a list of the last numbers called. + Use the Direction Keys to select the desired number.
+ Press RSK and select a contact from the phone book.
To place an international call you need to press a „+“ before the coun- + try code, which you get by pressing the „*“ key twice.
Some foreign telephone networks have extension lines that cannot be dialled as dial-through, but need to be entered by the key pad. To dial these directly as well, press the „*“ key quickly three times in a row after the telephone number. The „p“ character appears and then you can enter the dial extension.
After you have entered the number you can choose by pressing SIM1 Call Key or SIM2 Call Key which SIM and number should be used to make the call.
7.2 Accepting a call
Depending on the set mode, the mobile telephone will either ring and/or vibrate when there is an incoming call. You have the following options then:
To take the call press either SIM1 Call Key or SIM2 Call Key. +
To reject the call press shortly On/Off Key. +
If you have applied for the call line identity service, the calling number will be displayed on the screen. If the number has been stored in the phonebook, the name corresponding to the number will be displayed on the screen.
If the call is to the SIM1, "SIM1" will be displayed in front of the incoming call number or the name of the caller. If the call is to the SIM2, "SIM2" will be displayed in front of the incoming call number or the name of the caller.
7.3 Speed dial
Your phone is provided with 9 hotkeys. You can define the corresponding phone numbers for these keys by the menu. In this way, you may launch a call quickly by pressing number keys under standby status. The key 1 is specifically used for speed dial of the voice mailbox number. You may use this key after setting the number of voice mailbox.
Note: For dialing a number quickly, you must press and hold the key for more than 2 seconds. If the number key you dialed has not been defined in the "function Settings/Phone Settings/Speed Dial/Speed Dial List", you can't make the call.
7.4 Sending DTMF Signal
When sending DTMF signal has been set, you can press the number key and “*” or “#” on the screen dial keypad while in a call to send DTMF signal to the opposite side. If this function hasn't been enabled, it will be impossible to realize such functions as extension number dialing.
7.5 Speed short message read
When the user receives an unread short message, the icon will appear on the screen. If the SMS lock is not activated, you may click "Read" (LSK) or press the OK Key to read this short message.
7.6 Missed call
If you have missed a call, the icon will appear on the screen. You may click "Read" (LSK) or press the OK Key to show the number and details of the missed call.
7.7 Additional calls
If this is supported by your mobile communications provider, you can call a second party during the current telephone connection.
Simply dial the second party on the key pad as usual during the current connection. The first connection is put on „hold“ automatically.
Such additional calls can be only made from the same SIM card. A mix between the two SIM cards is not possible.
7.8 Conference calls
You can connect two or more calls to one telephone conference. Press the OK key for that while making a call and other connections are in hold mode. A menu appears with the following options:
Mute: Mute the active call
Conference: Every call will be merged in a conference
Quit all: Quit every call at once
8. Menu functions
8.1 Phone book
Your phone is provided with a card folder phone book. Information of each contact stored in the phone includes: 3 phone numbers (including Phone Number, Family Number, and Office Number), Company Name, Email, Fax Number, Birthday, Caller Picture, Melody, Caller Group (including Family, Friends, Important Persons, Colleague and Others).
Only the name and phone number of the contactor stored in the SIM card can be stored.
You can also store contacts on the SIM cards but because of memory limitations you can only save the name and number on the SIM card.
Phone book functions explain themselves by the separate menu options.
8.2 Messages
8.2.1 SMS Messages
Both SIM cards handle SMS messages separately: You can receive and send messages from each SIM card. Therefore the menu shows all options for both SIM cards.
After you have received a SMS message the screen will show this icon:

To write a SMS, select the menu option and enter the message. After you have finished the message, press the OK key and select which SIM should be used to send the SMS.
Note: The length of text messages is limited; usually 160 characters. If you want to send messages that are longer, then they are automatically split up into several messages, which your provider will charge you for individually. In the upper right corner of the display you will find information on the number of characters and messages, e.g. 70/1 (70 characters, fist message).
8.2.2 MMS Messages
A multimedia message can content character, audio chip and picture. Multimedia message of up to 90KB is available on your phone. If the size of a multimedia message is over the limit, the phone can't receive this multimedia message.
If a picture is contented in a multimedia message, the picture will be adjusted by the phone to display the picture completely on the screen. The display effect of the multimedia message can be different according to the receiving device.
Note: You can use this function only when the service is supported by your network operator or service supplier. Only the device featuring multimedia or email can receive and display a multimedia message.
As SMS also MMS can be send either thru SIM1 or SIM2.
8.2.3 Voice mail
Voice messages come from the electronic answering machine that is provided by your mobile communications provider. Contact your mobile communications provider to learn how it is set up.
Go to Menu, select Messages and then Voice mail server, to retrieve the messages. Also here you can select between SIM1 and SIM2.
To configure the settings of the Voice mail server choose Edit.
8.3 Call Center
The Call Center manages all incoming, dialed and missed calls. All functions and records are separated between the two SIM cards.
The Call History shows for both SIM cards missed calls, dialed calls and received calls. You can delete the records and also manage the cost of your calls.
8.3.1 General Call Settings
With this menu you can manage call settings for incoming and outgoing calls. Again also these functions are separated between the SIM cards:
Caller ID: Send / hide your ID +
Call waiting: This function is required to make conference calls +
Diverting calls under various conditions +
Barring calls +
Note: The above functions need to be supported by your mobile communications provider. If they are set in a wrong way, it may be possible that you cannot carry out anymore calls.
8.3.1.1 Auto Redial
The phone can redial automatically for ten times at most if the first dialing fails.
8.3.1.2 Speed Dial
If the speed dial is "ON", then you can click the corresponding key (2-9 keys) to dial the number designated to the key through the standby interface.
8.4 Settings
8.4.1 Dual SIM Settings
You can select whether both SIM cards are active (= Dual Standby) or only one should be used or both should be swichted off (Flight Mode)
In Flight Mode most of the other features of the phone like camera, media player and organizer still can be used.
If a SIM card is switched off it will appear to a caller for this number/SIM as if the phone has been switch off. Call divert options or voice mail can
be set as described in 8.3.1.
8.4.2 Phone setup
Set current date, time, format for date and time as well as menu language. Following a short description of the menu options that are not self explanatory.
8.4.2.1 Schedule power on/off
Set the times when the phone will be switched on and off automatically. This setting is for the complete phone and both SIM cards. You can still switch on and off the phone manually in addition to the settings.
8.4.2.2 Preferred input method
For some languages the phone offers text input help that completes words based on the first characters automatically. Please check if that feature is helpful for you.
8.4.2.3 Display Characteristic
Set up wallpaper, screen saver, power on/off display, main menu style, show date and time, show owner number.
8.4.2.4 Shortcuts
You can choose here which functions of the phone can be selected by shortcuts instead of going thru the menu. The functions you select here can be programmed to the dedicated keys in the next menu item.
8.4.2.5 Dedicated key
Assign the shortcuts defined above to the Direction Keys Up, Down, Left or Right.
8.4.3 Security Setup
Several security settings for the SIM cards and the phone.
When supplied the phone is unlocked but your SIM cards typically will require a PIN code. To lock the phone you can select Phone lock. The standard PIN to release this function is 1122.
8.4.3.1 Restore factory settings
All settings you have made are reset; the telephone can be returned to the status it was in when it was delivered. All data like pictures, contacts, music files, etc may be lost. The password / PIN for this function is 1122.
8.5 Multimedia
Here you can manage the camera, image viewer, video functions, audio player, sound recorder and the FM radio.
All data can be stored either on the phone or onto an external T-Flash memory card (optional, not provided, max. 1 GB). As the phone memory is limited and media files can be large we recommend to use T-Flash memory.
The following formats are supported by the phone:
Camera: JPG (VGA Resolution)
Image Viewer: JPG
Video: AVI, 3GP, MP4
Audio Player: MP3, AMR, MIDI
With the supplied USB cable you can connect the phone to your PC and exchange data files as with common USB memory (Win 2000 and higher).
Please don't use windows format command to carry on the format operation to the mobile disk of cell phone; otherwise, it will result in the damage that can't be repaired any more.
8.6 Fun and Games
This mobile phone integrates up to three games. Please refer to "Instructions" in game menu for specific operation.
8.7 User Profiles
Various settings e.g. for ring tones and volume can be managed using a profile. They can be easily changed when you go into different surroundings: The „Outdoor“ profile functions with an especially loud ring tone to make sure that calls are heard when there are loud ambient noises, whereas the „Conference“ profile is selected when there should be no interference.
The profiles are preset, but can be adjusted to fit your needs.
Select for that User Profiles choose the one you want to change and select then Customize.
8.8 Organizer
Functions like Calendar, To-Do Lists, Calculator, Currency converter, E-Book reader and more can be accessed thru this menu.
Also alarm can be set in this menu. The phone will manage up to five different alarms that also work when the phone is switched off. Please
make sure that the battery has sufficient capacity to provide the alarm function.
8.9 Services
The first entry are services offered by the mobile phone provider of your SIM card.
Furthermore you can enter here all settings for WAP services and data accounts. Such settings are different with the several mobile phone providers, so you have to contact them for support on this subject.
The Bluetooth interface is also managed by this menu. Bluetooth is supported for both SIM cards, but some Bluetooth devices (Headsets, Car Kits) have problems with the fast switch between the two SIM cards. Therefore we recommend putting the most used SIM card into SIM1 slot.
In addition to the profile (headset or handsfree) needed for headsets, car-kits or fixed installed solutions this mobile phone also supports the A2DP profile for high quality audio transmission.
To connect a Bluetooth device you must first power on the Bluetooth device, then select My device and Inquiry new device. The devices that you try to connect must be switched into pairing mode – please follow the instructions in the manual for these devices. A list of found devices will appear, select the one you want to connect and confirm it with Bond. The Bluetooth device may require a PIN code to authorize the connection, with most devices it is set to "0000" (see also manual).
9. Supplied accessories
- Stereo headset: With the stereo headphones you can listen to the radio and media player as well as converse on the telephone because it has an integrated microphone. This allows you to talk without having to hold the telephone in your hand.
- Travel charger: The travel charger serves to charge the battery of your telephone and can be operated with various input voltages ranging from 100 to 240 Volt. When the battery is fully charged an appropriate message will appear on the display.
- USB cable: To connect the phone with the travel adapter or your PC.
Please use only the supplied accessories or only accessories and in particular batteries those are explicitly intended for use with this telephone and approved.
10. Care and user information
This telephone was developed and manufactured with utmost care. Please observe the following user instructions so that you can use it for a long time and do not invalidate the warranty conditions:
Keep the telephone away from moisture and liquids. The phone has various openings (e.g. for the loudspeaker) through which liquids can enter into the inside and thereby destroy the electronics.
+ Do not use or store the telephone in dirty environments: Particles may enter into the inside and block mechanical components such as the keys.
Do not use or store the telephone at high temperatures, because this may damage the battery or cause the plastic parts to deform.
Keep the telephone also away from low temperatures: When the tele- + phone returns to normal temperatures condensation may form inside that can cause damages.
Do not open the telephone except for inserting the battery, a memory + and the SIM cards.
Avoid mechanical loads such as shaking or dropping: This may damage + the mechanical components or the display.
+ Do not use any aggressive cleaners, because they may harm the telephone's surfaces.
Do not paint the telephone or stick things on it. This may block the + mechanics and the keys for example can no longer be pressed.
Do not modify the electronics of the mechanics of the phone. This + forfeits all licences.
In case you send in the telephone for repair, you should if possible + make a backup of all data (telephone book, notes, etc.).
The notes above also apply to the supplied accessories. In case the phone does not function properly, bring it for repair only to an authorised service shop.
11. Additional safety information / SAR value
Keep the telephone and the supplied accessories out of the hands of children, because small parts can get loose that can be swallowed by the children.
Ambient conditions
Please be sure to observe all valid regulations for the use of mobile tele-
phones and switch it off when use is not permitted. Use the telephone only in the usual manner. The phone meets all the radiation criteria when it is held to the ear in the usual manner or at a distance of at least 2.5 cm from the ear. If you are using a bag or a belt holster, it should not contain any metal and keep the safety distance mentioned above. In some cases transmission of data (e.g. text messages) is delayed until connection to the mobile communications network has sufficient quality. Make sure that even in the event of a delayed transmission the safety distance prescribed above is kept. The telephone contains magnetic components: This can attract metallic objects and the telephone should not be held in the vicinity of hearing aids. Furthermore, credit cards or other magnetic storage media should be kept away from the telephone, because otherwise the data can be damaged.
Medical equipment
Any form of radio transmission, and this includes mobile telephones, can influence the function of medical equipment, in particular when these are not screened well enough. Switch the telephone off therefore in the vicinity of medical equipment – especially when requested to do so by appropriate signs.
Pacemakers
The manufacturers of pacemakers recommend a minimum distance of 16 cm / 7 inches between a mobile telephone and the pacemaker to avoid malfunctions by interferences. This recommendation is also supported by independent scientific research.
People that carry a pacemaker should therefore observe the following instructions:
Always keep a minimum distance of 16 cm/7 inches between the te- +
lephone and the pacemaker.
Do not transport the telephone in a breast pocket or near the pace- + maker.
During the telephone call, hold the telephone against the ear that is + further away from the pacemaker.
If there is any indication of interference, switch off the telephone im- + mediately.
Hearing devices and hearing aids
Some digital hearing devices can basically be disturbed by mobile telephones. In this case please contact the hearing device acoustician.
Use in automobiles and airplanes
The radio signals of mobile telephones can basically interfere with the electronic systems of automobiles and airplanes. Use the phone therefore only in automobiles when this is explicitly permitted and observe the respectively valid regulations.
Do not deposit the telephone or other parts in the vicinity of airbags. Airbags are inflated very quickly and the telephone can cause serious injuries when being hurled about.
The use of telephones in airplanes is generally not permitted at the date of this print. Switch off your telephone when you board an airplane. These regulations may be changed in the future. Information on the current status can be gathered from your airline or your mobile communications provider.
Explosive environments
Switch off the telephone if you are in an environment where there is a
risk of explosion. Observe all the pertinent regulations, because voltage peaks can trigger explosions in these environments that can cause serious, even fatal, injuries. Switch off the telephone therefore also in the vicinity of fuelling stations.
Explosive environments are usually clearly marked, for example with the directive that automobile motors should be switched off. In such cases the telephone must be switched off as well. Dangerous environments are for example fuel and gas storage, production and storage sites for chemicals, below deck on ships and areas where the air is loaded with for instance metallic or coal dust and the like.
SAR value
The SAR value of this mobile phone in GSM mode has a maximum of 00,429 W/kg. In GPRS mode, which is not used for phone calls, but e.g. for sending MMS, the maximum SAR value is 1,805 W/kg.