
VCR 4505 - VCR AEG - Free user manual and instructions
Find the device manual for free VCR 4505 AEG in PDF.


| Product Type | VHS Video Cassette Recorder (VCR) |
| Brand | AEG |
| Model | VCR 4505 |
| Dimensions (W x H x D) | 360 x 92 x 226 mm |
| Weight | 2.4 kg |
| Power Supply | 220-240 V ~ 50 Hz |
| Power Consumption | 25 W |
| Television System | PAL B/G |
| Video Head System | Rotary two-head helical scan |
| Tape Speeds | SP: 23.39 mm/s, LP: 11.70 mm/s |
| Maximum Recording Time (E-240 tape) | SP: 4 hours, LP: 8 hours |
| Tuner Channels | E2–E12, E21–E69, A–H (Italy), CATV (Hyper & Oscar bands) |
| RF Converter Output | UHF channel 22–69 (adjustable) |
| Timer Recording | 24-hour clock, 8 programmes (daily/weekly/once) |
| Special Features | One Touch Recording (OTR), Auto Repeat Playback, Picture Select (Normal/Soft/Sharp), Parents Lock, Auto Return, Auto Head Cleaner, NTSC playback |
| Connections | RF Out (coaxial), 2x Scart (AV1/TV, AV2/Decoder) |
| Supplied Accessories | Remote control, 2x R6 batteries, RF cable |
| Warranty | 24 months from date of purchase |
| Safety Notes | Do not open cabinet; avoid moisture; use in horizontal position only |
| Maintenance | Cabinet cleaning with soft damp cloth; auto head cleaning system |
Frequently Asked Questions - VCR 4505 AEG
User questions about VCR 4505 AEG
0 question about this device. Answer the ones you know or ask your own.
Ask a new question about this device
Download the instructions for your VCR in PDF format for free! Find your manual VCR 4505 - AEG and take your electronic device back in hand. On this page are published all the documents necessary for the use of your device. VCR 4505 by AEG.
USER MANUAL VCR 4505 AEG
OTR (One Touch Recording)
OTR (One Touch Recording)
OTR (One Touch Recording)
Before Using This Product ....2
Installation 4
Basic Operation 8
Advanced Operations 9
Maintenance 12
Troubleshooting Guide 13
Specifications 14
Declaration of Conformity 15
Warranty 16
Features
• Automatic Operations
- On Screen Display
• Auto Repeat Playback
- Picture Select
• One Touch Recording
- Parents Lock
- Auto Return
- Timer Recording
• Auto Head Cleaner
• NTSCPlayback
Supplied Accessories
- Remote control
- Two R6 batteries
- RF cable
Important Copyright Information
Unauthorised recording or use of broadcast television programming, video tape, film or other copyrighted material may violate applicable copyright laws. We do not take responsibility for the unauthorised duplication, use, or other acts which infringe upon the rights of copyright owners.
A Note About Recycling
This product's packaging materials are recyclable and can be reused. Please dispose of any materials in accordance with your local recycling regulations.
Batteries should never be thrown away or incinerated but disposed of in accordance with your local regulations concerning chemical wastes.
Model/Serial Number
This appliance has a serial number located on the rear panel. Please note down the serial number and retain the information for your records.
Model number: VCR 4505
Serial number: ____




Safety Information
WARNING:
• Live parts inside. Do not remove any screws.
• To avoid fire or electric shock, do not expose this unit to rain or moisture.
• Dangerous voltage inside
Precautions
- Use only cassettes with the VHS mark with this VCR.
- Do not attempt to open the cabinet. There are no parts you can service inside. Refer all servicing to qualified service personnel.
- Slots and openings in the cabinet and the sides or bottom are provided for ventilation. To ensure reliable operation and to protect the unit from overheating, these openings must not be blocked or covered.
- Avoid installation in enclosed spaces such as bookcases unless proper ventilation is provided.
- Keep the unit away from radiators and other heat sources.
- Avoid use near strong magnetic fields.
- Do not push objects of any kind into the VCR through the cabinet slots or openings as they could touch electrically live parts or short circuit parts resulting in a fire or electric shock.
-
Never spill liquid on this unit. If liquid is spilled and penetrates into the unit, consult qualified service personnel.
-
Use this unit in a horizontal (flat) position only.
- Before attempting to operate the unit, make sure that the timer recording mode is "OFF".
- This product is in Stand-by mode when it turns off while the power cord is connected.
Power Supply
The main power supply is engaged when the power cord plug is plugged in a 220-240V, 50Hz, AC outlet. To operate the unit, press FUNCTION to turn on the unit. (FUNCTION indicator on the VCR comes on.)
Dew Warning
Moisture condensation may occur inside the unit when it is moved from a cold place to a warm place, after heating up a cold room, or under conditions of high humidity. Do not use the VCR for at least 2 hours until it is dry inside.
Positioning
Do not place the VCR directly on top of, or underneath, your TV set. Ensure that there is at least 20 cm between the VCR and the TV set, and that air can circulate freely through the ventilation openings of the VCR.
Before Using This Product
Video Cassette Tape
This VCR will operate with any cassette that bears the VHS mark. For best results, we recommend the use of high-quality tapes. Do not use poor quality or damaged tapes.
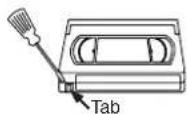
You can prevent accidental erasing of a recording by breaking off the erase-prevention tab on the back edge of the cassette. If you decide to record on the tape again, cover the hole with plastic tape.
Two Different Tape Speeds
Before recording, select the tape speed: SP mode (Standard Play) or LP mode (Long Play). The table below shows the maximum recording/playback time using E-60, E-120, E-180 or E-240 tapes in each mode.
| Tape Type Recording/Playback Time | |
| Tape Speed SP Mode LP Mode | |
| E-60 1 hour 2 hours | |
| E-120 2 hours 4 hours | |
| E-180 3 hours 6 hours | |
| E-240 4 hours 8 hours | |
TV Colour System
Different countries use different television colour systems. Tapes recorded in the PAL or NTSC system can be played back on this unit. Usually, the picture on the TV screen will be in black and white when you play back a tape that is recorded in a different colour system.
Tapes recorded in the NTSC system can be played back on this unit and a PAL system TV set. This feature is only available in the SP mode. When playing back such tapes, the picture may roll up or down, shrink vertically and black bars may appear both at the top and bottom of the screen. Adjust the vertical hold control on your TV, if the TV features this control.



Description of Controls
Front Panel

- Cassette compartment
2.F.FWD (Fast Forward) button
3.PLAY button - REW (Rewind) button
5.STOP/EJECT button
6.REC/OTR button
7. AUTO RETURN button
8.Indicator (See below.)
9.CHANNEL(▲/▼) buttons
10.FUNCTION button
Indicator

11.STANDBY indicator
12.FUNCTION indicator
13.TAPE IN indicator
14. TIMER indicator
15.REC indicator
Rear Panel
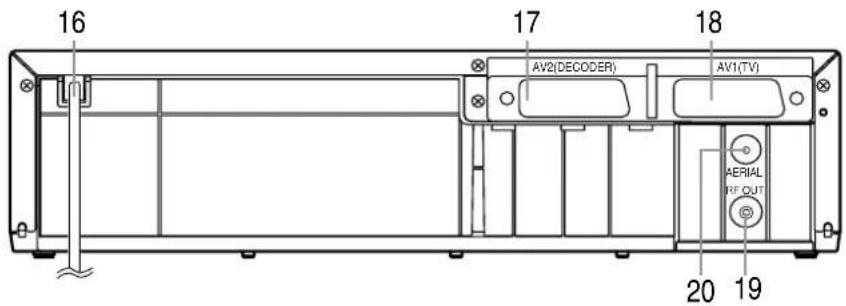
- Power cord
17.AV2 (DECODER) socket
18.AV1 (TV) socket
19.RF OUT socket
20.AERIAL socket
Remote Control
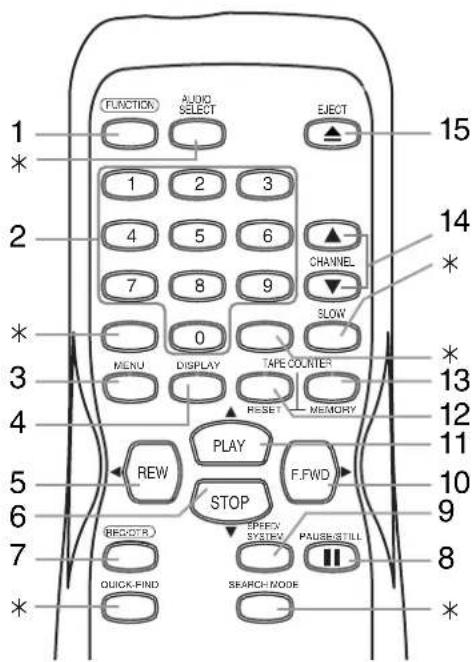
* These buttons do not function for this VCR.
-
FUNCTION button
-
number buttons
-
MENU button
4.DISPLAY button
- REW/ ▶ button
6.STOP/ ▼ button
7.REC/OTR button
8.PAUSE/ STILL button
9.SPEED/SYSTEM button
(Only the function of SPEED is available for this VCR.)
10.F.FWD/ ▶ button
11.PLAY/ ▲ button
12.TAPE COUNTER RESET button
13.TAPE COUNTER MEMORY button
14.CHANNEL ( ▲/▼) buttons
15.EJECT button
To insert the batteries:
Install two R6 batteries matching the polarity indicated inside the battery compartment.

Caution
Do not mix old and new batteries. (Also never mix alkaline batteries with manganese batteries.)
Installation
Connecting the VCR
VCR to TV Connection
1) Disconnect the TV's power cord from the AC outlet.
2) Disconnect the VHF/UHF TV aerial coaxial cable from the TV.
3) Connect the VHF/UHF TV aerial coaxial cable to the VCR.
4) Connect the VCR to the TV using the coaxial cable.
5) Plug the power cords of the VCR and TV into the AC outlets.

(Back of the unit)
Other Connections
Euro Scart (AV) Sockets
Your VCR is provided with two Scart sockets which you may connect to other external devices with Scart sockets. We recommend this connection to ensure a better audio and picture quality.

flowchart
graph TD
    A["Decoder (Not supplied)"] --> B["to 21-Pin Scart Jack"]
    B --> C["to aerial socket"]
    C --> D["(TV)"]
    D --> E["to aerial socket"]
    E --> F["to RF OUT"]
Euro Scart cables are obtainable at your dealer.
AV1 (TV) Connection to TV
If your TV has Scart sockets, you may connect your VCR's AV1 (TV) scart socket to the Scart socket on the back of your TV. Please see the instruction manual for your TV.


AV2 (DECODER) Connection for Other External Devices
The second Scart socket AV2 (DECODER) is designated for other external devices, e.g. decoder, another VCR, video camera and so on.
Note: If you want to connect a TV with Scart socket to your VCR, the TV must be connected to the VCR through AV1 (TV). A connection to AV2 (DECODER) will not function correctly.
External Input Mode
To receive the signal from an external source (decoder, video camera, another VCR, etc.), connect the source to the AV2 (DECODER) socket, and press CHANNEL (▲/▼) or enter "002" with the number buttons. "AV2" appears on the TV screen. If you use the AV1 (TV) socket, press
CHANNEL (▲/▼) or enter "001" with the number buttons.
"AV1" appears on the TV screen.
Initial Settings
Selecting the Language
The following steps should only be performed if there is a power failure or if the VCR is unplugged for more than 30 seconds.
- Use the remote control for this procedure.
1) Turn on the TV and select the video channel on the TV.
2) Press FUNCTION.
3) Press PLAY/▲ or STOP/▼ repeatedly to select your desired language.
4) Press MENU.

Changing the Language
If you want to change the language used on the TV screen menus, follow the steps below.
- Use the remote control for this procedure.
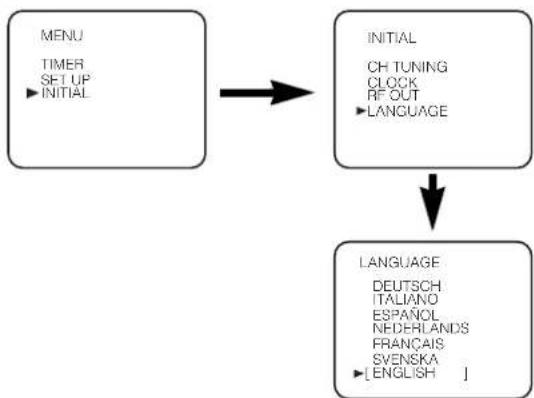
1) Press MENU.
2) Press PLAY/▲ or STOP/▼ to select "INITIAL", then press F.FWD/▶.
3) Press PLAY/▲ or STOP/▼ to select "LANGUAGE", then press F.FWD/►.
4) Press PLAY/▲ or STOP/▼ repeatedly to select your desired language.
5) Press MENU.
flowchart
graph TD
    A["MENU\nTIMER\nSET UP\n→INITIAL"] --> B["INITIAL\nCH TUNING\nCLOCK\nRF OUT\n→LANGUAGE"]
    B --> C["LANGUAGE\nDEUTSCH\nITALIANO\nESPANOL\nNEDERLANDS\nFRANÇAIS\nSVENSKA\n→[ENGLISH"]]
Video Channel Setting
Video channel setting will be necessary, if your VCR is connected to the TV via the coaxial cable.
- Use the remote control for this procedure.
1) Insert a pre-recorded tape into the VCR. The VCR will turn on and start playback automatically. If playback does not start, press PLAY/▲.
2) Select and adjust your TV to channel 36.
- If the playback picture appears on the TV screen, continue with step 8).
- If channel 36 is set for broadcasting, or interference lines appear on the picture, the RF converter must be set to a different channel between CH22 and CH69. Continue with step 3).
3) Press MENU.
4) Press PLAY/▲ or STOP/▼ repeatedly to select to "INITIAL". Then, press F.FWD/▶.
5) Press PLAY/▲ or STOP/▼ repeatedly to select to "RF OUT". Then, press F.FWD/▶. The RF OUT CH menu will appear.
6) Press PLAY/▲ or STOP/▼ to select a channel which is not used for broadcasted between channel 22 and channel 69 in your area, then press F.FWD/►.
7) Press MENU to exit.
Set the TV channel to the RF OUT CHANNEL which was selected on the VCR. A picture from the VCR will appear on the TV screen. If a picture does not appear, repeat steps 3) to 7) using a different channel which is not used for broadcasted.
8) Press STOP/▼ to stop the tape.




Note: You may also access the RF OUT CH menu by pressing and holding MENU on the remote control for 3 seconds during power off until the RF OUT CH menu appears.

flowchart
graph TD
    A["MENU\nTIMER\nSET UP\n→INITIAL"] --> B["INITIAL\nCH TUNING\nCLOCK\n→RF OUT\nLANGUAGE"]
    B --> C["→RF CUT CH 36"]
Setting the Clock
This VCR incorporates a 24-hour clock. The clock must be set for the Timer Recording function to operate correctly.
- Use the remote control for this procedure.
1) Press MENU.
2) Press PLAY/▲ or STOP/▼ to select "INITIAL", then press F.FWD/▶.
3) Press PLAY/▲ or STOP/▼ to select "CLOCK", then press F.FWD/▶.
4) Press PLAY/▲ or STOP/▼ until the relevant year appears, then press F.FWD/▶.
5) Press PLAY/▲ or STOP/▼ until the relevant month appears, then press FFWD/▶.
6) Press PLAY/▲ or STOP/▼ until the relevant day appears, then press F.FWD/▶.
7) Press PLAY/▲ or STOP/▼ until the relevant hour appears, then press E.FWD/▶.
8) Press PLAY/▲ or STOP/▼ until the relevant minute appears.
9) Press MENU to start the clock.
Note:
- Press REW/◀ to go one step back from the current step during steps 5) to 8).
- Although seconds are not displayed, they begin counting from 00 when you exit by pressing MENU. Use this feature to synchronize the clock with the correct time.
- If the VCR is unplugged or if there is a power failure for more than 30 seconds, you may have to reset the clock.

flowchart
graph TD
    A["MENU\nTIMER\nSET UP\n→INITIAL"] --> B["INITIAL\nCH TUNING\n→CLOCK\nRF OUT\nLANGUAGE"]
    B --> C["CLOCK\n→YEAR 2004\nMONTH 01\nDAY 07 WE\nHOUR\nMINUTE"]
Channel Presetting
Tuning of broadcast channels not already preset in the VCR can be performed in two ways.
Automatic Channel Preset
- By “AUTOMATICALLY” tuning channels and them in sequential order in the VCR’s memory i.e. the first channel found will be memorized into the VCR’s channel position 1, the second channel found will be memorized into the VCR’s channel position 2 and so on.
- Execution of the "Automatic" channel presetting cancels all the preset channels. DO NOT use this feature if you intend to use some of the pre-tuned channels. Use the "Manual" channel presetting function to tune in the additional channels you require.
Manual Channel Preset
• Each channel is tuned manually and individually. Follow the steps laid out in the "Manual Channel Preset" section.
Before you preset Channel...
- It is necessary to set the video channel if your VCR is connected to the TV via the coaxial cable, and TV channel 36 is set for broadcasting, or interference lines appear on the picture. Please refer to "Video Channel Setting".
Automatic Channel Preset
You can programme the tuner to scan only the channels that you can receive in your area.
- Use the remote control for this procedure.
1) Turn on the TV and select the TV channel to the video channel on the TV.
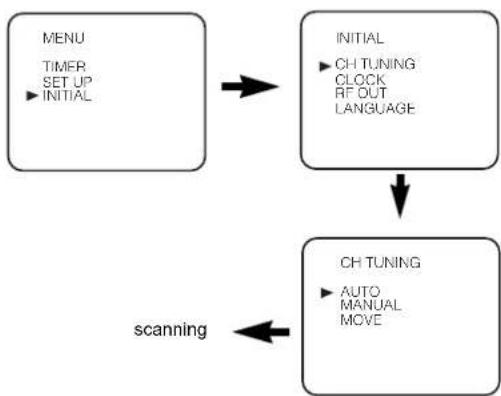
2) Press MENU.
3) Press PLAY/▲ or STOP/▼ to select "INITIAL", then press FFWD/▶.
4) Press PLAY/▲ or STOP/▼ to select "CH TUNING", then press F.FWD/▶.
5) Press PLAY/▲ or STOP/▼ to select "AUTO", then press FFWD/▶. - The tuner scans and memorizes all the active channels in your area. After scanning, the tuner stops on the lowest memorized channel.
flowchart
graph TD
    A["MENU\nTIMER\nSET UP\n→INITIAL"] --> B["INITIAL\n→CH TUNING\nCLOCK\nRF OUT\nLANGUAGE"]
    B --> C["CH TUNING\n→AUTO MANUAL\nMOVE"]
    C --> D["scanning"]



To Select a Desired Channel
You can select a desired channel by using CHANNEL (▲/▼), or directly pressing the number buttons on the remote control.
- Enter a channel numbers as a two-digit number for the quickest results. For example, to select channel 6, press 0 and 6. If you only press 6, channel 6 will be selected after a brief delay.
- You can only select channels 1–99.
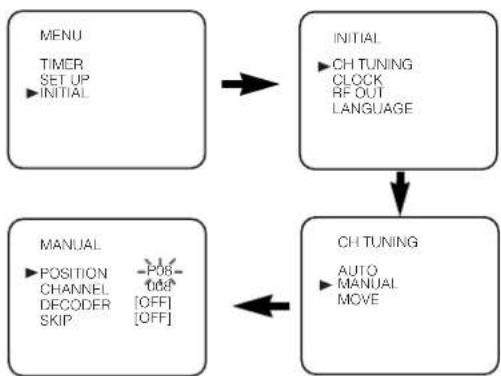
Manual Channel Preset
- Use the remote control for this procedure.
1) Press MENU.
2) Press PLAY/▲ or STOP/▼ to select "INITIAL", then press F.FWD/▶.
3) Press PLAY/▲ or STOP/▼ to select "CH TUNING", then press FFWD/▶.
4) Press PLAY/▲ or STOP/▼ to select "MANUAL", then press FFWD/▶.
5) Press PLAY/▲ or STOP/▼ to select "POSITION", then press FFWD/▶.
- When a weak signal is received in Manual Tuning mode, you can change the background to solid blue or the static screen by pressing TAPE COUNTER RESET.
6) Press the number buttons, PLAY/▲, or STOP/▼ to select your desired position number, then press F.FWD/▶.
•You can select position number 01-99.
- If [ON] appears on the right side of "SKIP", press PLAY/▲ or STOP/▼ to point to "SKIP". Then, press F.FWD/► to select [OFF].
- If you want to remove scrambled signals, press PLAY/▲ or STOP/▼ repeatedly to point to "DECODER". Then, press F.FWD/▶ to select [ON].
7) Press PLAY/▲ or STOP/▼ to select "CHANNEL", then press F.FWD/▶.
Press PLAY/▲ or STOP/▼. The VCR tuner will begin to search up or down automatically. When a channel is found, the VCR will stop searching and the picture will appear on the TV Screen.
- You can select desired channel number by using the number buttons. You must refer to the following Channel Plan table and press three digits to select the channel number.
(To select channel 24, press "0" button first and then press "2" and "4".)
- If this is the channel you want, press F.FWD/▶.
| Channel Plan | |
| CH Indication TV Channel | |
| 02 – 12 E2 – E12 | |
| 13 – 20 A – H (only ITALY) | |
| 21 – 69 E21 – E69 | |
| 74 – 78 X, Y, Z, Z+1, Z+2 | |
| 80 – 99,100 S1 – S20,GAP | |
| 121 – 141 S21 – S41 | |
This VCR can receive Hyper and Oscar frequency bands.
8) Press MENU to exit.
Note: To confirm that a channel has been added, press CHANNEL (▲/▼).
flowchart
graph TD
    A["MENU\nTIMER\nSET UP\n→INITIAL"] --> B["INITIAL\n→CH TUNING\nCLOCK\nRF OUT\nLANGUAGE"]
    B --> C["CH TUNING\nAUTO\n→MANUAL\nMOVE"]
    D["MANUAL\n→POSITION\nCHANNEL\nDECODER\nSKIP\n→POS\nOFF\nOFF"] --> C
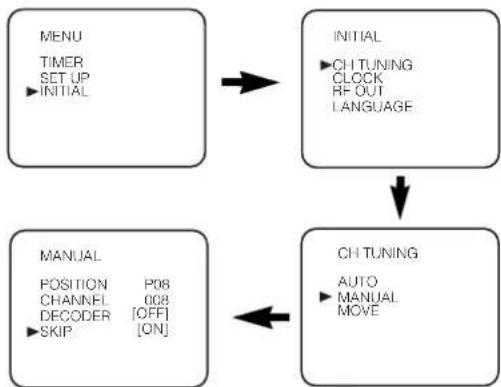
To Skip a Preset Channel
The channels you can no longer receive or seldom watch can be set to be skipped when you access channels by pressing CHANNEL (▲/▼).
- Use the remote control for this procedure.
1) Press MENU
2) Press PLAY/▲ or STOP/▼ to select "INITIAL", then press FFWD/▶.
3) Press PLAY/▲ or STOP/▼ to select "CH TUNING", then press FFWD/▶.
4) Press PLAY/▲ or STOP/▼ to select "MANUAL", then press FFWD/▶.
5) Press PLAY/▲ or STOP/▼ to select "POSITION", then press FFWD/▶.
6) Press the number buttons, PLAY/▲, or STOP/▼ to select relevant position number, then press F.FWD/▶.
7) Press PLAY/▲ or STOP/▼ to select "SKIP", then press FFWD/▶ to select [ON].
• To memorize the channel again, press F.FWD/▶. "ON" will change to "OFF".
8) Press MENU to exit.
Note: To confirm that a channel has been deleted, press CHANNEL (▲/▼).
flowchart
graph TD
    A["MENU\nTIMER\nSET UP\n→INITIAL"] --> B["INITIAL\n→CH TUNING\nCLOCK\nRF OUT\nLANGUAGE"]
    B --> C["CH TUNING\nAUTO\n→MANUAL\nMOVE"]
    C --> D["MANUAL\nPOSITION\nCHANNEL\nDECODER\n→SKIP\nP08\nOFF\nON"]




Channel Reprogramming
You can replace two channels.
- Use the remote control for this procedure.
1) Press MENU.
2) Press PLAY/▲ or STOP/▼ to select "INITIAL", then press F.FWD/▶.
3) Press PLAY/▲ or STOP/▼ to select "CH TUNING", then press F.FWD/►.
4) Press PLAY/▲ or STOP/▼ repeatedly to select "MOVE", then press FFWD/▶.
5) Press PLAY/▲ or STOP/▼ repeatedly to select the position number you want to change the channel, then press F.FWD/▶.
- You cannot select a position number where “--” appears next to the number. This is because SKIP is set to [ON] for this position number.
- When a weak signal is received in Channel Reprogramming mode, you can change the background to static blue by pressing TAPE COUNTER RESET. If you press the button again, the background will return to the static screen.
6) Press PLAY/▲ or STOP/▼ repeatedly until the channel move to another position number, then press F.FWD/▶.
7) Press MENU.
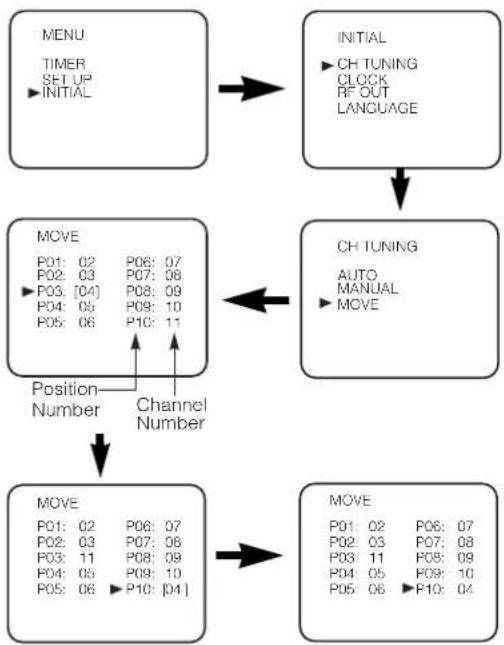
flowchart
graph TD
    A["MENU\nTIMER\nSET UP\n→INITIAL"] --> B["INITIAL\n→CH TUNING\nCLOCK\nRF OUT\nLANGUAGE"]
    B --> C["MOVE\nP01: 02 P06: 07\nP02: 03 P07: 08\n→P03: [04"] P08: 09\nP04: 05 P09: 10\nP05: 06 P10: 11]
    C --> D["MOVE\nP01: 02 P06: 07\nP02: 03 P07: 08\nP03: 11 P08: 09\nP04: 05 P09: 10\nP05: 06 →P10: [04"]]
    D --> E["Move\nP01: 02 P06: 07\nP02: 03 P07: 08\nP03: 11 P08: 09\nP04: 05 P09: 10\nP05: 06 →P10: 04"]
    E --> F["Move\nP01: 02 P06: 07\nP02: 03 P07: 08\nP03: 11 P08: 09\nP04: 05 P09: 10\nP05: 06 →P10: 04"]
    F --> G["Move\nP01: 02 P06: 07\nP02: 03 P07: 08\nP03: 11 P08: 09\nP04: 05 P09: 10\nP05: 06 →P10: 04"]
    G --> H["Move\nP01: 02 P06: 07\nP02: 03 P07: 08\nP03: 11 P08: 09\nP04: 05 P09: 10\nP05: 06 →P10: 04"]
    H --> I["Move\nP01: 02 P06: 07\nP02: 03 P07: 08\nP03: 11 P08: 09\nP04: 05 P09: 10\nP05: 06 →P10: 04"]
    I --> J["Move\nP01: 02 P06: 07\nP02: 03 P07: 08\nP03: 11 P08: 09\nP04: 05 P09: 10\nP05: 06 →P10: 04"]
Basic Operation
Playback
Tracking Adjustment
- Tracking adjustment will be activated automatically (Digital Tracking function) when you start playback.
- When playing pre-recorded tapes or tapes recorded on units other than your own, noise lines (black and white streaks) may appear on the playback picture. If this occurs, you can adjust the tracking control manually by pressing CHANNEL (▲/▼) until the streaks disappear. To return to the DTR function, stop the tape once and start playback again.
1) Turn on the TV and select the video channel on the TV.
2) Insert a prerecorded tape. The VCR will turn on automatically. If the erase-protection tab has been removed, the VCR will start playback automatically.
3) Press PLAY/▲ to begin playback.
- Tracking adjustment will be activated automatically (Digital Tracking function) when you start playback. To adjust the tracking manually, press CHANNEL (▲/▼).
• Using the buttons on the VCR Just press PLAY on the VCR. Power will automatically turn on and playback will start. (Direct Button Operation)
- Using the buttons on the remote control Press FUNCTION to turn on, and then press PLAY/▲.
4) Press STOP/▼ to stop playback.
Speed Search
1) Press F.FWD/▶ or REW/◀ during playback to view a videotape at a high speed in either a forward or reverse direction. In this mode, the sound will be muted.
2) Press the button again, the VCR will now search in super high speed. (This function will not operate for a NTSC tape.)
3) Press PLAY/▲ to return to normal playback.
Still Picture
Press PAUSE/ STILL during playback to view a still picture on the TV screen.
- If you press PAUSE/STILL to freeze the picture, usually there will be noiselines on the TV screen. This is normal, however, each time you press PAUSE/STILL the lines will change position.
- When the picture begins to vibrate vertically, stabilize the picture by pressing CHANNEL (▲/▼) in the Still mode.
- After the VCR has been in Still mode for 5 minutes, it will stop automatically to protect the tape and the video head.
- Usually there will be video "noise" lines (black and white streaks or dots) on the screen. This is normal. The still picture will, in addition to containing the "noise" lines, be black and white.
This is not a fault of the machine but merely a by-product of the technology involved in producing a VCR with LP mode.



Recording
Viewing and Recording the Same Programme
1) Insert a cassette tape with its erase-prevention tab in place. (If necessary, rewind or fast forward the tape to the point at which you want to begin recording.)
2) Press the number buttons or CHANNEL (▲/▼) to select the channel to be recorded.
3) Press SPEED/SYSTEM to select the tape speed (SP/LP).
4) Press REC/OTR to begin recording.
• The REC indicator on the VCR comes on.
5) Press STOP/▼ when recording is completed.
Skipping Unwanted Programme Material During Recording
1) Press PAUSE/ STILL when you want to temporarily halt recording.
You can check the remaining pause time with ■ marks on the TV screen. Each ■ mark represents 1 minute. After 5 minutes, the VCR will automatically switch to the Stop mode to prevent tape damage.
2) Press PAUSE/ STILL or REC/OTR to resume recording.
Recording One Programme While Viewing Another
You can record one programme while viewing another. To start recording, follow steps 1) to 4) under "Viewing and Recording the Same Programme". Then, set the TV to the channel you want to watch.
To Monitor the Progress of Your Recording
Select the video channel on the TV.
Assemble Function
- You can record in continuation from previous programme on a pre-recorded tape.
1) Insert a pre-recorded tape. Press PLAY/▲ to start playback.
2) Press PAUSE/STILL at the desired point on the tape.
3) Press REC/OTR. The VCR will be in the Recording Pause mode.
4) Press CHANNEL (▲/▼) to select the channel to be recorded.
5) Press REC/OTR or PAUSE/STILL. The recording will begin.
6) Press STOP/▼ when recording is completed.
Advanced Operations
Counter Memory
This feature can be used to memorize a beginning point that you want to watch again. Rewinding or fast forwarding makes it easy to locate this point.
Note: • If a tape includes both programmes recorded in the PAL system and ones recorded with NTSC system, this function may not be operated correctly.
• TAPE COUNTER MEMORY does not function if the Auto Repeat mode is set to ON. In this case, set the Auto Repeat mode to OFF.
1) Stop the tape at the desired point.
2) Press TAPE COUNTER RESET to display 0:00:00.
3) Press TAPE COUNTER MEMORY so that "M" appears on the TV screen.
4) Press REC/OTR or PLAY/▲.
• PresSTOP/▼ when recording or playback is completed.
5) Press REW/◄ or F.FWD/►. The VCR will automatically stop when the counter returns to 0:00:00 (approx.).
To Exit the Counter Memory
Press TAPE COUNTER MEMORY so that the "M" disappears from the TV screen.
Note: When you set the Auto Repeat mode to ON while the Counter Memory mode is ON, the VCR exits the Counter Memory mode automatically.
OTR (One Touch Recording)
This function enables you to set the duration of a recording simply by pressing REC/OTR.
1) Follow steps 1) to 3) in "Viewing and Recording the Same Programme" section.
2) Press REC/OTR repeatedly until the desired recording length appears in the upper left corner of the TV screen.
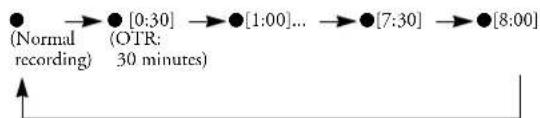
flowchart
graph LR
    A["(Normal recording)"] --> B["0:30"]
    B --> C["OTR: 30 minutes"]
    C --> D["1:00"]
    D --> E["..."]
    E --> F["7:30"]
    F --> G["8:00"]
Recording stops when 0:00 is reached.
• To check time remaining during an OTR Press DISPLAY.
• To change the recording length during an OTR Press REC/OTR repeatedly until the desired length appears.
- To stop an OTR before recording is finished Press STOP/▼.
- To cancel the OTR but continue recording
Press REC/OTR repeatedly until “●” appears without the recording length.
Auto Repeat Playback
The VCR has an auto repeat function that allows you to repeat a tape indefinitely without touching PLAY/▲.
- Use the remote control for this procedure.
- Insert a pre-recorded tape.
1) Press MENU.
2) Press PLAY/▲ or STOP/▼ to select "SET UP", then press FFWD/▶.
3) Press PLAY/▲ or STOP/▼ to select "AUTO REPEAT".
4) Press F.FWD/▶ so that "ON" appears next to "AUTO REPEAT" on the TV screen. When in Stop mode, Auto Repeat mode will start automatically. If the on-screen menu still remains, press MENU to exit, then press PLAY/▲.
Note: • Once you select the Auto Repeat mode, it stays in effect even after you turn off the VCR.
• TAPE COUNTER MEMORY does not function if the Auto Repeat mode is set to ON.
- When you set the Auto Repeat mode to ON while the Counter Memory mode is ON, the VCR exit the Counter Memory mode automatically.
To Stop Playback
Press STOP/▼.
To Exit the Auto Repeat Mode
Repeat steps 1) to 3). Then, press F.FWD/▶.




"OFF" will appear next to "AUTO REPEAT" on the TV screen. Press MENU to exit.

flowchart
graph TD
    A["MENU\n• TIMER\nSET UP\nINITIAL"] --> B["MENU\n• TIMER\n• SET UP\nINITIAL"]
    B --> C["SET UP\n• AUTO RETURN [ON"]\n• AUTO_REPEAT["ON"]\n• PICTURE["NORMAL"]]
Picture Select
This function enables you to select the picture quality of a tape.
- Use the remote control for this procedure.
1) Press MENU.
2) Press PLAY/▲ or STOP/▼ to select "SET UP", then press F.FWD/▶.
3) Press PLAY/▲ or STOP/▼ to select "PICTURE".
4) Press F.FWD/▶ until the desired mode (NORMAL, SOFT, or SHARP) is indicated on the TV screen.
5) Press MENU to exit.
Note: Once you select the Picture Select mode, it stays in effect even after you turn off the VCR.

flowchart
graph TD
    A["MENU\n• TIMER\nSET UP\nINITIAL"] --> B["MENU\n• TIMER\n• SET UP\nINITIAL"]
    B --> C["SET UP\nAUTO RETURN [ON"]\nAUTO_REPEAT["ON"]\n• PICTURE["NORMAL"]]
Automatic Operations
Automatic Rewind, Eject, Off
When the end of a tape is reached during recording, playback, or fast-forward, the tape will automatically rewind to the beginning. After that, the VCR will eject the tape and turn itself to off.
• The tape will not auto-rewind during timer recording or One Touch Recording.
- When the Counter Memory is activated, the tape will rewind to the M0:00:00 position and the VCR will enter the Stop mode.
Tape Eject
A tape can be ejected with the VCR power on or off (but the VCR must be plugged in).
- If a timer recording is set, a tape can only be ejected with the power on.
Real Time Tape Counter
- This shows the elapsed recording or playback time in hours, minutes, and seconds. (Nothing is shown in the case of blank portion.)
- The “-” indication will appear when the tape is rewound further than the tape counter position “0:00:00”.
Timer Recording
You may program the VCR to start and end a recording while you are away. You can set 8 programmes to record on specific days, daily or weekly within a 1-year period.
- Use the remote control for this procedure.
- Insert a cassette tape with its erase-prevention tab in place. (If necessary, rewind or fast forward the tape to the point at which you want to begin recording.)
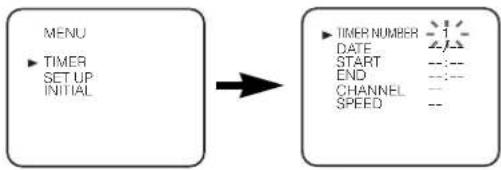
1) Press MENU
2) Press PLAY/▲ or STOP/▼ to select "TIMER", then press FFWD/▶.
Note: If you have not set the clock yet, "CLOCK" setting menu appears. If so, follow the steps outlined in the "Setting the Clock" section. Then, set the timer.
- When of F.WP/▶ afterspressing PLAY/▲ or STOP/▼ during steps 3) to 9), the input mode will move to the next step.
- If you do not press F.FWD/▶ within 5 seconds of setting an item, the input mode will move to the next step.
- Press REW/◀ to go back one step from the current setting during steps 4) to 9). If REW/◀ is pressed when the TIMER NUMBER is flashing, the entire programme contents will be erased.
3) Programme number flashes. Press PLAY/▲ or STOP/▼ repeatedly until the desired programme number appears. Then, press FFWD/▶.
4) For once-only recording: Press PLAY/▲ or STOP/▼ repeatedly until the relevant month appears.
For daily recording: To record a TV programme at the same time on the same channel from Monday through Friday. While the month digit is flashing, pressPLAY/▲ or STOP/▼ repeatedly to select "MO-FR".
For everyday recording : To record a TV programme at the same time on the same channel everyday. While the month digit is flashing, press PLAY/▲ or STOP/▼ repeatedly to select "MO-SU".
For weekly recording: To record a TV programme at the same time on the same channel every week. While the month digit is flashing, press PLAY/▲ or STOP/▼ repeatedly to select "W-MO" (Example: every monday).
5) For once-only recording only: Press PLAY/▲ or STOP/▼ repeatedly until your desired day appears.
6) Press PLAY/▲ or STOP/▼ repeatedly until the relevant start hour appears. Next, enter the minute digit.
7) Press PLAY/▲ or STOP/▼ repeatedly until the relevant end hour appears. Next, enter the minute digit.
8) Press PLAY/▲ or STOP/▼ repeatedly until the relevant channel number appears.




9) Press PLAY/▲ or STOP/▼ repeatedly until the desired tape speed appears.
10) Press F.FWD/▶. Programme 1 is now completed.
• To set another timer programme, repeat steps 3) to 10).
11) Press MENU to exit.
12) Press FUNCTION to activate the timer.
The TIMER indicator on the VCR comes on.
flowchart
graph LR
    A["MENU"] --> B["TIMER NUMBER"]
    A --> C["TIMER SET UP INITIAL"]
    B --> D["DATE: 2.1.1"]
    B --> E["START: ---"]
    B --> F["END: ---"]
    B --> G["CHANNEL: ---"]
    B --> H["SPEED: ---"]
To Stop a Timer Programme Which Has Already Started
Press STOP/EJECT on the VCR.
Note: STOP/▼ on the remote control will not function in the Timer Recording mode.
To Correct Timer Programmes
If you want to correct an automatic timer after you finished setting programme,
1) Repeat steps 1) to 3) in the "Timer Recording" section.
2) Select the setting you want to change using FFWD/▶ or REW/◀.
3) Enter the correct numbers using PLAY/▲ or STOP/▼, then press FFWD/▶.
4) Press MENU to exit.
5) Press FUNCTION to return to timer standby mode.
To Cancel or Check the Start/End Time
1) Repeat steps 1) to 2) in the "Timer Recording".
2) Select a programme number you want to check using PLAY/▲ or STOP/▼. The details of selected programme appears on the TV screen. You may cancel the entire programme by pressing REW/◄.
3) Press MENU to exit.
Avoid Overlap of TIMER Programmes...
A timer programme does not work while another programme is under execution.

bar_stacked
| Programme | 9:00 | 10:00 | 11:00 | |-----------|------|-------|-------| | Programme 1 | | | | | Programme 2 | | | | | Programme 3 | | | |Hint for Timer Recording
- If there is a power failure or if the VCR is unplugged for more than 30 seconds, the clock setting and all timer settings will be lost.
- If the tape runs out before the end time, the VCR will switch to the Stop mode immediately, eject the tape and the VCR power will be turned off. The TIMER indicator will flash.
-
If a tape is not in the VCR, timer recording cannot be performed and the TIMER indicator flashes. If an erase-prevention tab of the tape is missing, the tape will be ejected and the TIMER indicator will flash. Please insert a recordable tape.
-
When all the Timer Recordings are completed, the TIMER indicator also flashes. To play or eject the recorded tape, press FUNCTION first, and then press PLAY/▲ or EJECT. To rewind the tape to the beginning of the recorded programmes, press AUTO RETURN on the VCR.
- The TV that is connected to your VCR may be turned on or off when the VCR is in the Timer-recording mode.
- The VCR will only perform a timer recording after it has been placed into timer standby mode.
Auto Return
Using the AUTO RETURN Button
When all the Timer Recordings are completed (TIMER indicator flashes), press AUTO RETURN on the VCR first. The VCR will rewind to the beginning of the recorded programme(s).
Note: If there are any remaining programmes, press FUNCTION to turn on the VCR and then press AUTO RETURN. In this case, if you press any other button once and then press AUTO RETURN, AUTO RETURN will not be carried out.
Using the VCR Menu
If there are any remaining programmes including Daily, Everyday, & Weekly, AUTO RETURN will not operate.
1) Press MENU.
2) Press PLAY/▲ or STOP/▼ repeatedly to point to "SET UP", then press F.FWD/▶.
3) Press PLAY/▲ or STOP/▼ to point to "AUTO RETURN", then press F.FWD/►.
[ON] will appear next to "AUTO RETURN".
4) Press MENU.
Watch the Recorded Timer Programme
Press FUNCTION to turn on the VCR, then press PLAY/▲.
Parents Lock
Parents Lock prevents use of the VCR by making the VCR feature buttons on the VCR and the remote control inoperative.
The FUNCTION indicator on the VCR comes on.
1) Press and hold down FUNCTION on the remote control for 5 seconds until the TIMER, REC and TAPE IN indicators begin flash. The Parents Lock is activated. When you want to cancel it, press and hold FUNCTION on the remote control again for 5 seconds.
When Parents Lock is activated:
- You may insert a tape. However, the VCR power will remain off.
- You may press EJECT to remove the tape (unless a timer recording is programmed or has finished).
- Timer recording will take place as scheduled, even if Parents Lock is activated. "P.L." will appear steadily on the TV screen during the timer recording.
Copying a Video Tape
You can make copies of videotapes made by friends or relatives for your own enjoyment.
WARNING:
- Unauthorized recordings of copyrighted video tapes may be an infringement of copyright laws.




Connect the recording VCR (this unit), playing VCR (another VCR) and your TV as outline in the following diagram.

flowchart
graph TD
    A["Source (Playing) VCR <Monaural>"] --> B["TV set"]
    B --> C["To aerial socket"]
    C --> D["Coaxial cable (supplied)"]
    D --> E["To RF OUT"]
    F["Scarl Jack"] --> G["21-Pin Scarl Jack"]
    G --> H["[Editing (Recording) VCR"] (this unit)]
    H --> I["[TV set (Use for monitoring)"]]
1) Insert a pre-recorded videocassette into the playing VCR.
2) Insert a blank videocassette, or one you want to record over, into the cassette compartment of the recording VCR.
3) Press SPEED/SYSTEM on the remote control to select the desired recording speed (SP/LP).
4) Select "AV2" position on the recording VCR. See "Other Connections".
5) Press REC/OTR on the recording VCR.
6)Begin playback of the tape in the playing VCR.
7) To stop recording, press STOP/EJECT on the recording VCR, then stop playback of the tape in the playing VCR.
Note: • For best results during dubbing, use the VCR's front panel controls whenever possible. The remote control might affect the playback VCR's operation.
- If video or colour fades in and out, you may be copying a copy guarded video tape.
To Monitor the Recording
Turn on the TV and select the video channel on the TV.
A Status Display
To check the Counter, or Clock & Channel number, press DISPLAY. Each time you press DISPLAY, TV screen will change as illustrated:
When you select the channel using the number buttons, select the desired channel (position number).

flowchart
graph LR
    A["<<OFF mode>"] -->|Press once. Press once.| B["<<COUNTER mode>"]
    B -->|Press once.| C["<<CLOCK and CHANNEL NUMBER mode>"]
    C -->|Press once.| A
Note: If the on screen display or indicators on the front panel show an abnormal reading or no reading, unplug the VCR for 2 minutes, then replug it again.
Please note that language, clock, and timer settings will be cleared after disconnection.
Maintenance
Cabinet Cleaning
- Wipe the front panel and other exterior surfaces of the VCR with a soft cloth that has been immersed in lukewarm water and wrung dry.
- Never use a solvent or alcohol. Do not spray insecticide liquid near the VCR. Such chemicals may cause damage and discolouration to the exposed surfaces.
Auto Head Cleaning
- This feature automatically cleans the heads as you insert or remove a cassette to ensure a clear picture.
- The playback picture may become blurred or interrupted even if the TV programme received is clear. This does not mean that the recorded programme has been erased. This problem is caused by dirt accumulated on the head after long periods of use, or usage of rental or old tapes. In this case, head cleaning requires highly technical expertise and the nearest dealer should therefore be consulted. Clean heads only when problems occur.
Service
Should your VCR become inoperative, do not try to correct the problem by yourself. There are no user-serviceable parts inside. Turn the unit off, unplug the power cord, and take the unit to a Service Centre for servicing.





Troubleshooting Guide
If you have followed the instructions contained in this manual and have difficulty in operating your VCR, locate the SYMPTOM in the left column below. Check the corresponding cell CORRECTIVE ACTION columns to remedy the problem.
| SYMPTOM CORRECTIVE ACTION | |
| No power. | Make sure the power cord is connected to an AC outlet.Make sure the power is turned on. |
| Timer recording is not possible. | Make sure the timer recording is set correctly.Make sure the power is off.Make sure the VCR clock is set correctly. |
| Recording mode cannot be engaged. | Make sure the erase-prevention tab on the tape is intact. If removed, cover the hole after the tab with adhesive tape. |
| No picture or poor picture on playback. | Set your TV to the video channel.Fine tune your TV. |
| No picture but the audio is OK in playback. | Head cleaning is necessary, consult the nearest Authorized Service Centre. |
| Playback picture is partially noisy. | Adjust tracking control for a better picture by using CHANNEL (▲/▼). |
| On-the-air TV programmes cannot be seen. | Re-check the AERIAL and RF OUT connections.Set your TV to the TV channel correctly. |
| No operation by infrared Remote Control. | Check the batteries in the remote control. |
| Video or colour fades in and out when making a copy of a video tape. | You cannot copy a copyrighted video tape. You are experiencing copy guard protection. |
Make your contribution to the environment!!!

- Spent batteries do not belong in the dustbin.
- You can dispose of them at a collection point for spent batteries or special waste.
Contact your council for details.


Specifications
General Specifications
| Television system PAL B/G TV standard | |
| Video heads Rotary two-head helical scan system | |
| Tape width 12.65mm | |
| Tape speed SP :23.39mm/sec.LP :11.70mm/sec. | |
| Tuner channel E2~E12 E21~E69A~H (Only Italy)CATV | |
Note: This VCR complies with HYPER and OSCAR frequency bands of the CATV.
| RF converter Built-in UHF converter | ||
| Converter output UHF Channel | 22 to 69(adjustable) | |
| Timer indication 24-hour system | ||
| Operating temperature 5°C ~ 40°C | ||
| Terminals | AERIALRF OUTAUDIO/VIDEO | Coaxial type, femaleCoaxial type, male21 pin scart socket x 2 |
Electrical Specifications
| Video output level 1Vp-p | |
| Video output impedance 75Ω | unbalanced |
| Audio output level | -6dBv |
| Video input level 0.5~2.0Vp-p | |
| Audio input level | -10dBv |
| Video S/N ratio(STANDARD) | 45dB |
| Audio S/N ratio(STANDARD) | 41dB |
Other Specifications
| Power requirement | 220-240V~50Hz |
| Power consumption | 25 Watts |
| Dimensions | W 360mmH 92mmD 226mm |
| Weight | 2.4 Kg (approx.) |
Note: Designs and specifications are subject to change without notice.
Declaration of Conformity
EMC-Directive: 89 / 336 / EEC
Low Voltage Directive:73 / 23 / EEC
CE Marking: 93 / 68 / EEC
The Video Cassette Recorder VCR 4505
is in compliance with following norms:
EN 55013: 2001
EN 55020: 2002
EN 61000-3-2: 2000
EN 61000-3-3: 1995 + A1: 2001
EN 60065: 1998
CE



15
EN



Warranty
Warranty
This device is warranted for 24 months from the date of purchase (receipt).
During the warranty period, we will either repair or replace free of charge the device or its accessories*) if they are found to be defective due to faulty design or workmanship. Any warranty performances do not imply an extension of the Warranty or a claim on a new warranty!
The receipt serves as a proof of purchase. Without such proof, the product cannot be repaired or replaced free of charge.
To obtain warrantee service, please send the main appliance in its original packaging, together with the receipt, to your retailer.
*) Defective accessories do not necessarily imply the replacement of the whole appliance free of charge.
In this case, please call our hotline!
Broken glass or plastic parts are usually subject to charges!
Defective accessories or worn parts (e.g., motor electrodes, dough hooks, driving belts, spare remote control, spare tooth brushes, sawing blades, etc.), as well as cleaning, maintenance or replacement of worn parts are not covered by this Warranty and are therefore subject to charges!
Any unauthorized attempts to repair the product will void the Warranty.
After the Warranty expires
After the Warranty expiration date, any repairs performed by servicing or repair centres will be subject to charges.
- OTR (One Touch Recording)
- Features
- Supplied Accessories
- Important Copyright Information
- A Note About Recycling
- Model/Serial Number
- Safety Information
- WARNING:
- Precautions
- Power Supply
- Dew Warning
- Positioning
- Before Using This Product
- Video Cassette Tape
- Two Different Tape Speeds
- TV Colour System
- Description of Controls
- Front Panel
- Indicator
- Rear Panel
- To insert the batteries:
- Caution
- Installation
- Connecting the VCR
- VCR to TV Connection
- Other Connections
- Euro Scart (AV) Sockets
- AV1 (TV) Connection to TV
- AV2 (DECODER) Connection for Other External Devices
- External Input Mode
- Initial Settings
- Selecting the Language
- Changing the Language
- Video Channel Setting
- Setting the Clock
- Note:
- Channel Presetting
- Automatic Channel Preset
- Manual Channel Preset
- Before you preset Channel...
- To Select a Desired Channel
- To Skip a Preset Channel
- Channel Reprogramming
- Basic Operation
- Playback
- Tracking Adjustment
- Speed Search
- Still Picture
- Recording
- Viewing and Recording the Same Programme
- Skipping Unwanted Programme Material During Recording
- Recording One Programme While Viewing Another
- To Monitor the Progress of Your Recording
- Assemble Function
- Advanced Operations
- Counter Memory
- To Exit the Counter Memory
- Auto Repeat Playback
- To Stop Playback
- To Exit the Auto Repeat Mode
- Picture Select
- Automatic Operations
- Automatic Rewind, Eject, Off
- Tape Eject
- Real Time Tape Counter
- Timer Recording
- To Stop a Timer Programme Which Has Already Started
- To Correct Timer Programmes
- To Cancel or Check the Start/End Time
- Avoid Overlap of TIMER Programmes...
- Hint for Timer Recording
- Auto Return
- Using the AUTO RETURN Button
- Using the VCR Menu
- Watch the Recorded Timer Programme
- Parents Lock
- When Parents Lock is activated:
- Copying a Video Tape
- To Monitor the Recording
- A Status Display
- Maintenance
- Cabinet Cleaning
- Auto Head Cleaning
- Service
- Troubleshooting Guide
- Make your contribution to the environment!!!
- Specifications
- Declaration of Conformity
- Warranty
- After the Warranty expires
Brand : AEG
Model : VCR 4505
Category : VCR