Pandora 500 TTL - Machine à effets lumineux BeamZ - Free user manual and instructions
Find the device manual for free Pandora 500 TTL BeamZ in PDF.

| Product Type | Fog Machine |
| Model | Pandora 500 TTL |
| Brand | BeamZ |
| Power Consumption | 500 W |
| Power Supply | AC 230V / 50 Hz |
| Heating Time | approx. 5 minutes |
| Fog Output | up to 6,000 cu.ft/min |
| Fluid Tank Capacity | 1 liter |
| Control | Wired remote control included; optional DMX |
| Dimensions (L x W x H) | 400 x 250 x 250 mm |
| Weight | 4.5 kg |
| Fuse | 10 A |
| Safety Features | Thermal cut-off, automatic shut-off when empty |
| Cleaning | Use distilled water mixed with water-based fog fluid; clean tank weekly |
| Maintenance | Regularly inspect heating element; replace seals as needed |
| Spare Parts | Heating element, pump, remote control, fluid tank |
| Repairability | Modular design; user-accessible pump and heater; professional repair recommended |
| Operating Temperature | 5°C to 40°C |
| Warranty | 2 years |
Frequently Asked Questions - Pandora 500 TTL BeamZ
User questions about Pandora 500 TTL BeamZ
0 question about this device. Answer the ones you know or ask your own.
Ask a new question about this device
Download the instructions for your Machine à effets lumineux in PDF format for free! Find your manual Pandora 500 TTL - BeamZ and take your electronic device back in hand. On this page are published all the documents necessary for the use of your device. Pandora 500 TTL by BeamZ.
USER MANUAL Pandora 500 TTL BeamZ
natural_image
Empty white square with a thin border (no text or symbols)
CLASS 4 500mW RGB

PROFESSIONAL
PANDORA 500
INSTRUCTION MANUAL
GEBRUIKSAANWIJZING
GEBRAUCHSANLEITUNG
Congratulations to the purchase of this Beamz light effect. Please read this manual thoroughly prior to using the unit in order to benefit fully from all features.
Read the manual prior to using the unit. Follow the instructions in order not to invalidate the warranty. Take all precautions to avoid fire and/or electrical shock. Repairs must only be carried out by a qualified technician in order to avoid electrical shock. Keep the manual for future reference.
- Prior to using the unit, please ask advice from a specialist. When the unit is switched on for the first time, some smell may occur. This is normal and will disappear after a while.
- The unit contains voltage carrying parts. Therefore do NOT open the housing.
- Do not place metal objects or pour liquids into the unit This may cause electrical shock and malfunction.
- Do not place the unit near heat sources such as radiators, etc. Do not place the unit on a vibrating surface. Do not cover the ventilation holes.
- The unit is not suitable for continuous use.
- Be careful with the mains lead and do not damage it. A faulty or damaged mains lead can cause electrical shock and malfunction.
- When unplugging the unit from a mains outlet, always pull the plug, never the lead.
- Do not plug or unplug the unit with wet hands.
- If the plug and/or the mains lead are damaged, they need to be replaced by a qualified technician.
- If the unit is damaged to such an extent that internal parts are visible, do NOT plug the unit into a mains outlet and DO NOT switch the unit on. Contact your dealer. Do NOT connect the unit to a rheostat or dimmer.
- To avoid fire and shock hazard, do not expose the unit to rain and moisture.
- All repairs should be carried out by a qualified technician only.
- Connect the unit to an earthed mains outlet (220-240Vac/50Hz) protected by a 10-16A fuse.
- During a thunderstorm or if the unit will not be used for a longer period of time, unplug it from the mains. The rule is: Unplug it from the mains when not in use.
- If the unit has not been used for a longer period of time, condensation may occur. Let the unit reach room temperature before you switch it on. Never use the unit in humid rooms or outdoors.
-
During operation, the housing becomes very hot. Do not touch it during operation and immediately after.
-
To prevent accidents in companies, you must follow the applicable guide lines and follow the instructions.
- Secure the unit with an extra safety chain if the unit is ceiling mount. Use a truss system with clamps. Make sure nobody stands in the mounting area. Mount the effect at least 50cm away from inflammable material and leave at least 1 meter space on every side to ensure sufficient cooling.
- This unit contains high intensity LEDs. Do not look into the LED light to prevent damage to your eyes.
- Do not repeatedly switch the fixture on and off. This shortens the life time.
- Keep the unit out of the reach of children. Do not leave the unit unattended.
- Do not use cleaning sprays to clean switches. The residues of these sprays cause deposits of dust and grease. In case of malfunction, always seek advice from a specialist.
- Only operate the unit with clean hands.
- Do not force the controls.
- If the unit has fallen, always have it checked by a qualified technician before you switch the unit on again.
- Do not use chemicals to clean the unit. They damage the varnish. Only clean the unit with a dry cloth.
- Keep away from electronic equipment that may cause interference.
- Only use original spares for repairs, otherwise serious damage and/or dangerous radiation may occur.
- Switch the unit off prior to unplugging it from the mains and/or other equipment. Unplug all leads and cables prior to moving the unit.
- Make sure that the mains lead cannot be damaged when people walk on it. Check the mains lead before every use for damages and faults!
- The mains voltage is 220-240Vac/50Hz. Check if power outlet match. If you travel, make sure that the mains voltage of the country is suitable for this unit.
- Keep the original packing material so that you can transport the unit in safe conditions

This mark attracts the attention of the user to high voltages that are present inside the housing and that are of sufficient magnitude to cause a shock hazard.

This mark attracts the attention of the user to important instructions that are contained in the manual and that he should read and adhere to.

DO NOT LOOK DIRECTLY INTO THE LENS. This can damage your eyes. Persons who are subject to epileptic attacks should be aware of the effects that this light effect may have on them.
The unit has been certified CE. It is prohibited to make any changes to the unit. They would invalidate the CE certificate and their guarantee!
NOTE: To make sure that the unit will function normally, it must be used in rooms with a temperature between 5^ C/41°F and 35^ C/95°F.

Electric products must not be put into household waste. Please bring them to a recycling centre. Ask your local authorities or your dealer about the way to proceed.
NEDERLANDS
Immediately upon receiving a fixture, carefully unpack the carton, check the contents to ensure that all parts are present, and have been received in good condition. Notify the shipper immediately and retain packing material for inspection if any parts appear damage from shipping or the package itself shows signs of mishandling. Save the package and all packing materials. In the event that a fixture must be returned to the factory, it is important that the fixture be returned in the original factory box and packing.
Content:
1pcs Laser projector
1pcs Remote
1pcs Power cable
1pcs Manual
set Keys
LASER SAFETY
Before proceeding any further, please read the following safety page very carefully and it could help you avoid dangerous and hazardous situations which could lead to serious injury or property damage. Any laser system classified as a Class 4 laser must be used with caution only by professionals.
Make sure you follow these basic laser safety rules:
- Never look directly into a laser beam.
- Never look directly into laser aperture if the laser system is switched on.
- Be aware that lasers can burn the eye retina, skin or cause fires if not used properly.
- Never perform Audience Scanning, that's when laser beams and effects hit an audience directly. Always project with the laser above audience head level, at least 3m above floor level and 2.5 meters of horizontal separation is required between laser light and audience or other public spaces.

text_image
3 Meters- When performing outdoors, avoid pointing the laser at aircrafts, buses, trains, etc.
- Never leave the laser system unattended when it's switched on.
- Always check for reflective surfaces within the laser range, these can be very dangerous (i.e. mirror behind the bar in a club could bounce the beam into bar attendant's eye).
INSTALLATION

CAUTION: Please consider the respective national norms during the installation! The installation must only be carried out by an authorized employee or dealers!

Attention:
- The installation of the fixture has to be built and constructed in a way that it can hold 10 times the weight for 1 hour without any harming deformation.
- The installation must always be secured with a secondary safety attachment, e.g. an appropriate catch net. This secondary safety attachment must be constructed in a way that no part of the installation can fall down if the main attachment fails.
- Make sure the area below the installation place is free from unwanted persons during rigging, de-rigging and servicing.
- The operator has to make sure that safety-relating and machine-technical installations are approved by an expert before taking into operation for the first time and after changes before taking into operation another time.
- The operator has to make sure that safety-relating and machine-technical installations are approved by a skilled person once a year.
- The fixture should be installed in the position where persons cannot reach and where persons may walk by or be seated.

CAUTION: When installing the device, make sure there is no highly in inflammable material (decoration articles, etc.) in between a distance of min o.5 meter.


text_image
Clamp Safety-rope Adjust AnglePOWERSUPPLY
On the label on the backside of the light effect is indicated on this type of power supply must be connected. Check that the mains voltage corresponds to this, all other voltages than specified, the light effect can be irreparably damaged. The light effect must also be directly connected to the mains and may be used. No dimmer or adjustable power supply.
- Laser Aperture
- Key switch
- Sound sensitivity knob
- Sound active microphone
- ON/OFF switch
- Power input
- DMX in/out
- LCD function setting panel

text_image
REMOTE CLASS 4 500mW RGB PANDORA 500 beamZ PROFESSIONAL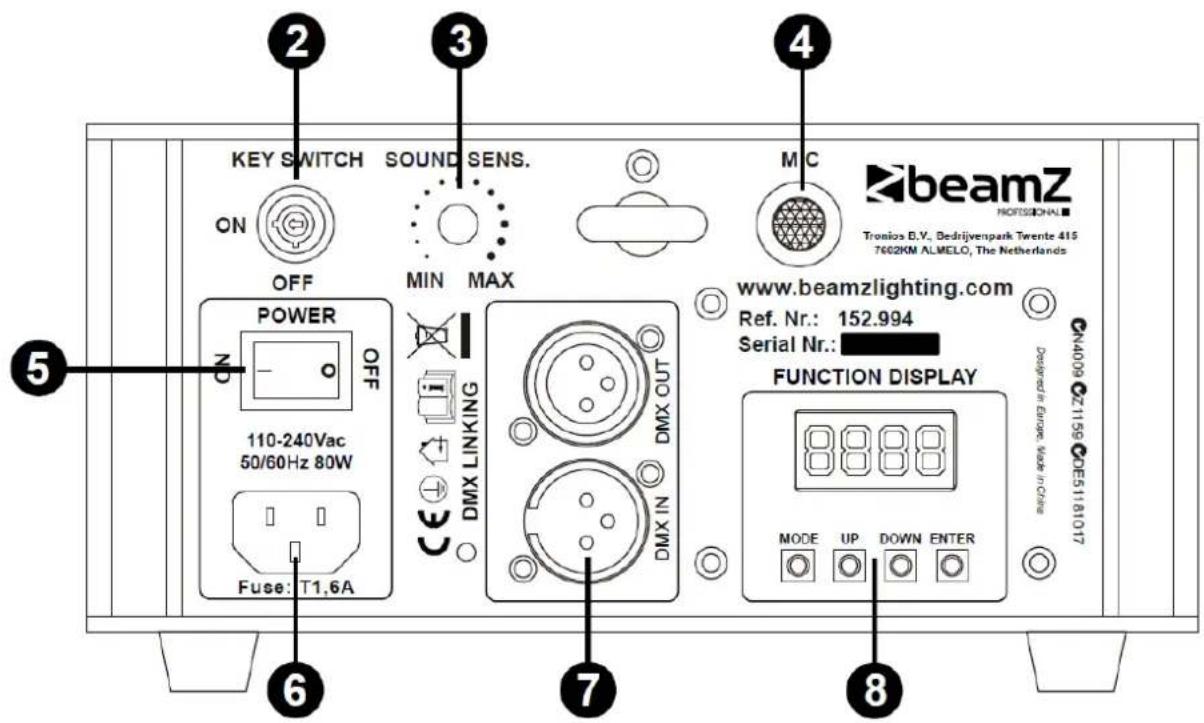
text_image
KEY SWITCH SOUND SENS. ON OFF MIN MAX MW MW MW MW MW MW MW MW MW MW MW MW MW MW MW MW MW MW MW MW MW MW MW MW MW MW MW MW MW MW MW MW MW MW MW MW MW MW MW MW MW MW MW MW MW MW MW MW MW MW 6 7 8 5 6 7 4 beamZ PROFESSIONAL Tronios B.V., Bedrijvenpark Twente 415 7602KM ALMELO, The Netherlands www.beamzlighting.com Ref. Nr.: 152.994 Serial Nr.: FUNCTION DISPLAY MODE UP DOWN ENTER Designed in Europe, Made in ChinaDISPLAY
FUNCTION DISPLAY

text_image
8888 MODE UP DOWN ENTERPress "MODE" to choose functions.
In "d***" mode, press "UP" or "DOWN" to select DMX address.
Press "ENTER" to save the current working mode or DMX address.
When laser is powered on, LCD monitor on rear panel shows the current operating standalone mode or DMX address of DMX mode. Press MODE to choose following modes as follows:
| Display Working mode Description | ||
| AUTO | Auto running mode Auto running program | |
| SOUD | Sound active mode Sound active running | |
| d*** | DMX mode | |
| SLAV | Slave mode | |
| OFF | Off Turn off the device | |
DMX MODE
This mode allows you to use universal DMX-512 console to operate.
- Install the units in a suitable position.
- Use standard XLR cable to connect your units together via the XLR connector on the rear of the units. For longer cable we suggest a terminator at the last fixture.
- Assign a DMX address to each the unit using the display.
- Turn on all units. Use DMX console to control your units.

text_image
KEY SWITCH SOUND SENS. ON OFF MIN MAX MIC beamZ Power ON 110-248Vac 56/6Hz 8W Fuse: T1.5A DMX LINKING DXK OUT www.beamzlighting.com Ref. Nr.: 152.994 Serial Nr.: FUNCTION DISPLAY 8888 MUSIC UP DOWN DOWN
text_image
KEY SWITCH SOUND SENS. ON OFF MIN MAX MIC POWER 110-240Vac 50/60Hz 80W Fuse: T1.6A MIN MAX DAX LINKING DAX OUT www.beamzlighting.com Ref. Nr.: 152.994 Serial Nr.: FUNCTION DISPLAY MODE UP DOWN EXTERDMX signal
DMX-512 CONNECTION
If you are using a standard DMX controller, you can connect the DMX output of the controller directly to the DMX input of the first unit in a DMX chain. If you wish to connect a DMX controller with other XLR outputs you will need to use adapter cables.
1 = Shield
2 = Signal (-)
3 = Signal (+)


DMX Output DMX Input 3-Pin XLR Socket 3-Pin XLR Socket
Connect the DMX output of the first unit in a DMX chain with the DMX input of the next unit in the chain. Always connect the output of one unit with the input of the next unit until all units are connected. If you use a controller with 5 pin DMX connection you will need to use a 5 pin to 3 pin adapter.
Caution at the unit, the DMX cable has to be terminated with a terminator. Solder a 120 Ohm resistor between Signal (-) and Signal (+) into a 3-pin XLR connector and plug this into the DMX output of the last unit in the chain.

| Channel Channel Function Value Description | ||||
| 1 Beam 1 | Mode select | 0 | Black out | |
| 001-049 | Manual mode, dynamic patterns running out-of-bounds; when the value is less than 5, the patterns size will shrink. | |||
| 050-099 | Manual mode, dynamic patterns running back-and-forth; when the value is less than 55, the patterns size will shrink. | |||
| 100-149 | Manual and sound mode, dynamic patterns running out-of-bounds; when the value is less than 105, the patterns size will shrink. | |||
| 150-199 | Manual and sound mode, dynamic patterns running back-and-forth; when the value is less than 155, the patterns size will shrink. | |||
| 200-229 Auto running each pattern (use CH2 to choose patterns) | ||||
| 230-255 Sound mode each pattern (use CH2 to choose patterns) | ||||
| 2 Beam 1 | Pattern select | 000-127 Selecting built-in 127 patterns | ||
| 128-255 Random changing the patterns | ||||
| 3 Beam 1 | Pattern size | 000-063 Manual adjust the size, from large to small | ||
| 064-255 | Dynamic size effect, each 32 value for a different zooming effect | |||
| 4 Beam 1 | Rotation | 000-063 Manual adjust the rotating position | ||
| 064-255 | Dynamic rotating effect, each 32 value for a different rotating effect | |||
| 5 Beam 1 | X-axis moving | 000-063 Manual adjust the horizontal movement | ||
| 064-255 | Dynamic effect of horizontal moving, each 32 value for a different moving effect | |||
| 6 Beam 1 | Y-axis moving | 000-063 Manual adjust the vertical movement | ||
| 064-255 | Dynamic effect of vertical moving, each 32 value for a different moving effect | |||
| 7 Beam 1 | Y-axis rolling | 000-063 Manual adjust the Y-rolling | ||
| 064-255 | Dynamic effect Y-rolling, each 32 value for a different rolling effect | |||
| 8 Beam 1 | X-axis rolling | 000-063 Manual adjust the X-rolling | ||
| 064-255 | Dynamic effect X-rolling, each 32 value for a different rolling effect | |||
| 9 Beam 1 | Drawing | 000-127 Manual drawing | ||
| 128-255 Auto drawing from slow to fast | ||||
| 10 Beam 1 | Scan speed 000-127 Choose scanning speed from slow to fast | |||
| Display dot 128-255 The larger the value, the sharper the dot | ||||
| 11 Beam 1 | Color setting | 000-127 | Manual choose the color, each 16 value for a different color. | |
| 128-191 | Every single color changing one by one automatically, from slow to fast | |||
| 192-255 Original pattern colors rolling change from slow to fast | ||||
| 12 Beam 2 | Mode select | 0 | Black out | |
| 001-049 | Manual mode, dynamic patterns running out-of-bounds; when the value is less than 5, the patterns size will shrink. | |||
| 050-099 | Manual mode, dynamic patterns running back-and-forth; when the value is less than 55, the patterns size will shrink. | |||
| 100-149 | Manual and sound mode, dynamic patterns running out-of-bounds; when the value is less than 105, the patterns size will shrink. | |||
| 150-199 | Manual and sound mode, dynamic patterns running back-and-forth; when the value is less than 155, the patterns size will shrink. | |||
| 200-229 Auto running each pattern (use CH2 to choose patterns) | ||||
| 230-255 Sound mode each pattern (use CH2 to choose patterns) | ||||
| 13 Beam 2 | Pattern select | 000-127 Selecting built-in 127 patterns | ||
| 128-255 Random changing the patterns | ||||
| 14 Beam 2 | Pattern size | 000-063 Manual adjust the size, from large to small | ||
| 064-255 | Dynamic size effect, each 32 value for a different zooming effect | |||
| 15 Beam 2 | Rotation | 000-063 Manual adjust the rotating position | ||
| 064-255 | Dynamic rotating effect, each 32 value for a different rotating effect | |||
| 16 Beam 2 | X-axis moving | 000-063 Manual adjust the horizontal movement | ||
| 064-255 | Dynamic effect of horizontal moving, each 32 value for a different moving effect | |||
| 17 Beam 2 | Y-axis moving | 000-063 Manual adjust the vertical movement | ||
| 064-255 | Dynamic effect of vertical moving, each 32 value for a different moving effect | |||
| 18 Beam 2 | Y-axis rolling | 000-063 Manual adjust the Y-rolling | ||
| 064-255 | Dynamic effect Y-rolling, each 32 value for a different rolling effect | |||
| 19 Beam 2 | X-axis rolling | 000-063 Manual adjust the X-rolling | ||
| 064-255 | Dynamic effect X-rolling, each 32 value for a different rolling effect | |||
| 20 Beam 2 | Drawing | 000-127 Manual drawing | ||
| 128-255 Auto drawing from slow to fast | ||||
| 21 Beam 2 | Scan speed 000-127 Choose scanning speed from slow to fast | |||
| Display dot 128-255 The larger the value, the sharper the dot | ||||
| 22 Beam 2 | Color setting | 000-127 | Manual choose the color, each 16 value for a different color | |
| 128-191 | Every single color changing one by one automatically, from slow to fast | |||
| 192-255 Original pattern colors rolling change from slow to fast | ||||
REMOTE CONTROL
- Power ON/OFF
- Auto mode
- Sound mode

text_image
POWER AUTO 3TROUBLE SHOOTING
- If the power indicator is off and the laser doesn't work, please check the power supply and the input.
- In Stand-Alone operation, if the power supply indicator is ON and sound active indicator is OFF, but the laser doesn't work.
A. The sound may be too small and cannot activate the laser running, please increase the music volume or increase sound sensitivity on rear panel.
B. Please check if unit has been set up in slave mode, or DMX mode.
- In Master-Slave operation, slave units don't running, please check as below.
A. Make sure there's only one master in the chain, and the others are set in slave mode.
B. Make sure to use a good quality power cable and XLR connector.
- In DMX operation, the unit can't be controlled by the DMX console, but the DMX signal indicator is flashing, please make sure the DMX console and unit have the same channel.
After trying the above solution you still cannot sort out the problem, please contact your dealer or our company for service.
TECHNICAL SPECIFICATION
Laser : 250mW red laser@650nm, 75mW green laser@532nm, 175mW blue laser@447nm
Guaranteed laser power : 400mW
Max. laser power : 500mW
Scanner system : 15K scanner
Modes : Sound Active, Auto run, DMX512 (22CH), Master/slave mode
Function : 3 pins XLR jack for DMX or Maser-Slave linking
Fuse : T1.6A
Rated voltage : AC1100\~240V 50/60Hz
Rated power : 80W
Dimensions per unit : 186 x 210 x 110mm
Weight (per unit) : 2.6Kg
The specifications are typical. The actual values can slightly change from one unit to the other. Specifications can be changed without prior notice.

ENGLISH : Attention! The use in France is only allowed to the professional user and not to the enduser. See decision: www.legifrance.gouv.fr

natural_image
Blue glossy circular logo with stylized white 't' shape (no text or symbols)tronios
Sound & Light
CE Declaration of Conformity
Importer: TRONIOS BV
Regulatory Requirement: EN 60598-1:2008+A11:2009
EN 60598-2-17:1989+A2:1991
EN 55015:2013
EN 61547:2009
EN 61000-3-2:2006+A2:2009
EN 61000-3-3:2013
EN 60825-1:2007
The product meets the requirements stated in Directives 2006/95 and 2004/108/EC and conforms to the above mentioned Declarations.
Almelo,
22-01-2015
P. Feldman
Signature :
