
ERA-301P2 - Robot dock SONY - Free user manual and instructions
Find the device manual for free ERA-301P2 SONY in PDF.
| Product Type | Robot Charging Station |
| Brand | SONY |
| Model | ERA-301P2 |
| Dimensions (L x H x D) | Approx. 65 × 45 × 75 mm |
| Weight | Approx. 90 g |
| Power Supply | 16 V DC (AC adapter ERA-201P1) |
| Power Consumption | 30 W |
| Output Voltage (charging) | 1.5 A at 16 V DC |
| Charging Time | Approx. 2 hours (for AIBO internal battery) |
| Display | Backlit LCD (size 15 × 40 mm) |
| Main Functions | Charging AIBO's internal battery; display panel for settings (date, time, time zone, volume) |
| Compatibility | AIBO series ERS-3×× |
| Required AC Adapter | ERA-201P1 (supplied with AIBO or optional) |
| Safety | Do not expose to rain or moisture; do not open the casing; do not use with children under 8 years old |
| Cleaning | Soft dry cloth; do not use solvents |
| Operating Temperature | 5 to 35 °C |
| Operating Humidity | 20 to 80% |
| Storage Temperature | -20 to 60 °C |
| Storage Humidity | 10 to 90% |
| Supplied Accessories | Instruction manual, mounting screws |
Frequently Asked Questions - ERA-301P2 SONY
User questions about ERA-301P2 SONY
0 question about this device. Answer the ones you know or ask your own.
Ask a new question about this device
Download the instructions for your Robot dock in PDF format for free! Find your manual ERA-301P2 - SONY and take your electronic device back in hand. On this page are published all the documents necessary for the use of your device. ERA-301P2 by SONY.
USER MANUAL ERA-301P2 SONY
AIBO Energy Station Core
Operation Instructions
ERA-301P2

English
Français
Deutsch
For Customers in the U.S.A. and Canada Safety Information
Owner's Record
The model number and serial number are located on the bottom of the station core. Record the serial number in the space provided below. Refer to the model and serial number whenever you call upon your Sony AIBO Customer Link.
Model No. ERA-301P2
Serial No. ____
For the Sony AIBO Customer Link, call 1-800-427-2988 in the U.S. or contact via email at aibosupprt@info.sel.sony.com
Warning
- To prevent fire or shock hazard, do not expose the unit to rain or moisture.
- To avoid electrical shock, do not open the enclosure. Refer servicing to qualified personnel only. (Contact the AIBO Customer Link on page 6.)
- Periodically examine the AC adapter for conditions that may result in the risk of fire, electrical shock, or injury to persons (such as damage to the cords, blades, housing) and in the event of such conditions, the AC adapter should not be used until properly repaired or replaced.
• Not intended for children under 8.
- ERA-301P2 Energy Station Core is only for use with the AIBO ERS-3×× Series System and should be powered only by the ERA-201P1 AC Adapter to charge the ERS-3×× Series Aibo Robot. (Refer to the operating instructions supplied with the AC Adapter.)
Regulatory Information
This equipment has been tested and found to comply with the limits for a Class B digital device, pursuant to Part 15 of the FCC Rules. These limits are designed to provide reasonable protection against harmful interference in a residential installation. This equipment generates, uses, and can radiate radio frequency energy and, if not installed and used in accordance with the instructions, may cause harmful interference to radio communications.
However, there is no guarantee that interference will not occur in a particular installation. If this equipment does cause harmful interference to radio or television reception, which can be determined by turning the equipment off and on, the user is encouraged to try to correct the interference by one or more of the following measures:
- Reorient or relocate the receiving antenna.
- Increase the separation between the equipment and receiver.
- Connect the equipment into an outlet on a circuit different from that to which the receiver is connected.
- Consult the dealer or an experienced radio/TV technician for help.
You are cautioned that any changes or modifications not expressly approved in this manual could void your authority to operate this equipment.
The shielded interface cable recommended in this manual must be used with this equipment in order to comply with the limits for a digital device pursuant to Subpart B of Part 15 of FCC Rules.
For Customers in Europe and Australia
Safety Information
WARNING
- To prevent fire or shock hazard, do not expose the unit to rain or moisture.
- To avoid electrical shock, do not open the enclosure. Refer servicing to qualified personnel only. (Contact the AIBO Customer Link on page 6.)
- Periodically examine the AC adapter for conditions that may result in the risk of fire, electric shock, or injury to persons (such as damage to the cords, blades, housing) and in the event of such conditions, the AC adapter should not be used until properly repaired or replaced.
- Not intended for children under 8 when this unit is used with AIBO.
- Caution! Only allow children at least 8 years old to use the Energy Station Core.
Explain that the Energy Station Core is not a toy and must not be played with. Give sufficient instruction so that the child is able to use the Energy Station Core in a safe way. - See also your AIBO’s Operating Instructions.
Regulatory Information
This product has been tested and found to conform to the following Safety Standards.
EMC Directive 89/336/EEC
EMI EN55022/98, EN55014/93 + A1/97+A2/99, EN50081-1/92
EMS : EN55024/98, EN55014-2/97, EN50082-1/97
The Energy Station Core has been tested all together as a system and found to conform to the following Safety Standards.
EN60335-1/94 + A11/95 + A12/98 + A14/98
EN60335-2-29/96
CE (EMC) Marking Conformity Remarks
a) This equipment complies with EN55022 Class B digital for use in the following areas: residential, business, and light-industrial.
b) This product conforms with the following European Directive: 89/336/EEC (EMC directive)
Customer Support
How can you contact the AIBO Customer Link?
In the United States and Canada:
1-800-427-2988 (U.S.A.)
Email address: aibosupport@info.sel.sony.com
In Europe:
English line: +44(0)-20-7365-2937
German line: +49(0)-69-9508-6309
French line: +33(0)-1-5569-5117
Email address: aibo@sonystyle-europe.com
In Australia:
+1300-36-2426 (toll free within Australia)
Email address: cicci@ap.sony.com
In Hong Kong:
+852-2345-2966
Email address: aibo_helpdesk@shk.sony.com.hk
In Singapore:
+65-473-8500
Email address: AIBO.Link@ap.sony.com
©2001 Sony Corporation. Reproduction in whole or in part without written permission is prohibited. All rights reserved.

natural_image
Abstract graphic of an orange sphere with a white abstract shape on black background (no text or symbols)OPEN-R
“OPEN-R” is the standard interface for the entertainment robot system that Sony is actively promoting. This interface expands the capability of the entertainment robot through a flexible combination of hardware and interchangeable software to suit various applications. AIBO ERS-3×× Series and Energy Station Core ERA-301P2 conform to the OPEN-R version 1.1.1.
- “AIBO” and the AIBO logo, “OPEN-R,” and the OPEN-R logo are registered trademarks of Sony Corporation.
- “Memory Stick,” “”, and “MEMORY STICK” are trademarks of Sony Corporation.
- All other systems and product names are trademarks of their respective holders. In this manual, “TM” and “©” are omitted.

http://www.aibo.com/
安全資訊
警告
© 2001 Sony Corporation

natural_image
Abstract graphic of an orange sphere with a white abstract shape on black background (no text or symbols)OPEN-R
Features of the Energy Station Core 12
Index to parts and controls 13
Attaching the Energy Station Core to the Stand 15
Charging AIBO's internal battery pack 17
Checking AIBO's settings 21
Making various settings 23
Setting the date and time 24
Setting the time zone 26
Setting the volume level 27
On handling the Energy Station Core 28
On cleaning 28
Limited warranty 29
Service procedure 32
Troubleshooting 33
Specifications 35
Time zone table 36
Features of the Energy Station Core
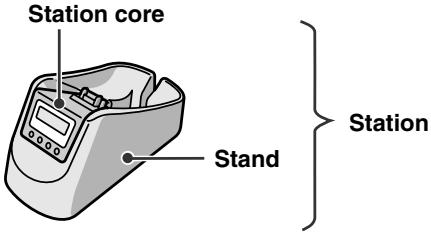
The Energy Station Core ERA-301P2 (referred to as the “station core” hereafter) is an AIBO ERS-3×× series-dedicated charging station core. The station core is used attached to the stand supplied with AIBO. (The set thus constituted by the station core and the stand is referred to as the “station” hereafter.)
The station provides the following functions:
- Charges AIBO's internal battery pack whenever you place AIBO on the station.
- Provides a display panel that allows you to make various AIBO settings without removing AIBO's extremities.
- Provides a backlight for the display panel that allows the battery charging level or the current time to be viewed under dark conditions.
- ERA-301P2 Energy Station Core is only for use with the AIBO ERS-3×× Series System and should be powered only by the ERA-201P1 AC Adapter to charge the ERS-3×× Series Aibo Robot. (Refer to the operating instructions supplied with the AC Adapter.)
Index to parts and controls
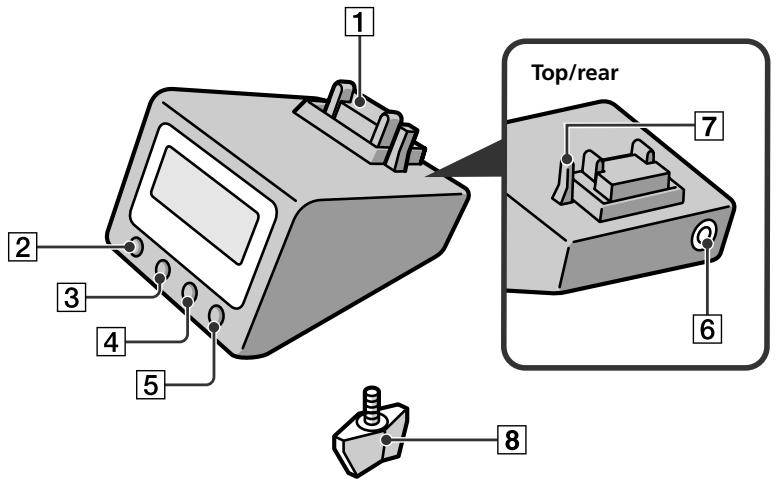
Display panel
1 Charging terminals
Charge AIBO's internal battery pack whenever AIBO is placed on the station. Makes contact with terminals on AIBO's stomach.
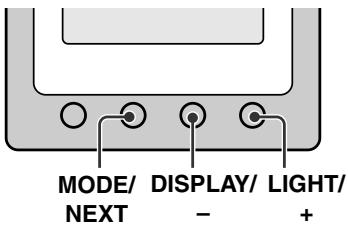
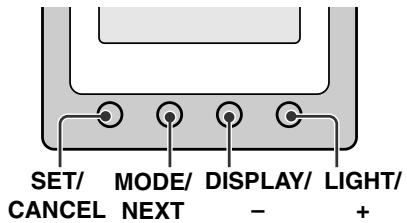
2 SET/CANCEL button
Press to put the station core into setting mode to make or cancel a setting. Press again to return to normal mode.
3 MODE/NEXT button
Press to change the indication in the display panel. In setting mode, pressing this button changes the setting item.
4 DISPLAY/– (minus) button
When the date or time indication is displayed, pressing this button changes the display format. In setting mode, each press of the button decreases the value to a next smaller one. Holding down the button decreases the value continuously.
5 LIGHT/+ (plus) button
In normal mode, press to turn on the backlight.
In setting mode, each press of the button increases the value to a next greater one. Holding down the button increases the value continuously.
6 AC Adapter terminal (on the rear of the station core)
Connect the AC adapter supplied with the AIBO or an optional AC adapter to this terminal.
7 Placement detection switch
Detects when AIBO is placed on the station.
8 Fixing screw (supplied)
Used to fix the station core to the stand (supplied with the AIBO).
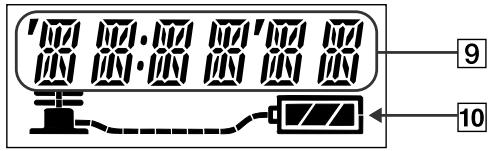
9 Date / time / time zone / volume level indication
10 Battery indicator
Indicates the charging level of AIBO's internal battery pack.
Attaching the Energy Station Core to the Stand
You can attach the station core to the stand supplied with AIBO as follows.
For ERS-3×× Series
1 Remove the decoration plate from the stand.
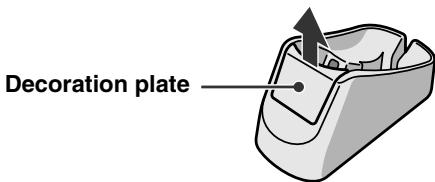
Note
To place the decoration plate back into the stand, match the projections on the plate with the grooves and push the plate into the stand.
2 Place the station core on the stand. Firmly grasp the set of station core and stand as illustrated, and turn it upside down. Fasten together the station core and the stand with the fixing screw.
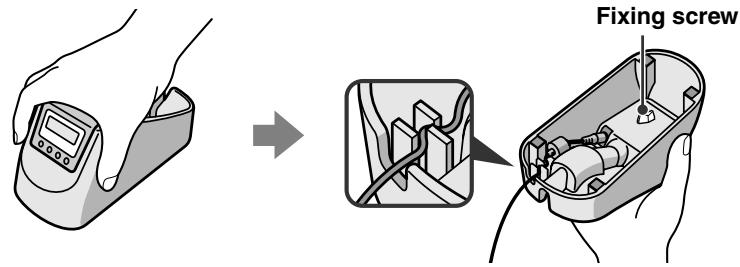
Notes
- The surfaces of the station core and stand are very smooth. Be careful not to drop them while handling.
- Do not tighten the fixing screw to an excessive degree.
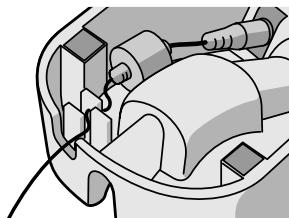
3 Connect the AC adapter (supplied with AIBO) to the station core, and pass the cord as illustrated.
natural_image
Mechanical assembly diagram showing a motor or engine component with no visible text or symbolsCharging AIBO's internal battery pack
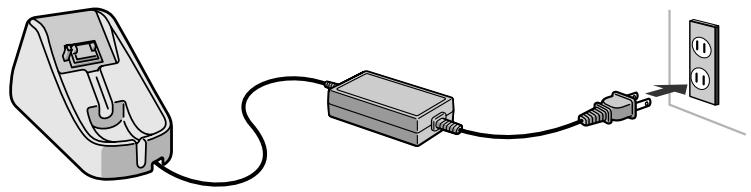
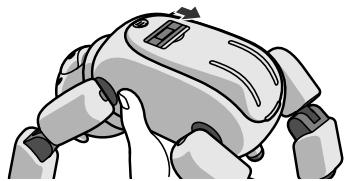
You can charge AIBO's internal battery pack by placing AIBO on top of the station after opening the charging terminal shutter on the cover of AIBO. It is recommended that you recharge the battery pack at room temperature (10°C to 30°C (50°F to 86°F)).
Note
Battery charging starts automatically when AIBO is put into a particular mode or state on top of the station. This particular mode or state differs with the model of AIBO and the AIBO-ware used.
1 Connect the AC adapter to a wall outlet.
natural_image
Illustration of a plug-in electrical outlet connected to a socket and cable (no text or symbols)2 After putting AIBO into pause mode (by pressing the pause button to turn off the back light) or putting it into charging posture, open the charging terminal shutter on the cover.
natural_image
Illustration of a robotic hand gripping a device (no text or symbols visible)3 Place AIBO on top of the station.
The time indication appears in the display panel of the station core.
Notes
- You do not need to use the supplied AC adapter conversion plug.
- For details on AIBO's charging posture, refer to the User's Guide for the respective AIBO-ware.
- The AIBO charging posture may not be displayed by certain AIBO-ware.
- When AIBO is not on top of the station, no information is displayed in the display panel.
If in that state you attempt to display information, the LCD display flashes for several seconds to indicate that AIBO is not on the station. - If the battery pack is not set in AIBO, the battery indicator does not appear.
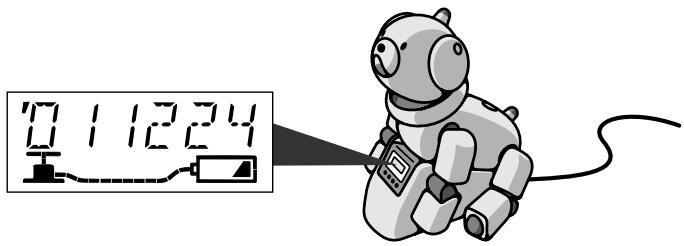
While charging is taking place
The handle of the pump indication in the display panel moves up and down. The battery indicator indicates the charging level.
The handle moves up and down.

flowchart
graph LR
    A["Pump"] --> B["Hose"]
    B --> C["Battery indicator"]
Charging level
| Nearly empty | Half full | Almost full | Full |
 |  |  |  |
Note
If the pump hose stays unlit, it indicates that charging is not taking place.
When AIBO's battery is fully charged
The handle of the pump indication in the display panel stops moving, and the whole length of the hose becomes lit.
Note
If all the charging level bars flash simultaneously, it means the battery pack is not charging properly. If this occurs, check that the battery pack is inserted correctly. If the flashing continues, the battery pack may be defective. Stop charging the battery pack immediately and contact the AIBO Customer Link.
Checking AIBO's settings
While AIBO is on top of the station, use the MODE/NEXT button to check its settings.
To change the information display
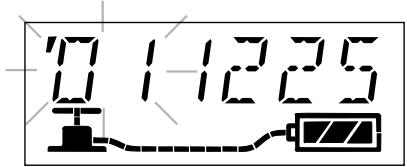
Press the MODE/NEXT button. Each press of the button changes the display as follows.
date → time → time zone → volume level
To change the date and time display formats
With the date or time indication being displayed, press the DISPLAY/– button. Each press of the button changes the display format as follows.
- Date: “YYMMDD” (year, month, day) → “MMDDYY” → “DDMMYY”
• Time: 12-hour clock → 24-hour clock
Notes
- The date and time formats return to their default settings when the station core is disconnected from the wall outlet. Set the formats again when you connect the station to a wall outlet again.
- The default setting for the date format is “year, month, day”. The default setting for the time format is 12-hour clock.
To turn on the display panel backlight
Press the LIGHT/+ button. The backlight stays on for about 60 seconds when AIBO is on the station, and for about four seconds when not.
Making various settings
When AIBO is on top of the station, you can set various items, such as the clock and volume level.
Notes
- To cancel the setting operation before finished, press the SET/CANCEL button. The display returns to the state before starting the setting operation.
- When AIBO is not on the station, you cannot change the settings. If you attempt to change the settings, the LCD display will flash for several seconds to indicate that AIBO is not on the station.
Setting the date and time
Note that the following description assumes that the date display format is “YYMMDD” (year, month, day).
1 Press the MODE/NEXT button repeatedly until the date and time indication appears.
2 Press the SET/CANCEL button.
The year indication starts to flash.
3 Use the DISPLAY/− or LIGHT/+ buttons to set the year. Then press the MODE/NEXT button.
The month indication starts to flash.
4 Use the DISPLAY/– or LIGHT/+ buttons to set the month. Then press the MODE/NEXT button.
The day indication starts to flash.
5 Use the DISPLAY/– or LIGHT/+ buttons to set the day. Then press the MODE/NEXT button.
The hour indication starts to flash.
6 Use the DISPLAY/– or LIGHT/+ buttons to set the hour. Then press the MODE/NEXT button.
The minute indication starts to flash.
7 Use the DISPLAY/− or LIGHT/+ buttons to set the minute. Then press the MODE/NEXT button.
The setting is entered and the date and time indication resumes.
Setting the time zone
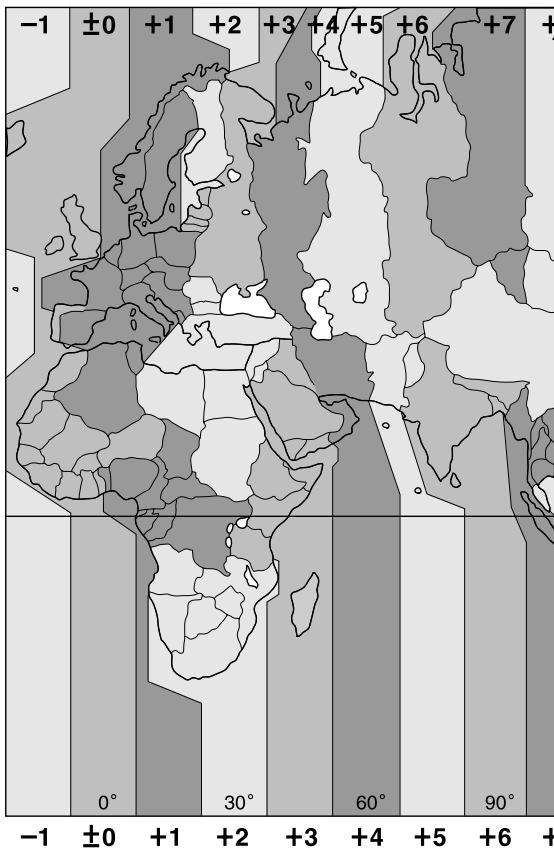
By setting the time zone, you specify the difference in hours from the time at the current location and the UTC (Universal Time Coordinated) time. The difference is expressed as a whole number from -12 to +12. For example, the time zone for Japan is +9. For details on the time zones of the world, see “Time zone table” on pages 36 and 37.
1 Press the MODE/NEXT button repeatedly until the time zone indication appears.
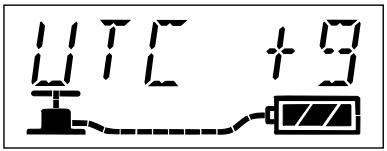
2 Press the SET/CANCEL button.
The time zone indication starts to flash.
3 Use the DISPLAY/– or LIGHT/+ buttons to change the time zone. Then press the MODE/NEXT button.
The setting is entered and the time zone indication resumes.
Note
The time zone function does not support daylight savings.
1 Press the MODE/NEXT button repeatedly until the volume level indication appears.
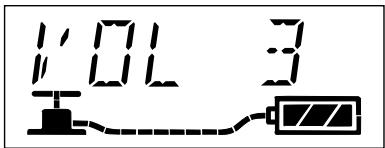
2 Press the SET/CANCEL button.
The current volume level setting starts to flash.
3 Use the DISPLAY/− or LIGHT/+ buttons to change the volume level. Then press the MODE/NEXT button.
The setting is entered and the volume level indication resumes. The volume level can be set to four levels. If you select “0,” AIBO’s musical tone is muted.
On handling the Energy Station Core
- While AIBO is on top of the station, do not place any object near it that might interfere with its movements.
- Do not touch the charging terminal directly with your hand. Doing so may soil the terminal and cause poor contact.
- Do not press down hard on the station core with your hand or elbow.
- Do not drop or shake the station core as this may damage it.
- Do not leave the station core in very hot places, such as a car parked in the sun, as this may deform or damage it.
- Do not allow the station core to get wet.
- For details on the battery pack or the AC adapter supplied with AIBO, refer to the operating instructions supplied with AIBO.
On cleaning
- Clean the station core with a dry, soft cloth.
- Do not use volatile solvents that may damage the station core's surface finish.
- If you are using a chemical dustcloth or the like, follow the instructions for its usage.
For the customers in the U.S.A.
Limited warranty
SONY ELECTRONICS INC. (“SONY”) warrants this Product and its accessories against defects in material or workmanship as follows:
- PRODUCTS: For a period of one (1) year from the date of purchase, SONY will, at its option, either repair or replace the defective parts and/or the Product (i.e., Energy Station) with new or rebuilt replacements. After this one (1) year period, you must pay all parts and labor charges.
- ACCESSORIES: For a period of thirty (30) days from the date of purchase, SONY will, at its option, either repair or replace defective parts and/or accessories (i.e., AC adapter and battery pack) with new or rebuilt replacements. After this thirty (30) day period, you must pay all parts and labor charges.
- REPAIRS: For a period equal to the longer of (a) the remainder of the original limited warranty period on the original Product or accessory, or (b) for 90 days after the date of repair/replacement of Products or for 30 days after the date of repair/ replacement of accessories, SONY will repair or replace defective parts, accessories and/or Products used in the repair or replacement of Products or accessories under this Limited Warranty with new or rebuilt replacements.
To obtain warranty service, you must first obtain an event number from AIBO Customer Link (page 6). You will need to return the Product and all accessories to SONY in the original carton, using the original packaging materials. All supplied accessories must be returned with the Product. SONY is not responsible for any damage during shipment arising from the failure to properly pack the Product or accessory being returned to SONY or for any damage caused by or resulting from the carrier's handling. For information on returning your Product or accessories for warranty repair, please contact the AIBO Customer Link.
This warranty does not cover customer instruction, installation or set up adjustments.
This warranty does not cover the cost of removal or reinstallation, cosmetic damage or damage due to acts of God, accident, misuse, abuse, negligence of, or to any part of the Product. This warranty does not cover lost profits, lost sales, loss of use of the Product, or other consequential loss or damage due to improper operation or maintenance, installation, connection to improper voltage supply, or attempted repair by anyone other than a facility authorized by SONY to service the Product. This warranty does not cover Products sold AS IS or WITH ALL FAULTS, or consumables (such as fuses). This warranty does not apply when the malfunction results from use of the Product in conjunction with accessories, products or ancillary or peripheral equipment not manufactured by SONY, and where it is determined by SONY that there is no fault with the Product itself.
SONY will pay shipping charges for all in-warranty service. However, if no trouble is found with the Product or accessory, if the trouble is from a non-covered charge or if it is determined that the warranty period has expired, you will be billed for the cost of shipping and handling.
This warranty is valid only in the United States.
Proof of purchase in the form of a bill of sale or receipted invoice which is evidence that the unit is within the Limited Warranty period must be presented to obtain warranty service.
This warranty is invalid if the factory applied serial number has been altered or removed from the Product.
REPAIR OR REPLACEMENT AS PROVIDED UNDER THIS WARRANTY IS THE EXCLUSIVE REMEDY OF THE CONSUMER. SONY SHALL NOT BE LIABLE FOR ANY INCIDENTAL OR CONSEQUENTIAL DAMAGES FOR BREACH OF ANY EXPRESSED OR IMPLIED WARRANTY ON THIS PRODUCT. EXCEPT TO THE EXTENT PROHIBITED BY APPLICABLE LAW, ANY IMPLIED WARRANTY OF MERCHANTABILITY OR FITNESS FOR A PARTICULAR PURPOSE ON THIS PRODUCT IS LIMITED IN DURATION TO THE DURATION OF THIS LIMITED WARRANTY.
Some states do not allow the exclusion or limitation of incidental or consequential damages, or allow limitations on how long an implied warranty lasts, so the above limitations or exclusions may not apply to you. This warranty gives you specific legal rights, and you may have other rights which vary from state to state.
For your convenience, SONY ELECTRONICS INC. has established telephone numbers for product information regarding the Entertainment Robot. Please call:
AIBO CUSTOMER LINK
1-800-427-2988
or write to: aibosupport@info.sel.sony.com
Other information about AIBO is also available on the internet site at: www.aibo.com/
For customers in the U.S.A.
Service procedure
- Contact the AIBO Customer Link. The E-mail address is aibosupport@info.sel.sony.com and its toll free number is 1-800-427-2988.
- If the AIBO Customer Link determines that your unit needs repair, follow the procedure described below.
a. The AIBO Customer Link will give you the event number, which is valid for ten days.
b. Following the procedure described on the label attached to the box, put AIBO or the designated accessories into the original box. If you did not keep the original box, the AIBO Customer Link will send a new box to you free of charge within the warranty period. Shipping and material cost will be charged to you if the warranty period has expired.
c. Mark your event number on the top of the box and send it to the designated address. The AIBO Customer Link will designate the shipping method and pay the shipping charges within the warranty period; after the warranty period, you must pre-pay the shipping charges.
d. As soon as the repair is completed, your AIBO or the accessories will be sent back to you. After the warranty period has expired, the actual shipping cost will be charged to you together with the repair cost.
- Please understand that the AIBO Customer Link only accepts credit cards for all the charges of repair, shipping and material after the warranty period has expired.
User registration
All users are registered based on information from the purchaser.
If a different person takes over this unit, please inform the “AIBO Customer Link” of the change.
Troubleshooting
If you experience any of the following difficulties, use this troubleshooting guide to remedy the problem. Should the problem persist, contact the AIBO Customer Link (page 6).
| Symptom | Cause/Remedy |
| The AIBO icon in the display panel flashes when you press a button on the station core. | AIBO is not placed on the station correctly.→ Place AIBO on the station correctly (page 17). |
| The display panel does not light up even when AIBO is on the station. | The connection between the station core, AC adapter, and the wall outlet is not correct.→ Reconnect these items properly (page 15). |
| All of the charging level bars of AIBO icon flash simultaneously. | The battery pack is not inserted into AIBO.→ Insert the battery pack and place AIBO on the station (page 17). |
| All of the charging level bars of the Battery indicator flash simultaneously. | The battery pack has not been charged properly.→ Make sure that the battery pack is correctly set in AIBO's body. If the symptom persists, contact the AIBO Customer Link immediately. |
| Charging does not start even when AIBO is placed on the station. | Heat may have built up in the battery pack.Wait for a while until the battery pack becomes cool.Battery charging starts automatically when AIBO is put into a particular mode or state on top of the station. This particular mode or state differs with the model of AIBO and the AIBO-ware used.For details, refer to the User’s Guide for the AIBO-ware used. |
Specifications
Power requirements
16 V DC
Power consumption
30 W
Output voltage
1.5 A at 16 V DC (for charging AIBO's internal battery pack)
Charging time
Approx.2 hours* (for charging AIBO's internal battery pack) (page 15)
Display LCD with back-lighting
Size: Approx. 15 × 40 mm ( ^19/32 × 1^5/8 in.)
Dimensions Approx. 65 × 45 × 75 mm
(2^5/8×1^13/16×3in.)(w/h/d)
Mass Approx. 90 g (3 oz)
Operating temperature
5 to 35°C (41 to 95°F)
Operating humidity
20 to 80%
Storage temperature
-20 to 60°C (-4 to 140°F)
Storage humidity
10 to 90%
Supplied accessories
Operating Instructions
Fixing screw
* The charging time may depend on AIBO's conditions, ambient temperature, and so on.
Design and specifications are subject to change without notice.
Time zone table
Use this table to enter the appropriate time zone.
geo
| Latitude | Longitude | Value | | -------- | --------- | ----- | | -1 | -1 | ±0 | | -1 | 0 | ±0 | | -1 | 30 | +1 | | -1 | 60 | +2 | | -1 | 90 | +3 | | -1 | +5 | +4 | | -1 | +6 | +5 | | -1 | +7 | +6 | | +1 | -1 | +1 | | +1 | 0 | +2 | | +1 | 30 | +3 | | +1 | 60 | +4 | | +1 | 90 | +5 | | +2 | -1 | +2 | | +2 | 0 | +3 | | +2 | 30 | +4 | | +2 | 60 | +5 | | +2 | 90 | +6 | | +3 | -1 | +3 | | +3 | 0 | +4 | | +3 | 30 | +5 | | +3 | 60 | +6 | | +3 | 90 | +7 | | +4 | -1 | +4 | | +4 | 0 | +5 | | +4 | 30 | +6 | | +4 | 60 | +7 | | +4 | 90 | +8 | | +5 | -1 | +5 | | +5 | 0 | +6 | | +5 | 30 | +7 | | +5 | 60 | +8 | | +5 | 90 | +9 | | +6 | -1 | +6 | | +6 | 0 | +7 | | +6 | 30 | +8 | | +6 | 60 | +9 | | +6 | 90 | +10 | | +7 | -1 | +7 | | +7 | 0 | +8 | | +7 | 30 | +9 | | +7 | 60 | +10 | | +7 | 90 | +11 | | -1 | 0 | 0 | | -1 | 30 | 1 | | -1 | 60 | 2 | | -1 | 90 | 3 | | -2 | 0 | 2 | | -2 | 30 | 3 | | -2 | 60 | 4 | | -2 | 90 | 5 | | -2 | +5 | 6 | | -2 | +6 | 7 | | -2 | +7 | 8 | | -2 | +8 | 9 | | -2 | +9 | 10 | | -2 | +10 | 11 | | -2 | +11 | 12 | | -2 | +12 | 13 | | -2 | +13 | 14 | | -2 | +14 | 15 | | -2 | +15 | 16 | | -2 | +16 | 17 | | -2 | +17 | 18 | | -2 | +18 | 19 | | -2 | +19 | 20 | | -2 | +20 | 21 | | -2 | +21 | 22 | | -2 | +22 | 23 | | -2 | +23 | 24 | | -2 | +24 | 25 | | -2 | +25 | 26 | | -2 | +26 | 27 | | -2 | +27 | 28 | | -2 | +28 | 29 | | -2 | +29 | 30 | | -2 | +30 | 31 | | -2 | +31 | 32 | | -2 | +32 | 33 | | -2 | +33 | 34 | | -2 | +34 | 35 | | -2 | +35 | 36 | | -2 | +36 | 37 | | -2 | +37 | 38 | | -2 | +38 | 39 | | -2 | +39 | 40 | | -2 | +40 | 41 | | -2 | +41 | 42 | | -2 | +42 | 43 | | -2 | +43 | 44 | | -2 | +44 | 45 | | -2 | +45 | 46 | | -2 | +46 | 47 | | -2 | +47 | 48 | | -2 | +48 | 49 | | -2 | +49 | 50 | | -2 | +50 | 51 | | -2 | +51 | 52 | | -2 | +52 | 53 | | -2 | +53 | 54 | | -2 | +54 | 55 | | -2 | +55 | 56 | | -2 | +56 | 57 | | -2 | +57 | 58 | | -2 | +58 | 59 | | -2 | +59 | 60 | | -2 | +60 | 61 | | -2 | +61 | 62 | | -2 | +62 | 63 | | -2 | +63 | 64 | | -2 | +64 | 65 | | -2 | +65 | 66 | | -2 | +66 | 67 | | -2 | +67 | 68 | | -2 | +68 | 69 | | -2 | +69 | 70 | | -2 | +70 | 71 | | -2 | +71 | 72 | | -2 | +72 | 73 | | -2 | +73 | 74 | | -2 | +74 | 75 | | -2 | +75 | 76 | | -2 | +76 | 77 | | -2 | +77 | 78 | | -2 | +78 | 79 | | -2 | +79 | 80 | | -2 | +80 | 81 | | -2 | +81 | 82 | | -2 | +82 | 83 | | -2 | +83 | 84 | | -2 | +84 | 85 | | -2 | +85 | 86 | | -2 | +86 | 87 | | -2 | +87 | 88 | | -2 | +88 | 89 | | -2 | +89 | 90 |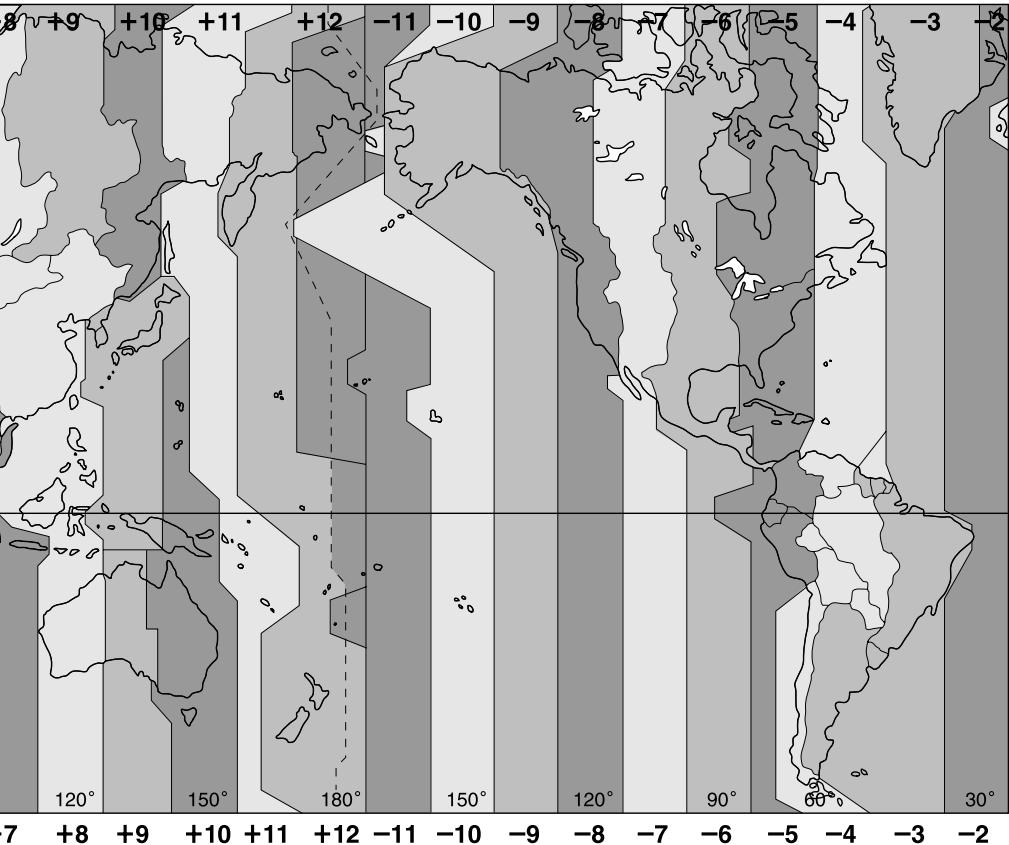
heatmap
| Latitude | Longitude | Value | | -------- | --------- | ----- | | +9 | 7 | +9 | | +10 | 8 | +10 | | +11 | 9 | +11 | | +12 | 10 | +12 | | -11 | 11 | -11 | | -10 | 12 | -10 | | -9 | 13 | -9 | | -8 | 14 | -8 | | -7 | 15 | -7 | | -6 | 16 | -6 | | -5 | 17 | -5 | | -4 | 18 | -4 | | -3 | 19 | -3 | | -2 | 20 | -2 |Directive EMC 89/336/EEC
EMI EN55022/98, EN55014/93 + A1/97 + A2/99, EN50081-1/92
EMS : EN55024/98, EN55014-2/97, EN50082-1/97
natural_image
Abstract graphic of an orange sphere with a gray abstract shape on black background (no text or symbols)OPEN-R
natural_image
Mechanical assembly diagram showing a motor or gearbox with no visible text or symbolsnatural_image
Illustration of an electrical plug connected to a power outlet (no text or symbols)natural_image
Illustration of a robotic hand gripping a device (no text or symbols visible)natural_image
Abstract graphic of an orange sphere with a white abstract shape on black background (no text or symbols)OPEN-R
natural_image
Mechanical assembly diagram showing a tool interacting with a component (no text or symbols visible)natural_image
Illustration of a plug-in electrical outlet connected to a power strip (no text or symbols)natural_image
Illustration of a robotic hand gripping a device (no text or symbols visible)Printed on recycled paper
Printed in Japan
- AIBO Energy Station Core
- For Customers in the U.S.A. and Canada Safety Information
- Owner's Record
- Warning
- Regulatory Information
- For Customers in Europe and Australia
- Safety Information
- Customer Support
- 安全資訊
- 警告
- OPEN-R
- Features of the Energy Station Core
- Index to parts and controls
- Charging terminals
- SET/CANCEL button
- MODE/NEXT button
- DISPLAY/– (minus) button
- LIGHT/+ (plus) button
- AC Adapter terminal (on the rear of the station core)
- Placement detection switch
- Fixing screw (supplied)
- Date / time / time zone / volume level indication
- Battery indicator
- Attaching the Energy Station Core to the Stand
- Note
- Notes
- Charging AIBO's internal battery pack
- Connect the AC adapter to a wall outlet.
- While charging is taking place
- Charging level
- When AIBO's battery is fully charged
- Checking AIBO's settings
- To change the information display
- To change the date and time display formats
- To turn on the display panel backlight
- Making various settings
- Setting the date and time
- Setting the time zone
- On handling the Energy Station Core
- On cleaning
- For the customers in the U.S.A.
- Limited warranty
- For customers in the U.S.A.
- Service procedure
- User registration
- Troubleshooting
- Specifications
- Time zone table
Brand : SONY
Model : ERA-301P2
Category : Robot dock