
CLIE PEGA-WL110 - PDA SONY - Free user manual and instructions
Find the device manual for free CLIE PEGA-WL110 SONY in PDF.

User questions about CLIE PEGA-WL110 SONY
0 question about this device. Answer the ones you know or ask your own.
Ask a new question about this device
Download the instructions for your PDA in PDF format for free! Find your manual CLIE PEGA-WL110 - SONY and take your electronic device back in hand. On this page are published all the documents necessary for the use of your device. CLIE PEGA-WL110 by SONY.
USER MANUAL CLIE PEGA-WL110 SONY
Operating Instructions
Mode d'emploi
US
FR
CLIÉ
GEAR
PEGA-WL110
Owner's Record
The model number and serial number are located at the rear of the product. Record the model number and the serial number in the space provided below. Refer to them whenever you call upon your Sony dealer regarding this product.
Model Number : PEGA-WL110
Serial Number : ____
For customers in the U.S.A. and Canada :
NOTICE
This equipment has been tested and found to comply with the limits for a Class B digital device, pursuant to part 15 of the FCC Rules. These limits are designed to provide reasonable protection against harmful interference in a residential installation.
This equipment generates, uses and can radiate radio frequency energy and, if not installed and used in accordance with the instructions, may cause harmful interference to radio communications.
However, there is no guarantee that interference will not occur in a particular installation. If this equipment does cause harmful interference to radio or television reception, which can be determined by turning the equipment off and on, the user is encouraged to try to correct the interference by one or more of the following measures:
— Change the direction and position of the receiving antenna.
— Increase the distance between the equipment and receiver.
— Connect the equipment into an outlet on a circuit different from that to which the receiver is connected.
— Consult the dealer or an experienced radio/TV technician for help.
FCC WARNING
Changes or modifications not expressly approved by the party responsible for compliance could void the user's authority to operate the equipment.
Declaration of Conformity
Trade Name : SONY
Model No. : PEGA-WL110
Responsible Party : Sony Electronics Inc.
Address : 680 Kinderkamack Road, Oradell, NJ 07649 USA
Telephone No. : 201-930-6972
This device complies with part 15 of the FCC Rules.
Operation is subject to the following two conditions:
(1) This device may not cause harmful interference, and
(2) this device must accept any interference received, including interference that may cause undesired operation.
FCC Radiation Exposure Statement:
The available scientific evidence does not show that any health problems are associated with using low power wireless devices. There is no proof, however, that these low power wireless devices are absolutely safe. Low power Wireless devices emit low levels of radio frequency energy (RF) in the microwave range while being used. Whereas high levels of RF can produce health effects (by heating tissue), exposure to low level RF that does not produce heating effects causes no known adverse health effects. Many studies of low level RF exposures have not found any biological effects. Some studies have suggested that some biological effects might occur, but such findings have not been confirmed by additional research. The Wireless LAN Card (PEGA-WL110) has been tested and found to comply with the Federal Communications Commission (FCC) guidelines on radio frequency energy (RF) exposures. The maximum SAR levels tested for the Wireless LAN Card (PEGA-WL110) has been shown to be 0.962 W/kg at body.
The term “IC:” before the radio certification number only signifies that Industry Canada technical specifications were met.
Operation is subject to the following two conditions: (1) this device may not cause interference, and (2) this device must accept any interference, including interference that may cause undesired operation of the device.
To prevent radio interference to the licensed service, this device is intended to be operated indoors and away from windows to provide maximum shielding. Equipment (or its transmit antenna) that is installed outdoors is subject to licensing.
IC Exposure of Humans to RF Fields
The installer of this radio equipment must ensure that the antenna is located or pointed such that it does not emit RF field in excess of Health Canada limits for the general population; consult Safety Code 6, obtainable from Health Canada's website:www.hc-sc.gc.ca/rpb
This Class B digital apparatus complies with Canadian ICES-003.
For customers in Europe:
Sony Corporation hereby declares that this Wireless LAN Card is in compliance with the essential requirements and other relevant provisions of the European Directive 1999/5/EC (R&TTE).
To obtain a copy of the Declaration of Conformity (DoC) with the R&TTE Directive, please access the following URL address: http://www.compliance.sony.de
In some countries the use of the Wireless LAN Card is restricted. Before using it, make sure you read the Wireless LAN Regulations leaflet of this product.
Warnings
- In some situations or environments, the use of the IEEE 802.11b technology might be restricted by the proprietor of the building or responsible representatives of the organization, for example on board of airplanes, in hospitals or in any other environment where the risk of interference with other devices or services is perceived or identified as harmful.
- If you are uncertain about the policy applying to the use of IEEE 802.11b technology in a specific organization or environment, you are encouraged to first ask for authorization prior to switching it on.
-
Consult your physician or the manufacturer of personal medical devices (pacemakers, hearing aids, etc.) regarding any restrictions on the use of IEEE 802.11b technology.
-
Sony, SONY, CLIÉ, CLIÉ, CLIÉ GEAR, CLIÉ, VAIOL, Jog Dial and Memory Stick are trademarks of Sony Corporation.
- Palm OS and HotSync are registered trademarks of Palm, Inc. or its subsidiaries. Palm Desktop and HotSync logo are trademarks of Palm, Inc. or its subsidiaries.
- Microsoft, Windows and Windows NT are registered trademarks of Microsoft Corporation in the United States and/or other countries.
- Adobe and Adobe Acrobat Reader are trademarks of Adobe Systems Incorporated.
- All other names of systems, products and services are trademarks of their respective owners. In the manual, the TM or ® marks are not specified.
Before using the PEGA-WL110, make sure you read the End User Software License Agreement that accompanies it.
• Copyright laws prohibit reproducing the software or the manual accompanying it in whole or in part, or renting the software without the permission of the copyright holder.
- In no event will SONY be liable for any financial damages, or loss of profits, including claims made by third parties, arising out of the use of the software supplied with this unit.
- If a problem occurs with this product as a result of defective manufacturing, SONY will replace it. However, SONY bears no other responsibility.
- The software provided with this unit cannot be used with other units.
- Please note that, due to continued efforts to improve quality, the software specifications may be changed without notice.
- Operation of this unit with software other than that provided is not covered by the warranty.
Table of Contents
Introduction....7
Names of Parts 9
Inserting/Removing the Wireless LAN Card 10
Installing the Software 12
Performing Communications via a Wireless LAN Access Point (Infrastructure Mode)....14
Basic Settings 14
Advanced Settings 20
Connecting your CLIÉ Handheld to a Wireless LAN 21
Performing Communications Directly between your CLIÉ Handheld and Another Device on a Wireless LAN (Ad-Hoc Mode) ...... 23
Basic Settings 23
Connecting your CLIÉ Handheld to Another Device on a Wireless LAN 30
Performing a HotSync Operation via a Network with a Wireless LAN Card 32
Troubleshooting 34
Precautions on Use 37
Specifications 38
Introduction
This product is a Wireless LAN Card for the Sony Personal Entertainment Organizer (referred to as CLIÉ handheld after this) with Palm OS 5 (ver. 5.0 or later). This product complies with IEEE 802.11b* and allows you to access the Internet without wires in locations where there is a Wi-Fi certified Wireless LAN access point.
* Wi-Fi certified.
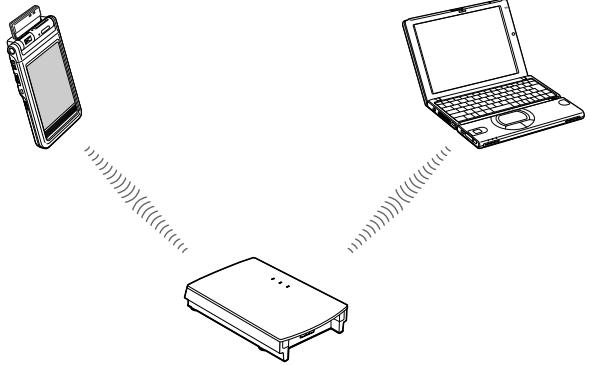
Performing a HotSync operation
You can perform a HotSync operation via a network (synchronize data without wires) between your CLIÉ handheld and a personal computer. For details on HotSync operation, see the Operating Instructions of your CLIÉ handheld.
PEGA-WL110 and CLIÉ handheld
natural_image
Line drawing showing three devices: a smartphone, a laptop, and a device with signal waves (no text or symbols)Wireless LAN access point
Personal computer

natural_image
Line drawing of a laptop computer with blank screen and keyboard (no text or symbols)Accessing the Internet
With the Wireless LAN card installed and configured, you can access the Internet, browse various websites, or send/receive e-mail from your CLIÉ handheld through a Wireless LAN access point.
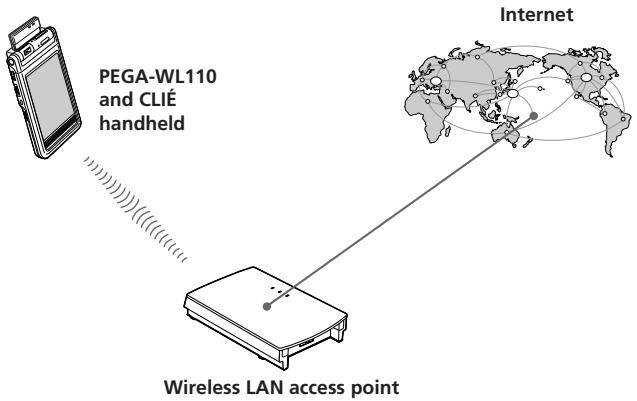
Notes
- To access the Internet through a Wireless LAN access point, you need to be a subscriber to a telecommunications company and an Internet Service Provider (ISP) in advance.
- You may need a personal computer to set a Wireless LAN network. For details, see the Operating Instructions of your Wireless LAN access point.
Names of Parts
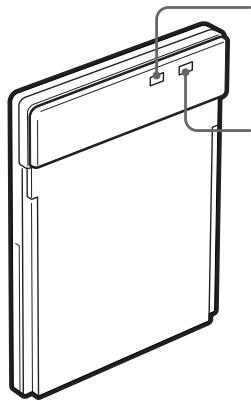
Wireless LAN Card
Front
natural_image
Technical line drawing of a rectangular electronic device with a flat top and side panels (no text or symbols)PWR (Power) indicator
Lights up while your CLIÉ handheld turns on.
LNK (Link) indicator
Blinks while your CLIÉ handheld initializes Wireless LAN card or when your CLIÉ handheld tries to connect to a Wireless LAN access point. Lights up while the access is connected.
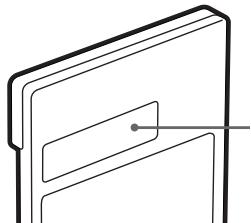
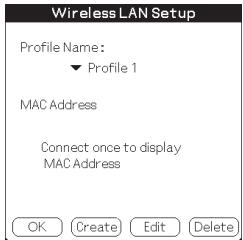
Rear
natural_image
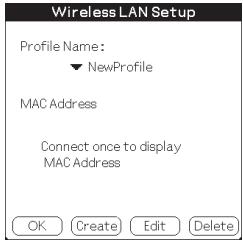
Pure line drawing of a book or folder structure without any text, numbers, or symbolsMAC Address
This address may be used by your System Administrator.
Other items included
CD-ROM (1)
Hard case (1)
Operating Instructions (1)
Warranty card (1)
End-User's License Agreement (1)
Inserting/Removing the Wireless LAN Card
Inserting the Wireless LAN card in your CLIÉ handheld
Insert the Wireless LAN card into the Wireless Communication Slot of the CLIÉ handheld.
Notes
- Insert the Wireless LAN card squarely into the slot.
- Do not insert the Wireless LAN card in the wrong way. Forcing it in the wrong way will damage it and cause a malfunction.
- You may be unable to use the Wireless LAN card when the remaining power of the battery in the CLIÉ handheld is low. Before use, charge the battery fully.
- If your CLIÉ handheld does not recognize the Wireless LAN card after insertion, remove the card and insert it into the slot again.
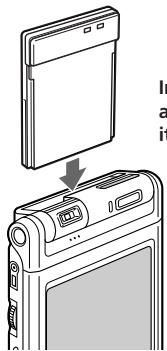
Insert the Wireless LAN card all the way into the slot until it is connected.
Removing the Wireless LAN card from your CLIÉ handheld
After use, stop all communication. Then, pull the Wireless LAN card up and out, keeping it straight.
When using this Wireless LAN card with a Flip&Rotate style CLIÉ handheld
Do not rotate the display when the Wireless LAN card is inserted in the Wireless Communication Slot of the CLIÉ handheld. This may press the display panel against the Wireless LAN card and cause a malfunction.
Note
During communication, do not remove the Wireless LAN card or subject the CLIÉ handheld to excessive shock.
Installing the Software
When you try to perform Wireless LAN communications for the first time after inserting the Wireless LAN card in your CLIÉ handheld, you need to install the Wireless LAN utility on your CLIÉ handheld. You can install the Wireless LAN utility by using the supplied CD-ROM.
Tip
The Wireless LAN utility supplied with your Wireless LAN card (PEGA-WL110) can be used with both PEGA-WL100 and PEGA-WL110.
If you are using the PEGA-WL100, also install the Wireless LAN utility by using the supplied CD-ROM with your Wireless LAN card (PEGA-WL110).
Note
Before installation, it is necessary to have Palm Desktop for CLIÉ installed and to perform a HotSync operation. Connect the CLIÉ handheld to a Windows computer, using a cradle, etc. For details on how to connect the CLIÉ handheld to the computer, see the Operating Instructions of your CLIÉ handheld.
1 Perform a soft reset on your CLIÉ handheld.
For details on how to perform a soft reset, see the Operating Instructions of your CLIÉ handheld.
2 Insert the supplied CD-ROM in the CD-ROM drive of your Windows computer.
The installer starts and the initial screen appears.
Tip
If the installer does not start automatically, double-click [setup] (setup.exe) which can be found on the CD-ROM.
3 Proceed with the installation, following the installer's instructions.
On the user name selection screen, select a user's name.
Note
If you want to use more than one CLIÉ handheld, you need to install this utility on each CLIÉ handheld.
4 Click [Done] in Install Tool window.
Your computer is ready to install the Wireless LAN utility on your CLIÉ handheld. In the next step, you will perform a HotSync operation to carry out the installation.
5 Click the Ⓧ icon in the task tray (Notification area) that is located in the bottom right-hand corner of the Windows display on your computer.
The [Local USB] check box should be selected in the shortcut menu on the display.
Tip
If you cannot find the 🎨 icon in the task tray (Notification area), click [Programs] ([All Programs] in Windows® XP), [Sony Handheld], and then [HotSync Manager] to start up the HotSync manager, from the [Start] menu.
6 Execute a local HotSync operation on your CLIÉ handheld.
The Wireless LAN utility is installed on your CLIÉ handheld.
Note
Part of this software application extends into the system of CLIÉ handheld. Therefore, it cannot be uninstalled.
After you perform a hard reset
Make sure you reinstall this utility.
After a hard reset, normally, the backup data on a personal computer is automatically restored to your CLIÉ handheld through a HotSync operation. However, this utility restores only the setting file when a HotSync operation is performed, and it does not restore the utility itself. Therefore, it is necessary to reinstall this utility after a hard reset.
Performing Communications via a Wireless LAN Access Point (Infrastructure Mode)
You can wirelessly access the Internet or perform communications with another communication device through a Wireless LAN access point.
Basic Settings
Before setting up
You first need to input a couple of values to set the Wireless LAN access point you use. Check the following values in advance.
[NetworkID (SSID)]: It is also called ESS-ID or Network Name.
[WE P (Wired Equivalent Privacy)]: It is also called Encryption.
For details, ask your System Administrator. If you have a Wireless LAN access point for your personal use, refer to the operating instructions of the Wireless LAN access point.
Note
The Wireless LAN card uses a channel between 1ch. and 11ch.(2.4 GHz frequency band). If your Wireless LAN access point uses a channel between 12ch. and 14ch., it is impossible to perform communications using the Wireless LAN card.
1 Insert the Wireless LAN card in the Wireless Communication Slot of your CLIÉ handheld.
2 Tap the [Prefs] icon on the home screen of your CLIÉ handheld.
The [Preferences] screen appears.
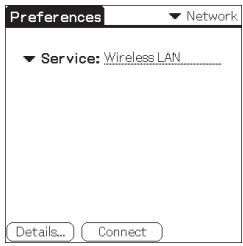
3 Tap ▼ in the top right-hand corner of the screen, and select [Network].
The [Network] screen appears.
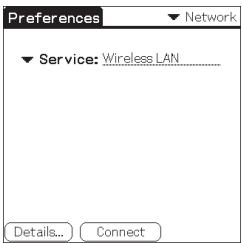
4 Tap ▼ next to [Service], and select [Wireless LAN].
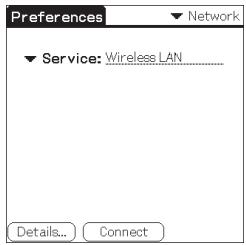
5 Tap [Details...] in the bottom left-hand corner of the screen. The [Wireless LAN Setup] screen appears.
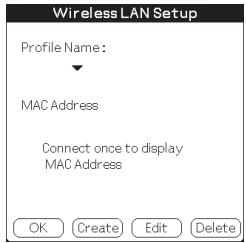
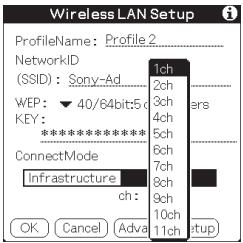
6 Tap [Create].
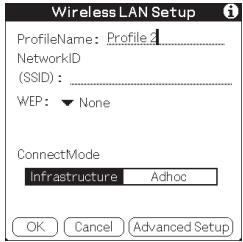
A new input screen of [Wireless LAN Setup] appears.
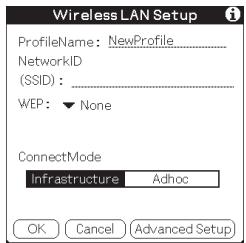
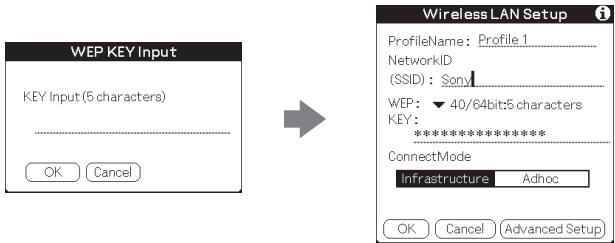
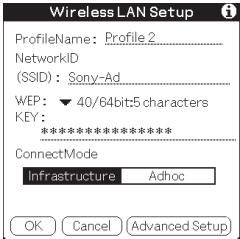
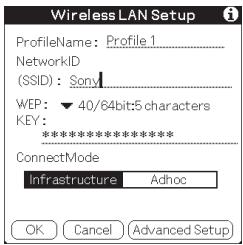
Check that [Infrastructure] is selected (highlighted) in [ConnectMode]. If it is not selected, tap [Infrastructure].
Tip
Tapping the ① mark in the top right-hand corner of the screen shows a brief explanation of the settings.
7 Enter a profile name in [ProfileName].
Specify a name freely according to the name of the other communication device, Wireless LAN access point, etc.

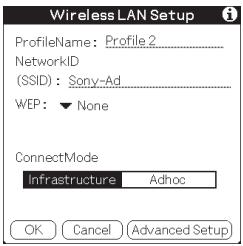
8 Enter a network ID in [NetworkID (SSID)].
Network ID (SSID) depends on the Wireless LAN access point you are using. Make sure you enter the network ID (SSID) that is specified by your Wireless LAN access point.

Note
The Network ID is case-sensitive. Be careful when entering a Network ID.
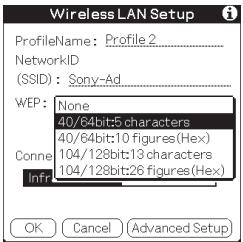
9 Select the encryption level in [WEP].
WEP (encryption level) is fixed depending on the Wireless LAN access point you use. Be sure to select the encryption that is used by your Wireless LAN access point.
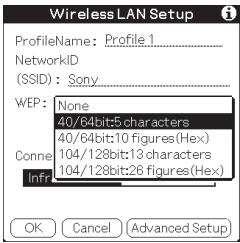
Tip
When you select [None] in [WEP], you do not need to enter a WEP key. In this case, skip the next step, and go to Step 11.
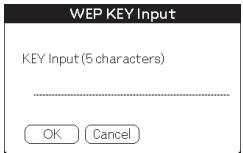
10 Enter a WEP key.
The WEP key is fixed, depending on the Wireless LAN access point you use. Make sure you enter the WEP key that is specified by your Wireless LAN access point.
When you select 40/64bit: alphanumeric string (5 characters)
Enter a 5-digit password using alphabetical characters (a-z, A-Z), numbers (0-9) and symbols.
When you select 40/64bit: hexadecimal notation (10 figures (Hex))
Enter a 10-digit password using alphabetical characters (a-f, A-F) and numbers (0-9).
When you select 104/128bit: alphanumeric string (13 characters)
Enter a 13-digit password using alphabetical characters (a-z, A-Z), numbers (0-9) and symbols.
When you select 104/128bit: hexadecimal notation (26 figures (Hex))
Enter a 26-digit password using alphabetical characters (a-f, A-F) and numbers (0-9).
Note
The WEP key is case-sensitive when entering in ASCII. Be careful when entering a WEP key.
Tips
- WEP key is the function that encrypts data that are to be sent by radio waves.
- Depending on the manufacturer, the above WEP keys might have different names.
11 Tap [OK].
The basic settings are completed for the profile name you set in Step 7.
12 Tap the Home icon on your CLIÉ handheld.
The home screen appears.
Modifying the settings
1 Tap the [Prefs] icon on the home screen of your CLIÉ handheld. The [Preferences] screen appears.
2 Tap ▼ in the top right-hand corner of the screen, and select [Network].
The [Network] screen appears.
3 Tap ▼ next to [Service], and select [Wireless LAN].
4 Tap [Details...] in the bottom left-hand corner of the screen.
The [Wireless LAN Setup] screen appears.
5 Tap ▼ below [ProfileName], and select the profile name you want to modify.
6 Tap [Edit] at the bottom of the screen.
The [Wireless LAN Setup] input screen appears.
7 Modify the settings.
8 Tap [OK].
9 Tap the Home icon.
The home screen appears.
Deleting the profile you have set
1 In Step 6 of "Modifying the settings" above, tap [Delete] at the bottom of the screen.
The selected profile is deleted.
2 Tap [OK].
3 Tap the Home icon.
The home screen appears.
Note
Do not modify the settings while the Wireless LAN card is being connected to the Wireless LAN access point.
Advanced Settings
Setting a network manually
When it is necessary to set a network IP address or DNS address, follow the procedure below.
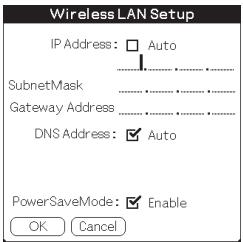
1 Tap [Advanced Setup] in the bottom right-hand corner of the [Wireless LAN Setup] input screen.
2 Tap the [Auto] check box in [IP Address] or [DNS Address]. The check mark disappears.
The IP Address input screen or the DNS Address input screen appears.
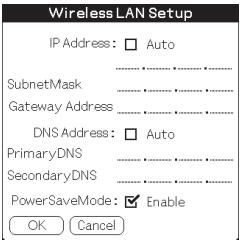
3 Enter necessary addresses.
4 Tap [OK] when you complete the setting.
Disabling the power saving mode
1 Tap [Advanced Setup] in the bottom right-hand corner of the [Wireless LAN Setup] input screen.
2 Tap the [Enable] check box in [PowerSaveMode]. The check mark disappears.
The power saving mode is disabled.
Tip
When the communication conditions are not good, you can disable the power saving mode to maximize the battery power and achieve better communications. However, it will make the battery life shorter.
Normally, the power saving mode is recommended.
Connecting your CLIÉ Handheld to a Wireless LAN
1 Insert the Wireless LAN card in the Wireless Communication Slot of your CLIÉ handheld.
2 Tap the [Prefs] icon on the home screen of your CLIÉ handheld.
The [Preferences] screen appears.
3 Tap ▼ in the top right-hand corner of the screen, and select [Network].
The [Network] screen appears.
4 Tap ▼ next to [Service], and select [Wireless LAN].

Tip
If you have set only one profile, go to Step 8.
5 Tap [Details...] in the bottom left-hand corner of the screen. The [Wireless LAN Setup] screen appears.
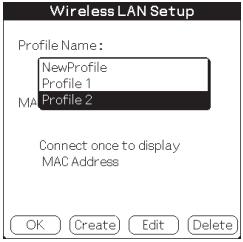
6 Tap ▼ below [Profile Name], and select the profile name you want to use.

7 Tap [OK].
The [Preferences] screen appears again.
8 Tap [Connect] at the bottom of the screen.
Your CLIÉ handheld begins to connect to a Wireless LAN. When a connection is established, start up the application you like.
Performing Communications Directly between your CLIÉ Handheld and Another Device on a Wireless LAN (Ad-Hoc Mode)
Your CLIÉ handheld can communicate directly with another device on a wireless LAN without using a Wireless LAN access point.
The Ad-hoc mode settings and communications require network knowledge.
Basic Settings
1 Insert the Wireless LAN card in the Wireless Communication Slot of your CLIÉ handheld.
2 Tap the [Prefs] icon on the home screen of your CLIÉ handheld.
The [Preferences] screen appears.
3 Tap ▼ in the top right-hand corner of the screen, and select [Network].
The [Network] screen appears.
4 Tap ▼ next to [Service], and select [Wireless LAN].
Continued on next page
5 Tap [Details...] in the bottom left-hand corner of the screen. The [Wireless LAN Setup] screen appears.
6 Tap [Create].
A new input screen of [Wireless LAN Setup] appears.

Tip
Tapping the ① mark in the top right-hand corner of the screen shows a brief explanation of the setting.
7 Enter a profile name in [ProfileName].
Specify a name freely according to the name of the other communication device, Wireless LAN access point, etc.
8 Enter a network ID in [NetworkID (SSID)].
Enter an alphanumeric string of your choice. The same network ID (SSID) needs to be entered in both your CLIÉ handheld and the other communication device.
9 Select the encryption level in [WEP].
Make sure you select the same encryption level for both your CLIÉ handheld and the other communication device.
Tip
When you select [None] in [WEP], you do not need to enter a WEP key. In this case, skip the next step, and go to Step 11.
10 Enter a WEP key.
Be sure to enter the same WEP key in both your CLIÉ handheld and the other communication device.
For details on WEP key, see pages 17-18.

11 Tap [Adhoc] in [ConnectMode].
The Ad-hoc mode is selected as the connection type.
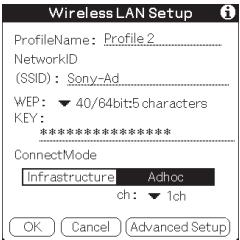
12 Tap ▼ next to [ch] below [Adhoc], and select a channel.
Make sure to select the same channel for both your CLIÉ handheld and the other communication device. Select a channel from 1 to 11.
13 Tap [Advanced Setup] in the bottom right-hand corner of the screen.
14 Tap the [Auto] check box in [IP Address]. The check mark disappears.
The IP address input screen appears.
Note
Ad-hoc mode may not be established if "Auto" is selected.
Auto IP is only possible when a PC has DHCP and shares an Internet connection. Most of the time, the user has to enter a static IP on the CLIÉ handheld for the Ad-hoc mode.
15 Enter an IP address and a sub-netmask.
Enter different IP addresses on your CLIÉ handheld and the other communication device.
Enter the same Subnet mask on your CLIÉ handheld and the other communication device.
(e.g.)
IP address
CLIÉ handheld: 192.168.0.1
Other device: 192.168.0.2
Subnet mask
CLIÉ handheld/other device:
255.255.255.0
Wireless LAN Setup
IP Address: □ Auto
192 168 0 1
SubnetMask
255 255 255 0
Gateway Address
DNS Address: ☑ Auto
PowerSaveMode: ☑ Enable
OK Cancel
Note
The user has to find the Subnet mask from the PC that he/she wants to connect to. Proceed as follows to find a Subnet mask on your PC.
Windows 98 and Windows ME:
From [Start] → [Run...] → type in 'winipcfg' → the [IP configuration] dialog box appears → check the IP address and Subnet mask.
Windows 2000 and Windows XP:
From [Start] → [Run...] → type in 'cmd' → type 'ipconfig/all' → check the IP address and Subnet mask.
Tip
Enter a gateway address if necessary. When it is necessary to enter a DNS address, tap and tick the checkbox of [Auto] in [DNS Address] before entering the DNS address.
16 Tap [OK].
The [Wireless LAN Setup] screen appears.
17 Tap [OK].
The settings are completed in the profile name you set in Step 7.
18 Tap the Home icon on your CLIÉ handheld.
The home screen appears.
Modifying the settings
1 Tap the [Prefs] icon on the home screen of your CLIÉ handheld. The [Preferences] screen appears.
2 Tap ▼ in the top right-hand corner of the screen, and select [Network].
The [Network] screen appears.
3 Tap ▼ next to [Service], and select [Wireless LAN].
4 Tap [Details...] in the bottom left-hand corner of the screen.
The [Wireless LAN Setup] screen appears.
5 Tap ▼ below [ProfileName], and select the profile name you want to modify.
6 Tap [Edit] at the bottom of the screen.
The [Wireless LAN Setup] input screen appears.
7 Modify the settings.
8 Tap [OK].
9 Tap the Home icon.
The home screen appears.
Deleting the profile you have set
1 In Step 6 of "Modifying the settings" above, tap [Delete] at the bottom of the screen.
The [Delete Profile] confirmation dialog window appears.
2 Tap [OK] to confirm deletion or [Cancel] to cancel the deletion.
3 Tap the Home icon.
The home screen appears.
Note
Do not modify the settings while the Wireless LAN card is being connected to the Wireless LAN access point.
Connecting your CLIÉ Handheld to Another Device on a Wireless LAN
1 Insert the Wireless LAN card in the Wireless Communication Slot of your compatible CLIÉ handheld.
2 Tap the [Prefs] icon on the home screen of your CLIÉ handheld.
The [Preferences] screen appears.
3 Tap ▼ in the top right-hand corner of the screen, and select [Network].
4 Tap ▼ next to [Service], and select [Wireless LAN].
Tip
If you have set only one profile, go to Step 8.
5 Tap [Details...] in the bottom left-hand corner of the screen. The [Wireless LAN Setup] screen appears.
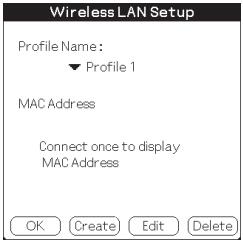
6 Tap ▼ below [Profile Name], and select the profile name you want to use.
7 Tap [OK].
The [Preferences] screen appears again.
8 Tap [Connect] at the bottom of the screen.
Your CLIÉ handheld begins to connect to a Wireless LAN. When a connection is established, start up the application you like.
Note
In the Ad-hoc mode, your CLIÉ handheld waits for a reaction from the selected device. If the selected device is out of connectable range, or a setting above is wrong (e.g. the setting for IP Address, SSID, or WEP is wrong), [Connected] is displayed on the screen of your CLIÉ handheld.
Performing a HotSync Operation via a Network with a Wireless LAN Card
This Wireless LAN card can be used in various ways. For example, you can perform a HotSync operation with a Windows computer via a Wireless LAN. Follow the procedures below.
Preparing your computer
1 Click the Ⓧ icon in the Windows task tray (Notification area) in bottom right-hand corner of the taskbar and select [Network] from the shortcut menu.
2 Click the Ⓧ icon in the Windows task tray (Notification area) again and select [Setup] from the shortcut menu.
The [Setup] screen is displayed.
3 Click the [Network] tab, then click the check box next to the user name for HotSync.
4 Click [TCP/IP Settings], and enter a Subnet Mask.
5 Click [OK].
6 Connect your CLIÉ handheld to your computer, and perform a local USB HotSync operation.
The computer information is transferred to your CLIÉ handheld. When you perform a HotSync operation via a Wireless LAN, your CLIÉ handheld identifies the computer based on the information transferred.
Preparing your CLIÉ handheld
Follow the steps below to set up your CLIÉ handheld for a HotSync operation via a Wireless LAN.
1 Select [Wireless LAN] in [Service] on the [Network] screen of [Preferences], and select a profile name for a HotSync operation on the [Wireless LAN details] screen.
For details, see the Steps 1 to 6 of “Connecting your CLIÉ Handheld to a Wireless LAN” on pages 21 and 22.
2 Rotate the Jog Dial navigator to select HotSync and press the Jog Dial navigator on the Application Launcher screen.
The [HotSync] screen is displayed.
You can also tap the [HotSync] icon to display the HotSync screen.
3 Tap the ☐ Menu icon, and tap [Primary PC Setup] from the [Option] menu.
4 Check that correct data is entered in [Primary PC Address] and [Subnet Mask(optional)], and tap [OK].
5 Tap the 📄 Menu icon, and tap [Modem Sync Prefs] from the [Option] menu.
6 Tap [Network], and tap [OK].
7 When the HotSync screen appears, tap [Modem], and then tap [Select Service].
8 Tap ▼ next to [Service], select [Wireless LAN], and tap [Done].
Tip
You do not have to enter a telephone number in [Enter phone #].
Note
It is also necessary to select [Wireless LAN] in [Service] on the [Network] screen of the [Preferences] that can be started from the home screen.
Performing a HotSync operation
When you have finished preparing your CLIÉ handheld and your computer, tap the [HotSync] icon on the [HotSync] screen.
Your CLIÉ handheld automatically connects to the network and begins a HotSync operation.
When communication is not possible
In Step 3 above, erase the [Primary PC Name].
Troubleshooting
If any problem occurs, for example, if communication is not possible, or if the unit does not operate normally, please check the points listed in this troubleshooting guide.
Visit Sony CLIÉ support website:
Customers in the U.S.A. and Canada:
http://www.ita.sel.sony.com/support/clie/access/
Customers in Europe:
http://www.clie-link.com/
Customers in Asia-Pacific and Mexico:
http://vaio-online.sony.com/clie/
If the problem persists, contact the Sony dealer where you purchased this product or a Sony service representative serving your area.
| Symptom | Cause/Remedy |
| Your CLIÉ handheld does not recognize this Wireless LAN card. (Although your CLIÉ handheld starts to connect, the LED indicator on the Wireless LAN card does not blink.) | → Tap the [CF Utility] icon on the home screen of your CLIÉ handheld, then check whether Card Info is correct, taking the following steps.Remove the Wireless LAN card from your CLIÉ handheld, then insert the Wireless LAN card into the slot again.Wireless LAN utility for this Wireless LAN card (PEGA-WL110) is not installed. Install the Wireless LAN utility for this card (PEGA-WL110) by using the supplied CD-ROM. For details, see “Installing the Software” on page 12. |
| You cannot connect your CLIÉ handheld to an Wireless LAN access point. | The Wireless LAN access point switches off.→ Turn the Wireless LAN access point on.A service other than [Wireless LAN] is selected in [Network] of [Preferences].→ Select [Wireless LAN] in [Service].The settings for Profile are not correct.→ Correct the settings of Network ID(SSID), WEP key, etc. Check the setting for Wireless LAN access point also. |
| You cannot connect your CLIÉ handheld to an Wireless LAN access point. | An obstacle may be blocking off radio waves (e.g., metal plate, concrete block, water) between your CLIÉ handheld and the Wireless LAN access point.→ Move your CLIÉ handheld and/or the Wireless LAN access point to a different place.→ Disable the power saving mode. For details, see “Advanced Settings” on page 20.The channel of the Wireless LAN access point is not set from 1ch. to 11ch..→ Change the channel setting of the Wireless LAN access point.There is a device operating at the 2.4 GHz frequency band (microwave oven, Bluetooth-enabled device, etc.) around the CLIÉ handheld.→ Turn the device off or keep the device and the CLIÉ handheld apart. |
| You forget a WEP (encryption) key. | → Set WEP (encryption) key of the Wireless LAN access point again. For details, see the operating instructions of the Wireless LAN access point. |
| You cannot access the Internet. | The Wireless LAN access point you are using is not connected to the Internet.→ The settings of the Wireless LAN access point to the Internet is wrong. Correct the settings of the Wireless LAN access point to the Internet, following the operating instructions of the Wireless LAN access point.If some network security, such as Firewall, is in place, there is some possibility that access to the Internet will be refused.→ Ask your System Administrator about the settings for your network security. |
| You cannot send or receive e-mail. | → Check the settings of the e-mailing software you are using. For details on how to set the e-mailing software, see its operating instructions. |
| You cannot browse homepages. | → Check the settings of the web browser you are using.For details on how to set the web browser, see its operating instructions. |
| The data transfer rate is slow. | Some other Wireless LAN access points are interfering with the communication.→ Change the channel number of the Wireless LAN access point you are using.For details on how to change the setting, see the Operating Instructions of your Wireless LAN access point.The Wireless LAN access point is being heavily used.→ Wait a while and try to Wireless LAN access it again.An obstacle may be blocking off radio waves (e.g., metal plate, concrete block water) between your CLIÉ handheld and the Wireless LAN access point.→ Move your CLIÉ handheld and/or the Wireless LAN access point to different places.→ Disable the power saving mode. For details, see “Advanced Settings” on page 20. |
| You cannot perform a HotSync operation. | → Check the settings of HotSync.For details on how to set HotSync, see the operating instructions supplied with your CLIÉ handheld.Also, if your computer has a Firewall, Hotsync operation may not function correctly. |
Tip
You can view communication preferences (e.g. IP Address you are using, IP Address of DNS server, etc) while performing communications using your CLIÉ handheld in which this Wireless LAN card is inserted, show the [Network] screen of [Preferences]. Select [Option] on the menu, then select [View Log].
Precautions on Use
Handling this Wireless LAN Card
- Do not subject the card to excessive shock or drop it. This may cause a malfunction.
- Do not use or store this unit in locations subject to:
- extremely high temperature, such as in direct sunlight or near a heater.
- excessive dust.
- high humidity.
- vibrations.
-
poor ventilation.
It may cause a malfunction. -
Do not use the card on an unstable surface.
- Do not put a metal object such as a metal clip etc. inside the card.
- When inserting the card in the CLIÉ handheld, take care not to force it in the wrong way. It may cause a malfunction.
- When there is a device operating at the 2.4 GHz frequency band around the CLIÉ handheld, the card and the CLIÉ handheld may not work correctly.
Condensation
Condensation is a phenomenon that occurs when moisture in the air turn into drops of water when it comes into contact with a metal plate, for example. Condensation may occur on the surface or inside the Wireless LAN Card when you quickly move it from a cold place to a warm place, when you turn on the heating in the room on a cold, winter morning. Using the Wireless LAN Card with condensation on it may cause a malfunction. If condensation occurs on the Wireless LAN Card, leave it without turning on the power of the CLIÉ handheld until the condensation disappears.
Specifications
Power source
Powered by CLIÉ handheld
Power consumption
When transmitting: Approx. 940 mW (typ)*
Idle: Approx. 200 mW (typ)*
* At the default setting
(Note: The Wireless LAN card consumes no electricity when the LED indicator is off.)
Dimensions
Approx. 1^11/16 × 2^1/8 × ^9/_32 in. (width/length/thickness)
(42.8×52.0×6.4 mm)
Mass
Approx. 0.6 oz. (16 g)
Maximum communication range ^1)
Indoor: 200 ft. (60 m)
Outdoor: 500 ft. (150 m)
Applied standard
IEEE 802.11b
Frequency band
2.4 GHz band (1 - 11 channels, ISM band)
WEP (data encryption)
128-bit/40-bit
Modulation method
DS-SS (in conformity to IEEE 802.11b)
Operating temperature
41^ - 95^(5^ - 35^)
^1) Actual range will vary depending on factors such as obstacles between devices, magnetic fields around a microwave oven, static electricity, interference, radio wave conditions, reception sensitivity or antenna performance, or the operating system or software application, etc.
Design and specifications are subject to change without notice.
natural_image
Diagram showing three devices: a mobile phone, a laptop, and a router connected by signal waves (no text or labels)natural_image
Technical line drawing of a rectangular electronic device with a flat top and side panels (no text or symbols)natural_image
Simple line drawing of a closed book with visible pages and cover (no text or symbols)Adresse MAC
6 Appuyez [Create].
Remarque

7 Appuyez [OK].
6 Appuyez [Create].
Astuce
Remarque
PowerSaveMode: ☑ Enable
OK ) ( Cancel
Remarque
7 Appuyez [OK].
For the latest support information, check our official Sony CLIÉ website
Customers in the U.S.A. and Canada:
http://www.ita.sel.sony.com/support/clie/access/
Customers in Europe:
http://www.clie-link.com/
Customers in Asia-Pacific and Mexico:
http://vaio-online.sony.com/clie/
http://www.sony.net/

Printed on 100% recycled paper using VOC (Volatile Organic Compound)-free vegetable oil based ink.
- Owner's Record
- For customers in the U.S.A. and Canada :
- NOTICE
- FCC WARNING
- Declaration of Conformity
- FCC Radiation Exposure Statement:
- IC Exposure of Humans to RF Fields
- For customers in Europe:
- Warnings
- Table of Contents
- Introduction
- Performing a HotSync operation
- Accessing the Internet
- Notes
- Names of Parts
- PWR (Power) indicator
- LNK (Link) indicator
- MAC Address
- Other items included
- Inserting/Removing the Wireless LAN Card
- Inserting the Wireless LAN card in your CLIÉ handheld
- Removing the Wireless LAN card from your CLIÉ handheld
- When using this Wireless LAN card with a Flip&Rotate style CLIÉ handheld
- Note
- Installing the Software
- Tip
- Click [Done] in Install Tool window.
- Click the Ⓧ icon in the task tray (Notification area) that is located in the bottom right-hand corner of the Windows display on your computer.
- Execute a local HotSync operation on your CLIÉ handheld.
- After you perform a hard reset
- Make sure you reinstall this utility.
- Performing Communications via a Wireless LAN Access Point (Infrastructure Mode)
- Basic Settings
- Before setting up
- Tap ▼ next to [Service], and select [Wireless LAN].
- Tap [Details...] in the bottom left-hand corner of the screen. The [Wireless LAN Setup] screen appears.
- Tap [Create].
- Enter a profile name in [ProfileName].
- Enter a network ID in [NetworkID (SSID)].
- Select the encryption level in [WEP].
- Enter a WEP key.
- When you select 40/64bit: alphanumeric string (5 characters)
- When you select 40/64bit: hexadecimal notation (10 figures (Hex))
- When you select 104/128bit: alphanumeric string (13 characters)
- When you select 104/128bit: hexadecimal notation (26 figures (Hex))
- Tips
- Tap [OK].
- Tap the Home icon on your CLIÉ handheld.
- Modifying the settings
- Deleting the profile you have set
- Advanced Settings
- Setting a network manually
- Disabling the power saving mode
- Connecting your CLIÉ Handheld to a Wireless LAN
- Performing Communications Directly between your CLIÉ Handheld and Another Device on a Wireless LAN (Ad-Hoc Mode)
- Tap [Adhoc] in [ConnectMode].
- Tap ▼ next to [ch] below [Adhoc], and select a channel.
- Tap [Advanced Setup] in the bottom right-hand corner of the screen.
- Tap the [Auto] check box in [IP Address]. The check mark disappears.
- Enter an IP address and a sub-netmask.
- Wireless LAN Setup
- Windows 98 and Windows ME:
- Windows 2000 and Windows XP:
- Tap [OK].
- Tap [OK].
- Tap the Home icon on your CLIÉ handheld.
- Connecting your CLIÉ Handheld to Another Device on a Wireless LAN
- Performing a HotSync Operation via a Network with a Wireless LAN Card
- Preparing your computer
- Preparing your CLIÉ handheld
- When communication is not possible
- Troubleshooting
- Customers in the U.S.A. and Canada:
- Customers in Europe:
- Customers in Asia-Pacific and Mexico:
- Precautions on Use
- Handling this Wireless LAN Card
- Condensation
- Specifications
- Power source
- Power consumption
- Dimensions
- Mass
- Maximum communication range 1)
- Applied standard
- Frequency band
- WEP (data encryption)
- Modulation method
- Operating temperature
- Adresse MAC
- Appuyez [Create].
- Remarque
- Appuyez [OK].
- Astuce
Brand : SONY
Model : CLIE PEGA-WL110
Category : PDA