
4300 series AC4372 - Air purifier PHILIPS - Free user manual and instructions
Find the device manual for free 4300 series AC4372 PHILIPS in PDF.


| Product Type | Air Purifier |
| Brand | Philips |
| Model | 4300 series AC4372 (also AC4374) |
| Filtration System | VitaShield IPS with 4-stage filtration: Pre-filter, Multi-care filter, Activated Carbon filter, HEPA filter (AC4372) or Pre-filter + Integrated Multi-care filter (AC4374) |
| Filter Replacement Indicators | Separate indicators for each filter (2, 3, 4) and REPLACE light |
| Filter Lock | Device locks after 2 weeks if filters not replaced |
| Air Quality Sensor | Built-in, adjustable sensitivity: Standard, Sensitive, Extra Sensitive (default Extra Sensitive) |
| Air Quality Light | Color-coded: Blue (very good), Dark purple (good), Purple (fair), Red (bad) |
| Fan Speeds | AUTO, Silent, 3 manual speeds: ~, ≈, ≈OSILENT TURBO |
| Timer | 1H, 4H, 8H |
| Child Lock | Yes, press and hold button for 3 seconds to activate/deactivate |
| Night Mode | Automatic when room darkens; all lights dim after 3 minutes; touch to awake for 5 seconds |
| Memory Mode | Recalls previous settings; defaults to AUTO if disconnected |
| Pre-filter Cleaning | Washable; recommended every 2 weeks; indicator CLEAN lights up when needed |
| Air Quality Sensor Cleaning | Recommended every 2 months; use soft brush and cotton swab |
| Safety Features | Auto shut-off if filters not replaced; EMF compliant |
| Warranty | Contact Philips Consumer Care Center |
| Power Supply | Check local voltage, plug type |
| Dimensions (approx.) | Not specified in manual |
| Weight (approx.) | Not specified in manual |
Frequently Asked Questions - 4300 series AC4372 PHILIPS
User questions about 4300 series AC4372 PHILIPS
0 question about this device. Answer the ones you know or ask your own.
Ask a new question about this device
Download the instructions for your Air purifier in PDF format for free! Find your manual 4300 series AC4372 - PHILIPS and take your electronic device back in hand. On this page are published all the documents necessary for the use of your device. 4300 series AC4372 by PHILIPS.
USER MANUAL 4300 series AC4372 PHILIPS
Always there to help you
Register your product and get support at
www.philips.com/welcome

AC4372
AC4374

EN User Manual 3
Understand the air quality light 10
Switch on 10
Set the sensitivity of the air quality
sensor 11
Activate child lock 12
Night mode 12
5 Clean your air purifier 13
Clean the air purifier 13
Clean the air quality sensor 13
6 Clean the pre-filter 14
7 Replace the filters 16
Reset filter lock 18
8 Troubleshooting 19
9 Guarantee and service 20
Order parts or accessories 20
10 Notices 21
Electromagnetic fields (EMF) 21
Recycling 21
1 Important
Safety
Read this user manual carefully before you use the appliance, and save it for future reference.
Danger
- Do not let water or any other liquid or flammable detergent enter the appliance to avoid electric shock and/or a fire hazard.
- Do not clean the appliance with water, any other liquid, or a (flammable) detergent to avoid electric shock and/or a fire hazard.
Warning
- Check if the voltage indicated on the bottom or indicated at the rear of the appliance corresponds to the local power voltage before you connect the appliance.
- If the power cord is damaged, you must have it replaced by Philips, a service center authorized by Philips, or similarly qualified persons in order to avoid a hazard.
- Do not use the appliance if the plug, the power cord, or the appliance itself is damaged.
- This appliance can be used by children aged from 8 years and above and persons with reduced physical, sensory or mental capabilities or lack of experiences and knowledge if they have been given supervision or instruction concerning use of the appliance in a safe way and understand the hazards involved. Children shall not play with the appliance. Cleaning and user maintenance shall not be made by children without supervision.
- Do not block the air inlet and outlet, e.g. by placing items on the air outlet or in front of the air inlet.
Caution
- This appliance is not a substitute for proper ventilation, regular vacuum cleaning, or use of an extractor hood or fan while cooking.
- If the power socket used to power the appliance has poor connections, the plug of the appliance becomes hot. Make sure that you plug the appliance into a properly connected power socket.
• Always place and use the appliance on a dry, stable, level, and horizontal surface.
- Leave at least 20cm free space behind and on both sides of the appliance and leave at least 30cm free space above the appliance.
- Do not place anything on top of the appliance and do not sit on the appliance.
- Do not place the appliance directly below an air conditioner to prevent condensation from dripping onto the appliance.
- Make sure all filters are properly installed before you switch on the appliance.
- Only use the original Philips filters specially intended for this appliance. Do not use any other filters.
- Avoid knocking against the appliance (the air inlet and outlet in particular) with hard objects.
- Do not insert your fingers or objects into the air outlet.
- Do not use this appliance when you have used indoor smoke-type insect repellents or in places with oily residues, burning incense, or chemical fumes.
- Do not use the appliance near gas appliances, heating devices or fireplaces.
• Always unplug the appliance after use and before you clean it. - Do not use the appliance in a room with major temperature changes, as this may cause condensation inside the appliance.
• To prevent interference, place the appliance at least 2m away from electrical appliances that use airborne radio waves such as TVs, radios, and radio-controlled clocks.
• The appliance is only intended for household use under normal operating conditions. - Do not use the appliance in wet surroundings or in surroundings with high ambient temperatures, such as the bathroom, toilet, or kitchen.
- The appliance does not remove carbon monoxide (CO) or radon (Rn). It cannot be used a safety device in case of accidents with combustion processes and hazardous chemicals.
2 Your air purifier
Congratulations on your purchase, and welcome to Philips!
To fully benefit from the support that Philips offers, register your product at www.philips.com/welcome.
Philips VitaShield IPS technology and NanoCloud technology ensures you "Healthy air always".
VitaShield IPS technology effectively removes pollutants (ultrafine particles, allergens, bacteria and viruses) with size >0.02 micron including bacteria and virus*.
*According to 2008 Microbiological Risk Assessment Report of the World Health Organization (WHO), the avian influenza, human influenza viruses, Legionella, Hepatitis viruses and SARS coronavirus are larger than 0.02 micron.
Read this user manual carefully before you install and use the unit. Save it for future reference.
Overview (for AC4372)
① Touchscreen control panel
② Light sensor
③ Air quality light
④ Air quality sensor
⑤ Filter 4: HEPA filter AC4154
⑥ Filter 3: Activated carbon filter AC4153
⑦ Filter 2: Multi-care filter AC4151
⑧ Filter 1: Pre-filter
⑨ Front panel

Overview (for AC4374)
① Touchscreen control panel
② Light sensor
③ Air quality light
④ Air quality sensor
⑤ Filter 2: Integrated Multi-care filter AC4138
⑥ Filter 1: Pre-filter
⑦ Front panel

⑤ ⑥ ⑦
3 Get started
Install filters
The appliance comes with all filters fitted inside, but you have to remove the packaging of the filters before you can use the appliance. Remove all filters, unpack them, and place them back into the appliance as described below.

Note
- Insert the filters in the correct position.
1 Place your fingers in the recesses of the side panels and gently pull the top part of the front panel towards you.
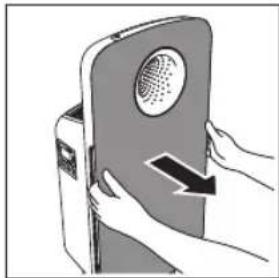
2 Lift the hooks at the bottom of the panel out of the bottom of the appliance.
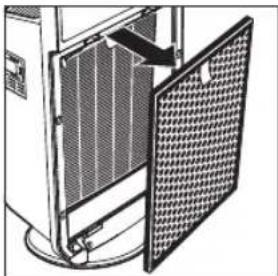
3 To remove the pre-filter, grab the two projections and pull the filter towards you.

4 Remove all the filters from the appliance.

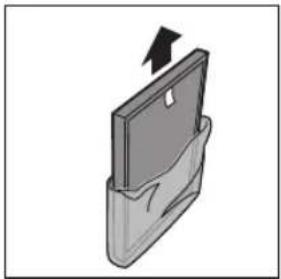
5 Remove all packaging material from the filters.

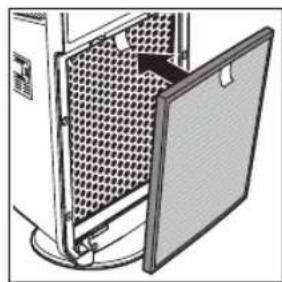
6 For AC4372, put the HEPA filter, activated carbon filter and multi-care filter back into the purifier.
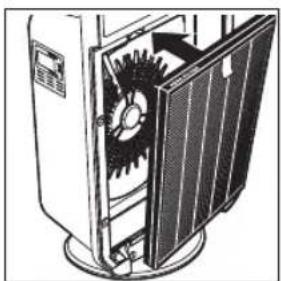
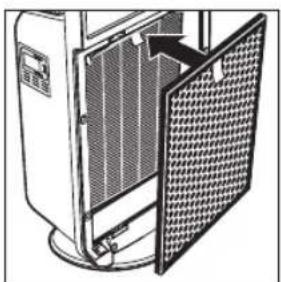

For AC4374, put the integrated Multi-care filter back into the purifier.


Note
• Make sure that the side with the tag is pointing towards you.
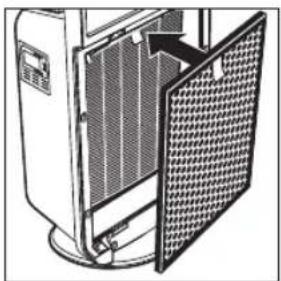
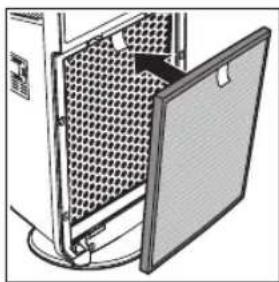
7 Place the pre-filer in the appliance.


Note
• Make sure that the side with the two projections is pointing towards you, and that all hooks are properly attached to the appliance.
8 To reattach the front panel, insert the bottom hooks into the bottom of the appliance first (1). Then, push the panel against the body of the appliance (2).

4 Use the air purifier
Understand the air quality light
| Color of the air quality light | Air quality level |
| Blue Very good | |
| Dark purple Good | |
| Purple Fair | |
| Red Bad |
The air quality light automatically goes on when the purifier is switched on.

Note
- The built-in air quality sensor measures the air quality and automatically selects the appropriate color of the air quality light. When the air is clean, the color of the air quality light is in blue. When the air quality deteriorates, the color of the air quality light changes from dark purple to red.
Switch on
1 Put the plug of the air purifier into the power socket.
All lights go on from left to right in cycle, and you hear a beep. Then, the lights go out again.
→ The air quality light shows 4 colors successively.
2 Press the ⏻ button to switch on the purifier.
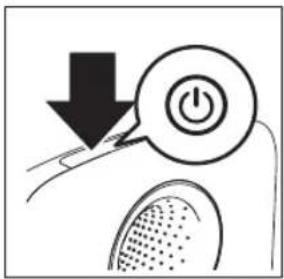
→ The fan speed indicator AS TO goes on.


Note
- When the purifier is switched on, the air quality sensor will take some time to measure the air quality in the room. The air quality light changes its color and eventually stays in the correct color in accordance with the air quality..
3 Press and hold the button for 2 seconds to switch off the purifier.


Tip
- The purifier has a memory mode. It will recall the previous settings of your last use.
- If you disconnect the purifier from the power supply after switching off, it will enter the default mode for next use. The fan speed is AUTO.
Set the sensitivity of the air quality sensor
To meet different needs when you use the appliance, we are offering you the opportunity to adjust the sensitivity of the air quality sensor. There are 3 sensitivity levels:
- standard
- sensitive
- extra sensitive
The pollution sensor is set to extra sensitive.
You can adjust the sensitivity of the air quality sensor in the following way.

Note
- When it is set to a higher sensitivity, the purifier becomes more allergic to the pollutants in the air. When the purifier is in AUTO mode, it is more likely to choose a higher fan speed than the standard mode.
1 Unplug the air purifier from the power socket.
2 Wait for a while before putting the plug back into the power socket.
3 Press the 📋 and buttons simultaneously.
→ The purifier beeps twice and one of
the fan speed indicators (\~, ≈ or ) ≈
flashes to show the current sensitivity
level of the air quality sensor.
| Fan speed indicator | Sensitivity level |
| ~ | Extra sensitive (default sensitivity) |
| ≈ | Sensitive |
| ≈ | Standard |
4 Press the button to adjust the sensitivity level of the air quality sensor.
→ One of the indicators (\~, ≈ ≈) goes on to show the preferred sensitivity level of the air quality sensor.
5 Press and hold the Button for 3 seconds to switch off the purifier, and the sensitivity setting is saved.

Note
- When setting the sensitivity, if no button is pressed in 10 seconds, the purifier will skip the sensitivity setting mode, and maintain the previous setting.
• After you change the sensitivity, the purifier automatically starts operating at the set sensitivity level whenever you switch on the purifier.
You can select the desired fan speed.
1 Press the button once or more times to select the desired fan speed (AUTO,
\~, ≈, ≈OSILENT TURBO

Set the timer
With the timer function, you can let the purifier operate for a set number of hours. When the set time has elapsed, the purifier automatically switches off.
1 Press the Ⓗ button to activate the timer.
→ The timer indicator 3H(4H or )8H goes on.
2 Press the button repeatedly to choose the number of hours you want the purifier to operate. The corresponding indicator (1H, 4H or ) goes on.
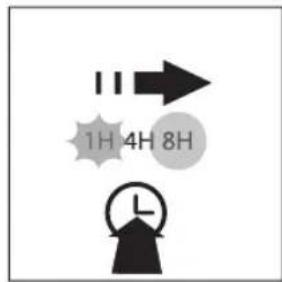
To deactivate the timer function, press the button repeatedly until the indicator (1H 4H, or 8Hs out.
Activate child lock
You can activate the child lock function.
1 Press and hold the button for
3 seconds to activate the child lock.
→ The child lock indicator lights up.

2 Press and hold the button again for 3 seconds to deactivate the child lock.


Note
- When the child lock function is activated, all buttons are locked except the button. There will be no audio feedback when you press the buttons.
Night mode
The purifier works in harmony with its surroundings. The purifier automatically switches to night mode in 3 minutes when the room in which it is operating becomes dark. All the lights on the control panel slowly go out. You can touch any buttons on the control panel during this period, and the lights go back on. However, they will go out again in 5 seconds if the purifier is in idle.
If the room becomes bright again for 5 minutes or longer, the purifier resumes normal operation.
5 Clean your air purifier

Tip
- You could use the concave of the air quality light as a handle to lift the purifier up.

Note
• Always unplug the purifier before you clean or move it.
- Never immerse the purifier in water or any other liquid
- Never use abrasive, aggressive, or flammable cleaning agents such as bleach or alcohol to clean any part of the purifier.
- Only the pre-filter is washable. Other air purifier filters are not washable nor vacuum cleanable.
Clean the air purifier
Regularly clean the inside and outside of the purifier body to prevent dust from collecting.
1 Wipe away dust with a soft dry cloth from the body of the purifier.

2 Clean the air inlet and the air outlet with a soft dry cloth.
Clean the air quality sensor
Clean the air quality sensor every 2 months for optimal functioning of the purifier. Clean it more frequently if you use the purifier in a dusty environment.

Note
- When the humidity level in the room is very high, it is possible that condensation develops on the air quality sensor. As a result, the air quality light may indicate that the air quality is bad even though it is good. In this case you have to clean the air quality sensor or use one of the manual speed settings.
1 Clean the air quality sensor inlet and the air quality sensor outlet with a soft brush.
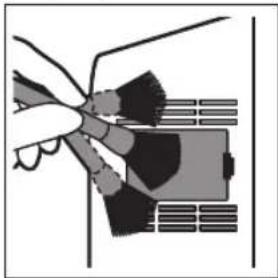
2 Remove the air quality sensor cover.
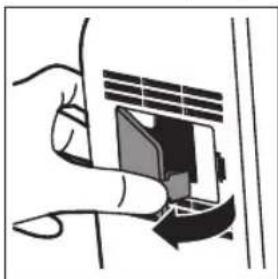
3 Clean the air quality sensor, the dust inlet and the dust outlet with a lightly moistened cotton swab.

4 Dry them with a dry cotton swab.
5 Reattach the air quality sensor cover.
6 Clean the prefilter

Note
• The pre-filter is washable.
- Clean the pre-filter for every two weeks to ensure optimal functioning of the purifier.
- When the pre-filter needs cleaning, the
CLEAN
goes on.

1 Switch off the purifier and unplug it.
2 Place your fingers in the recess of the side panels and gently pull the top part of the front panel towards you. Then lift the hooks at the bottom of the panel out of the top of the purifier.

3 To remove the pre-filter, grab the two projections and pull the filter towards you.

4 Use a vacuum cleaner or wash the pre-filter under a running tap. If the pre-filter is very dirty, use a soft brush to brush away the dust.

5 Air dry the pre-filter.
6 Put the pre-filter back into the purifier. Attach all hooks properly to the purifier.

7 To reattach the front panel, insert the bottom hooks into the bottom of the purifier first (1). Then, push the panel against the body of the purifier (2).
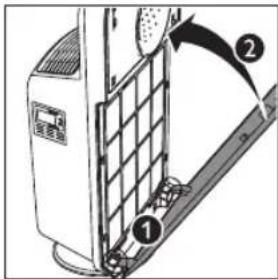
8 Plug the air purifier into the power socket and press the ⏻ button to switch on the purifier.
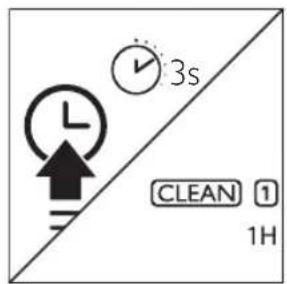
9 Press and hold the Ⓑ button for 3 seconds to reset the filter lifetime.
→ CLEAN 1 go off.

Note
• Make sure that the pre-filter is completely dry. If it is still wet, bacteria may multiply in it and shorten the lifetime of the pre-filter.
• Make sure that the side with the two projections is pointing towards you, and that all hooks of the pre-filter are properly attached to the purifier.
7 Replace the filters
The indicator of the filter replacement REPLACE indicates the respective filters (2, 3 or ) 4 have to be replaced.

Note
- Lifetime of the filter is based on the volume of air purified, it may differ from the way of using. In heavily polluted environment, the filter lifetime may be shorter than the recommended time.
- If you remove the front panel for filter changing while the purifier is switched on, all lights on the control panel will be off.
- Once the front panel is placed back to the purifier, it starts to run as its previous status.
- The replaceable filters are not washable nor vacuum cleanable.
For AC4372
Replace the multi-care filter, the activated carbon filter, and the HEPA filter when the respective indicators (2, 3 and ) on.
For AC4374
Replace the integrated Multi-care filter when the respective indicator (2) goes on.
This will last for approximately 2 weeks. On the last day of the 2 weeks, the purifier beeps every 30 minutes to inform you that the filter needs to be replaced.

Note
- Insert the filters in the correct position.
- For AC4372, make sure you place the filters in the order of HEPA filter, the activated carbon filter, the multi-care filter, and then pre-filter.
- For AC4374, make sure you place the filters in the order of integrated Multi-care filter, and then pre-filter.
• Make sure that the side with the tag is pointing towards you.
1 Switch off the purifier and unplug it.
2 Place your fingers in the recesses of the side panels and gently pull the front panel towards you. Then lift the panel off the hooks at the bottom of the purifier.

3 To remove the pre-filter, grab the two projections and pull the filter towards you.

4 For AC4372, remove the multi-care filter, activated carbon filter and HEPA filter from the purifier.


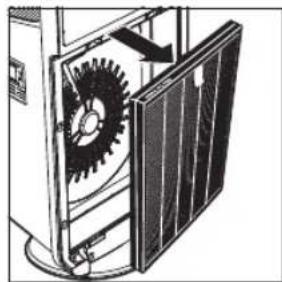
For AC4374, remove the integrated Multicare filter from the purifier.
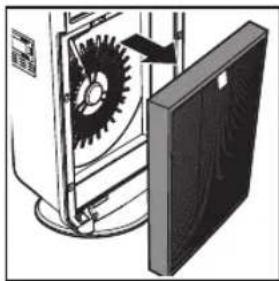
5 Take the used filter by the two sides and deposit it gently into the household trash bin.

Note
- Do not touch the pleated filter surface, or smell the filter as it has collected pollutants from the air.
- Wash your hands with tap water and soap after you have touched the used filter.
6 Remove all packaging material from the new filters that need replacement.
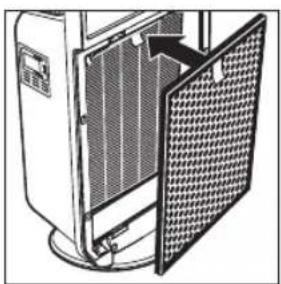
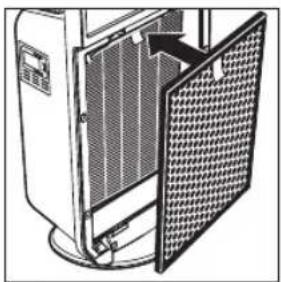
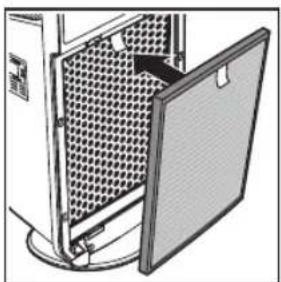
7 For AC4372, put the HEPA filter, activated carbon filter and multi-care filter back into the purifier.
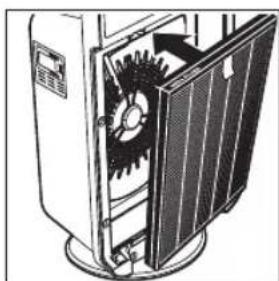


For AC4374, put the integrated Multi-care filter back into the purifier.

8 Put the pre-filter back into the purifier.

9 To reattach the front panel, insert the bottom hooks into the bottom of the purifier first (1). Then, push the panel against the body of the purifier (2).

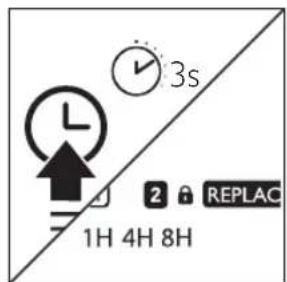
10 Press and hold the ⓣ button for 3 seconds to reset the filter lifetime.
→ For AC432:3,4 and REPLACE go off.

For AC432+: an REPLACE.
Reset filter lock
After 2 weeks of filter replacement alert, and the filters are still not replaced. Then, the purifier will not work until the filter is replaced and the filter lock is reset.
The 🔒 goes on along with the filter replacement indicators (2, 3, 4 and REPLACE). All indicators are off except CHILD LOCK if it has been activated. ⏻, 🔒 and ⏻ buttons remain active, while 📊 and buttons are deactive. See "Replace the filters" section to reset the filter lock.
8 Troubleshooting
This chapter summarizes the most common problems you could encounter with the purifier. If you are unable to solve the problem with the information below, contact the Consumer Care Center in your country.
| Problem Possible solution | |
| The 2 3 4 REPLACE indicators has been on continuously. | The filter is full. Replace the filter and reset the purifier. |
| No air comes out of the air outlet. | The purifier is not connected to the power supply. Plug the purifier into the power supply and switch on. |
| The fan speed does not change when the SILENT mode is activated. | In SILENT mode, the fan speed is set to a very low level. If you want to change the fan speed, press the button one or more times to set the desired fan speed. |
| The airflow that comes out of the air outlet is significantly weaker than before. | The pre-filter is dirty. Clean the pre-filter (see 'Clean the pre-filter').You have not removed all packaging material from the filters. Make sure that you have removed all packaging material. |
| The air quality does not improve, even though the purifier has been operating for a long time. | One of the filters has not been placed in the purifier. Make sure that all filters are properly installed in the following order, starting with the innermost filter: For AC4372: HEPA filter (4), activated carbon filter (3), multi-care filter (2) and pre-filter (1). For AC4374: Integrated Multi-care filter (2), pre-filter (1).The air quality sensor is wet. The humidity level in your room is high and causes condensation. Make sure that the air quality sensor is clean and dry (see 'Clean the air quality sensor'). |
| The color of the air quality light always stays the same. | The air quality sensor is dirty. Clean the air quality sensor (see 'Clean the air quality sensor'). |
| I need cleaner air because I have an allergy. | You can change the air quality sensor sensitivity (see 'Set the sensitivity of the air quality sensor') to make the purifier clean the air even better. |
| The purifier is extra loud. | Please check if you have removed all the packaging material from the filters.If the appliance is still too loud; you can change the fan speed to a lower fan speed level. |
| The purifier still indicates that I need to replace a filter, but I already did. | Perhaps you did not press the button to reset the filter lock properlyPlug in the purifier, press the button and press and hold the button for 3 seconds. |
9 Guarantee and service
If you need information or if you have a problem, please visit the Philips website at www.philips.com or contact the Philips Consumer Care Center in your country (you will find its phone number in the worldwide guarantee leaflet). If there is no Consumer Care Centre in your country, go to your local Philips dealer.
Order parts or accessories
If you have to replace a part or want to purchase an additional part, go to your Philips dealer or visit www.philips.com/support. If you have problems obtaining the parts, please contact the Philips Consumer Care Center in your country (you will find its phone number in the worldwide guarantee leaflet).
10 Notices
The making of unauthorized copies of copy-protected material, including computer programs, files, broadcasts and sound recordings, may be an infringement of copyrights and constitute a criminal offence. This equipment should not be used for such purposes.
Electromagnetic fields (EMF)
This Philips appliance complies with all applicable standards and regulations regarding exposure to electromagnetic fields.
Compliance with EMF
Koninklijke Philips N.V. manufactures and sells many products targeted at consumers, which, like any electronic apparatus, in general have the ability to emit and receive electromagnetic signals.
One of Philips' leading Business Principles is to take all necessary health and safety measures for our products, to comply with all applicable legal requirements and to stay well within the EMF standards applicable at the time of producing the products.
Philips is committed to develop, produce and market products that cause no adverse health effects. Philips confirms that if its products are handled properly for their intended use, they are safe to use according to scientific evidence available today.
Philips plays an active role in the development of international EMF and safety standards, enabling Philips to anticipate further developments in standardization for early integration in its products.
Recycling

Never dispose your product with other household waste. Please inform yourself about the local rules on the separate collection of electrical and electronic products. The correct disposal of your old product helps prevent potentially negative consequences on the environment and human health.
Daftar Isi
1 Penting 23
Pengaman 23
⑤ ⑥ ⑦
3 Memulai
Memasang filter


Catatan

Catatan
4 Gunakan penyedot debu atau cuci prafilter di bawah air keran. Jika pra-filter

Catatan


→ Untuk AC4321: daREPLACE padam.

Mereset kunci filter
⑤ ⑥ ⑦
3 เริ่มต้นใช้งาน
ติดตั้งแผ่นกรอง


หมายเหตุ

หมายเหตุ

หมายเหตุ


(AC4374) 概覽
⑤ ⑥ ⑦
3 開始使用
安裝過濾網
4 從產品移除所有過濾網。

5 除下所有過濾網的包裝。

提示
- 確保有標籤的一邊正向著您。
7 裝上預過濾網。


提示
4 使用空氣淨化器
認識空氣質素燈

貼士
2 使用柔軟的乾布清潔通風口和排氣口。
清潔空氣質量感測器
2 移除空氣質量感測器護蓋。

72 ZH-HK

提示


8 將預過濾網放回本淨化器內。

重設過濾網鎖
Specifications are subject to change without notice
All rights reserved.
4241 210 77993

- ALWAYS THERE TO HELP YOU
- 1 IMPORTANT
- SAFETY
- DANGER
- WARNING
- CAUTION
- 2 YOUR AIR PURIFIER
- OVERVIEW (FOR AC4372)
- OVERVIEW (FOR AC4374)
- 3 GET STARTED
- INSTALL FILTERS
- NOTE
- 4 USE THE AIR PURIFIER
- UNDERSTAND THE AIR QUALITY LIGHT
- SWITCH ON
- TIP
- SET THE SENSITIVITY OF THE AIR QUALITY SENSOR
- SET THE TIMER
- ACTIVATE CHILD LOCK
- NIGHT MODE
- 5 CLEAN YOUR AIR PURIFIER
- CLEAN THE AIR PURIFIER
- CLEAN THE AIR QUALITY SENSOR
- 6 CLEAN THE PREFILTER
- 7 REPLACE THE FILTERS
- FOR AC4372
- FOR AC4374
- RESET FILTER LOCK
- 8 TROUBLESHOOTING
- 9 GUARANTEE AND SERVICE
- ORDER PARTS OR ACCESSORIES
- 10 NOTICES
- ELECTROMAGNETIC FIELDS (EMF)
- COMPLIANCE WITH EMF
- RECYCLING
- DAFTAR ISI
- 3 MEMULAI
- MEMASANG FILTER
- CATATAN
- MERESET KUNCI FILTER
- 3 เริ่มต้นใช้งาน
- ติดตั้งแผ่นกรอง
- หมายเหตุ
- (AC4374) 概覽
- 3 開始使用
- 安裝過濾網
- 提示
- 4 使用空氣淨化器
- 貼士
- 清潔空氣質量感測器
- 重設過濾網鎖
Brand : PHILIPS
Model : 4300 series AC4372
Category : Air purifier