801-032 - Microwave Menuett - Free user manual and instructions
Find the device manual for free 801-032 Menuett in PDF.


| Product Type | Microwave oven |
| Brand | Menuett |
| Model | 801-032 |
| Electrical Data | 230 VAC, 50 Hz, 1200 W (microwaves) |
| Power Output | 800 W |
| Operating Frequency | 2450 MHz |
| External Dimensions (H x W x D) | 262 x 452 x 325 mm |
| Oven Dimensions (H x W x D) | 198 x 315 x 294 mm |
| Oven Volume | 20 L |
| Cooking Unit | Rotating plate |
| Weight | Approx. 10.5 kg |
| Functions | Microwave cooking, Weight Defrost, Preset, Auto Cook, Childlock, Quick Start |
| Control Panel | Push buttons and rotary knob (WEIGHT/TIME) |
| Display | Digital display showing cooking time, power, mode and clock |
| Safety Features | Door interlock system, child lock, earth connection |
| Maintenance | Clean inside and outside with damp cloth; glass plate dishwasher safe; ring washable in soapy water |
| Accessories | Glass plate, rotation ring |
| Max Cooking Time | 95 minutes |
| Power Levels | 100%, 80%, 60%, 40%, 20% |
| Cooking Programmes | Up to 2 automatic cooking sequences |
| Auto Cook Menu | 8 pre-programmed food categories (milk, rice, pasta, potatoes, etc.) |
| Defrost by Weight | 100 to 1800 g |
| Clock Setting | 12 or 24 hour format |
Frequently Asked Questions - 801-032 Menuett
User questions about 801-032 Menuett
0 question about this device. Answer the ones you know or ask your own.
Ask a new question about this device
Download the instructions for your Microwave in PDF format for free! Find your manual 801-032 - Menuett and take your electronic device back in hand. On this page are published all the documents necessary for the use of your device. 801-032 by Menuett.
USER MANUAL 801-032 Menuett
User Instructions for Microwave Oven
801-032

natural_image
Black microwave oven with digital display and control buttons (no visible text or symbols on main body)SV Bruksanvisning i original
NO Bruksanvisning i original
EN Operating instructions in original
SVENSKA 4
SÄKERHETSANVISNINGAR 4
SAFETY INSTRUCTIONS....26
Safety instructions to prevent exposure to microwave radiation 26
Important safety instructions.... 26
TECHNICAL DATA....27
DESCRIPTION 27
Parts....27
Control panel....28
INSTALLATION 28
Radio interference....29
Cooking in the microwave oven....29
Earth connection....29
Read the following before calling for service....29
Utensils 30
USE 30
SETTING 30
Audio signals for settings.... 30
Setting the clock.... 30
Cooking in the microwave oven 30
Quick start....31
Weight Defrost 31
Preset....31
Cooking programmes.... 31
Childlock 32
Auto Cook 32
Auto Cook menu 32
MAINTENANCE 32
SÄKERHETSANVISNINGAR
ETT LYDSIGNAL: Innmatingen aksepteres.
Read the User Instructions carefully before use. Note the serial number on the product type plate for future reference.
Safety instructions to prevent exposure to microwave radiation
- Do not start the oven with the door open as this can cause harmful exposure to microwave radiation. Never attempt to bypass or modify the interlocking system.
- Do not place any objects between the front of the oven and the door. There should be no dust or residual detergent on sealing surfaces.
- Do not use the oven if it is damaged. It is very important that the door closes properly and that the following parts are undamaged:
- door (deformed)
- hinges and catches (broken or loose)
- door seal and contact surfaces
- The oven must only be adjusted or repaired by qualified personnel.
Important safety instructions
Always take basic safety precautions when using electrical appliances to safeguard against the risk of fire, electric shock or personal injury.
WARNING: Always follow the instructions below to reduce the risk of burns, electric shock, fire, personal injury and exposure to microwave radiation.
- Read these instructions carefully before use.
- The appliance must only be used as it is intended to be used and in accordance with these instructions. Corrosive chemicals or vapours must not be used in the product. The oven is designed to heat, cook and dry food. It is not intended for industrial or laboratory use.
- Do not use the oven when it is empty.
- Do not use the appliance if the power cord or plug is damaged, if the appliance is not working properly, or if it is damaged in any other way. If the power cord gets damaged it must be replaced by an authorised service centre or qualified person to ensure safe use.
WARNING: Children must not use the appliance without supervision if they have not received proper instructions to use it safely and understand the risks of not using it properly.
- Precautions to reduce the risk of fire in the oven:
- Check the oven at frequent intervals when heating food in plastic or paper packaging, as it could catch fire.
- Remove bag sealers from paper and plastic bags before they are placed in the oven.
- If you see smoke coming from the appliance, turn it off and pull out the plug. Keep the door closed to smother any flames.
- Do not use the oven for storage. Do not allow paper, cooking utensils or food to remain in the oven when not in use.
WARNING: Liquids and food should not be heated in sealed containers, as they may explode.
- A liquid heated in the microwave oven can substantially expand after taking it out from the oven. Handle liquid containers with care.
• Do not fry food in the oven. Hot oil can damage the oven and utensils, and can cause burns. - Eggs with shells and hard-boiled eggs must not be heated in the microwave oven, as they may explode even after being removed from the oven.
- Food with a thick skin (potatoes, whole courgettes, apples, chestnuts, etc.) should be pierced before cooking in the microwave oven.
- The contents of feeding bottles and baby food jars should be shaken or stirred before serving. Check the temperature to avoid burns.
- Cooking utensils can get hot when heat is transferred from the heated food. Potholders may be needed when handling the utensil.
- Check that the utensil is intended to be used in a microwave oven.
-
WARNING: Service or repairs that involve removal of the casing, which protects against microwave radiation, can cause injuries and must only be carried out by trained personnel.
-
This product belongs to group 2 class B ISM. Group 2 comprises all ISM equipment (industrial, scientific and medical) where RF energy is created with the intent and/or used in the form of electromagnetic radiation for the treatment of materials and equipment for spark treatment. Class B equipment can be used for domestic purposes and in facilities directly connected to low voltage networks in residential buildings.
- The appliance is not intended to be used by persons (children or adults) with any form of functional disorders, or by persons who do not have sufficient experience or knowledge on how to use it, unless they have received instructions concerning the use of the appliance by someone who is responsible for their safety.
- Children must be supervised to make sure they do not play with the appliance.
TECHNICAL DATA
Electrical data 230 VAC, 50 Hz, 1200 W (microwaves)
Power output 800 W
Operating frequency 2450 MHz
External dimensions (H x W x D) 262 x 452 x 325 mm
Oven dimensions (H x W x D) 198 x 315 x 294 mm
Oven volume 20 l
Cooking unit Rotating plate
Weight
Approx.
10.5
DESCRIPTION
Parts
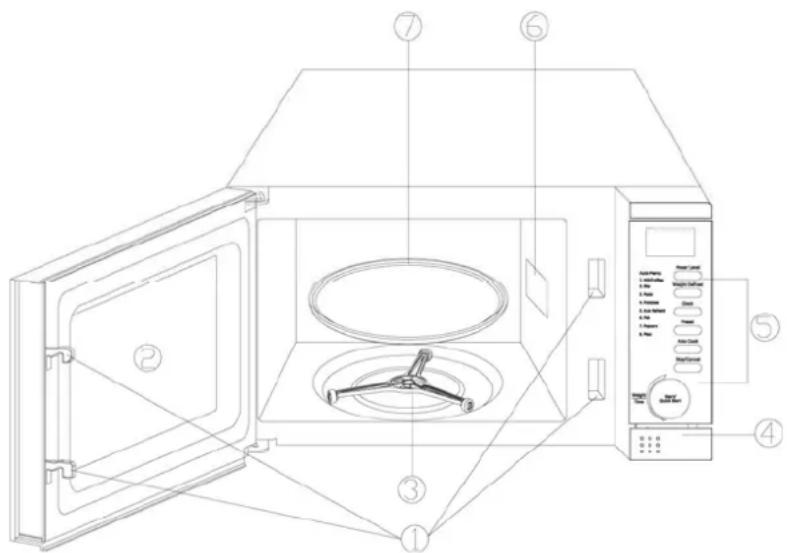
- Door interlock system
- Oven window
- Rotation ring
- Door open button
- Control panel
- Waveguide (do not remove the mica plate over the waveguide)
- Glass plate
Control panel

DISPLAY
- Displays the cooking time, power, mode and clock.
POWER LEVEL
- Press the Power Level button several times to set the cooking power.
WEIGHT DEFROST
- Press to defrost food according to weight.
CLOCK
- Press this button to set the clock.
PRESET
- Press to set a cooking programme.
AUTO COOK
- Press for quick cooking of normal food.
STOP/CANCEL
- Press the STOP/CANCEL button to delete the setting or to reset the appliance before setting a cooking programme.
- Press once to pause cooking, or twice to cancel it altogether.
- The button is also used to set the child lock.
WEIGHT/TIME
- Turn to set time, cooking time or food weight.
- Press to start a cooking programme. Press several times to set the cooking time and to start cooking immediately at full power.
INSTALLATION
- Check that all packaging material inside the oven has been removed.
WARNING: Check the oven for damage, e.g. a misaligned or bent door, damaged door seals and contact surfaces, damaged or loose door hinges and catches or dents in the oven or on the door. Do not use the appliance if it is damaged. Contact your dealer.
- The appliance must be placed on a flat, stable surface that can support the weight of the appliance and the food to be cooked.
- Do not place it where it will be exposed to heat, moisture or high humidity. Do not place it near flammable materials.
- The appliance requires an adequate flow of air to work correctly. Position the appliance so that it has 20 cm of free space above, 10 cm behind, and 5 cm on each side. Do not block the openings on the appliance. Do not remove the feet from the appliance.
- Do not use the oven without the glass plate, or if the support rollers and the axle are not in the correct position.
- Make sure the power cord is not damaged and that it is not lying under the appliance, or on hot surfaces or sharp edges.
- The plug must be easily accessible so that it can be easily pulled out in an emergency.
- Do not use the appliance outdoors.
Radio interference
Interference on radios, televisions or other similar equipment can occur when the microwave oven is used.
Interference can be reduced by taking the following measures.
- Clean the oven door and contact surfaces.
- Move the radio or TV antenna.
- Move the appliance in relation to the receiver.
- Move the appliance away from the receiver.
- Plug the appliance into a different circuit than the receiver.
Cooking in the microwave oven
- Position the food carefully. The thickest part should be closest to the edge of the utensil.
- Check the cooking time. Select the shortest suggested time and then increase this, if necessary. Overcooked food can start to smoke or catch fire.
- Cover food during cooking. This prevents splashing and cooking is more even.
- Turn the food during cooking to reduce the cooking time (e.g. chicken and hamburgers). Large pieces, such as roasts, must be turned at least once.
- Meatballs and similar food should be stirred halfway through cooking (from the sides to the middle of the utensil and vice versa).
Earth connection
The appliance must be earthed. The appliance has a power cord with an earth conductor and approved, earthed plug. The plug must be plugged into a correctly installed earthed mains socket. Earthing reduces the risk of electric shock by diverting current in the event of a short circuit. The appliance should be connected to a separate circuit. Do not connect the appliance to high voltage, this can result in personal injury, fire or material damage.
WARNING: Incorrect use of an earthed plug can cause electric shock.
NOTE:
- Consult your electrician or a qualified technician if you have any questions about electrical connections or earthing.
- Neither the manufacturer nor retailer is liable for damage to the appliance, or personal injury resulting from incorrect electrical connection.
The wires in the power cord have the following colours.
Green/yellow = earth
Blue = neutral
Brown = live
Read the following before calling for service.
If the appliance does not work
- Check that the appliance is connected correctly. If it is not, unplug the power cord, wait 10 seconds and then plug in the plug again.
- Check that no fuses or breakers have tripped. If they work, you can check the mains socket with another product.
- Check that the control panel is programmed correctly and that the timer is set.
- Check that the door is closed and that the door interlocking system has not been activated. The microwave function will not be activated if the door is not closed properly.
CONTACT A TECHNICIAN IF THIS DOES NOT SOLVE THE PROBLEM. DO NOT ATTEMPT TO ADJUST OR REPAIR THE APPLIANCE YOURSELF.
Utensils
- The best material for cooking utensils used in a microwave oven is one that allows the microwaves to pass through and heat the food.
- Microwaves cannot pass through metal and therefore metal utensils or plates with metal edges should not be used.
- Do not use utensils made of recycled paper in the microwave, they may contain small metal fragments that can cause sparks and fire.
- Use round or oval dishes instead of square/rectangular ones, as food in the corners will often be overcooked.
- Thin strips of aluminium foil can be used to prevent overcooking in the corners. Do not use too much foil and leave a space of about 2.5 cm between the foil and oven walls.
Below is a list of materials that can be used.
| TYPE OF UTENSILS MICROWAVE OVEN | |
| Heat resistant glass Yes | |
| Non heat-resistant glass No | |
| Heat-resistant ceramics Yes | |
| Plastic plates designed for microwave ovens Yes | |
| Kitchen paper Yes | |
| Metal washer No | |
| Metal stand No | |
| Aluminium foil and cookware foil No |
USE
SETTING
Audio signals for settings
ONE AUDIO SIGNAL: Input accepted.
TWO AUDIO SIGNALS: Input not accepted. Check and try again.
Setting the clock
Follow the instructions below to set the appliance clock to 8.30.
- In standby mode, press the CLOCK button repeatedly to set the clock to 12 or 24 hour display.
- Turn the WEIGHT/TIME knob to set the number 8.
- Press the CLOCK button once.
- Turn the WEIGHT/TIME knob to set the minutes until the clock shows 8.30.
- Press CLOCK again to save the setting.
NOTE: You can press CLOCK once to see the time during the cooking.
Cooking in the microwave oven
The longest possible cooking time is 95 minutes. Press the POWER LEVEL button repeatedly to set the required power level. Follow the instructions below to cook something for five minutes at 60% power:
-
Press the STOP/CANCEL button.
-
Press the POWER LEVEL button repeatedly to set the required power level.
| Display | Cooking | power |
| 100 | 100% | |
| 80 | 80% | |
| 60 | 60% | |
| 40 | 40% | |
| 20 | 20% | |
| 00 | 03 |
- Turn WEIGHT/TIME to 5.00.
- Press the START/QUICK START button.
NOTE:
- Press the POWER LEVEL button during the cooking to check the cooking power.
- When the cooking/thawing time has run out, the appliance emits an audio signal and End is shown on the display. Press STOP/CANCEL or open the door to reset before setting a new function (following cooking modes available).
Quick start
This allows you to quickly start the oven. The longest cooking time that can be set is 10 minutes. In standby mode, press the START/QUICK START button several times to set the cooking time. The oven starts immediately at full power.
Weight Defrost
You can defrost food in the oven by entering its weight. The time and power are automatically adjusted to the set weight. The weight can be from 100 to 1800 g.
Follow the instructions below to defrost 600 grams of prawns.
- Place the prawns in the oven and close the door.
- Press the STOP/CANCEL button.
- Press the WEIGHT DEFROST button once.
- Turn WEIGHT/TIME to enter a weight of 600 g.
- Press the START/QUICK START button.
NOTE: An audio signal is given during the thawing to remind you to turn the food over. Turn the food over and press START/QUICK START to resume.
Preset
Press PRESET to programme the appliance to start at a set time. Follow the instructions below to set a cooking programme to start at 11:30 when the time is 9:00:
- Set a cooking programme.
- Press the PRESET button.
- Turn the WEIGHT/TIME knob to set the number 11.
- Press the PRESET button.
- Turn the WEIGHT/TIME knob to set the number 30.
- Press the PRESET button to confirm.
NOTE:
- When this function is set you can press the PRESET button to check the set start time. You can cancel this function by pressing PRESET followed by STOP/CANCEL.
- The appliance emits an audio signal at the set time and the set cooking programme starts.
- The functions Weight Defrost and Quick Start cannot be preset.
Cooking programmes
The oven can be programmed with up to 2 automatic cooking sequences.
Follow the instructions below to set the cooking programme.
Cooking in the microwave oven
Cooking at low power
- Press the STOP/CANCEL button.
- Press the POWER LEVEL button repeatedly to set the required power level.
- Turn WEIGHT/TIME to the required time.
- Press the POWER LEVEL button repeatedly to set the required power level.
- Turn WEIGHT/TIME to the required time.
- Press the START/QUICK START button.
NOTE:
The functions Weight Defrost and Quick Start cannot be programmed. Auto Cook can only be programmed as a first step.
The status lamps shown the active step. An audio signal is given when the full cooking time has run out.
Childlock
Use the child lock so that children cannot use the appliance without adult supervision. The childlock symbol is shown on the display when the childlock is activated and it is not possible to start the appliance. Activation: In standby or Preset mode, press the STOP/CANCEL button for three seconds until a signal is given and the childlock symbol is shown. All buttons are deactivated when the childlock is activated.
Deactivation: Press and hold the STOP/CANCEL button for three seconds until a beep is heard and the LOCK text disappears.
Auto Cook
When cooking in Auto Cook mode you do not need to programme the cooking time and power. Just set the type of food to be cooked and its weight. The food may need turning over half way through cooking to ensure it is uniformly cooked.
Example: Follow the instructions below to cook 400 grams of fish.
- Press the STOP/CANCEL button.
- Press the AUTO COOK button repeatedly to select the required food.
- Turn WEIGHT/TIME to set a weight of 400 g.
- Press the START/QUICK START button.
Auto Cook menu
| Message | Food/cooking method |
| 01 | Milk/coffee (200) |
| 02 | Rice (g) |
| 03 | Pasta (g) |
| 04 Potatoes | (230 g/each) |
| 05 Automatic heating (g) | |
| 06 | Fish (g) |
| 07 | Popcorn (99) |
| 08 | Pizza (g) |
MAINTENANCE
- Switch off the appliance and unplug the power cord before cleaning.
- Keep the inside of the oven clean. Remove splashes and liquids with a damp cloth. Use a mild detergent if the appliance is very dirty. Avoid using sprays or strong detergents that can cause stains and streaks or a dull surface on the door.
- Clean the outside of the appliance with a damp cloth. Do not allow water to enter the ventilation openings, as this can damage the appliance.
- Wipe both sides of the door and window, the door seals and adjacent parts frequently with a damp cloth to remove stains and splashes. Do not use abrasive detergents.
- The control panel must not become wet. Clean with a damp cloth. Leave the door open when cleaning the control panel, to prevent the appliance starting unintentionally.
- Wipe with a soft cloth if condensation forms on the inside or around the edge of the door. Condensation may form when the appliance is used in very humid conditions. This is completely normal.
- Remove and clean the glass plate when necessary. Clean it in warm soapy water or in a dishwasher.
- The ring and base of the oven should be cleaned at regular intervals so that the ring can move freely. Wipe the bottom of the oven with a mild detergent. The ring can be cleaned in mild soapy water or in a dishwasher. Make sure the ring is refitted correctly in the oven after cleaning.
- Bad smells in the oven can be removed by using the peel and juice of one lemon mixed with 2.5 dl of water in a microwavable bowl. Cook the bowl in the microwave oven for 5 minutes. Wipe the appliance thoroughly with a soft cloth.
- Contact your dealer when the oven light needs replacing.
- The appliance should be regularly cleaned and any scraps of food removed. The surfaces can corrode if the appliance is not kept clean. This will reduce the useful life of the product and can cause damage.
- Recycle the product in accordance with local regulations when it reaches the end of its useful life.
Jula reserves the right to make changes. In the event of problems, please contact our service department.
www.jula.com

Care for the environment!
Must not be discarded with household waste! This product contains electrical or electronic components that should be recycled. Leave the product for recycling at the designated station e.g. the local authority's recycling station.
- User Instructions for Microwave Oven
- SVENSKA 4
- SÄKERHETSANVISNINGAR 4
- SAFETY INSTRUCTIONS....26
- TECHNICAL DATA....27
- DESCRIPTION 27
- INSTALLATION 28
- USE 30
- SETTING 30
- MAINTENANCE 32
- SÄKERHETSANVISNINGAR
- Read the User Instructions carefully before use. Note the serial number on the product type plate for future reference.
- Safety instructions to prevent exposure to microwave radiation
- Important safety instructions
- TECHNICAL DATA
- DESCRIPTION
- Parts
- Control panel
- DISPLAY
- POWER LEVEL
- WEIGHT DEFROST
- CLOCK
- PRESET
- AUTO COOK
- STOP/CANCEL
- WEIGHT/TIME
- INSTALLATION
- Radio interference
- Cooking in the microwave oven
- Earth connection
- NOTE:
- Read the following before calling for service.
- Utensils
- USE
- SETTING
- Audio signals for settings
- Setting the clock
- Quick start
- Cooking programmes
- Childlock
- MAINTENANCE
- Care for the environment!
Brand : Menuett
Model : 801-032
Category : Microwave