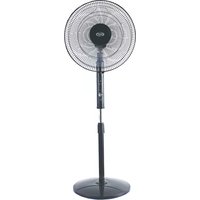
Fanny Plus - Fan Argoclima - Free user manual and instructions
Find the device manual for free Fanny Plus Argoclima in PDF.


| Product Type | Pedestal Fan |
| Brand | Argoclima |
| Model | Fanny Plus |
| Dimensions (HxWxD) | 100 x 30 x 30 cm |
| Net Weight | 4.0 kg |
| Power Supply | 220-240 V ~ 50/60 Hz |
| Power Consumption | 40 W |
| Speed Settings | 3 speeds (low, medium, high) |
| Oscillation | Yes, 90° horizontal |
| Tilt Adjustment | Manual tilt up/down |
| Timer | 0-7 hours (optional feature) |
| Remote Control | Yes, with battery (CR2025) |
| Blade Diameter | 16 inches (40 cm) |
| Material | ABS plastic and metal |
| Noise Level | ≤ 55 dB (A) |
| Safety Features | Overheat protection, stable base |
| Cleaning | Disconnect power, wipe with damp cloth |
| Storage | Store in dry place, cover to avoid dust |
| Spare Parts Availability | Blades, motor, remote control available |
| Energy Class | Class A (estimated) |
Frequently Asked Questions - Fanny Plus Argoclima
User questions about Fanny Plus Argoclima
0 question about this device. Answer the ones you know or ask your own.
Ask a new question about this device
Download the instructions for your Fan in PDF format for free! Find your manual Fanny Plus - Argoclima and take your electronic device back in hand. On this page are published all the documents necessary for the use of your device. Fanny Plus by Argoclima.
USER MANUAL Fanny Plus Argoclima
Read the instructions carefully before operating the appliance or carrying out maintenance operations. Observe all the safety instructions; failure to observe the instructions may lead to accidents and/or damage. Keep these instructions in a safe place for future reference.
GENERAL SAFETY INFORMATION
- Use this fan only as outlined in this manual. Any other use not recommended by the manufacturer may cause fire, electric shock or injury to people.
- Ensure that the mains power complies with the voltage specified on the fan's data plate (220-240V\~/50Hz).
- This product is not a toy. Children should be adequately supervised to ensure that they do not play with the appliance.
- This appliance is not suitable for use by people (including children) with reduced physical, sensory or mental abilities, or without the necessary experience and knowledge, unless they have been adequately supervised and instructed concerning use of the appliance by a person responsible for their safety.
- Do not restrict the air inlet and outlet grilles.
- Disconnect the mains power when the appliance is not used or for cleaning operations.
- Do not place anything on the appliance, use the appliance to dry clothing.
- Avoid placing fingers or foreign objects in the air inlet/outlet grilles, as this may lead to electric shock or fire and may damage the appliance.
- To avoid the risk of fire, do not block the grilles or tamper with them in any way while the fan operates.
- Do not use the appliance if the cord or plug are damaged. If the power supply cord is damaged, it must be replaced by the manufacturer, dealer or a similarly qualified person so as to avoid any safety risks.
- Do not operate the appliance if it has fallen from a height or has suffered damage in any way. Contact qualified technical personnel to examine the appliance or perform any electrical or mechanical repairs.
- The most common cause of overheating is the build-up of dust in the appliance. Remove dust deposits by unplugging the appliance and cleaning the air outlets and grilles with the aid of a vacuum cleaner.
- Do not use abrasive detergents for cleaning this appliance. Clean the appliance with the aid of a damp (not wet) cloth rinsed in hot soapy water. Always remove the plug from the mains socket before cleaning.
- To disconnect the fan, push the switch to OFF and remove the plug from the socket. Pull on the plug only. Avoid pulling on the cord when disconnecting the fan.
- Do not place any objects on the cord and do not bend it.
- It is not advisable to use extension cords, as these may overheat and cause the risk of fire. Do not use a single extension cord to operate multiple appliances.
- Do not immerse the cord, plug or any other element of the appliance in water or other liquids.
- Do not touch the plug with wet hands.
- Do not place the fan above or near another heat source.
- Do not connect the appliance to the mains power before it has been properly assembled and positioned.
- Do not run the cord under carpets. Do not cover the cord with blankets, carpets or similar materials. Place the cord far away from busy areas or where it cannot be accidentally pulled-out.
- Do not position the fan below a socket outlet.
- Do not operate the appliance outdoors.
WARNING: DO NOT DEPEND ON THE ON/OFF BUTTON SWITCH AS THE SOLE MEANS OF DISCONNECTING POWER. WHEN SERVICING OR MOVING THE FAN, ALWAYS UNPLUG THE POWER CORD.
- A fan has hot and arcing or sparkling parts inside. It must not be used in potentially dangerous locations such as flammable, explosive, chemical-laden or wet atmosphere.
- Do not place the fan on soft surfaces, like a bed, where openings may become blocked. Always place the fan on a stable, flat, level surface when operating, to avoid the chance of the overturning. Locate the power cord so the fan or other objects are not resting on it.
• Always unplug the fan when not in use.
• In order to avoid accidents turn unit off if unattended. - In the event of any problems (abnormal noise or a strange smell) switch off the appliance immediately, do not attempt to repair it and take it to your local after sales service.
DESK FAN - DESCRIPTION OF PARTS AND ASSEMBLY INSTRUCTIONS

- Front grille
- Nut
- Ring
- Blade
- Nut
- Rear grille
- Motor shaft
- Motor housing
- Neck
- Control box and body
- Base
- Screws
- Remote control
Open the box and remove the parts of the appliance.
Connect the base (11) to the body of the appliance (10) using the screws supplied (12).
Insert the rear grill (6) on the motor shaft (7) in the proper position (hanlde upward).
Screw the nut (5) in order to fasten the rear grill firmly.
Set the blade (4) on the motor shaft (7).
Tighten the nut (2) on the motor shaft (caution - counterclockwise direction).
With the aid of the ring (3) join front and rear grill and tighten the screw on the ring.
The appliance does not need to be installed.
Position the fan on the table.
STAND FAN - DESCRIPTION OF PARTS AND ASSEMBLY INSTRUCTIONS
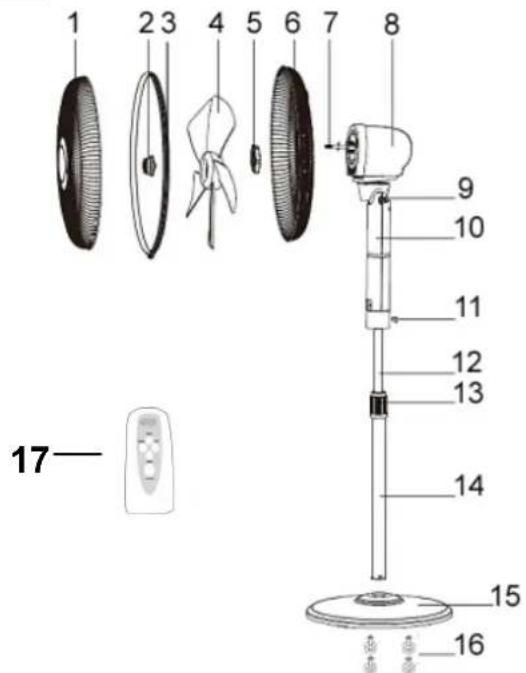
- Front grille
- Nut
- Ring
- Blade
- Nut
- Rear grille
- Motor shaft
- Motor housing
- Neck
- Control box and body
- Screw
- Inner rod
- Height adjustment ring
- Outer rod
- Base
- Screws
- Remote control
Open the box and remove the parts of the appliance.
Connect the base (15) to the outer rod of the appliance (14) using the screws supplied (16).
Unscrew the height adjustment ring (13) and pull out the inner rod(12).
Join the upper part (motor housing 8 + neck 9 + control box 10) and tighten the screw (11) firmly.
Set the height of stand fan by means of height adjustment ring (13).
Insert the rear grill (6) on the motor shaft (7) in the proper position (hanlde upward).
Screw the nut (5) in order to fasten the rear grill firmly.
Set the blade (4) on the motor shaft (7).
Tighten the nut (2) on the motor shaft (caution - counterclockwise direction).
With the aid of the ring (3) join front and rear grill and tighten the screw on the ring.
The appliance does not need to be installed.
Position the unit on a flat, stable surface.
HOW TO USE THE APPLIANCE
Connect the power cord to a suitable power socket (220-240V\~).
Do not use this fan in an area with high humidity, rich of dust or water.
Tilt adjustment: to regulate the air flow upward or downward, push gently the motor housing and adjust the angle of inclination with respect to the neck.
Press ON on the control panel or remote control.
A sound will indicate that the appliance is on and the digital display shows the MODE NORMAL. Fan speed is low.
The fan can be switched off using the OFF button.
This fan can be used both as a fan, with 3 modes (Normal, Natural and Sleep) and 3 fan speed options (low, medium and high).
CONTROL PANEL AND AVAILABLE FUNCTIONS
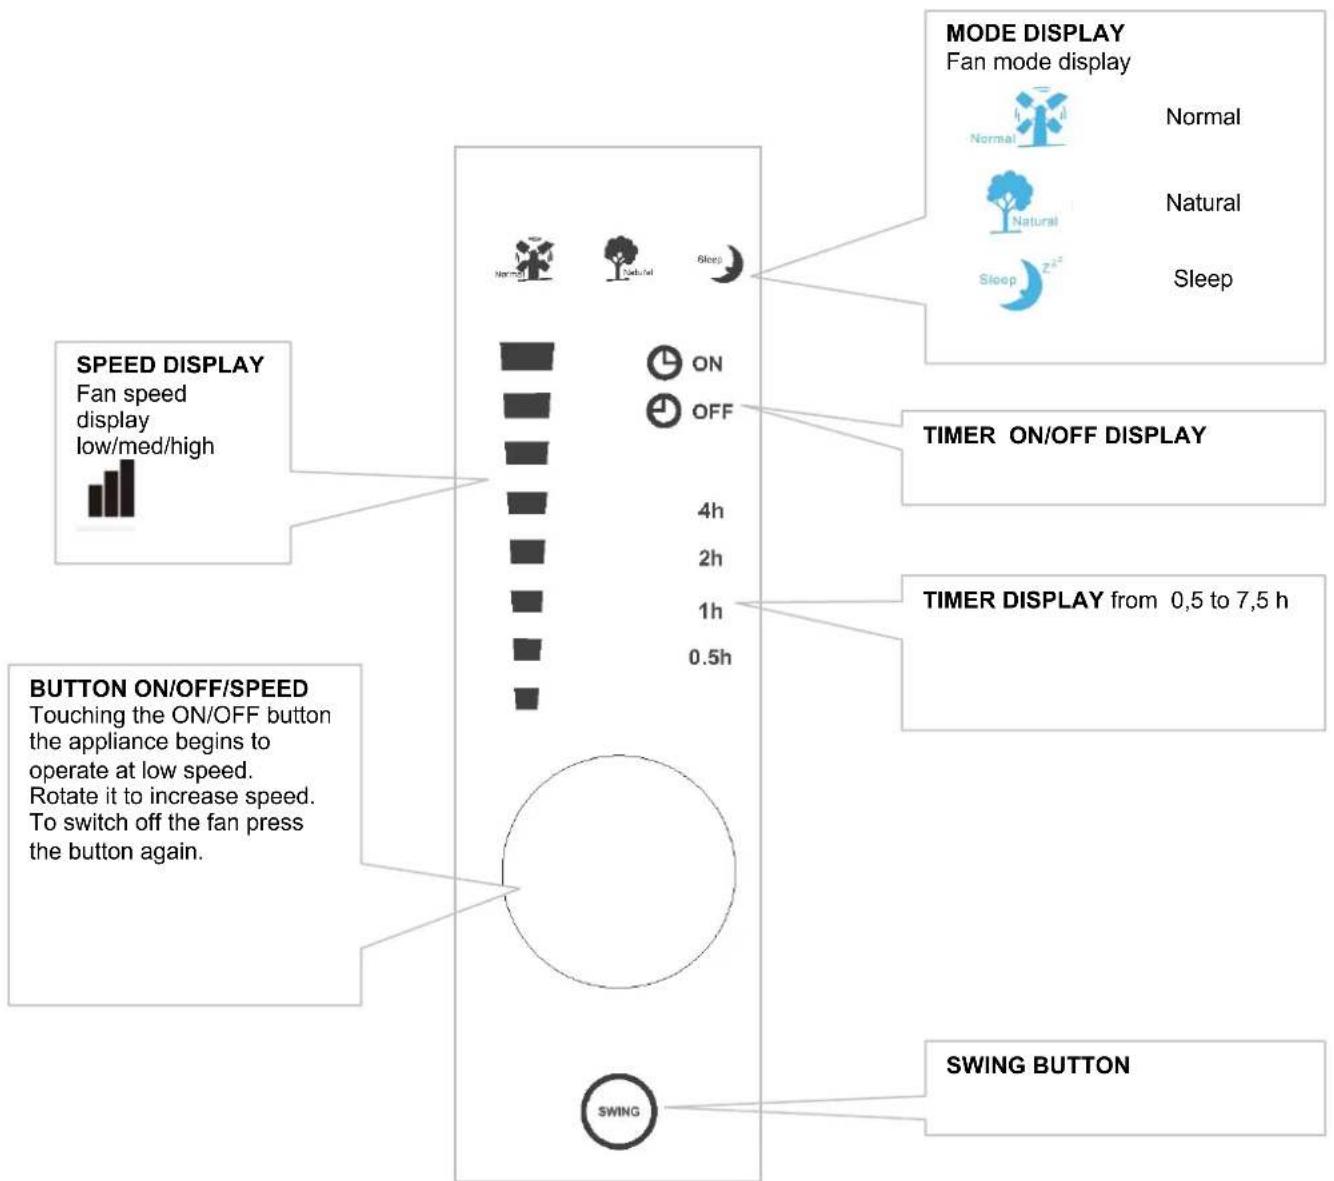
2. MODE SELECTION button (MODE)
Allows you to adjust 3 modes (SLEEP, NATURAL, NORMAL).
The LEDS SLEEP, NATURAL, NORMAL, will switch on simultaneously.
1. TIMER button
When the appliance is operating, the operating time can be set by touching the TIMER button: from 0,5 to 7,5 hours, with each touch corresponding to half an hour. The TIMER DISPLAY is switched on simultaneously and shows the time set. The unit will switch off automatically at the end of the programmed time.
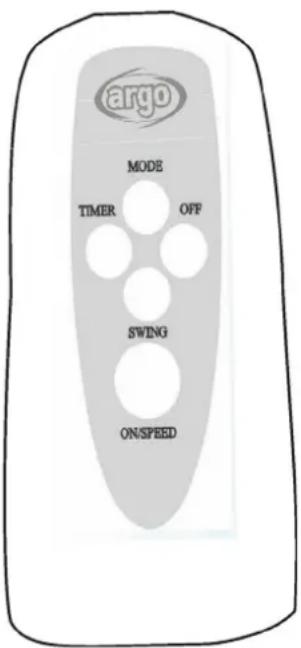
3. OFF button
To switch off the fan press the button OFF.
4. SWING button (SWING)
When the appliance is operating, touch the button SWING to make the appliance oscillate automatically, shifting the air flow from left to right. Touch the button SWING again to interrupt the oscillation.
5. ON/SPEED button
Touching the ON/SPEED button will cause the low speed LED to light and the appliance will begin to operate at low speed.
Touching the button ON/SPEED once again the fan speed increase from low to medium to high.
The LED SPEED is switched on simultaneously.
HOW TO INSERT / REMOVE THE REMOTE CONTROL BATTERIES (refer to the diagram below)
Open the battery cover on the back of the remote control (press and pull the cover).
Place the batteries inside the cover, making sure the polarity is correct.
Slot the cover back into position on the remote control.
Use no. two cells model LR03AAA 1,5V, compliant with Battery Directive no. 2006/66/EC.
Remove the batteries when not using the remote control for a long period of time.

INFORMATION FOR CORRECT DISPOSAL OF THE BATTERIES IN ACCORDANCE WITH EUROPEAN DIRECTIVE 2006/66/EC
Please replace the battery when its electrical charge has been exhausted: at the end of its useful life, it must not be disposed of together with unsorted waste. It must be must be delivered to appropriate separated waste disposal plants or to dealers that provide a similar service. Separate waste disposal of batteries prevents potential negative effects on the environment and human health resulting from inadequate disposal, and also allows the materials from which it is made to be recovered and recycled in order to achieve significant savings in terms of energy and resources. The separate disposal obligation is underlined by the crossed-out dustbin symbol appearing on the battery. Illegal disposal of the product by the user shall result in the application of of administrative sanctions as defined by current regulations.
MAINTENANCE AND STORAGE
ALWAYS UNPLUG THE APPLIANCE BEFORE CLEANING OR MAINTENANCE.
IMPORTANT: DO NOT SUBMERGE THE FAN IN WATER.
Cleaning the outside surface of the appliance
Turn the switch off and unplug before carrying out any maintenance work or moving the appliance.
Use a soft cloth to remove any dust from the fan.
If the fan is excessively dirty, use a soft cloth moistened with water and a mild detergent at a temperature lower than 50°C.
Let the fan dry completely before use.
Do not use corrosive detergents or solvents such as petrol. Do not wash the appliance with water. Do not use oils, chemical substances or other items to clean that may damage the surface.
Use a vacuum cleaner to remove dust from the air inlet/outlet grilles.
STORAGE
If the appliance is not used for prolonged periods, disconnect the power cord and store the appliance with this manual in its
original packaging, in a cool and dry place.

INFORMATION FOR CORRECT DISPOSAL OF THE PRODUCT IN ACCORDANCE WITH EUROPEAN DIRECTIVE 2002/96/EC
When this appliance reaches the end of its useful life, it must not be disposed of with household waste. It must be delivered to appropriate separated waste disposal plants or to dealers that provide a similar service. Separate waste disposal of an electrical appliance prevents potential negative effects on the environment and human health resulting from inadequate disposal, and also allows the materials from which it is made to be recovered and recycled in order to achieve significant savings in terms of energy and resources. The separate disposal obligation is underlined by the crossed-out dustbin symbol appearing on the product. Illegal disposal of the product by the user shall result in the application of administrative sanctions as defined by current regulations.

improve your life
www.argoclima.com


- GENERAL SAFETY INFORMATION
- WARNING: DO NOT DEPEND ON THE ON/OFF BUTTON SWITCH AS THE SOLE MEANS OF DISCONNECTING POWER. WHEN SERVICING OR MOVING THE FAN, ALWAYS UNPLUG THE POWER CORD.
- DESK FAN - DESCRIPTION OF PARTS AND ASSEMBLY INSTRUCTIONS
- STAND FAN - DESCRIPTION OF PARTS AND ASSEMBLY INSTRUCTIONS
- HOW TO USE THE APPLIANCE
- MODE SELECTION button (MODE)
- TIMER button
- OFF button
- SWING button (SWING)
- ON/SPEED button
- INFORMATION FOR CORRECT DISPOSAL OF THE BATTERIES IN ACCORDANCE WITH EUROPEAN DIRECTIVE 2006/66/EC
- MAINTENANCE AND STORAGE
- ALWAYS UNPLUG THE APPLIANCE BEFORE CLEANING OR MAINTENANCE.
- Cleaning the outside surface of the appliance
- STORAGE
- INFORMATION FOR CORRECT DISPOSAL OF THE PRODUCT IN ACCORDANCE WITH EUROPEAN DIRECTIVE 2002/96/EC
Brand : Argoclima
Model : Fanny Plus
Category : Fan