
MW-2110 SR - Beard trimmer Maxwell - Free user manual and instructions
Find the device manual for free MW-2110 SR Maxwell in PDF.


| Product Type | Beard trimmer / hair clipper |
| Model | MW-2110 SR |
| Brand | Maxwell |
| Power Source | Rechargeable battery or corded via power adapter |
| Battery Charging Time (first use) | 12 hours |
| Battery Charging Time (subsequent) | 6 to 8 hours |
| Battery Runtime (fully charged) | Approx. 60 minutes |
| Power Adapter Input | 100-240 V ~ 50/60 Hz |
| Power Adapter Output | DC 3 V, 300 mA |
| Cutting Blades | Adjustable upper blade and stationary lower blade |
| Attachment Combs | 3-6 mm and 9-12 mm |
| Additional Accessories | Comb, cleaning brush, lubricating oil, scissors |
| Usage Intention | Hair cutting (human only, not pets) |
| Operating Temperature | +5°C to +35°C (charging) |
| Max Humidity | 80% relative humidity |
| Cleaning Method | Brush attachments; washable attachments (dry after); wipe body with damp cloth |
| Blade Lubrication | After each use with included oil; do not use vegetable oil or solvents |
| Safety Precautions | Do not immerse in water; unplug when not in use; keep away from children |
| Unit Life | 3 years |
| Package Contents | Hair clipper, 2 attachment combs, power adapter, comb, cleaning brush, lubricating oil, scissors, manual |
| Standards Compliance | EMC Directive 2004/108/EC, Low Voltage Directive 2006/95/EC |
Frequently Asked Questions - MW-2110 SR Maxwell
User questions about MW-2110 SR Maxwell
0 question about this device. Answer the ones you know or ask your own.
Ask a new question about this device
Download the instructions for your Beard trimmer in PDF format for free! Find your manual MW-2110 SR - Maxwell and take your electronic device back in hand. On this page are published all the documents necessary for the use of your device. MW-2110 SR by Maxwell.
USER MANUAL MW-2110 SR Maxwell
natural_image
Diagram of a cylindrical device with radial blades and a numbered label '7' pointing to its top edge (no text or symbols on the device itself)
natural_image
Close-up of a black comb with visible teeth and a circular label showing number 9 (no text or symbols on the comb itself)
natural_image
Diagram of a mechanical component with vertical fins and a numbered label (8) pointing to its top edge.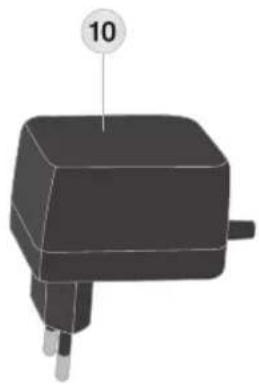
natural_image
3D rendered mechanical component with a numbered label (10) pointing to its top surface, no visible text or symbols on the body itself.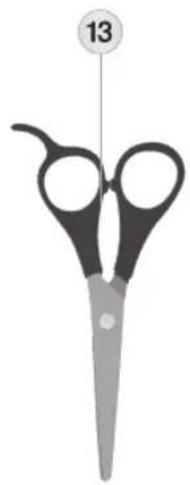
natural_image
Illustration of a pair of scissors with a numbered label (13) on the top right corner, no text or symbols on the scissors themselves.HAIR CLIPPER SET MW-2110 SR
The unit is intended for hair cutting.
DESCRIPTION
- Power adapter cord connection socket
- Power Battery On/ charging indicator
- Power switch «0/I»
- Unit body
- Adjustable (upper) blade
- Stationary (lower) blade
- 3-6 mm Attachment
- 9-12 mm Attachment
- Comb
- Power adapter
- Cleaning brush
- Lubricating oil
- Scissors
SAFETY MEASURES
Before using the unit, read this instruction manual carefully and keep it for future reference. Use the unit for intended purposes only, as specified in this manual.
Mishandling the unit can lead to its breakage and cause harm to the user or damage to his/her property.
- Before connecting the unit to the mains for battery charging for the first time, make sure that your home mains voltage corresponds to the power adapter operating voltage.
- Use only the attachments and the power adapter supplied with the unit.
- Do not use the unit in places with high temperature and relative humidity more than 80%.
- Charge the battery at the temperature from +5°C to +35°C.
- Never use the unit if the attachments or the blades are damaged.
• Do not use the unit to cut hair on pets.
• Always keep the blades clean and lubricated. - After each use, clean the attachments with the brush to remove the cut-off hair.
- Never leave the unit unattended when it is operating or during battery charging
- Switch the unit off during intervals in operation or when you are not using it.
• The power adapter cord must not:
– touch hot objects and surfaces,
– be immersed into water,
– run over sharp edges of furniture,
be used as a handle for carrying the unit. - Never pull the power adapter cord, when disconnecting the unit from the mains, take the power adapter and carefully remove it from the mains socket.
-
Clean the unit regularly.
-
Do not immerse the unit body, the power adapter or the power adapter cord into water or other liquids.
- Do not touch the power adapter body with wet hands.
- Do not leave children unattended to prevent using the unit as a toy.
- For children safety reasons, do not leave polyethylene bags used as packaging unattended.
Attention! Do not allow children to play with polyethylene bags or packaging film. Danger of suffocation!
- Do not allow children to touch the power adapter body during battery charging.
- This unit is not intended for usage by children under 8 years of age.
- This unit is not intended for usage by people (including children over 8) with physical, neural and mental disorders or with insufficient experience or knowledge. Such persons may use this unit only if they are under supervision of a person who is responsible for their safety and if they are given all the necessary and understandable instructions concerning the safe usage of the unit and information about danger that can be caused by its improper usage.
- Never use the unit if the power adapter or the power adapter cord is damaged, if the unit works improperly or after the unit was dropped.
- Do not disassemble the unit by yourself, if any malfunction is detected or after it was dropped, apply to the nearest authorized service center.
- Transport the unit in the original package only.
- Keep the unit out of reach of children and disabled persons.
After unit transportation or storage under winter (cold) conditions, it is necessary to keep it for at least two hours at room temperature. Battery charging
A fully charged battery provides about 60 minutes of continuous unit operation.
- Make sure that the «0/l» power switch (3) is in the «0» position.
- Insert the power adapter (10) cord plug into the socket (1).
- Insert the power adapter into the mains socket, the indicator (2) will light up.
- Before the first usage of the unit, charge the battery for 12 hours.
- After battery charging unplug the power adapter (10) from the mains, remove the adapter (10) cord plug from the socket (1).
Note:
- Duration of each next battery charging should take from 6 to 8 hours.
- If the blades' motion is slowing down and you need to continue the unit operation, you should charge the battery, and it will take at least 1 hour, or connect the power adapter.
- Charge the battery at the temperature from +5 °C to +35 °C.
- Never leave the unit connected to the mains unattended.
- If you haven't used the unit for a long time (more than 2 months), charge the battery completely during 12 hours before using the unit.
Lubricating oil
- To keep the unit in a good condition, you should lubricate the blades (5, 6) after each use of the unit.
Attention! Use only the lubricating oil (12) supplied with the unit. DO NOT USE vegetable oil, fat, oil mixed with any solvents to lubricate the blades. Solvents will evaporate, leaving thick grease that may slow down the motion of the adjustable blade (5).
Installing and removing the attachments (7, 8)
- To install the attachment (7 or 8) insert the ledge from one side of the attachment (7 or 8) into the groove on the unit body (4), then press the opposite side of the attachment (7 or 8) to fix the other ledge.
- To remove the attachment (7 or 8) press the outstanding part of the attachment in the direction from the unit body (4) and remove the attachment (7 or 8).
Using the unit
• For cordless use of the unit, charge the battery fully.
Note: For corded operation, connect the power adapter (10) cord plug to the socket (1) and plug the power adapter into the mains.
- Before cutting hair, switch the unit on by setting the «0/l» power switch (3) to the «l» position and make sure that unit operates normally and the blades move smoothly. If there is excess lubricating oil on blades (5, 6), remove it with a dry lint free cloth.
- Switch the unit off by setting the «0/l» power switch (3) to the «0» position.
- When installing the attachments (7, 8) follow hair length marks on the attachments (7 or 8).
- Switch the unit on by setting the «0/1» power switch (3) to the «1» position.
- After finishing the unit operation switch it off by setting the «0/1» power switch (3) to the «0» position.
Notes:
- Always switch the unit off during the intervals in operation.
- Before changing the attachment switch the unit off, when operating the unit from the mains also unplug the power adapter (10) from the mains.
Haircutting
- Before cutting hair make sure that the hair is clean and dry. The best haircutting results are reached on dry hair, not wet.
- Seat the person so that his/her head is at your eye level, cover his/her shoulders with a towel and set hair with the comb (9).
• Always start cutting from the back of the head. - You can cut hair along and against the direction of hair growth, but keep in mind that the hair cut against the growth will be shorter than the hair cut along the growth.
• To leave longer hair, take hair locks between your fingers and cut hair using the hair clipper. - Cut off a little amount of hair at a time, later you can return to the already cut area again for additional cutting.
- Set the hair with the comb (9) to reveal uneven locks.
- You can lift the hair locks and cut them along the comb (9).
• Use the scissors (13) to make haircut even - With time you will learn to model desired hair-cuts by yourself.
EXAMPLE OF A HAIRCUT
Note: When installing the attachments (7, 8) follow the hair length marks on the attachments (7 or 8).
Step one
Install the «3-6 mm» attachment (7). Switch the unit on using the power switch (3). Hold the unit with the blades pointed upwards. Start haircutting from the beginning of the hair growth. Slowly move the unit upwards. Cut the head back area at the neck bottom and near the ears.
Step two
Switch the unit off. Install the «9-12 mm» attachment (8). Switch the unit on using the power switch (3) and continue cutting hair near the top of the head.
Step 3 – cutting temples
Switch the unit off and install the «3-6 mm» attachment (7). Cut the hair on the temples. Then install
ENGLISH
the «9-12 mm» attachment (8) and continue cutting towards the top of the head.
Step 4 – cutting the crown of the head
Using the «9-12 mm» attachment (8) cut the hair from the top of the head towards the crown against the hair growth direction.
Step 5 – the final part
Remove the attachment (7 or 8) from the unit, turn the blades of the unit towards the hair and carefully trim hair on the temples and neck. Do not press hard on the unit; there is danger of injuries or cuts when open blades come in contact with the skin.
Cone-shaped haircut
Set the necessary attachment (7 or 8) and start cutting from the head back towards the top of the head. Cut hair against hair growth from the head front to the top of the head and on the sides. To get a flat top haircut, use the comb (9): lift the locks and cut them along the comb. Comb the hair to reveal uneven locks.
CLEANING AND CARE
- Switch the unit off right after its use by setting the «0/l» power switch (3) to the «0» position, if you are using the power adapter (10), disconnect it from the mains socket and disconnect the plug of the power adapter (10) cord from the socket (1).
- Remove the installed attachment (7 or 8) from the unit body and clean the inside and outside of the attachments (7, 8) from the cut hair, using the cleaning brush (11).
- You can wash the attachments (7, 8) under a water jet, then wipe them dry.
- Clean the unit body (4) with a soft, slightly damp cloth, and then wipe it dry.
- Do not immerse the unit body (4), the power cord (10) and the power cord plug into water or any other liquids.
- Do not use solvents or abrasives to clean the unit body (4) and attachments (7, 8).
Blade care
Regularly lubricate the blades (5, 6) using the oil (12) supplied with the unit.
- Switch the unit off by setting the «0/l» power switch (3) to the «0» position, if you are using the power adapter (10), disconnect it from the mains socket and disconnect the plug of the power adapter (10) cord from the socket (1).
- Remove the attachment (7 or 8).
- Remove the blade block by simultaneously pressing edges of the blade (5) from the both sides in the direction from the unit body (4).
- Use the brush (11) to clean the inner part of the unit body (4) and the blades block from the cut-off hair.
- Apply one or two drops of lubricating oil (12) on the teeth of the blades and the back supporting part of the upper blade (5).
- Insert the ledge on the lower part of the blades block into the groove on the body (4), press the stationary blade (6) from the outer side until the blade block is fixed. Clicking of the blade block clamp shows that the blade block is set properly.
- Turn the hair clipper on and make sure that the blades are moving smoothly.
- Switch the unit off and remove the excess lubricating oil from the blades (5, 6) with a dry lint free cloth.
STORAGE
- Clean the hair clipper and lubricate the blades (5, 6) with lubricating oil (12) before taking the unit away for storage.
- Keep the unit away from children in a dry cool place.
DELIVERY SET
- Hair clipper - 1 pc.
- Attachment combs - 2 pcs.
- Power adapter - 1 pc.
- Comb - 1 pc.
- Cleaning brush - 1 pc.
- Lubricating oil - 1 pc.
- Scissors - 1 pc.
- Instruction manual - 1 pc.
TECHNICAL SPECIFICATIONS
Input voltage of the power adapter:
100-240 V \~ 50/60Hz
Output voltage: DC (direct current) 3 V, 300 mA
The manufacturer reserves the right to change the specifications of the unit without a preliminary notification.
Unit operating life is 3 years
Guarantee
Details regarding guarantee conditions can be obtained from the dealer from whom the appliance was purchased. The bill of sale or receipt must be produced when making any claim under the terms of this guarantee.

This product conforms to the EMC-Requirements as laid down by the Council Directive 2004/108/EC and to the Low Voltage Regulation (2006/95/EC)
A production date of the item is indicated in the serial number on the technical data plate. A serial number is an eleven-unit number, with the first four figures indicating the production date. For example, serial number 0606xxxxxxx means that the item was manufactured in June (the sixth month) 2006.
DE
- HAIR CLIPPER SET MW-2110 SR
- DESCRIPTION
- SAFETY MEASURES
- Note:
- Lubricating oil
- Installing and removing the attachments (7, 8)
- Using the unit
- Notes:
- Haircutting
- EXAMPLE OF A HAIRCUT
- Step one
- Step two
- Step 3 – cutting temples
- ENGLISH
- Step 4 – cutting the crown of the head
- Step 5 – the final part
- Cone-shaped haircut
- CLEANING AND CARE
- Blade care
- STORAGE
- DELIVERY SET
- TECHNICAL SPECIFICATIONS
- Unit operating life is 3 years
- Guarantee
- DE
Brand : Maxwell
Model : MW-2110 SR
Category : Beard trimmer