
YPF-6106 - Iron Clas Ohlson - Free user manual and instructions
Find the device manual for free YPF-6106 Clas Ohlson in PDF.


| Product Type | Steam Iron |
| Model | YPF-6106 |
| Brand | Clas Ohlson |
| Dimensions (L x W x H) | Approx. 30 x 12 x 15 cm |
| Weight | Approx. 1.2 kg |
| Power Supply | 220-240 V ~ 50/60 Hz |
| Power Consumption | 2000 W |
| Water Tank Capacity | 250 ml |
| Soleplate Material | Ceramic |
| Steam Output (Continuous) | Up to 25 g/min |
| Steam Output (Boost) | Up to 100 g/min |
| Spray Function | Yes |
| Anti-Drip System | Yes |
| Auto Shut-Off | Yes (30 sec horizontal / 8 min vertical) |
| Self-Cleaning / Anti-Calc | Yes |
| Cord Length | 2.5 m |
| Warranty | 2 years |
Frequently Asked Questions - YPF-6106 Clas Ohlson
User questions about YPF-6106 Clas Ohlson
0 question about this device. Answer the ones you know or ask your own.
Ask a new question about this device
Download the instructions for your Iron in PDF format for free! Find your manual YPF-6106 - Clas Ohlson and take your electronic device back in hand. On this page are published all the documents necessary for the use of your device. YPF-6106 by Clas Ohlson.
USER MANUAL YPF-6106 Clas Ohlson
natural_image
Line drawing of a steam iron with handle and internal components (no text or symbols)Art.no Model
18-4516, -1 YPF-6106
34-3054, -1 YPF-6106 / Zebra
Ver. 20141128
Steam Iron
Art.no 18-4516, -1 Model YPF-6106
34-3054, -1 YPF-6106 / Zebra
Please read the entire instruction manual before using the product and then save it for future reference. We reserve the right for any errors in text or images and any necessary changes made to technical data. If you have any questions regarding technical problems please contact our Customer Services.
Safety
- The iron may be used by children of 8 years and above and by persons with reduced physical, sensory or mental capability or lack of experience and knowledge provided they have been given supervision or instruction concerning use of the appliance in a safe way and understand the hazards involved.
- Never let children play with the product.
- Cleaning and maintenance may be carried out by children but only under adult supervision.
- Never leave the iron unattended when it is plugged into the wall socket.
- Unplug the iron before filling the water tank.
- Only use the iron on a stable surface.
- When not in use, place the iron on a stable surface.
- Never use the iron if you have dropped it on the floor, or if there is any visible damage or leakage.
- If the mains lead is damaged it may only be replaced by the manufacturer, retailer or other qualified person to avoid any danger.
- Remember that the iron becomes extremely hot during use. Let the iron cool off completely before putting it away for storage.
- The iron should be kept out of reach of children under the age of 8 when it is in use or while it is cooling down.
Before initial use
The first few times the iron is used, a harmless odour and smoke may be given off. This is completely normal and is only temporary. Test the iron for the first time on an old piece of cotton cloth to check that both the soleplate and the water tank are clean.
Buttons and functions
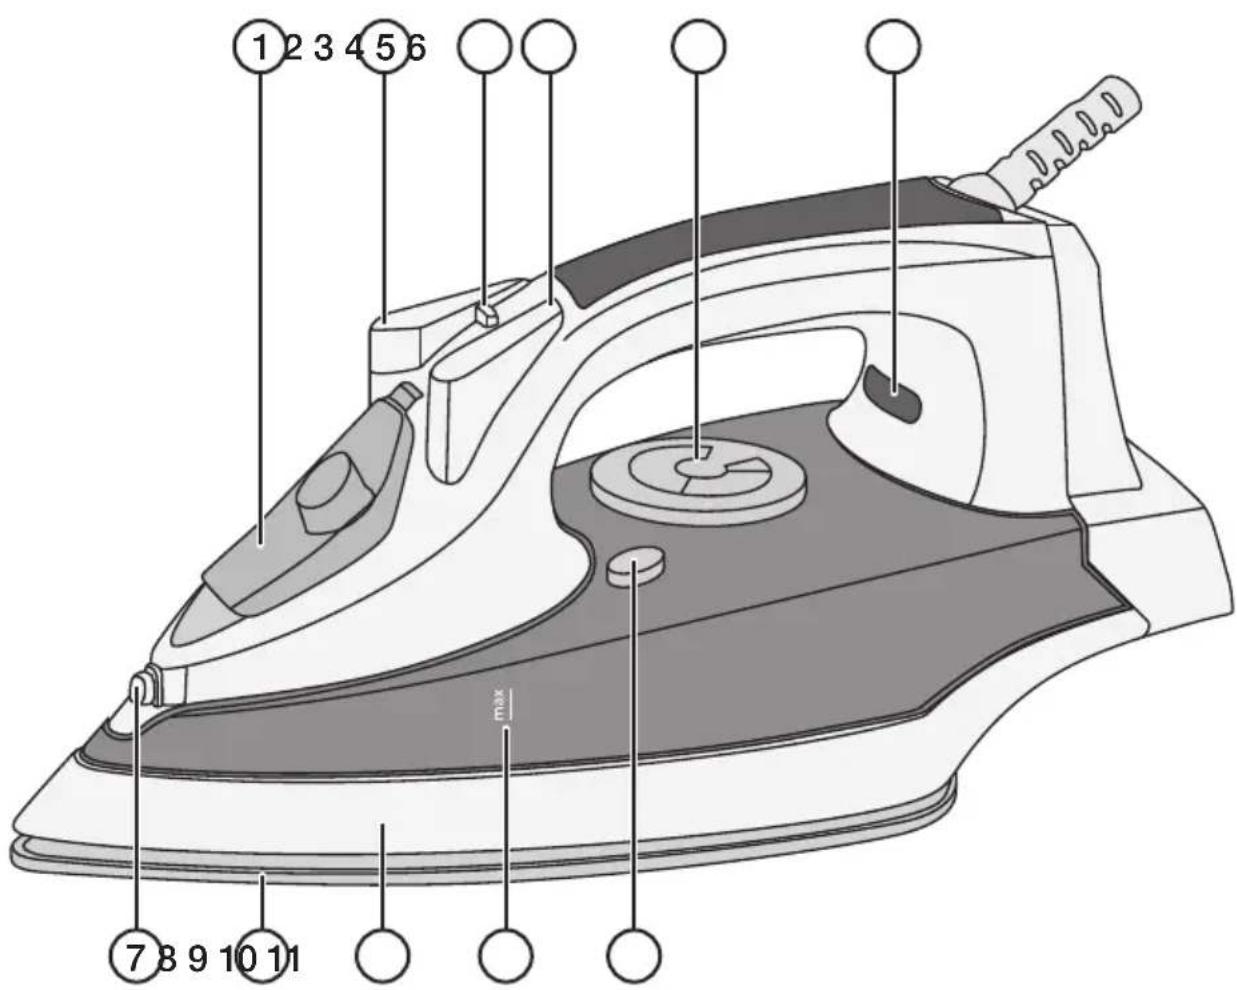
- Water tank refill port
- Steam shot button
- Steam control knob
- Spray button
- Temperature control knob
- Indicator light
- Spray nozzle
- Soleplate
- Housing
- Water tank
- Self-cleaning button
Water selection
This iron can be used with normal tap water. However, if you live in an area of relatively hard water, we suggest that you use distilled water.
Refilling
- Set the steam control knob to ✗ and the temperature control knob to min.
- Unplug the iron and let the soleplate cool down.
- Fill the tank with water up to the max level mark.
Temperature setting
• Always check the fabric care label on your clothing.
- Always use the lowest recommended temperature setting if the fabric consists of mixed materials.
- Plug in the iron and stand it upright.
- Turn the temperature control knob to the desired setting.
- The indicator lamp will go off when the temperature has been reached. The indicator lamp will come on and go off from time to time as the desired temperature is maintained.
Spray feature
This function can be used at any time and does not affect the temperature setting. Press the spray button (4) to spray a jet of water.
Steam ironing
This feature only works on the higher temperature settings.
-
medium heat
●●● high heat -
Fill the steam iron with water if you have not already done so.
- Plug in the iron and stand it upright.
- Set the temperature control knob to ●● or ●●●.
- The indicator lamp will go off when the temperature has been reached. The indicator lamp will come on and go off from time to time as the desired temperature is maintained.
- Set the steam control knob (3) to the desired setting, steam will come out of the holes in the soleplate.
Note: Water can escape from the holes in the soleplate if the temperature setting is too low. If this happens, set the temperature control knob (5) to ●● or ●●●. The steam will return when the correct temperature has been reached.
Steam shot feature
The steam shot feature can be used for both dry ironing and steam ironing. However, the temperature must be set on high. The steam shot feature can help you eliminate stubborn creases.
- Hold the iron over the piece of clothing.
- Press the steam shot button (max 2 seconds) until the steam begins flowing through the holes of the soleplate.
- Release the steam shot button.
Dry ironing
- Set the steam control knob to ✕
- Plug in the iron and stand it upright.
- Turn the temperature control knob to the desired setting.
- The indicator lamp will go off when the temperature has been reached. The indicator lamp will come on and go off from time to time as the desired temperature is maintained.
Note:
Do not scratch the soleplate – do not slide it over metal items such as buttons or zips.
After use
Warning: The iron is very hot directly after use. Remember to let it cool off completely before storing it.
- Unplug the product from the wall socket.
- Empty the water tank by pouring out the water. Press the spray button a few times to make sure the tank is completely empty.
Automatic standby shutdown/restart
The iron is equipped with an auto standby safety shutdown feature. If the iron is left unused for approximately 8 minutes it switches to standby mode automatically. If the iron is picked up when it is in standby mode, it will come back on again.
Note: This feature does not switch the iron off completely. When you have finished ironing the iron must be switched off at the wall socket or unplugged.
Self-cleaning
We recommend that you use the self-cleaning function at least once a month, possibly more depending on the quality of the water in your area. The self-cleaning function removes scale and dust particles from the water tank.
- Fill the water tank to half full.
- Set the temperature control to max and the steam control knob to ✗.
- Stand the iron upright.
- Plug the iron in to a wall socket.
- Wait until the iron has become really hot.
- Hold the iron over a basin/sink and press the self-cleaning button for a few seconds. Water and steam should begin flowing from the soleplate.
- Carefully shake the iron back and forth to loosen any scale or dirt deposits inside the water tank.
- Stand the iron upright and let it reheat.
- When the indicator light turns off, iron a test piece of cotton fabric. This cleans the soleplate from possible scale and dirt.
Care and maintenance
Cleaning the housing
- Note: Unplug the iron from the wall socket before cleaning.
- Wipe the exterior with a moist, soft cloth. Do not use abrasive cleaning agents or solvents.
Disposal
This product should be disposed of in accordance with local regulations. If you are unsure how to proceed, contact your local authority.
Specifications
Supply voltage 220–240 V, 50 Hz
Power 2 200 W
Water tank 300 ml
Cable length 3 m
Ångstrykjärn
Art.nr 18-4516, -1 Modell YPF-6106
34-3054, -1 YPF-6106 / Zebra
34-3054, -1 YPF-6106 / Zebra
34-3054, -1 YPF-6106 / Zebra
34-3054, -1 YPF-6106 / Zebra
Postal 10 – 13 Market Place
Kingston Upon Thames
Surrey
KT1 1JZ
Deutschland
- Steam Iron
- Safety
- Before initial use
- Buttons and functions
- Water selection
- Refilling
- Temperature setting
- Spray feature
- Steam ironing
- Steam shot feature
- Dry ironing
- Note:
- After use
- Automatic standby shutdown/restart
- Self-cleaning
- Care and maintenance
- Cleaning the housing
- Disposal
- Specifications
- Ångstrykjärn
- Deutschland
Brand : Clas Ohlson
Model : YPF-6106
Category : Iron