PN3800II - Saw Cotech - Free user manual and instructions
Find the device manual for free PN3800II Cotech in PDF.


| Product Type | Circular Saw |
| Brand | Cotech |
| Model | PN3800II |
| Power Supply | 220-240 V, 50 Hz |
| Rated Power | 1200 W |
| Blade Diameter | 185 mm |
| Arbor Size | 20 mm |
| Max. Cut Depth at 90° | 64 mm |
| Max. Cut Depth at 45° | 45 mm |
| No-Load Speed | 5000 rpm |
| Weight | 4.2 kg |
| Dimensions (L x W x H) | 310 x 240 x 230 mm |
| Bevel Capacity | 0° to 45° |
| Dust Extraction Port | Yes, 35 mm |
| Blade Guard | Auto-retracting lower guard |
| Safety Switch | Double-pole, non-lockable |
| Spindle Lock | For easy blade changes |
| Parallel Guide | Included, adjustable |
| Maintenance | Clean dust, check carbon brushes every 50 hours |
| Spare Parts Availability | Blades, carbon brushes, power cord |
Frequently Asked Questions - PN3800II Cotech
User questions about PN3800II Cotech
0 question about this device. Answer the ones you know or ask your own.
Ask a new question about this device
Download the instructions for your Saw in PDF format for free! Find your manual PN3800II - Cotech and take your electronic device back in hand. On this page are published all the documents necessary for the use of your device. PN3800II by Cotech.
USER MANUAL PN3800II Cotech
Read the entire instruction manual carefully and make sure that you fully understand it before you use the equipment. Keep the manual for future reference.
Viktig information:
natural_image
Black-and-white illustration of a CO TECH chain saw with visible gear and blade (no text or symbols on the device itself)ART.NO
30-9680
MODEL
PN3800II
Ver. 20130819
Original instructions
Bruksanvisning i original
Please read the entire instruction manual before using and save it for future use. We apologise for any text or photo errors and any changes of technical data. If you have any questions concerning technical problems please contact our Customer Service Department (see address on reverse.)
1. Guidelines for safe use
- Never use the chain saw if you are tired, sick, upset or under the influence of medication which causes drowsiness, alcohol or drugs.
- Wear protective footwear, tight-fitting clothes and safety glasses/visor, ear defenders and a helmet.
- Always be careful when handling fuel. Wipe off any spilt fuel and move the chain saw at least 3 metres away from the refuelling place before starting it.
3a. Remove any sources of ignition, sparks, open flames, smoking, etc. from places where the fuel is mixed, used or stored.
3b. Do not smoke while fuelling or using the chain saw. - Do not permit anyone other than the operator to come close to the chain saw when it is being started or used. Keep away from onlookers and animals. Children, pets and onlookers should keep at a distance of at least 10 metres from the chain saw when it is being used.
- Never begin using the chain saw without supervision of the work site. Make sure you are standing safely and with good balance or that you have an escape route so you can quickly move to a risk free area for tree felling.
- Always hold the chain saw steadily with both hands when the engine is running. Hold the handles with thumbs and fingers on each side of the handle.
- Keep all of your body parts away from the saw chain when the engine is running.
- Make sure that the saw chain is not in contact with any object before starting.
- Always carry the chain saw with the engine shut off. The guide bar should be turned backwards and the silencer should be turned away from the body
- Always inspect the chain saw before starting. Do not start it if there are worn, damaged or missing parts. Never use a chain saw which is damaged, incorrectly adjusted or not completely assembled correctly. When the engine has started: Check that the chain saw stops completely when you let go of the throttle.
- All service on the chain saw besides that mentioned in the manual should be carried out by qualified personnel, e.g. the wrong tool used for dismantling of the flywheel or a wrong tool used for securing the flywheel while dismantling the centrifugal clutch could lead to the flywheel loosening later.
- Shut off the engine before it is placed on the ground.
-
Take extra caution when you are cutting small bushes or brushwood. Small branches can get stuck in the chain saw and pull in the saw chain or tug causing you to lose your balance.
-
Be careful when cutting off hung branches. Guard against falling branches or getting stuck in them when the tension releases during cutting.
- Never fell a tree in strong or gusty winds, bad weather conditions with poor visibility or extremely high or low temperatures. Check that there are no dead branches which can fall down and injure you before the felling begins.
- Keep the handles clean, dry and free from oil or fuel.
- Use the chain saw only outdoors or in well ventilated locations. Never start it in a closed room or building. Exhaust fumes are dangerous to inhale. They contain carbon monoxide.
- Never use the chain saw while standing in a tree. This can only be done by trained personnel. Risk for Injury!
- Guard against kickback. Kickback is when the guide bar is thrown upward/backward which can occur when the tip of the guide bar comes in contact with an object. Kickback is very dangerous when the guide bar can suddenly be thrown up with strong force.
- Always make sure that the protection for the guide bar is mounted during transport.
Safety rules for preventing kickback
Warning!
Kickback is when the guide bar is thrown upward/backward which can occur when the guide bar's tip touches an object, or when the wood closes in and pinches the saw chain in the cut.
Contact with the guide bar's tip against an object can lead to a lightning-fast reverse action of the guide bar causing the chain saw to be thrown upwards/backwards where the guide bar with its rotating chain can yield injury to the user.
Do not only rely on the built-in safety details. You must also think for yourself before the work begins so that the risk for accidents is minimized.
- If you understand what causes kickback you can avoid being surprised. Unexpected courses of events increase the risk for accidents.
- Hold the chain saw with a steady grip with both hands, the right hand on the rear handle and the left hand on the forward arched handle at all times when the engine is running. Hold the handles with thumbs and fingers on each side of the handles. If you hold the saw steadily and correctly you will reduce kickback. It is easier to keep control of the chain saw if kickback should occur.
- Make sure that the work site is completely free from obstacles. Do not let the tip of the guide bar come in contact with branches, logs or other objects when the chain saw is being used.
- The chain saw should run on full capacity when sawing begins and also during the entire time when cutting of the tree is in process.
- Stand steadily and do not stretch. Never use the chain saw above shoulder height.
- Follow the manufacturer's instructions for sharpening and maintenance of the chain saw.
- Use only the original guide bar and saw chain, (or same quality).
2. Key of chain saw symbols
Product safety symbols and their meaning
For work safety and maintenance the chain saw is marked with warning symbols.
Try to understand the importance of the warning symbols and avoid making mistakes.

Important safety instructions.
Read the entire operating instructions before using product.

Warning! Risk for kickback.

Wear head protection, eye protection/visor and ear defenders.

Read carefully, understand and follow the safety instructions.
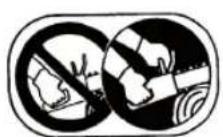
Always hold the chain saw with both hands.

Fuelling: Use only oil-mixed petrol.

Filling Oil: Check and fill with chain oil as needed.

On the back left side: Set ignition switch in "0" position to be able to quickly shut off the engine.

On the upper right part of the air filter cover: How to start the engine. Pull out the choke lever (at the back right side of the air filter cover) in the direction of the arrows to set the starting positions:

Position 1: The choke lever pulled out one notch – for start from warm engine.
Position 2: The choke lever pulled out two notches – for start from cold engine.
H H: adjustment of high speed nozzle
L L: adjustment of low speed nozzle
T T: adjustment of idle

On the saw's right side: The symbols indicate when the chain brake is disengaged (clear arrow) and released (filled arrow).
3. Assembly of guide bar and saw chain
This box contains:
Figure 1

Open the package and check that all the parts are included.
Assemble the guide bar and saw chain
Warning! The saw chain is very sharp. Use protective gloves while handling the saw chain for safety.
- Check that the chain brake handle is in rear position so that the chain brake is not released.
- Loosen both collar nuts which secure the chain sprocket cover.
- Wrap the saw chain round the chain sprocket. Put the guide bar on the bar bolts and push back the bar as far as it goes. Wrap the saw chain round the bar and adjust the chain tightener so that the heel fits into the holes of the bar.
Figure 2 Figure 3

Sprocket cover
Direction of movement
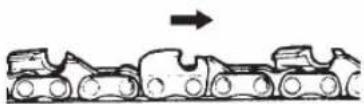
Note! Pay attention to assemble the saw chain in the correct direction.
-
Assemble the chain sprocket cover on the saw body and tighten the collar nuts by hand.
-
Hold the guide bar tip up and adjust the chain tension by turning the tension screw until the saw chain lies alongside the guide bar.
-
Hold up the tip of the guide bar and tighten the collar nuts (12 \~ 15 Nm). Check the chain tension/mounting as follows; The chain should be able to be lifted about 5 mm in the middle of the bar when the chain tension is correct. Wrap the saw chain around the bar by hand and see if it runs as it should (always use gloves while handling the chain saw), adjust the chain tension as needed.
-
Remember to loosen the collar nuts somewhat before you turn the chain tension screw, and to tighten the collar nuts again after adjustment.

Note! A new saw chain will lengthen in the beginning. Check and adjust the chain tension often. A loose chain can come off or dull both the guide bar and saw chain.
4. Fuel and chain oil
Fuel
Warning! Petrol is highly flammable. Avoid smoking close to where fuel is handled, do not cause any sparks embers or naked flames either. Switch off the chain saw and let it cool before refuelling it. Refuel outdoors and always move at least 3 metres away from the refuelling site before starting the chain saw.
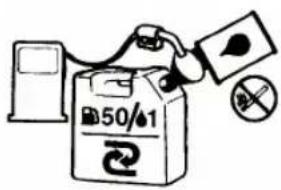
- Mix petrol (unleaded 95 octane without added ethanol) with a good quality 2-stroke oil intended for air-cooled 2-stroke engines.
• Recommended mixture: Petrol/oil 50:1 (2 %)
The engine is designed to be used with unleaded fuel.
• Use at least 87 octane fuel.
• If petrol with octane under 87 is used the engine can overheat resulting in engine damage.
• Use unleaded fuel to protect the environment and your health.
- Bad quality fuel or oil can damage seals, fuel pipes or the fuel tank.
Figure 5

natural_image
Illustration of a no-smoking cigarette crossed out of flames, symbolizing tobacco or smoking (no text present)
Mixing fuel
Note! Be precise with the mixture.
- Measure out the petrol and oil precisely before mixing.
- Pour a small amount of the petrol into a clean fuel can.
- Pour in all of the oil and agitate the fuel can.
- Pour in the rest of the petrol and agitate the fuel can for at least a minute. Certain oils do not mix well; therefore it is important that the fuel can be agitated to mix the oil and petrol. The engine will last longer if the fuel is well mixed, if the fuel is not mixed properly the mixture will be too lean and the engine may be damaged.
- Label the fuel can clearly, to avoid the risk of misidentification.
- Fuel containing oil is only intended for 2-stroke engines, pure petrol is for 4-stroke engines, it is therefore very important to label the fuel cans clearly.
Filling the chain saw
- Unscrew and remove the fuel cap.
- Fill with fuel until the can is roughly 80% full.
- Replace and tighten the fuel cap then wipe up any spilt fuel on or around the chain saw.
Warning!
- Refuel outdoors and on the ground.
- Always move at least 3 metres away from the refuelling site before starting the chain saw.
- Switch off the chain saw and let it cool before refuelling it. Only refuel when you are sure that the fuel can contains 2-stroke fuel!
Avoid the following to prolong the chain saw's longevity:
- Never use pure petrol. It can lead to engine damage very quickly.
- Do not use ethanol. This can reduce lubrication and can cause damage to rubber and plastic details.
- Do not use oil which is intended for four-stroke engines. The oil can block the spark plug and exhaust port or the piston rings become stuck.
- Unused two-strokes fuel which has remained in the chain saw's can for more than one month can thicken and lead to carburettor problems and result in difficulty when starting the chain saw again.
- When storing the chain saw for a longer period of time empty and rinse/dry the fuel can. Then start the engine and run until the fuel in the carburettor is gone.
- Make sure that fuel and oil surplus is delt with in an environmentally friendly way. Follow you local environmental ordinances.
Note! The guarantee does not cover damage which occurs due to wrong fuel, carburettor adjustment or if the operating manual has not been followed.
Chain oil
Use a chain saw oil of good quality. It should have good adhesiveness and lubricate better than engine oil. With exception can engine oil be use.
Never use filtered used oil. The oil pump can be damaged.
5. Engine
Warning! It is very dangerous to use a chain saw which has been damaged or has missing parts. Always check before starting that all the parts including the guide bar and saw chain are whole and mounted correctly.
How to start the engine

- Fill with fuel and chain saw oil and tighten the refuelling cap.

- Set the on/off switch to "I" and press the priming bulb 6–7 times.

Figure 8
natural_image
Three sequential line drawings of a mechanical component or tool, showing progressive assembly without any text or symbols.fig. a fig. b fig. c

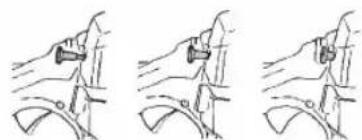
- Pull out the choke lever to the outermost position = two notches. See Figure a (CHOKE), the choke valve closes and the throttle locks in starting position. As soon as the engine is started the choke lever must be put into the START position. See fig. b (pull out choke lever one notch).
Note! Restarting directly after the engine has been shut off: Pull out the choke lever one notch. See fig. b (START) (choke valve open and throttle lever in start position).
Note! When the choke lever has been pulled out it can not be pushed back. Push in the throttle to free the choke lever so it will return to the first position. See fig. c (RUN).
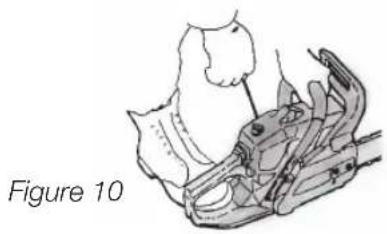
- Place the chain saw securely on the ground. Place one foot on the rear handle and hold the handle arch with one hand. Pull/tug the start handle with the other hand.
natural_image
Line drawing of a mechanical assembly with a hand holding a tool, labeled 'Figure 10' (no other text or symbols)Warning!
Do not start the chain saw while it is held in one hand. The chain saw can kickback at start and can cut into some part of the body. This is very dangerous!
- As soon as the engine ignites the choke lever must be put into START position. See fig b and pull/tug the start handle again to start the engine.
- Warm up and keep the engine running by gasing the engine a little.
Warning! Make sure that the saw chain is not in contact with anything when the engine is started. The saw chain starts to rotate directly when the motor starts.
Check the chain lubrication
Warning! The guide bar, saw chain and drive sprocket should always be assembled while checking the chain lubrication. If you start without these being assembled you can be injured by rotating parts or by the centrifugal clutch's weights. It is very dangerous to start the chain saw if all the parts are not mounted.
Start the engine and let it run on medium speed. Keep the guide bar with the saw chain close to the ground or an object. If the chain lubrication is working a small amount of oil should spatter in front of and under the guide bar.

Figure 11 Figure 12 Figure 13
Adjusting caburettor
The carburettor is carefully adjusted in the factory however it might need to be trimmed.
Before adjusting the carburettor you must always check that the air filter is whole and clean and that the right quality fuel and oil mix are in the fuel can.
If you need to adjust the carburettor do so in the following way:
Note! Guide bar and saw chain must always be assembled before adjusting the carburettor.
- Shut the engine off and screw in (clockwise) both nozzles (H and L) completely. Do not tighten, only until they stop. Then unscrew (anticlockwise) them.
H (high speed nozzle): 3/4± 3/8 revolution
L (low speed nozzle): 1½±¼ revolution
- Start the engine and warm it up on semi-gas.
- Carefully turn the low speed nozzle (L) clockwise to a positon which gives the highest idle revolution. Then turn the nozzle back 14 revolution anticlockwise.
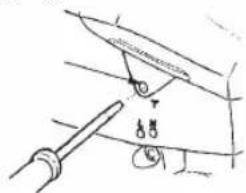
- Turn the idle screw (T) anticlockwise and decrease the engine revolution until the saw chain stops. Turn the idle screw (T) clockwise if the idle is too low.
- Make a trial cut into a log and adjust the high speed nozzle (H) for strongest power, not for the highest revolution. It should not die out. It should four-stroke.
Chain brake
The chain saw comes equipped with an automatic chain brake to stop the saw chain from kickback. The chain brake is activated by the inertial forces triggered by the kickback itself. The chain brake can also be activated manually by pushing forward the front hand guard in front of the arched handle. Release the activated chain brake by pulling the front hand guard backward towards the arched handle until it stops with a click.
Warning! Test the chain brake before you begin working with the chain saw.
Check the chain brake:
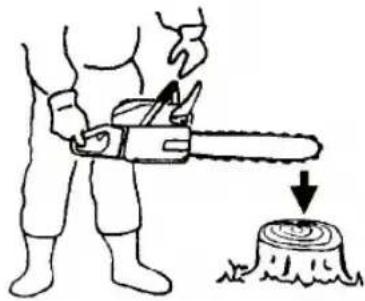
- Shut off the engine.
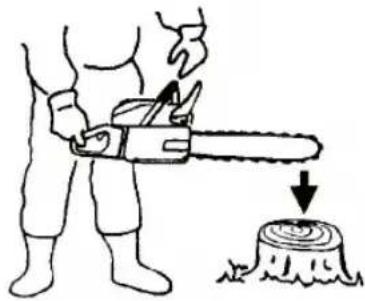
- Hold the chain saw horizontally over a stump, log etc. Hold the rear handle and let go of the arched handle so that the guide bar strikes the stump. The chain brake should automatically activate (sensitivity for the chain brake's activation depends on the length of the guide bar).
Figure 14

natural_image
Technical line drawing of a mechanical clamp or bracket assembly with two views (no text or symbols)Figure 15

Contact the retailer for reparation if the chain brake does not activate.
If the motor continues to run on high revolution without activating the chain brake the clutch will overheat and become damaged. Release, therefore, the throttle directly when the chain brake has been activated.
Stop engine
- Release the throttle and let the engine idle a little while.
- Turn the ignition switch to position "0".

Figure 16
6. Use of chain saw
Note!
To prevent inaccurate use of the chain saw read the entire operating manual before you begin using the chain saw for the first time. All information concerning use of the chain saw is relevant to your personal safety.
Let a professional user show you how to use the chain saw and protective equipment before you begin using it yourself for the first time! Start by cutting timber on a saw horse to acquaint yourself with the chain before you take on more difficult tasks.
Always follow the safety instructions. The chain saw is intended only for cutting wood material. Never use the chain saw for cutting other material. Vibrations and kickback can occur when cutting other material. Never use the chain saw to lift, move or split objects. Do not fasten it onto a stationary stand or other object. It is completely forbidden to connect other accessories to the drive shaft of the chain saw other than those which are specified from the manufacturer.
- It is not necessary to press the guide bar hard against the object being cut. Let the engine run on full speed and carefully press the guide bar against the object to be cut.
- Do not try to pull the guide bar out if it has fastened in the track. Use instead a wedge or breaking bar so the saw track widens and the guide bar loosens.
Kickback
Figure 17

natural_image
Diagram of a circular mechanical or robotic system with four figures and rotating components, no text or symbols present.- The chain saw comes equipped with an automatic chain brake to stop the saw chain from kickback. Check the chain brake before using every time. Let the engine run on high speed 1 to 2 seconds and manually activate the chain brake by pushing forward the front hand guard in front of the arched handle. The saw chain should stop immediately even if the engine is running on full speed. If the saw chain stops slowly or not at all the brake band or brake drum must be changed or cleaned.
- It is very important that the chain brake is checked every time before it is used and that the saw chain is sharp edged and correctly sharpened to avoid kickback. Deleted safety details, wrongful maintenance or faulty assembling of guide bar and saw chain lead to increased risk for accidents related to kickback.
Tree felling
Note! Protective equipment should always be used for forestry work: Helmet with ear defenders and visor, trousers with cutting protection, boots or shoes with cutting protection and of course a first aid kit. Also use work clothes in a visible colour that stands out.
Small trees can often be felled with a cut almost entirely through the whole trunk and pushed in the correct direction by hand or by a shoulder. (Do not cut completely through, save a little of the trunk to be used as a hinge).
Larger trees demand directional felling. Directional felling determines the direction of the fall.
Warning! Always make sure that you have an escape route ready. If needed take away bushes and branches that are in the way. The best escape route (A) is diagonally behind the felling direction (B).
Warning! Always make sure to stand on the uphill position of the tree if the ground is uneven at the site of felling, as it with great probability that the tree will glide or roll downward after felling.
Note! The tree's felling direction (B) is determined by directional felling. Check before felling if the tree leans somewhat towards one direction or another or if the branches are much larger on one side of the tree so that the tree has a natural fall direction.
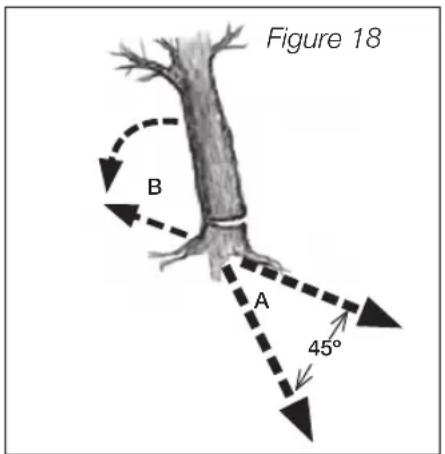
Warning! Never fell a tree alone or if there is risk for it falling onto something which can be damaged, house, fence etc. Get help from a professional. Never fell a tree close to a power line or telephone line. Check that there are no onlookers or pets close by before you begin cutting. Look up often and check that no one is approaching the risk area.
Normal tree felling consists of two cutting phases, directional cutting (C) and felling cut (D).
Start with the top directional cut (C) on the side of the tree which is facing the felling direction (E). Then make a bottom directional cut horizontally so that it will meet the top directional cut (do not cut too far). The directional cut should be broad enough so that it will steer the tree during a large part of the fell as possible.
Warning! Never walk in front of a tree where you have made a directional cut.
Make the fell cut (D) from the other side of the tree and 3-5 cm over the bottom directional cut.
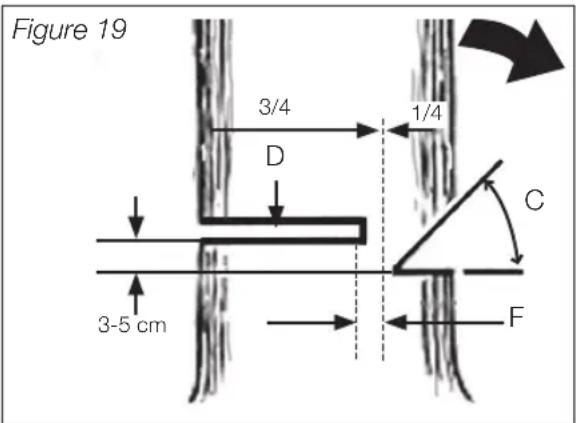
NEVER cut through the remaining trunk completely. Always leave a hinge (F). It is the hinge that steers the tree during the fell. If the tree is completely cut through you will loose control of the direction of the felling and the tree can fall towards whichever direction. Place a felling wedge or breaking bar in the felling cut before the cutting has been completed. If you cut the entire fell cut before placing a felling wedge or breaking bar in the cutting track the tree can bend backwards and clamp down on the guide bar. Before felling the tree check that no onlookers or pets are within the risk area.
Warning! Before making the final cut check again that there are no onlookers, pets or other obstacles within the area.
- Use a felling wedge of plastic or wood (A) to prevent the guide bar (B) from being clamped down upon in the cutting wedge.
Figure 20
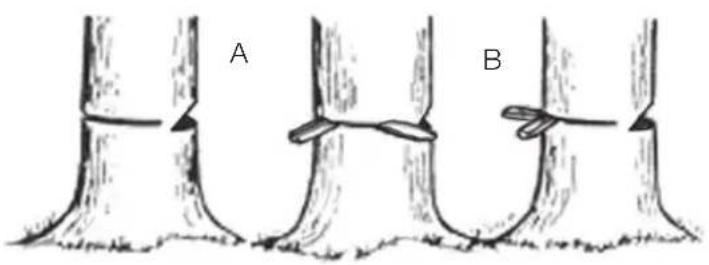
- If the diameter of the tree is larger than the length of the guide bar you must make two cuts.

natural_image
Diagram of a mechanical device with rotating arm and curved arrow indicating rotation (no text or symbols)Figure 21
Warning! When the fell cut (D) has been cut so deep that only the wedge (F) is left the tree can begin to fall, otherwise you must use a felling wedge or breaking bar to help.
Take away the chain saw and shut off the engine. Take a few steps diagonally back and towards the side and into the escape route and keep your eye on the tree when is falls (fig 18).
De-limbing
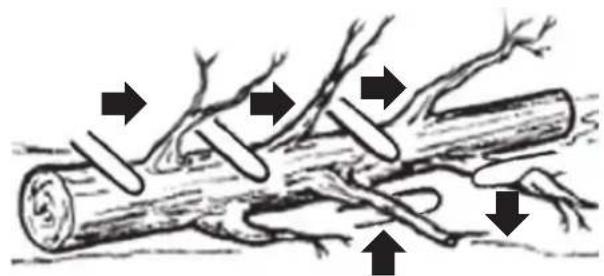
De-limbing refers to cutting away branches on a fallen tree. Start by cutting the higher branches on the tree. Stand to one side of the tree and de-limb them from the other side of the trunk (the trunk will serve as protection between you and the chain saw). Take caution when cutting branches which are hung up. They should be cut from the correct side otherwise the cutting bar will get stuck.
Warning! Never stand on the tree trunk while de-limbing.
natural_image
Illustration of tree branches with arrows indicating movement or force (no text or symbols)Figure 22
A
Cutting
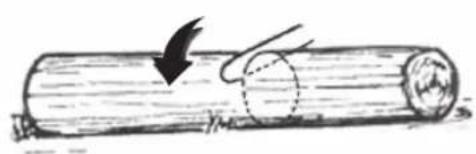
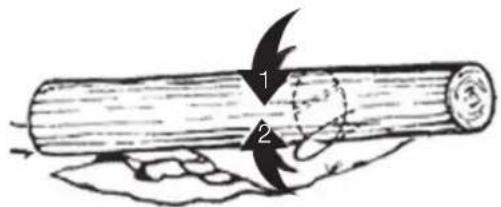
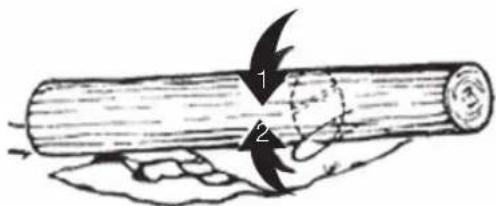
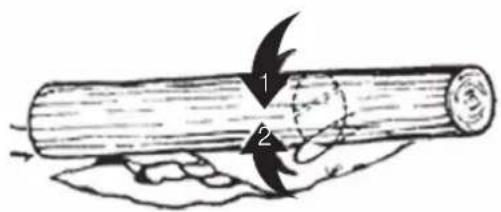
During the cutting phase, fallen trunks are cut to another length. Make sure that you are standing steadily with good balance. If the ground is sloped you should stand in the uphill position of the tree trunk when cutting. The tree trunk should preferably be chocked up on something so that it is not lying directly on the ground which helps to prevent the saw chain from cutting into the ground and becoming dull. If the tree trunk has support on both ends you must begin by cutting it in the middle. Start by cutting through half of the log from above. Then make a cut which meets from underneath. Otherwise the saw can be clamped down upon. Be careful not to let the saw chain come in contact with the ground.
- A tree trunk with support underneath the entire length: Cut from above the trunk first, then roll the trunk over and make cuts which meet from above.
- A trunk with support from one end (e.g. the tree trunk lies against a saw horse): Cut from underneath first (1/3 of the diameter, to avoid splitting). Then make a cut which meets from above.
- A tree trunk with support at both ends: Cut from above first (1/3 of the diameter, to avoid splitting). Then make a cut which meets from underneath (Fig 24).
Figure 23 Figure 24
natural_image
Simple line drawing of a wooden log being cut with a black arrow indicating the direction (no text or symbols)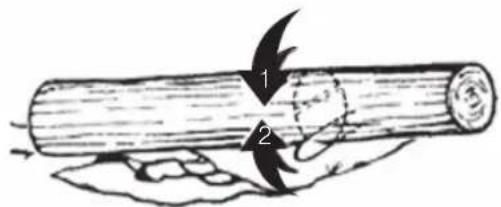
Note! The best way to cut is to use some type of support, preferably a saw horse. If that isn't possible the tree trunk can lean against something else, however make sure that the tree trunk leans securely so that it doesn't roll or fall down.
Figure 25
Cutting with help of a saw horse
A. Hold the chain saw steadily with both hands on your right side while cutting.
B. Keep the left arm as straight as possible.
C. Stand steadily with weight divided between both feet.
Release the activated chain brake by pulling the front hand guard backwards towards the arched handle until it stops with a click.

Pruning small trees
Figure 26
Cut from underneath and finish from above.
Warning!
- Stand with good balance. Never stand on a ladder when cutting.
• Do not stretch so that you loose your balance.
• Never work above shoulder height
• ALWAYS hold the chain saw with both hands when cutting.

7. Maintenance
Warning! Make sure that the chain saw is shut off and has cooled before service, cleaning or checking. Pull away the ignition cable from the spark plug to prevent the engine from an unexpected start.
Maintenance after every use
1. Air filter
First use a toothbrush or other type of brush to take away dirt from the outside of the air filter, carburettor and other parts under the air filter cover before taking away the air filter. Then take away the air filter. Wash the air filter with petrol or water with dish detergent. Use a flat screwdriver to divide the air filter (see fig. 28) and blow clean with compressed air from the inside.
Put both parts of the air filter back until it clicks. Let it dry completely and then reassemble it.
Note! Make sure that the rubber sealing between the air filter and the carburettor are assembled correctly so that it fits into the track under the air filter.
Figure 27

natural_image
Technical line drawings of mechanical components, showing hands operating a motor and a close-up of a component (no text or symbols present)Figure 28
2. Check the supply of chain oil to the guide bar
Take away the guide bar and saw chain and check that the hole for the chain oil is open.
3. Guide bar
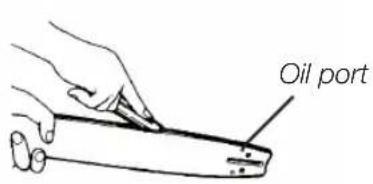
Figure 29 Figure 30
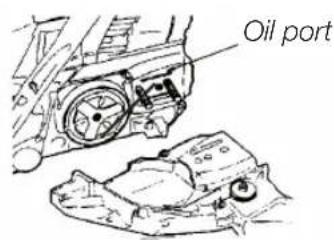
Clean the guide bar's sprocket and oil port when the guide bar is unassembled. File the edges of the bar with a flat file if they have become sharp.
4. Other
Check the petrol hose for correct mounting or leakage. Check that all the screws, nuts and other parts sit tightly, especially handles and the bar. If you find any defects these must be dealt with by a professional before the chain saw can be used again.
Periodic service
1. Cooling flange
The engine's cooling flange must be kept clean from dirt and deposits otherwise the engine can overheat. Check the cooling flange when you take away the top cover and air filter. Blow clean with compressed air or use a screwdriver. Make sure that cables and loose parts lie correctly when assembling the top cover. Remember to cover the opening of the carburettor so that dirt doesn't get inside.
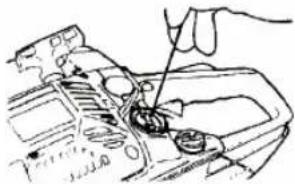
2. Fuel filter
Use a small metal hook and pull out the fuel filter through the filling hole.
Pull the fuel filter apart and wash it with petrol or change it if needed.
Note! Use a pair of tweezers or something similar to hold onto the fuel hose when the filter is taken away. Make sure that no dust or dirt is present in the fuel hose and fuel filter before assembling.
3. Oil can
Use a small metal hook and pull the filter out through the refill hole and wash it with petrol. Make sure that the filter is placed in the front right corner of the can when it is put back into the can. Clean the inside of the can.
4. Spark plug
Clean the spark plug electrodes with a steel brush and set the distance between electrodes to 0.65 mm.
5. Sprocket
Check the sprocket for cracks or wear. Change if needed. Never use a new saw chain together with a worn sprocket or vice versa.

Figure 31

natural_image
Mechanical assembly diagram showing a hand using a spring-loaded tool to install components (no text or labels visible)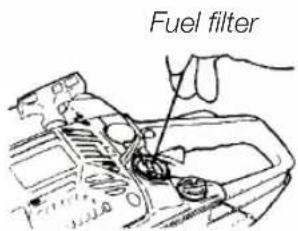
Figure 32
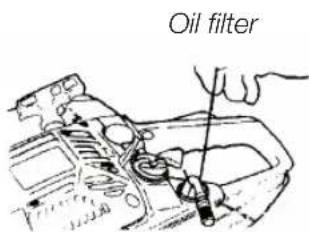
Figure 33
8. Maintenance of guide bar and saw chain
Saw chain
Warning! It is very important that the saw chain is sharp for safe and effective use of the chain saw.
Chain should be sharpened:
- When saw dust becomes like powder.
- When the chain saw needs to be pressed against the object to be cut.
- When the cut is not straight.
- When vibration increases:
- When use of fuel increases:
Warning! Always use work gloves while handling the saw chain.
Before filing begins:
• Make sure that the chain saw is shut off.
• Make sure that the chain saw is held in a steady grip.
- Make sure that you have the correct equipment: A good file with the correct dimension: ∅ 4mm and preferably some type of filing gauge for filing at the right angle and depth.
Chain type: 91VG
File diameter: ∅ 4 mm (5/32")
Place the saw in a cut track or in a screw vice so that both hands can be used for filing.
Place the file in a tooth and push the file forward according to the picture. File each tooth equally. Keep count of how many cutting teeth which are filed so you know when the whole chain is filed.
When all the teeth have been filed the clearance heels must be measured and filed to correct height according to the picture.
Warning! Remember to round off the support heels to reduce the risk for kickback or chain break.
Figure 35

Figure 36

Figure 37

Support template

Round off the support heels (keep the original angle)

Support size 0.64 mm.
Check that all the cutting teeth have the same length and cutting angle illustrated in the picture:
Figure 38
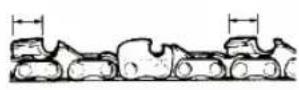

Cutter length Filing angle Angle cutting

teeth side
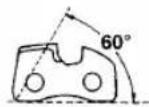
Cutting teeth
Guide bar
Turn the guide bar once in a while to avoid wearing it out on one side.
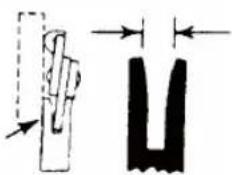
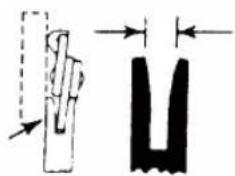
The guide track on the guide bar should have straight edges. Check for wear: Press a ruler against the guide bar and up against the outside of a guide link. If a gap between them is seen then the guide bar is good. If no gap is seen then the guide track is worn and the guide bar must be changed.

No gap
natural_image
Pure mechanical part diagrams without any text, numbers, or symbolsFigure 39
The chain folds
9. Troubleshooting
Problem with starting
Check that the fuel does not contain water or has become bad.
Rinse the can out and fill with new fuel.

Check if the engine has "flooded" (too much petrol in the cylinders).


Take out the spark plug and dry it. Pull the start cord a couple of times to empty the cylinder (without the spark plug and with the choke lever pushed in).
Check if the spark plug sparks.
Change spark plug.
Weak power/weak acceleration/weak idle
Check that the fuel does not contain water or has become bad.

Rinse the can out and fill with new fuel.
Check the air filter and fuel filter.

Clean or change if needed.
Check carburettor setting

Adjust the nozzle.
No feed from chain oil
Check if the oil has the right quality and viscosity.

Rinse the can out and fill with new chain oil.

Check that the port for the chain oil is open.

Clean.
If this trouble shooting schedule does not assist in finding the fault you should leave the chain saw to a repair shop.
Specifications
Engine
Cylinder volume: 37.2 cm ^4
Power: 1.2 kW/1.63 hp
Fuel: Oil mixed petrol 1/50 (mix of 2% two-strokes oil)
Volume, fuel can: 310 ml
Chain lubrication: Chain saw oil
Volume, fuel can: 210 ml
Oil pmp, chain oil: Automatic, adjustable
Carburettor: Walbro WT diaphragm type
Ignition system: Ignition interrupter (CDI)
Spark plug: NHSP LD M7 or Champion RCJ-7Y
Sprocket: 6T × 3/8" (teeth × gap)
Size: 370 × 235 × 270 (l × w × h)
Dry weight: 4.2 kg (without guide bar and chain)
Cutting equipment
Guide bar
Type With nose wheel
Length: 14" (350 mm)
Saw chain
Type: 91VG
Pitch: 3/8" (9.53 mm)
Track width: 0.05 (1.3 mm)
Sound
Guaranteed sound effect level (LwA): 110 dB (A)
Measured sound effect level (LwA): 103 dB (A)
Sound pressure level (LpA): 101.80 dB
Vibration level: 5.5 m/s ^4
Specifications can be changed without notification.
Motorsåg 37,2 CC
ART.NR 30-9680 MODELL PN3800II
natural_image
Illustration of a no-smoking cigarette emitting smoke from fire (no text or symbols)
Blanda bränsle
natural_image
Line drawing of a hand using a tool to adjust or install a mechanical component (no text or symbols visible)Bild 10
Varning!
natural_image
Technical line drawing of a mechanical clamp or bracket assembly (no text or symbols)Bild 15
natural_image
Illustration of a person using a chainsaw to cut tree roots (no text or symbols)natural_image
Diagram of a circular mechanical system with four wheels and rotating components, no text or symbols presentnatural_image
Diagram illustrating a mechanical or optical setup with a tool, rotating arrow, and textured surface (no text or symbols)natural_image
Simple line drawing of a wooden log being cut with a hand, showing a curved line and a circular base (no text or symbols)Bild 24
natural_image
Line drawing of a hand operating a mechanical device with no visible text or symbols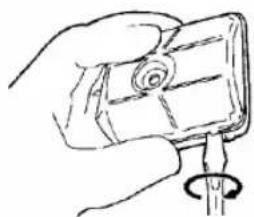
natural_image
Hand holding a small object with a spiral pattern, possibly a device or tool, being pointed at by a finger (no text or symbols visible)Bild 28
3. Sågsvärdet

Bild 29 Bild 30

natural_image
Mechanical assembly diagram showing a hand using a tool to adjust or install a spring-loaded component (no text or symbols visible)2. Bränslefilter
natural_image
Hand using a tool to adjust or install a component on a device (no visible text or symbols)Bild 32
3. Oljetank
natural_image
Hand holding a tool interacting with a car engine component (no visible text or symbols)Bild 33
4. Tändstift
Ingen glipa
natural_image
Pure diagram of two mechanical components with arrows indicating motion, no text or symbols presentnatural_image
Illustration of a no-smoking cigarette emitting smoke from fire (no text or symbols)- Bland bensinen (blyholdig eller blyfri 95 oktan, uten etanoltilsetting) med en 2-taktsolje av god kvalitet, som er beregnet på luftavkjølte totaktsmotorer.
• Anbefalt blandingsforhold: bensin/olje = 50/1 (2 %).
natural_image
Line drawing of a hand using a tool to adjust or install a mechanical component (no text or symbols visible)Bilde 10
Advarsel!
natural_image
Simple line drawing of a tool or scraper with a handle and base, no text or symbols presentKjedeolje
Bilde 11
natural_image
Illustration of a hand operating a tool with a tool handle (no text or symbols visible)Høy-hastighets munnstykke
Bilde 12 Bilde 13
Tomgangsskrue
natural_image
Simple line drawing of a mechanical component with no text or symbolsnatural_image
Technical line drawing of a mechanical clamp or bracket assembly (no text or symbols)natural_image
Illustration of a person using a chainsaw to cut tree roots (no text or symbols)Bilde 16
natural_image
Diagram of a circular mechanical or robotic system with four figures and rotating components, no text or symbols present.Bilde 17
natural_image
Simple line drawing of a wooden log with a curved arrow indicating motion (no text or symbols)Bilde 24

natural_image
Line drawing of a robotic arm with hands operating the components (no text or symbols)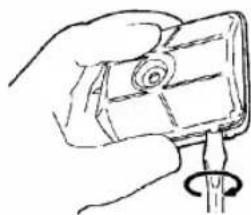
natural_image
Hand holding a small electronic device with a scroll wheel (no text or symbols visible)Bilde 28
3. Sverdet

Bilde 29 Bilde 30
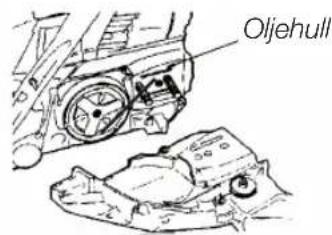
3. Oljetank/oljefilter
natural_image
Mechanical assembly diagram showing a hand using a tool to adjust or install a spring-loaded component (no text or symbols visible)Bensinfilter
natural_image
Illustration of a hand using a tool to adjust or install electronic components (no text or symbols visible)Bilde 32
Oljefilter

natural_image
Hand holding a tool interacting with a car engine compartment (no visible text or symbols)Bilde 33
natural_image
Pure diagram of two mechanical components with arrows indicating motion, no text or symbols presentVolum, oljetank: 210 ml
Oljepumpe for kjedeoljen: Automatisk, justerbar
natural_image
Illustration of a no-smoking cigarette crossed out of flames, symbolizing tobacco or smoking (no text present)natural_image
Illustration of a hand using a tool to adjust or install a mechanical component (no text or symbols visible)Kuva 10
Varoitus!
natural_image
Simple line drawing of a tool or tool interacting with a surface (no text or symbols)natural_image
Line drawing of a mechanical assembly with no visible text or symbolsnatural_image
Simple line drawing of a medical procedure with surgical tools and tubing (no text or symbols)natural_image
Technical line drawing of a mechanical clamp or bracket assembly (no text or symbols)Kuva 15

natural_image
Illustration of a person using a chainsaw to cut tree roots (no text or symbols)Kuva 16
natural_image
Diagram of a circular arrangement of animal heads and rings with directional arrows, no text or symbols presentKuva 17
natural_image
Simple line drawing of a wooden log being cut with a lightning bolt (no text or symbols)Kuva 24
natural_image
Line drawing of a mechanical assembly with hands operating a component (no text or symbols)
natural_image
Hand holding a small object with a spiral and arrow indicator (no text or symbols)Kuva 28
3. Terälevy

natural_image
Mechanical assembly diagram showing a hand using a tool to adjust internal components (no text or labels visible)natural_image
Hand using a tool to adjust or install components on a device (no visible text or symbols)Kuva 32
3. Öljysäiliö
natural_image
Technical line drawing of a mechanical component with a hand operating a tool (no text or symbols visible)Kuva 33
4. Sytytystulppa
natural_image
Two abstract diagrams showing a hand holding a rectangular object and a U-shaped object with arrows indicating direction (no text or symbols)natural_image
Technical line drawing of a mechanical assembly with gears and components (no text or symbols)natural_image
Line drawing of a hand using a tool to adjust or install a mechanical component (no text or symbols visible)Abb. 10
Warnung:
natural_image
Simple line drawing of a tool with a pointed tip and base, no text or symbols presentSägekettenöl
natural_image
Technical line drawing of a mechanical assembly with no visible text or symbolsnatural_image
Technical line drawing of a mechanical assembly with no visible text or symbolsAbb. 11 Abb. 12 Abb. 13
natural_image
Technical line drawing of a mechanical component with two views showing internal structure and an arrow indicating direction (no text or symbols)Abb. 15
natural_image
Illustration of a person using a chainsaw to cut tree roots (no text or symbols)natural_image
Diagram of a circular arrangement with four animal heads and directional arrows, no text or symbols presentAbb. 17
natural_image
Diagram of a mechanical or optical setup with directional arrows and a circular cross-section, labeled Abb. 21 (no text or symbols on the diagram itself)natural_image
Simple line drawing of a wooden log being cut with a black arrow indicating the motion (no text or symbols)Abb. 24
natural_image
Technical line drawing of a robotic arm with hands operating it (no text or symbols present)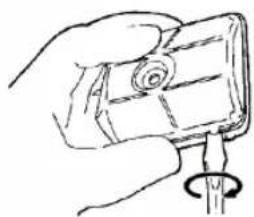
natural_image
Hand holding a small object with a spiral arrow, no visible text or symbolsAbb. 28
natural_image
Mechanical assembly diagram showing a hand operating a spring-loaded component (no text or labels visible)Kraftstofffilter

natural_image
Hand using a screwdriver to adjust or install components on a mechanical device (no text or symbols visible)Abb. 32
Ölfilter

natural_image
Hand holding a tool interacting with a car engine component (no visible text or symbols)Abb. 33
natural_image
Two abstract diagrams showing a hand holding a U-shaped object and a vertical bar with arrows, no text or symbols present.Vergaser: Walbro WT, Membrantyp
Declaration of Conformity
Declares that this product complies with the requirements of the following directives and standards
Issued by the following notified body:
Klas Balkow
President
Insjön, Sweden, 2013-08-12
SVERIGE
KUNDTJÄNST Tel: 0247/445 0 0
Fax: 0247/445 09
E-post: kundservice@clasohlson.se
INTERNET www.clasohlson.se
BREV Clas Ohlson AB, 793 85 INSJÖN
NORGE
KUNDESENTER Tlf.: 23 21 40 00
Faks: 23 21 40 80
E-post: kundesenter@clasohlson.no
INTERNETT www.clasohlson.no
POST Clas Ohlson AS, Postboks 485 Sentrum, 0105 OSLO
SUOMI
ASIAKASPALVELU Puh.: 020 111 2222
POSTAL 10 – 13 Market Place
Kingston Upon Thames
Surrey
KT1 1JZ
DEUTSCHLAND


- Viktig information:
- Guidelines for safe use
- Safety rules for preventing kickback
- Warning!
- Key of chain saw symbols
- Product safety symbols and their meaning
- Assembly of guide bar and saw chain
- This box contains:
- Assemble the guide bar and saw chain
- Fuel and chain oil
- Fuel
- Mixing fuel
- Note! Be precise with the mixture.
- Filling the chain saw
- Avoid the following to prolong the chain saw's longevity:
- Chain oil
- Engine
- Check the chain lubrication
- Adjusting caburettor
- Chain brake
- Warning! Test the chain brake before you begin working with the chain saw.
- Stop engine
- Use of chain saw
- Note!
- Kickback
- Tree felling
- De-limbing
- Cutting
- Cutting with help of a saw horse
- Pruning small trees
- Maintenance
- Maintenance after every use
- Air filter
- Check the supply of chain oil to the guide bar
- Guide bar
- Other
- Periodic service
- Cooling flange
- Fuel filter
- Oil can
- Spark plug
- Sprocket
- Maintenance of guide bar and saw chain
- Saw chain
- Chain should be sharpened:
- Before filing begins:
- Guide bar
- Troubleshooting
- Problem with starting
- Weak power/weak acceleration/weak idle
- No feed from chain oil
- Specifications
- Engine
- Cutting equipment
- Sound
- Motorsåg 37,2 CC
- ART.NR 30-9680 MODELL PN3800II
- Blanda bränsle
- Varning!
- Sågsvärdet
- Bränslefilter
- Oljetank
- Tändstift
- Advarsel!
- Sverdet
- Oljetank/oljefilter
- Varoitus!
- Terälevy
- Öljysäiliö
- Sytytystulppa
- Warnung:
- Declaration of Conformity
- SVERIGE
- NORGE
- SUOMI
- DEUTSCHLAND
Brand : Cotech
Model : PN3800II
Category : Saw