
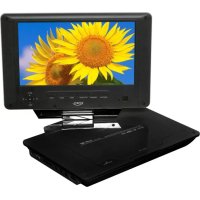
HSD 7799 - Portable DVD Player XORO - Free user manual and instructions
Find the device manual for free HSD 7799 XORO in PDF.


| Product Type | Portable DVD Player |
| Brand | Xoro |
| Model | HSD 7799 |
| Display Size | 7 inch TFT LCD |
| Display Resolution | 800 x 480 pixels |
| Disc Formats Supported | DVD, DVD±R/RW, CD, CD-R/RW, MP3, JPEG, DivX |
| Media Playback | USB 2.0, SD/MMC card slot |
| Battery Type | Built-in rechargeable lithium-ion |
| Battery Capacity | 1800 mAh |
| Power Supply | AC 100-240V, DC 9V 1.5A |
| Dimensions (L x W x H) | 200 x 160 x 30 mm |
| Weight | 0.8 kg |
| Audio Output | Built-in stereo speakers, headphone jack (3.5mm) |
| Video Output | AV out (RCA composite) |
| Additional Functions | Parental control, anti-shock protection, program play, repeat play, zoom |
| Included Accessories | Remote control, AC adapter, car adapter, AV cables |
| Safety Precautions | Avoid moisture, use only supplied adapter, no user-serviceable parts inside |
| Cleaning | Wipe with a soft dry cloth, do not use solvents |
| Repairability | Contact authorized service center for repairs |
Frequently Asked Questions - HSD 7799 XORO
User questions about HSD 7799 XORO
0 question about this device. Answer the ones you know or ask your own.
Ask a new question about this device
Download the instructions for your Portable DVD Player in PDF format for free! Find your manual HSD 7799 - XORO and take your electronic device back in hand. On this page are published all the documents necessary for the use of your device. HSD 7799 by XORO.
USER MANUAL HSD 7799 XORO
FREE TO CHOOSE INNOVATIONS
XORO®
H5D 7799


natural_image
Black-and-white photo of a portable TV with a screen displaying a 'X' in the sky, placed on a curved surface (no visible text or symbols)Manufactured under license from Dolby Laboratories. "Dolby" and the double-D symbol are trademarks of Dolby Laboratories. Confidential Unpublished works. 1992-1997 Dolby Laboratories, Inc. All rights reserved.
SICHERHEITSHINWEISE
U.S. Patens Nos. 4,631,603; 4,577,216; 4,819,098; 4,907,093; 5,315,448 and 6,516,132
"This product incorporates copyright protection technology that is protected by U.S. patents and other intellectual property rights. Use of this copyright protection technology must be authorized by Macrovision, and is intended for home and other limited viewing uses only unless otherwise authorized by Macrovision. Reverse engineering or disassembly is prohibited."
natural_image
Symbol of a trash bin crossed with no text or labels, representing waste sorting or recycling (no text present)Lieferumfang
natural_image
Technical line drawing of a mechanical component with no visible text or symbolsnatural_image
Four-step diagram showing a mechanical or architectural component with arrows indicating motion, no text or symbols present.natural_image
Silhouette of a small airplane transforming into a larger, flanged aircraft (no text or symbols)natural_image
Technical line drawing of a mechanical component with a circular feature and an arrow indicating direction (no text or symbols)Sommerzeit
FREE TO CHOOSE INNOVATIONS
XORO®
H5D 7799

natural_image
Black-and-white photo of a portable TV with a screen displaying a 'X' in the sky, placed on a curved surface (no visible text or symbols)USER'S GUIDE (ENG)
| Safety Information | 4 |
| Accessories | 8 |
| Features | 8 |
Battery
| Install | the | battery | 9 |
| Battery | Storage | 9 |
| Main Unit | 1 | 0 |
Remote Control
| Insert Buttons | Batteries | 12 |
| 13 |
Connecting
| Headphones | 14 | |||
| To a | TV | set | 14 | |
| Audio/Video | In | 14 |
Playback
| Menu / Stop / Chapter / Track / Pause / FFW / FFB 15 | ||||||
| Subtitle / Audio / Repeat 16 | ||||||
| Volume / Zoom / Mute / USB 17 | ||||||
| Display Information / LCD SETUP 18 | ||||||
| J | P | E | G- | F | i | le s |
| Music | Files | 20 | ||||
| MPEG-1 / MPEG-2 / MPEG-4 21 | ||||||
| USB | Port | 22 | ||||
Setup
| General | Settings | 23 |
| Audio | Settings | |
| Video | 25 | 24 |
| Preferences | 25 |
| Troubleshooting DVD | 28 |
DVB-T
| Connect | the | antenna | 29 | ||
| First | Time | Installation | 29 | ||
| Important | Functions | 30 | |||
| E | P | G | 3 | 0 | |
| DVB-T | Setup | 32 | |||
| Troubleshooting | DVB-T | 38 | |||
| Specifications | 3 | 9 |
| Limited Warranty | 4 | 0 |
Safety Information



The lightning flash with an arrowhead symbol within an equilateral triangle is intended to alert the user of the presence of uninsulated
"dangerous voltage" within the product's enclosure that may be of sufficient magnitude to constitute a risk of electric shock to persons.
The exclamation point within an equilateral triangle is intended to alert the user of the presence of important operating and
maintenance (servicing) instructions in the literature accompanying the appliance.
THIS DEVICE COMPLIES WITH PART 15 OF THE FCC RULES. OPERATION IS SUBJECT TO THE FOLLOWING TWO CONDITIONS: (1) THIS DEVICE MAY NOT CAUSE HARMFUL INTERFERENCE, AND (2) THIS DEVICE MUST ACCEPT ANY INTERFERENCE RECEIVED. INCLUDING INTERFERENCE THAT MAY CAUSE UNDESIRED OPERATION.
User Manual
- All the safety and operating instructions should be read before the product is operated.
- Retain Instructions - The safety and operating instructions should be retained for future reference.
- All warnings on the product and in the operating instructions should be adhered to.
- All operating and use instructions should be followed.
Laser
This Digital Video Disc Player employs a Laser System of the class 1.
- Make sure the device is shut down prior to opening player lid.
- Do not open the appliance. Do not attempt to dismantle the appliance.
- In order to avoid any danger: Have service work only carried out by the manufacturer or an authorized service workshop.
- Visible laser radiation when open and interlocks defeated.
- Use of controls or adjustments or performance of procedures other than those specified herein may result in hazardous radiation exposure.
Operation
- Playing of Video DVD/Video CD or Audio-CD.
- Playback of content (video, music and pictures) from USB flash memory.
- Attention: The USB port is related with the DVD-Player.
- Reception of digital terrestrial channels (DVB-T).
- Playback of content (video, music and pictures) from SD cards.
- No other uses are allowed.
USB Port
Due to the legal requirements of CE-conformity, the customer is asked to only connect USB-Sticks to the USB port
Power Supply
- Never touch the plug with wet hands.
- If you want to pull the plug out of the plug socket, always pull directly on the plug. Never pull on the cable as it could tear.
- Make sure that the power cable is not bent, caught or run over and that it does not come into contact with heat sources.
-
Make sure that the power cable is not wound around the device while in operation.
-
Never place the machine on the power cable while it is being operated.
-
Only use extension cables that are designed for the power consumption level of the machine.
-
Keep the appliance away from rain and any moisture.
-
Only operate the machine if the electrical voltage stated on the type plate beneath the machine agrees with the voltage on your plug socket. The wrong voltage can destroy the machine.
-
Do not stand vases etc. on the appliance. Water could seep into the appliance.
-
Do not open the appliance.
-
Pull out the mains plug if the appliance is not to be used over a longer period of time.
-
Take care that nobody can trip over the power supply cable.
Battery
The DVD player contains a battery pack.
- The battery is part of the device and build-in.
- Do not open the device to access the battery.
- There is a risk of fire and burns if the battery pack is handled improperly.
- Do not disassemble, crush, puncture, short external contacts, or dispose of in fire or water. Do not attempt to open or service the battery pack.
- Replace only with the battery pack designated for this product.
- Discard used batteries according to the manufacturer's instructions.
- The voltage shall be not higher than 9 Volt.
Recycling of Batteries
- The batteries can be returned free of charge after use in the shop or in their immediate vicinity.
- The consumer is legally obliged to return of used batteries.
- The icons on batteries are with one of the two following characters, consisting of a strikethrough trashcan and the chemical symbol of heavy metals decisive for classification as contaminant-laden.
- Both symbols have the same meaning.
- Batteries that contain pollutants are characterised by chemical symbols: Pb = battery contains lead, Cd = battery containing cadmium, Hg = battery contains mercury.

Every consumer is legally obliged to make these batteries with a collection of his church or in the trade so that they can be conveyed to an environmentally sound disposal. We discard used batteries for you free of charge and environmentally. Simply return them to us.
Safety Information
Operation and Position
-
During playback, the disc rotates very fast. Do not open or do not move the player during playback. Otherwise the disc can be damaged.
-
Do not connect accessories on the player which are not defined by the manufacture.
-
Do not place this product on an unstable cart, stand, tripod, bracket, or table. The product may fall, causing serious injury to a child or adult, and serious damage to the product. Use only with a cart, stand, tripod, bracket, or table recommended by the manufacturer, or sold with the product. Any mounting of the product should follow the manufacturer's instructions, and should use a mounting accessory recommended by the manufacturer.
-
A product and cart combination should be moved with care. Quick stops, excessive force, and uneven surfaces may cause the product and cart combination to overturn.
-
The player is able to show a still image on the TV screen or monitor over an unlimited period of time. This can cause damage to the screen. It is therefore advisable to activate the screen saver. Or switch the player off, if the device is not in use.
-
Do not uses the player permanent in the 4:3 mode. This can cause damage to the screen.
-
Do not increase the volume when the player is just playing very quiet sections. This cold damage the speaker if very loud passages starts all of a sudden after the quiet section.
-
Place only CDs or DVDs into the tray.
-
Switch the player off by the Off/On switch if it is not going to used for a longer period of time.
-
Disconnect the main plug during thunderstorms.
-
Slots and openings in the cabinet are provided for ventilation and to ensure reliable operation of the product and to protect it from overheating, and these openings must not be blocked or covered.
-
The openings should never be blocked by placing the product on a bed, sofa, rug, or other similar surface.
-
This product should not be placed in a built-in installation such as a bookcase or rack unless proper ventilation is provided or the manufacturer's instructions have been adhered to.
-
Protect the device against weather influences, moistures and high temperature.
-
Never spill liquid of any kind on the product.
-
Do not expose the device and the remote control to direct sunlight.
-
If an outside antenna or cable system is connected to the product, be sure the antenna or cable system is grounded so as to provide some protection against voltage surges and built-up static charges. Article 810 of the National Electrical Code, ANSI/NFPA 70, provides information with regard to proper grounding of the mast and supporting structure, grounding of the lead-in wire to an antenna discharge unit, size or grounding conductors, location of antenna-discharge unit, connection to grounding electrodes, and requirements for the grounding electrode.
Macrovision
U.S. Patens Nos. 4,631,603; 4,577,216; 4,819,098; 4,907,093; 5,315,448 and 6,516,132
"This product incorporates copyright protection technology that is protected by U.S. patents and other intellectual property rights. Use of this copyright protection technology must be authorized by Macrovision, and is intended for home and other limited viewing uses only unless otherwise authorized by Macrovision. Reverse engineering or disassembly is prohibited."
Dolby
Manufactured under license from Dolby Laboratories. "Dolby" and the double-D symbol are trademarks of Dolby Laboratories. Confidential Unpublished works. 1992-1997 Dolby Laboratories, Inc. All rights reserved.
Safety Information
Defect
- Servicing - Do not attempt to service this product yourself as opening or removing covers may expose you to dangerous voltage or other hazards. Refer all servicing to qualified service personnel.
- Damage Requiring Service - Unplug this product from the wall outlet and refer servicing to qualified service personnel under the following conditions:
a. When the power-supply cord or plug is damaged.
b. If liquid has been spilled, or objects have fallen into the product.
c. If the product has been exposed to rain or water.
d. If the product does not operate normally by following the operating instructions.
Adjust only those controls that are covered by the operating instructions as an improper adjustment of other controls may result in damage and will often require extensive work by a qualified technician to restore the product to its normal operation.
e. If the product has been dropped or damaged in any way, and
- When the product exhibits a distinct change in performance this indicates a need for service.
- When replacement parts are required, be sure the service technician has used replacement parts specified by the manufacturer or have the same characteristics as the original part. Unauthorized substitutions may result in fire, electric shock, or other hazards.
- Please read in the section Troubleshooting our service address and phone number.
Recycling of electronic devices
This product is designed and manufactured with high quality materials and components which can be recycled and reused.
This symbol means that electrical and electronic equipment, at their end-of-life, should be disposed of separately from your household waste.
Please, dispose of this equipment at your local community waste collection/recycling centre. In the European Union there are separate collection systems for used electrical and electronic product. Please, help us to conserve the environment we live in!
natural_image
Symbol of a trash bin crossed with no text or numbers, representing waste sorting or disposal (no text present)Recycling of paper and carton
The material recycling symbol on the carton and user manual denotes that they are recyclable. Dispose them not with the normal household waste.

natural_image
Green recycling symbol with three chasing arrows forming a triangle (no text or labels)Recycling of plastic parts
The material recycling symbol on the plastic parts denotes that they are recyclable. Dispose them not with the normal household waste.

Green Dot
natural_image
Circular icon with a green and yellow curved arrow design, no text or symbols present.First inventory the contents of your Portable DVD player package:
• HSD 7799
- Remote Control
• AC/DC power adapter
• Audio/Video adapter cable
- Earphone
- Car adapter
- User Manual
- Bag
Notes:
- If any item should be damaged or missing, please contact your dealer without delay.
- Keep the packaging materials, you may need them to transport your player in the future.
• Always transport or send the player in its original packing. - Do not change or modify any components of the device or accessories.
Battery Storage
- The battery is part of the device and build-in.
- To charge the battery, please switch off the device. Connect the AC/DC power adapter cable to the DC In on the left side of the player. Plug the AC/DC power adapter to the wall outlet.
- It takes about 4-5 hours to recharge the battery if the player is off. It takes about 6-8 hours to recharge the battery if the player is on. A fully charged battery can power the unit for about >2 hours. Power consumption depends on the operations of the player such as brightness of the screen, volume level, etc.
- Under no circumstance should you short out the battery, store it in a metal container, or leave it in a humid or damp environment.
- Storage Temperature and Humidity (Short-term) In a dry location with low humidity (Max.85%), no corrosive gases, at a temperature range of -20°C to 45°C. In a location where humidity is extremely high or with temperature below -20°C or above 45°C, the metallic parts of battery will rust and result in electrolyte leakage due to expansion or contraction in parts composed of organic materials.
- As long-term storage can accelerate battery self-discharge and lead to the deactivation of reactants, locations where the temperature ranges between 10^ C and 30^ C are suitable for long-term storage
- When charge for the first time after long-term storage, deactivation of reactants may have led to increased battery voltage and decreased battery capacity. Restore such batteries to original performance through repeating several cycles of charge and discharge.
- Do not open the battery.
- Do not put the battery into fire, do not heat the battery and do not contact the battery with water.
Use the device in the car
- This device may only be used with the original vehicle adapter, as a different adapter can damage the device.
- The original vehicle adapter may only be used for this device. Do not use it for other equipment.
- While you are driving the vehicle it is forbidden to adjust the device or watch videos and CDs.
- Please ensure that the device is firmly installed and cannot fall inside the vehicle in the case of an accident.
- If the cigarette lighter is dirty, poor conductivity will make the connection hot. Please ensure that the adapter is only inserted into a clean cigarette lighter connection.
- After use the 9 V adapter should be removed from the device and from the cigarette lighter socket.
Note:
Disconnect the HSD 7799 from the Car when you start or stop the engine!
MAIN UNIT

1
DVD/AV/TV (Switch between DVD-, AV-IN and DVB-T Mode)
VOL-/VOL+ (Volume)
USB/CARD (In DVD-Mode: Activate USB-Port or Card Reader)
2
MENU (In DVD-Mode: Go to DVD-Menu)
▶ | | PLAY/PAUSE (In DVD-Mode: Play/Pause)
SETUP (SETUP Menu)
3
◀◀ ▶▶ (In DVD-Mode: Fast Forward / Rewind)
|◀◀ ▶▶ | (In DVD-Mode: Next File/Chapter/Track)

OPEN (Press to OPEN/CLOSE DVD- Flap)
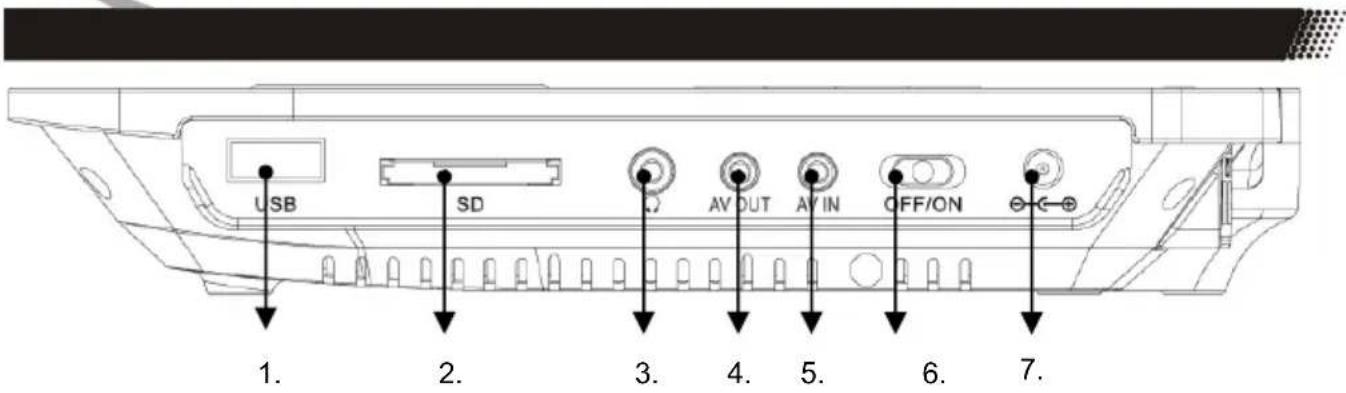
Right
- USB-Port (USB)
- Cardreader (SD/MMC)
- Earphone
- Audio/Video Out (AV OUT)
- Audio/Video In (AV IN)
- Power (ON/OFF)
- DC-IN
Left

natural_image
Technical line drawing of a mechanical component with mounting flanges and a central circular feature (no text or symbols)Input for DVB-T Antenna.

Front
- Battery (red= charging, green: Battery is completely charged)
- IR Receiver
- Power LED (blue=Power On)
Insert battery
- Prior to shipping, a separating film was applied to the battery. Remove this film.
- Insert the battery into the receptacle and insert the receptacle into the remote.
- For the best results, aim the remote towards at the player, screweiving window. Stay within 5 metre and angles of 60 degrees or less.
- Under normal use the battery will last for one year.
- Remove battery during storage or when you are not using the DVD player for a long time.
Notes:
- Weak batteries can leak and several damage by the remote control.
- Leaking out battery acid can damage your health.
- Remove the battery from the battery compartment as soon as it is exhausted or if the remote control is not going to be used for a longer period of time.
- Wipe up leaked out battery acid with a cloth.
- In case of skin contact immediately wash the affected area.
- Seek medical advice if battery acid has been swallowed. In case of contact with your eyes wash out the eyes and seek medical advice.

flowchart
graph TD
    A["Step 1: Folding a grid-patterned object"] --> B["Step 2: Splitting to a container with a small circular mark"]
    B --> C["Step 3: Separating the container with a small circle mark"]
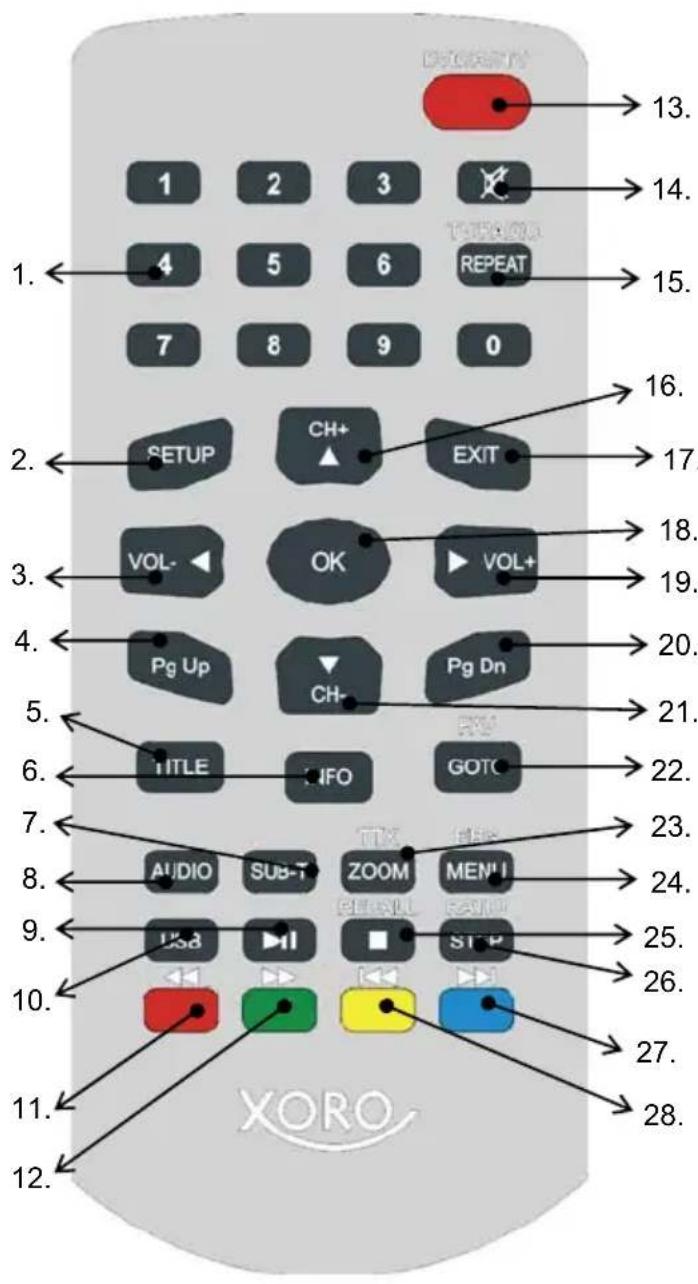
Buttons on the remote control:
- Numeric buttons (0 ... 9)
- SETUP button
- Reduce Volume (VOL-) / Navigation button Left
- Page Up button (PgUp)
- TITLE button
- Information button (OSD/INFO)
- SUBTITLE button
- AUDIO button
- PLAY / PAUSE button
- USB/CARD (DVD-Mode only)
- Fast backward (<<); DVB-T: Red button
- Fast Forward button (>>); DVB-T: Green button
- DVD/DTV/AV button
- Mute button
- DVD: REPEAT button; DVB-T: TV/Radio button
- DVB-T: Change Channel (CH+); Navigation button UP
- EXIT button
- Confirmation button (OK)
- Increase Volume (VOL-); Navigation button Right
- Page Down button (PgDn)
- DVB-T: Change channel (CH-); Navigation button Down
- DVD: GOTO button; DVB-T: Favourite Channel
- DVD: Zoom button; DVB-T: Teletext button
- DVD: Video-DVD MENU button: DVB-T: EPG button
- DVD: STOP button
- DVD: STEP button
- DVB-T: Aspect Ratio
- DVD: Previous button (|<<); DVB-T: Blue button
- DVD: Next button (>>|); DVB-T: Yellow button
Connecting to a TV set
- Turn off the power and unplug both units before setting up any connections.
- Connect the adapter cable (supplied by the HSD 7799) to AV OUT.
- Connect the yellow cable (Video) to the adaptor cable and to the VIDEO-IN of the TV set.
- Connect the red and white cable to the adaptor cable and to the AUDIO-IN of the TV set.
By using the SCART connection on the TV set, please uses the AV/SCART adapter and connect the AV cable with the AV/SCART adapter.

Connecting headphones
- Connect the headphones. Headphones with a 3.5 mm stereo plug can be connected.
- Adjust the volume by turning the dial.
- Avoid listening to sound at levels which may be harmful to your ears.
Note:
Do not use the earphone continuously over a prolonged period.
Audio/Video IN
You can uses the HSD 7799 as a Monitor by using the AV IN function.
- In order to play back the picture from another playback device (e.g. digital camera) on the LCD screen, connect the audio/video cable to the AV IN socket and the other end to the playback device.
- Switch the device into AV mode by pressing the DVD/AV/TV several times.
How to start playback from the MENU screen
- Press MENU to access the menu screen.
- Press navigation or the number buttons to select the title.
- Press the OK or PLAY button.
- The DVD video player will start playback from the title selected.
Note:
You also can input the assigned number of the title to select it directly.
A title is generally a distinct section of a DVD disc. For example the main feature could be title 1, a documentary describing how the film was made could be title 2, and cast interviews could be title 3. Each title is assigned a reference number enabling you to locate it easily.

Titel 1

Titel 2

Titel 3

Titel 4
How to stop playback?
Press the STOP button. The player is pre-stopped. Two times pressing STOP and the player stops completely.
Fast Forward or Fast Backward
Press << or >> during playback on the remote control and the HSD 7550 changes the speed of playback. The playback speed becomes double the normal speed. The playback speed changes, each time you press the REV or FWD button.
Normal —> x2 —> x4 —> x8 —> x16 —> x32 —> Normal
Note:
The function is invalid on some DVD discs.
Pause the playback
Press one times PAUSE/STEP button during playback, and the player goes into pause mode. Press the PLAY button again to continue the playback.
Press the STOP button. The player is pre-stopped (only by Video-DVD). Two times pressing STOP and the player stops completely.
Chapter / Track
A chapter is a segment of a title such as a scene in a film or one interview in a series. Each chapter is assigned a chapter number, enabling you to locate the chapter you want. Depending on the disc, chapters may not be recorded.
When a title on a disc has more than one chapter |<< (SKIP or PREV) or >>| (SKIP or NEXT) a disc has more than one track, you can move to another chapter/track as follows:
- Press SKIP or briefly during playback to select the next (or previous) chapter/track or to return to the beginning of the current chapter/track.
- Press SKIP twice briefly to step back to the previous chapter/track.
- To go directly to any chapter during DVD playback, input the chapter/track number.
Selecting Subtitles
You have the option to select a preferred subtitle from those included on the DVD video disc.
- Press the SUBTITLE button during playback.
- Press the SUBTITLE button during playback until the subtitles disappears
How to change the Audio languages?
Press the AUDIO button repeatedly during playback to hear a different audio channel.
By playback of a Video-DVD or a MPEG-4 file with multi-audio you can change the audio track respectively the audio languages.
By playback of a VCD you can change the different audio channel (Stereo, Left, or Right).
REPEAT
You can play a title/chapter/all/track on a disc repeatedly. Press REPEAT during playback to select a desired repeat mode. Depend on the kind of disc (Video-DVD, VCD or Data files) you have different Repeat modes.
DVD Video Discs - "Repeat Chapter / Title / All / Off"
Chapter: repeats the current chapter. Chapter
Title: repeats the current title.
All : repeats all the tracks on a disc.
Off : does not play repeatedly.
Video CDs, MPEG-4, MPEG-1, MPEG-2, JPEG discs - "Repeat Track / All / Off"
Track : repeats the current track.
All : repeats all the tracks on a disc.
Off : does not play repeatedly.
Music disc - Track / All / Off
Track : repeats the current track.
All : repeats all the tracks on a disc.
Off : does not play repeatedly.
Notes:
- On a Video CD with PBC, you must set PBC to Off to use the repeat function.
- If you press SKIP/NEXT (|<< or >>|) once during playback, the repeat function will be cancelled.
Search or GoTo
The on-screen menu enables comfortable access to any sections of a medium. To do this, proceed as follows:
- Select the desired category by repeatedly pressing the button GOTO-button.
- Now move to the point from which the replay should start. Depending on the type of medium this may be a track number, a chapter or even a point in time. The input must be made with the Numerical Buttons. Playback begins after a short time.
Volume Control
- Change the volume by using the volume knob on the HSD 7799.
- Change the volume by using the right and left button on the remote control.
ZOOM
This DVD video player allows you to zoom into a picture as well as shift the zoom point.
Press ZOOM during normal playback. The player magnifies in the center of the picture. If you press during zoom playback, the zoom point shifts.

natural_image
Silhouette of a small airplane transforming into a larger, empty aircraft (no text or symbols)Pressing more than one time the ZOOM button the Zoom function changes in the following sequences:

flowchart
graph LR
    A["2x"] --> B["3x"]
    B --> C["4x"]
    D["1/2"] --> E["1/3"]
    E --> F["1/4"]
    F --> G["Normal Playback"]
Note:
Zoom may not work on some disc.
Mute
You can mute the player by pressing the MUTE button. The sound switches off. A sign will displayed on the screen. To activate the sound, press again the MUTE button.
USB
If you want to playback pictures, music or video from USB storage, please insert the USB adapter cable into the USB jack on the right side of the player. Plug the USB storage to the adapter cable. Press the USB button.
Security Note:
If you want disconnect the USB flash media, press at first the USB button and change to "DVD". When the DVD loader is active than you can disconnect the USB flash media.
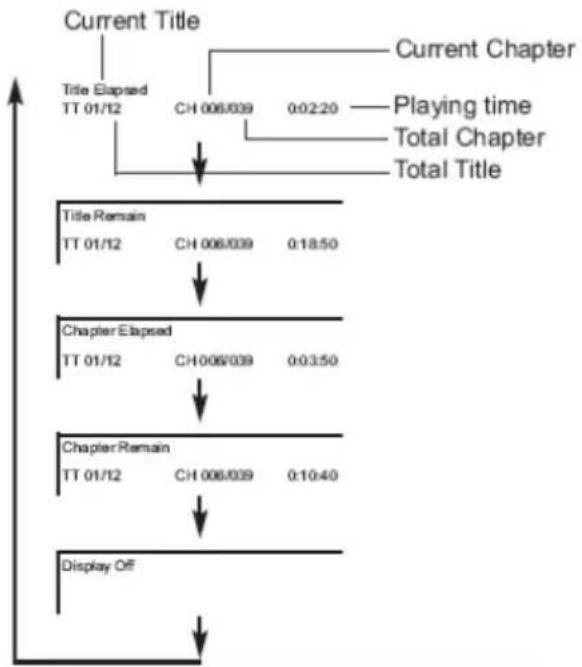
Checking the operational status
THIS UNIT ALLOWS YOU TO VIEW THE OPERATIONAL STATUS AND DISC INFORMATION ON YOUR TV SCREEN.
With this function you can view on your TV the following:
- Current title
- Track number
• Total playing time
flowchart
graph TD
    A["Current Title"] --> B["Title Elapsed TT 01/12"]
    A --> C["Current Chapter"]
    B --> D["Chapter Elapsed TT 01/12"]
    C --> E["Playing time 0:02:20"]
    C --> F["Total Chapter"]
    C --> G["Total Title"]
    D --> H["Chapter Remain TT 01/12"]
    D --> I["Display Off"]
    E --> J["CH 008/039 0:10:40"]
    F --> K["CH 008/039 0:03:50"]
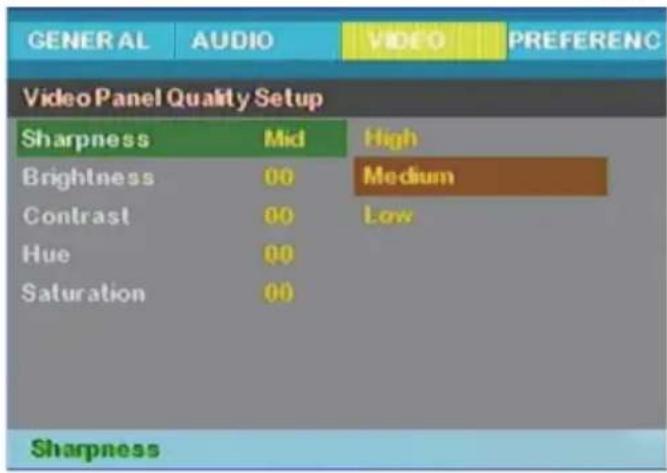
Video Setup - Panel Quality
The Panel settings can only be accessed in DVD-Mode. However, these settings are also affective in DVB-T Mode.
- Switch to DVD-Mode
- Press SETUP
- Go to VIDEO -> Panel Quality
- No you can change settings for Sharpness, Brightness, Contrast, Hue and Saturation
Press SETUP to leave Video Menu. All settings are stored.
Playing back JPEG files
- Place the CD on the disc tray.
- Select a folder or a picture contained on the CD.
After the CD is loaded, a menu will appear on the screen. Press UP or DOWN to select a folder, and press OK to view folder contents (shown in right column as below).
JPEG disc compatibility with this player is limited as follows
- Depending upon the size and number of JPEG files, it could take a long time for the DVD player to read the disc's contents. If you don't see an on screen display after several minutes, some of the files may be too large reduce the resolution of the JPEG files to less than 2 MPixels as 2760 x 2048 pixels and burn another disc.
- The total number of files and folders on the disc should be less than 650. Some discs may be incompatible due to a different recording format or the condition of disc. Ensure that all the selected files have the." jpg" extensions when copying into the CD layout. If the files have. "jpg" or. "jpeg" extensions, please rename them as "jpg" file. File names without "jpg" extension will not be able to be read by this DVD player. Even though the files are shown as JPEG image files in Windows Explorer.

Playback
Choose a file and press the OK button on the remote control. The picture appears on the screen. Every pictures appears a few second on the screen and than the next picture started.
Pause
If you want to watch on picture a longer time, please press the PLAY/PAUSE button during the playback or slideshow. The viewing paused by the actually picture. If you want go ahead with the playback, than press the PLAY/PAUSE button again.
Stop
If you want to cancelled the playback, press the STOP button and the player returns to the file browser. If you press the MENU button during a slideshow, than the player goes also back into the file browser without pressing the STOP button.
Rotate an image
During the slide show, you can use arrow keys to rotate an image:
Press UP to invert an image.
Press DOWN to mirror an image.
Press LEFT to rotate an image to the left.
Press RIGHT to rotate an image to the right.
Zoom
With the DVD player you can view magnified images. Press the ZOOM button on the remote.
Playing back Music files
Disc
The DVD player can play CD and MP3 formatted recordings on CD-R, CD-RW, DVD+R and DVD+RW discs.
Audio
Once an Audio CD is inserted it will be played automatically. Its playback information will be show on screen, such as chapter elapse time.

Format Compatibility
Music disc compatibility with this player is limited as follows:
- Sampling frequency: within 8 - 48 kHz (MP3)
- Bitrate: within 8 - 320kbps (MP3)
- The player cannot read an / file that has a file extension other than MP3
- CD-R physical format should be ISO 9660.
- File names should have a maximum of 8 letters and must incorporate an".mp3" extension.
They should not contain special letters such as "/? * : <> I "etc. - The total number of files on one disc should be less than 650.
This DVD player requires discs and recordings to meet certain technical standards in order to achieve optimal playback quality. Pre-recorded DVDs are automatically set to these standards. There are many different types of recordable disc formats (including CD-R containing MP3 files) and these require certain pre-existing conditions (see above) to ensure compatible playback.
Customers should note that permission is required in order to download MP3 files and music from the Internet. Our company has no right to grant such permission. Permission should always be sought from the copyright owner.
Playback function:
- Press the navigation buttons to select a folder, and press OK to see the folder contents.
- Press the navigation buttons to select a track then press PLAY or OK. Playback starts.
• STOP for stopping the playback
• PREV (|<<) / NEXT (>>|) for choosing the next track
• REPEAT for repeating a Track, a Folder or All Tracks
• Fast Backward (<<) or Fast Forward (>>)
MPEG-1, MPEG-2 and MPEG-4 files
Using this DVD Player you can play MPEG-1, MPEG-2 and MPEG-4 disc.
- Insert a disc and close the tray. The folder menu appears on the TV screen.
- Press the navigation buttons to select a folder, and press OK. A list of files in the folder appears. If you are in a file list and want to return to the Folder list, use the left navigation button on the remote and than you changes to the previous folder. Or navigate to the “..” folder field, highlight them and press OK.

-
If you want to view a particular file, press the navigation buttons to highlight a file and press OK or PLAY.
-
Press STOP to exit.
-
Press NEXT to move to the next page.
MPEG-4 disc compatibility with this player is limited as follows:
- Available resolution size of the MPEG-4 file is under 720x576 (W x H) pixel.
- The file name of the MPEG-4 subtitle is available by 56 characters.
- If there is impossible code to express in the MPEG-4 file, it may be displayed as " _ " mark on the display.
- If the number of the screen frame is over 30 per second, this unit may not operate normally.
- If the video and audio structure of recorded file is not interleaved, either video or audio is outputted.
- Playable MPEG-4 file ".avi ", ".mpg ", ".mpeg".
- Different MPEG-4 codices are supported. There must be encoded with are MPEG-4 part 2 (MPEG-4 SP/ASP) standard.
- Do not use MPEG-4 codes like H.264 or container formats like MKV, MP4, MOV or others.
playable Audio format
Supported audio formats are "AC3", "PCM", "MP3"
Sampling frequency: within 8 - 48 kHz (MP3)
Bit rate: within 8 - 320kbps (MP3)
Playback
When you choose a file and press the PLAY button on the remote control, the next music starts to playback.
Pause
If you press the PAUSE/STEP button during the playback or slideshow, the playback paused. If you want go ahead with the playback, than press the PLAY button.
Stop
If you want to cancelled the playback, press the STOP button and the player stops the playback completely and go back to the file browser. If you press the MENU button during the playback, then the player returns back directly into the file browser without pressing the STOP button.
Please connect the USB stick on the rear side of the device. Please pay attention, that the stick is connected firmly. Press the USB button and than the supported files of the USB memory are shown in the file browser.
Playback functions
The playback options are similar than the different files types from disc.
Supported formats and Bit rates from USB Flash Memory
You can playback from USB storage the same kind of contents as from disc. For example, MPEG-4 videos, MPEG-1 and MPEG-2 videos, JPEG pictures and music files (compressed music formats). Please pay attention to the bit rate of the video content. Do not use bit rate higher than 2000 kbps.
Supported Media
The DVD Player supports different types and different sizes of USB Flash Memories.
Security information
If you want disconnect the USB Flash Memory from the USB port, please press at first the USB button.
Note:
If you disconnect the USB Flash Memory when the USB is active, than the USB Flash Memory could be damage.
USB Port
Due to the legal requirements of CE-conformity, the customer is asked to only connect USB-Sticks to the USB port
Warning: Connect USB Mass Storage device only. It is not allowed to charge MP3-Player, Mobile Phone etc. with HSD 7799.
General Operation
- Press SETUP to enter the Setup Menu.
- Press OK to the next level submenu or confirm your selection.
- Press to enter the submenu or return to the previous menu
- Press to highlight the desired menu.
- To exit from the menu
- Press SETUP again and the settings will be stored in the player's memory even if the player is switched off.
Navigate through the options:
- Press to highlight 'TV Display'.
- Enter its submenu by pressing.
- Move the cursor by pressing to highlight the selected item.
The Setup is divided into four different section: General Setup, Speaker Setup, Dolby Digital Page, Preference Page, Password settings and DVB-T settings.
General Setup Page
The options included in General Setup page are:"TV Display", "Angle Mark", "OSD lang", "Closed Captions", "Screen Saver" and "Last Memory".
TV Display
Set the aspect ratio of the DVD Player according to the TV you have connected.
4:3 PANSCAN
If you have a normal TV and want both sides of the picture to be trimmed or formatted to fit your TV screen.
4:3 LETTERBOX
If you have a normal TV. In this case, a wide picture with black bands on the upper and lower portions of the TV screen will be displayed.


16:09
If you have a wide-screen TV.
Angle Mark
Displays current angle setting information on the right hand corner of the TFT screen if available on the disc. The options are:
On: Enable Angle Mark.
Off: Disable the current angle setting display.
OSD Lang
You can select your own preferred language settings. This DVD system will automatically switch to the selected language whenever you load a disc. If the language selected is not available on the disc, the disc's default language will be used instead. The OSD language in the system menu will remain once selected.
Closed Captions
Closed captions are data that are hidden in the video signal of some discs. Captions are different from subtitles because captions hearing are impaired by showing the sound effects (e.g. "phone ringing" and "footsteps"), while subtitles do not. Before you select this function, please ensure that the disc contains closed captions information and your TV set also has this function.
On: Enable Closed Captions.
Off: Disable Closed Captions.
Screen Saver
This function is used to turn the screen saver On or Off.
On: In STOP, PAUSE or No DISC mode, if no actions are performed about 3 minutes, the Screen Saver will be activated.
Off: Screen Saver is disabled.
Last Memory
If the option "ON" is set, than the players remembers the last playback position by Video-DVD.
Audio Setup Page
The options included in Audio Setup Page is 'Downmix'.
Downmix
This options allows you to set the stereo analog output of your DVD Player.
LT / RT:
Select this option if your DVD Player is connected to a Dolby Pro Logic decoder.
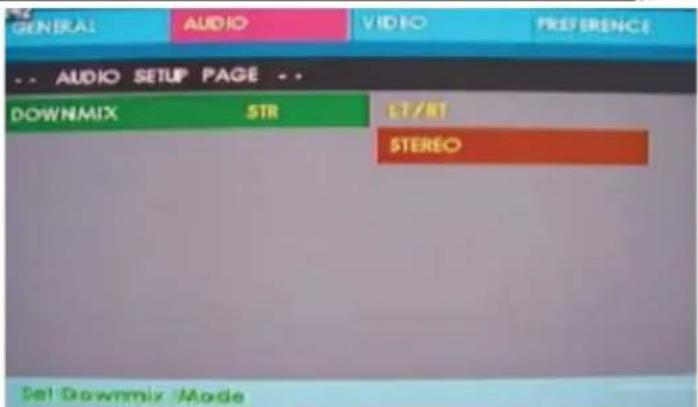
Stereo:
Select this option when output delivers sound from only the two front speakers.
Allows to Set:
- Sharpness
- Brightness
- Contrast,
- Hue
- Saturation
See Page 18.
Preference Page
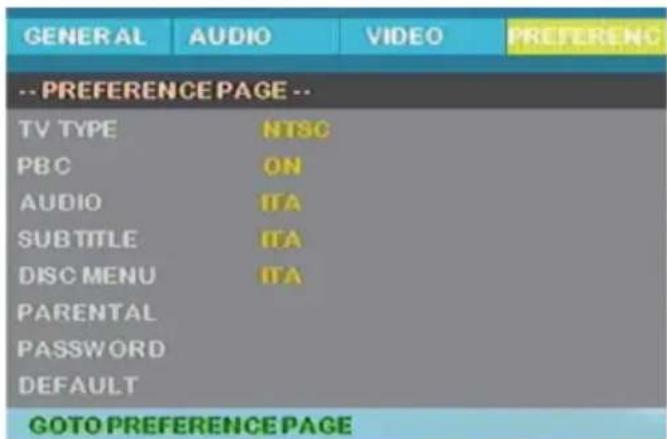
The options included in Preference page are : 'TV Type', 'Audio', 'Subtitle', 'Disc Menu', 'Parental' "Password" and 'Default'.
Note:
Some Preference features can be selected only during 'No Disc' condition or STOP mode.
TV Type
Selecting the colour system that corresponds to your TV when AV outputs. This DVD Player is compatible with both NTSC and PAL. In order for a DVD disc to play on this Player, the colour system of the Disc, the TV and the DVD Player should match.
PAL
Select this if the connected TV is PAL system. It will change the video signal of a NTSC disc and output in PAL format.
NTSC
Select this if the connected TV is NTSC system. It will change the video signal of a PAL disc and output in NTSC format.
Audio, Subtitle and Disc menu
These options set the Audio, Subtitle and Disc menu language fit for you.
• Audio (disc 's soundtrack / languages)
- Subtitle (disc 's subtitles / languages)
• Disc Menu (disc 's menu / languages)
Preference Page
Parental
DVD video discs equipped with the parental lock function are rated according to their content. The contents allowed by a parental lock level and the way a DVD video disc can be controlled may vary from disc to disc. For example, if the disc allowed, you could edit out violent scenes unsuitable for children and replace them with more suitable scenes, or lock out playback of the disc all together.
- Press stop twice during playback
- Press SETUP
- The SETUP MENU appears on the screen.
- Select Preference Page, press ENTER.
- Select Parental, press ENTER.
- Select ratings, press ENTER
- Enter your password then press ENTER. The pre-set password is 8806
- Press SETUP to exit setup, press ENTER to start.
Ratings
• KID Safe - Kids material. Recommended especially for children and viewers of all ages.
• 2 G - General Audience. Recommended as acceptable for viewers of all ages.
• 3 PG - Parental Guidance suggested.
• 4 PG13 - Material is unsuitable for children under age 13.
- 5 PG and 6 R - Parental Guidance-Restricted. Recommended that parents restrict children under 17 from viewing or allow to view only when supervised by a parent or adult guardian.
• 7 NC17 - No children under age 17. Not recommended viewing for children under age 17.
- 8 ADULT - Mature material. Should be viewed only by adults due to graphic sexual material, violence or language.
• OFF - It will play all discs.
Note:
Some DVDs are not encoded with a rating though the movie rating may be printed on the Disc cover. The rating level feature does not work for such Discs.
Default
Setting the 'Default' function will reset all options and your personal settings to the factory defaults and all your personal settings will be erased.
Caution!
When this function is activated, all settings will be reset to factory defaults.
Preference Page
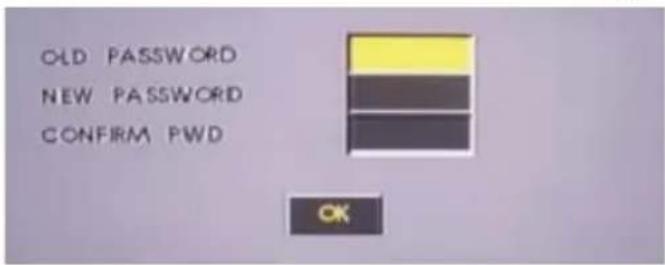
Password
This feature is used for Parental Control. Enter your four digit password when a hint is displayed on the screen. The default password is 8806.
- Insert the old password
- Insert the new password.
- Confirm the new password
- Navigate to Feld and press ENTER button.
Check the following guide for the possible cause of a problem before contacting service.
Technical Support of Xoro/MAS Germany:
| Symptom | Correction |
| No power | Check if AC adapter of power is connected securely.If powered with the battery, check if it is exhausted.Pay attention to the right fitting of the battery.Switch the power button to the position ON. |
| No sound | Ensure that the equipment is connected properlyEnsure that the input settings for the TV and stereo system are proper.Please make sure, that the audio track exists on the disc.Control the volume. |
| No key operation | Turn the unit off and then back to on.Disconnect the unit from power and from battery and connect them again. |
| No playback | Condensation had formed, please wait 1 or 2 hours to allow the player dry out.Wrong disc, please use only DVD, CD or ISO Data discThe disc may be dirty and require cleaning.Ensure that the disc is installed with the label side up.The disc has too many scratches.Remove the laser pickup protection on the disc tray.The DVD+/-RW should be finalized.Wrong region code by the Video-DVDCancel the parental lock function or change the parental lock level. (The Pre-set password is 8806). |
| No remote control | Check the batteries in the remote controlAre the polarities correct?Batteries are depleted. Please uses new one.Point the remote control unit at the Infrared sensor and operate.Remove the obstacles between the remote control and the Infred snesorOperate the remote control unit at a distance of not more than 5 meters from the Infrared sensor. |
| No sound or picture by AV IN/OUT | Pay attention to the cable connection.Press to DVD/AV/TV button until AV is available |
The HSD 7799 has integrated a DVB-T TV tuner. To receive the terrestrial broadcast, you need to connect the player with an antenna. The best case is to use the roof antenna. If your position is nearby the transmitters, than you can a passive or an active indoor aerial.

natural_image
Technical line drawing of a mechanical component with a circular feature and an arrow indicating direction (no text or symbols)Connect the cable from the antenna to the to RF ANT jack on the left side of the player.
Please pay attention that you can receive the DVB-T in your area.
If you want to use the DVB-T than you have to change the mode by the player. Please press the DVD/AV/TV button on the remote control or the DVD/AV/TV button on the device to change the to the DVB-T mode.
First Time Installation
Fast installation operation
Connect this unit and other equipments related according to "EASY INSTALL":
- Turn on the unit, then the Welcome window is popped:
A. Get to the setup menu with ▲/▼ button, and select the proper setting parameters with ◀/▶ button: Region (Default setting is France), and OSD Language (English is default).
B. Once the setting is over, move to OK with ▲/▼ button, then press OK button to enter Auto Scan menu and press it again to start auto scan.
C. Exit the Main Menu when auto scan is finished, then press OK to pop up Channel List, where you can choose a preferred channel with ▲/▼ button before pressing OK to start viewing it.
- If no Welcome menu appears when the unit is turned on:
A. Press SETUP button, then enter Tools menu by pressing ▲/▼ button to Load Factory Default. (You have to perform this operation when the unit is used for the first time or the software has been upgraded).
B. Press EXIT to quit Tools menu and get to Installation menu with ▲/▼ button, then choose Auto Scan and get to Search menu with OK, and press OK again to start auto scan.
C. After scan, exit the Main Menu, and press OK to display Channel List where you can choose a channel with ▲/▼ button and press OK to view it.
Important Functions
Channel List
Press the OK button to access the channel list.
Change Channel
Press CH− or CH+ to get to next or previous channel.
Tele- / Videotext
Press TEXT button to view the videotext information of the current TV program.
Subtitle
Press SUB-T button to turn on or off the subtitle on the screen. This function can be activated, if the service is provide by the TV channel and program.
TV / Radio
Press TV/RADIO button to switch between TV and Radio station.
Language or another Audio
Press AUDIO button to change the audio language or the audio track output. The options are:
Audio Mode:
Stereo, Left, Right
Audio Track:
Here you
can
choose
another

Information
Press INFO button to view the information of the current channel.
EPG
Press EPG button to show the EPG information. The EPG window is organizes in different sections:
Top left:
TV Channel list
Top Right:
Date and Time. Additional the actual TV program title and the next TV program tilte.
Middle:
EPG overview of the TV channel (7-days EPG)
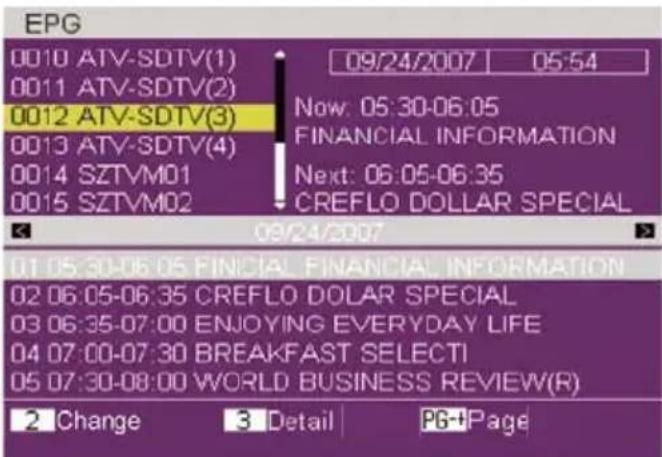
Bottom Side:
Navigation help informations
The cursor starts by the channel list. You can navigate with the ▲/▼ buttons to the next TV channel. If you change to the next channel, the EPG list will be updated automatically.
Important Functions
Button 2:
Here you can change between the TV channel list and the EPG overview.
Button 3:
If you marked a TV program, than you display the detailed EPG information.
▲/▼ buttons:
Changes between one TV channel to another or change from one TV program to another.
PgUp and PgDn button:
With these buttons you can scroll in the TV list or in the TV program list.
◀/▶:
In the EPG overview you can scroll from the current day to the next day. Each pressing of the button the device scrolls one day more.
The detailed view of the EPG information (with the 3 button enabled) shows an altered appearance of the EPG window.
This displays the program title. Detailed information of the TV broadcast is displayed with the 1 button. The following figure shows the expanded view.
Note:
Sometimes it may happen that in the detailed EPG information to the message "No Information" or "No Description" will appear. Often, however, more information is available, to press the 1 button and other contents are displayed.

Press SETUP key to brows the Main Menu which includes 5 submenu items on the screen:
- Channel
- Installation
- Setup
- Tools
Press ▲/▼ buttons to select a menu item, then OK button to confirm it, or press ◀/▶ button to choose a functional option, then press EXIT to return to the upper-level menu.

Note:
- The four direction buttons (▲/▼/◄/►), OK and EXIT button usually have the same functions in menus at all levels.
- Certain menu option should be operated according to the navigation hints displayed on the screen.
- Color buttons refer to different function operations in different menu.
At Channel option, press OK, then the submenu containing 6 options shall be displayed on the
Channel
screen:
• TV Channel List
• Radio Channel List
- Delete All Favorites
- Delete All
• Group rename
TV Channel List
• Use ▲/▼ button to choose a channel, and press OK to confirm.
- Use ◀/▶ button to shift favorite channels (Note: Only when favorite channels have been set).
- Numeric 1 (Edit) button: Use this button to edit the channels, such as Favor, Lock and Skip etc.
- Numeric 2 (Find) button: Used to search for a particular channel by inputting the channel name or number.
- Numeric 3 (Sort) button : sort the channel orders in five ways: Default, Name (A-Z), Name (Z-A), FTA and Lock.
- Numeric 4 (Move) button : Used to move a channel to an expected place with ▲/▼ button, then press OK to confirm.
- Press PgUp/ PgDn to turn over the page down or up and browse the list. There are not less than 600 channels stored.
- SETUP or EXIT button: Used to quit current interface.
Regarding the operation of Channel Edit:
When press OK button or Numeric 1 (Edit) button after accessing one channel, the following operating interface will appear. Please follow the relevant instruction for the operation:
- OK (Select) button: use this button to choose the channels to be edited one by one.
- (All) button: Choose all the channels to be edited at one time.
- (FAV) button: Set the chosen channels as your Favorites which can be sorted into 8 groups.
- 2—(Lock) button: Lock or unlock a channel (program).
• 3—(Skip) button: Set one channel to be skipped over when look through the list by pressing ▲/▼ button.
• 4—(Delete) button: Delete the chosen program (Channel). - 5—(Rename): Rename the chosen program (Channel).
- ◀/▶ (Group) button: These two buttons function only when Favorite channels are already set, and used to shift from one Favorite group to another.
- PgUp/ PgDn button: Used to turn over the page down or up and browse the list. There are no less than 600 channels stored.
- SETUP or EXIT button: Press either button to quit current interface.

Radio Channel List
Refer to the operation of TV Channel List for more information.
Delete All Favorites
Press OK to get to this setup option, then delete all favorite TV channels and radio channels that have been edited following the navigation guidance on the screen.
Delete All
Press OK to get to this setting, where all stored TV and radio channels can be deleted following on the screen.
Move to Installation and press OK, then a submenu shall be popped up which includes three options:
- Auto Scan
- Channel Scan
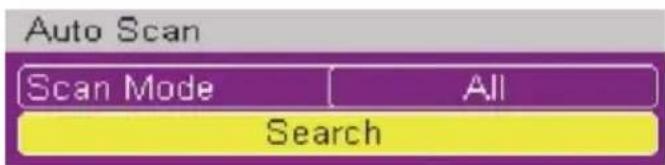
Auto Scan
Scan Mode: Free (scan all free channels), All (scan all channels including free and paid ones); Search: Press OK to display Scan box and conduct auto scan, or press SETUP or EXIT to quit. The scan box indicates the scan process by percentage of completion; On the top there is details about Scan Band, Frequency, Demodulation mode, Channel No, Transmission mode and Guard Interval etc.; Below are the scanned TV channels and radio channels displayed in two columns.
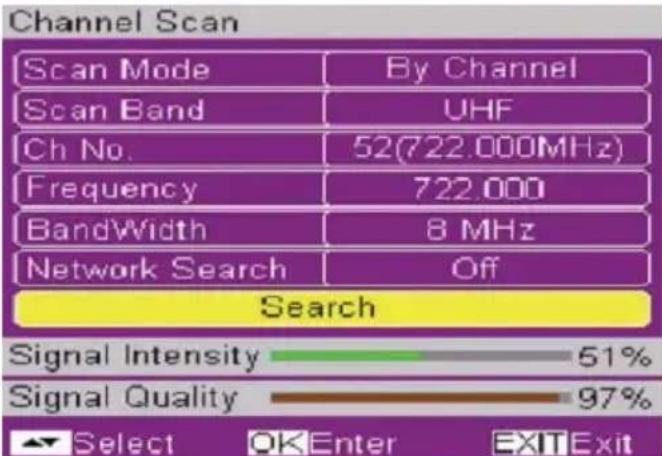
Channel Scan
- Scan Mode: By Channel and By Frequency. Either alternative shall be fine for scan.
- Scan Band: VHF/ UHF available.
- Ch No. : Channel 5\~12 (VHF), and Channel 21\~69 (UHF)
- Frequency: 174\~230 MHz (VHF), 470\~862 MHz (UHF) are available. (The frequency system can be set automatically according to different regions, and the actual frequency point should be referred to the practice).
- Band Width: There are three options: 6 MHz, 7 MHz, and 8 MHz.
- Search: Move the cursor here and press OK, then a information box shall appear indicating the scanning process. Pressing Exit allows you to cancel scan and quit current interface. The scan process box shows the progress of scan by percentage of completion; On
the top there is detail about Scan Band, Frequency, Demodulation modes, Channel No, Transmission mode and Guard Interval etc.; Below are the scanned TV channel list and radio channel list displayed in two columns.

Notes:
- Only when Scan Mode is set to "By Channel", can Scan Band and Ch No be ready for setup.
- Only when Scan Mode is set to "By Frequency", can Frequency and Band Width be set.
Configuration
When the cursor is at Setup, press OK to display its submenu containing 7 options:
- OSD Language
• TV System
• Region and Time - Timer Setting
- OSD Setting
- Parental Lock
OSD Language
Get to OSD Language and press OK to start this setup. Select your desired OSD Language
TV System
- Display Mode:
- Auto
- PAL
- NTSC
- Aspect Ratio:
- 4:3 LB (Letter Box)
- 4:3 PS (Pan Scan)
- 16:9
• LCN mode:
- On
- Off

If LCN mode is chosen ON, the system shall automatically list the channels in a natural order according to the program stream; if Off is the alternative, the system shall list the channels in a routine order.
Configuration
Region and Time
- Region: France, Germany, Greek, Iran, Italy, Poland, Portugal, Russia, Spain, Sweden, United Kingdom, Vietnam, Argentina, Australia, Denmark, and Finland.
- GMT Usage:
| 1. | User | Define |
| 2. | By | Region |
| 3. | Off |
- GMT Offset: Within the range of GMT+12:00\~ GMT-11:30.
- Date. Press OK to start the setup, then use ◀/▶ button to move the cursor and the number buttons to enter the date value.

Once the setup is done press OK to confirm, the setup gets effective.
- Time: Press OK to start the setup, then use ◀/▶ button to move the cursor and the number buttons to enter the time value.
Once the setup is finished, press OK to confirm.
• Time Display: On/ Off.
Notes:
- Only when the option GMT Usage is set to "User Define", can GMT Offset be available to set;
- Only when the option GMT Usage is set to "Off", can Date and Time be set.
OSD Setting
- Subtitle Display: Standard/ Teletext / Off
- OSD transparency: Off, 10%, 20%, 30%, 40% and 50%
- OSD Style: Here Style 1 and Style 2 are available for setting.
- Load Factory OSD Setting: Press OK to load the default OSD settings.

Tools
Move here and press OK, then a submenu will be brought up including three options:
- Receiver Information
- Game
- Load Factory Default
- Software upgrade
Receiver Information
Move the cursor here and press OK to display the relevant information of current channel.
Game
- Snake: Press OK to get into Snake game.
• Othello: Press OK to get into Othello game.
Note:
Regarding the rules of games, refer to the hints displayed on the screen.
Load Factory Default
Press OK to load Factory Default settings following the screen guidance by choosing Yes and pressing OK again to confirm.
When this unit is used for the first time or has just been upgraded, be sure to perform this setting operation.
Note:
The initial password preset at the factory is "3 3 3 0".
Check the following guide for the possible cause of a problem before contacting service.
Technical Support of Xoro/MAS:
| Symptom | Correction |
| No DVB-T reception / serious distortion by mosaics or artefacts/ freeze pictures | Switch the player into the DVB-T mode.No DVB-T reception in your region.Realign the antenna. Please pay attention to the direction of the antenna tower.Please use an active indoor aerial or a roof antenna.Retry the Auto Scan.The HSD 7799 can only receive SD/MPEG2 Broadcasts. HD MPEG4 is not supported |
| No power | Plug the power cord into the outlet tightly and turn on the power. |
| Can not scan programs | Adjust the antennaRefer settings for searching |
| No picture / no coloured pictures | Control the connection to the TV set.Control the video output mode in the setup. |
| Remote control does not work | Change the batteries.Operate within normal range (max. 5 meters, 30°)The sensor is pointed to by bright light. |
| No sound | Cancel MuteIncrease volumePay attention to connection to TV set or amplifier.Cancel Sleep timer |
| Audio / Subtitle without function or can no choose | Change audio track (press AUDIO button)Change subtitle track (press SUB-T button)Other audio track is not supportedSubtitles are not supported |
| No sound during playback | Please control the sound track of the video fileAC3 sounds can not playback |
General Data
Power Inlet AC 100-240 V with 50/60Hz
DC 9 V 1,5 A via AC/DC adapter
Consumption < 14Watt
Dimension
240×45
x180mm
Weight (Main Unit) 0.95kg
Weight (Main Unit, RC, PSU ) 1.30kg
Battery
Rechargeable
Lithium-Polymer
Duration Time
above 2 hours by DVD/DVB-T
Screen
Size 9" (22.8 cm) TFT Display
Resolution 800 x 480 with 16:9 Aspect Ratio
Backlight
LED
DVD-Player
Disc Size 12cm/8cm
Format
DVD-Video/Audio-CD/DVD
ROM,
VCD, SVCD
Files
AVI, MPG,
JPG, MP3
Codec (max. 720x576) MPEG1, MPEG2, MPEG4 (ASP)
DVB-T Receiver
Input Frequency
170-230MHz, 470-862MHz
Bandwidth
6,7 and 8 MHz
Video Decoding:
ISO/IEC13818-2 MPEG2
Video Resolution:
PAL 720 × 576 / NTSC
Audio Decoding:
ISO 111723
Operation Condition
Temperature
0
40^
C
Humidity
5 - 85% (non condensation
)
Limited Warranty
In case the products delivered are not free from defects in material or workmanship, MAS Elektronik AG has the right to either repair or replace the defective product at its choice. MAS Elektronik AG manufactures and repairs goods using components which are new or equivalent to new in accordance with industry standards and practice.

The warranty for wearing parts (e.g. rechargeable batteries) is limited to 6 months.
In case the device is equipped with internal data storage (e.g. hard disc drive, Flash drive), the customer is responsible to backup his data before sending the device. MAS Elektronik AG is not liable for any data loss on returned devices. MAS Elektronik AG reserves the right to reset returned devices to factory defaults. Please note your personal settings for this reason.
MAS Elektronik AG is not liable for any accessories not belonging to original package content such as DVDs, hard disc drives, Flash storage devices, batteries, etc.
This limited warranty covers the warranty requirements set by authorities in your country.
This limited warranty only is valid in the coThis limited warranty does not cover finishes, accessories or batteries, nor does it cover damage resulting from accident, misuse, abuse, dirt, water, battery leakage, tampering, servicing performed or attempted by unauthorized service agencies. This limited warranty does not cover damages resulting from firmware upgrades. Only in case of firmware upgrades needed to add functions promised at time of purchase, such damages are covered by this limited warranty. For a correct and frictionless completion of warranty or repairs you need a RMA No. You may obtain a RMA on the internet at www.mas.de/FAQ or by telephone.
Please send the device in its original packing material, all standard accessories and a copy of the invoice, a description of defect and the RMA No. to following address. Please note the RMA number clear and in large numbers on the outer package.
MAS Elektronik AG
Pollhornbogen 19
21107 Hamburg
Germany
Support
e-mail: support@ersservice.de
Hotline: +49 (0) 40 - 77 11 09 - 17
Fax: +49 (0) 40 - 76 73 35 - 15
FREE TO CHOOSE INNOVATIONS

XORO by MAS Elektronik AG
Pollhornbogen 19
21107 Hamburg
Deutschland
Tel: +49(040) 77 11 09 17
Fax: + 49(040) 76 73 35 15
xoro@mas.de
www.xoro.de

natural_image
Green recycling symbol with three chasing arrows forming a triangle (no text or labels)DE V1
ENG V1
FS: 12361




- XORO®
- SICHERHEITSHINWEISE
- Lieferumfang
- Sommerzeit
- Safety Information
- User Manual
- Laser
- Operation
- USB Port
- Power Supply
- Battery
- Recycling of Batteries
- Operation and Position
- Macrovision
- Dolby
- Defect
- Recycling of electronic devices
- Recycling of paper and carton
- Recycling of plastic parts
- Green Dot
- Notes:
- Battery Storage
- Use the device in the car
- MAIN UNIT
- Right
- Left
- Front
- Insert battery
- Buttons on the remote control:
- Connecting to a TV set
- Connecting headphones
- Audio/Video IN
- How to start playback from the MENU screen
- How to stop playback?
- Fast Forward or Fast Backward
- Pause the playback
- Chapter / Track
- Selecting Subtitles
- How to change the Audio languages?
- REPEAT
- Search or GoTo
- Volume Control
- ZOOM
- Mute
- USB
- Security Note:
- Checking the operational status
- Video Setup - Panel Quality
- Playing back JPEG files
- JPEG disc compatibility with this player is limited as follows
- Playback
- Pause
- Stop
- Rotate an image
- Playing back Music files
- Disc
- Audio
- Format Compatibility
- Playback function:
- MPEG-1, MPEG-2 and MPEG-4 files
- MPEG-4 disc compatibility with this player is limited as follows:
- playable Audio format
- Playback functions
- Supported formats and Bit rates from USB Flash Memory
- Supported Media
- Security information
- General Operation
- Navigate through the options:
- General Setup Page
- TV Display
- 4:3 PANSCAN
- 4:3 LETTERBOX
- 16:09
- Angle Mark
- OSD Lang
- Closed Captions
- Screen Saver
- Last Memory
- Audio Setup Page
- Downmix
- LT / RT:
- Stereo:
- Allows to Set:
- Preference Page
- Note:
- TV Type
- PAL
- NTSC
- Audio, Subtitle and Disc menu
- Parental
- Ratings
- Default
- Caution!
- Password
- First Time Installation
- Fast installation operation
- Important Functions
- Channel List
- Change Channel
- Tele- / Videotext
- Subtitle
- TV / Radio
- Language or another Audio
- Information
- EPG
- Button 2:
- Button 3:
- ▲/▼ buttons:
- PgUp and PgDn button:
- ◀/▶:
- Channel
- TV Channel List
- Radio Channel List
- Delete All Favorites
- Delete All
- Auto Scan
- Channel Scan
- Configuration
- OSD Language
- TV System
- Region and Time
- OSD Setting
- Tools
- Receiver Information
- Game
- Load Factory Default
- General Data
- Screen
- DVD-Player
- DVB-T Receiver
- Operation Condition
- Limited Warranty
- XORO by MAS Elektronik AG
Brand : XORO
Model : HSD 7799
Category : Portable DVD Player