
HRK 7540 - Digital decoder XORO - Free user manual and instructions
Find the device manual for free HRK 7540 XORO in PDF.


| Product Type | Digital Satellite Receiver (DVB-S2/S2X) |
| Brand | Xoro |
| Model | HRK 7540 |
| Dimensions (W x D x H) | Approx. 160 x 100 x 40 mm |
| Weight | Approx. 0.3 kg |
| Power Supply | DC 12V, 1A (external adapter) |
| Power Consumption | Max. 12 W (standby <1 W) |
| Video Output | HDMI 1.4, SCART (composite) |
| Audio Output | HDMI, digital optical (S/PDIF) |
| Supported Resolutions | 576i, 576p, 720p, 1080i, 1080p |
| Video Decoding | MPEG-2, MPEG-4, H.264, H.265 (HEVC) |
| Tuner Type | DVB-S2 / S2X, 1x F-connector |
| USB Port | 1x USB 2.0 (front) for recording and media playback |
| Storage | Supports external USB HDD (up to 2 TB) |
| Recording Features | Timeshift, scheduled recording, PVR ready via USB |
| Channel Memory | Up to 4000 channels |
| Electronic Program Guide (EPG) | 7-day EPG support |
| Remote Control | Infrared, includes batteries (AAA) |
| Languages | Multilingual menu (EN, DE, FR, ES, etc.) |
| Maintenance & Cleaning | Wipe with a dry soft cloth; avoid liquids and abrasives. |
| Safety | Indoor use only; ensure proper ventilation; disconnect during storms. |
| Spare Parts & Repairability | Contact Xoro support or authorized service centers for parts; user-replaceable only remote batteries. |
| General Information | Comes with user manual, remote control, power adapter, AV cable. |
Frequently Asked Questions - HRK 7540 XORO
User questions about HRK 7540 XORO
0 question about this device. Answer the ones you know or ask your own.
Ask a new question about this device
Download the instructions for your Digital decoder in PDF format for free! Find your manual HRK 7540 - XORO and take your electronic device back in hand. On this page are published all the documents necessary for the use of your device. HRK 7540 by XORO.
USER MANUAL HRK 7540 XORO
FREE TO CHOOSE INNOVATIONS
XORO®
HRK7540

User's Manual (English)
flowchart
graph TD
    A["CABLE IN"] --> B["LOOP OUT"]
    C["TV SCART"] --> D["HDMI"]
    E["XORO"] --> F["HD DVB-C Receiver"]
    G["DC IN"] --> H["USB2.0"]
    I["D E F G H I"] --> J["Ground"]
    K["SPBIP COAL"] --> L["Ground"]
    M["DC IN: 5V --- max. 2A"] --> N["Ground"]
Audio S/PDIF (Koaxial)
Antenne IN/OUT IEC 61069-2
Daten USB 2.0
FREE TO CHOOSE INNOVATIONS
XORO®
HRK7540

User's Manual (English)
Safety Precaution:
This STB has been designed and manufactured to satisfy the international safety standards. Please read the following safety precautions carefully before operating this receiver.
Power Supply Unit:
Before operating, please check the units operating voltage is 100-240V AC 50/60Hz.
Overload:
Do not overload a wall outlet, extension cord or adapter, neither use damaged power cord or touch it with wet hand as this may result in electric shock.
Liquid:
The receiver shall not be exposed to dripping or splashing water, and that no objects filled with liquids, such as base, shall be placed on the apparatus.
Ventilation:
Keep the slots on top of the receiver uncover to allow sufficient airflow to the unit. Do not put the receiver on soft furnishings or carpets. Do not expose the receiver to direct light or do not place it near a heater or in humid conditions. Do not stack other electronic equipments on top of the receiver.
Cleaning:
Plug out the receiver from the wall outlet before cleaning. Clean the receiver by a soft cloth or mild solution of washing-up liquid (no solvents).
Location:
Put the receiver indoor in order to avoid lightening, raining or sunlight.
Uncover:
Do not remove the cover, to reduce the risk of electric shock. Contact qualified and licensed service personnel to repair the receiver, or contact your dealer.
1. Reference
1.1 General Features
Manual search Supported
Auto search supported
Full Color (32 bits) on screen display (OSD)
8 favorite group and parental lock supported.
Multi-language menu supported
Multi-language audio supported
Multi-language DVB Subtitle output
7 days Electronic Program Guide (EPG)
Teletext output through VBI and OSD.
USB 2.0 Interface
1.2 Accessories
- Users manual
- Remote Control Unit
- Batteries
• Power Supply Unit
2. Product Overview
2.1 Front Panel

- LED Display: Used to display information.
- Power LED (red: Stand By, blue: Power On)
3.CH ▲( Selects the next Channel)
4.CH▼ (Selects the previous Channel) - Standby (Used to switch the set top box to on or standby)
2.2 Rear Panel

- CABLE IN: Connect the cable.
- LOOP OUT: Connect another receiver or TV.
- TV SCART: This socket connects to your TV.
4.HDMI OUT: This socket connects to your HDMI device. - COAXIAL : Digital Audio output (S/PDIF).
- USB2.0 : Connect USB Mass Storage Devices (5V, max. 500mA)
- DC-5V: Connect Power Supply Unit
2.3 Remote Control Unit (RCU)
-
POWER: Switch between operation and standby modes.
-
MUTE: 🤒 Mute audio.
-
DISPLAY: Set the HDMI Resolution.
-
MODE: Sets the display format (aspect ratio).
-
TV/R: Switch between TV and RADIO.
-
FIND: Quickly find channels which you want.
-
NUMERIC KEY (0\~9): Enter a TV/radio channel number or menu option number.
-
EPG (Electronic Program Guide): Display the program guide.
-
CH▲/CH▼: Changes program.
-
VOL◄/VOL►: Change volume in viewing mode.
-
OK: Confirm the selected operation or display the channel list while watching TV.
-
MENU: Activate main menu.
-
EXIT: Exit current menu step by step.
15.P ▲/P ▼:Page up/down on menu.
16.FAV: Display favorite channel list you set before
-
RECALL: Move to the previous viewed channel.
-
AUDIO: Display the audio list.
-
ZOOM: Picture Zooming function.
-
INFO: Display the programme information.
-
PAUSE: Freeze the picture.
-
F1: Accessorial function.
-
F2:Display Subtitle List.
-
F3/TIMER: Setup event timer.
-
TXT: Display the Teletext.
-
I◀◀: Previous, ▶I: Next.
-
◀◀: Rewind, ▶▶: Fast forward.
-
II: Pause/timeshift, ●: PVR-Record.
-
▶: Play, Display PVR-Record list
-
■:stop recording and playing.

3. Connection with Other Device
3.1 Connecting to TV

3.2 Connecting the Cable

4. Installation
Tip: The default password is 0000. If you have forgotten your password, please contact your local product distributor.
4.1 Powering On
- Connect the power cord of the product to a wall outlet.
- Power on by pressing the POWER button on the remote control or the POWER button at the front of the product.
4.2 Manual Search
Manual Search allows you to configure the cable setting parameters.
Menu->Installation->Manual Search
Press the VOL◀/VOL▶ keys you can see the prestored Transponder list, in this menu, you can Search, Add, Edit, Delete transponders.

bar
| Metric | Value | | -------------- | ------ | | TP | 47 / 95 | | Frequency | 67800 | | Symbol rate | 6900 | | Polarisation | 64QAM | | Strength | 98% | | Quality | 0% |1. Start Search
In this menu, you can press the VOL◄/VOL► keys to choose the transponder which you want
to search, then press the Red key to search. You will be asked to confirm whether network search or not. If you select “Yes”, you will implement network search.
2. Add
You can add a new transponder with the Green key. Here you can input new Frequency, Symbol Rate. Press OK to confirm the setting, now this new transponder is added to the Transponder list.
3. Edit
You can edit a transponder with the Yellow key. Here you can input new Frequency and Symbol Rate. Press OK to confirm the setting, now this new transponder will replace the old transponder.
4.Delete
You can delete the transponder which you want with the Blue key. You will be asked to
confirm whether delete the transponder or not. If you select "Yes", all the channels in the selected transponder will be deleted. Press OK key, and the selected transponder will disappear.
4.3 Auto Search
- Select Country: Press the VOL+/VOL- button to select your country.
- Network: Select your Cable Network Provider.
- Auto Search: Press OK to start the Channel Scan.

Factory Default allows you restore the product to the factory default.
1) All: All data and settings will be deleted.
Info: If you select "Yes" all data and setting will be lost.
2) Channel List Only: All channels data will be deleted.
3) Radio Channel Only: All radio channels data will be deleted.
4) Scramble Channel Only: All scramble channels data will be deleted.
5. Edit Channels
5.1 Edit Channels
Menu->Edit Channels->Edit Channels
Edit Channels allows you to delete, lock/unlock, rename and move the channels in the channel list conveniently.
Tip: Radio Channels operation similar to the TV Channels.

1. Delete
1) Highlight the Delete function using VOL◄/VOL► button to enter.
2) Press the CH▲/CH▼ to highlight the channel which you want to delete, press the OK button to sign the channel. You can also press the CH▲/CH▼ button to find the channel you want to delete until you sign all the channels you want to delete.
3) Press the EXIT button, select "Yes" will delete the chosen channels.
2. Lock/unlock
1) Highlight the Lock function using VOL ◀/VOL▶ button to enter.
2) Press the CH▲/CH▼ to highlight the channel which you want to lock, press the OK button to sign the channel.
3) Input the password to lock the channel.
4) Press the CH▲/CH▼ button to select other channels you want to lock too.
5) Press the EXIT button then the chosen channels will be locked.
Note: If the highlighted channel is locked, press the OK button here to switch it into Unlock.
3. Rename
1) Highlight the Rename function using VOL◄/VOL► button to enter.
2) Press the CH▲/CH▼ to highlight the channel which you want to rename, press the OK button.
3) According to the help information enter a channel name directly using the keyboard displayed on the screen and press the Blue button to complete.
4. Move
1) Highlight the Move function using VOL◄/VOL► button and press OK to enter.
2) Press the CH▲/CH▼ to highlight the channel which you want to move, press the OK button to sign the channel.
3) Press the CH▲/CH▼ button or press the NUMERIC(0-9) buttons to the destination in the channel list and press the OK button.
4.1. Move Group Channels
1) According to the help information, Press the Blue button to enter Group move.
2) Press the CH▲/CH▼ to highlight the channel you want to group move, press the Blue
button to sign the channel. You can also press the CH▲/CH▼ or VOL◄/VOL► button to find the channel you want to sign until you sign all the channels you want to group move.
4) Press the CH▲/CH▼ or VOL◄/VOL► button to the destination in the channel list and press OK to confirm.
5.2 Edit Favorite
Menu->Edit Channels->Edit Favorite
Edit Favorite allows you to add or remove channels from the favorite groups.
- Highlight the channels you want to add or remove from the favorite channel list.
-
Press the VOL ◀/VOL▶ button to change the favorite group and press the OK button to select the favorite group you like.
-
Press the EXIT button to exit the menu and save it.
5.3 Sort Channels

Menu->Edit Channels->Sort Channels
Sort Channels allows you to sort the channels list.
- Highlight the option you want and press the OK button to sort the channel list.
5.4 User Channel List
User Channel List allows you to save or load the channel list you want.
- Save Channel list
Menu->Edit Channels ->User Channel List->Save - Load Channel list
Menu-> Edit Channels ->User Channel List->Load
6. System Setting
6.1 System
Menu->Settings->System settings
Tip: You can set all the settings here by pressing VOL◄/ VOL► button.
- Menu Language: Set the menu language.
- Audio1: Set the preferred audio language.
- Audio2: Set the sub-prime audio language.
-
Subtitle Language: Set the subtitle language.
-
EPG Language: Set the EPG language.
-
TXT Language: Set the TXT language.
-
LCN: Set the LCN On or Off.
-
Auto Exit CH List: If you set ON, the channel list will disappear when you press OK on a Highlighted channel.
-
Recall List: You can turn Recall List on or off. If you set ON, when you press Recall button of RCU you can get the recall list. If you set OFF, when you press recall button you can go back to the last program you have selected.
-
ECO Stand By: If set to "on", power consumption in Standby is reduced, but Loop-Out is disabled and start-up of the Set Top Box takes more time.
-
Front Panel Light: Set the brightness of the LED-Display.
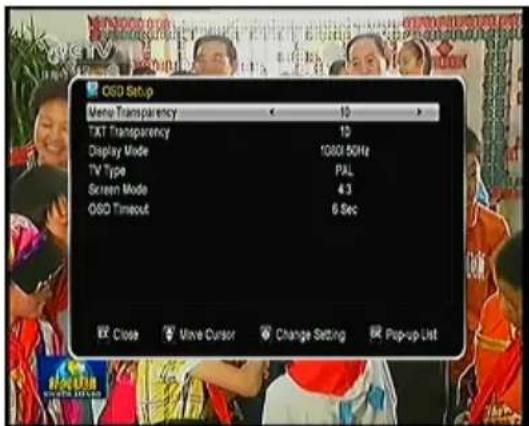
6.2 OSD
Menu->System settings->OSD Setup
- Digital Audio: Selects the Output-Format for the Digital Audio Output

-
Menu Transparency: Set the transparency of all menus.
-
TXT Transparency: Set the transparency of teletext.
-
Display Mode: Set the HD format between 1080p, 1080i, 720p, 576i or 576p.
-
TV Type: Set the TV Type on PAL/NTSC state.
-
Screen Mode: Set the display format according to the screen ratio. Select TV screen mode either 4:3 or 16:9 according to the TV type, or press the MODE button of RCU directly.
-
OSD Timeout: Set the display time of the program information.
-
SCART Output: Allows to select between CVBS and RGB.
6.3 Parental control
Menu-> SETTINGS ->Parental Control
You can lock the changes you have made using Installation Lock, Edit Channel Lock and System Lock. And you can change Age Rating.
6.4 About STB
Menu-> SETTINGS ->ABOUT STB
ABOUT STB can get the information about the STB, such as product name, software & hardware version and so on.
7. Times
7.1 Time Settings
Menu->TIMES->Time Settings
Time Settings will set the time mode, time zone and daylight saving time.

7.2 Event Timer
Menu->TIMES->Event Timer.
Event Timer You can set 8 timer events. It will record or play the program automatically according to the timer event list that you set.
7.3 Sleep Timer
Menu->TIMES->Sleep Timer.
SLEEP Timer can set the automatic turn off time.
7.4 Standby Time
Menu->TIMES->Standby Time.
Standby time can set the time display on front panel when standby.
8. Expansion
8.1 Games
Menu->EXPANSION->Games
Games offers funny games you can play.
8.2 USB
Menu->EXPANSION->USB or press the USB button directly
8.2.1 Basic Operations
1. Tool (Red button)
In USB menu, you can press the RED button to select Rename/Delete/Move To/Copy To/Sort the folders and files. And also can create the new folders and format the disk.
![GENERIC USB DISK - AI Autista1News News Subtle(DVB & TXT) AL(OVR92) 031_dengijun - [herjunella] 1.jpg 130834 bin 2 bmp 2010-01-01 00:19:04 2013-06-29 02:15:23 2013-06-21 07:48:24 VCB 82.8 MB 2009-06-15 19:50:12 JPG 84.6 KB 2013-01-06 09:40:36 BIN 4.9 KB 2005-01-26 20:45:51 BNP 88.4 KB 2013-01-06 09:40:54 Task Play Mode Upload PVR Setting](/content/2026/05/1026612/images/66d29df99f5b948d1d420dfea452919b06e25fbf7f432a1d29fc627792571b07.jpg)
2. Upload (Yellow button)
You can press the YELLOW button to upload data/channel/all to USB.
3. Play Mode (Green button)
Press the GREEN button to set the play mode.
4. PVR Setting (Blue button)
Press the BLUE button to enter the PVR Setting menu.
8.2.3 Play Files
1. Music
1) Press the VOL◄/VOL► to highlight the Music.
2) Press the CH▲/CH▼ to change the folder or file and press the OK button to open the folder or play the music file. It supports *.mp3, *.ogg format music files.
2. Photo
1) Press the VOL◄/VOL► to highlight the Photo.
2) Press the CH▲/CH▼ to change the folder or file and press the OK button to open the folder or play the picture. It supports *.bmp, *.jpg, and *.gif format photos.
3. Movie
1) Press the VOL◄/VOL► to highlight the Movie.
2) Press the CH▲/CH▼ to change the folder or file and press the OK button to open the folder or play the movie file. It supports *.AVI,*.MKV,*.MP4,*.MOV,*.MPG,*.TS format movie files.
4. PVR
1) Press the VOL◄/VOL►
to highlight the PVR.
2) Press the CH▲/CH▼ to change the folder or file and press the OK button to open the folder or play the PVR file.
8. Channel List
This chapter will help you use the channel list.
8.1 List
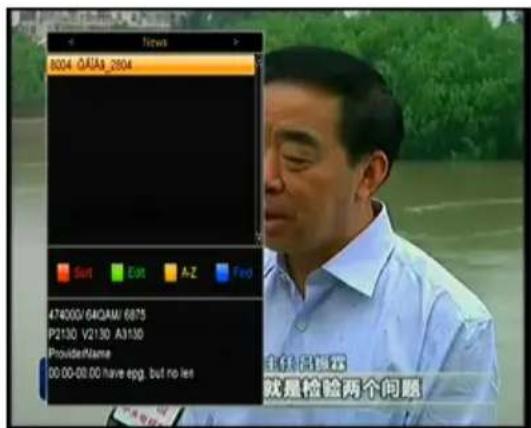
1) Press the OK button to enter the channel list while watching TV.
2) Press the Red button to change the channel list order.
3) Press the Yellow button can help you find the channel quick by their name.
4) Press the Blue button to enter the Quick Find menu.

8.2 Favorite List
1) If you have set several favorite lists, press the FAV button to enter the favorite list.
2) Press the VOL ◀/VOL▶ button to change different favorite list and press the OK button to select the favorite list.
2) Press the Red button to sort the channels.
3) Press the Yellow button can help you find the channel quick by their name.
Note: If you selected a favorite list, press the
CH▲/CH▼ button can only change the channels in this favorite list and press the OK button can only display the channels in this favorite list.
Limited Warranty
In case the products delivered are not free from defects in material or workmanship, MAS Elektronik AG has the right to either repair or replace the defective product at its choice. MAS Elektronik AG manufactures and repairs goods using components which are new or equivalent to new in accordance with industry

standards and practice. The warranty for wearing parts (e.g. rechargeable batteries) is limited to 6 months.
In case the device is equipped with internal data storage (e.g. hard disc drive, Flash drive), the customer is responsible to backup his data before sending the device. MAS Elektronik AG is not liable for any data loss on returned devices. MAS Elektronik AG reserves the right to reset returned devices to factory defaults. Please note your personal settings for this reason.
MAS Elektronik AG is not liable for any accessories not belonging to original package content such as DVDs, hard disc drives, Flash storage devices, batteries, etc.
This limited warranty covers the warranty requirements set by authorities in your country.
This limited warranty only is valid in the country the product was purchased. This limited warranty does not cover finishes, accessories or batteries, nor does it cover damage resulting from accident, misuse, abuse, dirt, water, battery leakage, tampering, servicing performed or attempted by unauthorized service agencies. This limited warranty does not cover damages resulting from firmware upgrades. Only in case of firmware upgrades needed to add functions promised at time of purchase, such damages are covered by this limited warranty. For a correct and frictionless completion of warranty or repairs you need a RMA No. You may obtain a RMA on the internet at www.mas.de/FAQ or by telephone.
Please send the device in its original packing material, all standard accessories and a copy of the invoice, a description of defect and the RMA No. to following address. Please note the RMA number clear and in large numbers on the outer package.
MAS Elektronik AG
Weidegrund 3
21614 Buxtehude
Germany
Support
e-mail: support@ersservice.de
Hotline: +49 (0) 40 - 77 11 09 - 17
FREE TO CHOOSE INNOVATIONS

XORO by MAS Elektronik AG
natural_image
Green recycling symbol with three chasing arrows forming a triangle (no text or labels)DE: V1
ENG: OEM V1
FS: 12454


- XORO®
- User's Manual (English)
- Safety Precaution:
- Power Supply Unit:
- Overload:
- Liquid:
- Ventilation:
- Cleaning:
- Location:
- Uncover:
- Reference
- General Features
- Accessories
- Product Overview
- Front Panel
- Rear Panel
- Remote Control Unit (RCU)
- Connection with Other Device
- Connecting to TV
- Connecting the Cable
- Installation
- Powering On
- Manual Search
- Start Search
- Add
- Edit
- 4.Delete
- Auto Search
- Edit Channels
- Edit Channels
- Delete
- Lock/unlock
- Rename
- Move
- Move Group Channels
- Edit Favorite
- Menu->Edit Channels->Edit Favorite
- Sort Channels
- Menu->Edit Channels->Sort Channels
- User Channel List
- System Setting
- System
- Menu->Settings->System settings
- OSD
- Menu->System settings->OSD Setup
- Parental control
- About STB
- Times
- Time Settings
- Event Timer
- Sleep Timer
- Standby Time
- Expansion
- Games
- USB
- Basic Operations
- Tool (Red button)
- Upload (Yellow button)
- Play Mode (Green button)
- PVR Setting (Blue button)
- Play Files
- Music
- Photo
- Movie
- PVR
- 1) Press the VOL◄/VOL►
- Channel List
- List
- Favorite List
- Limited Warranty
- XORO by MAS Elektronik AG
Brand : XORO
Model : HRK 7540
Category : Digital decoder