
HRS 8530pro - Digital decoder XORO - Free user manual and instructions
Find the device manual for free HRS 8530pro XORO in PDF.


| Product Type | Digital Satellite Receiver (DVB-S2) |
| Dimensions (W x H x D) | 168 x 38 x 95 mm |
| Weight | Approx. 0.5 kg |
| Power Supply | 220-240V AC, 50/60 Hz |
| Power Consumption | <25 W (normal), <1 W (standby) |
| Video Outputs | HDMI, SCART (RGB/CVBS) |
| Audio Output | S/PDIF Coaxial |
| USB Port | USB 2.0 High Speed (front panel) |
| Max USB Storage Capacity | 320 GB (FAT16/32, NTFS) |
| PVR Ready | Yes (record to USB, Time Shift) |
| Media Playback | Video, music, photo (AVI, MKV, MP3, JPEG, etc.) |
| Electronic Program Guide (EPG) | Yes |
| Teletext | Yes |
| Subtitle Support | Yes (DVB and external SRT, SUB, SMI) |
| Aspect Ratio | 4:3, 16:9 (adjustable) |
| Video Resolution (max) | 1920 x 1080p |
| Audio Decoding | MPEG, MP3, AC3, AAC, E-AC3 |
| LNB Support | Universal, Unicable (EN50494), DiSEqC 1.0/1.1 |
| Operating Temperature | 0°C to 40°C |
| Humidity | 5% – 90% (non-condensing) |
| Safety & Compliance | FCC Part 15, CE compliant |
| Accessories Included | Remote control (AAA batteries), user manual |
Frequently Asked Questions - HRS 8530pro XORO
User questions about HRS 8530pro XORO
0 question about this device. Answer the ones you know or ask your own.
Ask a new question about this device
Download the instructions for your Digital decoder in PDF format for free! Find your manual HRS 8530pro - XORO and take your electronic device back in hand. On this page are published all the documents necessary for the use of your device. HRS 8530pro by XORO.
USER MANUAL HRS 8530pro XORO
FREE TO CHOOSE INNOVATIONS
XORO®
DVB-S2 Receiver
HR 8530

Bedienungsanleitung
User Manual
natural_image
Symbol of a trash bin with crossed lines indicating no waste or discharge (no text or labels)natural_image
Recycling symbol with four arrows forming a triangle (no text or labels)natural_image
Circular icon with two opposing curved arrows, no text or symbols present.Batterien
natural_image
Two identical line drawings of a trash bin with a cross symbol, no text or labels present.Lieferumfang
natural_image
Diagram of a battery pack with two batteries and a switch, showing internal components and wiring (no text or symbols)Hinweise:
Standards ISO/IEC 11172 Layer I & II, AC3, E-AC3
Sampling Frequenz 32, 44.1 & 48kHz
Anschlüsse
Video HDMI, SCART (FBAS/RGB)
Audio S/PDIF (Coaxial)
Audio Codecs MPEG, MP3, AC3, AAC
Betriebsbedingungen
Technically unlimited
MAS
Elektronik AG
FREE TO CHOOSE INNOVATIONS
XORO®
DVB-S2 Receiver
HR 8530

User's Manual
Safety information 5
Contact of the service 8
Notes 9
Recycling Information 9
Accessoires 10
Features 10
Control Elements 11
Front Panel 11
Rear Panel 11
Remote Control 12
Insert battery and operation 12
Buttons 13
Connection 14
Connecting to the TV 14
Connection to satellite dish 15
connection to a Hi-Fi system 15
Connecting to USB storage 15
Initial Installation 16
Initial Installation 16
Dish Setup-preparation 17
Dish Setup-Procedure 18
Dish Setup-explanation of the parameters 19
Channel Search 20
Daily Use 21
Switch Channel 21
Channel List 21
Favourite 21
Subtitles 21
Audio settings of TV programs 22
Teletext 22
Mute 22
Change Volume 22
Information 22
Aspect Ratio 22
EPG 23
Timer Programming on EPG 23
Table of Contents
Recorder (optional) 24
Recording 24
Record programming 24
Recording List 24
Rename recorded files 24
Delete recorded files 24
USB Media Player 25
Supported file formats 25
Supported Media 25
Photos 26
Music 27
Movie 27
Supported Formats 29
Settings 30
Main Menu 30
Program 30
Picture 32
Channel Search 33
Time 33
Option 34
System 35
USB 36
Troubleshooting 39
Specifications 40
Warranty 41
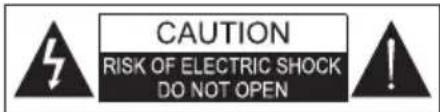

The lightning flash with an arrowhead symbol within an equilateral triangle is intended to alert the user of the presence of un-insulated "dangerous voltage" within the product's enclosure that may be of sufficient magnitude to constitute a risk of electric shock to persons.
The exclamation point within an equilateral triangle is intended to alert the user of the presence of important operating and maintenance (servicing) instructions in the literature accompanying the appliance.
THIS DEVICE COMPLIES WITH PART 15 OF THE FCC RULES. OPERATION IS SUBJECT TO THE FOLLOWING TWO CONDITIONS: (1) THIS DEVICE MAY NOT CAUSE HARMFUL INTERFERENCE, AND (2) THIS DEVICE MUST ACCEPT ANY INTERFERENCE RECEIVED. INCLUDING INTERFERENCE THAT MAY CAUSE UNDESIRED OPERATION.
User Manual
- All the safety and operating instructions should be read before the product is operated.
- Retain Instructions - The safety and operating instructions should be retained for future reference.
- All operating and use instructions should be followed.
Satellite dish
XORO HRS8530 is designed for the connection to a regular satellite dish.
- Please have the satellite dish installed by a technician to insure a perfect function and avoid damage.
• The Satellite dish will have to be grounded. - If the dish fails to take the precise position, it will cause signal disturbance or other problems. Please have the antenna measured by a technician.
• Please employ high quality antenna cable. - If the LNB is too old, it might not be suitable for receiving current satellite program. Please choose a LNB which fits all programs. (These LNBs bear often the label “Digital” or “Universal”).
Please get informed of the correct dish position and program list from the web page of the satellite operators or from specialized stores.
Power Supply
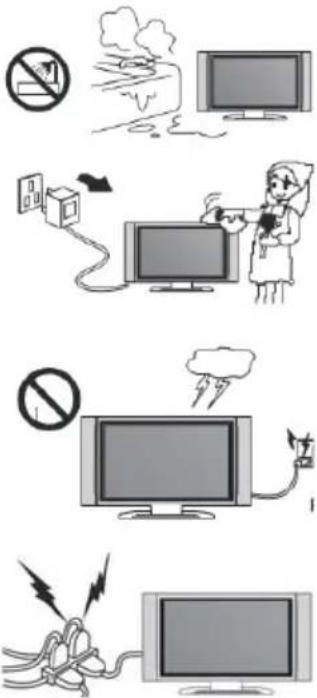
- Never touch the plug with wet hands.
- Do not stand vases etc. on the appliance. Water could seep into the appliance.
- Keep the appliance away from rain and any moisture.
- If you want to pull the plug out of the plug socket, always pull directly on the plug. Never pull on the cable as it could tear.
- Make sure that the power cable is not bent, caught or run over and that it does not come into contact with heat sources.
- Make sure that the power cable is not wound around the device while in operation.
- Never place the machine on the power cable while it is being operated.
- Only use extension cables that are designed for the power consumption level of the machine.
- Only operate the machine if the electrical voltage stated on the type plate beneath the machine agrees with the voltage on your plug socket. The wrong voltage can destroy the machine.
- Do not open the appliance.
- Pull out the mains plug if the appliance is not to be used over a longer period of time.
- Take care that nobody can trip over the power supply cable.
USB port
- Due to legal requirements of CE-conformity, the customer is asked to only connect USB-Sticks to the USB port.
Please refer to further details on USB on the page 15.
Position
-
Do not connect accessories on the player which are not defined by the manufacture.
-
Do not place this product on an unstable cart, stand, tripod, bracket, or table. The product may fall, causing serious injury to a child or adult, and serious damage to the product. Use only with a cart, stand, tripod, bracket, or table recommended by the manufacturer, or sold with the product. Any mounting of the product should be turer's instructions, and should use a mounting accessory recommuturer.
-
A product and cart combination should be moved with care. Quick stops, excessive force, and uneven surfaces may cause the product and cart combination to overturn.
-
The device is able to show a still image on the TV screen or monitor over an unlimited period of time. This can cause damage to the screen. It is therefore advisable to activate the screen saver. Or switch the player off, if the device is not in use.
-
Do not use the device permanent in the 4:3 mode. This can cause damage to the TV screen.
-
Do not increase the volume when the player is just playing very quiet sections. This cold damage the speaker if very loud passages starts all of a sudden after the quiet section.
-
Switch the player off by the Off/On switch if it is not going to used for a longer period of time.
-
Disconnect the main plug during thunderstorms.
-
Slots and openings in the cabinet are provided for ventilation and to ensure reliable operation of the product and to protect it from overheating, and these openings must not be blocked or covered.
-
The openings should never be blocked by placing the product on a bed, sofa, rug, or other similar surface.
-
This product should not be placed in a built-in installation such as a bookcase or rack unless proper ventilation is provided or the manufacturer's instructions have been adhered to.
-
Protect the device against weather influences, moistures and high temperature.
-
Never spill liquid of any kind on the product.
-
Do not expose the device and the remote control to direct sunlight.

natural_image
Illustration showing a person holding a large screen with a prohibition symbol, sitting at a desk with a monitor and chair (no text or symbols present)
Operation
- Reception of digital broadcast in SD or HD by satellite.
- Recording DVB-S on USB storage and play back the recorded files from USB storage.
- Time Shift function with a connected USB storage
- Playback of supported video, audio and picture files from USB storage.
The device is designed for private household.
Dolby
Manufactured under license from Dolby Laboratories. "Dolby" and the double-D symbol are trademarks of Dolby Laboratories.
Defect
-
Servicing - Do not attempt to service this product yourself as opening or removing covers may expose you to dangerous voltage or other hazards. Please turn to qualified service personnel.
-
Damage Requiring Service - Unplug this product from the wall outlet and refer servicing to qualified service personnel under the following conditions:
a. When the power-supply cord or plug is damaged.
b. If liquid has been spilled, or objects have fallen into the product.
c. If the product has been exposed to rain or water.
d. If the product does not operate normally by following the operating instructions. Adjust only those controls that are covered by the operating instructions as an improper adjustment of other controls may result in damage and will often require extensive work by a qualified technician to restore the product to its normal operation.
e. If the product has been dropped or damaged in any way, and
-
When the product exhibits a distinct change in performance this indicates a need for service.
-
When replacement parts are required, be sure the service technician has used replacement parts specified by the manufacturer or have the same characteristics as the original part. Unauthorized substitutions may result in fire, electric shock, or other hazards.
-
Nicotine can damage the electronic components. In case of service regarding too much nicotine, than the warranty/guarantee expired.

natural_image
Illustration of a person sitting at a desk watching television (no text or symbols visible)Contact of the XORO customer service:
Per Telefon: 040 - 77 11 09 17 (Mo-Fr, 9.00 - 18.00)
Per eMail:support@ersservice.de
Per Fax: 040 - 76 73 35 15
It is our pleasure to help you in case of questions on utilisation or functional problems. Please also take note of the trouble shooting at the end of this manual.
Recycling Information
Recycling of electronic devices
This product is designed and manufactured with high quality materials and components which can be recycled and reused.
This symbol means that electrical and electronic equipment, at their end-of-life, should be disposed of separately from your household waste.
Please, dispose of this equipment at your local community waste collection/recycling centre. In the European Union there are separate collection systems for used electrical and electronic product. Please, help us to conserve the environment we live in!

natural_image
Symbol of a trash bin crossed with no text or labels, accompanied by a black rectangular block below (no readable text or symbols)Recycling of paper and carton
The material recycling symbol on the carton and user manual denotes that they are recyclable. Dispose them not with the normal household waste.

natural_image
Recycling symbol with four arrows forming a triangle (no text or labels)Recycling of plastic parts
The material recycling symbol on the plastic parts denotes that they are recyclable. Dispose them not with the normal household waste.

Green Dot
The “Grüne Punkt” denotes that the MAS Elektronik AG pays a duty to the "Society for Waste Prevention and Secondary Resource Generation".

natural_image
Abstract circular logo with two opposing curved arrows, no text or symbols present.Batteries
Every consumer is legally obliged to dispose the used batteries at the local collection centres or stores for an environmentally sound disposal. Please do not dispose the used batteries in house hold waste.

Accessoires
Please make sure that the following accessories are included:
- HRS 8530
- Remote Control
- User Manual
Notes:
• Please employ only the original accessories.
- Shall any item be damaged or missing, please contact directly the shop where you bought this product.
Features
• High Definition DVB-S2 Receiver
- HDMI Port
- SCART output
• Electronic program guide (EPG) and videotext
• USB 2.0 High Speed connection
• PVR Ready - records DVB-S broadcast on USB storage
• Time Shift Function with a connected USB storage
• Playback of video, audio and picture files Digital audio out by Coaxial
Front Panel

- USB 2.0 port
- IR receiver
- LED display: showing the program number with the power on
- To previous channel (CH-)
- To next channel (CH+)
- Power button
Rear Panel

- Loop Out Aerial output
- Aerial Input
- Digital audio output (S/PDIF coaxial)
- HDMI output
- SCART output
- Power input
Insert batteries and operation radius
- Insert the battery (type AAA) into the receptacle of the remote.
- Close the battery cover

natural_image
Simple line drawing of a rectangular object with an arrow indicating direction, no text or symbols present.
natural_image
Diagram of a hand holding a battery with an arrow indicating direction (no text or symbols)
natural_image
Simple line drawing of a rectangular object with a curved handle and a small circular element, no text or symbols present.- For the best results, aim the remote towards at the player. Stay within 5 meter and angles of 60 degrees or less.
- Remove battery during storage or when you are not using the device for a long time.
Notes:
- Remove and exchange old batteries. Leaking out battery acid can damage your health and the remote control.
- Clean leaking out battery acid with a cloth
- In case of skin contact immediately wash the affected area.
- Please contact a medic after swallowing the battery or battery acid immediately
- Seek medical advice if battery acid has been swallowed. In case of contact with your eyes wash out the eyes and seek medical advice.
Buttons

1
2
3
4
Buttons of the remote control
Part I
Power (on/off)
SUB-T (subtitle)
LANG(change sound track)
MUTE (sound on/off)
EPG
GOTO (start play back from a certain point defined by time)
PAGE+/-(page up/down)
TTX (videotext)
Repeat
Part 2
Menu (to access main menu)
CH+/CH-(change channel, select menu up/down)
EXIT (quit menu, to the higher menu)
VOL+/VOL-(change volume, select menu right/left)
FAV (to access favorite list)
TV/RADIO ( switch between TV and Radio)
OK (confirming selection, to access program list)
Part 3
Numerical buttons (0-9)
RECALL (to previous program or higher directory)
INFO (to access information page)
Part 4
◀◀ ▶▶ (fast rewind/fast forward)
I◀◀ ▶▶▶ I (previous/next file)
▶ (start play back)
|| (Pause, start Time-Shift)
■ (Stopp playback, access Media player)
- (recording)
PVR (display recorded files, red button)
V-FORMAT (change HDMI solution, green button)
ASPECT (change aspect ratio, yellow button)
TIMER (display timer list, blue button)
Notes:
Some buttons function only as described above in the corresponding mode. For example: the GOTO button and the Repeat button function only in media player mode. Please take note of further descriptions in the manual and the notice on the screen.
Connecting to the TV
General information
• Assure that the device is switched off and unplugged.
- Read the manual of your TV and attend to the safety instructions.
- Connect the power cable at last with a electronic socket.
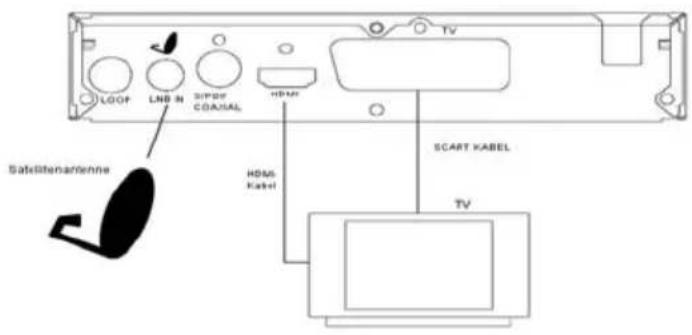
The HRS8530 could be connected either through HDMI or scart to TV. Please connect the receiver through HDMI if possible. The TV could only display the signal in high definition quality through HDMI out put.
HDMI:
Connect the HDMI output of HRS8530 to a free HDMI input of the TV. Please read the manual of your TV to select the HDMI input. Generally the TV does not switch automatically to the HDMI input upon connection. A HDMI cable is necessary for this connection. It is not included in the delivery of the receiver.
SCART:

Connect the TV SCART output of HRS8530 to a free SCART input of the TV. Please read the manual of your TV to select the SCART input. Generally the TV does not switch automatically to the SCART input upon connection. A SCART cable is necessary for this connection. It is not included in the delivery of the receiver.
Notes:
- The HRS8530 is designed for TV with 16:9 as aspect ratio. Please refer to the page 32 how to set a TV with aspect ratio 4:3 to fit the receiver. It is also described there how to change the HDMI resolution and signal type under the SCART connection.
- Please employ high quality cables. Low quality cables (especially up 1,5 m length) might cause picture failure or make an image transmission impossible. Poorly shielded cables might result in “double image” or disturbing sound.
Connection to satellite dish
Connect the cable of your satellite dish to the Antenna input LNB IN of the HRS8530.
LNB OUT


13/18V --- max. 500mA
Notes:
- Screw the so-called F plug together with the LNB IN.
- Please make sure to avoid short circuit at the F plug.
- Employ only high quality antenna cables. Low quality antenna cables might cause disturbance
You can connect further satellite receivers onto the LNB out. We recommend it only to technically experienced users, for the receivers connected this way affect each other and do not share the complete program accessible to both receives.
connection to a Hi- Fi system
A coaxial cable is necessary for the S/PDIF signals for the digital connection to a Hi-Fi system. This cable is not included in the delivery of this receiver. Connect the S/PDIF out put with the S/PDIF input of your Hi–Fi system. Please refer to the manual of the Hi-Fi system to select the audio input.
Notes:
The HRS8530 could out put digital signals in PCM-(stereo) or AC3- Bitstream (Dolby Digital). If your Hi-Fi system provides no sound for programs with Dolby Digital sound track, please refer to page 34 to change the out put format of the S/P DIF out put.
Connecting to USB storage
The USB port is on the front side of the HRS8530. It takes the receiver under circumstances some time to recognize the USB and get ready for further operation.
Please remove the USB storage only after all recording or playback processes are completed.
Following USB devices will be supported:
- USB storage
• Max. capacity 320 GB
• File system: FAT 16, FAT32, NTFS
Notes:
- There are a variety of USB storages on the markt. Not all of them conform the specification of USB storage. If your USB storage could not be read by HRS8530, please try another USB storage.
- If a USB device could not be read any more, please carry out a data storage medium analysis with your computer or format the storage again.
- USB storages requiring higher electric current than 500mA (0,5A) do not conform the specification of USB storage. These USB storages could possibly not work smoothly together with HRS8530.
- USB Storage up to 320GB will be supported. USB storage of larger capacity could also be used. However the capatability of these USB storages with HRS8530 could not be guaranteed.
- Please always save all data on the USB before connection to the HRS8530.
- A sufficient writing—and reading speed of the USB storage is necessary for recording HD programs or use the Time-Shift function. In case of problems in recording or Time-Shift, please try a USB storage of higher writing—and reading speed.
Initial Installation
The XORO installation menu will be displayed by initial operation of the HRS8530. This menu contains four options:
- OSD Language
- Country
- Channel search
- Load the pre-inst.
Navigate with the arrow keys CH+ and CH− to high light the option and make the selection with the VOL− and VOL+ buttons.
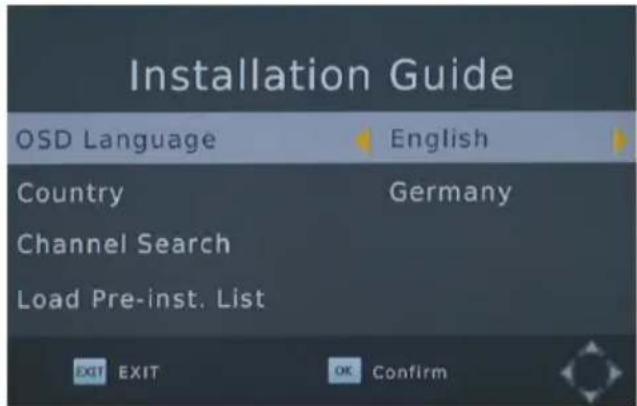
OSD Language
Choose the menu language.
Country
Select the country where you use the HRS8530
Channel Search
Please select "Channel Search/Satellite Setting" to define further parameters for a scanning, if your satellite receiving system fulfill following criteria:
• System with rotatable antenna
• System with more than one antenna or LNB (DiSEqC)
• System with nonstandard components
Most of the customers could complete the installation by selecting "load the pre-inst.".
Load the Pre-inst.
A program list of the satellite ASTRA 19.2° is saved in the factory firmware. German TV programs top this list.
In most cases, the installation is completed with loading the program list.
Select the OSD language and country and decide whether to load the pre installed program list. Press OK to confirm.
- The first TV program will be shown on the screen after loading the pre programmed list. If there is no TV program to be seen, please check the cable connection, Antenna Set up and carry out the channel scanning.
- If you have chosen not to take the pre installed list, there appears a "Dish Setup" menu on the screen.
For the case there appears no "Installation Guide" menu after connection and power on, please read the page 35 to reset the device.

Dish Setup-preparation
Preparation:
You will have to be informed of following points to make a successful channel scanning.
- Towards which sagellite does your antenna orient?
- If you have more than one antenna or one antenna with more than one LNB, you will have to know which type of switch (Toneburst or DISEqC) is employed and to which port is each Antenna LNB connected.
- For a Unicable/SCR EN50494, you will have to know which IF-Channel is available and its corresponding Frequency.
Please ask the installer, if any of the parameter is not known. If you live in a rental house or apartment, please ask the renter.

Example:
The most satellite antennas orient satellite AS-TRAS 19.2° and have a “universal” or “Digital” LNB. We recommend the pre installed list in the case.
If you would not like to use the pre programmed list, the common setup for ASTRA 19.2° is as following:
Satellite: 019.2E Astra 1H.
LNB Type: 09750/10/600
LNB voltage: 13/18V
22KHz: AUTO
Tonebust: None
DiSEqC 1.0/1.1: None
Motor: None
Dish Setup-Procedure
On the left side of the screen there is a list of satellites for which HRS8530 is pre programmed. Settings of the chosen satellite is displayed on the right side.

Process:
- Select the first satellite to be set up with CH+/CH-
- Press the OK button. The chosen satellite is marked with a hook, confirming this satellite will be considered in the coming channel scan.
- Press the button VOL+ to access to right side.
- Select the option with CH+/- and change the parameter with VOL+/-
- Press Menu after defining all parameters for this satellite to get back to the left side.
- If your satellite system can receive signals from a number of satellites, select a further satellite with CH + / - . Press OK and define the parameter on the right side.
- Repeat this procedure for all satellites available for your receiver.
Notes:
- After a correct setting, an approximate value of the signal quality will be shown on the lower part of the menu.
- If a satellite is missing on the list, press the RED button. A dialogue winter appears, input the value for longitude, East/West and frequency, and choose "Blind Scan" in the coming channel scan. If you add a satellite to the list, there will be no display of the signal quality for this satellite, in spite of correct setting. Signal quality could only be displayed for satellites with pre installed transponder lists.
- Press GOTO to display the Transponder of the chosen satellite. Add new transponder with the RED button and mark the transponder for channel scan with OK.
Dish Setup-explanation of the parameters
LNB Typ: define the oscillator frequency for your LNB. Please take the correct value from the-manual of your LNB (standard:09750/10600)
If you have a Unicalbe/SCR EN50494, select LNB type Unicable (A oder B, A is generally the correct choice by a Unicable system for satellite reception). Choose a free channel (IF channel) and the corresponding frequency. Please refer to the manual of your Univable system. Ask your renter for the free channel, if the connection is provided in the rental house.
LNB Voltage: This parameter defines the voltage of the antenna, this voltage decides signal from horizontal or vertical polarized transponder will be received. The setting will only have to be changed in very rare cases. A false setting will result in missing program or no signal reception at all. (standard:13/18V)
22KHz: The receiver can switch the LNB with 22 KHz signals for the reception of another frequency band. The setting will only have to be changed in very rare cases. A false setting will result in missing program or no signal reception at all. (standard: Auto)
Toneburst: Tone burst switcher has two input ports, enabling the connection of 2 antennas or LNB to the receiver. If you have a Tone burst switcher, you will have to select one of the both connections (A or B) for the satellite chosen on the left side.
DiSEqC: DiSEqC switcher has up to 16 input ports enabling the connection of multiple antennas or LNB to the receiver. If you have a DiSEqC switcher, you will have to select one of connections for the satellite chosen on the left side. Please check which version (1.0, 1.1) could be supported in the manual of your switcher.
Motor: Rotatable Antennas require extended configurations. We recommend professional installation from a technician. Please set up according to your antenna. You can open further set up windows with the RED and the GREEN button.
After the set up has been done for all reachable satellites, please press the BLUE button to open the menu for channel scan.
Channel Search
There appears a window showing "Channel Search" upon pressing the BLUE button on the menu of the Satellite Setting.
On this Window you can make three entries to affect the scan result.
Search Mode:
- Standard: The receiver scans channels according to a pre-programmed list. This search process goes quickly but without being able to find programs on new transponders.
- Blind search: The receiver scans every possible frequency. It takes a little bit more time than standard scan. However it is possible to find programs from unknown transponders.
- Network: The receiver scans channels according to a pre-programmed list. The frequency of a new transponder could be found out through analysis of the known transponders. The scan process is shorter than “blind scan”, but there might be possibly missing programs.
Please employ "Blind Scan". It takes a little bit longer, but will result in a complete program list. If you have added a new satellite on the menu of Satellite Setting, please employ "Blind scan", for there is no transponder list available for the newly added satellite. There is no "Blind scan" option in case of UniCable system.

Encrypted:
- All programs: both free and encrypted programs (Pay TV) will be added to the program list during the channel scan.
• FTA (free): The channel scan saves only free programs.
The XORO HRS8530 can not decrypt Pay-TV programs. Please select "FTA" (free programs), so that you will get a shorter program list and save some time in sorting the programs.
Service Type:
- All: The channel scan saves both TV and Radio programs.
- DTV: The channel scan saves only TV programs.
- Radio: The channel scan saves only Radio program.
Press the OK button to start the Channel scan.

After the channel scan is completed, live picture of the first found screen.
channel will be shown on the
Important keys and their functions
Switch Channel
To switch program please press the CH+/CH- buttons or input the number of the wished program with the numerical buttons 0-9 on the remote control.
Channel List
Access the Channel List by pressing OK
▲/▼ Next/previous program
OK Activating the chosen
program
PAGE+/- Next/previous page
TV/Radio switch between Radio- and TV channel list
RED Button search a channel after the name
GOTO Choose a satellite/show all programs
EXIT Exit the program list

Favourite
If you have defined favourite groups, you can access this list by pressing the FAV button. The operation on the favourite list is as following:
FAV display favourite list
◀/▶ Next/previous favourite list
▲/▼ Next/previous program
OK Starting the chosen TV program
EXIT Exit favourites list
Subtitles
Press SUB-T to enable subtitles. Select a language for the subtitle with ▲/▼ and confirm it with OK. If the program contains no subtitle, there will be only one option: OUT.
To quit the "Subtitle language", press EXIT.

Important keys and their functions
Audio settings of TV programs
Access the audio settings by pressing LANG.
Select a language and a audio track with ▲/▼. To confirm, press OK.
Press EXIT to exit this menu.

Teletext
The teletext is activated via the TTX button. You may use the numerical buttons 0-9 on the remote control for a direct entry of the wished page.
To quit the teletext page press EXIT.
Mute
Press the MUTE button to switch off the tone. Press the MUTE button once more, the tone will be turned on again.
Change Volume
To increase or decrease the volume press the ◀/▶(VOL+/VOL-) button.

If you output Dolby Digital or other surround sound formats as Bitstream through HDMI, the volume is not regulated by the receiver. Volume of the SPDIF (Coaxial) out put could not be changed with the VOL-/VOL+ buttons.
Information
You will have the access to various of information by pressing the INFO button once or a multiple of times.
Aspect Ratio
During a live program you may change the Aspect ratio without opening the main menu. Press the ASPECT button and the Aspect Ratio will be changed with each pressing. (See also Page 32)
Important keys and their functions
EPG
Press the EPG button to display the program guide.
OK the marked program will be taken over in the Timer programming
INFO display the Timer list
▲/▼ select a TV program
◀/▶ switch program
EXIT quit EPG

Timer Programming on EPG
Select the program to be recorded with the ▲/▼ buttons and press OK. The program number, time of begin and end will be taken over in the window "Timer New".
Further settings on this window are Repeat and Mode. The option Repeat defines whether the program will be recorded once or regularly. The option Mode will have to be set for recording as RECORD. Press OK to save the setting. The programmed broadcast appears now on the timer list.
Press EXIT to close a dialogue window. Press EXIT repeatedly to quit EPG window.

Notes:
- Please do not forget to connect a USB storage (see page 15)
- Option Mode: Select RECORD to record a program on the USB storage. Select VIEW to have the receiver switched on at a given time without recording the program on USB.
Recorder (optional)
Immediate recording and Timer programming, Recording list
Recording
If you want to record the current TV program simply and quickly, first connect a USB memory to the USB port and then press the ● button. Press the ● button once more to define the concluding time of
the recording. You can stop the recording by pressing the ■ button. Confirm the safety query with the OK button.
Record programming
You can programme a recording during the live broadcast. Press the BLUE button to display the Timer list.
Press the RED button to display the setting window for the new Timer. Please refer to the setting details on Page 23.

Recording List
Press the PVR button to show all recorded broadcasts.
▲/▼ Next/previous recorded file
OK playback the chosen recorded file in preview window
RED Switch full screen/preview GREEN Rename the recorded file YELLOW Delete the recorded file
Playback
▶ fast forward
◀◀ fast rewind
II Pause, press again to resume playback EXIT/STOP stop the playback, switch to the recording list

Rename recorded files
Choose a recorded file from the list to be renamed and press the GREEN button. An OSD keyboard appears on the screen. Choose letters for the new name with the navigation buttons and confirm each letter with the OK button.
After entry of the complete name, navigate to the OK field and press the OK button.
Delete recorded files
Choose a recorded file from the list to be deleted and and press YELLOW. Now the recording is marked with a checkmark and press the OK button. Confirm the safety query with the OK button.
The USB media player plays back movie, photos, and music files. There are two ways of accessing the media player.
- Open the main menu with the MENU button. Press ◀/▶ repeatedly until USB menu is shown on the screen. Press ▲/▼ to choose Multimedia and confirm with OK.
- Press the STOP button during live broadcast. The media play is started. You have these four options:
Music
- Photo
- Movie
PVR
Supported file formats
Pictures (JPEG, BMP), Music (MP3, WMA) or video files (MPEG-1, MPEG-2, MPEG-4) and more.
Supported Media
The USB port supports a set of different sizes of flash drives. Use a USB flash drive with a minimum of 8 GB for recording. Smaller media's are maybe too slow for recording or Time shift.
Note
Due to the legal requirements of CE-conformity, the customer is asked to only connect USB-Sticks to the USB port.
If you want to play music, videos or pictures von USB media connect the USB media, press MENU and choose USB with ◀/▶. Enter the USB menu with OK.
Now choose Multimedia with ▲/▼ and enter with OK.


Photos
After initialising the USB media the directory structure is shown. Choose the directory with ▲/▼ and enter with OK.
If there are pictures in this directory, they are listed in the file browser and the preview of the first picture is shown on the right.
▲/▼ Next/Previous folder or file
OK display a photo or open a folder
Play (▶) Start slide show (all pictures in the directory)
RECALL go to higher directory
GOTO Show pictures in small previews
EXIT back to multimedia menu

Preview Window
▲/▼ Next/Previous picture
◀/▶ Next/Previous picture
OK Start Slide show
EXIT quit the preview window
Display Photos
Start the slide show with PLAY or OK. The slide show will proceed according to the settings in the USB menu.
| Next picture
|<< Previous picture
RED Zoom picture
Green Rota te picture 90° in counter clock wise direction
YELLOW Rotate picture 90° in clockwise direction
INFO Show information of the picture like file name, resolution and file size
RECALL Exit photo display
EXIT Exit photo display

Music playback during the photo display
It is possible to play music while browsing in the pictures. Choose a music file before you go to the picture browser.
Supported formats
The supported picture formats are:
JPEG Baseline up to 15360 x 8640 / Progressive up to 1024 x 768 pixels
BMP Up to 9600 x 6400 pixels
PNG Up to 9600 x 6400 pixels
Notes: Displaying photos in the maximal resolution might take much time.
Music
After initialising the USB media the directory structure is shown. Choose the directory with ▲/▼ and enter with OK.
If there are music files in this directory, they are listed in the file browser.
OK / PLAY Playback a music file
STOP Stop the playback
▶▶| Next track
|◀◀ Previous track
|| Pause
▲/▼ choose a folder or a file
REPEAT Repeating single track or directory
EXIT back to multimedia menu

Supported formats
Format: MP3, AAC, WMA
Sampling Frequenz: 32 - 48 kHz (MP3), 8 - 48 kHz (AAC, WMA)
• The maximal resolution of the movie file is 1920 x 1080 pixel.
• The file name should not contain more than 15 letters.
- If a character is not recognized correctly (for example special characters), there appears at the place of this character an underline “_”.
- Following video containers are supported: AVI, MKV, MP4, MPG, VOB, MOV etc. Various codics are supported. They will have to be created according to the established standards. For MPEG-2 applies ISO/IEC13818 and for MPEG-4 applies ISO/IEC 14496. Other wise there might be error at the playback.
Please take note of the supported formats on Page 29.
There exist a variety of video codecs, audio codecs, video containers and PC programs generating these files. it is possible that some video files are not supported.
Movies
After initialising the USB media, the directory structure is shown. Choose the directory with ▲/▼ and enter with OK.
▲/▼ Next/Previous folder/file
OK Playback a file / Open a directory
RED Full screen display
RECALL to a higher directory
EXIT back to multimedia menu
If you have selected a movie and started the playback with OK, the movie is shown in the preview window on the right. You can switch to full screen with RED. You can alternatively press PLAY to playback the movie directly in full screen.
OK Playback in preview window
PLAY Playback in full screen
RED Switch preview / full screen
INFO Access information such as play back time/duration, file name, file size, reso lution, picture frequency
LANG Switch audio track
SUB-T 1x display subtitle alternatives, 2x change subtitle setting
MENU back to file browser (the movie continues in preview window)
RECALL back to file browser (the movie continues in preview window)
GOTO Jump to a certain (self defined) time
◀◀ / ▶▶ Fast forward/backward
|◀◀ Previous movie
▶▶| Next movie
|| Pause
STOP Stop the play back
REPEAT Repeating modes (Single track or all files in a directory)
Resume play back
By some file formats the receiver can save the position where the previous play back is stopped. If the receiver has saved the position, there will appear by restart on the upper edge of the screen the alternatives: Continue/[EXIT]: break
- Continue: the play back starts from the saved position
- [EXIT]:break: the play back starts from the very beginning of the file
You can choose one of the options with the ▲/▼ buttons. Confirm the selection with OK.
Supported Formats
| Extension Co | container Video | Codec | Maximal Reso-lution | Audio Codec | Profile |
| mpg, mpeg MP | MPEG | Mpeg 1,2 19 | 20x 1080/30P MP2 | ,MP3, AC3,LPCM | Main |
| Ts, trp, m2ts M | MPEG2-TS, H264-TS | MPEG2, H.264 | 1920x 1080/30P MP2 | ,MP3, AC3,AAC | Main |
| vob MPEG2-P | S MPEG2 720 | x576/30P MP2,MP3, | AC3,LPCM | Main | |
| mp4 AVI, MP4 | MPEG4, | Divx 4.12, Divx 5.x, Divx 6, Xvid 1.00, Xvid 1.01, Xvid 1.02, Xvid 1.03, Xvid 1.10-beta 1/2, H.264 | 1920x1080/30P MP3, AAC H264 | : Main Profile and High Profile @Level 4.0 MPEG4: Simple Profile and Ad-vanced Simple Pro-file @Level 5 | |
| mkv MKV | H.264, | MPEG 1,2,4 | 1920x1080/30P MP2,MP3, AC3,AAC | H264: Main Profile and High Profile @ Level 4.0 MPEG4: Simple Profile and Ad-vanced Simple Pro-file @Level 5 | |
| divx, avi | AVI (1.0,2.0), DMF0,1,2 | MPEG2, MPEG4 Divx4, Divx 5, Divx 6, Xvid 1.00, Xvid 1.01, Xvid 1.02, Xvid 1.03, Xvid 1.10-beta1/2 H.264 | 1920x1080/30P MP2,MP3, AC3,AAC | MPEG2: Main Profile MPEG4: Simple Profile and Ad-vanced Simple Pro-file @Level 5 | |
Notes: GMC will not be supported. Maximal picture frequency: 20 Mbit/sec. Aspect Ratio: 4/3, 16/9. Specifications subject to mistakes and changes.
Main Menu
Press MENU for the main menu. The submenu are:
- Program
- Picture
- Channel Search
- Time
- Option
- System
- USB
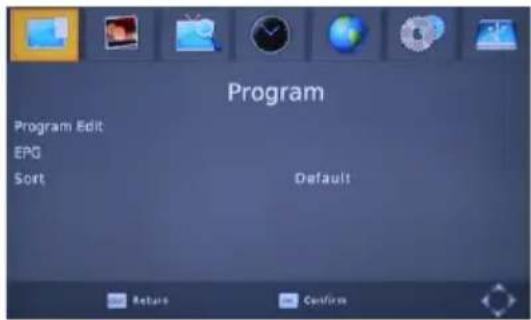
Program
Notes:
The standard password is 000000.
Program Edit
You can sort, edit, delete, rename the program and build favourite groups here.
Move the program with ▲/▼
• Select a program with ▲/▼ to be moved
• Press the RED button to mark the program
- Choose a position for the marked program with ▲/▼
- Press OK to move the program to the chosen place
Notes: You can mark multiple programs with the RED button.
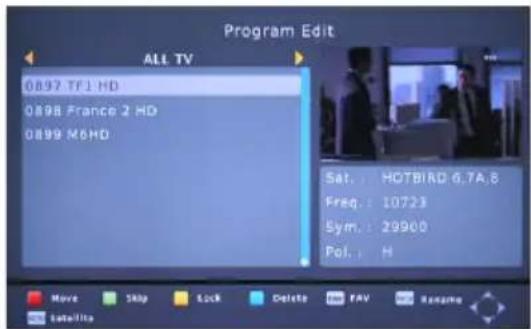
Move the program through input of new program number
• Select a program with ▲/▼ to be moved.
- Press the RED button.
- Input the new position with the numerical button 0-9.
• Press ok to move the program to the given place.
Delete
• Choose a program to be deleted with ▲/▼.
• Press BLUE. A security query appears.
- Press OK to confirm deleting the program.
Program
Lock channels
The receiver will ask for the password before display a locked program.
- Select a program with ▲/▼ to be locked.
- Press the YELLOW button. The chosen channel is highlighted with a lock symbol.
- Press the YELLOW button again to unlock the channel.
Skip Channels
Programs maked with the Skip symbol will be skipped in channel switch with the CH+/- buttons. They could only be accessed through entry of program number with the numerical buttons 0-9.
- Select a program with ▲/▼ to be “skipped”.
- Press GREEN. The chosen channel is marked with "SKIP".
• Press GREEN again to withdraw.
Favourites
The receiver has four pre defined favourite groups (movie, news, sport, music). You can categorize a channel as any favourite group and a channel may belong to multiple groups.
• Select a program with ▲/▼ to be categorized
• Press FAV to access the favourite menu.
• Select a favourite group with ▲/▼
- Press OK. The channel is marked with a "Star" symbol.
- You can choose multiple favourite groups here. Power off at this time leaves the configuration of favourite groups unsaved.
- Press EXIT once to close the Favourite window
Rename Channels
Choose a channel to be renamed with ▲/▼ and press INFO. There appears a key board. Input letters of the new name with ◀/▶ ▲/▼ confirm each letter with the OK button. After completion of the entry navigate to the OK field and confirm with the OK button.
Notes:
• To switch between TV and Radio, press the TV/Radio button.
- Press GOTO to list programs of all satellites or one certain satellite.
- Quit the Program edit menu with EXIT. The configuration will be saved.
Programm
Sort Channels
This option sorts the channels on the channel list according to criteria as encryption, Frequency, etc.
Picture
The previous sort is replaced.
Aspect Ratio
This setting defines the picture format of your TV and how the content with different Aspect Ratio be adapted for your TV.
• Auto (for 16/9 TV. 4:3 or wide screen content will be full screen displayed with the picture distorted. Further adaption will be done by the TV.)
- 4:3 Pan Scan (for 4:3 TV. Content with different Aspect Ratio will be possibly full-screen displayed, without distortion but with information lost.)
- 4:3 Letterbox (for 4:3 TV. Content with different Aspect Ratio will be displayed without distortion but with "black bar".)
- 16:9 Pillar box (for 16/9 TV, Content with different Aspect Ratio will be displayed without distortion but with "black bar".)
- 16:9 Pan scan (for 16/9 TV. 16/9 Broadcast will be full-screen displayed without distortion. 4/3 Broadcast will be displayed without distortion but with the picture enlarged. This setting is especially suitable for 4/3 Letter box programs to reduce the "black bar".)
You can switch among these alternatives with the
ASPEC button during live program.
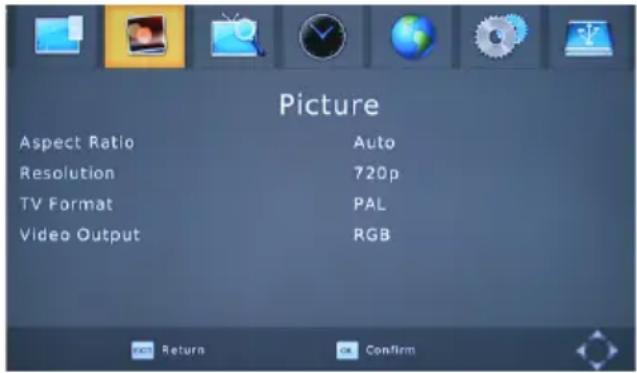
Resolution
Define the HDMI output resolution
• 576i (PAL) / 480i (NTSC)
• 576p (PAL) / 480p (NTSC)
- 720p
• 1080i
• 1080p
Note:
Please note the manual of your TV and the correction resolution.
Colour system/V frequency
Define the colour system for the SCART output (PAL or NTSC) and frame rate for the HDMI output (50 Hz or 60 Hz).
Signal type (SCART)
You can define the signal type at the SCART port. Generally RGB offers the best picture quality. Please note the manual of your TV.
Channel Search
Dish Setup
See page 17
Save/load channel list
With this option you can save the channel list on a USB (export) or load the channel list from the USB storage (import).
Import: The receiver lists all available data. Choose the file to be installed and confirm with OK. The message "load Database successfully" shows that the program list has been installed correctly.
Export: Save the current program list on the USB storage. The file contains following name: HB_DATABASE_X_Y.DBM. „X“ suggests the month. „Y“ suggests the date.
Time
The receiver sets the time automatically, as soon as a satellite program is received. The Time Zone will have to be set correctly so that the receiver could calculate the local time properly.
Time Zone setting
Auto The receiver set the Time Zone automatically
Manual You can define the Time Zone.
Time Zone
You can define the Time Zone as long as the Time Offset is given as "Manual". For Germany it is MGZ+1, and it is MGZ+2 during the European Summer Time.

EuP Auto-Stand By
To save energy according the the EU Regulation (EuP), the receiver switches off after a certain time without user interaction (such as pressing the buttons etc.).
Option
OSD / Subtitle Language
Define the OSD / subtitle language.
Note: Many broadcasts do not contain subtitle information.
Audio Language
Define the language to be spoken.
Digital Audio
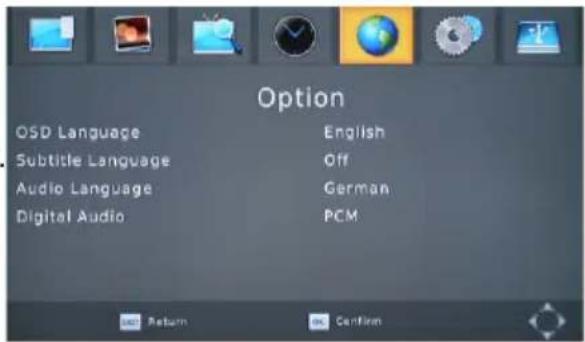
You can define here the format of audio signals at SPDIF (COAX) and /or HDMI output.
PCM: Digital audio output (HDMI and SPDIF COAX)
RAW HDMI OFF: If a broadcast or a vedio file contains a Dolby Digital sound track, the tone format will be outputted through SPDIF(COAX). PCM stereo is still available through HDMI.
RAW HDMI ON: If a broadcast or a vedio file contains a Dolby Digital sound track, the tone format will be outputted through SPDIF(COAX) and HDMI. If you get no tone, please choose either "PCM" or "RAW HDMI OFF".
Attention: The receiver could only decode Dolby Digital surround sound and out put it as analogue or PCM stereo. Other surround sound could be outputted under circ umstances as Bitsteam (RAW) though SPDIF or HDMI. In this case the analogue and PCM stereo tone are not available.
Please use the LANG button to choose the Dolby Digital Sound track of a program, if it is available. If you output the Dolby Digital or other surround sound formats as Bitstream (RAW) through HDMI, the receiver could not regulate the volume. The volume of the SPDIF (Coaxial) output could not be changed with the VOL-/VOL+ buttons.
System
Parental Guidance
You can define here whether a program will only be displayed after a correct entry of the password. Note: Information on the age limit of a DVB program is not broadcasted in Germany.
Set Password
You can change your password here. At first you have to confirm the old password (standard 0 0 0 0 0 0). After confirming the old password type in the new password and repeat it. If all data was correct the new password is active.

Note: For the case the password is forgotten, you can use the super password to set a new password.
Super Password: 8 8 8 8 8
You can cancel all settings and changes by restoring the factory default. Choose this option and input the password.
Note: All settings will be cancelled. You will have to go through the channel scan once more.
Information
Access information on software and hardware.
Recall List
You can change the function of the RECALL button. If "off" is given, the receiver displays the last program upon pressing the RECALL button. IF it is set "on", a list of programs seen at last will be displayed upon pressing RECALL.
Software update
USB upgrade
If an update is necessary, the update software and the update instruction are to be found on www.xoro.de. Please install only the suitable XORO firmware. Installation of a false firmware may make the receiver unusable and void your claim on warranty.
System
SAT Upgrade (in some regions not availabe)
The receiver can download the firmware from the Satellite ASTRA 19.2°. This update is free for you. Choose SAT Upgrade. The data for software downed (Transponder, Frequency) which are correct at the time of production are pre programmed. Start the upgrade with OK.
The download takes 30-180 minutes. The duration varies according to receiving conditions. Please do not switch off the receiver and do not press any button. Please note the message on the screen.
New information on firmware update is available on www.xoro.de or at the XORO customer servcie (see page 8, 39)
Xoro Update-Transponder (Stand 27.09.2011)
Satellite: 019.2E Ku_ASTRA1H,1KR,1L
Transponder: 23
Freq: 12148
Symbolrate: 27500
Polarity: H
USB
USB Media Player
Opens the multimedia Player (see page 25).
Photo Configure
Configure the playback and Slideshow of picture files
Slide Time
Define the duration for every picture in the slide mode.
Aspect Ratio
- Keep (display without distortion)
• Discard (full screen display with distortion)


USB
Subtitle Set up
This setting concerns only the display of an external subtitle.
The options are:
Subtitle Specific
Define the size of subtitle in media player.
Subtitle Background
Define the background of the subtitle in media player.
Subtitle Letters
Define the colour of subtitle letters
Formats
Supported formats of the external subtitles are as following:
- Micro DVD (SUB)
- Subrip (SRT)
- Sami (SMI)
Please note the notation of subtitles. Name of the subtitle and the movie will have to be the same.
For example:
- Film.avi
Film.srt
It is also possible to use 2 languages:
- Movie.avi,
- Movie.ger.srt
- Movie.eng.srt
If a letter could not be displayed correctly, please save the subtitle file in format "Unicode" once more.
PVR Configure
Recording device
This menu shows the information (size and file system) on the USB. If the USB storage has multiple partition, you can choose a partition with ◀/▶. Press OK to confirm.
The TMS storage sets the maximal capacity to be used for Time Shift Function.
USB
Format
Choose a USB storage or partition to be formatted at "Format".
Choose at "File System" the wished file system.
Return to Format and confirm with OK.
Attention:
All files and directories will be lost during the formatting process. Please do not format a storage with important information.
Notes:
The file system FAT 32 is fast compatible with all computer and home entertainment products. However the maximal file size is limited to be 4GB. Data storage medium larger than 32 GB is used inefficiently by FAT 32.
NTFS might not be recognized by some operating systems and home entertainment products. There is no limit of 4GB on file size.
Check the following guide for the possible cause of a problem before contacting service. Technical Support of Xoro/MAS:
| Symptom Correction | |
| No DVB-S reception /serious distortion bymosaics or artefacts/freeze pictures | No DVB-S reception in your region.Realign the dish. Please pay attention to the directionof the satellite.Please use a bigger dish.Retry the Auto Scan. |
| No power | Plug the power cord into the outlet tightly and turn onthe power. |
| Can not scan programs | Adjust the dishRefer settings for searching |
| No picture / no coloured pictures | Control the connection to the TV set.Control the video output mode in the setup.TV channel or program is scrambled |
| Remote control doesnot work | Change the batteries.Operate within normal range (max. 5 meters, 30 °)The sensor is pointed to by bright light. |
| No sound | Cancel Mute. PressMUTEbuttonIncrease volume. PressVOL+buttonPay attention to connection to TV set or amplifier. |
| Audio / Subtitle withoutfunction or can nochoose | Change audio track (pressAUDIObutton)Change subtitle track (pressSUBTITLEbutton)Other audio track is not supportedSubtitles are not supported by broadcaster |
| No Recording | No USB memory are connected.No free space on the storage. |
| Recording has jerkingsor other mal functions | The connected storage is too slow.Please control the reception quality of the dish andalign them for getting better quality. |
General
Voltage 220-240V, 50/60Hz
Consumption
<25W*(Normal) / < 1W (Stand By)
Size 168 x 38 x 95mm
Receiver
Frequency 950 - 2150MHz
Impedance 75Ohm
Modulation QPSK 8PSK
Symbol Rate 2 - 45Mbps
Video Decoder
Standards MPEG4 AVC/H.264 HP@L4/MPEG 2 MP@HL
Aspect Ratio 4:3/16:9
Resolutoin up to 1920x1080p
Audio Decoder
Standards
ISO/IEC 11172 Layer I & II, AC3, E-AC3
Sampling Frequenz 32, 44.1 & 48kHz
Connections
Video HDMI, SCART (CVBS/RGB)
Audio S/PDIF (Coaxial)
Antenna F port IEC 169-2
Data USB 2.0 High Speed
Media Player
Storage USB Storage with FAT32/NTFS
Container AVI, MKV, TS, MPG, MP4, TRP, MOV
Video Codecs (1080p) MPEG1, MPEG2, MPEG4 (SP/ASP/H264)
Audio Codecs
MPEG, MP3, AC3, AAC
Conditions of Operation
Temperature of Operation
0 - 40°C
Humidity
5 - 90% (non condensing)
* Depending on electrical consumption of the USB connected.
Note:
Weight and dimensions are not absolutely exact values. Specifications are subject to change
Limited Warranty
In case the products delivered are not free from defects in material or workmanship, MAS Elektronik AG has the right to either repair or replace the defective product at its choice. MAS Elektronik AG manufactures and repairs goods using components which are new or equivalent to new in accordance with industry standards and practice. The warranty for wearing parts (e.g. rechargeable batteries) is limited to 6 months.
In case the device is equipped with internal data storage (e.g. hard disc drive, Flash drive), the customer is responsible to backup his data before sending the device. MAS Elektronik AG is not liable for any data loss on returned devices. MAS Elektronik AG reserves the right to reset returned devices to factory defaults. Please note your personal settings for this reason.
MAS Elektronik AG is not liable for any accessories not belonging to original package content such as DVDs, hard disc drives, Flash storage devices, batteries, etc.
This limited warranty covers the warranty requirements set by authorities in your country. This limited warranty only is valid in the country the product was purchased.
This limited warranty does not cover finishes, accessories or batteries, nor does it cover damage resulting from accident, misuse, abuse, dirt, water, battery leakage, tampering, servicing performed or attempted by unauthorized service agencies. This limited warranty does not cover damages resulting from firmware upgrades. Only in case of firmware upgrades needed to add functions promised at time of purchase, such damages are covered by this limited warranty. For a correct and frictionless completion of warranty or repairs you need a RMA No. You may obtain a RMA on the internet at www.mas.de/FAQ or by telephone.
Please send the device in its original packing material, all standard accessories and a copy of the invoice, a description of defect and the RMA No. to following address. Please note the RMA number clear and in large numbers on the outer package.
MAS Elektronik AG
Pollhornbogen 19
21107 Hamburg
Germany
Support
e-mail: support@ersservice.de
Hotline: +49 (0) 40 - 77 11 09 - 17
Fax: +49 (0) 40 - 76 73 35 - 15
FREE TO CHOOSE INNOVATIONS

XORO by MAS Elektronik AG
Pollhornbogen 19
21107 Hamburg
Deutschland
Tel: +49(040) 77 11 09 17
Fax: + 49(040) 76 73 35 15
xoro@mas.de
www.xoro.de

natural_image
Green recycling symbol with three chasing arrows forming a triangle (no text or labels)


- XORO®
- Batterien
- Lieferumfang
- Hinweise:
- Safety information 5
- Notes 9
- Control Elements 11
- Remote Control 12
- Connection 14
- Initial Installation 16
- Daily Use 21
- Table of Contents
- Recorder (optional) 24
- USB Media Player 25
- Settings 30
- Troubleshooting 39
- Specifications 40
- Warranty 41
- User Manual
- Satellite dish
- Power Supply
- USB port
- Position
- Operation
- Dolby
- Defect
- Recycling Information
- Recycling of electronic devices
- Recycling of paper and carton
- Recycling of plastic parts
- Green Dot
- Batteries
- Accessoires
- Notes:
- Features
- Front Panel
- Rear Panel
- Insert batteries and operation radius
- Buttons
- Buttons of the remote control
- Part I
- Part 2
- Part 3
- Part 4
- Connecting to the TV
- General information
- Connection to satellite dish
- connection to a Hi- Fi system
- Connecting to USB storage
- Initial Installation
- OSD Language
- Country
- Channel Search
- Load the Pre-inst.
- Dish Setup-preparation
- Preparation:
- Example:
- Dish Setup-Procedure
- Process:
- Dish Setup-explanation of the parameters
- Search Mode:
- Encrypted:
- Service Type:
- Important keys and their functions
- Switch Channel
- Channel List
- Favourite
- Subtitles
- Audio settings of TV programs
- Teletext
- Mute
- Change Volume
- Information
- Aspect Ratio
- EPG
- Timer Programming on EPG
- Recorder (optional)
- Immediate recording and Timer programming, Recording list
- Recording
- Record programming
- Recording List
- Rename recorded files
- Delete recorded files
- Supported file formats
- Supported Media
- Note
- Photos
- Music playback during the photo display
- Supported formats
- Music
- Movies
- Resume play back
- Main Menu
- Program
- The standard password is 000000.
- Program Edit
- Delete
- Lock channels
- Skip Channels
- Favourites
- Rename Channels
- Programm
- Sort Channels
- Picture
- Resolution
- Colour system/V frequency
- Signal type (SCART)
- Dish Setup
- Save/load channel list
- Time
- Time Zone setting
- Time Zone
- EuP Auto-Stand By
- Option
- OSD / Subtitle Language
- Audio Language
- Digital Audio
- System
- Parental Guidance
- Set Password
- Recall List
- Xoro Update-Transponder (Stand 27.09.2011)
- USB
- USB Media Player
- Photo Configure
- Slide Time
- Subtitle Set up
- Subtitle Specific
- Subtitle Background
- Subtitle Letters
- Formats
- PVR Configure
- Recording device
- Format
- Attention:
- Limited Warranty
- XORO by MAS Elektronik AG
Brand : XORO
Model : HRS 8530pro
Category : Digital decoder