
Kobe - Television SEG - Free user manual and instructions
Find the device manual for free Kobe SEG in PDF.


| Product Type | Television |
| Screen Size | 32 inches |
| Resolution | HD Ready (1366 x 768) |
| Display Technology | LED |
| Power Supply | AC 100-240V, 50/60Hz |
| Power Consumption (Standby) | 40W (0.5W in standby) |
| Dimensions (with stand) | 732 x 480 x 180 mm |
| Weight (with stand) | 4.2 kg |
| Audio Output | 2 x 8W |
| Connectivity | 2 x HDMI, 1 x USB, 1 x AV, 1 x VGA, 1 x RF |
| Remote Control | Yes (batteries included) |
| Wall Mount Compatible | VESA 200 x 100 mm |
| Energy Class | A+ |
| Tuner Type | DVB-T/T2/C |
| Additional Features | Sleep timer, parental lock, noise reduction |
| Cleaning and Maintenance | Use a soft dry cloth. Do not use liquid cleaners or sprays. Unplug before cleaning. |
| Safety Precautions | Do not open the casing. Keep away from water and heat sources. Ensure proper ventilation. |
| Spare Parts and Repairability | Contact SEG support for spare parts. Repairs should be carried out by qualified personnel. |
| General Information | Model: Kobe; Brand: SEG; Manufactured in China. |
Frequently Asked Questions - Kobe SEG
User questions about Kobe SEG
0 question about this device. Answer the ones you know or ask your own.
Ask a new question about this device
Download the instructions for your Television in PDF format for free! Find your manual Kobe - SEG and take your electronic device back in hand. On this page are published all the documents necessary for the use of your device. Kobe by SEG.
USER MANUAL Kobe SEG
Operating Instructions
HDMI ^TM
Schlüsselmerkmale....5
Verpackungsinhalt 6
natural_image
Front view of a black flat-screen computer monitor with a stand (no visible text or symbols)
natural_image
Black remote control with multiple keypad and buttons, accompanied by two small accessories (no text or symbols visible)Stromadapter
Stromkabel
Stromkabel

natural_image
Black rectangular electronic device with a coiled cable and connector (no visible text or symbols)
natural_image
Black-and-white illustration of a coiled cable with connectors (no text or symbols)
natural_image
Front view of a flat-screen computer monitor with a small stand at the bottom (no visible text or symbols)LCD-Fernseher
Standfuß

natural_image
3D rendering of a computer monitor with a cable inserted, showing internal components and a screwdriver inserted (no text or symbols visible)
natural_image
Technical illustration of two vertical electronic devices with a 20° angle indicator (no text or symbols on devices)natural_image
3D illustration of a computer with an open lid and internal components, showing a mechanical assembly (no text or symbols visible)
natural_image
3D rendering of a rectangular electronic component with a slot and mounting bracket (no text or symbols)natural_image
3D rendering of a rectangular mechanical component with a central protrusion and a small protrusion (no text or symbols)
natural_image
Computer monitor with internal components and a blue circular overlay highlighting a device (no text or symbols visible)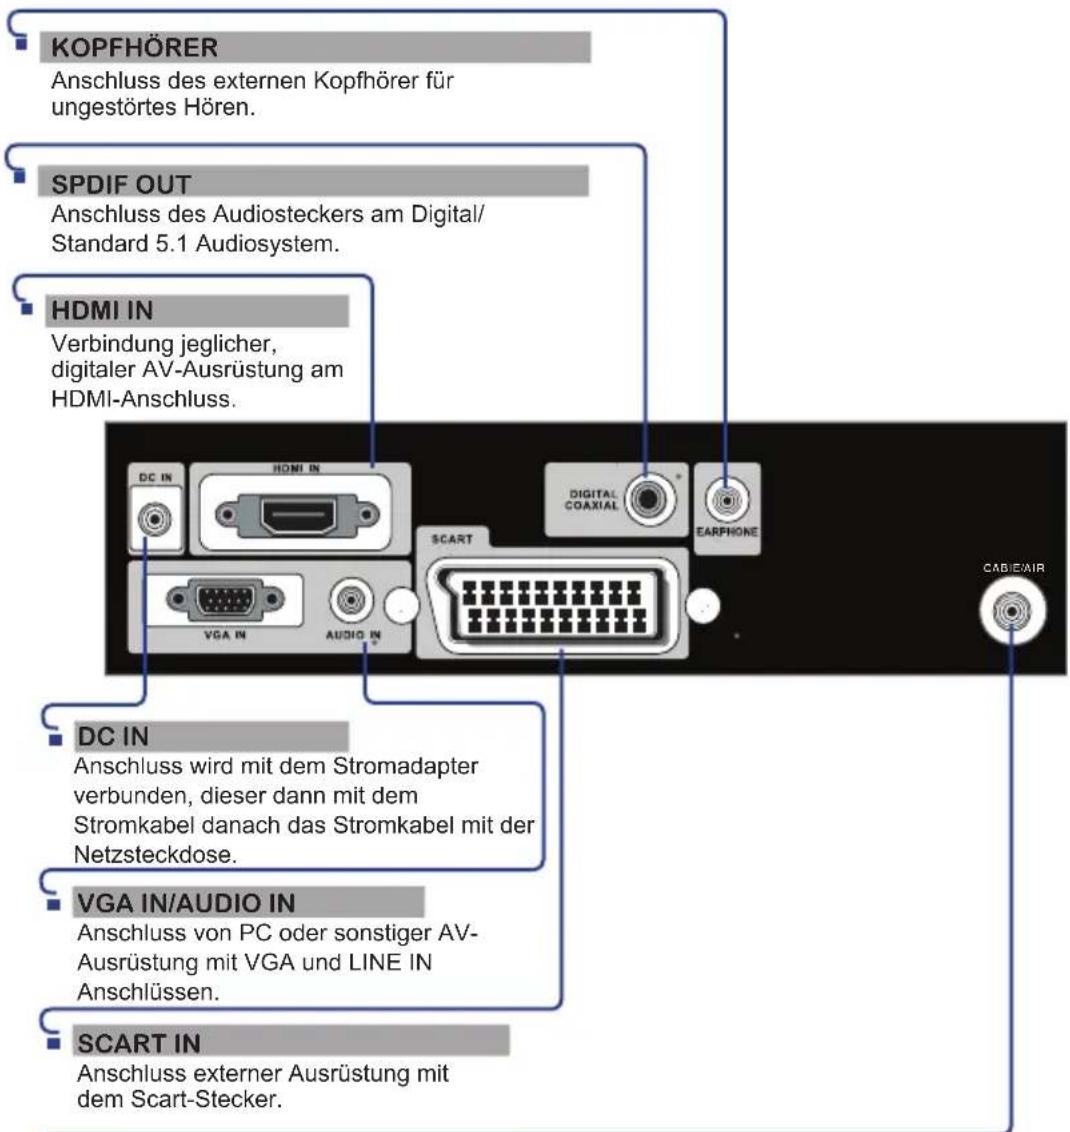
natural_image
Illustration of a computer monitor with an open rear panel and a hand inserting a cable into it (no text or symbols visible)natural_image
Illustration of a hand connecting a USB cable to a computer monitor (no text or symbols visible)

This TV incorporates High-Definition Multimedia Interface (HDMI ^™ ) technology. HDMI, the HDMI logo and High-Definition Multimedia Interface are trademarks or registered trademarks of HDMI Licensing LLC.

This sign indicates that this product may not be disposed of with your regular household waste. The recycling and separate collection of such products is your responsibility. Please drop off the above-mentioned waste at a designated place for recycling waste electrical and electronic equipment. If you do not know where to drop off your waste equipment for recycling, please contact your local city office or household waste collection service.
WARNINGS AND PRECAUTIONS
To prevent any injuries, the following safety precautions should be observed in the installation, use, servicing and maintenance of this equipment.
Before operating this equipment, please read this manual completely, and keep it nearby for future reference.

This symbol is intended to alert the user to avoid the risk of electric shock. This equipment must not be disassembled by anyone except qualified service personnel.

This symbol is intended to alert the user to the presence of important operating and maintenance instructions in the literature accompanying the appliance.

To reduce the risk of fire or electric shock, do not expose this equipment to rain or moisture.
- TO REDUCE THE RISK OF ELECTRIC SHOCK,
- DO NOT REMOVE COVER (OR BACK).
- NO USER-SERVICEABLE PARTS INSIDE.
- REFER SERVICING TO QUALIFIED SERVICE PERSONNEL.

Use of controls, adjustments or performance of procedures other than those specified herein may result in hazardous radiation exposure.
Important Safety Instructions

This symbol indicates caution points.

This symbol indicates actions that should not be done.

This symbol indicates actions that must be performed.

- Do not place the equipment on any uneven or unstable trolleys, stands, tables, shelves etc. The equipment may fall, causing serious injury to children or adults and serious damage to the equipment itself.
- Use only a trolley or stand recommended by the manufacturer. This equipment and recommended trolley or stand should be handled with care. Quick stops, excessive force, and uneven surfaces may cause the equipment and trolley/stand to overturn.


- Do not disable the 3-wire grounding type plug. The grounding pin on the 3-prong plug is an important feature. Removing the grounding pin will increase the risk of damaging the equipment.
- If you can not fit the plug into the electrical outlet, contact an electrician to install a grounding outlet.
- Always operate this equipment from the type of power source indicated on the rear of the serial / model information label.
- Never overload wall outlets and extensions.

- Use and handle the power cord with care. Do not place any heavy objects on the AC power cord.
- Do not pull the AC power cord. Do not handle the AC power cord with a wet hand.
- Do not touch the power cord and antenna cable during lightning.
- Remove the plug from the wall outlet, if the equipment will not be used for a long period of time.
- Do not place, use or handle this equipment near water.
- Never expose the equipment to liquid, rain, or moisture. Seek for service if any of the above is spilled into the equipment.
- Do not expose the equipment to extreme temperature or to direct sunlight, as the equipment may heat up and suffer damage.
- Do not install the equipment near any heat sources such as radiators, heat registers, stoves, or any other apparatus that might produce heat.
- Do not attempt to service the equipment yourself.
- Opening and removing the covers may expose you to dangerous voltage or other hazards and may void your warranty. Refer service to qualified personnel.
- Do not place or drop any other objects on top.
- Do not insert anything into the ventilation holes of your equipment. Inserting any metal or flammable objects may result to fire or electric shock.
- Do not place the equipment on uneven or unstable trolleys, stands, tables, shelves etc. The equipment may fall, causing serious injury to children or adults and serious damage to the equipment itself. Always place the equipment on the floor or on a surface that is sturdy, level, stable and strong enough to support the weight of the equipment.
- Do not block any ventilating openings. Leave an open space around the equipment. Never place the equipment: on a bed, sofa, rug, or any other similar surfaces; too close to drapes/curtains/walls, in a bookcase, built-in cabinet, or any other similar places that may cause poor ventilation.
- Unplug this apparatus during lightning storms or when unused for long periods of time.
- Refer all servicing to qualified service personnel. Servicing is required when the apparatus has been damaged in any way, such as power-supply cord or plug is damaged, liquid has been spilled or objects have fallen into the apparatus, the apparatus has been exposed to rain or moisture, does not operate normally, or has been dropped.

- Always remove the power cord from the outlet before cleaning the equipment.
- Never use liquid or aerosol cleaners on the equipment. Clean only with a soft dry cloth.

- Only use attachments/accessories specified by the manufacturer.
- Precaution has to be taken that during the use of the product, no mechanical forces shall be applied on the mains cord and mains socket. Partly loosened mains plugs can cause arcing or fire.
- Where the mains plug or an appliance coupler is used as the disconnected device, the disconnect device shall remain readily operable.
LISTENING WITH EARPHONES
- Listen at moderate Volumes to avoid hearing damage.
- If you hear no sound during playback, do not turn the Volume up as the music may suddenly begin at a high Volume. Excessive sound pressure from earphones and headphones can cause hearing loss.
- To avoid damaging your ears, adjust the Volume to the lowest level before playback, and turn up to the desired level when playback has started.
Antenna Safety Instructions
If an outdoor antenna is connected, follow the precautions below:

- An outdoor antenna should not be located in any area where it could come in contact with overhead power lines, or any other electric light or power circuits.
- When installing an outdoor antenna system, extreme caution should be taken to prevent contact with power lines. Direct contact with power lines may be fatal and should be avoided at all costs.

WARNINGS AND PRECAUTIONS
Important Safety Instructions....1
INTRODUCING THE LCD TV
Key Features .... 5
Package Contents 6
Setting Your LCD TV....7
Your LCD TV....10
Your Remote Control 13
INSTALLING THE LCD TV
Connecting a TV Cable or an Antenna 15
Connecting optional AV Equipment
Connecting an AV Equipment with SCART Connector.... 20
Connecting an AV Equipment with HDMI Connector.... 21
Connecting an AV Equipment with DVI Connector 22
Connecting a PC....23
Connecting an Audio Receiver 24
USING THE FEATURES
Using the Programme Guide ....25
Customizing the PICTURE Settings 26
Customizing the SOUND Settings....28
Customizing the TIME Settings....29
Customizing the OPTION Settings....30
Customizing the CHANNEL Settings 31
Customizing the LOCK Settings....33
TROUBLESHOOTING
…… 35
SPECIFICATIONS
......□ 36
Various Audio/Video terminals for external equipment connection
- 1 SCART input terminal
- 1 VGA terminal
- 1 VGA LINE IN terminal
- 1 HDMI input terminal
- 1 coaxial audio output terminal
- 1 Headphone terminal
High Definition Multimedia Interface (HDMI)
- High Definition Multimedia Interface (HDMI) is a small, user-friendly interconnect that can carry up to 5 Gbps of combined video and audio in a single cable. This system eliminates the cost, complexity and confusion of multiple cables used to connect current A/V systems.
HDTV Component Video Inputs
- Offers the best video quality for DVD and digital set-top-box connections (480p/576i/576P, HD1080i, 720p).
3D Digital Noise Reduction
- This function can digitally reduce image noise to provide better picture quality.
Film-Mode Detection
- This function can automatically detect content derived from film and adjust the interlacer's frame matching to provide a more natural-looking, clearer image of the moving picture.
Make sure all of the following contents are included.
LCD TV
☑ Remote Control/AAA Batteries x 2
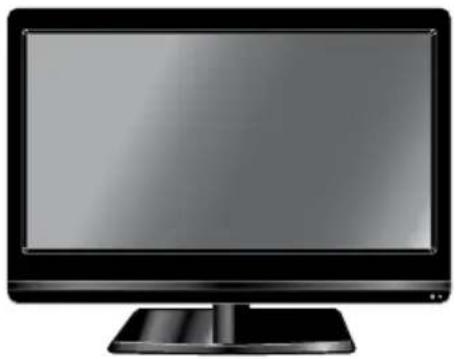
natural_image
Front view of a black flat-screen monitor with a stand (no text or symbols visible)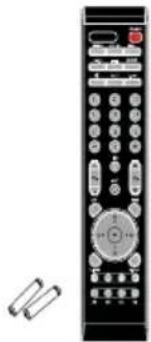
natural_image
Black remote control with multiple keypad and buttons, accompanied by two batteries (no visible text or symbols)☑ AC-DC Adapter
Power Cord
User Guide

natural_image
Black rectangular electronic device with a coiled cable and plug, no visible text or symbols
natural_image
Black-and-white illustration of a coiled cable with two connectors (no text or symbols)
The power cord type may be different depending on your country's power type.
☑ Warranty Card

The photos of the accessories are for reference only, the colour of the remote control, the type of power cord are variable based on the actual models.
These items are all you need to set up and operate the LCD TV in its basic configuration.

Make sure all of the above contents are included. If you are missing any items, please return this product to the original place of purchase.
How to install the TV Stand
Follow the instructions below to install the TV stand:

Open the box, and make sure all necessary parts are in the box. The package contains:

natural_image
Illustration of a flat-screen monitor and a rectangular electronic device (no text or symbols visible)LCD TV Stand

Cover an even stable surface with a soft cloth. Place the LCD TV unit face-down on the cloth. Fit the stand onto the bottom of the LCD TV unit as shown, then use a screw driver to tighten the screw on the bottom of the stand until the screw is firmly fixed in place.

natural_image
3D rendering of a device with a slide and cable inserted, showing internal components (no text or symbols visible)
In order to ensure a healthy and relaxed body position when using the TV at visual display workstations, you are able to adjust the TV's angle of the stand. The angle of the LCD TV may be adjusted approximately 20 degrees.

natural_image
Two black-and-white diagrams showing a vertical stand with a 20° angle measurement, no text or symbols present.How to remove the TV Stand
If you prefer to mount your new TV on a wall instead of attaching it to the stand, please reference the instructions included in the wall mounting kit (sold separately).

To prevent damaging the surface of the LCD TV, place the TV on a soft cloth.
Remove the screw of the table stand and detach the table stand from the TV.

natural_image
3D illustration of a computer floppy disk with an open lid and internal components, showing a scroll wheel and drive mechanism (no text or symbols)
Affix the VESA mount to the back of the TV using the four screws provided in the wall-mount kit. When install the TV on the wall, allow to leave some space.


When install TV on the wall, allow to leave some space(6 cm at least). Verify your TV's model and be sure to use the wall mounting kit specified for your TV model only. Contract your technician for assistance when installing the wall mounting kit.
How to setup the TV
1
Use a supplied antenna cable to connect the VHF/UHF signal to the LCD TV's ANT. terminal (refer to page 18-21).
2
Connect the AC power cord at the back of the TV and connect the power cord to wall outlet.
3
Insert the 2 batteries supplied in remote control.
Step1 Slide the back cover up to open the battery compartment of the remote control.

natural_image
3D rendering of a rectangular electronic component with a small internal feature and an arrow indicating direction (no text or symbols)Step2 Insert two AAA size batteries. Make sure to match the (+) and (-) ends of the batteries with the (+) and (-) ends indicated in the battery compartment.
Slide the cover back into place.

natural_image
3D diagram of a mechanical component with a black arrow pointing to a feature (no text or symbols)
Do not use caustic cleaners (porcelain, stainless steel, toilet, or oven cleaner etc.) on the remote, as it may suffer damage.
4
Connect other an external AV device (refer to page 23-28).
Front/Left /Right Side View and Controls
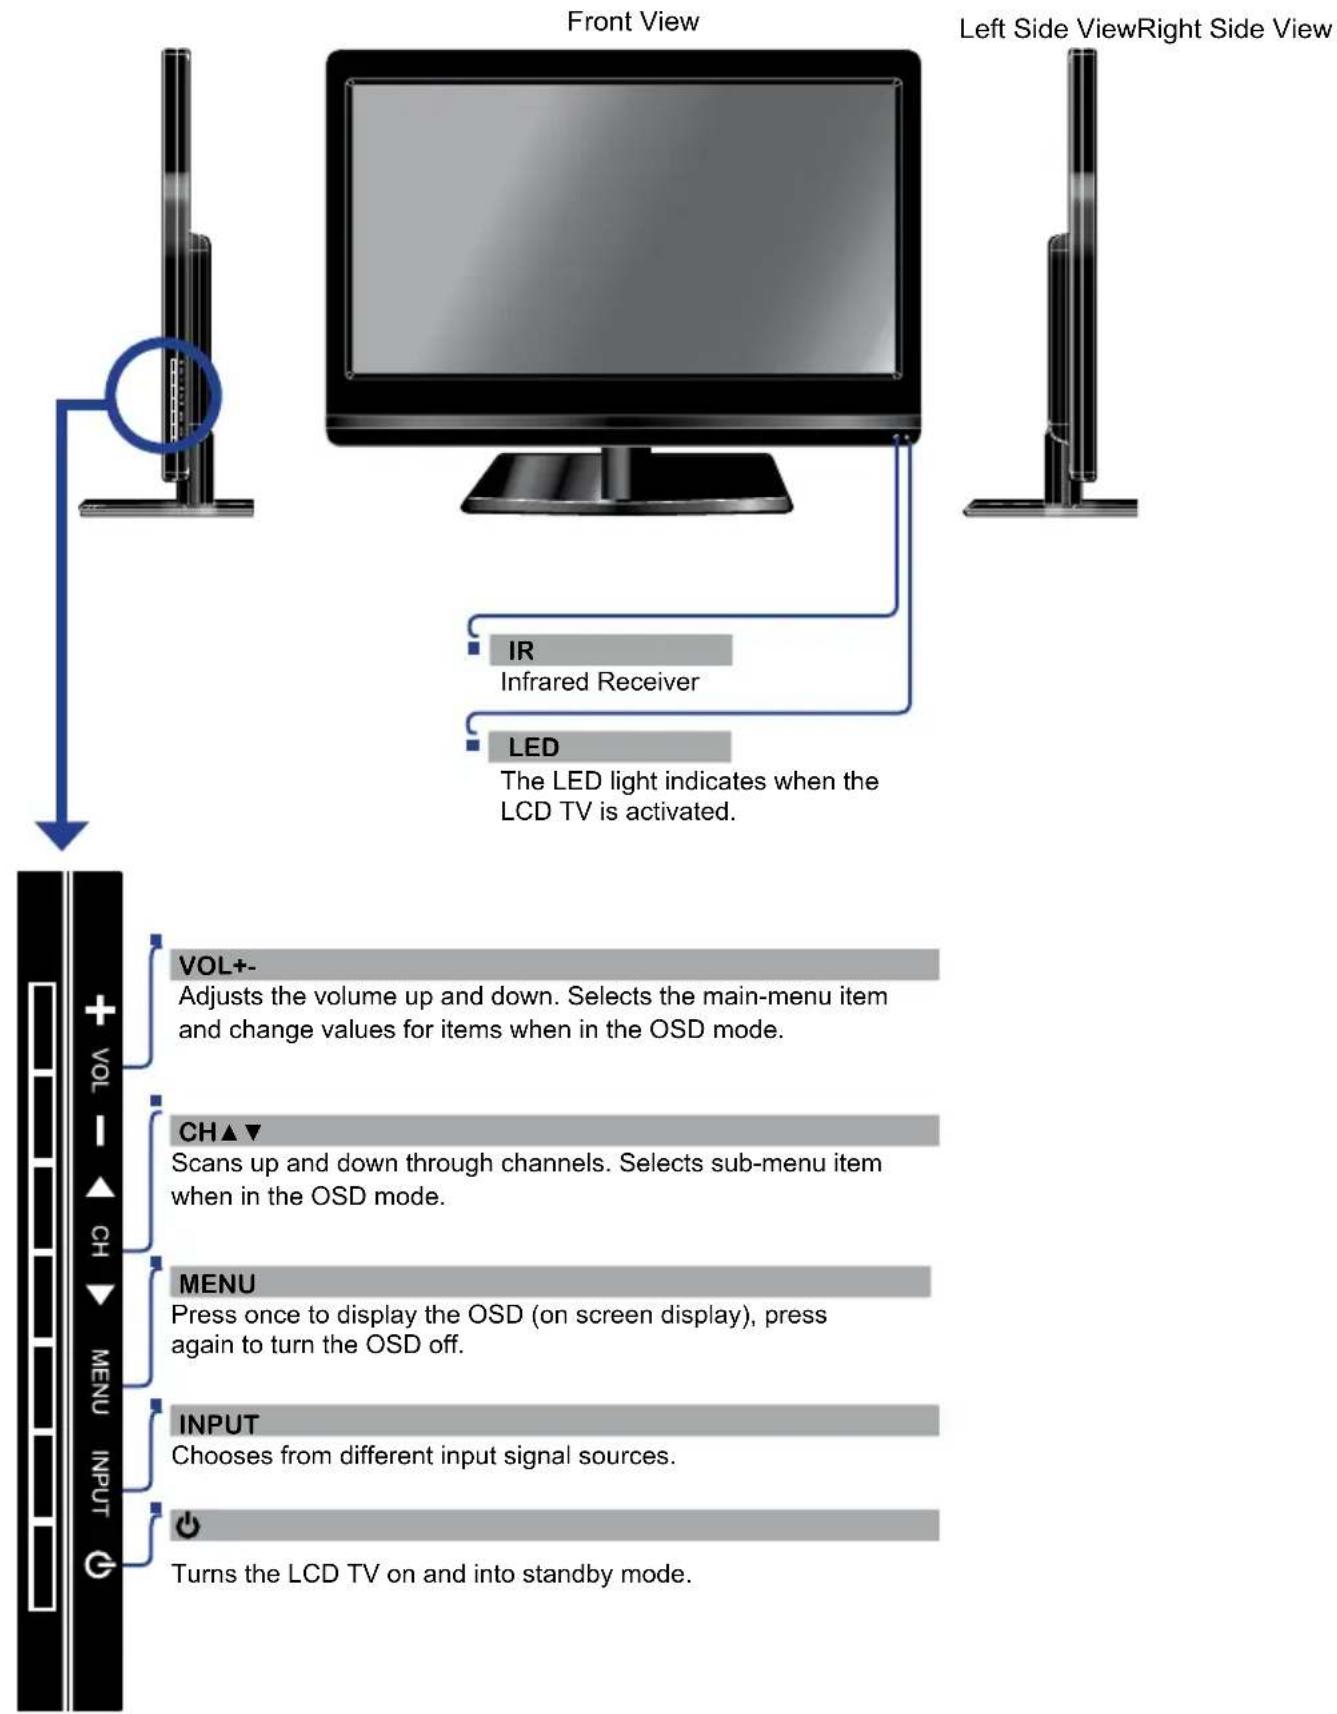
flowchart
graph TD
    A["Front View"] --> B["Left Side View"]
    B --> C["Right Side View"]
    D["VOL+"] --> E["Adjusts the volume up and down. Selects the main-menu item and change values for items when in the OSD mode."]
    F["VOL-"] --> G["Scans up and down through channels. Selects sub-menu item when in the OSD mode."]
    H["CH"] --> I["Press once to display the OSD (on screen display), press again to turn the OSD off."]
    J["CH"] --> K["Choose from different input signal sources."]
    L["MENU"] --> M["Turns the LCD TV on and into standby mode."]
    N["INPUT"] --> O["Turns the LCD TV on and into standby mode."]
    P["LED"] --> Q["The LED light indicates when the LCD TV is activated."]
Rear View and Jacks
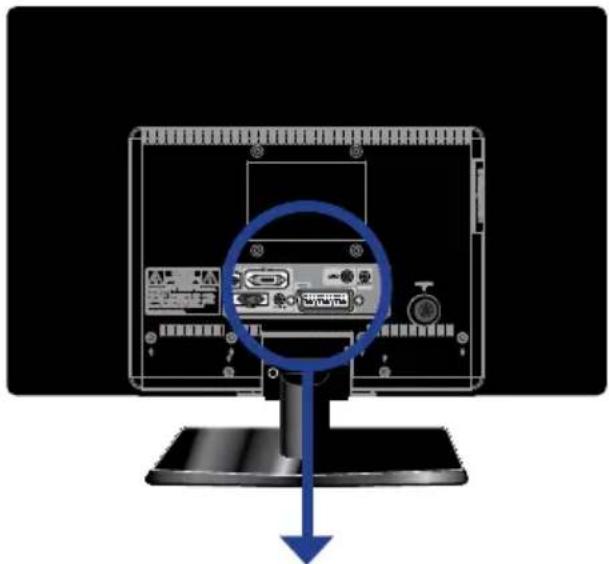
natural_image
Computer monitor with rear panel showing internal ports and a blue circular annotation highlighting the central port (no text or symbols on main body)
VHF/UHF IN Connects RF input from VHF/UHF antenna or cable to receive high/standard definition television.
How to connect CI(Common Interface) card

1
To view the scrambled (pay) services in digital TV mode.
- TO INSERT A CI CARD
Insert the CI card into the slot in the direction of the arrow until it fits.

natural_image
Illustration of a computer monitor with an open screen and a hand inserting a cable into it (no text or symbols visible)- TO REMOVE A CI CARD
When removing the CI card, do pull it from its slot.
This function enables you to watch the scrambled services (pay services) in some channels. If you remove the CI Module, you can watch the available digital/analogue programme in some channels.
2
Press the INPUT button the remote control to display the Input menu, and use the ▲▼ buttons to select the DTV.

1 POWER Turns the LCD TV on and off.
2 SUBTITLE Cycles through the TV subtitle options in DTV mode.
3 FREEZE Pressing FREEZE to freeze the current picture, press again to restore the picture.
4 GUIDE Displays the Program Guide on the screen in TV mode. Pressing again to turn GUIDE off.
5 I-II Cycles through the TV sound options (NICAM): MONO/DUAL/STEREO
6 FAV.CH Pressing FAV.CH display favorite channels.
7 Turns on and off the Teletext function.
8 Mutes and restores your LCD TV sound.
9 SLEEP Cycles through the LCD TV sleep time.
10 P.SIZE Cycles through Wide mode settings: / Auto/4:3/16:9/ZOOM1/ZOOM2
11 0-9/ENT Pressing a number selects a channel.
Following selection, pressing ENT
activates the channel, or channel
activates automatically in 3 seconds.
12 JUMP Switches back and forth between the current and previous channels.
13 INFO Pressing once displays a variety of information such as the current channel and the input source.
14 VOL.+- Increases and decreases volume.
15 CH. ▲▼ Scans up and down the channels.


INPUT
Pressing INPUT displays the source list, use ▲▼ to select the video equipment connected to the video inputs of your LCD TV :DTV/ATV/SCART/VGA/HDMI
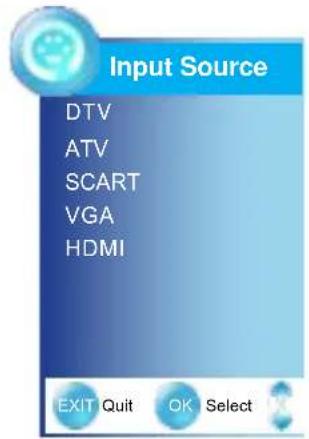

The Component input is dependent on model.

EXIT Exits the OSD menu.

MENU Displays the OSD menu on the screen.

▲▼▶◀ Cycles through OSD options and OK selects individual menu items. OK confirms option settings.

S.MODE Selects sound effect options: User/Sports/Movie/Music/Standard

P.MODE Selects picture mode: User/Mild/Standard/Dynamic

Press the appropriate colour to direct access the colour page.

Displays the main index in TELETEXT mode.

Reveals hidden information such as the answer to a quiz in TELETEXT mode.

Eezes a multi-page passage on screen in TELETEXT mode.

Displays the top, bottom or all of page, to easily read in TELETEXT mode.

Effective range:
The remote can control the LCD TV from up to 5m away, if pointed directly at the receiver.
Installing the LCD TV
Refer to the owner's manual of any external equipment to be connected.
When connecting any external equipment, do not connect any AC power cords to wall outlets until all other connections are completed.
Connecting a TV Cable or an Antenna
Antenna Connection
The antenna requirements for good color TV reception are more important than those for a black & white TV reception. For this reason, a good quality outdoor antenna is strongly recommended. The following is a brief explanation of the type of connection that is provided with the various antenna systems.

Use one of the following two diagrams when connecting an outdoor antenna.
A: Shows how to use a VHF/UHF combination outdoor antenna.
B: Shows how to use a separate VHF and/or UHF outdoor antenna.
A. Combination VHF/UHF antenna

flowchart
graph TD
    A["Monitor"] --> B["300-ohm twin-lead cable"]
    B --> C["75-ohm coaxial cable"]
    C --> D["VHF/UHF Antenna"]
    D --> E["VHF/UHF Antenna"]
    E --> F["300/75-ohm adapter (not included)"]
B. Separate VHF and/or UHF antennas
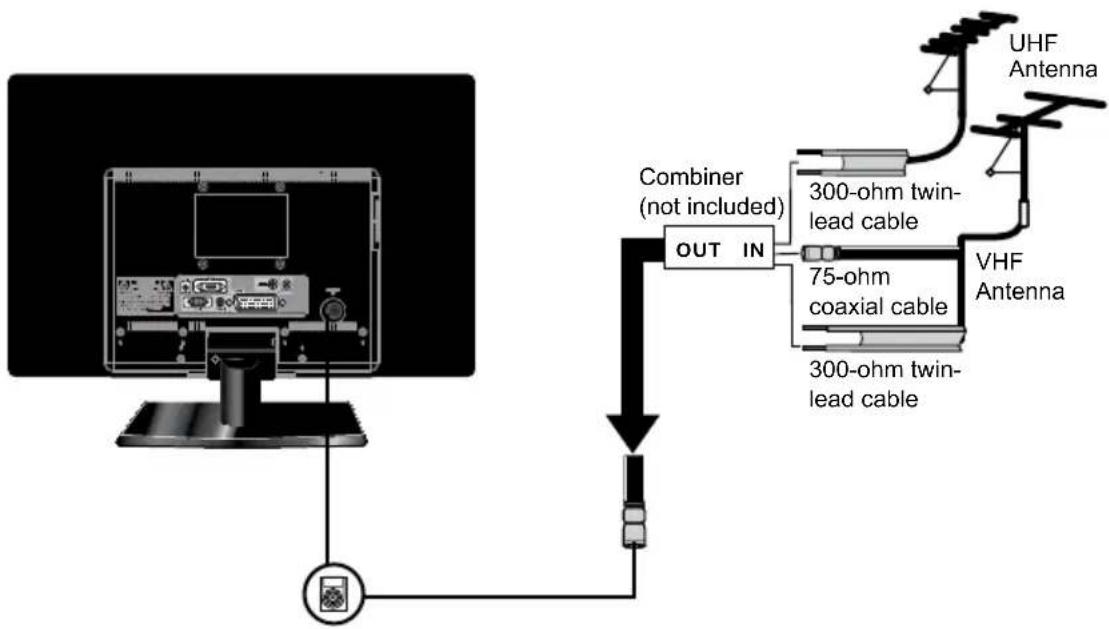
flowchart
graph TD
    A["Computer monitor"] --> B["Out IN"]
    B --> C["300-ohm twin-lead cable"]
    B --> D["75-ohm coaxial cable"]
    B --> E["300-ohm twin-lead cable"]
    F["UHF Antenna"] --> G["VHF Antenna"]
    G --> H["Output"]
Cable TV (CATV) Connection
■ A 75-ohm coaxial cable connector is built into the set for easy hookup. When connecting the 75-ohm coaxial cable to the set, connect the 75-ohm cable into the ANT. terminal.
■ Some cable TV companies offer premium pay channels. Since the signals of these premium pay channels are scrambled, a cable TV converter/descrambler is generally provided to the subscriber by the cable TV company.
This converter/descrambler is necessary for normal viewing of scrambled channels.
(Set your TV to channel 3 or 4, typically one of these channels is used. If this is unknown, consult your cable TV company.)
For more specific instructions on installing cable TV, consult your cable TV company.
One possible method of connecting the converter/descrambler provided by your cable TV company is shown in the diagram below.
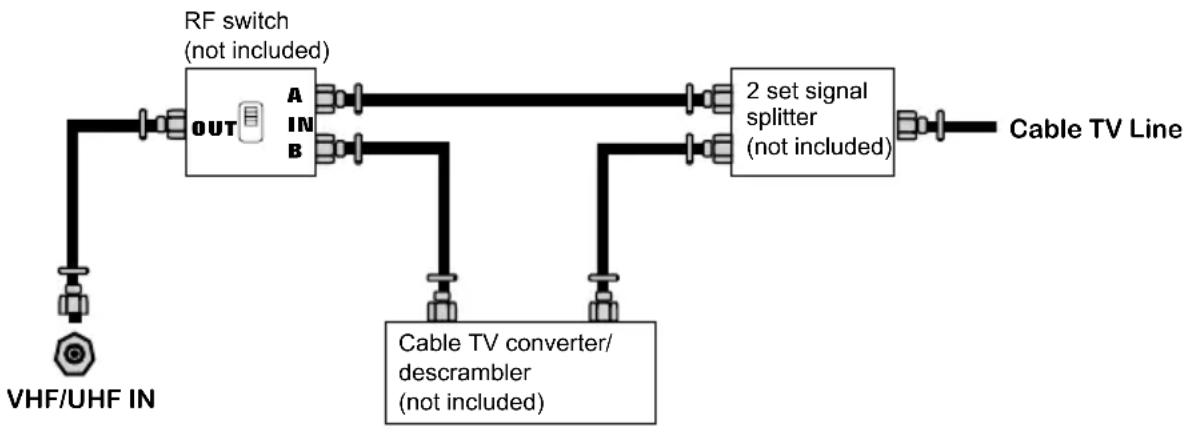
flowchart
graph LR
    A["VHF/UHF IN"] --> B["RF switch (not included)"]
    B --> C["OUT"]
    C --> D["A IN B"]
    D --> E["2 set signal splitter (not included)"]
    E --> F["Cable TV Line"]
    G["Cable TV converter/descrambler (not included)"] --> D

■ The RF switch (not included) is required to provide two inputs (A and B). Setting the RF switch to position A allows viewing of all unscrambled channels by using the TV channel keys.
■ Setting the RF switch to position B allows viewing of all scrambled channels via the converter/descrambler by using the converter channel keys.

Use an antenna cable to connect the TV signal to the LCD TV's TV CABLE terminal.
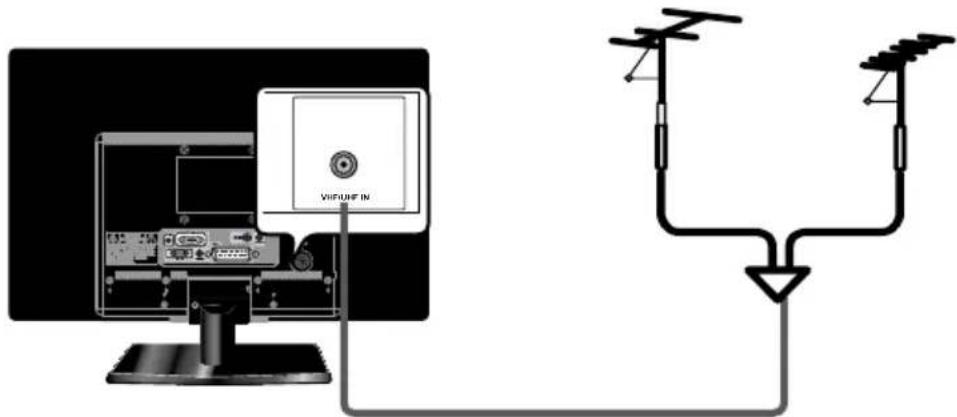

Connect the DC plug of the AC-DC adapter to the DC 12V port at the rear of the TV. Connect the power cord to the AC-DC adapter and wall outlet.

natural_image
Illustration of a hand connecting a USB cable to a device on a monitor, showing ports and cables (no text or symbols present)
Press the button on the remote to turn on the LCD TV.

Always disconnect the LCD TV from the power outlet when the LCD TV will not be used for a long period of time.
The POWER button on the front panel is only used for switching the LCD TV into standby, it does not disconnect the device from the main voltage. To completely disconnect the main voltage, please remove the power plug from the socket.

Press the INPUT button on the remote to display the Source List. Use the ▲▼ buttons to select DTV/ATV, and press the OK button.

When you switch on the TV for first time, press MENU button on the remote and use the ▲▼ buttons to select OPTION.
Press the ▼ button to select Language, and use the ◀▶ buttons to select the language displayed on the menu.

Use the ▲▼ buttons to select CHANNEL, press the ▼ button to select Auto Scan and press the OK button.
Use the ◀▶ buttons to select the YES. The Auto Tuning automatically creates a list of receivable channels. Press the EXIT button at any time to interrupt the memorization process. (The list cannot be created if interrupted)
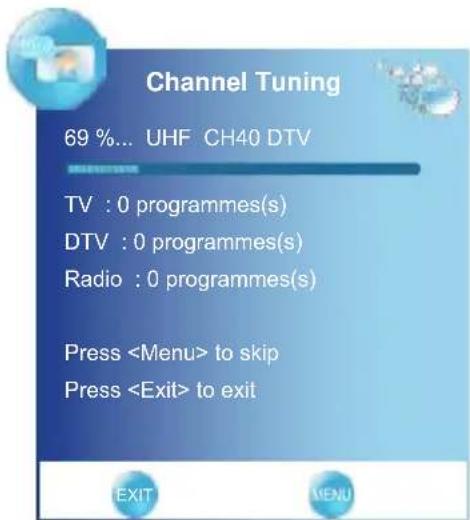

Rear of TV
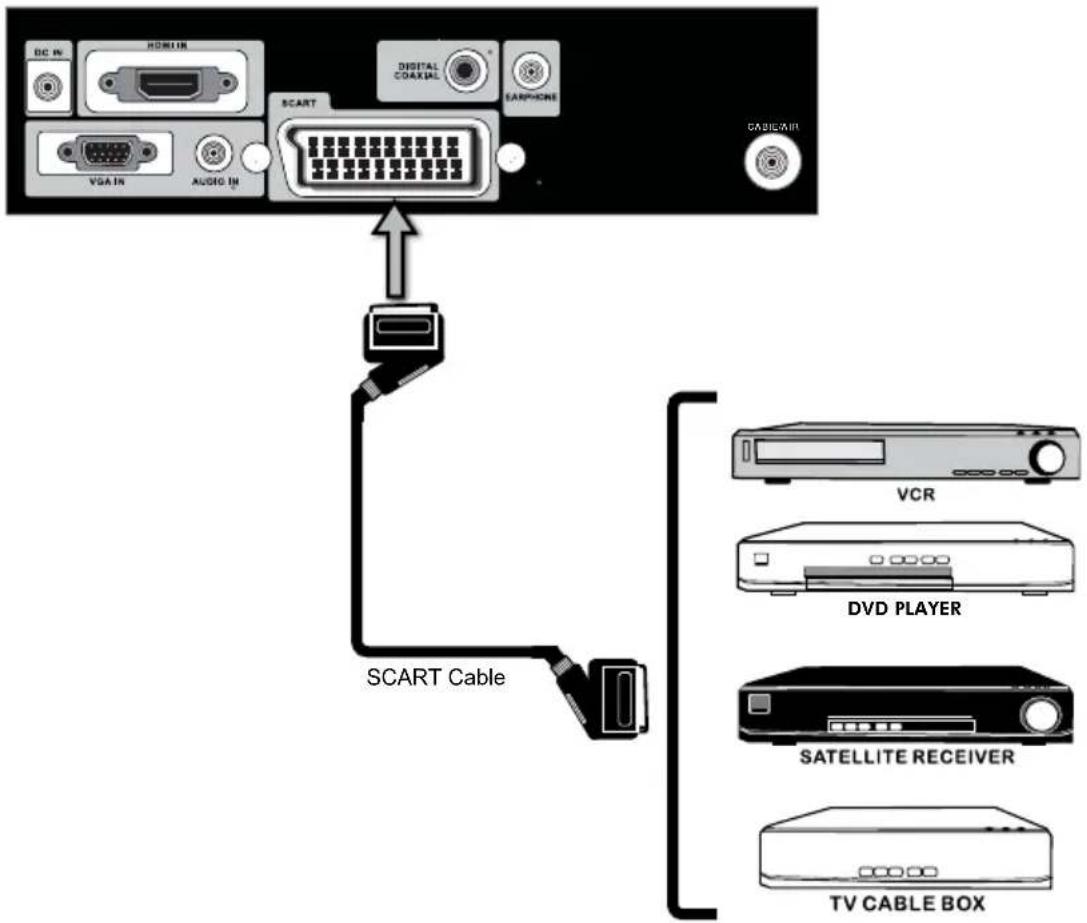
1 Use a SCART cable to connect the external A/V device's SCART socket to the LCD TV's SCART jack.
2 Connect all AC power sources, before turning on the power switch of the LCD TV or other connected equipment.
3 Press the ⏻ button on the remote to turn on the LCD TV.
4 Press the INPUT button on the remote to select SCART.
Connecting an AV Equipment with HDMI Connector
Rear of TV

Use a HDMI cable to connect the AV equipment's HDMI output jack to the LCD TV's HDMI IN jacks.
2 Connect all AC power sources, before turning on the power switch of the LCD TV or other connected equipment.
3 Press the ⏻button on the remote to turn on the LCD TV.
4 Press the Input button on the remote to select HDMI.

The HDMI connector provides both video and audio signals, it's not necessary to connect the audio cable.
Rear of TV

flowchart
graph TD
    A["ACI IN"] -->|USB| B["BCS"]
    B --> C["DCI IN"]
    C --> D["DCI IN"]
    D --> E["DCI IN"]
    E --> F["DCI IN"]
    F --> G["DCI IN"]
    G --> H["DCI IN"]
    H --> I["DCI IN"]
    I --> J["DCI IN"]
    J --> K["DCI IN"]
    K --> L["DCI IN"]
    L --> M["DCI IN"]
    M --> N["DCI IN"]
    N --> O["DCI IN"]
    O --> P["DCI IN"]
    P --> Q["DCI IN"]
    Q --> R["DCI IN"]
    R --> S["DCI IN"]
    S --> T["DCI IN"]
    T --> U["DCI IN"]
    U --> V["DCI IN"]
    V --> W["DCI IN"]
    W --> X["DCI IN"]
    X --> Y["DCI IN"]
    Y --> Z["DCI IN"]
    Z --> AA["DCI IN"]
    AA --> AB["DCI IN"]
    AB --> AC["DCI IN"]
    AC --> AD["DCI IN"]
    AD --> AE["DCI IN"]
    AE --> AF["DCI IN"]
    AF --> AG["DCI IN"]
    AG --> AH["DCI IN"]
    AH --> AI["DCI IN"]
    AI --> AJ["DCI IN"]
    AJ --> AK["DCI IN"]
    AK --> AL["DCI IN"]
    AL --> AM["DCI IN"]
    AM --> AN["DCI IN"]
    AN --> AO["DCI IN"]
    AO --> AP["DCI IN"]
    AP --> AQ["DCI IN"]
    AQ --> AR["DCI IN"]
    AR --> AS["DCI IN"]
    AS --> AT["DCI IN"]
    AT --> AU["DCI IN"]
    AU --> AV["DCI IN"]
    AV --> AW["DCI IN"]
    AW --> AX["DCI IN"]
    AX --> AY["DCI IN"]
    AY --> AZ["DCI IN"]
    AZ --> BA["DCI IN"]
    BA --> BB["DCI IN"]
    BB --> BC["DCI IN"]
    BC --> BD["DCI IN"]
    BD --> BE["DCI IN"]
    BE --> BF["DCI IN"]
    BF --> BG["DCI IN"]
    BG --> BH["DCI IN"]
    BH --> BI["DCI IN"]
    BI --> BJ["DCI IN"]
    BJ --> BK["DCI IN"]
    BK --> BL["DCI IN"]
    BL --> BM["DCI IN"]
    BM --> BN["DCI IN"]
    BN --> BO["DCI IN"]
    BO --> BP["DCI IN"]
    BP --> BQ["HDMI-to-DVI Cable"]
    BQ --> BR["HDMI-to-DVI Cable"]
    BR --> BS["HDMI-to-DVI Cable"]
    BS --> BT["HDMI-to-DVI Cable"]
    BT --> BU["HDMI-to-DVI Cable"]
    BU --> BV["HDMI-to-DVI Cable"]
    BV --> BW["HDMI-to-DVI Cable"]
    BW --> BX["HDMI-to-DVI Cable"]
    BX --> BY["HDMI-to-DVI Cable"]
    BY --> BZ["HDMI-to-DVI Cable"]

Use a HDMI-to-DVI cable to connect the AV equipment's DVI output jack to the LCD TV's HDMI IN jacks.
Use an audio cable to connect the AV equipment's audio output jacks to LCD TV's HDMI AUDIO jacks.

Connect all AC power sources, before turning on the power switch of the LCD TV or other connected equipment.

Press the ⏻ button on the remote to turn on the LCD TV.

Press the Input button on the remote to select HDMI.

If the LCD TV is connected to AV equipment's DVI connector, you will need an HDMI-to-DVI cable or an HDMI adapter(not supplied) and an audio cable.
Rear of TV
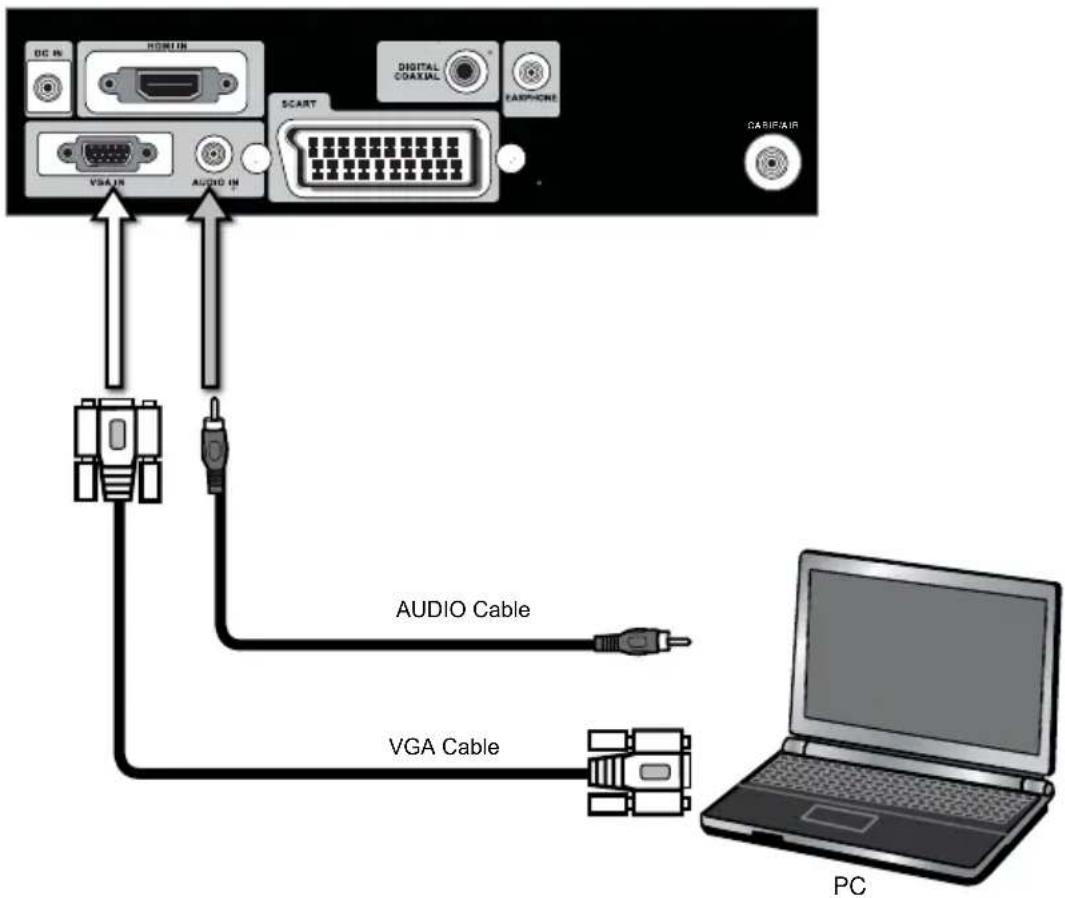
Use a D-SUB cable to connect the PC's D-SUB output jack to the LCD TV's VGA input jack. Use an audio cable to connect the PC's audio output jacks to LCD TV's.
2 Connect all AC power sources, before turning on the power switch of the LCD TV or other connected equipment.
③ Press the ▼button on the remote to turn on the LCD TV.
4 Press the INPUT button on the remote to select VGA.
For better sound quality, you may want to play the LCD TV audio through your stereo system.
Rear of TV

Use an audio cable to connect the audio receiver's audio LINE IN jacks to LCD TV's COAXIAL audio jacks.
2 Connect all AC power sources, before turning on the power switch of the LCD TV or other connected equipment.
3 Press the button on the remote to turn on the LCD TV.
USING THE FEATURES
Using the Programme Guide
The Programme Guide is an Electronic Programme guide that provides viewers with a quick and easy way to view a complete list of digital of programmes. The Program Guide feature brings all sorts of information to your screen, such as program title, program duration, time remaining, rating information, availability, etc.
With the LCD TV connected to a television programming source, press the INPUT button on the remote control then use ▲▼ to select DTV and press OK button.
2 Press the GUIDE button on the remote control, the Programme Guide will appear on the screen:
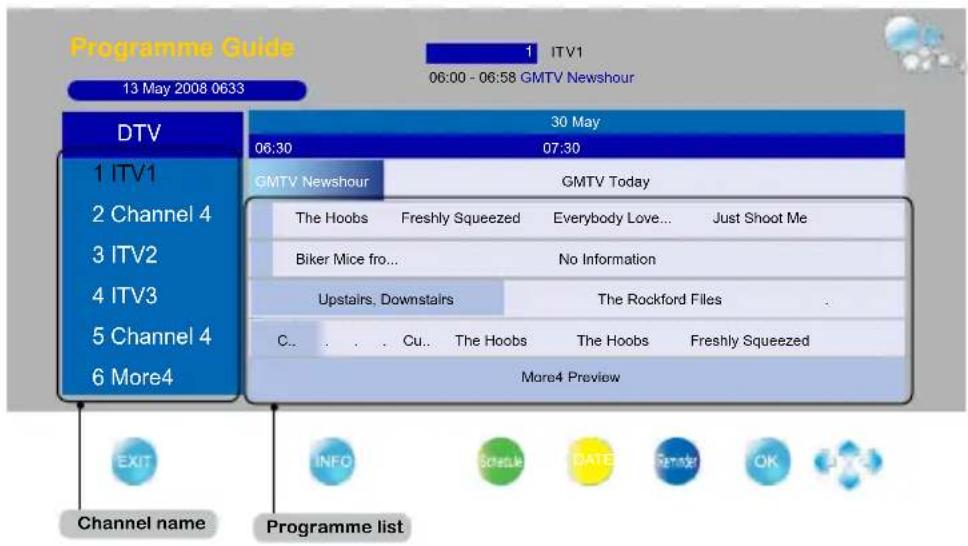
3 Press ▲▼ buttons to select channels and press OK button to confirm.
4 Press ▲▼◀▶ buttons to select the programme from a list, the Programme Guide provides introduction about the current programme being shown on each channel. (The Programme information in the guide is provided by the broadcasters)
5 Press EXIT button on the remote control to exit the Programme Guide

Press the button to turn the LCD TV on.

Press the MENU button on the remote control to display the Main menu, and use the ◀▶ buttons to select the Picture.

Use the ▲▼ buttons to highlight an individual picture option, use the ◀▶ buttons to change the setting, and press the MENU to exit the menu.


The available menu items are dependent on the input source being selected. All illustration is for reference only.

The PICTURE menu includes the following options:
Picture Mode Cycles among display types: User/Mild/Standard/Dynamic User: Allows to store your preferred settings.

Contrast Controls the difference between the brightest and darkest regions of the picture.
Brightness Controls the overall brightness of the picture.
Colour Controls the colour intensity.
| Sharpness | Increase this setting to see crisp edges in the picture; decrease it for soft edges. |
| Tint | Controls the difference between the green and red regions of the picture. |
Colour Temperature Adjusts colour components independently to achieve a warm or cool effect: Cool/Warm//Standard/User
- Warm: Increases red tint
- Cool: Increases blue tint
- User: Allows the user to adjust red, green and blue colour component levels independently.
Aspect Ratio Selects through Wide mode settings :
In TV and video mode: Auto/4:3/16:9/ZOOM1/ZOOM2
■ In VGA/DVI mode:4:3/16:9
Noise Reduction Select to reduce the noise level of connected equipment: Off/On

The available menu options depend on the chosen signal source / menu settings. All illustrations act as a referee.
1
Press the
button to turn the LCD TV on.
2
Press the MENU button on the remote control to display the Main menu, and use the ◀▶ buttons to select the SOUND.
3
Use the ▲▼ buttons to highlight an individual sound option, use the ◀▶ buttons to change the setting, and press the MENU to exit the menu.

4
The SOUND Setup menu includes the following options:
Sound Mode Allows selection of an audio-enhancement technique from among the following options: User/Sports/Movie/Music/Standard
Treble Controls the relative intensity of higher pitched sounds.
Bass Controls the relative intensity of lower-pitched sounds.
Balance
Adjusts the relative volume of the speakers in a multiple speaker system.
Surround Sound Enables or disables surround sound effect.

The available menu options depend on the chosen signal source / menu settings. All illustrations act as a referee.

Press the
button to turn the LCD TV on.

Press the MENU button on the remote control to display the Main menu, and use the ◀▶ buttons to select the TIME.

Use the ▲▼ buttons to highlight an individual time option, use the ◀▶ buttons to change the setting, and press the MENU to exit the menu.
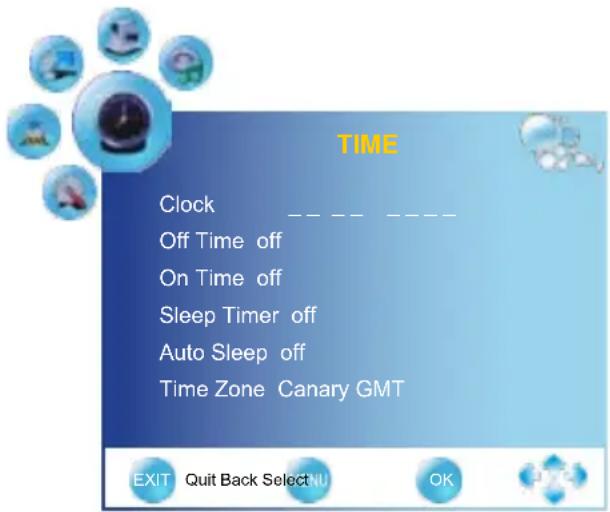

The TIME menu includes the following options:
| Clock Selects to set the current clock. | |
| 1 Press the OK button to display the Clock menu:2 Press the ▲▼ buttons to move to Date, Month, Year, Hour and Minute.3 Press the ◀► buttons to set. | |
| Off Time | Allows to set the Off timers that the TV will switch off automatically at the time you select. |
| On Time | Allows to set the On timers that the TV will switch on automatically and tune to the mode of your choice at the time you select. |
| Sleep Timer | Use ◀► buttons to select a period of time after which the TV automatically switches to standby mode:off/10min/20min~/240min. |
| Auto Sleep | Select on, the TV will be automatically turned off, in case of no signal inTV & input source or no remote control input. |
| Time Zone | Use ◀► buttons to cycle through the availabletime zones in the country. |

Press the ⏻ button to turn the LCD TV on.

Press the MENU button on the remote control to display the Main menu, and use the ◀▶ buttons to select the OPTION.

Use the ▲▼ buttons to highlight an individual option option, use the ◀▶ buttons to change the setting, and press the MENU to exit the menu.

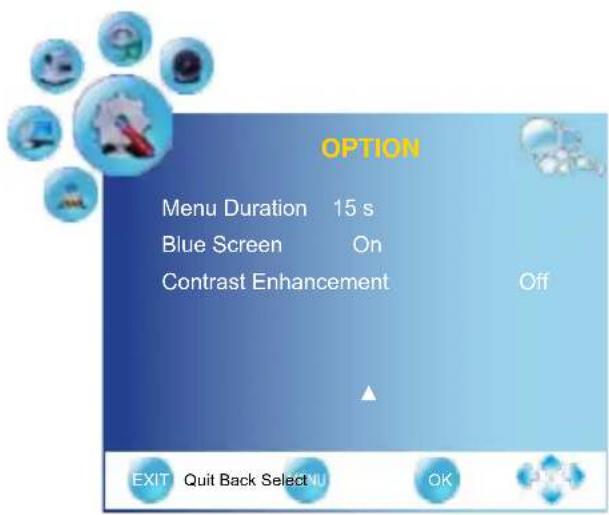

The OPTION menu includes the following options:
| Language | Selects to display all on-screen menus in your language of choice. |
| Audio Language | Allows to select the audio language. |
| Subtitle Language | Allows to display subtitle on the screen. |
| Country | Allows you select the country: UK, Ireland, Denmark, Finland, Italy, Norway, Spain, Sweden, Luxembourg, France, Czech., Poland, Hungary, Austria, Germany, Switzerland, Belgium, Netherlands, other. |
| Restore Setting | Restores factory settings. |
| Menu Duration | Allows selection of the display time of the on-screen menu. |
| Blue Screen | Enables or disables the blue screen. |
| Contrast Enhancement | On: Selects to increase the contrast levels of the image with changing scenes.Off: Selects to turn off the contrast enhancement function. |
1
Press the button to turn the LCD TV on.
2
Press the MENU button on the remote control to display the Main menu, and use the ◀▶ buttons to select the CHANNEL.
3
Use the ▲▼ buttons to highlight an individual channel Setup option, use the ◀▶ buttons to change the settings, and press the MENU exits the menu.

4
The CHANNEL menu includes the following options:
| Auto Scan | Press the OK button, the Auto Tuning automatically creates a list of receivable channels. |
| DTV Manual SCAN Allows adjustment for the fine tune level by hand if signal is too weak or picture is blurry in DTV mode.1 Press OK button to display the Manual Tuning menu:2 Press ◀▶▼ buttons to select channel number.3 Press OK button button to start scanning. | |
| ATV Manual SCAN | Allows adjustment for the fine tune level by hand if signal is too weak or picture is blurry in ATV mode. |
Programme Edit
Allows DELETE/RENAME/MOVE/SKIP of channels on the channel list.

DELETE (red button)
Press the red button on the remote control with the selected
channel, then press it again if you wish to delete it. To retrieve the
deleted channel you must return the TV.
- RENAME (green button)
Press the green button on the remote control with the selected
channel, change the characters by pressing the ▲▼ buttons and move the cursor by ◀▶ buttons. Press the green button again when finished.
NOTE: Only analogue TV channel names can be edited.
- SWAP (yellow button) Press the yellow button on the remote control with the selected channel, move the channel by pressing the ▲▼ buttons then press the yellow button again.
- SKIP (blue button) Press the blue button on the remote control with the highlighted channel; press again to un-skip.
CI Information Allows to display the CI information: Module Information, Smart Card Information, Language, Software Download
1
Press the button to turn the LCD TV on.
2
Press the MENU button on the remote control to display the Main menu, and use the ◀▶ buttons to select the LOCK.
3
Use the ▲▼ buttons to highlight an individual lock Setup option, use the ◀▶ buttons to change the settings, and press the MENU exits the menu.

4
The LOCK menu includes the following options:
| Lock Channel | Lock channel is designed to prevent accidentally retuning the TV and losing channels. When the Lock channel is “ON”, a valid password is required if the TV is to be retuned. |
| Change Password | Allows to set the password.Use the function, must enter a four-digit password. The factory password is 0000 |
Block Program Selects to setup the TV Programme Lock options:
① Press OK button to display the Block Programme menu:
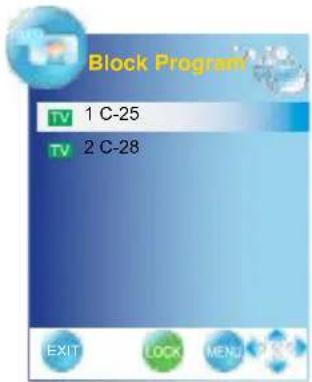
② Press ▲▼ buttons to move to the channel you want to block.
③ Press Green button button to block the programme, a padlock icon will appear. Press the green button again to unblock.
Parental Guidance
Select the parental level for your children, only programmes with this feature will be blocked: 4 to 18 year olds, off
TROUBLESHOOTING

Before consulting service personnel, check the following chart for a possible cause of problem and for a possible solution.
TV will not turn on
Make sure the power cord is plugged in, then press the button on the remote.
② The batteries in the remote control may be exhausted.
③ Replace the batteries.
No picture, no sound
① Check the interface cable between TV and antenna/cable TV.
2 Press the ⏻ button on the remote.
3 Press the INPUT button on the remote repeatedly to select the connected video sources.
Poor picture, sound OK
① Check the interface cable between TV and antenna/cable TV.
② Try another channel, the station may have broadcast difficulties.
3 Adjust the Brightness/Contrast options in the VIDEO Menu.
Picture OK, poor sound
① Sound may be muted. Press the ☑ button on the remote.
② Press the VOL+ button to increase the volume.
Audio noise
1 Move any infrared equipment away from the TV.
SPECIFICATIONS
| MODEL | Kobe | Osaka | |
| LCD Panel Panel | Size 18.5" TFT LCD | 21.5" TFT LCD | |
| Brightness 250 | 250 | ||
| Contrast Ratio 1000:1 | 1000:1 | ||
| Max. Resolution 1366x768 | 1920x1080 | ||
| Input Connector | |||
| SCART 1 | 1 | ||
| VGA 1 | 1 | ||
| HDMI 1 | 1 | ||
| COAXIAL OUT 1 | 1 | ||
| HEADPHONE 1 | 1 | ||
| VHF/UHF IN 1 | 1 | ||
| Power Source 12V DC, 4A | 12V DC, 4A | ||
| Power Consumption Max. 42 W, standby < 1 W | Max. 45 W, standby < 1 W | ||
| Dimension(WxDxH) 462*161*350 mm | 529*161*389 mm | ||
| WEIGHT (Net) | 2.98 kg | 3.78 kg | |
| MODEL | Tokyo | |
| LCD Panel Panel | Size 23.6" TFT LCD | |
| Brightness 250 | ||
| Contrast Ratio 1000:1 | ||
| Max. Resolution 1920x1080 | ||
| Input Connector | ||
| SCART 1 | ||
| VGA 1 | ||
| HDMI 1 | ||
| COAXIAL OUT 1 | ||
| HEADPHONE 1 | ||
| VHF/UHF IN 1 | ||
| Power Source 12V DC, 5A | ||
| Power Consumption Max. 52 W, standby < 1 W | ||
| Dimension(WxDxH) 573*171*410 mm | ||
| WEIGHT (Net) | 5 kg | |
Features and Specifications are subject to change without notice.
Herstellergarantie
service@schmid-electronics.de
service@schmid-electronics.de




- HDMI TM
- WARNINGS AND PRECAUTIONS
- Important Safety Instructions
- LISTENING WITH EARPHONES
- Antenna Safety Instructions
- INTRODUCING THE LCD TV
- INSTALLING THE LCD TV
- USING THE FEATURES
- TROUBLESHOOTING
- SPECIFICATIONS
- Various Audio/Video terminals for external equipment connection
- High Definition Multimedia Interface (HDMI)
- HDTV Component Video Inputs
- 3D Digital Noise Reduction
- Film-Mode Detection
- 1
- - TO INSERT A CI CARD
- - TO REMOVE A CI CARD
- 2
- INPUT
- Connecting a TV Cable or an Antenna
- Antenna Connection
- Cable TV (CATV) Connection
- Connecting an AV Equipment with HDMI Connector
- Using the Programme Guide
- 3
- 4
- Programme Edit
- TV will not turn on
- No picture, no sound
- Poor picture, sound OK
- Picture OK, poor sound
- Audio noise
- Herstellergarantie
Brand : SEG
Model : Kobe
Category : Television