
BTC500 - Headphones ACME - Free user manual and instructions
Find the device manual for free BTC500 ACME in PDF.


| Product Type | Over-ear headphones |
| Brand | Acme |
| Model | BTC500 |
| Color Options | Black, White |
| Dimensions | 7.5 x 6.5 x 3.5 inches (190 x 165 x 89 mm) |
| Weight | 8.8 oz (250 g) |
| Power Source | Rechargeable lithium-ion battery |
| Battery Life | Up to 30 hours |
| Charging Time | 2 hours |
| Charging Port | USB-C |
| Wireless Connectivity | Bluetooth 5.0 |
| Wireless Range | Up to 33 ft (10 m) |
| Driver Size | 40 mm |
| Frequency Response | 20 Hz – 20 kHz |
| Impedance | 32 Ω |
| Sensitivity | 100 dB |
| Microphone | Built-in, noise-cancelling |
| Controls | On-ear buttons for volume, track, and calls |
| Compatibility | iOS, Android, Windows, Mac |
| Included Accessories | USB-C charging cable, audio cable, carrying pouch |
| Foldable | Yes |
| Ear Cushions | Memory foam with leatherette |
| Headband Padding | Soft silicone |
| Warranty | 1 year limited |
Frequently Asked Questions - BTC500 ACME
User questions about BTC500 ACME
0 question about this device. Answer the ones you know or ask your own.
Ask a new question about this device
Download the instructions for your Headphones in PDF format for free! Find your manual BTC500 - ACME and take your electronic device back in hand. On this page are published all the documents necessary for the use of your device. BTC500 by ACME.
USER MANUAL BTC500 ACME
natural_image
Line drawings of two different electronic devices, one with a back panel and display screen, the other with a grid-patterned cover and ventilation slots (no text or symbols)solar bluetooth hands-free car kit
GB
User's Manual
Congratulations on your purchase of this ACME solar Bluetooth hands-free car kit, BTC500. Please read this user's manual carefully before use.
About the Car Kit
BTC500 is a solar-powered Bluetooth hands-free car kit. It has the following features:
• Answer a call, end a call and reject a call
• Redial last number
• Voice dial (This function needs to be supported by your mobile phone)
• Volume control
• Call transfer between your mobile phone and the car kit
- Microphone mute
• LCD showing caller ID
- Caller ID memory
• Built-in phone book
• Charging by solar power
• Full duplex DSP for echo cancellation and noise reduction
- Call waiting
Overview
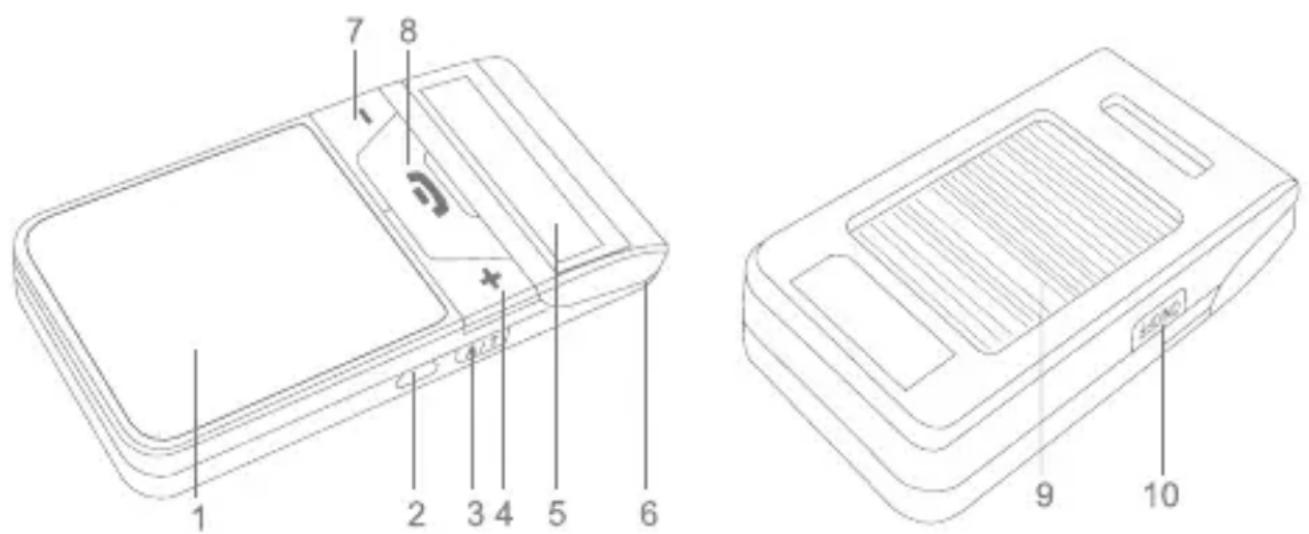
Front of Main Body
Back of Main Body
GB
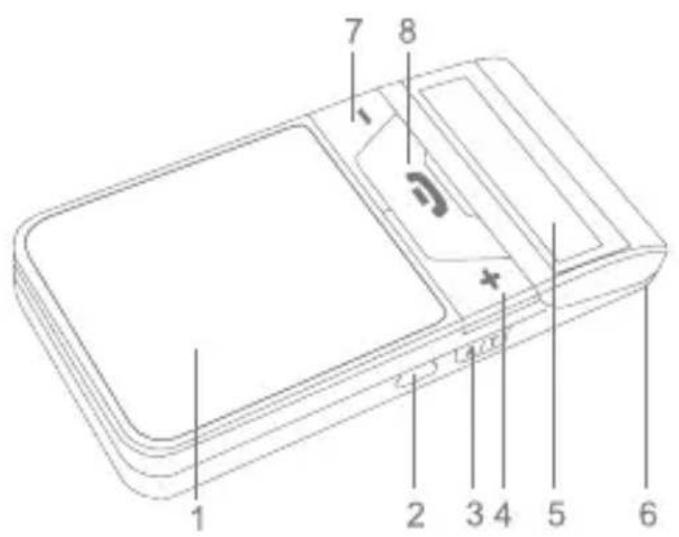
| 1 Loudspeaker |
| 2 USB port - Charging port |
| 3 A/T button - Phone book transfer |
| 4 + button - Increase the volume, see last phone number |
| 5 LCD screen - Display current status |
| 6 Microphone |
| 7 - button - Reduce the volume, see next phone number |
8  button - Multi-function button (MFB) button - Multi-function button (MFB) |
| 9 Solar panel |
| 10 ON/OFF button - Power on/off, enter pairing mode |
Charging the Car Kit
The car kit comes with a built-in rechargeable Li-polymer battery, prior to using it, it is recommended to charge the battery fully for the first time.
When the LCD screen displays a low power icon and a "DU" tone can be heard every 15 seconds, you have to recharge the battery of the car kit.
Using the USB Car Charger
Please connect the car kit to car cigarette lighter socket using USB car charger. It will take about 2 hours to charge the battery fully.
Using Solar Power
Please stick the car kit onto the car windshield, when the car is in sunlight, the car kit will be able to use the sunlight to charge its battery. It will take about 28 hours to charge the battery fully.
While charging is in progress, the battery icon on the LCD will blink. It will stop blinking after charging has completed.
Note: If you want to charge the battery of the car kit by using solar power, you must first turn on the car kit.
GB
Basic Operation
Power on/off
| Function Operation LCD indicator | ||
| Power on Press and hold ON/OFF button for about 2 seconds | Power On | |
| Power off Press and hold ON/OFF button for 3~5 seconds | Power Off | |
| Entering pairing mode | When power is off, press and hold ON/OFF button for 6~7 seconds | Pairing... |
| Reset to power off | Press ON/OFF button and volume + button simultaneously to reset the car kit | None |
Note: The car kit will turn off automatically if it is in standby mode and can't connect to any devices after 10 minutes.
Pairing with a Bluetooth Mobile Phone
Prior to using the car kit for the first time, you have to pair it with a Bluetooth-enabled mobile phone. The pairing procedures are different for all models of mobile phones. Please refer to the user manual of your mobile phone for further information. The general pairing procedures are as follows:
- Keep the car kit and your Bluetooth mobile phone within 1 metre when pairing;
- Make sure the car kit is turned off, otherwise turn it off;
- Press and hold the ON/OFF button for about 6\~7 seconds until the LCD screen displays "Pairing..." Now the car kit entered pairing mode;
- Activate your mobile phone's Bluetooth function and search for Bluetooth devices. After the search is completed, select "BTC500" from the Bluetooth device list;
- As directed, enter either password or PIN No: "0000", and press "Yes" or "confirm";
- After successful pairing, select "BTC500" from the Bluetooth device list and press "connect". After successful connecting, the LCD screen will display the name of your mobile phone.
Notes:
- Pairing mode will last 3 minutes. The BTC500 will switch to standby mode automatically if it can't pair with any devices after 3 minutes. Standby mode will remain activated until the BTC500 runs out of power. If you want to continue to pair BTC500 with a Bluetooth device, please turn off the BTC500 first and pair again according to steps 1\~6 mentioned above.
- The BTC500 can remember 8 paired devices. When the number of paired devices exceeds 8, the first one will be replaced.
- When BTC500 is turned on but doesn't connect to any devices, you can press the MFB once to connect the BTC500 to the last connected device.
- Every time the BTC500 is turned on, it will connect to the last connected device automatically. If you want to pair it with other devices, please turn off the Bluetooth function of the last connected devices first and then try to pair the BTC500 with a new device according to steps 1\~6 mentioned above.
Built-in Phone Book Function
The car kit has a built-in phone book. You can transfer the phone book from your mobile phone to the car kit, which will be more convenient for you to make a call with the car kit.
- Transferring the phone book from a mobile phone via AT command: Please make sure the BTC500 and the mobile phone are connected to each other and press and hold A/T button for about 3 seconds to start transfer. The LCD screen will display "SYNC Phonebook" and then will display the searching phone number during the transfer. If there are no phone numbers in searching position, the LCD screen will display "Downloading". After the transfer is completed, the LCD screen will display "SYNC DONE". If the transfer has failed, the LCD screen will display "Sync Fail".
- Transferring phone numbers via OPP (Object Push Profile): When BTC500 and your mobile phone are paired or connected, you can transfer phone numbers from your mobile phone to the BTC500. Please refer to the user manual of your mobile phone for further information.
- Displaying phone book: Briefly press A/T button once to display names and telephone numbers. When the name is Chinese, just the phone number will be displayed. Press volume + button or volume – button to see the previous/next phone number.
- Erasing the phone book: Briefly press A/T button once to enter the phone book and the LCD screen will now display a phone number, and then press the 📞 button for about 5 seconds, the LCD screen will display "Erase all?". If you want to erase all phone numbers, briefly press the 📞 button once and the LCD screen will display "Erase Complete". The phone book has been
GB
deleted.
- Erasing a single phone number: Briefly press the A/T button to enter the phone book. The LCD screen will display the first phone number now. By pressing volume + button or volume - button, you can search for the phone number you want to erase and by pressing the volume + and volume - button simultaneously, the phone number will be deleted. The LCD screen now displays "Erase Complete".
Notes:
- When the phone number being transferred already has been sent to BTC500, the LCD screen will display "Same Number" and prompt "SYNC DONE" while exiting the transfer. When you use the BTC500 to extract all phone numbers from a mobile phone, the LCD screen will display "Same Number" when encountering an already copied number and move on to the next one.
- The car kit's phone book can store 400 phone numbers at most. When transferring the phone book from a mobile phone via AT command, the BTC500 can only search 400 phone numbers stored in the mobile phone and 200 phone numbers stored in the SIM card.
- When transferring the phonebook from the mobile phone via AT command, an HFP connection will be used.
Call Records
BTC500 can store the last 20 call records, including received calls and missed calls.
-
Checking call records: When the BTC500 is in standby mode and connected to a device, briefly press volume + button or volume - button to check the call records. The LCD screen will display corresponding phone number and contact name, simply press 📄 button to dial the phone number.
-
Erasing call records: When the LCD screen displays a phone number, press volume + button and volume – button simultaneously to erase the current phone number. After deletion, the LCD screen will display "Erase Complete".
Making a Call with the Car Kit
You can make a call with the BTC500 when it connects to a mobile phone, and you can make a call in different ways.
-
Make a call from your mobile phone: Find the number you want to dial from the phone book of mobile phone and dial it.
-
Make a call from the phone book of the BTC500: When BTC500 is in standby mode, briefly press A/T button once to open the phone book of the BTC500, LCD screen will display the phone book of the BTC500, and then press the volume + button or volume – button to see previous or next
GB
phone number to find the number you want to dial, finally briefly press the button.
- Make a call from the call records of the BTC500: When the BTC500 is in standby mode, briefly press the volume + button or volume – button once to open the call records of the BTC500, LCD screen will display the last incoming call, and then press volume + button or volume – button to see previous or next phone number to find the number you want to dial, finally briefly press button.
- Redial last number from the BTC500: Double click the button to dial last number.
The operation is as follows:
| Function Operation | |
Voice dial Briefly press the button once  | |
Redial last number Double click the butto  | |
Cancel calling Briefly press the  button once button once | |
| Volume up Briefly press the volume + button | |
| Volume down Briefly press the volume – button | |
End a call Briefly press the  button once button once | |
Answer a call Briefly press the  button once button once | |
| Reject a call | When there is an incoming call, briefly press thebutton twice |
| Transfer call (BTC500 to mobile phone) | Press and hold the volume + button for 2 seconds |
| Transfer call (mobile phone to the BTC500) | Press and hold the volume + button for 2 seconds |
| Microphone mute Press and hold the volume – button for 2 seconds | |
| Cancel mute Press and hold the volume – button for 2 seconds | |
| Reconnection Briefly press the button once | |
GB
Notes:
- Not all mobile phones support all the functions listed above. Please refer to your mobile phone's user's manual for further information.
- When the volume is adjusted to max. or min. you will hear a long "DU" tone.
- When pressing the answer button on some mobile phones, the call will be transferred to the mobile phone. You have to switch the call to the hands-free car kit manually then. Please refer to your mobile phone's user's manual for further information.
Call waiting
The BTC500 supports call waiting function, so you will never have to worry about missing a call while talking on the phone. It requires your mobile phone to have call waiting function enabled.
| Function Operation | |
| Incoming ring When there is a new incoming call, BTC500 will ring | |
| End current call and then answer a new call | When there is a new incoming call, briefly press the MFB button once |
| Keep current call and then answer a new call | When there is a new incoming call, press and hold the MFB button for about 2 seconds |
| Call transfer | Press and hold the MFB button for about 2 seconds during a call |
| End current call and then switch to the call to be kept | Briefly press the MFB button once during a call |
Note: When there is a new incoming call, the LCD screen will display the caller ID. When put through and during call, the LCD screen will display" calling" all the time.
FAQs
What should I do when there is interference?
- Keep a little distance between the BTC500 and your mobile phone to minimize interferences due to mobile phone radiation;
- Stay within the Bluetooth operating range and avoid barriers between the devices to ensure good conversation quality.
What should I do when there is no sound?
- Make sure the BTC500 is charged and turned on;
- Ensure the BTC500 is connected to your mobile phone. If they are not connected, press MFB once to reconnect or check your mobile phone's Bluetooth device list.
What should I do when the BTC500 doesn't connect to my mobile phone?
- Make sure the BTC500 is charged and turned on;
- Ensure the BTC500 is paired with your mobile phone;
- Make sure your mobile phone's Bluetooth function is turned on, refer to its user's manual for further information;
- Keep the BTC500 and your mobile phone within 10 metres and make sure there are no barriers like walls or other electronic devices between them.
- Try pairing your cell phone with BTC500 again in case you still encounter difficulties.
What should I do when BTC500 can't be turned off?
Press ON/OFF button and volume + button simultaneously to turn off the BTC500.
GB
Specifications
| Bluetooth specification Bluetooth V2.1 | |
| Bluetooth profiles supported HSP and HFP | |
| Operating distance Up to 10 metres Class II | |
| Talk time Up to 10 hours | |
| Standby time Up to 160 hours | |
| Charging input voltage DC 5 V | |
| Charging time About 2 hours | |
| Solar panel 5.5V | ——50mA |
| Working temperature -10~60°C | |
| Storage temperature -20~70°C | |
| Dimensions 106×54×15mm | |
| Weight | Main body: 65gWindshield mount: 14g |
Care and maintenance
Your device is a product of superior design and craftsmanship and should be treated with care. The suggestions below will help you protect your warranty coverage.
- Keep all accessories and enhancements out of the reach of small children.
- Keep the device dry. Precipitation, humidity, and all types of liquids or moisture can contain minerals that will corrode electronic circuits. If your device does get wet, allow it to dry completely.
- Do not use or store the device in dusty, dirty areas. Its moving parts and electronic components can be damaged.
- Do not store the device in hot areas. High temperatures can shorten the life of electronic devices, damage batteries, and warp or melt certain plastics.
- Do not store the device in cold areas. When the device returns to its normal temperature, moisture can form inside the device and damage electronic circuit boards.
- Do not drop, knock, or shake the device. Rough handling can break internal circuit boards and fine mechanics.
- Do not use harsh chemicals, cleaning solvents, or strong detergents to clean the device.
- Do not paint the device. Paint can clog the moving parts and prevent proper operation.
All of the above suggestions apply equally to your device, battery, charger, or any enhancement. If any device is not working properly, take it to the nearest authorized service facility.
LT
Naudotojo vadovas
Galinė korpuso pusė
Warranty card www.acme.eu/warranty
| Product Product model | |
| Product purchase date Seller name, address | |
| Failures (date, description, position of the person who accepts the product, first name, last name and signature) | |
1. Warranty period
Warranty enters into force starting with the day when the buyer acquires the product from the seller. Warranty period is indicated on the package of the product.
2. Warranty conditions
The warranty is valid only by providing an original document of the product acquisition and this warranty sheet, which includes name of the product model, product purchase date, name and address of the seller.
If it is noticed during the warranty period that the product has faults and these faults where not caused by any of the reasons when the warranty is not applied as indicated in the paragraphs below, manufacturer undertakes to replace the product.
The warranty is not applied to regular testing, maintenance and repair or replacement of the parts which are worn out naturally.
The warranty is not applied if damage or failures occurred due to the following reasons:
- Inappropriate installation of the product, inappropriate usage and/or operating the product without following
the manual, technical requirements and safety standards as provided by the manufacturer, and additionally, inappropriate warehousing, falling from heights as well as hard strikes.
• Corrosion, mud, water and sand.
- Repair works, modifications or cleaning, which were performed by a service not authorised by the manufacturer.
- Usage of the spare parts, software o consumptive materials which do not apply to the product.
- Accidents or events or any other real which do not depend on the manufacturer, which includes lightning, water, fire, magnetic field and inappropriate ventilation.
- If the product does not meet standard and specifications of a particular country, in which it was not bought. Any attempt to adjust the product in order to meet technical and safety requirements such as those in the other countries withdraws all the rights to the warranty service.
If no failures are detected in the product, all the expenses in relation to the service are covered by the buyer.
Garantinis lapas
www.acme.eu/warranty
natural_image
Solid orange horizontal bar with no text or symbolsModel: BTC500
solar bluetooth hands-free car kit
- solar bluetooth hands-free car kit
- GB
- User's Manual
- About the Car Kit
- Overview
- Charging the Car Kit
- Using the USB Car Charger
- Using Solar Power
- Basic Operation
- Pairing with a Bluetooth Mobile Phone
- Notes:
- Built-in Phone Book Function
- Call Records
- Making a Call with the Car Kit
- Call waiting
- FAQs
- Care and maintenance
- LT
- Naudotojo vadovas
- Warranty card www.acme.eu/warranty
- Warranty period
- Warranty conditions
- Garantinis lapas
Brand : ACME
Model : BTC500
Category : Headphones