
Saeco Syncrony Digital DM 1075 - Coffee maker PHILIPS - Free user manual and instructions
Find the device manual for free Saeco Syncrony Digital DM 1075 PHILIPS in PDF.


| Product Type | Super-automatic espresso machine |
| Brand | Philips |
| Model | Saeco Syncrony Digital DM 1075 |
| Dimensions (W x D x H) | 25 x 35 x 42 cm |
| Weight | 10 kg |
| Power Consumption | 1500 W |
| Voltage | 220-240 V, 50-60 Hz |
| Water Tank Capacity | 1.8 L |
| Bean Hopper Capacity | 250 g |
| Pump Pressure | 15 bar |
| Milk Frother | Integrated steam wand |
| Grinder Type | Ceramic disc grinder |
| Adjustable Coffee Strength | Yes, 5 levels |
| Programmable Settings | Coffee volume, temperature, pre-ground coffee option |
| Removable Brewing Unit | Yes, for easy cleaning |
| Descaling Indicator | Automatic alert |
| Auto Shut-Off | After 30 minutes of inactivity |
| Child Lock | Yes, via button lock |
| Water Filtration | AquaClean filter compatible |
| Spare Parts Availability | Brewing unit, water tank, drip tray, coffee spout |
Frequently Asked Questions - Saeco Syncrony Digital DM 1075 PHILIPS
User questions about Saeco Syncrony Digital DM 1075 PHILIPS
0 question about this device. Answer the ones you know or ask your own.
Ask a new question about this device
Download the instructions for your Coffee maker in PDF format for free! Find your manual Saeco Syncrony Digital DM 1075 - PHILIPS and take your electronic device back in hand. On this page are published all the documents necessary for the use of your device. Saeco Syncrony Digital DM 1075 by PHILIPS.
USER MANUAL Saeco Syncrony Digital DM 1075 PHILIPS









DESCRIPTION OF SYMBOLS TE

The warning triangle shows all important safety indications to ensure the user's safety. The non-observance of said instructions may cause serious injuries!

The first cover page of the manual shows figures relevant to the text. Thus, keep it open while reading the instructions.
How to use the instructions
These instructions cannot anticipate every possible use of the machine.
For further information or questions concerning specific situations or problems, please contact the local dealer or manufacturer directly.
B
Reference to figures, parts of the machine and control elements are given by numbers or letters, as figure B exemplifies.
Save these instructions carefully and make sure to hand them to other users.
SAVE THESE INSTRUCTIONS

The lightning flash with arrowhead symbol, within an equilateral triangle, is intended to alert the user to the presence of unisulated 'dangerous voltage' within the product's enclosure that may be of sufficient magnitude to constitute a risk of fire or electric shock to persons.

The exclamation point within an equilateral triangle is intended to alert the user to the presence of important operating and maintenance (servicing) instructions in the literature accompanying the appliance.
Table of contents
Page
Page
29 Technical data
31 Safety indications
33 Controls and machine elements
33 Control panel description
34 Unpacking/ Installation
34 Power supply connection
34 Starting and use
35 Drainage
35 Programming the machine
39 Dosage of ground coffee
39 Recommendations
40 Brewing
43 Incorporated safety devices
43 Cleaning/ Maintenance
46 Disposal
47 Troubleshooting
10
| Voltage rating See rating plate on the back of the machine | |
| Nominal power See rating plate on the back of the machine | |
| Dimensions (length x width x height) approx. 385x330x395 mm | |
| Machine case plastic material ABS/ metal | |
| Weight approx. 13 kg | |
| Cable length approx. 1.2 m | |
| System | free flow thermal cut-out, alternating piston pump |
| Temperature control electronic | |
| Coffee grinder adjustment grinding adjustment device | |
| Coffee grounds ejection automatic | |
| Ground coffee dosage coffee releasing device | |
| Cup programming 0250 ml approx. | |
| Water tank removable, transparent tank | |
| Water regulation electronic, continuous | |
| Capacity - water tank approx. 2.4 litres | |
| - bean coffee container | 300 g bean coffee |
| Steam/ hot water dispensing tube | adjustable, supplied with burn protection |
| Steam/ hot waterdispensing | adjustable, continuous |
| Heating time | approx. 2 min. |
| Brewing time - espresso coffee | approx. 20s/ cup |
| - coffee | approx. 30s/ cup |
| - hot water | approx. 60s/ cup |
| - milk | approx. 60-90s cream/ cup |
| Overheating protection | incorporated |
| Insulation | protection range I |
| approval | See rating plate on the back of the machine |
| In compliance with EN regulation | EN 603352·15 · EN 55014 |
| Warranty | in compliance with the warranty |
| certificate enclosed herein | |
Accessoires (included in the machine price)
Measuring spoon
Central unit key
Cleaning brush
Water hardness detecting strips
The manufacturer reserves the right to make improvements to the appliance due to technological advancement.

SAFETY INDICATIONS
!
Electrical parts should never be in contact with water: danger of short-circuit! Steam and hot water may cause burns. Never direct steam or water jets towards the body; special attention must be paid when touching the steam/hot water spout and the heating plate: danger of burns!
This machine must be used exclusively for the purposes it has been manufactured.
Do not make technical changes for any reason whatsoever; any improper use is forbidden, due to the risks which might occur!
Warnings
The machine shall only be used by adults and properly instructed persons.
Voltage
Never touch parts under current! They might cause electric shocks, serious injuries and death. The machine must be connected to a socket with suitable voltage. Voltage must correspond to the voltage shown on the appliance rating plate.
A
Power cord
Never use the machine with a defective power cord. Replace defective power cords and plugs, contacting authorised personnel. Do not extend the power cord around comers, sharp edges or over hot parts and protect it from oil. Do not shift or move the machine by pulling its power cord. Do not unplug the machine by pulling the power cord and never touch it with wet hands. Make sure the power cord does not hang from tables or shelves.
B
Keep children away
Do not allow children to play with the machine. Children are not aware of the potential danger caused by electric appliances.
Positioning
Place the machine on a plane surface, where nobody can turn it upside down or be hurt. Hot water or overheated steam might escape from the machine: danger of burns! Never use the coffee machine outdoors or inside rooms with low temperature conditions. Do not place the machine on hot surfaces or in the proximity of open flames to avoid possible damages of the case.
C
Danger of burns
Do not direct the overheated steam or hot water jet towards you or other people. Do not touch hot surfaces, such as the steam/ hot water spout.
D
Necessary space
For a proper operation of the machine it is advisable to keep to the following indications: - choose a levelled surface
- choose a properly lit and hygienic room provided with accessible sockets
- leave a minimum distance of 100 mm between the machine and the wall
E
Cleaning
Before cleaning the machine, make sure to switch off all keys and unplug the machine. Wa ah until the machine cools down. Never plunge the machine into water! Do not tamper with the Inner parts of the machine and never open the machine.
Repair/ maintenance
In case of defect or suspected damage following a fall, unplug the machine immediately. Never use a defective appliance. Only skilled personnel are authorised to carry out repairs. The manufacturer declines any liability whatsoever, should repairs fall to be carried out by authorised personnel.
In case of fires, use carbon dioxide (CO2) extinguishers. Never use water or powder extinguishers.
CONTROLS AND MACHINE PARTS U
IMPORTANT SAFEGUARDS
a) A short power supply cord (or detachable power supply cord) is to be provided to reduce risk resulting from becoming entangled in or tripping over a longer cord.
b) Longer detachable power-supply cords or extension cords are available and may be used if care is exercised in their use.
ci If a long detachable power-supply cord or extension cords is used.
1) The marked electrical rating of the detachable power-supply cord or extension cord should be at least as great as the electrical rating of the appliance.
2) If the appliance is of the grounded type, the extension cord should be a grounding-type 3-wire cord, and 3) The longer cord should be arranged so that it will not drape over the counter top or table top where it can be pulled on by children or tripped over.
1 Coffee grounds container
2 Drip tray
3 Cup holder surface
4 Main switch
5. Power cord
6 Coffee dispensing unit
7 Steam/ hot water dispensing tube with heat protector
8 Control panel
9 Steam/ hol water selection knob
10 Heating plate for cups
11 Water tank
12 Water tank cover
13 Water level
14 Pre-ground coffee container with cover
15 Coffee bean container cover
16 Coffee bean container
17 Grind adjustment lever
18 Coffee dosage adjustment lever
19 Service door
20 Filling funnel
21 Handle for assembling and disassembling of central unit
22 Central unit
23 Coffee rest drawer
24 Swivel
Control panel description

■14
Unpacking/Installation
Standard packing is strong enough to protect the machine during mail shipping. Keep this package to return the machine to the manufacturer should it be necessary.
Before installing the machine, keep to the following safety indications:

Position the machine in a safe place.

Do not allow children to play with the machine.

Make sure the machine is not placed nearby hot surfaces or open flames.
Always use the machine with the swivel (24). Thus, when installing the machine, make sure to rest it directly on this support by inserting it into the slot on the lower side of the machine.
Now the machine is ready to be connected.
Power supply connection

Warning: electric current may cause death!
The coffee machine must be connected to an adequate socket. Voltage must suit to the voltage specified on the appliance rating plate.

Never use defective power cords. Defective power cords and plugs must be replaced by authorised personnel.

Should an extension cord be used, check its perfect condition. The extension cord must have a minimum section of 1.5 mm² or 16 AW G and must be supplied with a three-pole plug/ socket.
Starting and use

Danger!
Electric voltage may cause death! Parts under current shall never be in contact with water: danger of short-circuit! Overheated steam and hot water may cause burns. Do not direct steam or water jet towards the body; furthermore, great attention must be given when touching either the dispensing tube or the heating plate: danger of burns!
For your own safety as well as for other people's safety, keep to the safety precautions described (see page 31).

Never use the machine without water or coffee beans.
Remove measuring spoon, brush and the central unit key from the coffee grounds container (1) and keep them within reach.
Unwind the power cord (5) from the rear side of the machine.
25
The bean coffee container (16) is attached with two screws. Remove the cover (15) and fill it with coffee beans (approx. 300 g), then replace the cover.
Adjust grinding by means of the grind adjust-
DRAINAGE SI
ment lever (17), positioning it on point 5 of the scale.

Never fill the coffee bean container with other products. They might damage the machine!

Before filling the container with coffee beans, make sure the pre-ground coffee container is closed to prevent coffee beans from falling into it. They might damage the machine!.
26
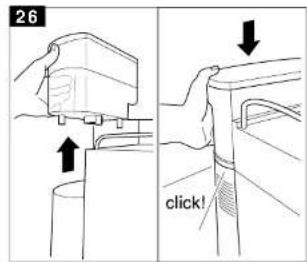
Remove the water tank (11) from the machine, remove its cover (12) and fill it with cold water (approx. 2.4 l). A valve on the tank bottom prevents water from escaping.
Before installing the water tank in the machine, make sure the coffee bean container cover is properly fitted.
Install the water tank, slightly pressing over it to fit the valve which will open automatically. Replace the cover on the tank.

Do not fill the tank with an excessive quantity of water.

Always fill the tank with fresh water: hot water as well as other fluids might damage the tank.

Do not switch on the machine if the water tank is empty. Before using the machine make sure there is enough water in the tank.
Connect the plug to the socket and press the main switch.
The display shows
"WARMING UP "
Should
"ENERGY " "SAVING "
(1/2) be displayed, press the Energy saving switch to disactivate the energy saving mode.
Drainage
Direct the steam/ hot water dispensing tube (7) over the drip tray (2). Place a cup or another suitable container under the dispensing tube, then turn the steam/ hot water knob (9) counterclockwise. The pump starts automatically. Wait until a regular water jet is obtained, then close the knob. The machine is now drained and ready to work. The display shows
"ECONOMIE " "ENERGIE "
Important: It is advisable to drain the machine before the first start, after a prolonged period the machine has not been used or whenever the water tank has been completely emptied. Furthermore, should the pump be defective, the display shows
"VENTILATE "
Programming the coffee machine
27
To enter the programming mode, press the key ENT (pre-ground coffee) when the machine is on and keep it pressed until the first two lines of
16
the programming mode are displayed:
"LANGUAGE" "RINSING"
The display shows:
"LANGUAGE" "ENGLISH"
At the end of the line appears a blinking asterisk, which can be moved up and down with the keys (all and regular coffee).
The display shows the following items in this sequence:
LANGUAGE PREGRINDING RINSING TOTAL COFFEES WATER HARDN. DESCALING CUP HEATER SIGNAL. DESCAL. TEMPERATURE TIMER PREBREWING RINSING CYCLE
Then, press ESC. The machine is now in the normal mode again.
The keys allow you to change the set options: Deutsch, italiano, français, english, español, portugues.
Rinsing cycle function
If the rinsing cycle function is activated, the machine that is started after a period of inactivity starts a water rinsing cycle to the coffee dispensing units automatically.
Move the asterisk to the menu item RIN SING CYCLE using the keys and press ENT to active it. The display shows:
"RINSING " "ON "
You can modify the chosen item with the key 7x7y off.
Selecting menu items
Select the different menu items by means of the keys △. The key ent allows you to activate the selected item. It is possible to modify the selected figures in a menu item using the keys △. The key ent memorizes the selected options, for instance ON for the item cup heater.
Should you accidentally change some data, press esc to leave the menu item without saving the new options which were selected accidentally.
Selecting the language
Move the asterisk at the end of the line to the menu item LANGUAGE using the keys △▽ Press ent to activate this item.
Water hardness adjustment
In order to adjust the water hardness, it is necessary to test the water using the strip supplied with the machine. Dip the strip into the water for a second, shake off excess water gently, wait approx. 1 minute and read the results.
Move the asterisk at the end of the line to the menu item WATER HARDN. using the keys △. Press ent to activate this item. The display shows:
"WATER HARDN " "HARDNESS 2 "
SELECTING THE LANGUAGE SE

The keys sallow you to change the set options: hardness 1 (very soft), hardness 2 (soft), hardness 3 (medium), hardness 4 (hard).
Activating the cup heater
Move the asterisk at the end of the line to the menu item CUP HEATER. Press ent to activate this function.
The display shows:
"CUP HEATER " "ON "
The keys allow you to change the set options: on, off.
Selecting temperature
Move the asterisk at the end of the line to the menu item TEMPERATURE using the keys.^^Press ent to activate this item.
The display shows:
"TEMPERATURE" "MEDIUM"
The keys allow you to change the set options: minimum, low, medium, high, maximum.
Selecting the prebrewing function
As soon as the coffee has been moistened, the pump stops for a while. Then, the brewing cycle continues.
Move the asterisk at the end of the line to the menu item PRE BREWING using the keys ^^. Press ent to activate this function. The display shows:
"PREBREWING " "ON "
The keys allow you to change the set options: on, off, long (in this case the pump stops for a longer period).
Selecting the pregrinding function
By selecting the pre-grinding function, the machine grinds coffee every time the doser is empty. So, a ground coffee portion is always ready in the doser. This allows time saving in the semi-professional domain.
Move the asterisk at the end of the line to the menu item PRE GRINDING using the keys ^^. Press ent to activate this function. The display shows:
The keys allow you to change the set options: on, off.
Total coffees
Move the asterisk at the end of the line to the menu item TOTAL COFFEES using the keys ^^. Press ent to activate the option. The display shows:
"TOTAL COFFEE "
and the total number of coffees dispensed by the machine.
18
This figure cannot be changed.
To leave this menu, press ent or esc.
Descaling
Move the asterisk at the end of the line to the menu item DESCALING using the keys △. Press ENT to activate the item. The display shows:
"DESCALING "
On descaling see page 44.
In programming function, by pressing keys, move the asterisk till the end of the line on the menu Sign. Descal. and confirm the selection with ENT button.
The following message will be displayed:
"RESET DESCALING " "NO "
By means of the same keys, it is possible to modify the value; Yes, or no.
If the function "SIGN. DESCAL." is selected without the display message Descale, the following message will be displayed:
"QUANTITY WATER " "NOT REACHED "
To enter the programming mode, press the Key ENT.
Timer
The timer enables the automatic switching off of the machine after a preset period, which can be set from 15 minutes to 12 hours after last dispensing.
If after a few seconds coffee is brewed again, the timer is reset. If the value set is 0:00, the timer function is not activated and the machine does not switch off.
Move the asterisk at the end of the line to the menu item TIMER by means of the keys △▽ Press ent to activate this item. The display shows:
"STANDBY" "AFTER 0:00"
The keys allow you to set the time periods. Save by means of the ent key.
If the set time has already passed, the display shows:
"ENERGY" "SAVING"
and the machine switches off. If necessary, you can switch on the machine again by means of the energy saving switch.
Rinsing cycle
This appliance is equipped with a rinsing cycle program for the usual, daily and weekly rinsing. If regularly used, this program effectively eliminates the greasiness of coffee in inaccessible parts and avoids alterations in the taste of coffee.
Depending on the way the appliance is used, it is advisable to rinse it every month or after max. 250 cups of coffee. The rinsing cycle lasts about 5 minutes, and it is divided into 4 cycles, including the rinsing with cold water. Each cycle is followed by a short pause of about 40 seconds.

Never stop the rinsing cycle.
DOSAGE OF GROUND COFFEE RE
Important: before starting the rinsing cycle, always fill completely the water tank and put a capacious container (min. 1 litre) under the coffee dispensing unit, which is height-adjustable and can be removed for cleaning.
The rinsing cycle needs about 1 litre of water (including final rinsing). From time to time, empty the water tank.
By using the keys prove the asterisk to the menu item RINSING CYCLE. To enable this menu item use the ENT key.
The following message appears on the display:
"RINSING CYCLE "
This function starts the rinsing cycle with water of those parts concerned with the coffee dispensing. When the rinsing cycle ends, the following message appears on the display:
"SELECT PRODUCT "
"READY FOR USE "
Dosage of ground coffee
28
The coffe dosage adjustment lever (18) allows the selection of the coffee quantity, from 6 to 9 grams.
Place the adjustment lever (18) on the required position.
Recommendations
Test
If the machine has not been used for a prolonged period, it is advisable for hygienic
reasons to run a rinse cycle through the machine.
Place a cup under the dispensing tube (7) and operate the steam/ hot water (9) knob. Fill a cup with water.
Preheating cups
Cups may be preheated by placing them on the heating plate.
Temperature led
When connecting the machine, the display shows
"WARMING UP "
As soon as the operating temperature has been reached, the display shows
"SELECT PRODUCT "
"READY FOR USE "
Empty coffee bean container warning light
"COF. BEANS EMPTY "
"READY FOR USE "
When this led is on, the coffee grinder stops. Fill the container with coffee beans and restart the cycle.
Empty water tank warning light
"WATERTANK EMPTY "
An empty water tank causes the cycle to stop automatically. Fill the tank with water and restart the cycle.
20
Grounds container warning light
"DREGDRAWER FULL "
"READY FOR USE "
This message appears on the display as soon as there are 30 coffee grounds in the container. The machine though does not stop. Remove the grounds container and empty it.
Grind
If the coffee flows too quickly (coarse grind) or too slowly (fine grind) into the cup, adjust the coffee grinder:
Recommended grind level: position 5 Grind too coarse = adjust to a lower value (for instance from 5 to 3)
Grind too fine = adjust to a higher value (for instance from 5 to 7).

Adjust the grind level only when the coffee grinder is running.
Avoid extreme adjustment (for instance, on position 1) whenever possible. It is preferable to try another coffee blend, because not all coffee blends are suitable.
Coffee
Make sure coffee is fresh. An espresso roast is preferable.
In order to obtain a strong and aromatic espresso coffee, use special blends suitable for espresso coffee machines and special cups with thick sides.
Keep coffee in a cool place, in an hermetically sealed container.
Water quality
In addition to blend, grind and water temperature, the water quality is of the utmost importance for the brewing of a good coffee. Thus, the use of a decalcifier to remove limescale and eliminate any unpleasant taste and organic impurities from water, is strongly recommended. Furthermore a water decalcifier partially eliminates limescale from water, thus protecting the machine heating system from chemical buildup and prolonging its working life.
The water tank must be emptied daily and filled with fresh water.
Operation time
The machine may be kept on all day long. However, it is advisable to activate the energy saving mode after the last use. Press the Energy saving switch. If the timer has been programmed, the machine switches on automatically. See page 35.
Should the machine not be used for a prolonged period (e.g. during the night) it is advisable to switch the main switch (4) off.
Switching off the machine
Switch the machine off only after the coffee cycle has been concluded.
Brew ing
Cup level filling
This machine allows the precise dosage of the coffee quantity according to the cup dimension.
By means of the 3 selection keys 🎨 🎨 🎨 the desired coffee quantity can be chosen. The display shows the selected quantity.
BREWING BA
Cup level adjustment
To set the quantity of coffee to be dispensed, press the selection key corresponding to the right quantity and keep it pressed while the coffee is dispensed into the cup. Release the key only when the right level has been reached (max. 250 ml). As soon as the dosage programming mode gets activated, the display shows:
"1 SMALL COFFEE "
"PROGR. QUANTITY "
Warning! If activated, the pre-brewing function will be performed.
Double quantity of coffee i.e. 2 cups of coffee
If one of the three selection keys (no matter which one) is pressed twice before coffee brewing, the machine will brew a double quantity of coffee.
Coffee beans
29
This machine grinds a portion of fresh coffee for each cup; for two cups, it grinds two portions of coffee, one after the other thus ensuring optimum coffee quality.

Before any use, make sure the steam/ hot water knob is closed.
Adjust the desired grinding degree: the recommended average value is 5.

The grinding degree must be adjusted only when the coffee grinder is operating, otherwise it may be damaged.
Place one or two preheated cups on the grill (3) under the dispenser (6). Press the relevant selection key. The machine will automatically dispense the selected coffee.
The coffee flow may be stopped at any moment by pressing any selection button (except the standby switch), for instance when an excessive quantity of water has been selected. Should you interrupt the coffee flow after the first of two coffees has been brewed, the second is not dispensed.
Pre-ground coffee

Make sure to use pre-ground coffee only (medium ground). Never use whole beans or soluble coffee!

Right before making coffee, fill the container with freshly ground coffee. Remember that ground coffee ages soon, thus losing its quality.
30
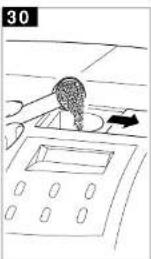
Use the measuring spoon supplied to fill the container (14) with ground coffee. Use a full measure only.
Then, press the pre-ground coffee selection button and the desired selection key (regular, espresso or tall coffee) to obtain a cup of coffee. It is not possible to obtain a second cup of coffee.
The coffee flow may be stopped at any moment by pressing any selection button (except the standby switch), for instance when an excessive quantity of water has been selected.
22
Hot water
The hot water dispensing is separate from the coffee circuit, in order to supply tasteless hot water for tea, soup etc.
31
Place a glass or cup under the steam/ hot water dispensing tube (7), then slowly open knob (9), turning it counterclockwise. Hot water will be automatically dispensed. As soon as dispensing is over, close knob again.
Steam
To heat milk or other drinks.

Clean the spout with a damp cloth soon after use; otherwise, it might be difficult to remove milk residues.

After a steam outflow, always drain the machine. If the machine is not drained or drained partially, the coffee brewing program automatically stops, due to excessive temperature.

If the machine is on the steam mode, the automatic coffee brewing is prevented.
"STEAM
"WARMING UP
"
"
"
"
"
Operating temperature has been reached.
Direct the steam/ hot water dispensing tube (7) over the cup holder grill (3) and slightly open knob (9), turning it counterclockwise.
Wait until the remaining water has flown out of the spout. Then move the spout outwards and immerse it into the fluid to heat.
32
Slowly open the steam/ hot water knob and heat the fluid using a circular movement from the bottom to the top.
When the fluid has reached the desired temperature, close the knob and immediately clean the spout with a damp cloth.
Warning: the spout is hot, it may cause burns!
If you are not going to use the steam/ hot water dispensing tube any longer, position it over the cup holder grill and disactivate the steam function by pressing the key
"OVERTEMPERATURE "
The machine stops working and does not brew coffee. Let it cool down or open the steam/ hot water knob again. Drain the machine (the pump starts automatically) until water flows regularly out of the spout (see section on Drainage, page 8) and the display shows
"HOT WATER "
"READY FOR USE
"
Close the steam/ hot water knob. The machine is ready to brew coffee again.
Cappuccino froth
Fill a cup 1/3 with cold fresh milk, then immerse the steam/hot water dispensing tube (7) just below the milk surface. Move the cup with a circular movement to form a thick froth. Then
immerse the dispensing tube deep into the milk to heat it.
tem will stop the coffee grinder after approx. 20 seconds.
USER MAINTENANCE INSTRUCTIONS
Incorporated safety devices
Automatic off
Should the service door be open, the machine automatically switches off and its operation is thus prevented. If the central unit is not mounted, it is possible to dispense water but not steam and coffee.
Electronic grinding time control
As soon as the coffee bean container is empty, the machine automatically stops after approx. 20 seconds. Fill the container with coffee beans. The coffee brewing cycle can be restarted.
Electronic pump delivery control
The machine switches off automatically as soon as the water tank is empty.
Automatic temperature adjustment
This adjustment controls the correct temperature for coffee, water, and steam. Coffee brewing is automatically interrupted should the water temperature be too high (safety thermostat and overheating safety device activated).
Antigravel device
Even selected coffees may contain some impurities. The coffee grinder is fitted with an antigravel device to avoid any damage. Should gravel end up into the coffee grinder, you will hear a strong and characteristic noise. Stop the machine immediately otherwise the protection sys-
Cleaning/ Maintenance
Cleaning
To ensure high coffee quality and a longer working life of the machine, always keep the machine clean.

Before cleaning the machine, turn off the main switch and unplug the machine.

Before cleaning the machine, wait until it cools down.

Do not immerse the machine into water or other fluids. (It may be damaged!)

Do not wash parts of the machine in the dishwasher!.

Always handdry all parts of the machine; do not dry them in the oven or microwave oven!
Water tank / Drip tray / Coffee grounds container / Coffee dispensing unit / coffee machine
33
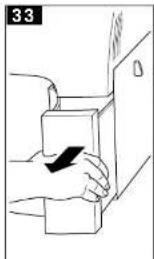
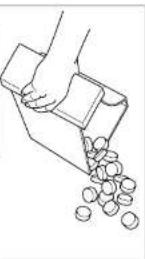
In order to keep the service area and the central unit (22) clean, it is recommended to empty the coffee grounds container (1) every day.
2422
CLEANING/ MAINTENANCEIN
The water tank (11), drip tray (2), cup holder grill (3), and coffee grounds container should be washed periodically, using a non-abrasive solvent and drying them carefully.
34
The coffee dispenser (6) may be removed for cleaning operations. Unloose the screws and rinse the dispensing tubes thoroughly with hot water.
From time to time, clean the machine casing with a damp cloth and dry it.
Clean the pre-ground coffee container (14) with the aid of the brush supplied whenever necessary.
Central unit
Clean the central unit (22) whenever the coffee bean container has been re-filled, or at least once or twice a week.
Switch off the machine by pressing the main switch (4) and open the service door (19). Remove the coffee grounds container (1).
35
Remove the central unit (22) by holding the handle and pressing the "PRESS" key.
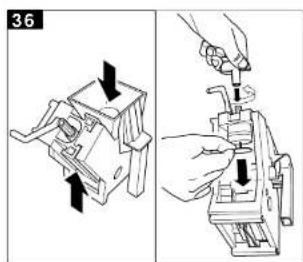
W ash the central unit with warm water without any solvent. Make sure there are no coffee residues on the two steel filters.
36
Remove the superior filter by means of the supplied screw and clean it. Unscrew the screw, turning it counterclockwise. Then, dry all the parts of the central unit and tighten the filter with the screw.
37
Remove the coffee rest drawer (23) and clean it, using a non-abrasive solvent.
Clean the service space thoroughly and fit the coffee rest drawer again.
38
By holding the central unit by its handle, slide it back into its original position, making sure it is correctly engaged. Then close the service door. Insert the coffee grounds container again.

When fitting the central unit, do not press "PRESS" (this may cause damage to the machine)!
Warning: if the central unit is not correctly fitted, the display shows
"BREW UNIT MISS "
It is not possible to brew coffee. The machine does not work.
Coffee grinder

Never fill the coffee grinder with water: it may damage the machine!
Descaling
Descaling is necessary to remove limescale from all surfaces and holes, thus ensuring a perfect operation of valves, heating controls and other important parts.
Note: due to the complexity of the coffee machine hydraulic circuit, the following descaling cycles (automatic and standard) do not allow the descaling of all tubes.
In fact, easily accessible components such as the central unit (22) and its plastic connection are excluded.
The machine must be descaled every 3-4 months, according to the water hardness degree. A more frequent descaling is recommended wherever the water hardness degree is very high.
This machine is supplied with a particular warning light
Descaling must be carried out at the latest when this message is displayed. In spite of the message, the machine does not stop working. To switch off the display, press the steam key for approx. 5 seconds until the message disappears.
Furthermore, said display warning may be adjusted according to the water hardness degree. The machine has been adjusted at the factory to 25°_H value, which causes the display to switch on showing the message DESCALING after approx 150 l.
The water hardness value may be changed, if necessary, following the instructions shown on page 27.
The following adjustments are possible:
Hardness 4: high water hardness, over 29° fH (14° dH), approx. 80 l water passage.
Hardness 3: medium water hardness, approx. 20°-29° fH (7°-14° dH), approx. 150 l water passage
Hardness 2: soft water, approx. 12°-20° fH (4°-7° dH), approx. 300 l water passage
Hardness 1: less than 10° fH (3° dH), approx. 500 l water passage
In case of hard water, a filter should be used both to improve the coffee quality and to protect the machine, thus reducing the descaling frequency.
Note: for this purpose, use a descaling product suitable for coffee machines. Never use vinegar to clean the machine; it might damage it.
There are two ways to carry out the descaling of the machine:
Automatic descaling
Switch the machine onto the programming mode (see page 33).
Move the asterisk at the end of the line to the menu item DESCALING. To activate this menu item press ent.
The display shows:
"DESCALING "
Pour a descaling solution into the water tank (according to the instructions on the package). Place a large container under the steam/ hot water dispensing tube and open the steam/ hot water knob slowly. The automatic descaling starts. Small quantities of descaling solution are pumped into the circuit. Then the pump stops to let the solution take effect.
The display shows:
"MACHINE IS "
"DESCALING "
This operation takes about 45 minutes. As soon as descaling is completed, the display shows:
"DESCALING "
"FINISHED "
and the pump stops.
Close the hot water knob and press ent. A display message reminds you to rinse away residue from the machine
"RINSE MACHINE "
Remove the water tank, rinse it and fill it with water. Clean the machine using the hot water knob and let the whole tank content flow out. The display shows:
"RINSING FINISHED "
26
DISPOSAL
Close the hot water knob again and press ent. The machine is in the main menu of the programming mode. Move the asterisk at the end of the line to <10 Exit* > using the key * Press ent. The machine is now in the normal mode. After heating, the machine is ready to work.
Note
Descaling can be interrupted any time by pressing esc. Before doing this, close the hot water knob.
Standard descaling
Switch off the machine. Pour a descaling product into the water tank (according to the instructions on the package). Place a large container under the steam/ hot water dispensing tube (7) and open the steam/ hot water knob (9) slowly, turning it counterclockwise. Turn on the machine by pressing the main switch and let the descaling product flow out of the dispensing tube for approx. 1 min.
Close the knob again. Turn off the machine with the main switch and let the solution take effect for approx. 5 minutes. Repeat this procedure two or three times, to allow all the descaling product in the water tank to flow out of the dispensing tube.
As soon as decalcification has been carried out, rinse the water tank (11) thoroughly and fill it with water.
Switch on the machine again and let water (approx. 2 l) flow out of the steam/ hot water dispensing tube in order to rinse away residue. The coffee machine is now ready for operation.
Important
A periodic descaling avoids expensive repairs. The machine warranty does not cover damages occurring as a result of the non-observance of descaling procedures, improper use and any other instructions contained herein. Maintain the manufacturer's adjustment if the water hardness degree is not known.
Storage of the machine

Switch off and unplug the machine if it will not be used for long periods of time.

Keep the machine in a dry place, far from the reach of children.
Should the machine not be used for a long period, keep it from dust and dirty.
Maintenance
Periodically check the machine and clean it in accordance to the instructions.
Disposal
Machines which are no longer operational should immediately be made non serviceable, by cutting the power cord. Machines should be delivered to a public disposal centre.
Troubleshooting

In case of failure, fault or suspected damage following a fall, unplug the machine immediately.
To fix problems, follow the instructions in the table below. Otherwise contact authorised personnel.
TROUBLESHOOTING
| Trouble | Possible cause/ causes | Resolution |
| No message on the display | The machine is not getting power | Turn the main switch on, check plug and fuse |
| The service door is open | Close the service door | |
| The automatic coffee brewing does not start | BREW UNIT MISS | Insert and lock the central unit |
| BREW UNIT BLOCK | Clean the central unit (see page 44) | |
| The steam key is being pressed | Disactivate the steam function and drain the machine (see page 42) | |
| WATETANKEMPTY COF.BEAN.SEMPTY READY FOR.USE | Fill with water or coffee beans and restart the cycle | |
| The automatic coffee brewing does not start | OVERTEMPERATURE | Drain thoroughly the machine again |
| DREGDRAW.MISS | Fit the coffee grounds container properly | |
| GRINDER BLOCKED | Clean the grinder | |
| Water is dispensed instead of coffee | The pre-ground coffee selection key has been pressed while there is no coffee in the container | Fill with pre-ground coffee |
| Steam and/ or hot water are not dispensed | The steam/ hot water spout hole is clogged | Clear it with the aid of a thin needle |
| Coffee flows too quickly | Grinding too coarse | Adjust the grinder to a finer grinding, ex. from 6 to 3 |
| Coffee is flows too slowly | Grinding too fine | Adjust the grinder to a coarser grinding, ex. from 6 to 7 |
| The central unit filter is jammed | Clean the filter | |
| Coffee is not hot enough | The cup has not been preheated | Place the cup on the heating plate |
| Coffee is not creamy | The coffee blend is not suitable, coffee has not been recently ground, the pre-ground coffee has been ground too thin or too coarse | Try another coffee blend |
| The coffee brewing is reduced, the machine takes longer to hear and the water capacity is not correct | Limescale in the machine | Carry out the machine descaling, as described at page 44. |
| The central unit cannot be removed | The central unit is out of position | Switch on the machine. Close the service door and fit the coffee grounds container. The machine returns automatically in its starting position. |
Only skilled personnel are authorised to service and repair the machine. The user might incur serious injuries should repairs not be properly carried out. The manufacturer declines any liability whatsoever, should repairs fail to be carried out according to the instructions contained in this manual. Furthermore, in these cases warranty rights cannot be honored.
IMPORTANT SAFEGUARDS
When using your coffee maker, basic safety precautions should always be followed, including the followed to reduce the risk of fire, electric shock, and/or injury to persons including the following:
1 • Read all instructions.
2 • Do not touch hot surfaces. Use handles or knobs.
3 • To protect against electric shock, do not place cord. plug or appliance in water or other liquid.
4 • Close supervision is necessary when any appliance is used by or near children.
5 • Unplug from the outlet when not in use and before cleaning. Allow to cool before putting on or taking off parts, and before cleaning the appliance.
6 • Do not operate any appliance with a damaged cord or plug or after the appliance malfunctions, or has been
damaged in any manner. Return appliance to an authorised service facility for examination, repair or adjustment.
- The use of an accessory not evaluated for use with this appliance may cause injuries.
8 • Do not use outdoors.
9 • Do not let cord hang over edge or table or counter, or touch hot surfaces.
10 • Do not place on or near a hot gas or electric burner, or in a heated oven.
11 • Always attach plug to appliance first, then plug cord into the wall outlet. To disconnect, turn any control to the off position, then remove plug from wall outlet.
12 • Use this appliance only for its intended use as described in this manual
13 • Keep the cord away from heated surfaces.
SAVE THESE INSTRUCTIONS

WARNING
RISK OF FIRE OR ELECTRIC SHOCK DO NOT OPEN

WARNING: TO REDUCE THE RISK OF FIRE OR ELECTRIC SHOCK.
DO NOT REMOVE COVER (OR BACK)
NO USER-SERVICEABLE PARTS INSIDE
REPAIR SHOULD BE DONE BY AUTORIZED SERVICE PERSONNEL ONLY
"TEMPERATURA" "MEDIA"
"PREINFUSION " "CONEXION "
"DECALC. RESETT." "NO"
Temporizador
"TEMPERATURA" "MEDIA"
"DESCALCIFIC." "RESET NAO "
"APARELHO. DESL." "APOS "
"HEET WATER " "KLAAR V. GEBR."
"TAAL " "NEDERLANDS "
Met de pijljesloelsen 🐎u dit veronderen in : Deutsch, Italiano, Français, English, Espanol, Portugues.
Functie voorspoelen
"WATERHARDHD" "HARDHEID 2"

"WARMH. PLAAT " "AAN "
"APPARAAT UIT " "NA: 0:00"
"PRODUKT KIEZEN " "KLAAR V. GEBR."
"KOF. HDR. LEGEN " "KLAAR V. GEBR."
"STOOM " "KLAAR V. GEBR."
"HEET WATER "KLAAR V. GEBR.
"ONTKALKEN " "KLAAR V. GEBR."
"APPARAAT WORDT " "ONTKALKT "
- DESCRIPTION OF SYMBOLS TE
- HOW TO USE THE INSTRUCTIONS
- B
- SAVE THESE INSTRUCTIONS
- 10
- SAFETY INDICATIONS
- WARNINGS
- VOLTAGE
- A
- POWER CORD
- KEEP CHILDREN AWAY
- POSITIONING
- C
- DANGER OF BURNS
- D
- NECESSARY SPACE
- E
- CLEANING
- REPAIR/ MAINTENANCE
- IMPORTANT SAFEGUARDS
- 14
- UNPACKING/INSTALLATION
- POWER SUPPLY CONNECTION
- STARTING AND USE
- DANGER
- 25
- DRAINAGE SI
- 26
- BEFORE INSTALLING THE WATER TANK IN THE MACHINE, MAKE SURE THE COFFEE BEAN CONTAINER COVER IS PROPERLY FITTED
- DRAINAGE
- PROGRAMMING THE COFFEE MACHINE
- 27
- 16
- RINSING CYCLE FUNCTION
- SELECTING MENU ITEMS
- SELECTING THE LANGUAGE
- WATER HARDNESS ADJUSTMENT
- SELECTING THE LANGUAGE SE
- ACTIVATING THE CUP HEATER
- SELECTING TEMPERATURE
- SELECTING THE PREBREWING FUNCTION
- SELECTING THE PREGRINDING FUNCTION
- TOTAL COFFEES
- 18
- DESCALING
- TIMER
- RINSING CYCLE
- DOSAGE OF GROUND COFFEE RE
- DOSAGE OF GROUND COFFEE
- 28
- RECOMMENDATIONS
- TEST
- PREHEATING CUPS
- TEMPERATURE LED
- EMPTY COFFEE BEAN CONTAINER WARNING LIGHT
- EMPTY WATER TANK WARNING LIGHT
- 20
- GROUNDS CONTAINER WARNING LIGHT
- GRIND
- COFFEE
- WATER QUALITY
- OPERATION TIME
- SWITCHING OFF THE MACHINE
- BREW ING
- CUP LEVEL FILLING
- BREWING BA
- CUP LEVEL ADJUSTMENT
- DOUBLE QUANTITY OF COFFEE I.E. 2 CUPS OF COFFEE
- COFFEE BEANS
- 29
- PRE-GROUND COFFEE
- 30
- 22
- HOT WATER
- 31
- STEAM
- 32
- OVERTEMPERATURE
- CAPPUCCINO FROTH
- USER MAINTENANCE INSTRUCTIONS
- INCORPORATED SAFETY DEVICES
- AUTOMATIC OFF
- ELECTRONIC GRINDING TIME CONTROL
- ELECTRONIC PUMP DELIVERY CONTROL
- AUTOMATIC TEMPERATURE ADJUSTMENT
- ANTIGRAVEL DEVICE
- CLEANING/ MAINTENANCE
- WATER TANK / DRIP TRAY / COFFEE GROUNDS CONTAINER / COFFEE DISPENSING UNIT / COFFEE MACHINE
- 33
- 2422
- CLEANING/ MAINTENANCEIN
- 34
- CENTRAL UNIT
- 35
- 36
- 37
- 38
- COFFEE GRINDER
- AUTOMATIC DESCALING
- DISPOSAL
- NOTE
- STANDARD DESCALING
- IMPORTANT
- STORAGE OF THE MACHINE
- MAINTENANCE
- TROUBLESHOOTING
- WARNING
- TEMPORIZADOR
- FUNCTIE VOORSPOELEN
Brand : PHILIPS
Model : Saeco Syncrony Digital DM 1075
Category : Coffee maker