
PR3094/00 - Electrical stimulation device PHILIPS - Free user manual and instructions
Find the device manual for free PR3094/00 PHILIPS in PDF.

| Product type | Wireless electrical stimulation device (TENS) |
| Model | PR3094/00 (Wireless TENS Pro) |
| Power supply (TENS units) | Rechargeable Li-Ion battery, charged via mains charger (100-240 V, 50/60 Hz, output 5 V DC, 500 mA) |
| Power supply (remote control) | 2 AAA 1.5 V alkaline batteries |
| Battery life (TENS units) | Approximately 8 hours continuous after full charge (3 hours charging) |
| Number of preset programs | 15 (classic, burst, frequency modulation) |
| Number of channels | 2 (main and extension, up to 4 electrodes) |
| Connectivity | Wireless between remote control and TENS units; USB port for professional PC application (PR3094 only) |
| Monitoring functions | Integrated activity monitor (60-day log); configurable activity goal via PC application |
| Stimulation parameters | Frequency: 1-120 Hz; Pulse width: 40-400 µs; Max current: 60 mA (under 500-1000 Ω); Max voltage: 120 V; Waveform: symmetrical biphasic |
| Electrodes | Self-adhesive hydrogel, limited shelf life (expiration date on package) |
| Ingress protection rating | IP22 (remote control and TENS units); IP21 (charger) |
| Operating conditions | Temperature: 5 °C to 40 °C; Relative humidity: 15% to 93% (non-condensing) |
| Storage conditions (device) | Temperature: -10 °C to 50 °C; Humidity < 93% |
| Storage conditions (electrodes > 1 month) | Temperature: 5 °C to 27 °C |
| Medical class | Class IIa (CE 0344) |
| Expected service life | 5 years |
| Care and cleaning | Clean with a damp cloth and mild detergent; disinfection possible with 70% isopropyl alcohol; do not immerse |
| Spare parts | Electrodes, extension cable, charger, batteries (available at www.philips.com/tens-electrodes) |
| Warranty | 5 years (excluding electrodes) |
Frequently Asked Questions - PR3094/00 PHILIPS
User questions about PR3094/00 PHILIPS
0 question about this device. Answer the ones you know or ask your own.
Ask a new question about this device
Download the instructions for your Electrical stimulation device in PDF format for free! Find your manual PR3094/00 - PHILIPS and take your electronic device back in hand. On this page are published all the documents necessary for the use of your device. PR3094/00 by PHILIPS.
USER MANUAL PR3094/00 PHILIPS
Always here to help you
Register your product and get support at www.philips.com/welcome
PR3094
PR3093

natural_image
Medical device with Philips screen displaying a bar chart and connected earplugs (no visible text or symbols on main components)User manual
PHILIPS
ENGLISH 4
DEUTSCH 57
ITALIANO 118
FRANÇAIS 176
Introduction
Congratulations on your purchase and welcome to Philips! To fully benefit from the support that Philips offers, register your product at www.philips.com/pain-management/register.
Read this user manual carefully before you use the Wireless TENS (PR3093) or the Wireless TENS Pro (PR3094) and save it for future reference. The Wireless TENS (PR3093) and the Wireless TENS Pro (PR3094) are available without prescription. To achieve optimal treatment success with your Wireless TENS device, you have to use it according to the treatment instructions in this user manual. If you need further information or have questions, please visit www.philips.com/
pain-management or contact the Philips Consumer Care Centre in your country.
Intended use
The Wireless TENS (PR3093) and the Wireless TENS Pro (PR3094) are intended to be used by adult consumers experiencing mild to moderate chronic musculoskeletal pain. The devices are intended to be used for transcutaneous electrical nerve stimulation (TENS) for the purpose of pain relief and for monitoring activity with the integrated activity monitor. The Wireless TENS device may be brought to appointments with a medically trained healthcare professional who is responsible for using the TENS device according to the user manual and who is skilled in:
- analysing the patient's activity and treatment patterns
- determining individual treatment and adapting settings of the TENS device by means of the Wireless TENS Pro PC Application (PR3094 only) The Wireless TENS Pro PC Application is only for use by a healthcare professional in combination with the Wireless TENS Pro device (PR3094), which enables the healthcare professional to offer more specific TENS treatment programs and enables the healthcare professional to track and analyse the patient's activity patterns in relation to the use of the device.
The device is intended to be used and operated by and on one single adult person. It should always be used in accordance with the safety information and operating instructions included in this user manual and for the purpose for which it is designed.
TENS and pain management
Transcutaneous electrical nerve stimulation (TENS) is a non-invasive pain relief method for which clinical proof exists that it can help relieve pain. TENS is used daily by physiotherapists and other healthcare professionals. During TENS treatment, electrical pulses are passed across the intact surface of the skin to activate the underlying nerves. Clinical evidence suggests that TENS produces pain relief in a similar way to the nervous system's own pain-relief mechanisms, for instance similar to massaging a painful area.
The pulses are generated by the battery-powered TENS units, which have to be connected to the self-adhesive hydrogel electrodes. You can choose from a set of preset TENS programs with different pulse settings and can adjust the intensity of the pulse according to your own preference. This booklet contains information on the placing of the electrodes and the programs used for treatment.
Activity monitoring and pain management
We all want to enjoy doing our daily activities. When you experience pain, however, the instinctive reaction is to avoid pain by reducing your activity level. As a result, you become less fit and less able to enjoy doing the things you like. Staying active, without overdoing it, is important to avoid being trapped in a persistent pain cycle. The key to self-managing your pain is pacing: distributing periods of activity and periods of rest over the day in a way that feels most comfortable for you. The key to pacing is spreading out your activities and ‘taking a break before you need it’. An activity monitor can help you keep track of how well you pace your activities over the day. The remote control of the Wireless TENS device has a built-in activity monitor that records your activity when you wear it attached to your belt or waistband or when you carry it around in the pocket of your trousers or skirt. It can record and store the activity data of 60 days. In this way, you cannot only check your activity pattern over the last 24 hours, but also your activity pattern of the previous week and the previous month. If you want to get more tips on pacing and how to self-manage your pain, please read the Pain Toolkit booklet included in the packaging.*
* Note: Only the German version of the Pain Toolkit is included in the package. If you want to have the English, French or Italian version, please go to www.philips.com/pain-management to download your preferred version.
Information for the healthcare professional (PR3094 only)
The Wireless TENS Pro (PR3094) can be used in combination with the Wireless TENS Pro PC Application, which is designed for use by medically trained healthcare professionals who are responsible for using the TENS device according to the user manual and who are skilled in:
- analysing patient activity patterns in relation to patient treatment patterns using an external PC application
- determining individual treatment and adapting settings of the TENS device by means of an external PC application
The Wireless TENS Pro PC Application enables healthcare professionals to offer more specific TENS treatment programs to their patients and to track and analyse patients' activity patterns on a PC in relation to the use of the device and the patient's pain experience. The Wireless TENS Pro PC Application is not included in the package, but can be downloaded on request.
Please go to www.philips.com/tens-download and leave your contact details. You will receive a link from where you can download the Wireless TENS Pro PC Application. Via this link you can also access or download the user manual of this PC application.
USB cable
The Wireless TENS Pro PC Application works when the remote control is connected to your PC with a mini USB cable. You can obtain this standard mini USB cable in two ways:
1 You can leave your contact details on www.philips.com/tens-download and indicate that you would like to receive a mini USB cable. When we have received your details, we will send you a mini USB cable by post.
2 If you received a trial kit from our sales force, this kit should contain the mini USB cable. If you have other questions regarding the availability of the Wireless TENS Pro PC Application or the mini USB cable, please contact the Consumer Care Centre in your country.
Important
Contra-indications
Do not use the device if:
- you have a cardiac pacemaker, implanted defibrillator or other implanted metallic or electronic device (e.g. a drug delivery system), as use in these cases could cause electric shock, burns, electrical interference, or even death.
- you have a heart disease.
- you have epilepsy.
- you are pregnant, as the safety of electric stimulation during pregnancy has not yet been established.
- you have a cognitive impairment.
Adverse reactions
You should stop using the device and consult your doctor if you experience adverse reactions from the device.
Possible adverse reactions may include the following:
- skin irritation beneath the electrodes, although the gel used on the electrodes is not known to cause allergic reactions
- burns beneath the electrodes
- headaches or other painful sensations
- nausea or feeling faint
Important safety information
Warning
- This is a medical device. Keep the device out of the reach of children.
- Read this user manual carefully and always adhere to the treatment instructions.
- This appliance is not intended for use by adults with reduced sensory or mental capabilities.
- Do not use the device on children.
- Do not use the device if your pain cannot be clearly defined as mild to moderate muscoskeletal pain. If you are not certain about the cause of your pain, consult your doctor.
- If you are in the care of a doctor, consult your doctor before you use the device.
- Do not apply stimulation on your neck, as this could cause severe muscle spasms that could close your airway and result in breathing difficulties and that may also have an adverse effect on your heart rhythm or blood pressure.
- Do not apply stimulation across your chest because electric current entering into the chest may cause heart rhythm disturbances, which could be lethal.
- Since the effects of stimulation of the brain are unknown, stimulation should not be applied across the head and electrodes should not be placed on opposite sides of the head.
- Be careful when you have a tendency to bleed internally due to any impact or injury.
- Consult your doctor if you recently had surgery, as stimulation may have a negative effect on the healing process.
-
Do not apply stimulation over or near cancerous lesions.
-
Do not apply stimulation over open wounds or rashes, or over swollen, red, infected or inflamed areas or skin eruptions (e.g. phlebitis, thrombophlebitis and varicose veins).
- Do not apply stimulation on areas of skin that lack normal sensation.
- Only apply stimulation to normal, intact, clean and healthy skin.
- Use of electric stimulation and conductive electrodes may lead to skin irritation or skin sensitisation.
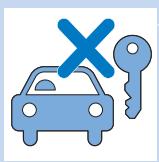
- Do not apply stimulation while driving, operating machines or while performing any other activity in which electrical stimulation can put you at risk of injury.
- Do not apply stimulation while sleeping. If the device is used at bedtime, set the timer to make it switch off automatically.
- Do not use the device and electrodes internally.
- Do not apply stimulation near electronic monitoring equipment (e.g. cardiac monitors, ECG alarms), as this equipment may not operate properly when the device is in use.
- Do not apply stimulation in the bath, shower or swimming pool.
- Do not use plaster or tape to attach the electrodes to the skin.
- Always check the device and the electrodes for damage before use.
- Do not use the device or an electrode if it is damaged.
- Do not modify the device or the electrodes.
Caution
- Only use this device with the charger, cables, electrodes and accessories recommended by the manufacturer.
- The device is not waterproof. Do not use the device in wet surroundings and prevent it from getting wet.
- The device can be used indoors and outdoors, but it has not been designed to withstand all weather conditions.
- The device cannot withstand high and low temperatures. Please check the operating conditions in chapter 'Specifications'.
- The USB connection port is only to be used by a healthcare professional in conjunction with the Wireless TENS Pro PC Application (PR3094) supplied by Philips.
- The electrodes have a limited shelf life. Please check the packaging for the use-by date prior to use. Do not use electrodes whose use-by date has expired. For ordering replacement electrodes, see chapter 'Ordering accessories'.
- Make sure that you end the treatment by switching off the TENS units or by setting the intensity to 0 mA on the remote control before you remove the TENS units, the extension cable (if used, PR3094 only), or the electrodes. If you do not end the treatment, you may experience an unpleasant sensation in your fingers. This sensation is not harmful, but can be unpleasant.
- Always use and store the electrodes according to the instructions in chapters 'Using the device' and 'After use'.
- If the device does not function as described in this manual, stop using it and contact the Consumer Care Centre. For contact details, see chapter 'Guarantee and support'.
Compliance with standards
- The device meets the relevant standards for this type of Class IIa electrical medical appliance and appliances using electrical stimulation for home use.
- This Philips appliance complies with all applicable standards and regulations regarding exposure to electromagnetic fields.
Preset programs
Program overview
The device comes standard with 8 preset programs (PR3093) or 15 preset programs (PR3094). There are three different TENS types: Conventional TENS, Burst TENS and Frequency-modulated TENS. For more details, see below.
Conventional TENS programs
Conventional TENS is a common TENS program with high-frequency stimulation. It is based on the Gate Control Theory that states that this type of stimulation will cause the transmission of pain signals in the nervous system to be blocked. It is comparable to ‘rubbing the pain away’. Most people use Conventional TENS for 30 minutes per session, but you can use it as often and as long as you feel comfortable with. The effect is usually most perceptible during stimulation. The effect generally wears off rather quickly when stimulation has ended. You should adjust the intensity of the program so that you clearly feel the stimulation. Stimulations should not give an unpleasant or painful sensation, however.
| Name of Conven-tional TENS program | Program no. on remote control PR3093 | Program no. on remote control PR3094 | Program description | Sug-gested treat-ment time |
| Conven-tional | 1 | 1 | May give you a continu-ous tingling stimulation | No limit |
| Thorough stimulus | 2 | 2 | May give you a more thorough stimulating sensation | No limit |
| Pre-activity | 3 | 3 | May give you a more local and soft stimulating stimulation | No limit |
| Soft stimulus | - | 4 | May give you a softer stimulating sensation, e.g. for sensitive body parts | No limit |
| Deep stimulus | - | 5 | May give you a deeper stimulating sensation | No limit |
| Radiating pulse | - | 6 | May give you a more radiating stimulation sensation | No limit |
Burst TENS programs
Burst TENS offers a high-frequency stimulation that comes in trains of pulses. This type of stimulation is known to trigger endorphin release. Endorphins are pain killers produced by the body. You can use Burst TENS around 30 minutes multiple times a day, for example 3 times. You are advised to adjust the intensity of the Burst program so that you feel the stimulation strongly. Burst programs generally give a sharper sensation, which can feel somewhat unpleasant. It is also
advised to adjust the intensity to a level that produces visible muscle contractions in the stimulation area. These contractions are not harmful. If you find these contractions too uncomfortable, you can decrease the intensity, choose a different program or move the electrodes to a different place. Burst TENS should preferably be applied while resting, since it can result in muscle contraction in the stimulation area.
| Name of Burst TENS program | Program no.on remote control PR3093 | Program no.on remote control PR3094 | Program description | Suggested treatment time |
| Continuous Burst | 4 | 7 | May give you a pulsing burst stimulation to release endorphins in your body | 30 min.* |
| Slow kneading | 5 | 8 | May give you a slower and massaging burst stimulation to release endorphins | 30 min.* |
| Mild kneading | 6 | 9 | May give you a milder burst stimulation to release endorphins in your body | 30 min.* |
| Deep kneading | - | 10 | May give you a more local and deeper burst stimulation to release endorphins in your body | 30 min.* |
| Diffuse Burst | - | 11 | May give you a more diffuse burst stimulation to release endorphins in your body | 30 min.* |
* optionally multiple times a day
Frequency-modulated TENS programs
Frequency-modulated TENS is a program in which the frequency of the pulse varies from high to low. This can be more comfortable or effective than the other programs in some cases. You can use frequency-modulated TENS for around 30 minutes multiple times a day, for example 3 times.
| Name of Freq. Mod. program | Pro-gram no. on remote control PR3093 | Pro-gram no. on remote control PR3094 | Program description | Sug-gested treatment time |
| Mixed frequency | 7 | 12 | May give you a flowing stimulation sensation | 30 min.* |
| Pulsing massage | 8 | 13 | May give you a more puls-ing stimulation sensation | 30 min.* |
| Deep massage | - | 14 | May give you a slower and deeper flowing sensation | 30 min.* |
| Gentle massage | - | 15 | May give you a mild flow-ing stimulation sensation | 30 min.* |
* optionally multiple times a day
Program specifications
The table below gives information on the frequency, pulse width and preset time of each program. The current pulse in all programs has a symmetrical bi-phase waveform.
| Program name | Pro-gram no. PR3093 | Pro-gram no. PR3094 | Pro-gram type | Fre-quency | Pulse width | Preset time |
| Conven-tional | 1 | 1 | Con-ven-tional | 100 Hz | 200μs | contin-uous |
| Thorough stimulus | 2 | 2 | Con-ven-tional | 40 Hz | 200μs | contin-uous |
| Pre-activity | 3 | 3 | Con-ven-tional | 100 Hz | 150μs | contin-uous |
| Soft stimulus | - | 4 | Con-ven-tional. | 80 Hz | 60μs | contin-uous |
| Deep stimulus | - | 5 | Con-ven-tional | 80 Hz | 150μs | contin-uous |
| Radiating Pulse | - | 6 | Con-ven-tional | 60 Hz | 150μs | contin-uous |
| Continu-ous Burst | 4 | 7 | Burst | 100 Hz, 2 Hz | 250μs | 30 min. |
| Slow kneading | 5 | 8 | Burst | 80 Hz, 1 Hz | 200μs | 30 min. |
| Mild kneading | 6 | 9 | Burst | 80 Hz, 3 Hz | 200μs | 30 min. |
| Deep kneading | - | 10 | Burst | 80 Hz, 2 Hz | 150μs | 30 min. |
| Diffuse Burst | - | 11 | Burst | 80 Hz, 2 Hz | 180μs | 30 min. |
| Mixed Frequen-cy | 7 | 12 | Freq. Mod. | 8-100 Hz | 250μs | 30 min. |
| Pulsing massage | 8 | 13 | Freq. Mod. | 2-8 Hz | 250μs | 30 min. |
| Deep massage | - | 14 | Freq. Mod. | 2-80 Hz | 180μs | 30 min. |
| Gentle massage | - | 15 | Freq. Mod. | 8-80 Hz | 150μs | 30 min. |
Note: With the Wireless TENS Pro (PR3094), healthcare professionals can use the Wireless TENS Pro PC application to create and install additional programs tailored to their patient's needs as part of a pain-management regimen.
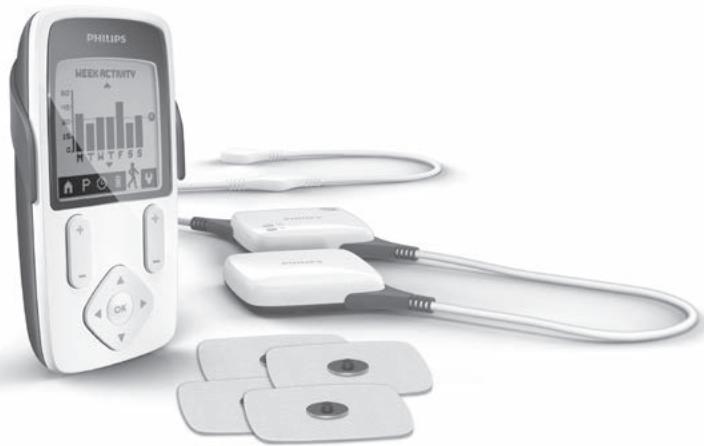
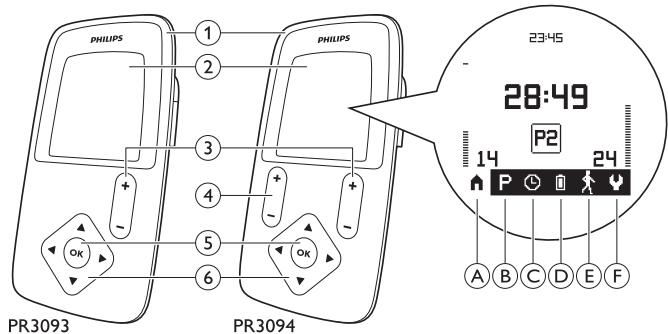
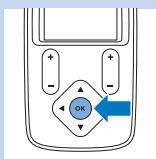
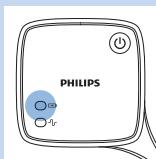
Product overview (Fig. 1)
1 Remote control
2 Display
- A. Home screen symbol
- B. Program screen symbol
- C. Timer screen symbol
- D. Battery symbol
- E.Activity screen symbol
- F. Settings screen symbol
3 Intensity button (PR3093); intensity button for extension channel (third and fourth electrode) (PR3094)
4 Intensity button for main channel (first and second electrode) (PR3094)
5 OK button
6 Selector with up, down, right and left arrows
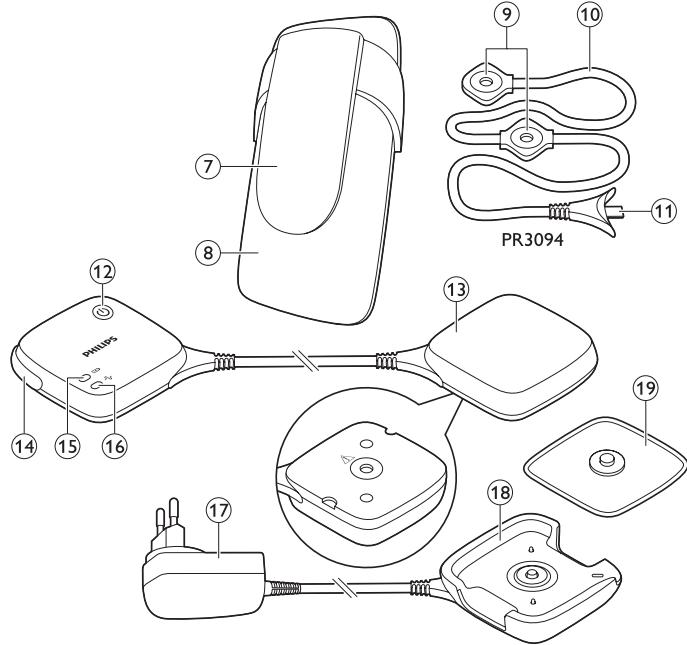
7 Removable belt clip
8 Battery compartment cover
9 Extension channel connectors for third and fourth electrode (PR3094 only)
10 Extension channel cable (PR3094 only)
11 Plug to connect extension channel cable to TENS units (PR3094 only)
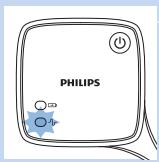
12 On/off button of TENS units
13 TENS units
14 Removable corner piece (PR3094 only)
15 Battery status indicator of TENS units
16 Treatment status indicator of TENS units
17 Adapter
18 Charger
19 Self-adhesive hydrogel electrode
Note: You find the related picture on the inside of the front cover.
Preparing for use
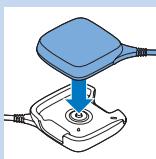
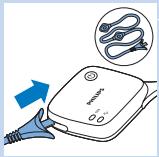
Charging the TENS units
To be able to use the device, you first have to charge the TENS units. Charging the TENS units takes approx. 3 hours, if the device is at room temperature. When the rechargeable battery is fully charged, it contains sufficient energy for approx. 8 hours of continuous use under normal operating conditions.
natural_image
Illustration of a blue electrical plug with a circular socket connected to a wall, showing an arrow indicating direction (no text or symbols present)Note: If the rechargeable battery of the TENS units is not fully charged when you start a treatment, the batteries may run out during the treatment. We advise you to always fully charge the TENS units before you start a treatment.
Note: Treatment is not possible when the TENS units are charging.
natural_image
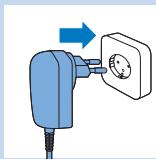
Diagram showing a blue device with a downward arrow pointing to a circular component, connected to two cables (no text or symbols present)1 Insert the adapter of the charger in a wall socket.
2 Place the TENS unit with the rechargeable battery (the one without the on/off button and the indicators) in the charger.
The battery status indicator on the other TENS unit flashes green during charging.
The battery status indicator stops flashing and is solid green when the battery is fully charged.
3 Remove the TENS unit from the charger when the battery is fully charged.
Note: Always disconnect the charger from the mains after use by removing the adapter from the wall socket.
Preparing for treatment with two channels and four electrodes (PR3094 only)
The Wireless TENS pro (PR3094) comes with an extension cable that allows you to connect two extra electrodes. Because the Wireless TENS pro (PR3094) has two channels, its remote control has two intensity buttons, one for each channel.
Preparing for treatment
natural_image
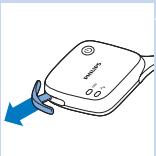
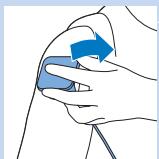
Illustration of a medical device with a blue arrow pointing to the left side (no text or symbols)1 Remove the detachable corner from the TENS units to make the socket for the extension cable accessible.
Note: Store the detachable corner for later use.
Caution: Store the detachable corner out of the reach of children.
natural_image
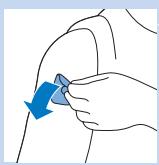
Illustration of a medical device with an arrow pointing to it, showing internal components and a magnified view of the device (no text or symbols present)2 Insert the plug of the extension cable into the socket.
Preparing the remote control
natural_image
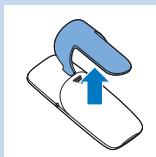
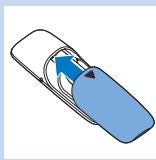
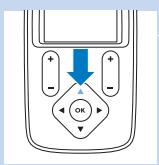
Illustration of a blue ergonomic device with an upward arrow, no text or symbols presentInserting the batteries in the remote control
1 Remove the belt clip from the remote control, if it was attached.
natural_image
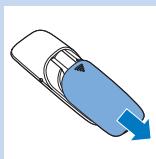
Illustration of a car with a blue arrow pointing downward (no text or symbols)2 Slide the battery compartment cover off the remote control.
natural_image
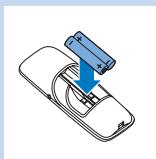
Diagram of a battery pack with an arrow indicating direction (no text or symbols)3 Put the two AAA 1.5-volt alkaline batteries in the remote control.
Note: Make sure that the - and + poles point in the direction indicated in the battery compartment.
Note: Remove the batteries if you are not going to use the device for a month or more to prevent battery leakage.
natural_image
Illustration of a car with a blue arrow indicating direction (no text or symbols)4 Slide the battery compartment cover back onto the remote control.
natural_image
Illustration of a blue-handled robotic arm interacting with a white object, showing a blue arrow indicating force or movement (no text or symbols present)5 If you want to wear the remote control attached to your belt or waistband, reattach the belt clip to the remote control. You can also use the remote control without the belt clip.
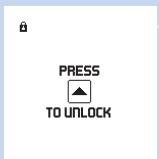
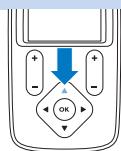
Locking and unlocking the remote control
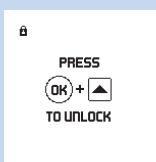
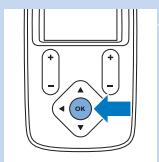
The control panel of the remote control locks automatically after some time of inactivity to prevent accidental operation.
1 When you press a key on the remote control, the screen prompts you to press the OK button and then the up arrow.
2 Press the OK button to unlock the remote control.
flowchart
graph TD
    A["+"] --> B["OK"]
    C["-"] --> B
    D["+"] --> B
    E["-"] --> B
The screen prompts you to press the up arrow.
3 Press the up arrow on the selector.
When you unlock the remote control, you can use the control panel again.
When you have inserted new batteries and the TENS units are switched off, the 'no connection' screen appears.
Note: This ‘no connection’ screen may also appear due to other causes (see ‘Error signals on the remote control’ in chapter ‘Signals on the device’).
4 If you want to lock the remote control, hold down the OK button for 2 seconds.
Note: There is nothing on the display when the remote control is locked.
Tip: Lock the remote control when you have started the treatment. This allows you to wear the remote control attached to your belt or waistband or in a pocket without any risk of unintentionally changing the settings.
Setting the date and time
If you want to use activity monitoring to keep track of your activity and treatment pattern, you have to set the date and time on your remote control.

1 The date and time setting screen opens automatically on the display, with the date field highlighted.
Note: This screen only opens automatically at first use and if you replace the batteries more than 24 hours after the batteries ran out. Select the settings screen symbol to change the date and time in all other cases.
2 Press the OK button to be able to change the date setting.
The day field is highlighted.
3 Use the up or down arrow to choose the day and press the right arrow to go to the month field.
The month field is highlighted.
4 Use the up or down arrow to choose the month and press the right arrow to go to the year field.
The year field is highlighted.
5 Use the up or down arrow to choose the year and press the OK button to confirm the date.


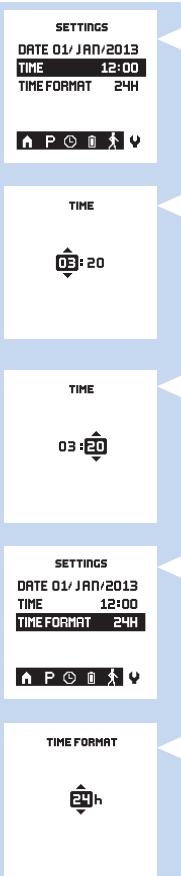
6 Use the down arrow to go to the time setting field.
7 Press the OK button to be able to change the time set.
The time setting screen opens.
The hour field is highlighted.
8 Use the up or down arrow to choose the hour and press the right arrow to go to the minutes field.
The minutes field is highlighted.
9 Use the up or down arrow to choose the minutes and press the OK button to confirm the time.
10 Use the down arrow to go to the time format field.
11 Press the OK button to be able to change the time format.
12 Use the up or down arrow to toggle between the 24-hour clock and the 12-hour clock. Press the OK button to confirm your choice.
Using the device
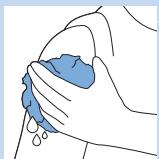
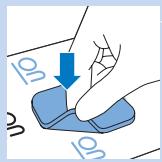
Attaching the electrodes and TENS units
natural_image
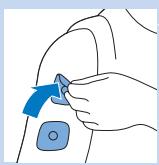
Illustration of a hand holding a blue object with droplets, no text or symbols present1 Make sure the skin you want to place the electrodes on looks healthy and is free from wounds or rashes.
Note: Do not place electrodes on red or inflamed skin and skin with open wounds, cancerous lesions or rashes.
2 Clean the skin with a moist cloth and dry it. The skin you want to place the electrodes on must be dry, clean and free from cream or lotion.
Note: Dirt, grease or particles left on the skin may lodge themselves in the hydrogel of the electrodes. This has an adverse effect on the adhesive power of the electrodes.
3 Take the electrodes from the plastic bag and check them for damage and signs of wear.
Caution: Do not use electrodes whose use-by date has expired. The use-by date is shown on the resealable plastic bag.
Note: Replace the electrodes when they are damaged or dirty, when they have lost their adhesive power or when the stimulation becomes uncomfortable, i.e. when you experience an unpleasant stinging or biting sensation.
4 Pull the electrode off the liner and place it on the skin at the place you want to treat. See section ‘Electrode placement’ below and the placement guide at the end of this manual.
natural_image
Illustration of a hand holding a blue medical device with an arrow pointing to it, no text or symbols present.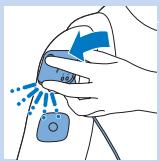
natural_image
Illustration of a hand holding a blue device with a blue arrow indicating rotation (no text or symbols)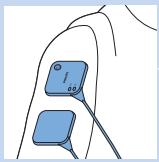
natural_image
Illustration of a human finger with two blue electrode sensors (no text or symbols)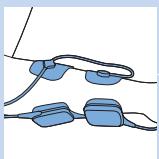
natural_image
Illustration of two blue mechanical components connected by wires (no text or symbols)
5 Place the second electrode on the body part you want to treat. In the case of PR3094, you can also place a third and fourth electrode on the body part you want to treat.
Note: Always place the electrodes on the skin before you connect the TENS units
Note: Do not place the electrodes on top of each other or so close to each other that they touch each other.
6 Attach the TENS units to the electrodes. The TENS units have magnets in the centre to ensure easy connection to the metal connectors of the electrodes. When the TENS units lock onto the electrodes properly, you hear a click.
Note: You can wear the electrodes with the TENS units attached to them under your clothes, also during treatment.
Note: During many treatment programs, you can perform all activities allowed as intended use and not warned against in chapter ‘Important’ when you wear the TENS units on your body. You can also continue to wear the TENS units on your body in between treatments.
Note: If you want to treat with four electrodes (PR3094 only), you first attach the TENS units to two electrodes and then you attach the connectors of the extension cable to the other two electrodes.
7 Press the on/off button to switch the TENS units to standby.
The treatment status indicator on the TENS units flashes green to indicate that they are in standby and ready for treatment.
If you do not start the treatment within 5 minutes, the TENS units switch off automatically. If this happens, you first have to press the on/off button again to start a treatment.
Electrode placement
To receive maximum results from your stimulation, it is important to place the electrodes correctly. Always make sure that you have normal skin sensation in the place you want to treat before you attach the electrodes. The optimal place may vary slightly from person to person, so try moving the electrodes around until you get the most effective results. In some cases it can be helpful to mark the spot for future use. For suggestions regarding placement of the electrodes, see the placement guide at the end of this manual. Please note that you may need assistance to place the electrodes on certain spots on your body.
As a rule, the electrodes should be placed on or near the painful area. Stimulation may result in visible muscle contraction in the stimulation area. This is not harmful, but if you find these contractions uncomfortable, move the electrodes to a different place.
Do not place electrodes on your neck or across your chest. Do not place electrodes on red or inflamed skin and skin with open wounds, on cancerous lesions or rashes.
Start and stop treatment
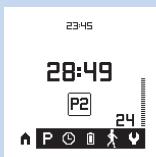
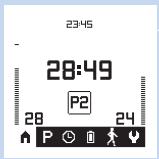
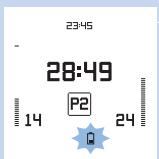
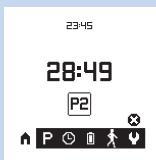
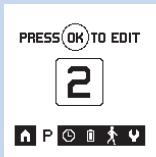
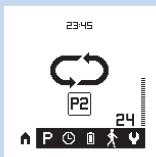
This is the home screen. On it you see the program, the treatment time and the intensity selected. On the menu bar at the bottom of the screen you see from left to right:

- The home screen symbol: This symbol is highlighted when the home screen is displayed.
- The program screen symbol: Select this symbol to choose a treatment program.
- The timer screen symbol: Select this symbol to set the treatment duration.
- Battery symbol: Select this symbol to check the battery status.
- Activity screen symbol: Select this symbol to select the activity monitor (see section 'Activity monitoring' in this chapter).
- Settings screen symbol: Select this symbol to change the date or time (see chapter 'Preparing for use' for details on setting the date and time).
Note: The menu bar on the home screen and other screens disappears after a while, but reappears as soon as you push a button.
Selecting a program
1 When you want to select another program than the default program on the home screen, use the left or right arrow to highlight P for program on the menu bar.
2 Press the OK button to confirm that you want to change the selected program.
The program screen opens with the previously selected program highlighted.
3 Use the up or down arrow to choose a program and press the OK button to confirm your choice.
Note: The program selected is saved as default in the memory of the remote control. The next time you use
the device, this is the program that is used. If you want to change the program follow steps 1 to 3 above.
Note: The same program applies to both channels of the Wireless Tens Pro (PR3094).
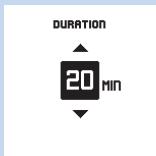
Setting the duration of a program
1 On the home screen you see the duration that is selected as default. If you want to change the default duration of the treatment, use the left or right arrow to highlight the timer icon on the menu bar.
Note: When you change the program, the duration is reset to the default duration of that program.
2 Press the OK button to confirm that you want to change the duration.
On the timer screen, the default preset duration is highlighted.
3 Use the up or down arrow to choose the duration you prefer and press the OK button to confirm.
- You can set the treatment duration in minutes.
- You can also set the treatment duration to ‘continuous’, the screen shows the continuous symbol on the display instead of the treatment duration in minutes. If this symbol flashes on the home screen, the treatment continues until you end it.
Note: The treatment duration selected is saved as default in the memory of the remote control. The next time you use the device, this is the duration setting that is used. If you want to change the duration, follow steps 4 to 6 above.
Note: The same duration applies to both channels of the Wireless TENS Pro (PR3094).
Starting and stopping a treatment (PR3093)
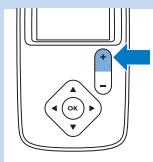
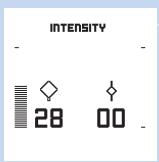
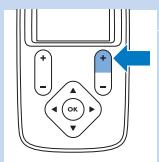
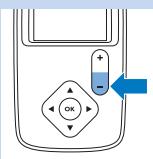
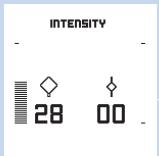
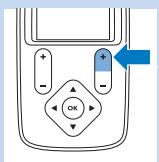
To start a treatment, you first have to switch on the TENS units with the on/off button and then you press the + side of the intensity button to increase the intensity.
1 Press + side of the intensity button to set the intensity. The intensity always starts to increase from 0 mA. The treatment starts and the timer starts to count down as soon as the intensity is higher than 0 mA. The higher the intensity, the stronger the pulse in the area to which the electrodes are attached.
Hold down the + side of the intensity button to increase the intensity constantly and slowly. Release the intensity button when you feel you have found the right level of stimulation.
Note: For Conventional TENS and Frequency-modulated TENS, you should clearly feel the stimulation, but this should not be an unpleasant sensation and should not be painful.
Note: For Burst TENS, you should feel the stimulation strongly, which generally gives a sharper sensation and can feel somewhat unpleasant. It is also advised to adjust the intensity to a level that produces visible muscle contractions in the stimulation area. These contractions are not harmful. If you find the contractions too uncomfortable, you can decrease the intensity, choose a different program or move the electrodes to a different place.
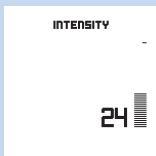
The intensity level is shown in numbers above the intensity button. The intensity ranges from 0 mA to 60 mA. The intensity level is shown by the intensity level bar on the right side of the screen. The higher the bar, the higher the intensity.

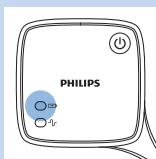
When the treatment starts, the treatment status indicator on the TENS units starts to flash yellow.
The home screen of the remote control shows the program selected, the treatment time left and the intensity selected.
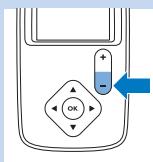
If the intensity feels uncomfortable, press the - side of the intensity button to reduce the intensity constantly and slowly.
Note: Since your body initially adapts to the intensity of the stimulation, you may have to adjust the intensity level after some time to ensure optimal stimulation.
2 To end the treatment before the set treatment time has elapsed or if you set the treatment duration to ‘continuous’, hold down the - side of the intensity button for 3 seconds to make the intensity drop to 0 mA. When the intensity level is 0 mA, no pulse is emitted by the TENS units.
Note: You can also end the treatment by pressing the on/off button on the TENS units. In that case, treatment on both channels stops immediately.
Starting and stopping a treatment (PR3094)
To start a treatment, you first have to switch on the TENS units with the on/off button and then you press the + sides of the intensity buttons to increase the intensity.
1 Press the + side of the intensity buttons to set the intensity for the main and the extension channel separately and start the treatment.
Hold down the + side of the intensity button on the left side of the remote control to increase the intensity of the main channel. This starts the pulse between the first two electrodes.
The intensity level is shown in numbers above the left intensity button. The intensity level is also shown by the intensity level bar on the left side of the screen.
Hold down the + side of the intensity button on the right side of the remote control to increase the intensity of the extension channel. This starts the pulse to the third and the fourth electrode.
The intensity level is shown in numbers above the right intensity button. The intensity level is also shown by the intensity level bar on the right side of the screen.
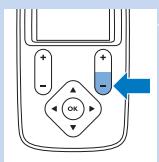
2 To end the treatment of one or both channels before the set treatment time has elapsed or if you set the treatment duration to 'continuous', hold down the - side of the intensity button for 3 seconds to make the intensity drop to 0 mA. When the intensity level is 0 mA, no pulse is emitted by the TENS units.
Note: Because you can operate the two channels independently, you can stop treatment on one channel while you continue treatment on the other.
Note: You can also end the treatment by pressing the on/off button on the TENS units. In that case, treatment on both channels stops immediately.
Activity monitoring
This additional feature available on the remote control allows you to check your activity pattern over a day, a week or a month. Since activity and pacing are important elements in pain management, the activity monitor included in the remote control provides you with a tool to check how well you pace your activities. If you want to know more about self-managing your pain and the importance of pacing, please read the Pain Toolkit booklet.
Note: To ensure activity monitoring works effectively, you have to wear the remote control on or close to your waist all day. You can attach it to your belt or waistband with the belt clip or you can carry it around in the pocket of your trousers or skirt.
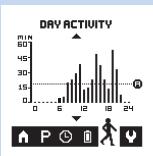
Reading the results
1 Press the right arrow to highlight the activity icon on the menu bar.
2 The first screen to open is the day view. Use the up or down arrow to scroll from one screen to the next.
The day view shows your activity level over the last 24 hours. The height of the bars shows how many minutes you have been active. The horizontal line (A) shows your average activity level and allows you to establish if your activity level over the day was above or below average.
The week view shows your activity level over the last 7 days including today. The letters below the graph indicate the days of the week. The height of the bars shows how many hours per day you have been active over the past week. The horizontal line (A) shows your average activity level over the past 6 days. This line allows you
bar
| Hour | Activity | | ---- | -------- | | 0 | 0 | | 6 | 5 | | 12 | 30 | | 18 | 50 | | 24 | 15 |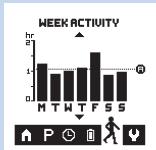
bar
WEEK ACTIVITY | Week | Time (hr) | | :--- | :--- | | M | 1.2 | | T | 0.8 | | W | 0.9 | | T | 1.1 | | F | 1.5 | | S | 0.7 | | S | 1.0 |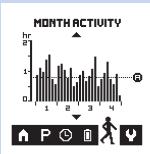
bar
| Month | Hour | |-------|------| | 1 | 1 | | 2 | 1 | | 3 | 1 | | 4 | 1 |
bar
| Day | Activity (MIN) | | --- | --- | | 0 | 0 | | 6 | 0 | | 12 | 35 | | 18 | 50 | | 24 | 15 |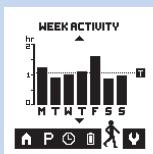
bar
| Day | Time (hr) | |-----|-----------| | M | 1.2 | | T | 0.8 | | W | 0.9 | | T | 1.0 | | F | 1.5 | | S | 0.9 | | S | 0.8 |to establish if the activity level in the past week was above or below average. It also allows you to establish on which days of the past week your activity level was above or below average.
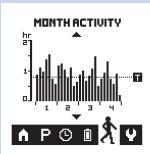
The month view shows your activity level over the last four weeks including today. The weeks are indicated by the numbers below the graph. The height of the bars shows how many hours per day you have been active over the past four weeks. The horizontal line (A) shows your average activity level over the last month. This line allows you to establish if your activity level over the last month was below or above average. It also allows you to establish on which days your activity level was above or below average.
Activity target (PR3094)
If you are managing your pain with the Wireless TENS Pro in consultation with a healthcare professional who uses the Wireless TENS Pro PC Application (PR3094), the activity monitor will give your healthcare professional more insight into your activity and treatment patterns. The PC application also allows your healthcare professional to set an activity target. If a target has been set, the horizontal line will show a (T) instead of an (A).
The day view shows your activity level over the last 24 hours. The horizontal line (T) shows the activity target set level and allows you to establish if your activity level over the day met the target.
The week view shows your activity level over the last 7 days until today. The horizontal line (T) shows the activity target set for the week. It allows you to establish if the activity level over the past week met the target and on which days your activity level was higher or lower than the target.
bar
| Hour | Time (hr) | | ---- | --------- | | 1 | 0.5 | | 1 | 1.0 | | 1 | 1.5 | | 1 | 2.0 | | 2 | 0.5 | | 2 | 1.0 | | 2 | 1.5 | | 2 | 2.0 | | 3 | 0.5 | | 3 | 1.0 | | 3 | 1.5 | | 3 | 2.0 | | 4 | 0.5 | | 4 | 1.0 | | 4 | 1.5 | | 4 | 2.0 |The month view shows your activity level over the last four weeks until today. The horizontal line (T) shows your average activity level over the last month. It allows you to establish if your activity level over the last month met the target and on which days your activity level was higher or lower than the target.
After use
Caution: Make sure that you end the treatment by switching off the TENS units or by setting the intensity to 0 mA on the remote control before you remove the TENS units, the extension cable (if used, PR3094 only), or the electrodes. If you do not end the treatment, you may experience an unpleasant sensation in your fingers. This sensation is not harmful, but can be unpleasant.
natural_image
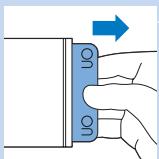
Illustration of a hand holding a blue object with an arrow indicating direction (no text or symbols)1 Switch off the TENS units by pressing the on/off button.
2 Detach the TENS units from the electrodes by pulling them off.
Note: If you forgot to switch off the TENS units, they will switch off automatically in 5 minutes when they are detached.
3 Recharge the TENS units to ensure they are ready for the next treatment.
natural_image
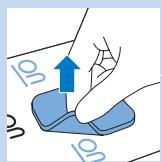
Illustration of a hand holding a small blue object with a blue arrow indicating direction (no text or symbols)4 Peel the electrodes off the skin by pulling at the edge.
Note: Do not leave the electrodes on the skin overnight. If you develop skin irritation, try attaching the electrodes in a different spot. Make sure that you move the electrodes to a different spot regularly so that you do apply stimulation at the same spot every day.
Storage of the electrodes
1 Place the electrodes back on the liner.

2 Slide the liner with the electrodes back into the bag.
natural_image
Hand holding a small object with a blue arrow pointing downward (no text or symbols)3 Reseal the bag for dustfree storage.
Note: To keep the electrodes in good condition and prevent the hydrogel layer from drying out, always store them in the resealable bag when they are not attached to your body for treatment. Seal the resealable bag to guarantee dustfree storage.
Note: If you want to store electrodes for more than a month, keep them at temperatures between +5^ and 27^ . Do not store the electrodes in the freezer or the refrigerator. Avoid extreme heat and exposure to direct sunlight.
Cleaning
Do not immerse the remote control and the TENS units in water or rinse them under the tap.
Do not immerse the electrodes in water.
1 Clean the remote control, the charger, the TENS units and the extension cable (PR3094 only) with a damp cloth and a mild cleaning agent, e.g. dishwashing liquid.
Note: You can also clean them with 70% isopropyl alcohol (IPA).
Caution: Do not use any other cleaning agents than the ones mentioned above, as these cleaning agents could damage the material, e.g. cause loss of gloss.
2 If the electrodes are dirty, put a drop of water on your finger and gently rub the dirt off the surface.
Note: Do not use soap or alcohol to clean the electrodes.
Troubleshooting
This chapter summarises the most common problems you could encounter with the Wireless TENS and the Wireless TENS Pro. If you are unable to solve the problem with the information below, visit www.philips.com/support for a list of frequently asked questions or contact the Philips Consumer Care Centre in your country.
| Problem | Possible cause | Solution |
| The remote control does not switch on. | The batteries of the remote control are empty. | Replace the batteries (see chapter ‘Preparing for use’). |
| The batteries are not correctly placed. | Open the battery compartment and place the batteries correctly (see chapter ‘Preparing for use’). | |
| The remote control may be broken. | Contact the Philips Consumer Care Centre. | |
| The battery status indicator on the TENS units flashed orange and the device switched off. | The battery of the TENS units is empty. | Charge the TENS units (see chapter ‘Preparing for use’). |
| The battery status indicator on the TENS units is solid orange. | The battery of the TENS units is low. The battery icon on the remote control flashes. | This means that the battery has 30% of its capacity left. Recharge the TENS units as soon as possible (see chapter ‘Preparing for use’). |
| The ‘no connection symbol’ is on the screen (see chapter ‘Signals on the device’). | There is no connection because the TENS units are switched off. | Check if the TENS units are switched on. The treatment status indicator flashes green when the TENS units are switched on and in standby. If the TENS units are switched off, press the on/off button to switch them on. |
| There is no connection because battery of the TENS units is empty. | Charge the TENS units (see chapter ‘Preparing for use’). | |
| The TENS units overheated inside. If this is the case, the treatment status indicator flashes red. | Detach the TENS units and let them cool down. As soon as they have cooled down sufficiently, you can reattach them to the electrodes and press the on/off button on the TENS units to resume treatment. The TENS units may become warm on the outside during treatment, but the temperature never becomes so high that there is any risk of damage or injury. | |
| The remote control is too far from the TENS units. | Bring the remote control closer to the TENS units. | |
| The TENS units may be broken. | Contact the Philips Consumer Care Centre. | |
| There is a cross on the display and I cannot increase the intensity level to start a treatment (see chapter ‘Signals on the device’). | The cross is the ‘channel interrupted’ symbol. It may indicate that the electrodes are not placed properly. | Make sure that the electrodes are attached to the skin properly. Please note that the ‘channel interrupted’ symbol only disappears when you increase the intensity. |
| The ‘channel interrupted’ symbol may indicate that the TENS unit or units are not placed on the electrodes properly. | Check if the TENS units are placed on the electrodes correctly.Wireless TENS Pro (PR3094) only: If the ‘channel interrupted’ symbol is above the left intensity button, check if the TENS units are connected properly. If the cross is above the right intensity button, check if the connectors of the extension cable are connected properly. Please note that the ‘channel interrupted’ symbol only disappears when you increase the intensity. | |
| The electrodes have become detached from the skin. | The electrodes have lost their adhesive power because they are dirty or because they have been used for a long time. You can try to clean the electrodes (see chapter ‘Cleaning’). If this does not help, replace the electrodes. Please note that the ‘channel interrupted’ symbol only disappears when you increase the intensity. | |
| The battery symbol on the menu bar of the remote control flashes. | This means that the batteries of the remote control are low. The battery status indicator on the TENS units is solid orange. | You can continue treatment as long as the treatment feels the same as usual. When you press the on/off button of the TENS units to stop treatment, replace the batteries. |
| The treatment status indicator on the TENS units flashes red and the treatment has stopped. | The TENS units overheated inside. | If the TENS units overheat inside, remove them from the electrodes and let them cool down. As soon as they have cooled down sufficiently, you can reattach them to the electrodes and press the on/off button on the TENS units to resume treatment. The TENS units may become warm on the outside during treatment, but the temperature never becomes so high that there is any risk of damage or injury. |
| I experienced an unpleasant sensation when I touched the connectors of the TENS units or the electrodes. | You did not decrease the intensity to 0 to end the treatment before you removed the TENS units. | Always decrease the intensity to 0 mA before you remove the TENS units. In this way you avoid the unpleasant sensation when you touch the connectors of the TENS units or the extension cable, or touch the electrodes. This sensation is unpleasant but not harmful. |
| The stimulation feels different or less pleasant than usual. | The intensity is too high or too low. | Press the + or - side of the intensity button to increase or decrease the intensity. |
| The electrodes are not in the right place. | Switch off the TENS units and detach them from the electrodes. Remove the electrodes from the skin and move them to a slightly different place. | |
| The electrodes are not properly attached. | Switch off the TENS units and detach them from the electrodes. Check if the electrodes are attached to the skin properly. | |
| The electrodes are too dirty. | You can try to clean the electrodes (see chapter ‘Cleaning’). If this does not help, replace the electrodes. | |
| The electrodes are worn. | Replace the electrodes. |
Signals on the device
Battery status indications on the remote control
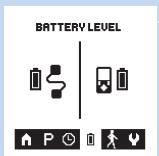
1 To check the battery level of the remote control or the TENS units, use the left or right arrow to highlight the battery icon on the menu bar. The battery screen opens and shows the charge level of the rechargeable battery of the TENS units on the left and the charge level of the batteries of the remote control on the right. The battery symbol can indicate four charge levels: full, two-thirds full, one-third full and empty.
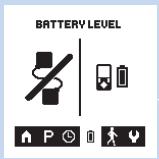
2 When the battery of the TENS units is empty, the connection is lost and the 'no connection' symbol appears on the left.
Error signals on the remote control
Battery low
- The battery symbol at the bottom of the display of the remote control flashes when the batteries of the remote control are low. When the batteries run out completely, the remote control switches off. - The battery symbol at the bottom of the display of the remote control also flashes when the rechargeable battery of the TENS units is low. If that is the case, the battery status indicator on the TENS units is solid orange.
Note: The battery symbol starts flashing when the batteries of the remote control or the rechargeable battery of the TENS units have less than 30% of their total capacity left.
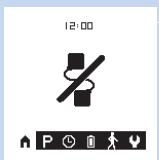
No connection with the TENS units
- This ‘no connection’ symbol on the screen indicates that there is no connection between the remote control and the TENS units. This may have several causes:
1 The rechargeable battery of the TENS units is empty.
2 The TENS units are switched off.
3 The remote control is out of reach of the TENS units.
4 If neither of the above applies, there is something wrong with the TENS units.
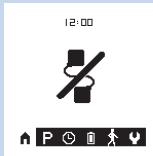
Channel interrupted
- The ‘channel interrupted’ symbol (the cross) on the screen indicates that the corresponding channel is interrupted.
- If a channel is interrupted, this may have the following causes:
1 There is no contact between the TENS units and the electrodes.
2 The electrodes are not attached to the skin properly. - When you have made sure the electrodes are properly attached to the skin and the TENS units are properly connected to the electrodes, press the + side of the intensity button to check if the channel is properly connected. If it is properly connected, the cross disappears and the intensity value appears.
Indicator signals on the TENS units

Battery status indicator
- The battery status indicator on the TENS units flashes:
1 The battery status indicator flashes orange briefly when the rechargeable battery is empty and then the TENS units switch off.
2 The battery status indicator flashes green when the TENS units are charging.
- The battery status indicator is burning solid:
1 The battery status indicator is solid orange when the rechargeable battery of the TENS units is low. The rechargeable battery has only 30% of its total capacity left. The battery status indicator also turns solid orange when the batteries of the remote control are low.
2 The battery status indicator is solid green when the rechargeable battery is fully charged.
Treatment status indicator
- The treatment status indicator on the TENS units flashes:
1 The treatment status indicator flashes green when the TENS units are switched on and in standby.
2 The treatment status indicator flashes yellow during treatment to indicate that the treatment is in progress.
3 The treatment status indicator flashes red when the TENS units overheated. When the TENS units become overheated, the treatment stops automatically and the 'no connection' symbol appears on the display. Detach the TENS units from the electrodes and let them cool down. As soon as they have cooled down sufficiently, reattach them and resume treatment.
Note: It is normal for the TENS units to become warm during treatment. During normal operation, they do not become so hot that there is any risk of damage or injury.
Note: If you use the device at maximum setting for several hours, the TENS units may overheat and switch off as a safety precaution.
Replacement
Electrodes
Replace the electrodes if:
- they are damaged or torn.
- they are past the use-by date indicated on the resealable bag.
- they have lost their adhesive power. Never use plaster or tape to attach them to your skin.
- stimulation feels less strong.
- when the stimulation is uncomfortable, i.e. when you experience an unpleasant stinging or biting sensation.
Note: Always replace the electrodes with electrodes recommended for this device by the manufacturer. New electrodes can be ordered at www.philips.com/tens-electrodes.
Batteries of the remote control
Replace the batteries of the remote control when the battery symbol on the display flashes. Always replace them with two AAA 1.5-volt alkaline batteries (see 'Preparing the remote control' in chapter 'Preparing for use').
Ordering accessories
To buy accessories or spare parts, visit www.shop.philips.com/service or go to your Philips dealer. You can also contact the Philips Consumer Care Centre in your country.
Electrodes
You can order new electrodes on www.philips.com/tens-electrodes.
Caution: Only use this device with the charger, cables, electrodes and accessories recommended by the manufacturer.
Guarantee and support
Your Wireless TENS device has been designed and developed with the greatest possible care to guarantee an expected service life of 5 years. If you need service or information or if you have a problem, please visit our website at
www.philips.com/support. You can also contact the Philips Consumer Care Centre in your country. Its telephone number is:
- Germany: 0800 0007522 (free of charge for calls within Germany)
- Austria: 0800 880932 (free of charge for landline calls within Austria; costs for mobile phone calls depend on provider)
- Switzerland: 0800 002050 (free of charge for landline calls); 0848 000292 (costs for mobile phone calls depend on provider)
- United Kingdom: 0844 338 04 89 (5p/min. from a BT landline, other landline and mobile providers may charge more)
Guarantee restrictions
The electrodes are not covered by the terms of the guarantee because they are subject to wear and have to be replaced regularly.
Manufacturer's legal address
Philips Consumer Lifestyle B.V.
Tussendiepen 4 9206 AD Drachten
The Netherlands
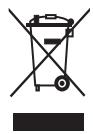
Recycling
natural_image
Symbol of a trash bin crossed with no text or numbers, representing waste sorting or recycling (no text present)
- This crossed-out wheeled bin symbol on a product means that the product is covered by European Directive 2012/19/EU. Please inform yourself about the local separate collection system for electrical and electronic products. Never dispose of the product with normal household waste. Correct disposal of your product helps prevent potentially negative consequences for the environment and human health.
- This symbol indicates that batteries contain substances that may be harmful to human health and the environment. Never dispose of batteries with normal household waste. Follow the local rules for separate collection of batteries. Correct disposal of batteries helps prevent potentially negative consequences for the environment and human health.
- The TENS units contain a built-in rechargeable battery that cannot be removed by the user. Take them to an official collection point or a service centre to have the rechargeable battery removed.

natural_image
Recycling symbol with three arrows forming a triangle (no text or labels)- All plastic parts are marked with recycle symbols.
Specifications
| Model | PR3094, PR3093 |
| Rated voltage(V) - adapter | 100-240 ~ 150mA |
| Rated frequency (Hz) - adapter | 50-60 |
| Rated output - adapter | 5V ·s 500 mA |
| Class | Medical device Class IIa |
| Ingress of water - device except charger | IP22 |
| Ingress of water - charger | IP21 |
| Battery type - TENS units | Li-Ion |
| Battery type - remote control | 2 AAA 1.5V alkaline batteries |
Pulse output parameters
| Frequency range | 1-120 Hz |
| Pulse width | 40-400 μs |
| Current output | Max. 60mA at 500-1000 Ohm |
| Maximum output voltage | 120V |
Pulse output parameters
| Current pulse shape | Biphase symmetrical (net current 0dc) |
Operating conditions
| Temperature | from 5°C to +40°C |
| Relative humidity | from 15% to 93% (non-condensing) |
| Atmospheric pressure | from 700hPa to 1060hPa |
Storage and transport conditions
| Temperature - electrodes | from 0°C to +40°C |
| Temperature - device | from -10°C to 50°C |
| Relative humidity | less than 93% (non-condensing) |
| Atmospheric pressure | from 700hPa to 1060hPa |
Note: If you want to store the electrodes for more than a month, keep them at temperatures between +5^ and +27^ .
Note: Do not store the electrodes in the freezer or refrigerator. Do not leave them in extreme heat, nor immerse them in water, or leave them outside of the plastic bag.
Explanation of symbols


natural_image
Simple wavy line drawing with no text or symbols
natural_image
Simple horizontal line with three vertical tick marks (no text or symbols)
Symbols on the device
- This is the symbol for reference number. This symbol is followed by the manufacturer's reference number, which is the type number of the device. The type plates on the remote control and the TENS units show the same type number. On the type plate of the remote control, the type number is followed by the letters RC. On the type plate of the TENS units, the type number is followed by the letters TU.
- This is the symbol for serial number. This symbol is followed by the manufacturer's serial number.
- This symbol means: alternating current.
- This symbol means: direct current.
- This symbol on the remote control, the TENS units and the extension cable, if provided, means: protected against access to hazardous parts with a finger and against vertically falling water drops when tilted up to 15 degrees.


natural_image
Symbol of a wireless signal tower emitting sound waves (no text or labels)
natural_image
Blue pedestrian crossing sign icon (no text or symbols)
natural_image
Blue abstract geometric shape resembling a stylized plant or structure (no text or symbols)
- This symbol on the charger means: protected against access to hazardous parts with a finger and against vertically falling water drops.
- This symbol means that this device emits non-ionising radiation. All devices and systems that include RF transmitters or that intentionally apply RF electromagnetic energy must be labelled with this symbol.
- This symbol means: Type BF (Body Floating) applied part (i.e. electrode) complying with IEC 60601-1.
- This symbol means 'Manufactured by' and appears next to the address of the legal manufacturer.
- This symbol means: caution TENS output. It is placed near all electrode connections.
CE 0344
- This symbol means: Conforms to EC Directives. CE stands for ‘Conformité Européenne’. 0344 is the number of the notified body.
- This symbol means: Do not throw away with the normal household waste. For further instructions, see chapter 'Recycling'.

- This symbol indicates that the adapter is double insulated (Class II).

natural_image
Simple blue line drawing of a house with chimney (no text or symbols)- This symbol indicates that the adapter may only be used indoors.

natural_image
Blue circular icon with a white human figure holding an open book (no text or symbols)- This symbol means: Read the user manual before you start using the device.

- This symbol means: Keep dry.
- This symbol is the mark that identifies the on/off button.
- This is the TENS pulse symbol. It is shown next to the treatment status indicator.
- This is the battery symbol. It is shown next to the battery status indicator.
- This UL classification mark indicates that this device complies with both Canadian and US requirements. MEDICAL-APPLIED CURRENT/ENERGY EQUIPMENT AS TO ELECTRICAL SHOCK, FIRE AND MECHANICAL HAZARDS ONLY IN ACCORDANCE WITH ANSI/AAMI ES60601-1 (2005, C1:09, A2:10), IEC 60601-1 (2005), CAN/CSA C22.2 No.60601.1 (2008, R:2011), IEC 60601-2-10 (2012), CAN/CSA C22.2 No.60601-1-11 (2010)
natural_image
Icon showing a car with a blue 'X' symbol and a key, indicating no text or symbols present.
natural_image
Simple line drawing of a hand holding a small object with a blue X mark, no text or symbols present
natural_image
Simple line drawing of a hand holding two blue square objects with a cross mark (no text or symbols)
natural_image
Frontal view of a human head with marked electrical sensor points (no text or symbols)Symbols on electrode bag
- This symbol means: Do not use while driving, operating machines or performing other activities that may present a risk of injury.
- This symbol means: Do not use damaged or worn electrodes or electrodes that have lost their adhesive power.
- This symbol indicates that the electrodes should be used by one person and not shared with others.
- This symbol means: Do not place the electrodes on top of each other or so close to each other that they touch each other.
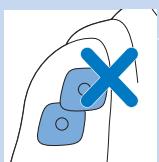
- This symbol means: Do not place electrodes on your face or neck.
natural_image
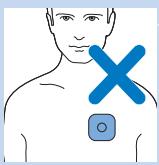
Human torso with a blue X mark and a medical icon on the chest (no text or symbols)- This symbol means: Do not place the electrodes on your chest.
natural_image
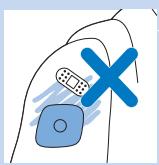
Illustration of a hand holding a medical device with a blue X mark, no text or symbols present- This symbol means: Do not put the electrodes on open wounds, cancerous lesions, rashes and infected or inflamed skin.
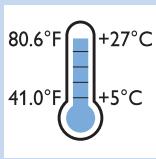
- This symbol indicates the minimum and maximum storage temperature for electrodes if they are stored for more than a month.
natural_image
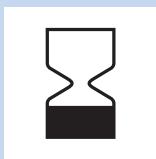
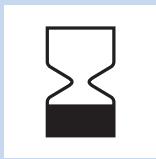
Simple black hourglass icon on white background (no text or symbols)- This is the symbol for 'use by'. It indicates after which date the electrodes must not be used anymore.
Electromagnetic emissions and immunity
Electromagnetic Compatibility (EMC)
The Wireless TENS (PR3093) and the Wireless TENS Pro (PR3094) are approved according to EMC safety standard EN 60601-1-2. They are designed to be used in typical domestic or clinical environments.
Electrode placement guide (Fig. 101)
Einführung
www.philips.com/tens-download
Wichtig
Gegenanzeigen
natural_image
Illustration of a blue electrical plug with a circular socket inserted, showing an arrow indicating direction (no text or symbols present)
natural_image
Diagram of a blue device with a plug and cable, showing a button on a base (no text or symbols)
natural_image
Illustration of a handheld device with a blue arrow pointing to the left side (no text or symbols)natural_image
Illustration of a medical device with an arrow pointing to it, showing internal components and a magnified inset of a sperm-like structure (no text or symbols present)natural_image
Illustration of a blue-handled robotic arm pressing down on a smartphone screen with an upward arrow (no text or symbols)natural_image
Simple line drawing of a car with a blue arrow indicating downward motion (no text or symbols)natural_image
Diagram of a battery being inserted into a plug into a motor (no text or symbols)natural_image
Illustration of a car with a blue arrow indicating direction (no text or symbols)natural_image
Illustration of a blue-handled curved object interacting with a flat surface, showing a blue arrow indicating rotation (no text or symbols)natural_image
Illustration of a hand holding a blue object with droplets, no text or symbols presentnatural_image
Illustration of a hand holding a medical device with a blue arrow pointing to the device (no text or symbols present)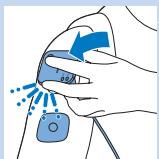
natural_image
Illustration of a hand holding a blue medical device with a blue arrow indicating rotation (no text or symbols)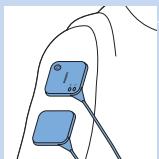
natural_image
Illustration of a human finger with two blue electrode sensors (no text or symbols)natural_image
Illustration of two blue cable harnesses with connectors (no text or symbols)

INTENSITY

natural_image
Diagram of a handheld device with control buttons and an 'OK' button (no text or symbols beyond basic labels)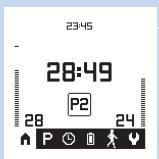
bar
WEEK ACTIVITY | Week | Time (hr) | |---|---| | M | 1.3 | | T | 0.9 | | W | 1.0 | | T | 1.1 | | F | 1.6 | | S | 0.8 | | S | 1.0 |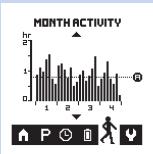
bar
| Hour | Activity | | ---- | -------- | | 0 | 0.5 | | 1 | 1.2 | | 2 | 0.8 | | 3 | 1.5 | | 4 | 0.6 |
bar
DAY ACTIVITY | Time | Activity (min) | |---|---| | 0 | 0 | | 1 | 0 | | 2 | 0 | | 3 | 0 | | 4 | 0 | | 5 | 0 | | 6 | 5 | | 7 | 15 | | 8 | 25 | | 9 | 35 | | 10 | 45 | | 11 | 35 | | 12 | 45 | | 13 | 55 | | 14 | 45 | | 15 | 35 | | 16 | 25 | | 17 | 15 | | 18 | 5 | | 19 | 0 | | 20 | 0 | | 21 | 0 | | 22 | 0 | | 23 | 0 | | 24 | 0 |bar
| Week | Time Spent (hr) | |------|-----------------| | M | 1.5 | | T | 1.0 | | W | 1.2 | | T | 1.3 | | F | 1.8 | | S | 1.0 | | S | 1.1 |
bar
| Hour | Time | Activity Level | |------|------|----------------| | 1 | 1 | 1 | | 1 | 2 | 2 | | 1 | 3 | 1 | | 2 | 1 | 1 | | 2 | 2 | 2 | | 2 | 3 | 1 | | 3 | 1 | 1 | | 3 | 2 | 2 | | 3 | 3 | 1 | | 4 | 1 | 1 | | 4 | 2 | 2 | | 4 | 3 | 1 |natural_image
Illustration of a hand holding a blue object with an arrow indicating direction (no text or symbols)natural_image
Illustration of a hand holding a small blue object with a blue arrow indicating direction (no text or symbols)natural_image
Hand holding a small object with a blue arrow pointing downward (no text or symbols)natural_image
Symbol of a trash bin crossed with a diagonal line, representing no waste or disposal (no text or numbers present)
natural_image
Recycling symbol with three arrows forming a triangle (no text or labels)natural_image
Simple black wavy line on white background (no text or symbols)natural_image
Simple horizontal line with three vertical tick marks, no text or symbols presentnatural_image
Symbol of a wireless signal tower emitting sound waves (no text or labels)
natural_image
Blue icon of a human figure walking inside a square frame (no text or symbols)
natural_image
Abstract blue geometric shape resembling a stylized building or industrial block (no text or symbols)CE 0344
natural_image
Blue line icon of a trash bin with crossed x-axes and a blank rectangular base (no text or symbols)

natural_image
Simple blue line drawing of a house with chimney (no text or symbols)
natural_image
Blue circular icon with a white human figure reading a book (no text or symbols)natural_image
Simple black-and-white icon of an umbrella with raindrops falling (no text or symbols)natural_image
Abstract black wavy line on white background (no text or symbols)natural_image
Simple black-and-white icon of a battery with a lightning bolt symbol (no text or numbers)E360567
natural_image
Blue icon showing a car with a 'X' symbol above and a key beside it (no text or symbols present)natural_image
Simple line drawing of a hand holding a blue X-shaped object (no text or symbols)natural_image
Simple line drawing of a hand holding two blue rectangular objects with a 'X' mark overlay (no text or symbols)natural_image
Frontal view of a human head with a blue X mark and two circular markers on the forehead (no text or symbols)natural_image
Human torso with a blue X mark and a medical device icon, no text or symbols presentnatural_image
Illustration of a hand holding a medical device with a blue X mark and a bandage (no text or symbols)natural_image
Simple hourglass icon with no text or symbolsnatural_image
Illustration of a blue electrical plug with a white socket, showing an arrow pointing to it (no text or symbols present)
natural_image
Diagram of a blue plastic device with a downward arrow indicating force or insertion, mounted on a base with coiled wires (no text or symbols)
natural_image
Illustration of a medical device with a blue arrow pointing to the left side (no text or symbols)natural_image
Illustration of a medical device with an arrow pointing to it, showing internal components and a magnified inset of the device (no text or symbols present)natural_image
Illustration of a computer mouse with a blue handle and an upward arrow indicating motion (no text or symbols)natural_image
Two-step diagram showing a device being inserted into a battery, with no visible text or symbols.natural_image
Illustration of a blue device with an arrow indicating direction (no text or symbols)natural_image
Illustration of a blue-handled device with a downward arrow indicating compression or disassembly (no text or symbols)The image is too blurry to recognize any text content.


natural_image
Illustration of a hand holding a blue object with droplets, no text or symbols presentnatural_image
Illustration of a hand holding a medical device with a blue arrow pointing to the pad area (no text or symbols present)natural_image
Illustration of a hand holding a blue object with a blue arrow indicating rotation (no text or symbols)natural_image
Illustration of a human finger with two blue electrode sensors (no text or symbols)natural_image
Simple line drawing of two blue abstract shapes connected by lines (no text or symbols)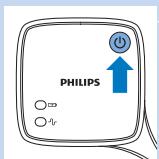


natural_image
Diagram of a handheld device with control buttons and an 'OK' button, no readable text or symbols present.bar
| Week | Time (hr) | |------|-----------| | M | 1.5 | | T | 1.0 | | W | 1.0 | | T | 1.0 | | F | 1.8 | | S | 1.0 | | S | 1.0 |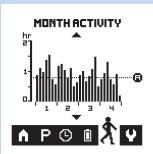
bar
| Hour | Activity (hr) | | ---- | ------------- | | 1 | 1 | | 2 | 1 | | 3 | 1 | | 4 | 1 |natural_image
Illustration of a hand holding a blue object with an arrow indicating direction (no text or symbols)natural_image
Illustration of a hand holding a small object with a blue arrow indicating direction (no text or symbols)natural_image
Hand holding a blue USB flash drive with an arrow indicating left motion (no text or symbols)natural_image
Hand holding a small object with a blue arrow pointing downward (no text or symbols)www.philips.com/tens-electrodes.
natural_image
Symbol of a trash bin crossed with no text or symbols, representing waste sorting or recycling (no text present)

natural_image
Recycling symbol with three arrows forming a triangle (no text or labels)natural_image
Simple wavy line drawing with no text or symbolsnatural_image
Simple black-and-white icon of a radio tower emitting signal waves (no text or symbols)natural_image
Blue human figure walking inside a square frame (no text or symbols)
natural_image
Abstract blue geometric shape resembling a stylized building or industrial block (no text or symbols)

natural_image
Vertical sequence of five blue icons representing home, reading, umbrella, power button, and square (no text or symbols)natural_image
Simple blue line drawing of a house with chimney (no text or symbols)
natural_image
Blue circular icon with a white human figure holding an open book (no text or symbols)
natural_image
Simple black-and-white icon of an open umbrella with raindrops falling (no text or symbols)
natural_image
Simple black power button icon on white background (no text or symbols)
natural_image
Abstract black wavy line on white background (no text or symbols)E360567
natural_image
Blue icon showing a car with a 'X' symbol above and a key beside it, indicating no text or symbols.natural_image
Simple line drawing of a hand holding a blue X-shaped object (no text or symbols)natural_image
Simple line drawing of a hand holding two blue square buttons with a 'X' mark, no text or symbols presentnatural_image
Front view of a human head with blue X mark and medical device icons on upper face (no text or symbols)natural_image
Human torso with a blue X mark and a medical icon on the chest (no text or symbols)natural_image
Illustration of a hand holding a medical padlock and a blue X symbol (no text or labels)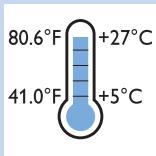
natural_image
Simple black hourglass icon on white background (no text or symbols)natural_image
Illustration of a white electronic device with a blue arrow pointing to its side (no text or symbols)natural_image
Illustration of a medical device with a blue arrow pointing to it, showing internal components and a magnified inset of a coiled tube (no text or symbols present)natural_image
Illustration of a blue curved object pressing down on a white surface with an upward arrow (no text or symbols)natural_image
Illustration of a car with a blue arrow pointing downward (no text or symbols)natural_image
Diagram of a battery connected to a cable, showing internal components and a blue arrow indicating direction (no text or symbols)natural_image
Illustration of a remote control device with a blue cable and directional arrow (no text or symbols)natural_image
Illustration of a blue-handled mechanical component with a downward arrow indicating compression or disassembly (no text or symbols)The image is too blurry to recognize any text content.

The image is too blurry to recognize any text content.

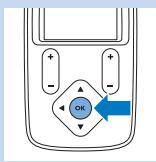
natural_image
Illustration of a hand holding a blue object with droplets, no text or symbols present
natural_image
Illustration of a hand holding a blue medical device with an arrow pointing to it, next to a small blue square (no text or symbols)natural_image
Illustration of a hand holding a blue device with a blue arrow indicating rotation (no text or symbols)natural_image
Illustration of a human finger with two blue square sensors attached to the palm (no text or symbols)natural_image
Illustration of two blue cable connectors with wires, no text or symbols present

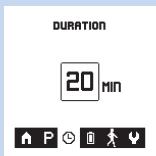
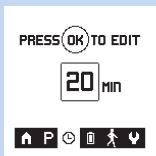
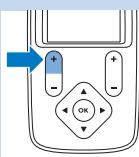


bar
| Week | Time (hr) | |------|-----------| | M | 1.3 | | T | 0.9 | | W | 1.0 | | T | 1.1 | | F | 1.7 | | S | 0.9 | | S | 1.0 |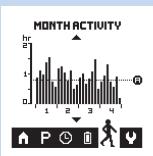
bar
| Hour | Time (hr) | | ---- | --------- | | 1 | 0.5 | | 1 | 1.0 | | 1 | 1.5 | | 1 | 2.0 | | 2 | 0.5 | | 2 | 1.0 | | 2 | 1.5 | | 2 | 2.0 | | 3 | 0.5 | | 3 | 1.0 | | 3 | 1.5 | | 3 | 2.0 | | 4 | 0.5 | | 4 | 1.0 | | 4 | 1.5 | | 4 | 2.0 |bar
| Week | Time (hr) | |------|-----------| | M | 1.5 | | T | 1.0 | | W | 1.0 | | T | 1.0 | | F | 1.8 | | S | 1.0 | | S | 1.0 |
bar
| Hour | Time (h) | | ---- | -------- | | 1 | 1 | | 2 | 1 | | 3 | 1 | | 4 | 1 |natural_image
Illustration of a hand holding a blue object with an arrow indicating direction (no text or symbols)natural_image
Hand holding a small object with a blue arrow pointing downward (no text or symbols)Canal interrompu
natural_image
Symbol of a trash bin crossed with no text or numbers, representing waste sorting or recycling (no text present)
natural_image
Recycling symbol with three arrows forming a triangle (no text or labels)natural_image
Simple wavy line drawing with no text or symbols
natural_image
Simple horizontal line with three vertical tick marks, no text or symbols present
natural_image
Simple black-and-white icon of a radio tower emitting signal waves (no text or symbols)
natural_image
Blue icon of a human figure inside a square frame (no text or symbols)
natural_image
Blue abstract geometric shape resembling a stylized building or industrial block (no text or symbols)
natural_image
Simple blue line drawing of a house with chimney (no text or symbols)natural_image
Blue circular icon with a white human figure holding an open book (no text or symbols)natural_image
Icon showing a car with a blue 'X' symbol and a key, indicating no text or symbols present.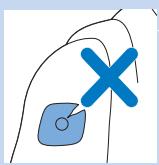
natural_image
Simple line drawing of a hand holding a small object with a blue X mark, no text or symbols present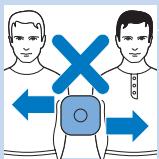

natural_image
Simple line drawing of a hand holding two blue square objects with a cross mark, no text or symbols present.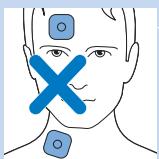
natural_image
Frontal view of a human head with marked electrical sensor points (no text or symbols)natural_image
Human torso with a blue X mark and a medical device icon (no text or symbols)natural_image
Illustration of a hand holding a medical padlock and a blue X symbol (no text or labels)- Always here to help you
- User manual
- PHILIPS
- Introduction
- Intended use
- TENS and pain management
- Activity monitoring and pain management
- Information for the healthcare professional (PR3094 only)
- USB cable
- Important
- Contra-indications
- Adverse reactions
- Important safety information
- Warning
- Caution
- Compliance with standards
- Preset programs
- Program overview
- Conventional TENS programs
- Burst TENS programs
- Frequency-modulated TENS programs
- Program specifications
- Product overview (Fig. 1)
- Preparing for use
- Charging the TENS units
- Preparing for treatment with two channels and four electrodes (PR3094 only)
- Preparing for treatment
- Preparing the remote control
- Inserting the batteries in the remote control
- Locking and unlocking the remote control
- Setting the date and time
- Using the device
- Attaching the electrodes and TENS units
- Electrode placement
- Start and stop treatment
- Selecting a program
- Setting the duration of a program
- Starting and stopping a treatment (PR3093)
- Starting and stopping a treatment (PR3094)
- Activity monitoring
- Reading the results
- Activity target (PR3094)
- After use
- Storage of the electrodes
- Cleaning
- Troubleshooting
- Signals on the device
- Battery status indications on the remote control
- Error signals on the remote control
- Battery low
- No connection with the TENS units
- Channel interrupted
- Indicator signals on the TENS units
- Battery status indicator
- Treatment status indicator
- Replacement
- Electrodes
- Batteries of the remote control
- Ordering accessories
- Guarantee and support
- Guarantee restrictions
- Manufacturer's legal address
- Recycling
- Explanation of symbols
- Symbols on the device
- Symbols on electrode bag
- Electromagnetic emissions and immunity
- Electromagnetic Compatibility (EMC)
- Electrode placement guide (Fig. 101)
- Einführung
- www.philips.com/tens-download
- Wichtig
- Gegenanzeigen
- Canal interrompu
Brand : PHILIPS
Model : PR3094/00
Category : Electrical stimulation device