
Feeling OpenTherm - Thermostat Grässlin - Free user manual and instructions
Find the device manual for free Feeling OpenTherm Grässlin in PDF.


| Type | Digital room thermostat clock with modulating burner control |
| Dimensions (H x W x D) | 87 x 154 x 27 mm |
| Weight | 200 g |
| Power supply | OpenTherm bus (optional: 2 x 1.5 V AA LR6 batteries) |
| Battery service life | Up to 2 years (depending on usage) |
| Power reserve | More than 1 hour (without batteries) |
| Connection type | OT bus via screw terminals (1.5 mm²), external inputs via plug-in terminals (1.0 mm²) |
| Display | Light blue backlit LCD with time, temperature, operating modes, histogram |
| Temperature setting range | +5°C to +32°C |
| Temperature control accuracy | ±0.5°C (20 K/hour) |
| Resolution of room temperature display | 0.1°C |
| Programming | Weekly program with up to 48 time and temperature events; 4 pre-programmed + 1 user-defined |
| Operating modes | Automatic, Manual Override, Comfort, Reduced, Vacation, OFF |
| External inputs | Motion detector, window/door contact, telephone remote switch, outdoor temperature sensor (NTC 100 kΩ) |
| Regulation | Modulating (PID or 2-point) with optional outdoor temperature compensation (OTC) |
| Protection class | II |
| Protection type | IP40 |
| Colors available | White (9010), anthracite (7016), silver (9006) |
| Installation | Surface mounted on wall or flush-mounted box; professional electrician required |
| Maintenance | No special maintenance required; battery replacement only if used |
| Overridden | Yes, via manual override keys or phone |
Frequently Asked Questions - Feeling OpenTherm Grässlin
User questions about Feeling OpenTherm Grässlin
0 question about this device. Answer the ones you know or ask your own.
Ask a new question about this device
Download the instructions for your Thermostat in PDF format for free! Find your manual Feeling OpenTherm - Grässlin and take your electronic device back in hand. On this page are published all the documents necessary for the use of your device. Feeling OpenTherm by Grässlin.
USER MANUAL Feeling OpenTherm Grässlin
1 Gerät öffnen

2 Wandbefestigung


3
![graph TD A["A"] --> OT_Bus["OT-Bus"] B["B"] --> OT_Bus OT_Bus --> Boiler_Heizung["Boiler / Heizung"] Boiler_Heizung --> Digital["digital 4"] Boiler_Heizung --> G["G"] Boiler_Heizung --> Temp["Temp. 5"] Digital --> ext. Temp --> ext.](/content/2026/05/1018953/images/e667ff0993bc24f8321558231c6a0a979bdf1ed09e27ef722f5e781938b6e03c.jpg)
DE

Verwenden Sie
2 x 1.5 V AA LR6
(Für Hintergrund-
3 = 50/35 System, 4 = 40/30 System
Safety Instructions 44

Information about the device 45
Description of the device 45
Designated use 45
Technical data 46

Installation and mounting 48

Operation and configuration 50
Operating information 50
Description of the assembly groups ....51
Display 52
Function keys ....53
Function keys - Direct access ....54

Start-up ....57
Settings 58
Set date and time ....58
New program – central heating (CH) 59
New program – domestic hot water (DHW) ......62
Edit program 65
Delete program 65
Operating modes 66
External inputs ....70
User Menu 73
Installation Menu 74
Outdoor temperature compensation (OTC) 77
Error messages 80

Disposal / Recycling 81
EN
Safety Instructions

Danger! Risk of electric shock!
▷ Connection and mounting must be performed by a professional electrician!
• To avoid injuries, the device must be connected and mounted by a skilled electrician only!
- Please observe the national regulations and safety instructions.
- Interventions and changes to the device will invalidate the warranty and guaranty rights.
Read and observe these instructions to guarantee a perfect function of the device and a safe operation.

Information about the device
Description of the device
Digital room thermostat clock with modulating burner control, which allows control and programming of service water and heating applications by transmitting data between the room thermostat clock and the water heater.
The room thermostat clock has different operating modes and additional inputs for connecting accessories such as outdoor temperature sensor, motion detector or window/door contact. In addition, the room thermostat can be controlled by phone.
Designated use
- Control of OpenTherm water heater and burner.
- Surface mounted device which is mounted on walls.
- Suitable for installation on flush-mounted box.
- Suitable for use in dry rooms only!

Technical data
Dimensions H x W x D (mm) 87 x 154 x 27
Weight (g) 200
Power supply Water heater OT bus (optionally: batteries 1.5 V AA LR6)
Service life of battery 2 years (depending on frequency of switching)
Power reserve > 1h (without optional batteries)
Connection type OT bus – screw terminals / 1.5 mm 2
external inputs – plug-in terminals / 1.0 mm 4
Resolution of the room temperature 0.1°C display
Temperature setting range +5°C... + 32°C
Time display 24 h or 12 h AM/PM format
Resolution of the time setting
– daytime display 1 minute
– program 30 minutes
Temperature controlling accuracy ± 0.5°C (20 K/hour)

Heat measurement (heating system) 3 K/hour
Room temperature display +0°C... + 50°C
Programming Weekly program containing up to
48 time and temperature programs
Pre-programmed programs 4 + 1 user-defined
Protection class II
Protection type IP40
Display lighting Yes / light-blue
External input – analog - no voltage
- digital - sensor NTC 100 kΩ
Manual override Yes
Regulation Modulation
Colors: white / anthracite / silver 9010 / 7016 / 9006
EN

Installation and mounting


1 Opening the device

2 Wall mounting


3
⚠️ Connection and mounting must be performed by a professional electrician!

![graph TD A["A"] -->|OT bus| B["water heater / heating"] B --> C["EN"] D["B"] --> A E["digital"] --> F["4"] E --> G["G"] E --> H["5"] I["ext. temp."] --> E](/content/2026/05/1018953/images/7e5ece7600e2847564ff8fc8c805a80823631ad1f200b5d95772ba222bb9fa8f.jpg)
4 Closing the deviceConnection / Wiring diagram

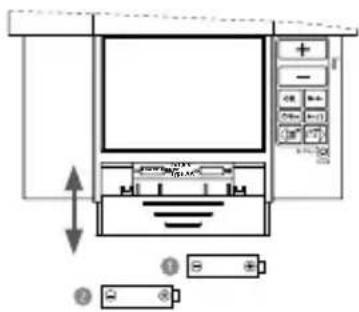
5 Inserting batteries (optional)

Use
2 x 1.5 V AA LR6
(For backlight, if the water heater does not support smart power.)

Operation and configuration
The device provides two ways of regulating the room temperature:
- Room-temperature-dependent regulation without outdoor temperature sensor (PID adjustable, 2-point regulation or optimum start). Integrated into the control device is a room temperature sensor, which will take into account heat sources, such as solar radiation or stoves.
- Regulation depending on outdoor temperature including outdoor temperature sensor (OTC – outdoor temperature compensation)
See chapter External Inputs; outdoor temperature sensor"
Operating information
- Flashing texts signal that an entry is required. If you do not enter anything within two minutes, the device switches back to automatic operation.
- Confirm all entries by pressing OK.
- Saved settings are stored in the data memory.
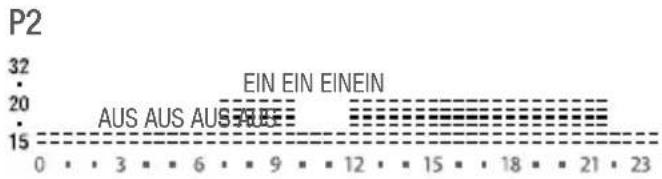
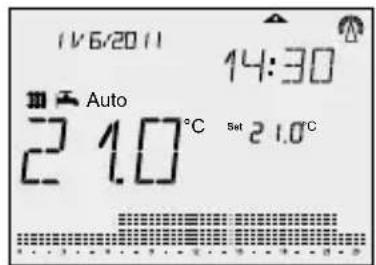
- The histogram shows the programmed temperature profile 7 – 15°C = shown as one segment 16 – 26°C = one segment represents 1°C more than 26°C = shown as 12 segments

Description of the assembly groups

EN
A Sliding device cover
B Keys for manual override function (override keys)
C Window
D Keypad
E Battery compartment
F Display
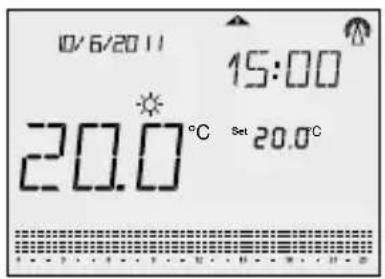
Display

A Current weekday (1 = Monday, 2 = Tuesday, ...)
B Operating hours
C Battery status
D1 Antenna symbol: Communication ON; flashing during data transfer
D2 Antenna symbol crossed out: Communication problem
E Time, 12h or 24h format
F Operating mode
G Symbol for room /outdoor temperature
H Set temperature
I OFF mode
J Time/Temperature histogram
K Outdoor temperature compensation (OTC) is active
L Current temperature
M Operating mode status display
N Current date

Function keys
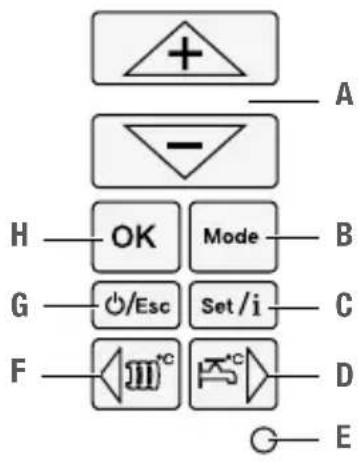
* Press RESET key when putting the room thermostat clock back on the mounting plate (only if device is working without batteries).
A +/- keys to set temperature, days, hours and events.
B MODE key to select the available operating modes.
C INFO key for the inquiry of important settings.
SET key for settings after start-up (press the key and hold it down for 5 seconds).
D DHW key (▷ key) for displaying and controlling the domestic hot water temperature
E RESET key to return to the default settings. *
F CH key (◀ key) for displaying the actual/nominal temperature of central heating.
G ESC/STANDBY key: ON/OFF key, to go one step in the menu. To return to the main menu/automatic mode, press key > 3 seconds.
To go to standby mode, press the key > 5 seconds.
H OK key to confirm entries and go one step forward.
Function keys – Direct access
Info Menu
Here you can retrieve the following information:
• Current room temperature (IN)
• Current outdoor temperature (OUT)
• Modulation level in % (MOD)
- Programs – central heating (CH)
- Programs – domestic hot water (DHW)
![graph TD A["Set/i"] --> B["IN"] B --> C["OUT"] C --> D["MOD"] D --> E["CH"] E --> F["DHU"] F --> G["AUTONODE"] C --> H["Set/i"] H --> I["Set/i"] I --> J["Set/i x 7"] J --> K["Set/i x 7"]](/content/2026/05/1018953/images/38002a6e3ce26eec7dc111a820638802e38d8aacd4e7dc6698e8c0960df21b2e.jpg)
Operating mode
Here you can select the following operating modes:
• Automatic mode ( Auto
- Comfort temperature mode (☀️)
- Reduced temperature mode ( )
- Vacation mode ( )
▶ Press OK to confirm the selection.
![graph TD A["Mode"] --> B["Auto"] B --> C["Mode / OK"] B --> D["Mode / OK"] B --> E["Mode / OK"] B --> F["Mode / OK"] B --> G["Mode / OK"] B --> H["Auto"]](/content/2026/05/1018953/images/485b5cfe931384d5ae32ad25027ea6d7706024fe60ff2be10bd6c58217274cf4.jpg)
Temperature menu – central heating
Here you can view the actual (ACt) and set (SEt) heating temperatures.
![graph TD A["Actual Temp."] --> B["SET Temp."] B --> C["Output"]](/content/2026/05/1018953/images/19dc0336e1258c8296b8b5638676a97ef663a7dcf75d1ae64fde5016a504e2a6.jpg)
EN

Temperature menu – domestic hot water
Here you can control and set the domestic hot water temperature.
![graph TD A["Hand icon"] --> B["Actual Temp."] B --> C["SET Temp."] C --> D["ON, OFF, TIMED SET Temp."] D --> E["OK"] D --> F["OK"] E --> G["+"] F --> H["-"]](/content/2026/05/1018953/images/e28dae2ff904cfd90fdbf0a1bea5d8157d192c715ac5cf21252243e4ae660103.jpg)
- Press the DHW key
Displays the current water temperature
Displays the set water temperature
- Select when domestic hot water is required:
ON (ON) = all-day domestic water preparation
OFF (OFF) = no hot water preparation
TIM (timed) = program-dependent hot water preparation,
see chapter "New program – domestic hot water (DHW)", page 62.
- Confirm by pressing OK.
- Select the desired domestic hot water temperature
→OK

Start-up
Set date and time
Sequence for setting the date and time during start-up.
15/06/2011 appears as default setting.
Insert batteries or connect to OpenTherm water heater *
![graph TD A["OpenTherm water heater *"] --> B["YEAR"] B --> C["MONTH"] C --> D["DAY"] D --> E["HOURS"] E --> F["MINUTES"] F --> G["PROGRAM"] G --> H["CH or DHW"] H --> I["..."] I --> J["EN"] C --> K["+/-"] K --> L["+/-"] L --> M["+/-"] M --> N["+/-"] N --> O["+/-"] O --> P["+/-"] P --> Q["+/-"] Q -->…](/content/2026/05/1018953/images/ae59635b5ca4ddaafb3e75b5dfc899d564232d2c488e95146836fb662431f801.jpg)

* If no batteries have been inserted, it may take up to 45 seconds until communication between the room thermostat clock and the water heater is initiated via the OT bus.

- Use the +/- keys to set year, month, day, hour and minute.
- Press OK to confirm the selection.
- For the detailed procedure of creating a new program, see chapter "New program – central heating (CH)" or "New program – domestic hot water (DHW)".

Settings
Press the SET/INFO key for 5 seconds to go to the "Settings" menu. Here you can set the date, time and programs for central heating and domestic hot water.
Set date and time
![graph TD A["Set / i"] --> B["DATE 1-3"] B --> C["YEAR"] C --> D["MONTH"] D --> E["DAY"] E --> F["OK"] C --> G["OK"] G --> H["OK"] E --> I["OK"]](/content/2026/05/1018953/images/ff8498033b5404270a30d09cd05bc21dfae6c523774f32489c503aef6775a07e.jpg)
The +/- key can be used to select between:
- 1-3 = Setting the date
- 2-3 = Setting the time
- 3-3 = Setting the programs
(central heating or domestic hot water)

- Use the +/- keys to set year, month, day, hour and minute.
- Press OK to confirm the selection.
- The time is set in the same way as the date.

New program – central heating (CH)
![graph TD A["Set /i"] --> B["5 sec."] B --> C["PROG 3-3"] C --> D["OK"] C --> E["OK"] C --> F["OK"] D --> G["NEW 1-3"] E --> H["NEW CH 1-2"] F --> I["PROG CH DAY"] G --> J["PROG P1...P4"] H --> K["PROG P1...P4"] I --> L["EDIT PROGRAM"] J --> M["SET /i"] K --> N["OK"] L --> O["OK"] M --> P["OK"] N -->…](/content/2026/05/1018953/images/0faaa2892fcec28e2955e5293291bf1983a89843a28547f5ce0a3c53bc702ef7.jpg)
- Press the SET/INFO key for 5 seconds.
- Select PROG 3-3 → OK
- Select NEW 1-3 → OK
- Select NEW CH 1-2 → OK
- Select desired days (◀ or ▷ key)

Select between:
- Complete week: 1-7
- Working week: 1-5
- Weekend: 6-7
- Single days: 1, 2, 3, 4, 5, 6, 7
▶ Confirm day block by pressing OK.
▶ Select single days by pressing the SET/INFO key Then confirm single day block by pressing OK.
EN

Select program
Each weekday or day block must be assigned a program P1, P2, P3, P4 (predefined) or Pd (user-defined).

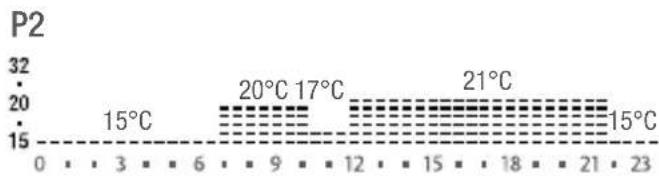
- Select desired program +/- and confirm by pressing OK.
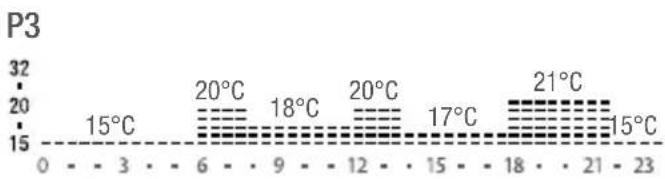
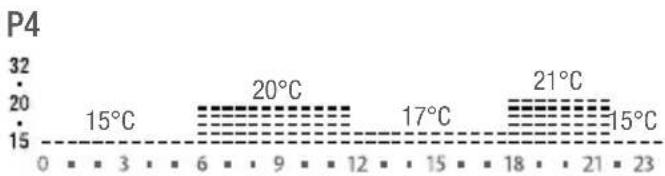
Pd User-defined program.


If desired, you can modify the predefined programs P1-P4 or create your own program under Pd.
Use the + / - keys to increase/decrease the temperature stepwise by 0.5°C .
Use the ◀ or ▷ key to go forward/ backward by 30 minutes each. The previously set temperature will be applied.
- Press OK to save the settings.
EN
New program – domestic hot water (DHW)
![graph TD A["Set / i"] --> B["5 sec."] B --> C["PROG 3-3"] C --> D["OK"] C --> E["NEW 1-3"] E --> F["OK"] E --> G["NEW DHU 2-2"] G --> H["OK"] G --> I["PROG. DHU DAY"] I --> J["OK"] I --> K["PROG. P1...P4"] K --> L["OK"] K --> M["EDIT PROGRAM"] M --> N["+"] N --> O["+"] O --> P["+"] P --> Q["+"] Q --…](/content/2026/05/1018953/images/e0e710b1df6d86812f81e0c00a533f3c8adab094384cd0dd57f4c432138a27a9.jpg)
- Press the SET/INFO key for 5 seconds.
- Select PROG 3-3 → OK
- Select NEW 1-3 → OK
- Select NEW DHW 2-2 → OK
- Select desired days (◀ or ▷ key)

Select between:
- Complete week: 1-7
- Working week: 1-5
- Weekend: 6-7
- Single days: 1, 2, 3, 4, 5, 6, 7
▶ Confirm day block by pressing OK.
▶ Select single days by pressing the SET/INFO key Then confirm single day block by pressing OK.

Select program
Each weekday or day block must be assigned a program P1, P2, P3, P4 (predefined) or Pd (user-defined).

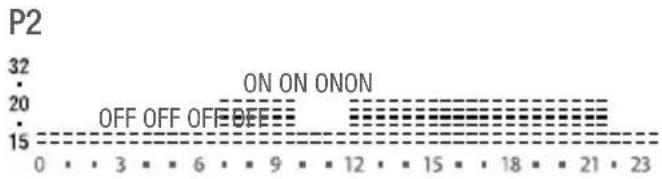
- Select desired program +/- and confirm by pressing OK.


Pd User-defined program.
EN

If desired, you can modify the predefined programs P1-P4 or create your own program under Pd.
Use the +/- keys to switch the domestic hot water preparation to ON or OFF. Use the ◀ or ▷ key to go forward/backward by 30 minutes each. The previously set value (ON/OFF) will be applied.
- Press OK to save the settings.

To activate the program-dependent domestic hot water preparation, you have to select the setting tIM in the "Domestic hot water" temperature menu, see page 56.

Edit program Delete program
![graph TD A["Set /i *)"] --> B["PROG 3-3"] B --> C["EDIT 2-3"] C --> D["EDIT CH 1-2"] D --> E["EDIT CH DAY"] E --> F["EDIT TEMPERATURE"] F --> G["+"] F --> H["-"] G --> I["+"] H --> J["-"] I --> K["+"] J --> L["-"] K --> M["OK"] L --> N["OK"] M --> O["OK"] N --> P["OK"] O --> Q["OK"] P --> R["OK"]](/content/2026/05/1018953/images/62583cc66e43b13f511439075aadfafdb44f8ee9b4b9f2ebd3883edb10903684.jpg)
![graph TD A["Set /i *)"] --> B["PROG 3-3"] B --> C["DEL 3-3"] C --> D["DEL CH1-2"] D --> E["DEL CH TAG"] E --> F["OK"] F --> G["OK"] G --> H["OK"] H --> I["OK"] I --> J["OK"] J --> K["+"] K --> L["-"] L --> M["+"] M --> N["-"] N --> O["+"] O --> P["-"] P --> Q["+"] Q --> R["+"] R --> S["+"] S --> T["…](/content/2026/05/1018953/images/ebb1b02f30897b85beceeacc25c4bca1bc8a31818b36f116abe190a7188625bd.jpg)
*) Press the key for 5 seconds. *) Press the key for 5 seconds.
EN

Operating modes

Keep pressing the MODE key until the desired operating mode appears and confirm by pressing OK.
Press the MODE or ESC key for 5 seconds to quit the respective operating mode prematurely. After that, the room thermostat clock returns to Automatic mode.
Automatic mode
Symbol: Autoth room-temperature-dependent control)
Auto + otc (with outdoor-temperature-dependent control)
After each programming, the device returns to Automatic mode. In this mode, the predefined or user-defined programs are executed.
Manual Override (with room-temperature-dependent control)
Symbol: 👍
With room-temperature-dependent control, you can use the manual override function to increase or decrease the currently set temperature with the housing closed. Press keys to set the desired temperature. A confirmation by pressing OK is not required. The set value is valid for


the current period and is maintained until the next program change (time and temperature).
To return to Automatic mode, press the upper △▼ keys for 3 seconds or open the housing cover and press the OK key.
Comfort temperature mode
Symbol:
In the Comfort temperature mode, the temperature for the current day is set to a value (default setting: 20°C). At the beginning of the next day (00:00 o'clock), the room thermostat clock will return to the Automatic mode. The comfort temperature can be set in the user menu.
Press the MODE key to quit the Comfort temperature mode prematurely.
EN

Reduced temperature mode
Symbol:
In the Reduced temperature mode, the temperature for the current day is set to a value (default setting: 15°C). At the beginning of the next day (00:00 o'clock), the room thermostat will return to the Automatic mode.
The reduced temperature can be set in the user menu.
Press the MODE key to quit the Reduced temperature mode prematurely.
Vacation mode
Symbol:
This function leaves a set temperature (7 - 18°C) switched on for a certain period of time. This period of time can be set to between 1 and 90 days. The starting day is the current day.
After the set time has expired, the device returns to the Automatic mode.


Use the +/- keys to set the temperature, date and time. Press the OK key, to confirm the selection.
Press the MODE key to quit the Vacation mode prematurely.
Press the ESC key to change the settings of the vacation program.
OFF mode
Symbol: OFF
This mode switches the system off (the frost protection is retained). To activate the OFF mode, press the ESC/STANDBY key for 5 seconds. To leave the OFF mode, press the ESC/STANDBY key again for 5 seconds.
The Standby mode can only be set in Automatic mode.

EN
External inputs

Press the OK, MODE and SET/INFO keys simultaneously for 3 seconds until the installation menu (INSTALLERS MENU) is displayed. Under EXTERNAL INPUT (EXT), you can configure the external input.
Motion detector (DIGI)
If you connect a motion detector to the external input, in the installation menu under EXTERNAL INPUT (EXT) you have to select the setting MdC (motion detector).
The connection type of the motion detector must be an NO contact.
After connection of the motion detector, the room thermostat clock will switch to the Reduced temperature mode (▶+ ✗ If the motion detector detects movement in the room, the room thermostat clock will automatically switch to the Comfort temperature mode for the next 30 minutes ( ✉ ✘ If the motion detector detects further movement, before the 30 minutes have expired, the Comfort temperature mode will be extended by another 30 minutes.
If no more movement is detected within the 30 minutes, the room thermostat clock will switch back to the Reduced temperature mode.

Window/Door contact (DIGI)
If you connect a window/door contact to the external input, in the installation menu under EXTERNAL INPUT (EXT) you have to select the setting UdC (window/door contact).
The connection type of the window/door contact must be an NO contact.
After connection of the window/door contact, the room thermostat clock will switch to the Automatic mode. If windows/doors are opened for more than 2 minutes, the room thermostat clock will switch to the Reduced temperature mode ( + ). When the windows/doors are closed again, the room thermostat clock will return to the automatic mode after 2 minutes.
Telephone remote switch (DIGI)
If you connect a telephone remote switch to the external input, in the installation menu under EXTERNAL INPUT (EXT) you have to select the setting tLF (telephone).
Next, under EXTERNAL PHONE MODE (EPM) you select the setting rdC for the Reduced temperature mode or CoM for the Comfort temperature mode.
The connection type of the telephone remote switch must be an NO contact.
After connection of the telephone remote switch, the room thermostat clock will switch to the Automatic mode. Upon activating the telephone remote switch, the room thermostat clock will switch, depending on the setting, to the Comfort or Reduced temperature mode ( ✉ + 📞 + ⚫ ). 📞
EN

This operating mode is executed until the telephone remote switch is deactivated again or the ESC key is pressed. After that, the room thermostat clock returns to Automatic mode.
Outdoor temperature sensor (OTS)
An outdoor temperature compensation (OTC) regulation allows the the water heater to respond quickly to changes of the outdoor temperature, in order to adjust the supply temperature and guarantee a constant room temperature.
If you connect an outdoor temperature sensor (NTC 100 kΩ) to the external input of the room thermostat clock, in the installation menu under OUTDOOR TEMPERATURE SENSOR (OTS) you have to select the setting ON.
The outdoor-temperature-dependent regulation must be activated in the installation menu under OTC REGULATION (OTC) (ON). If you do not activate the outdoor-temperature-dependent regulation (OFF), only the current outdoor temperature will be shown on the display.
The outdoor temperature sensor can also be connected directly to the water heater. An outdoor-temperature-dependent regulation is also possible in this case, but the current outdoor temperature will not be shown on the display of the room thermostat clock.

User Menu
Press the MODE and SET/INFO keys simultaneously for 3 seconds until the user menu (USER MENU) is displayed. To go to the next menu item, press the ▷ key; to return to the previous menu item, press the ◀ key.
Use the +/- keys to change setting and confirm them by pressing OK.
The following settings are possible:
Display lighting (D_t) Switches the display lighting on (5, 10 or 15 seconds)
Display brightness (D_B) Sets the display brightness (0 = OFF, ..., 4 = 100%)
Display contrast (D_C) Sets the display contrast (0 = min., ..., 15 = max.)
Comfort temperature (COT) Sets the comfort temperature (15°C to 24°C)
Reduced temperature (RET) Sets the reduced temperature (7°C to 15°C)
Offset (OFS) Option to set/modify the measured temperature (-5°C...+5°C)
Summertime/wintertime (SWT) Activates/deactivates the automatic change
Time format (TMF) 12h or 24h format can be set
Default settings (DFL) Restores the default settings
EN

Installation Menu
Press the OK, MODE and SET/INFO keys simultaneously for 3 seconds until the installation menu (INSTALLERS MENU) is displayed. To go to the next menu item, press the ▷ key; to return to the previous menu item, press the ◀ key.
Use the +/- keys to change setting and confirm them by pressing OK.
The following settings are possible:
High temperature (HIT): Sets the high temperature for programs (central heating)
max. value: +32°C, preset value: +32°C
Low temperature (LOT) Sets the low temperature for programs (central heating)
min. value: +7°C, preset value: +15°C
Frost protection (FRT) Sets the frost protection temperature to between +3°C and +7°C
preset value: 5°C
DHW temperature (HWT) Sets the low temperature for programs (domestic hot water)
min. value: +20°C, max. value: +85°C, preset value: +60°C
DHW time (HWT) Sets the time for domestic hot water preparation
- ON = all-day domestic hot water preparation
- OFF = no domestic hot water preparation
- tIM (timed) = program-dependent domestic hot water preparation

Algae function (ALG) Sets the algae function: ON or OFF
To prevent the formation of bacteria in the domestic hot water storage tank during prolonged shutdown periods, the domestic hot water is heated once a week (Wednesdays, 2:00 o'clock) to 70°C for one hour.
(Only available if a separate domestic hot water storage tank is present.)
Regulation (REG) To select between PID and 2-point regulation (preset: PID)
System reaction (S_R) Sets the heating system reaction
– Fast (FSt): 12 cycles per hour (preset)
– Medium (Med): 6 cycles per hour
– Slow (Slo): 3 cycles per hour
(only available, if regulation (REG) is set to PID)
Differential (DIF) Sets the differential value to between 0.1°C and 0.9°C
(only available, if regulation (REG) is set to 2P)
Optimum start (OPS) Sets the optimum start: ON or OFF
(the temperature is reached at the set time.)
EN

Heat gradient Sets the speed/time to reach the desired room temperature: 1°C/hour,
2°C/hour or 4°C/hour
(only available, if optimum start (OPS) is set to ON)
OTC regulation (OTC) Set the OTC regulation to ON or OFF
Installation type (ITC) Sets the heating type: 1, 2, 3 or 4
1 = 90/70 system, 2 = 70/50 system (preset),
3 = 50/35 system, 4 = 40/30 system
(only available, if OTC regulation (OTC) is set to ON)
External input (EXT) Sets the external input: OFF, tLF (telephone), UdC (window/door contact)
or MdC (motion detector)
External phone mode (EPM) Sets the external phone mode: rdc = Reduced temperature mode or
CoM = Comfort temperature mode
(only available, if external input is set to tLF)
Outdoor temperature sensor Sets the outdoor temperature sensor: ON or OFF (OTS)
Key lock (LOK) Activates the key lock to prevent unauthorized access.
To deactivate the key lock, press the MODE and ESC/STANDBY key for
3 seconds.

Operating hours (OPT) Displays the operating hours of the room thermostat
(max. 99.999 hours).
Maintenance (MAN) You can set whether and after how many months a maintenance
message is to be displayed - 6M (6 months), 12M (12 months), 18M
(18 months), 24M (24 months), rST (Reset) or OFF.
After the set time has expired, a message appears on the display.
Battery level (BAT) The battery level is displayed.
Outdoor temperature compensation (OTC)
For OTC regulation, the starting and end points of the heating curve are set.
They can be set in the installation menu under INST_TYPE.
To change the temperatures temporarily, the heating curve can be shifted by pressing the 4 keys, see manual override page 79.

EN

Type of heating
| Type of heating Setting range | Supply / return temperature |
| Radiator heating High temperature | +90°C/ +70°C |
| Radiator heating Middle temperature | +70°C/ +50°C |
| Radiator heating Low temperature | +50°C/ +35°C |
| Floor heating Lowest temperature | +40°C/ +30°C |
Sets the type of heating
| Type of heating | Menu selection* HK | starting point HK end | point | P shift Reduction |
| 90 / 70 system 1 | +30°C +85°C -15°C | |||
| 70 / 50 system 2 | +25°C +75°C -15°C | |||
| 50 / 35 system 3 | +25°C +55°C -15°C | |||
| 40/30 System 4 | +25°C +45°C -15°C |
*) The selection of the type of heating is done in the installation menu under INST_TYPE. Select the heating type for your system.

Manual Override (with OTC regulation)
Symbol: 📋 + otc
With OTC regulation, you can use the manual override function to shift the current heating curve in parallel, in order to increase or decrease the room temperature.
Use the △▽ keys to set the desired nominal value between -5 and +5, i.e., a shift in the heating curve by 5 K maximum. A confirmation by pressing OK is not required. The set value is valid for the current period and is maintained until the next program change (time and temperature).

To return to Automatic mode, press the upper keys for 3 seconds or open the housing cover and press the OK key.
EN

Error messages
As soon as an error occurs, the warning symbol △ appears on the display.
▶ Press the SET/INFO key to see the error code.

| Error code Description | |
| 000 Faulty connection –No communication with the water heater | |
| 001 Error – Water heater locked | |
| 002 Water pressure too low (central heating) | |
| 003 Error gas/flame (water heater) | |
| 004 Error air pressure (water heater) | |
| 005 Water too hot (central heating) | |
| 006 Diagnosis/Service display | |
| 007 No connection to outdoor temperature sensor |
Disposal / Recycling
Dispose of the packing material correctly according to legal requirements and regulations.
For the disposal of defective system components or of the system at the end of its service life, please observe the following information:
- Ensure proper disposal of the parts, i.e., separating them according to type.
- Do not throw electrical and electronic components in the bin. Take these parts to the recycling centers.
- Always ensure that the device is disposed of in an environmentally compatible manner in accordance with state-of-the-art environmental protection, recycling and disposal technologies.

For further product information, please go to our eLearning Portal at www.graesslin.de/elearning
EN

Indice



3
collegamento


Utilizzare
2 x 1,5 V AA LR6



1 Apparaat openen

2 Wandbevestiging


3
![graph TD A["A"] --> OT_Bus["OT-bus"] B["B"] --> OT_Bus OT_Bus --> boiler["boiler / verwar-ming"] External["External ingangen"] --> digitaal["digitaal 4"] External --> digitaal["G"] External --> digitaal["5"] ext-temp["ext. temp."] --> digitaal style External fill:#f9f,stroke:#333 style External fill…](/content/2026/05/1018953/images/25ce5557d76a9a82b3d5afea92f964e3908fe085a3c3771f27815a8d88e3c8b0.jpg)
NL

Gebruik
2 x 1.5 V AA LR6
(voor

3 = 50/35 systeem, 4 = 40/30 systeem
- 3
- DE
- SAFETY INSTRUCTIONS
- DANGER! RISK OF ELECTRIC SHOCK
- INFORMATION ABOUT THE DEVICE
- DESCRIPTION OF THE DEVICE
- DESIGNATED USE
- TECHNICAL DATA
- OPERATION AND CONFIGURATION
- OPERATING INFORMATION
- FUNCTION KEYS
- FUNCTION KEYS – DIRECT ACCESS
- INFO MENU
- OPERATING MODE
- TEMPERATURE MENU – CENTRAL HEATING
- TEMPERATURE MENU – DOMESTIC HOT WATER
- START-UP
- SET DATE AND TIME
- SETTINGS
- NEW PROGRAM – CENTRAL HEATING (CH)
- SELECT PROGRAM
- NEW PROGRAM – DOMESTIC HOT WATER (DHW)
- OPERATING MODES
- AUTOMATIC MODE
- COMFORT TEMPERATURE MODE
- SYMBOL
- REDUCED TEMPERATURE MODE
- VACATION MODE
- OFF MODE
- EXTERNAL INPUTS
- MOTION DETECTOR (DIGI)
- WINDOW/DOOR CONTACT (DIGI)
- TELEPHONE REMOTE SWITCH (DIGI)
- OUTDOOR TEMPERATURE SENSOR (OTS)
- USER MENU
- INSTALLATION MENU
- OUTDOOR TEMPERATURE COMPENSATION (OTC)
- MANUAL OVERRIDE (WITH OTC REGULATION)
- ERROR MESSAGES
- DISPOSAL / RECYCLING
- INDICE
Brand : Grässlin
Model : Feeling OpenTherm
Category : Thermostat