SC1711 - Microwave Scarlett - Free user manual and instructions
Find the device manual for free SC1711 Scarlett in PDF.


| Product Type | Microwave Oven |
| Brand | Scarlett |
| Model | SC1711 |
| Category | Countertop Microwave |
| Capacity | 20 Liters |
| Power Output | 800 Watts |
| Dimensions (W x H x D) | 45.5 x 26.2 x 34.5 cm |
| Weight | 10.5 kg |
| Voltage | 230 V / 50 Hz |
| Cooking Functions | Defrost, Auto Cook, Quick Start, Timer |
| Control Type | Mechanical Dials |
| Door Type | Side-opening with Handle |
| Interior Light | Yes |
| Turntable | Yes, Removable Glass Tray |
| Child Lock | No |
| Auto Shut-off | Yes, at end of cooking time |
| Cleaning | Wipe with damp cloth; mild detergent |
| Safety | Door interlock switch; overheating protection |
| Spare Parts Availability | Glass tray, turntable ring, fuse available |
| Warranty | 1 year limited |
Frequently Asked Questions - SC1711 Scarlett
User questions about SC1711 Scarlett
0 question about this device. Answer the ones you know or ask your own.
Ask a new question about this device
Download the instructions for your Microwave in PDF format for free! Find your manual SC1711 - Scarlett and take your electronic device back in hand. On this page are published all the documents necessary for the use of your device. SC1711 by Scarlett.
USER MANUAL SC1711 Scarlett
natural_image
Line drawing of a Capter/Cron microwave oven with control panel and display (no text or symbols on main body)www.scarlett.ru
GB DESCRIPTION
- Door lock system
- Oven window
- Waveguide mica shield (DO NOT REMOVE!)
- Shaft
- Roller ring
- Glass tray
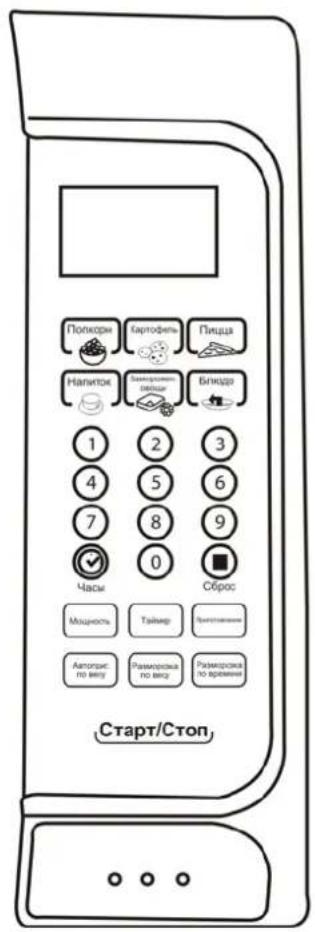
- Control panel
- Digital display
- Door open button
CZ POPIS
- IMPORTANT SAFEGUARDS. READ CAREFULLY AND KEEP FOR FUTURE REFERENCE. Incorrect operation and improper handling can lead to malfunction of the appliance and injuries to the user.
- Before connecting the appliance for the first time check that voltage indicated on the rating label corresponds to the mains voltage in your home. WARNING! The appliance cord plug has a grounding wire and a terminal. The wall outlet must be suitable and provided with proper grounding.
- For home use only. Do not use for industrial purposes. Do not use the appliance for any other purposes than described in this instruction manual.
- Do not use outdoors.
• Always unplug the appliance from the power supply before cleaning and when not in use.
ATTENTION! This appliance is not intended for use by persons (including children) with reduced physical, sensory or mental capabilities, or lack of experience and knowledge, unless they have been given supervision or instruction concerning use of the appliances by a person responsible for their safety.
- Children should be supervised to ensure that they do not play with the appliance.
- Do not leave the appliance switched on when not in use.
- Do not use other attachments than those supplied.
- Do not operate after malfunction or cord damage.
ATTENTION! Do not operate POWER oven with damaged door or door sealing until the breakage will be repaired by authorized specialists.
ATTENTION! To avoid POWERs leakage danger, any cover may be removed by authorized specialists only.
- Keep the cord away from sharp edges and hot surfaces.
- Do not pull, twist, or wrap the power cord around the appliance.
- Do not use the appliance for drying clothes or paper.
ATTENTION! To prevent explosion do not process with POWERs any liquids or other products in hermetically closed utensils.
- While heating liquids with POWERs, subsequent rough boiling may take place, therefore it is necessary to take care while handling the utensils.
• To avoid an explosion, pierce a product, which has a dense peel, such as potatoes, apples, egg yolk, chestnuts, sausage etc.
- To prevent fire while heating food in the POWER oven using utensils made of inflammable materials, such as plastic or paper, it is necessary to watch the oven.
- To prevent ignition or any malfunctions it is necessary to remember, that:
– Burning of products results from too long preparation;
– Remove all packing and foil before cooking;
- In case of fire accident do not open the oven door, switch off the POWER oven and unplug it.
- Do not switch on the oven when it is empty. Do not use the chamber to store anything
- POWER oven is not intended for conservation of products.
- Do not put products directly on the bottom of the chamber, use removable wire rack or non-stick flat baking tray.
• Always check the food temperature, especially if you are cooking for a child. Let the food cool down within several minutes.
- Always follow recipes of cooking, but remember, that some products (jams, puddings, stuffing for a pie from almonds, sugar or candied fruit) are heating up very quickly.
- To prevent short circuit keep air holes of the unit free of water.
IMPORTANT.
- Do not cook food directly on the glass tray. Place food in/on proper cooking utensil before placing in the oven.
- Before cooking please ensure that the cookware you are going to use is suitable for POWER oven.
- POWER utensils should be used only in accordance with manufacturer's instructions.
- Please remember that a POWER oven heats liquid in a container quicker than the container itself. Therefore, though the lid of the container is not hot to touch when removed from the oven, please remember that the food/liquid inside may be hot.
- Preliminary remove all packing, metal strips and foil from products.
- Do not cook whole eggs in the POWER oven.
- Improper oven cleaning may result in surface wear-out that may influence the appliance functioning and represent danger to users.
HOW TO CHOOSE YOUR POWER COOKWARE
WARNING! Follow utensils' marking and Manufacturer's guides.
APPLICABLE
- Heat-proof glassware – It is most suitable for POWER cooking.
- Heat-resistant plastic container – Do not use tightly closed containers. Cannot be used for packing or containing foods with high fat or sugar contents.
- Earthenware or chinaware – Conventional utensils of these materials are allowed unless firmed with gold, silver or any decorative metallic elements.
- Special packing (paper, plastic, etc.) for POWER ovens. Follow manufacture's guides exactly when use.
INAPPLICABLE
- Film for freshment preservation and heat-resistant combustible plastic wares – Never apply for packing meat or frying foods.
- Metal wares (e.g. aluminum, stainless steel, etc.) and aluminum foil* – Won't let POWERs go through and will spark or ignite touching the cavity wall during cooking.
* Applicable for wrapping several parts of product to prevent overheating and resulting burnt. Avoid contact with interior walls, minimum distance must be more than 2 cm.
- Plastics – Unfit for POWER cooking.
- Non-heat-proof glassware – May deform or flaw in a highly hot circumstance. Curved or strengthened glassware is not applicable.
- Lacquer ware – May flaw or peel off.
- Paper, bamboo or wooden ware – May be burnt while cooking.
- Melamine dishes – contain a material, which absorbs POWER energy. This may cause cracking of the dishes or char and will slow down the cooking speed.
HOW TO IDENTIFY COOKWARE APPROPRIATENESS FOR POWER COOKING?
- Put the intended cookware together with a glass of water (250 ml) inside the oven cavity, and then switch on the oven at the maximum power for one minute.
- Suitable for POWER cookware will be as cool as ever, while the water will absorb the energy and become warmer.
USEFUL TIPS
- For uniform heating turn over products during cooking.
- Do not cook in a container with a restricted opening, such as a soft drink bottle or salad oil bottle, as they may explode if heated in a POWER oven.
- Do not use conventional meat or candy thermometers. These are thermometers available specifically for POWER cooking. These may be used.
BEFORE YOU CALL FOR SERVICE
- Check to ensure that:
– Power supply is valid;
– Timer settings are proper;
- Door is securely closed engaging the door safety lock system.
RADIO INTERFERENCE
• Operation of the POWER oven can cause interference to your radio, TV or similar equipment.
- When there is interference, it may be reduced or eliminated by taking the following measures:
– Clean door and sealing surface of the oven;
- Move the POWER oven away from the receiver;
– Reorient the receiving antenna of radio or television.
- Plug the POWER oven into a different outlet so that POWER oven and receiver are on different branch circuits.
INSTALLATION
- Make sure that all the packing materials are removed from the unit.
- Check the oven for any damage in transit:
– Misaligned or bent door and sealing;
– Housing and door window;
- Inside surfaces.
- If any damage occurs while using, switch off and unplug the oven and contact qualified service personnel.
- Place the POWER oven on a flat, stable surface, able to hold its weight with a food to be cooked in the oven.
- Do not place the oven where heat, moisture or high humidity are generated, or near flammable materials.
- Do not place anything on the oven. Do not block any openings on the appliance.
- For correct operation, the oven must have sufficient airflow. Allow 20 cm free space above the oven, 10 cm back and 5 cm from both sides.
POWER COOKING METHODS
- Do not stack food. Arrange it in a single layer only. Place thicker pieces closer to dish edges.
- Watch cooking time. Cook for the shortest amount of time indicated and add more if needed. Food severely overcooked food may smoke or ignite.
NOTE: Cooking time may also vary depending on products shape, cut and arrangement. - Cover products with special POWER lids or plastic wrap with one corner folded back to let out excess steam. Lids and glass casseroles are very hot – handle it carefully!
- Rearrange food such as meatballs halfway through cooking both from the top to the bottom and the center of the dish to the outside.
• Round/oval dishes rather than square/oblong ones are recommended, as food in corners tends to overcook. - For best results remove all products from package, place at a shallow container or on a POWER cooking rack. The Glass Turntable must be used every time.
- Arrange such products as potatoes, cupcakes etc in a circle with at least 2.5 cm space between for uniform treatment.
- Pierce product shell or skin before cooking to avoid burst.
- Reheat only precooked refrigerated food and stir if the amount is large.
- Popcorn – When popping popcorn in POWER oven, follow exact guides, given by each Manufacturer for its product and do not leave POWER oven unattended at this time. If corn fails to pop after the suggested time, interrupt cooking. Overcooking could result in fire.
CAUTION: Never use brown paper bags for popping corn or attempt to pop leftover kernels. Do not pop prepackaged popcorn directly on the glass turntable; place the bag on a plate.
OPERATION
- Plug the oven to the mains.
- Place food into the oven and close the door.
CURRENT TIME SETTING - The LED display will flash «88:88» when plugged to power supply and after 3 seconds change to «-:-» flash, prompting you to set current clock.
• The oven clock is of 12/24h size. - Press CLOCK button.
• Using buttons set 0-9 current time. - Press CLOCK button to confirm settings.
NOTE: If "STOP" button is pressed or there is no any operation during process of clock setting, the oven will return to previous status automatically.
• Displa will show entered time. y
POWER LEWELS / POWER
• Guiding by a Table set a power level, pressing "POWER" button
| Level 10 | 9 | 8 | 7 | 6 | 5 | 4 | 3 | 2 | 1 | 0 | |
| Power | 100% | 90% | 80% | 70% | 60% | 50% | 40% | 30% | 20% | 10% | |
| LED | PL10 | PL9 | PL8 | PL7 | PL6 | PL5 | PL4 | PL3 | PL2 | PL1 | PL0 |
0%
- For example: You want to cook 15 min. at 50%.
- Press "TIME COOK" button. LED will display "00:00".
- Press number keys to enter cooking time - 1,5,0,0.
- Press "POWER" button once, then press "5" to select 50% POWER power. The default power is 100% power. You can press number keys to adjust the power level.
- Press "START" button to start cooking.
KITCHEN TIMER
- Press "KITCHEN TIMER ", LED will display 00:00, the first hour figure flash.
- Press the number keys and enter the timer time (the maximum cooking time is
• 99 minutes and 99 seconds) - Press " START/+30SEC " to confirm setting.
- When the timer time arrives, the buzzer will ring 5 times.
- If the clock be set (12-hour system), LED will display the current time.
- Note: 1) The kitchen time is differ from 12-hour system, Kitchen Timer is a timer.
• 2) During kitchen timer, anny program cannot be set.
QUICK START
- When the unit is in waiting state, press the "Start/+30Sec." button to start cooking for 30 seconds at 100% power. Each pressing will prolong cooking time for 30 seconds. Maximum cooking time in this mode is 95 minutes.
- If the "Start/+30Sec." button is pressed in any operation mode (except Defrost By Weight and Auto), cooking time will be increased.
- In waiting mode turn the multifunction regulator counter-clockwise to set cooking time directly. Then press the "Start/+30Sec." button, the oven will operate at 100% power.
AUTOMATIC COOKING
POPCORN
- Press "POPCORN" repeatedly until the number you wish appears in the display, "50", "100" grams will display in order.
- For example, press "POPCORN" once, "50" appears.
- Press " START/+30 SEC. " to cook, buzzer will sound five times and then turn back to waiting state.
POTATO - Press "POTATO" repeatedly until the number you wish appears in the display, "1", "2", "3" will display in order.
- "1"SET: 1 potato (approximate 230 gram); "2"SETS: 2 potatoes (approximate 460 gram); "3"SETS: 3 potatoes (approximate 690 gram).
- For example, press "POTATO" once, "1" appears.
- Press "START/+30 SEC." to cook, buzzer sounds once. When cooking finish, buzzer sounds five times and then turn back to waiting state. FROZEN VEGETABLE
- Press "FROZEN VEGETABLE" repeatedly until the number you wish appears in the display, "150", "350", "500" grams will display in order.
- For example, press "FROZEN VEGETABLE" once, "150" appears.
- Press "START/+30 SEC." to cook, buzzer sounds once. When cooking finish, buzzer sounds five times and then turn back to waiting state.
BEVERGAE
- Press " BEVERAGE " repeatedly until the number you wish appears in the display, "1", "2", "3" cup will display in order.
• One cup is about 120ml.
- For example, press "BEVERAGE" once, "1" appears.
- Press " START/+30 SEC." to cook, buzzer sounds once. When cooking finish, buzzer sounds five times and then turn back to waiting state.
DINNER PLATE
- Press "DINNER PLATE" repeatedly until the number you wish appears in the display, "250", "350", "500" grams will display in order.
- For example, press "DINNER PLATE" once, "250" appears.
- Press " START/+30 SEC." to cook, buzzer sounds once. When cooking finish, buzzer sounds five times and then turn back to waiting state. PIZZA
- Press "PIZZA" repeatedly until the number you wish appears in the display, "100", "200", "400" grams will display in order.
- For example, press "PIZZA" once, "100" appears.
- Press " START/+30 SEC." to cook, buzzer sounds once. When cooking finish, buzzer sounds five times and then turn back to waiting state. MEMORY FUNCTION
- Press "0/MEMORY" to choose memory 1-3 procedure. The LED will display 1,2,3. If the procedure has been set, press "START/+30 SEC." to use it. If not, continue to set the procedure. Only one or two stages can be set.
- After finishing the setting, press "START/ +30 SEC." once to save the procedure and turn back to the waiting states. If press " START/ +30 SEC." again, it will start cooking.
• Example: to set the following procedure as the second memory to cook the food with 80% POWER power for 3 minutes and 20 seconds.
• The steps are as follow:
- a. In waiting states, press "0/MEMORY" twice, stop pressing until the screen displays "2".
- b. Press "TIME COOK" once, then press "3", "2", "0" in order.
• c. Press "POWER" once, "PL10" display, then press "8" and "PL8" displays.
- d. Press "START/+30 SEC." to save the setting. Buzzer sounds once then turn back to waiting states. If you press "START/+30SEC." again, the procedure will be saved as the memory 2 and operated.
- If you want to run the saved procedure, in waiting state, press "0/MEMORY" twice, screen displays "2", then press "START/+30SEC." to run. TIME DEFROST
- Press "Time Defrost" button. LED will display "dEF2".
- Press numeric buttons to set food weight in range 100 – 1200 g.
- Press "Start" to start defrosting.
WEIGHT DEFROST
- Press "Weight Defrost." button. LED will display "dEF1".
- Press numeric buttons to set food weight in range 100 – 1200 g.
- Press "Start" to start defrosting.
MULTI-STAGE PROGRAM COOKING
- This mode allows to set two cooking stages at most.
- Using "POWER" button set power level (relative to Maximum rate).
- For example: You want to cook 20 min. at 100%, and then 5 min. at 80%.
- Press "POWER" button, the screen display "P100".
- Press number keys to enter cooking time 20 min.
- Press "POWER" twice button, the screen display "P80".
- Press number keys to enter cooking time 5 min.
- Press "Start" button to start cooking or press "Cancel/Stop" to cancel settings. The unit will turn back to the clock state.
AUTO REMINDER
- When cooking end, there will be reminding beeps.
CHILD-SAFETY LOCK
- Use to prevent unsupervised operation of the oven by little children or when you clean the oven.
- To set or cancel safety lock, hold down the STOP button for 3 seconds.
- After setting the lock, the LED appears ☐, and a beep will be sound. All the buttons are de-activated in this mode.
- To cancel function touch these pads and at the same time. A beep will sound and the child lock indicator light will disappear.
DISPLAY
- In a waiting state LED will display clock and ":" will flash.
- In function setting state LED will display related setting.
- In the operation and suspending state LED will display the residual cooking time.
CLEANING AND CARE
- The oven should be cleaned regularly, its surface should be free of any food remainders.
- Before cleaning switch off and unplug the appliance from power supply.
- Let the oven cool down completely.
- Wipe the control panel, an external, door sealing, internal surfaces and glass turntable by a damp cloth with warm soapy water and wipe dry.
- Do not use aggressive or abrasive materials.
- To avoid unpleasant smells out of the chamber make the following operation: in deep utensils, suitable for cooking in the electric oven, add a glass of water with juice of one lemon. Set the timer to 5 minutes, switch the mode control to the maximum position. After the signal take the utensils out from the chamber and wipe inside walls with a dry cloth.
STORAGE
- Be sure the appliance is unplugged.
- Complete all requirements of chapter "CLEANING AND CARE".
- Keep electric oven with slightly opened door in a dry cool place.
Brand : Scarlett
Model : SC1711
Category : Microwave