
INN-840 - Coffee maker Innoliving - Free user manual and instructions
Find the device manual for free INN-840 Innoliving in PDF.


| Product Type | Coffee Maker |
| Brand | Innoliving |
| Model | INN-840 |
| Dimensions (HxWxD) | 30 cm x 25 cm x 20 cm |
| Weight | 1.5 kg |
| Power Supply | 220-240 V, 50/60 Hz, 800 W |
| Capacity | 10 cups (1.2 L) |
| Water Tank | Removable, 1.2 L |
| Filter Type | Permanent mesh filter (reusable) |
| Brewing Function | Automatic drip brewing |
| Keep Warm Function | Yes, automatic after brewing |
| Auto Shut-Off | Yes, after 2 hours |
| Indicator Lights | Power on, keep warm |
| Materials | Plastic housing, glass carafe |
| Cleaning | Descaling recommended every 2-3 months |
| Safety Features | Overheat protection, boil-dry protection |
| Accessories Included | Permanent filter, measuring spoon, carafe |
| Warranty | 2 years |
| Country of Origin | China |
Frequently Asked Questions - INN-840 Innoliving
User questions about INN-840 Innoliving
0 question about this device. Answer the ones you know or ask your own.
Ask a new question about this device
Download the instructions for your Coffee maker in PDF format for free! Find your manual INN-840 - Innoliving and take your electronic device back in hand. On this page are published all the documents necessary for the use of your device. INN-840 by Innoliving.
USER MANUAL INN-840 Innoliving
innoliving easy tech, easy life
MACCHINA DA CAFFÈ IN CIALDE COFFEE PODS MACHINE

natural_image
Red and black photo of a red self-service coffee maker with a 'innolving' button, showing its interior and exterior (no text or symbols on the device itself)INN-840
MANUALE D'USO
USER MANUAL
natural_image
Close-up of a transparent cylindrical device with a white handle and blue liquid, no visible text or symbolsnatural_image
Close-up of a black handheld device with a transparent cylindrical body and metallic handle (no visible text or symbols)natural_image
Technical line drawing of a mechanical assembly with intersecting lines and a central arrow (no text or symbols)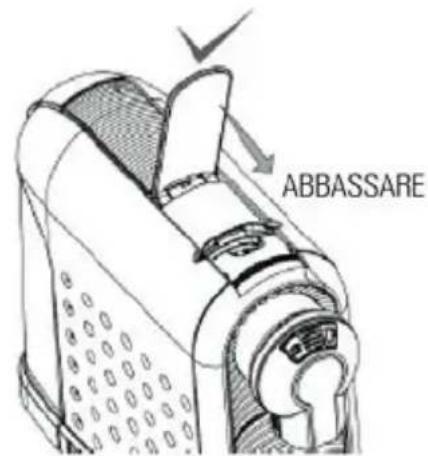
natural_image
Hand turning a circular component into a mechanical part (no text or symbols visible)natural_image
Close-up of a hand holding a small circular device with a perforated lid, next to a black industrial machine (no visible text or symbols)natural_image
Close-up of a mechanical device with a circular component and textured base (no visible text or symbols)natural_image
Hand holding a black plastic bag on a wooden surface (no text or symbols visible)
natural_image
Close-up of a mechanical component being processed with a tool, showing a black part and a circular inset (no text or symbols visible)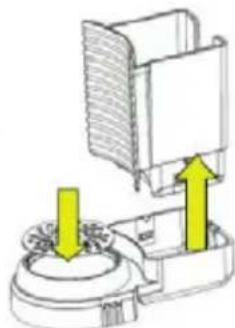
natural_image
Diagram of a mechanical device with yellow arrows indicating upward movement or force, no text or symbols presentnatural_image
Hand pointing at a curved black electronic device with three buttons (no visible text or symbols)natural_image
Close-up of a dark, glossy object with no visible text or symbolsVAPORIZZAZIONE
natural_image
Technical line drawing of a mechanical component with a cylindrical pin and mounting bracket (no text or symbols)natural_image
Line drawing of a mechanical device with a lever and base mount (no text or symbols)natural_image
Line drawing of a hand operating a mechanical device with a cylindrical component (no text or symbols)Thank you for purchasing the INN-840 pod coffee machine.
Read the instructions carefully before use and keep this manual for future reference.
WARNINGS AND SAFETY RULES
- Before using the appliance, carefully read the instructions for use and in particular the safety warnings and follow them. Keep this manual for the entire lifespan of the appliance, for reference purposes. Failure to follow the instructions could cause accidents and void the warranty, relieving the manufacturer of any liability.
- This product is not intended for use by persons (including children) with reduced physical, mental or sensory capabilities, lack of experience and knowledge, unless they have supervision or training in the use of the product. the appliance supplied by the person responsible for their safety and understand the dangers involved.
- This product is not a toy. Make sure that children do not play with the appliance. Keep the product and its cord out of the reach of children.
- This appliance must be used solely for the purpose for which it was designed, i.e. as a coffee machine for domestic use. Any other use is considered non-compliant and therefore dangerous.
• This appliance is intended for DOMESTIC use only.
- Packaging elements (plastic bags, cardboard, polystyrene, etc.) must not be left within the reach of children as they
are potential sources of danger and must be disposed of in accordance with current regulations.
- After removing the appliance from the packaging, check for any transport damage and the integrity of the supply according to the drawing. In case of damage or doubts as to its actual integrity, do not use the appliance and contact the authorized assistance service.
- Before connecting the appliance, check that the mains voltage data shown on the data label correspond to those of the local electrical network. The data label is located on the appliance itself.
- The appliance plug must fit into the socket perfectly. Do not modify the plug in any way. Do not use adapters or extension cords.
- Do not use the product if it has been dropped, if there are visible signs of damage or leaks.
- Do not pull the power cord to lift, carry or remove the plug from the socket.
• Make sure the cable has no knots or kinks.
- Check the condition of the electrical cable. Damaged or knotted cords increase the risk of electric shock.
- Do not touch or use the product with wet or damp hands or feet. Do not touch the plug or cord with wet or damp hands or feet.
- If the power cord is damaged, it must be replaced by the manufacturer or an authorized technical assistance center, in order to prevent any risk. Do not use the appliance if the cable or plug is damaged.
- Disconnect the appliance from the mains before changing accessories or cleaning it, before moving the product or before long periods of non-use.
- Do not leave the product unattended when it is in use.
- The power socket must be easily accessible so that you can easily unplug it in case of emergency.
- Do not let the cord hang from the table or other surface.
- In the event of a breakdown or malfunction of the appliance, turn it off and do not tamper with it. For any repairs, contact an authorized technical assistance center exclusively.
- Never immerse the product in water or other liquids. Risk of electric shock!
- Do not use the product if it has been dropped, if there are visible signs of damage or leaks.
- Do not use the product outdoors. To use, place the product on a flat and stable surface, so that it cannot fall on the floor, sink or other containers of water. Do not place the product while in use inside a cabinet. Use the machine only in dry environments.
- Take care that the cable does not come into contact with hot, incandescent surfaces, open flames, pots and other hot utensils.
- All parts intended to come into contact with food during use of the appliance must be washed well before use.
- For cleaning instructions for the appliance, refer to the "Cleaning and Maintenance" paragraph in the manual.
- Cleaning and user maintenance should not be carried out by children without supervision.
- Store the product in a dry, dust-free environment, away from direct sunlight and heat sources, and not accessible to children.
- Do not use near the kitchen hob and/or other heat sources.
- Allow the product to cool before proceeding with storage, cleaning and maintenance operations.
- Do not touch hot surfaces during heating and for a few minutes after use (e.g. the dispensing group), as the product retains residual heat after use, it could be very hot and cause burns and scalds. Do not move the product while it is in operation.
- Never cover the coffee machine during operation.
- Use the appliance only with any accessories and spare parts supplied.
- Do not operate the coffee machine with the tank empty or with a quantity of water lower than the MIN level.
- Do not move the operating lever when the machine is still under pressure during coffee preparation. Risk of burns!

Caution, hot surfaces, do not touch.
BEFORE USE
Remove the espresso pod machine from the packaging.
After unpacking, check that the following parts are included:
- Water tank
- Coffee machine
- Manual
Suggestion: Keep the packaging for any transport of the machine (e.g. for removals, assistance, etc.)
Note: There may be some water remaining in the machine.
To ensure the perfect functioning of the machine, it was tested with water before leaving the factory.
Rinse the water tank thoroughly with fresh water before first use. Clean the pod coffee machine only with a damp cloth.
Caution: Improper handling of electrical equipment is dangerous and can be lethal. Pay attention to the safety precautions in this manual, especially the following:
- Danger of burning: be careful with hot water!
- Do not use the machine with the water tank empty or with a water level lower than the minimum.
- Do not open the handle while the machine is running for dispensing.
• Always unplug the power plug before cleaning the machine. - Use the machine only in a dry environment.
Type of pod that can be used:
• Use only E.S.E. pods. 7 g, 44 mm.
PRODUCT DESCRIPTION
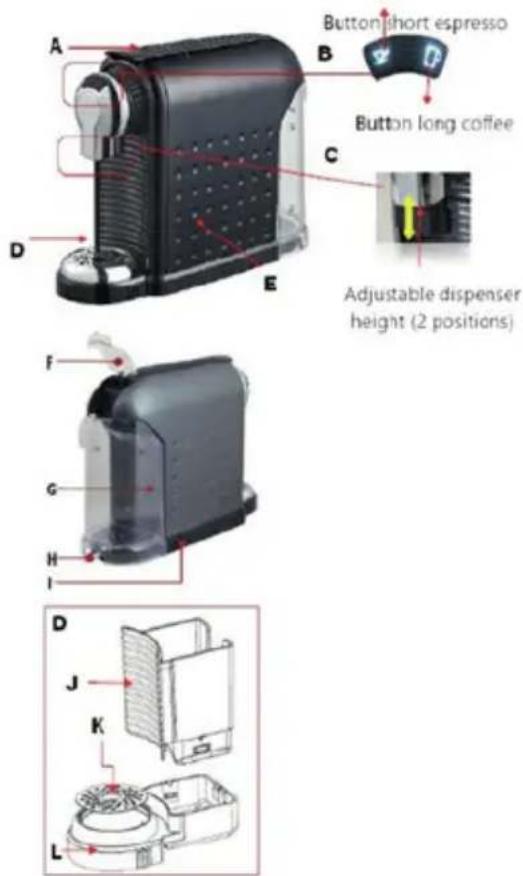
A. Lever
B. Selection keys
C. Dispenser
D. Drip tray
E. External walls of the product
F. Water tank cover
G. Removable water tank
H. Power cord
I. Main switch
J. Used pod container
K. Drip tray cover
L. Removable drip tray
HOW TO FILL THE WATER TANK
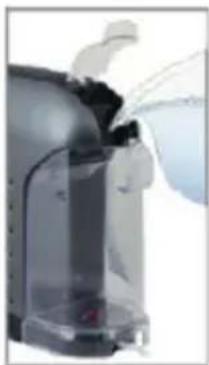
natural_image
Close-up of a transparent cylindrical device with liquid and spray, no visible text or symbolsThere are two ways to fill the water tank: directly in the machine, for example using a jug, or by removing the water tank.
FILLING WITHOUT REMOVING THE TANK
– Lift the water tank lid.
- Fill the tank up to the "MAX" mark with cold, fresh water (the maximum capacity is 0.8 litres), or at least up to the "Min" mark.
- Lower the lid.

FILLING BY REMOVING THE WATER TANK
- Hold the water tank handle at an angle as shown in direction 1 to remove the water tank from the machine.
- Fill the tank up to the "MAX" mark with cold, fresh water (the maximum capacity is 0.8 litres) or at least up to the "Min" mark.
- Slowly slide the water tank onto the tank base; When the water tank outlet is inserted into the inlet socket, press firmly on the handle as shown in direction 2 to lock the water tank.


RINSING THE MACHINE AND INTERNAL PIPES
Before first use or after long breaks (e.g. holidays), you should rinse the machine.
This short procedure allows to thoroughly clean the internal pipes.
Fill the water tank to the maximum level.
Plug in the appliance and turn it on.

The lights on the control buttons will flash and the light in the used pod container will turn blue, then turn off after 1 minute.
Tip: You can more easily check whether the used pod container is full when the blue light is on.
The lights on the buttons become stable when the machine is warmed up; the heating time is approximately 45 seconds.


Press the long coffee button, wait for the appliance to complete rinsing.
– Before pressing the button, make sure that:
– the lever is lowered, the machine has no coffee pod inside.
- The water tank is full.
- The water tank is securely in place. Since there is hot water for cleaning coming out while heating. Be careful with hot water: risk of burning!
- The drip tray with the used POD container is fully inserted (never operate the machine without the drip tray (part D shown in "PRODUCT DESCRIPTION" or the hot water will run out when you open the handle).)
– A large bowl (250 ml or larger) is placed under the dispenser. Press the long coffee button to start draining.
– Raise the lever when the rinsing process has stopped automatically.
- Empty the cup.
– The rinse cycle is finished.
NOTE: After rinsing, if the 2 buttons flash, it means the machine is heating up.
COFFEE PREPARATION
*Make sure the water tank is in place before dispensing.
Be careful with hot water: risk of burning!

natural_image
Hand holding a mechanical component with an arrow indicating direction (no text or symbols)
natural_image
Hand holding a mechanical component, possibly a tool or part, with no visible text or symbols.-
Place an empty cup under the spout. For small cups, lower the spout.
-
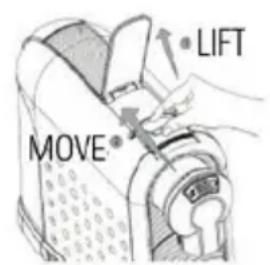
Raise the lever.
-
Push the plastic door back to open the slot to insert the coffee pod.
-
Insert a pod correctly into the compartment.
-
Lower the lever to load the pod.
- Press the desired coffee type button once.
- The selected button will flash and the machine will start pre-heating, then complete the brewing process, brewing will automatically stop when the default brewing time is reached (25 seconds for espresso, 40 seconds for long coffee), the default setting can be programmed, refer to "How to program dispense volume".
- Lift the lever to eject the used capsule into the container. And push the plastic door back to make sure that the hot coffee pod is in the container for used pods.
- Lower the lever.
Tips: *When using the machine after a certain period of inactivity (more than 1 hour), it is recommended to dispense the water first to remove the residual flavor of the last coffee.
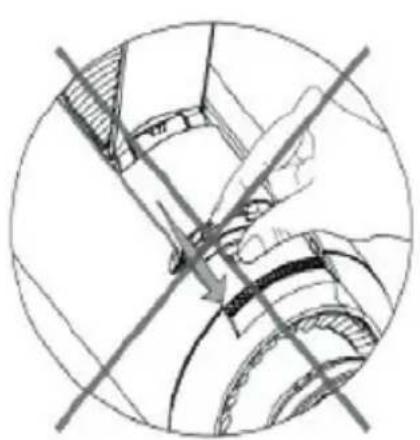
*Never pull the plastic door forward with your fingers. Always lower the lever to close the plastic door; Open the door with your fingers and then close it with the lever.
natural_image
Technical line drawing of a mechanical assembly with intersecting lines and shaded regions (no text or symbols)
HOW TO TOP UP THE HYDRAULIC CIRCUIT WHEN THE WATER TANK IS EMPTY DURING COFFEE DELIVERY
- It is strongly recommended to ensure that there is enough water in the tank before preparing coffee, at least at the minimum level. If the water runs out while brewing coffee, you can stop the process by pressing the selected button that is flashing.
Lift the lever to eject the used pod. WARNING: Be careful with hot steam: risk of burning! Rinse the machine in accordance with the "Rinse the machine and internal pipes" procedure.
COFFEE VOLUME PROGRAMMING
Make sure there is enough water in the tank before programming the coffee volume. Check that the water tank is positioned correctly before starting dispensing. During heating, hot cleaning water may flow out. Be careful with hot water: risk of burning!

-
Place an empty cup under the dispenser. For small cups, lower the spout.
-
Lift the handle fully upwards.
-
Push the plastic door back to open the slot and insert the coffee pod.


natural_image
Illustration of a hand adjusting a mechanical component with a circular knob (no text or symbols)
-
Gently insert a coffee pod into the compartment
-
Lower the lever completely to load the pod.
-
Press the button for the desired type of coffee and hold it down. Once you reach the desired volume, release the button; the button is now reprogrammed.
-
After programming, the brewing time will be stored. For next use, just press the button normally (i.e. press once).
Repeat the procedure for the other buttons, if necessary. Volume Range: Preset time from 13s to 90s (25ml\~150ml for espresso and long), the default time is 25s for small cup and 40s for large cup.
Once programming is complete, let the machine cool down for 30 seconds before lifting the lever.
ATTENTION:
- Be careful with hot steam: risk of burning! Tip: The flash rate is 1 second per flash, so you can count the flashes to monitor the output.
ENERGY SAVING MODE
The machine automatically enters energy saving mode after 15 minutes of inactivity; the 2 buttons will flash cyclically in this mode. To exit power saving mode, press the express button or long button; the appliance will start to heat up with the lights flashing and, when the buttons remain lit continuously, the machine will be ready to brew coffee.
CLEANING AND MAINTENANCE

natural_image
Hand inserting a small circular device into a black industrial machine (no visible text or symbols)Emptying the pod container and drip tray
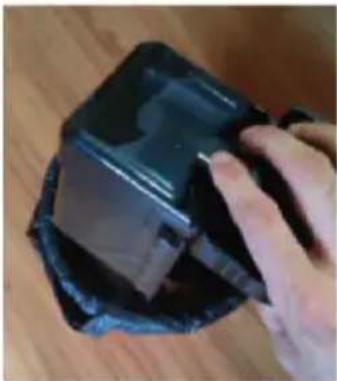
The pod container can hold approximately 10 used pods. We recommend emptying the used pod container and the drip tray daily; you can check if the used capsule container is full when the blue light is on in the container itself.
- Lift the lever to make sure there are no pods in the dispensing compartment.
- Raise the dispensing spout if it is in the low position.
- Hold the drip tray firmly and lift it out gently.
- Dispose of the used pods and the contents of the drip tray.
- The used pod container can be detached, if necessary, from the lower drip tray (snap lock).
- Rinse the drip tray with fresh water.
- Remove the water from the drip tray and rinse the water tank with fresh water.

natural_image
Close-up of a black mechanical device with ornate circular components and a central cross symbol (no visible text or symbols)Cleaning the coffee pod machine
- Always unplug the power plug before cleaning the machine.
- Never immerse the machine in water or clean it under running water.
– Clean the outside of the machine with a dry cloth. - Never use abrasive agents or materials (for example use dry rags or kitchen paper).
natural_image
Close-up of a hand holding a black plastic object with a glossy surface, placed on a wooden surface (no text or symbols visible)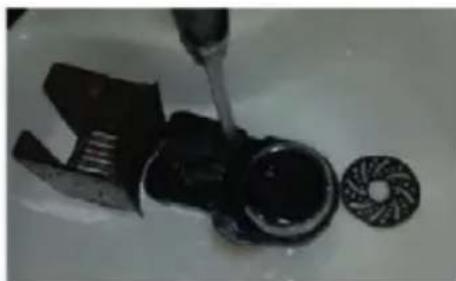
natural_image
Close-up of a hand using a pipette to apply liquid into a black ink bottle onto a white surface, with a circular inset showing a patterned ring (no text or symbols visible)
natural_image
Diagram of a mechanical device with yellow arrows indicating upward motion or force, no text or symbols presentDESCALING / MAINTENANCE
The quality of drinking water varies depending on the area. The limescale particles present in hard water settle as residues in the machine, clogging the pipes and causing damage. To avoid this, it is necessary to descale the machine after having prepared at least 300-400 cups of coffee or if you notice a significant drop in yield or, in any case, after one or two months. Descaling must be done correctly to prevent damage, so it is essential to follow these instructions.
Important: – Never clean the machine with vinegar. This can cause damage and alter the flavor of the coffee. – Damage caused by incorrect descaling or failure to descale is not covered by the guarantee. –
Caution: Be careful with hot water!
Recommendations: Purchase a commercially available descaler (descaling liquid) diluted according to the manufacturer's instructions; pour the mixture into the water tank. Make sure there are no pods inside the machine. Place a large bowl under the spout to collect the descaling solution and limescale residue. Fill the water tank to the maximum level with water mixed with the descaling solution, ensuring that the solution is completely dissolved. Press the small button to flow the descaling water as you would normally do with coffee, repeat the operation several times until the water in the tank runs out. Repeat the process with another tank of water mixed with the descaling solution. Repeat the process to rinse the internal circuit with a tank of fresh water (without descaling solution) to completely clean the internal circuit.
RESTORATION OF FACTORY SETTINGS

natural_image
Hand holding a black curved object with a small circular mark and a small heart symbol, no visible text or symbols.In case you want to have the default setting of the machine, follow the following
a. Turn off the machine.
b. Press the long coffee button and hold the button, then turn on the machine.
c. At the same time, release the button after 3 seconds or when you see the buttons flashing. (If the machine is warming up after reset, the machine will flash more than twice.)
d. After the above operation, the machine is restored to factory default settings, as follows
Coffee brewing time,
- 25 seconds
- 40 seconds
After resetting, the machine can start working when the lights are solid.
VAPORIZATION
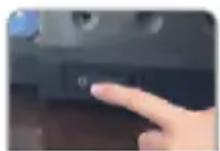
Tips: Reset when the machine is warmed up so that you can see the flash signal more easily.

natural_image
Close-up of a black plastic bag attached to a surface, with no visible text or symbols.STEAMING / STORAGE / TRANSPORT
- Before long periods of non-use or for storage or transport at temperatures below 5 °C, it is essential to let the steam out of the machine. This removes water from the system to avoid frost damage.
- Turn on the machine.
– Empty the water tank and place it in its location.
- Place an empty cup under the coffee spout.
- Press the "Long" button to start dispensing.
– Thus the vaporization begins.
- After the pump stops automatically, the vaporization expulsion process is completed.
– Turn off the machine and unplug it.

CAUTION:
Be careful with hot steam: risk of burning!
PROBLEM SOLVING
| PROBLEM CAUSE SOLUTION | ||
| Coffee is not dispensed The | water tank is empty Fill the water tank | |
| Coffee is not enough - Cold | cups/cups- Scale accumulation in the machine- Cold machine | -heat cups/cups.- decalcification- dispense a cup of hot water. |
| The pod doesn't fall - the compartment for collecting used pods is full- the pod was deformed during coffee dispensing | - empty the used pod compartment.- push the pod down with your fingers or lift and lower the lever again | |
| Steam comes out when the lever is raised | The lever was raised too soon after dispensing the coffee | Wait a few seconds for the residue to come out pressure. |
| Water on the support surface | -The water tank is leaking.-The drip tray is full of water.-At the end of dispensing, the lever was raised without the drip tray inserted.-The water tank is out of place during use | -Check whether the valve on the water tank is on blocked.- Empty the drip tray.-Make sure the drip tray set is in place.-Make sure the water tank is in place. |
| The pod fell directly into the used pod collection compartment | The pod has become deformed | - Try again using a different angle for insertion- Use a new pod |
| Some drops come out of the coffee spout after use | The machine is still warm | Occasionally seeing a few drops is normal |
| During use, the coffee comes out in drops/the coffee ends up in the used pod compartment | The coffee powder in the pod is too fine | Change type of pod |
| The lever does not lower The pod was not inserted correctly | Try to push the pod downwards so that it fits correctly into the appropriate compartment | |
IMPORTANT NOTE
Before using the machine after a long period of inactivity (e.g., after holidays), you may experience issues with water pumping. In this case, follow steps 1-3 to manually fill the machine's internal system with water. If necessary, repeat the procedure 2-3 times. After completing this process, the machine will be able to pump water normally.

natural_image
Technical line drawing of a mechanical component with a cylindrical pin and bracket (no text or symbols)Remove the water tank and place the pipe into the water entrance.

natural_image
Line drawing of a mechanical device with a lever and base (no text or symbols)Fill water into the pipe. Place the stamp on the pipe and push it down firmly.

natural_image
Line drawing of a hand operating a mechanical device with a cylindrical component (no text or symbols)RATING LABEL
Innoliving Spa Via Merloni 2/B - 60131 Ancona - Italy
INN-840 MACCHINA CAFFÈ COFFEE MAKER
220-240V\~50/60Hz 1260W
MADE IN CHINA


This product complies with all applicable European directives.

Food Contact

Read carefully the instruction manual
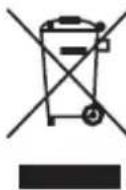
INFORMATION TO USERS according to Legislative Decree No. 49 of March 14, 2014 "2012/19/UE Implementation of the Directive on Waste Electrical and Electronic Equipment (WEEE)"
The crossed-out dustbin symbol indicates that the product at the end of its life must be collected separately from other waste.
The user should, therefore, take the equipment with the essential components at the end of its useful life to the separate collection center of electronic and electrical waste, or return it to the retailer when purchasing new equipment of equivalent type, in ratio of one to one, or one to zero for devices with larger side less than 25 cm. The separate collection for the decommissioned equipment for recycling, treatment and environmentally compatible disposal contributes to avoid possible negative effects on the environment and human health and promotes recycling of the materials. Improper disposal of the product by the user entails the application of administrative sanctions according to Legislative Decree No. 49 of 14 March 2014.
Innoliving coffee machine model INN-840 is compatible with E.S.E. (Easy Serving Espresso) pods. Please note that E.S.E. is a registered trademark of the “Consortium for the Development and Protection of the Easy Serving Espresso Standard (E.S.E.)”. The production of the INN-840 coffee machine by Innoliving is independent and not directly or indirectly connected to the Consortium.
innoliving easy tech, easy life
Innoliving Spa Via Merloni, 2/B 60131 Ancona Italy Tel 071 2133550 www.innoliving.it
MADE IN CHINA
CE
Rev.00_11.2024
- innoliving easy tech, easy life
- MACCHINA DA CAFFÈ IN CIALDE COFFEE PODS MACHINE
- VAPORIZZAZIONE
- WARNINGS AND SAFETY RULES
- BEFORE USE
- PRODUCT DESCRIPTION
- HOW TO FILL THE WATER TANK
- FILLING WITHOUT REMOVING THE TANK
- FILLING BY REMOVING THE WATER TANK
- RINSING THE MACHINE AND INTERNAL PIPES
- COFFEE PREPARATION
- HOW TO TOP UP THE HYDRAULIC CIRCUIT WHEN THE WATER TANK IS EMPTY DURING COFFEE DELIVERY
- COFFEE VOLUME PROGRAMMING
- ENERGY SAVING MODE
- CLEANING AND MAINTENANCE
- Emptying the pod container and drip tray
- Cleaning the coffee pod machine
- DESCALING / MAINTENANCE
- RESTORATION OF FACTORY SETTINGS
- STEAMING / STORAGE / TRANSPORT
- CAUTION:
- IMPORTANT NOTE
- RATING LABEL
Brand : Innoliving
Model : INN-840
Category : Coffee maker