
GD 075 - Dishwasher Equator - Free user manual and instructions
Find the device manual for free GD 075 Equator in PDF.


| Product Type | Freestanding Dishwasher |
| Model | GD 075 |
| Brand | Equator |
| Dimensions (H x W x D) | 85 cm x 60 cm x 60 cm |
| Weight | 50 kg |
| Power Supply | 220-240 V, 50 Hz |
| Energy Consumption (per cycle) | 1.2 kWh |
| Water Consumption (per cycle) | 12 L |
| Noise Level | 49 dB(A) |
| Capacity | 12 Place Settings |
| Energy Efficiency Class | A+ |
| Wash Programs | Intensive, Normal, Eco, Quick, Rinse |
| Drying System | Condensation Drying |
| Features | Delay Start, Half Load, Salt and Rinse Aid Indicators |
| Maintenance | Clean filters monthly, descale every 3 months |
| Safety | Child Lock, Anti-Flood System |
| Spare Parts & Repairability | Filters, racks, hoses, spray arms available |
| Water Supply | Cold water only, max 0.8 MPa |
| Installation | Freestanding, requires connection to water and drain |
| Warranty | 2 years |
Frequently Asked Questions - GD 075 Equator
User questions about GD 075 Equator
0 question about this device. Answer the ones you know or ask your own.
Ask a new question about this device
Download the instructions for your Dishwasher in PDF format for free! Find your manual GD 075 - Equator and take your electronic device back in hand. On this page are published all the documents necessary for the use of your device. GD 075 by Equator.
USER MANUAL GD 075 Equator
natural_image
Line drawing of a thermospan bottle with lid and handle (no text or symbols)OWNER'S MANUAL
Please read the instruction carefully and keep for future reference. Information may be updated from time to time so please refer to the website for the latest version of the manual.
Equator Appliances undertakes to the consumer-owner to repair or, at our option, to replace any part of this product which proves to be defective in workmanship or material under normal personal, family or household use, in USA and Canada, for a period of one year from the date of original purchase. For commercial use, the product is warranted for a period of 90 Days. During this period, we will provide all labor and parts necessary to correct such defect, free of charge, if the appliance has been installed and operated in accordance with the written instructions with the appliance. Ready access to the appliance, for service, is the responsibility of the consumer-owner. Services would be provided from Monday to Friday between normal business hours.
Exclusions
In no event shall Equator Appliances be liable for incidental or consequential damages or for damages resulting from external causes such as abuse, misuse, incorrect voltage or acts of God. This warranty does not cover service calls which do not involve defective workmanship or materials covered by this warranty. Accordingly, diagnosis and repair costs for a service call which does not involve defective workmanship or materials will be the responsibility of the consumer-owner.
Most work is covered. The defining factor is, has the machine malfunctioned (Equator Appliances is responsible) or has the customer omitted or done something to cause the machine to malfunction (customer is responsible). Some states do not allow the exclusion or limitation of incidental or consequential damages, so the above limitation of exclusion may not apply to you.
This warranty is given by:
Equator Appliances
10222 Georgibelle Drive, Suite 200
Houston, Texas 77043-5249
For Service:
Call: 1-800-776-3538
Email: service@ApplianceDesk.com
Web: www.ApplianceDesk.com
Business hours: 9:00 am to 5:00 pm weekdays
You can register your Warranty by either of the following methods:
- Scan Chat-AI
- Open Smart Phone
- Open Camera
- Click the Link

-
Register online at ApplianceDesk.com/Warranty
-
Chat-AI is also used to obtain Product Information, Manuals and Updates
GENERAL
Since it is a responsibility of the consumer-owner to establish the warranty period by verifying the original purchase date, Equator Appliances recommends that a receipt, delivery slip or some other appropriate payment record be kept for that purpose.
This warranty gives you specific legal rights, and you may also have other rights which vary from State to State.
All rights reserved. Manual subject to change without notice.
Safety
- Ensure the power cord of the garbage disposer enters the enclosure through a watertight fitting or is sealed in place.
- Ensure the garbage disposer has a strain relief, independent of the seal, and which reduces the risk of flexing or movement of the seal.
- Ensure the face of the receptacle is flush with or extends beyond a nonconductive surrounding surface or extends at least 0.015 inches (0.38 mm) beyond a conductive surrounding surface.
- Ensure that the strain relief can withstand for 1 minute, without displacement, a direct pull of 35 lbs. applied to the cord.
Save these instructions.
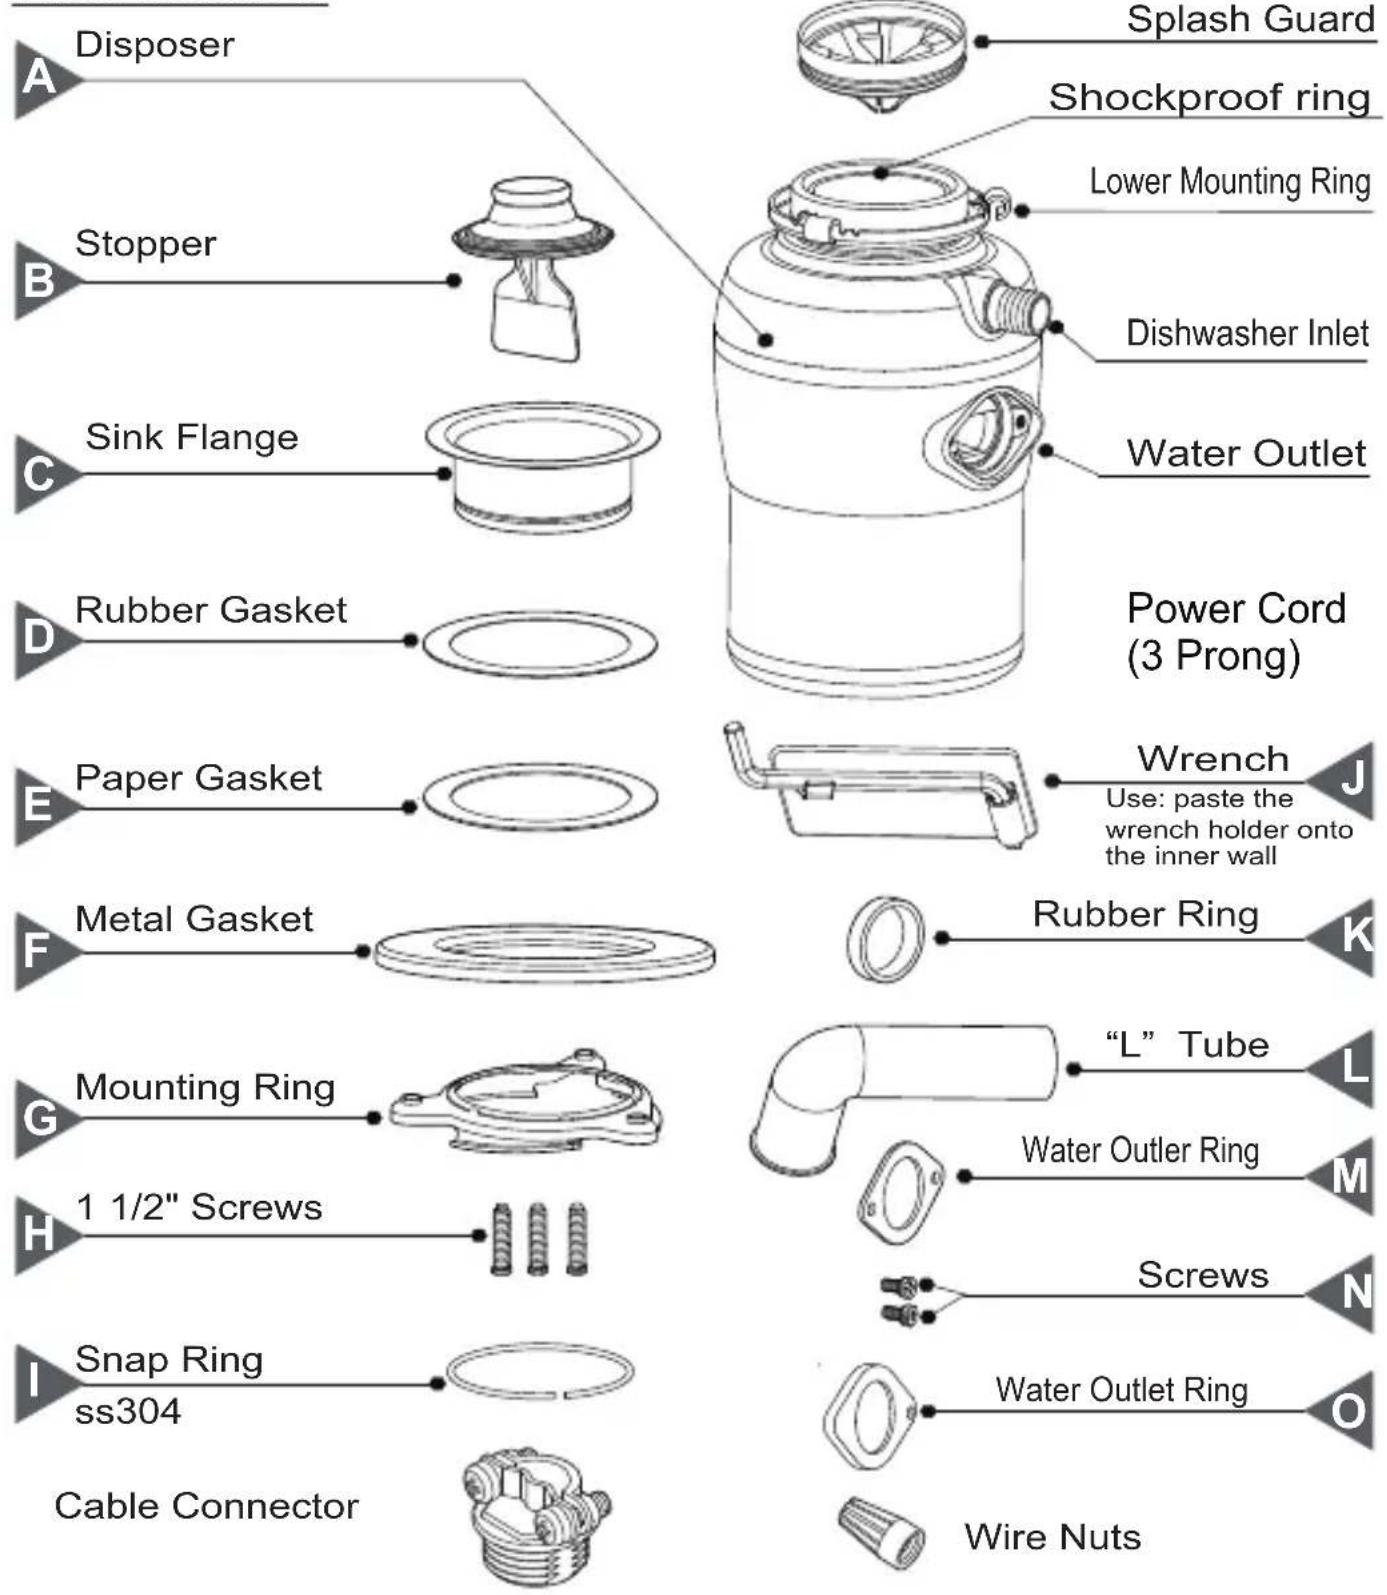
Parts Included:

Installation Instructions

WARNING: Before installation disconnect the power supply.
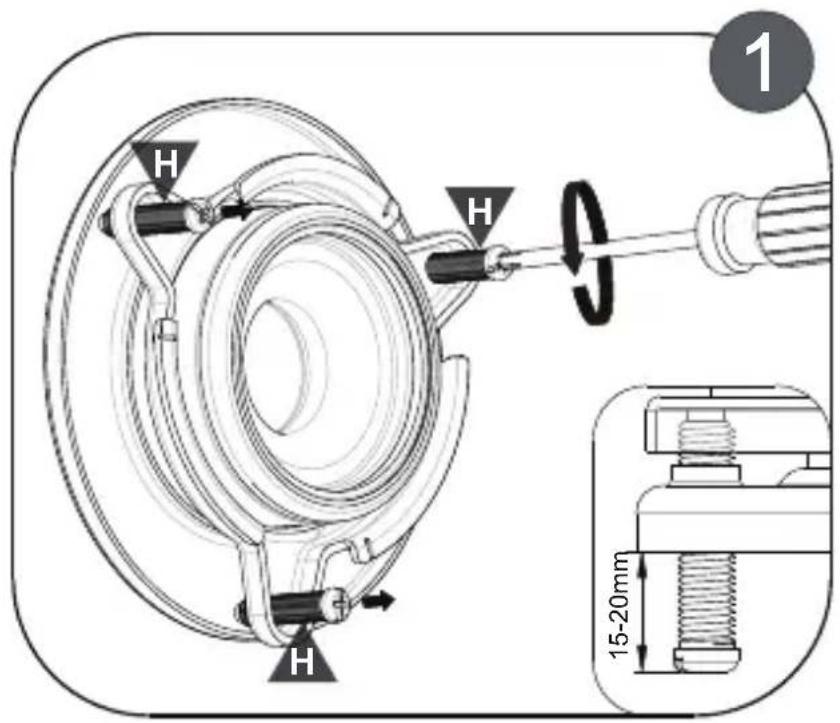
Loosen the three screws on the mounting assembly, get them out about 0.6 - 0.8 inch (15-20mm).
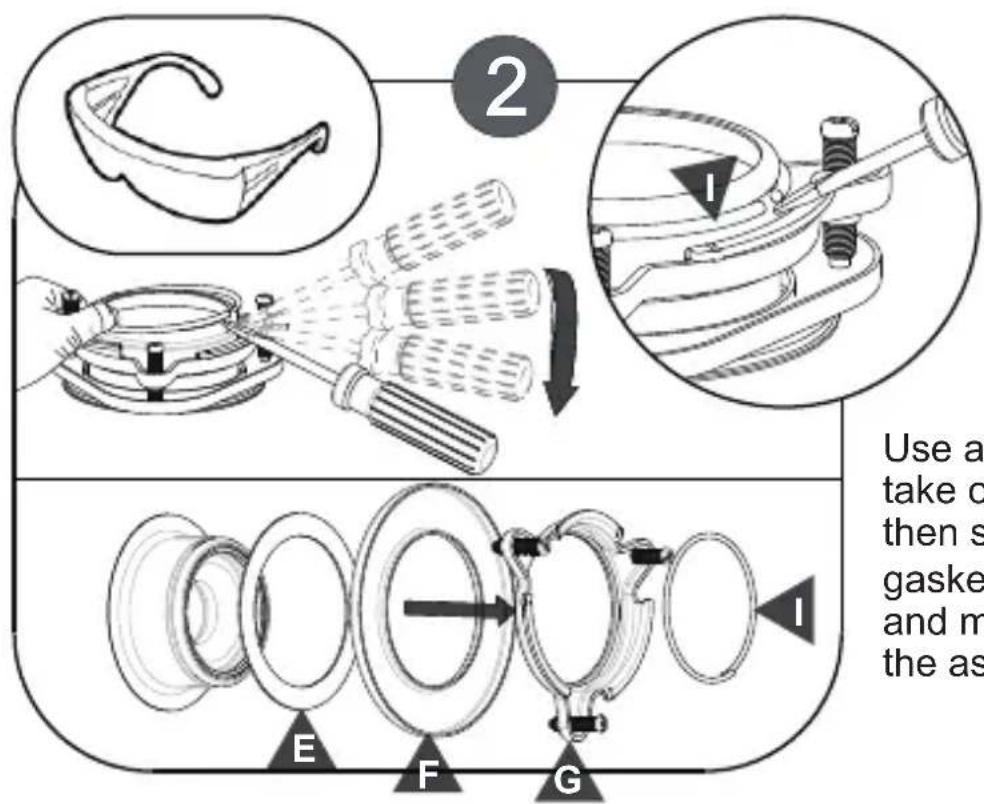
Use a flat head screw to take out the snap ring (I), then separate the paper gasket (E), metal gasket (F), and mounting ring (G) from the assembly.
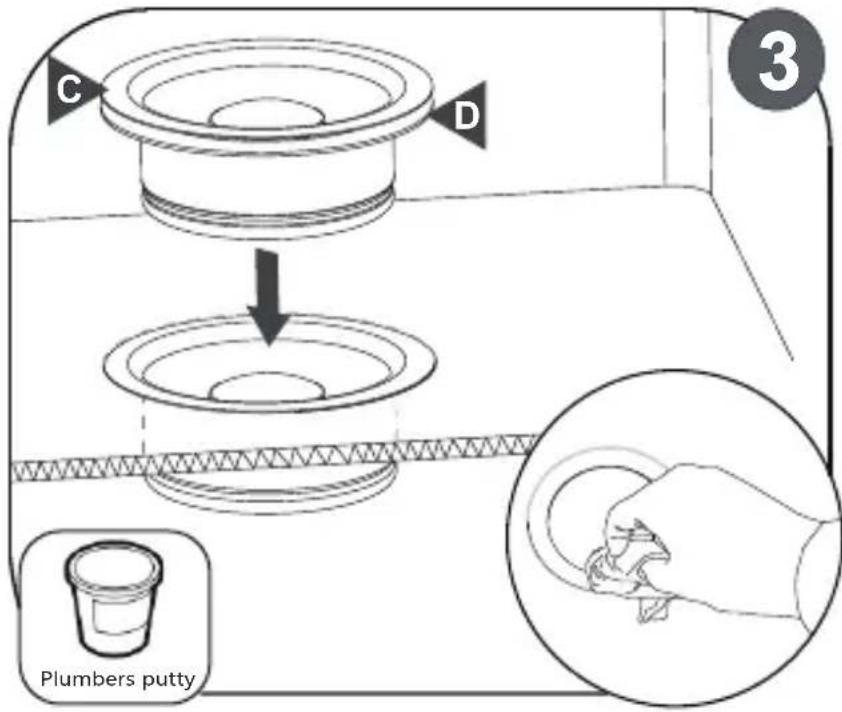
Take out the paper gasket (E) and put it aside, put the gasket (D) onto the sink flange (C), then press it firmly onto the sink drain as shown.
Evenly apply 1/2" thick rope of plumber's putty around sink flange (C).
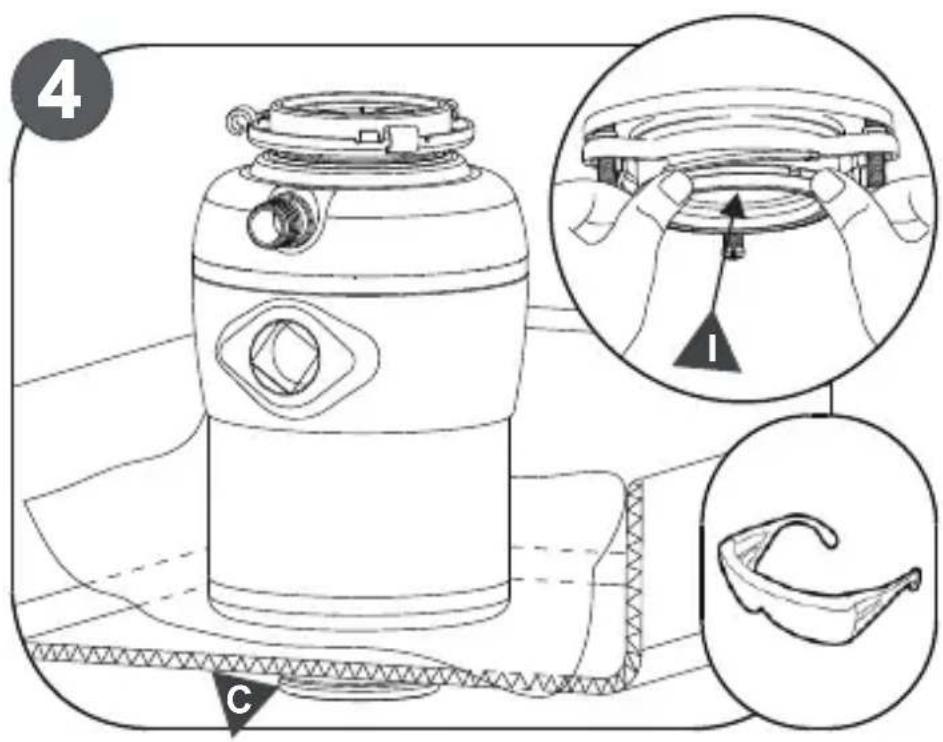
Put the disposer on top of the sink flange (C) to hold it in place, use a towel to prevent scratching the sink.
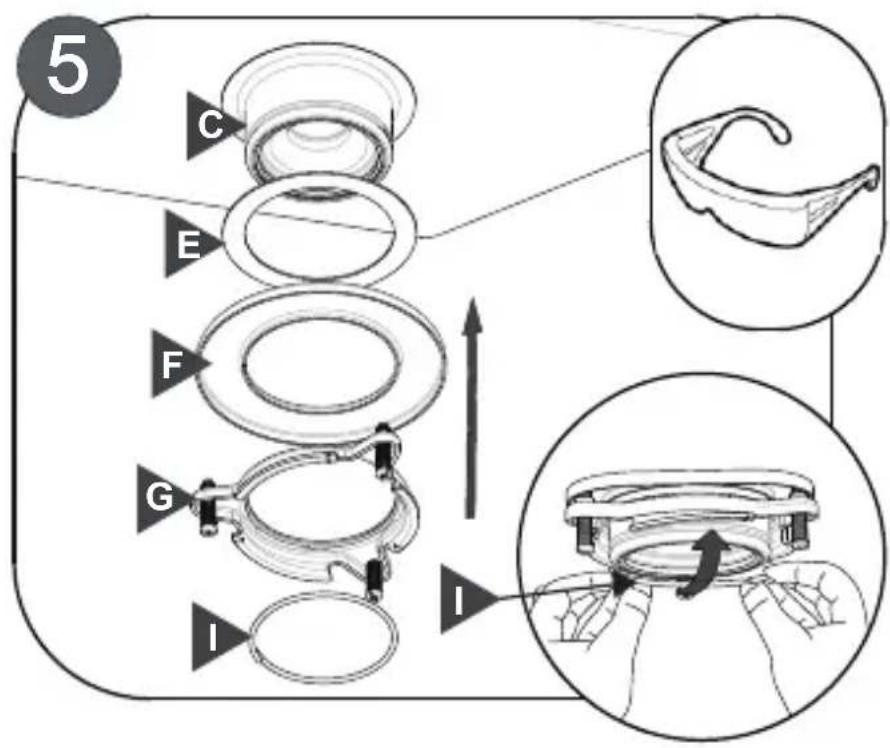
Insert paper gasket (E), metal gasket (F), and mounting ring (G). Press snap ring (I) firmly in place.
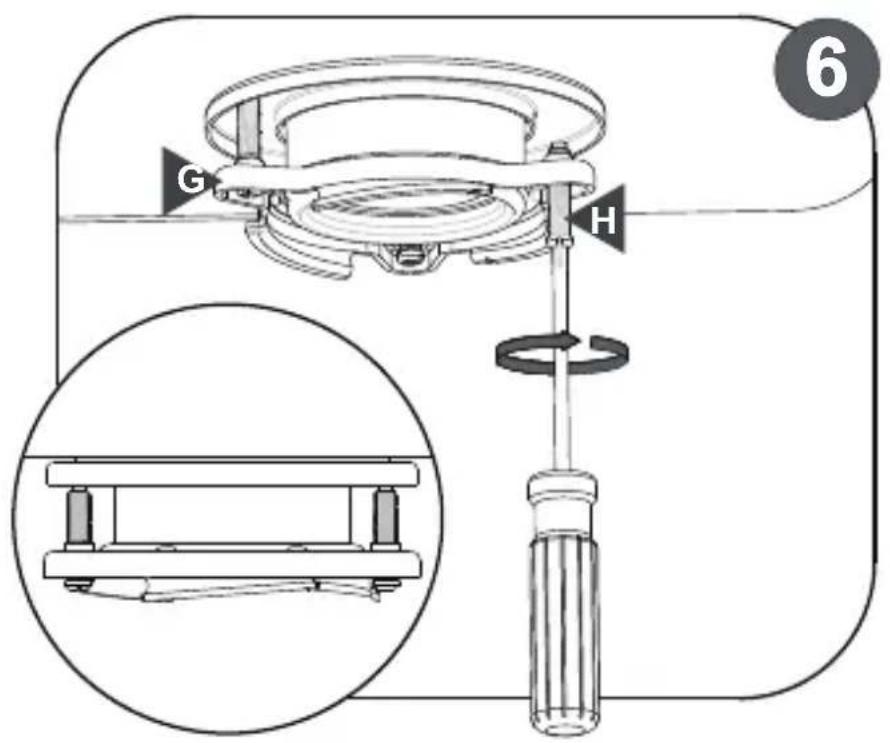
Tighten the three mounting screws (H) evenly and firmly against the flange.
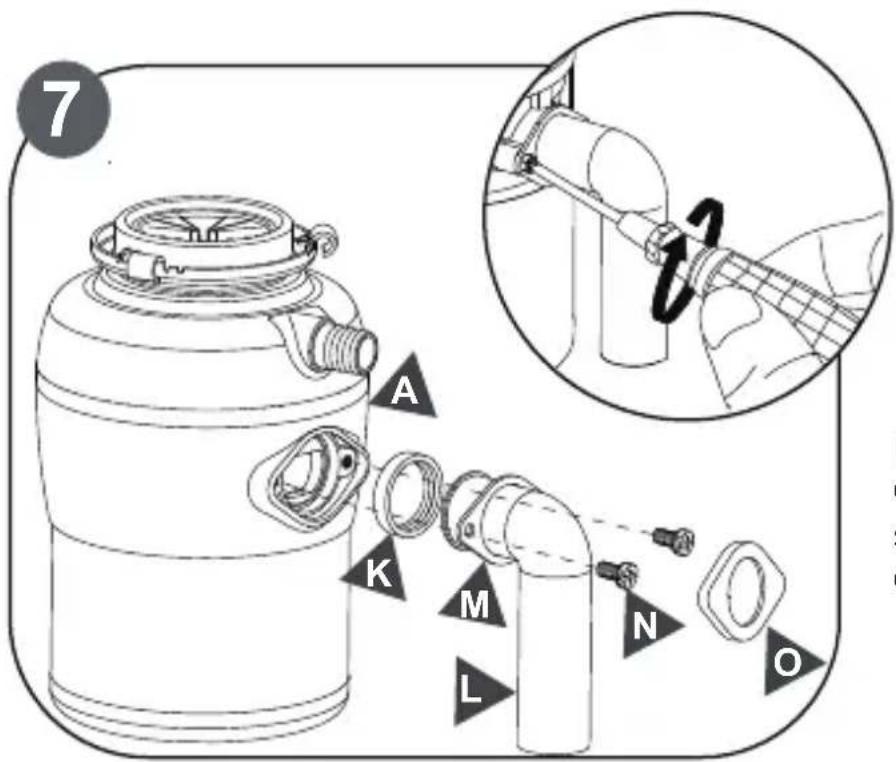
Install the rubber ring (K) onto the tube (L), then secure the tube to disposer with screws.

Stop and read
CAUTION: DISHWASHER CONNECTION ONLY.
If you do not need to attach the dishwasher,
Please skip steps 8, 9, 17.
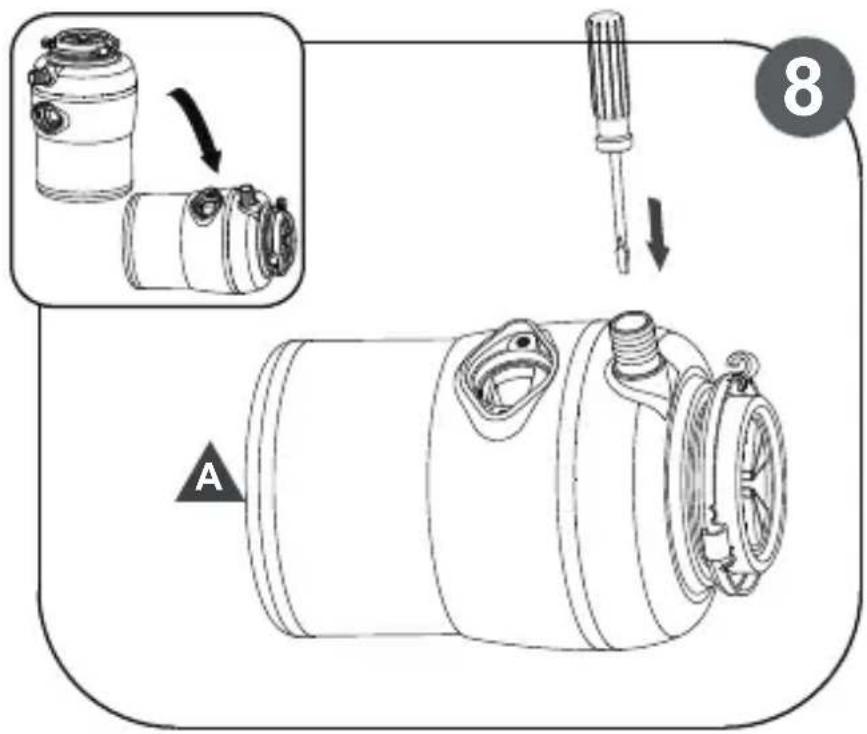
Turn disposer onto side and insert screwdriver into dishwasher inlet.
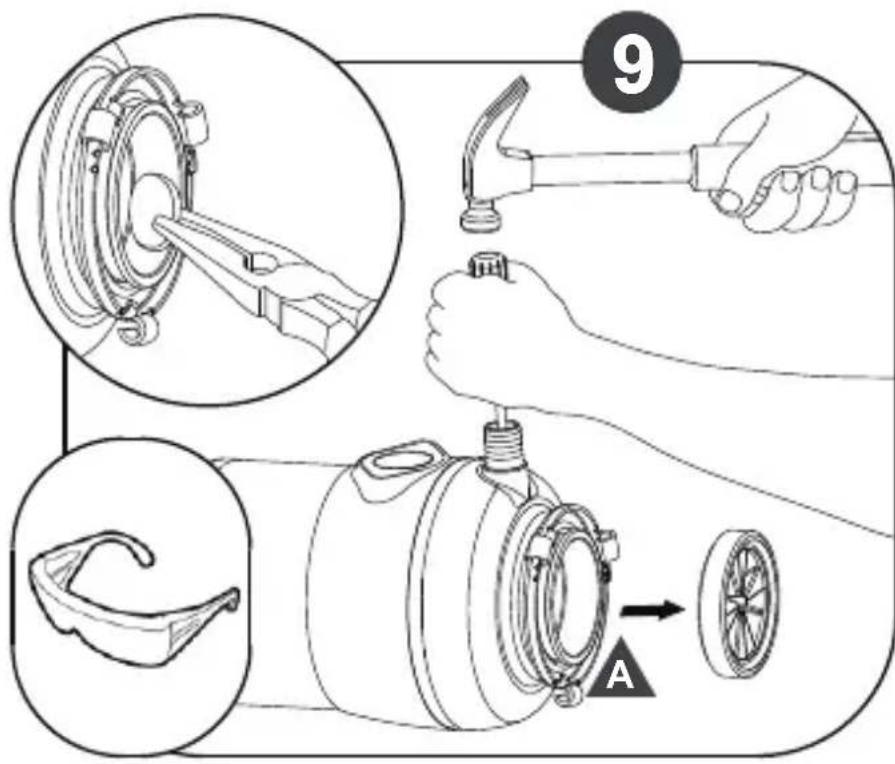
Knock out drain plug and remove plug from inside of disposer.
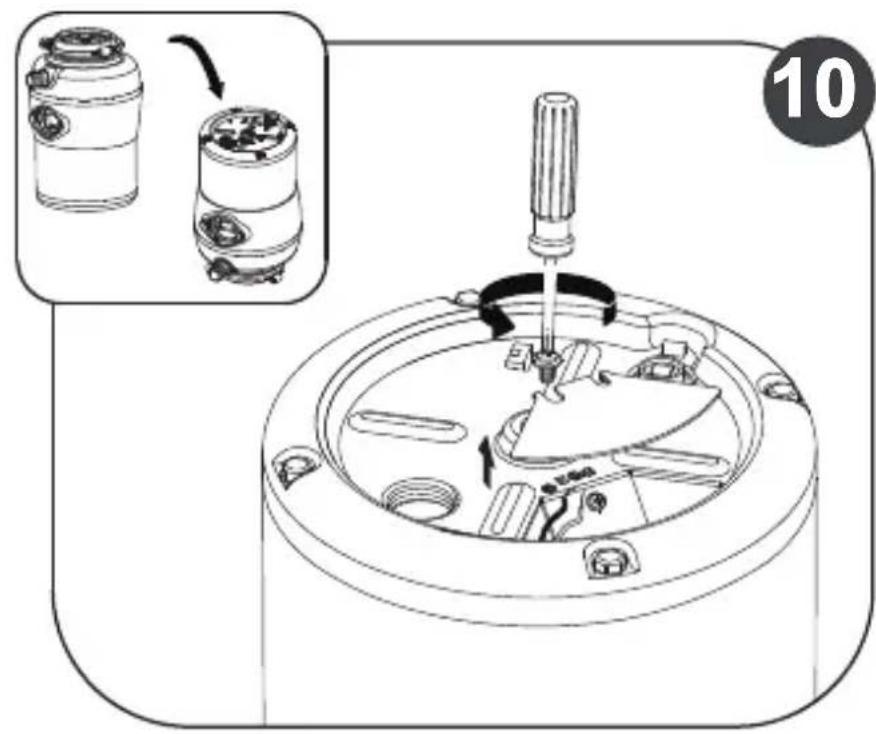
Turn the garbage disposal upside down. Remove the wiring cover.
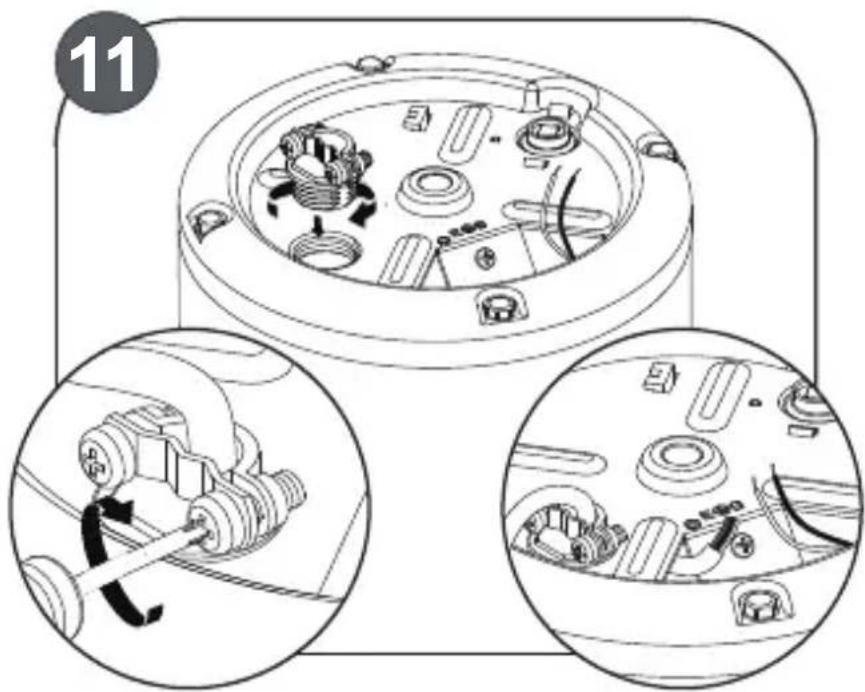
Install the cable connector on wiring cover.
Fixed and tightening its position, make the power cord pass through the cable connector.
Pull it out from wiring holes, proper length.

WARNING: . Danger of electric shock due to poor grounding
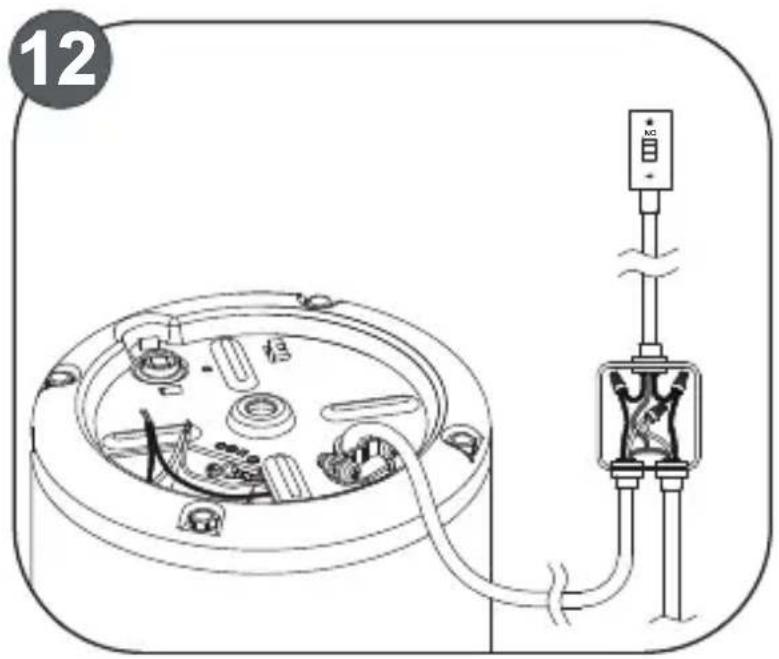
This disposer requires a switch (15 amp minimum rating) with a marked "Off" position (wired to disconnect all ungrounded supply conductors) installed within sight of the disposer sink opening, except if using an air switch or batch feed accessory or batch feed disposer.
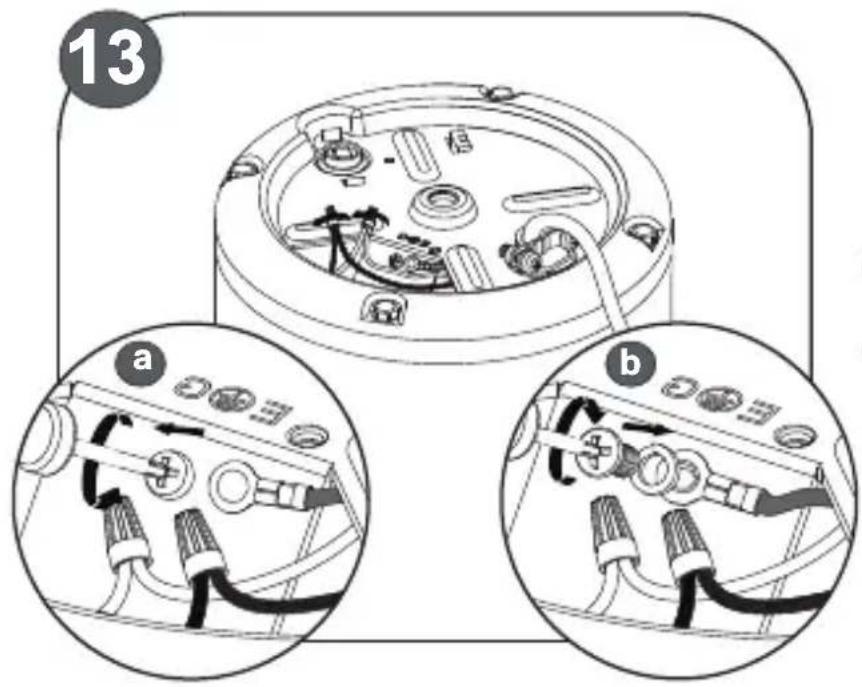
Connect the cable to the corresponding terminal of the machine.
(a) Remove the green ground screw.
(b) Connect the ground wire with a lock washer and tighten the green ground screw.

WARNING: Danger of electric shock due to poor grounding. Avoid letting the power cord interface touch water, and prevent excessive bending or moving of the power cord, causing danger or damage.
natural_image
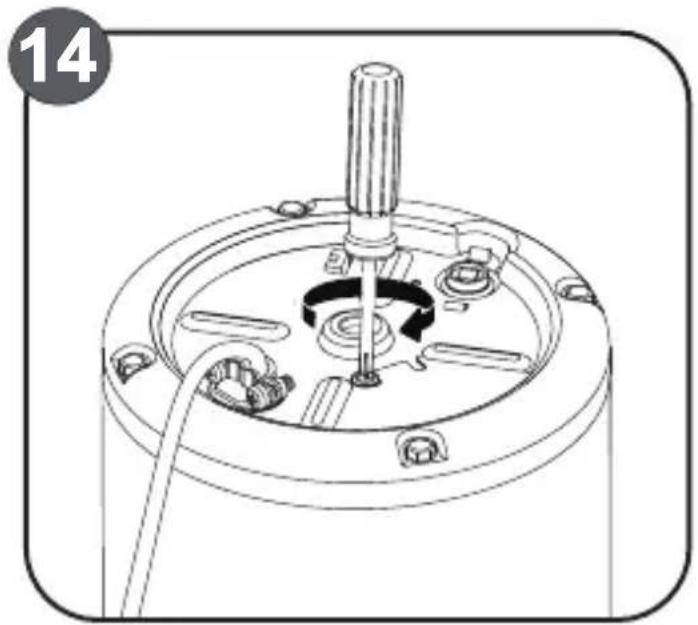
Technical line drawing of a mechanical device with a central hub and surrounding components (no text or symbols)Push the wiring into the wiring hole.
Do not move the winder board.
Push the wiring into the inter layer between the cardboard and the bottom cover.
Fix and lock the wiring cover.
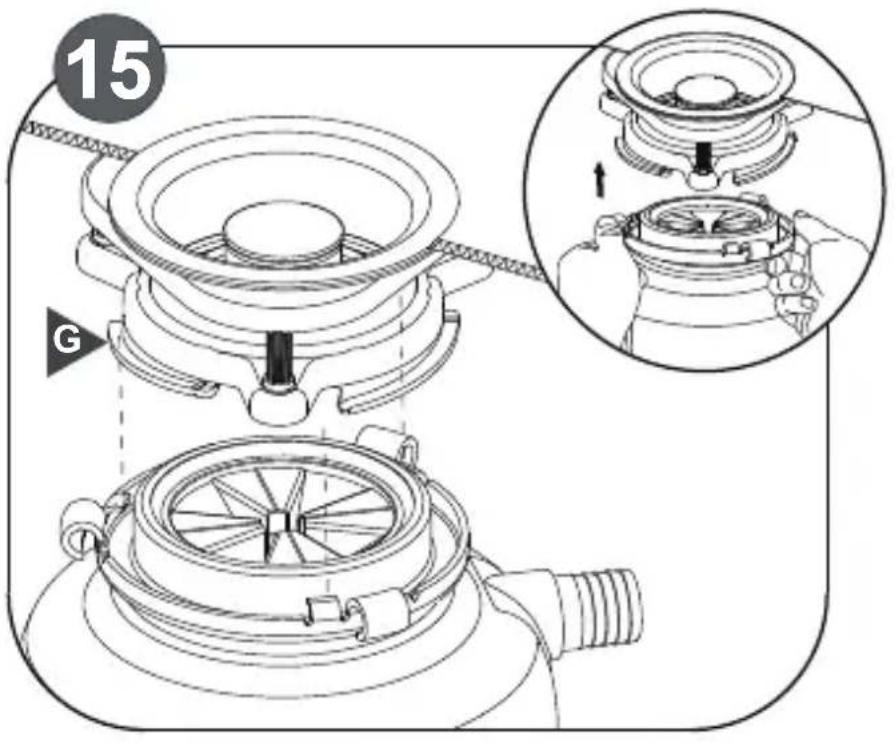
Hang disposer by aligning 3 mounting tabs with slide-up ramps on mounting ring.

WARNING: . Falling Hazard
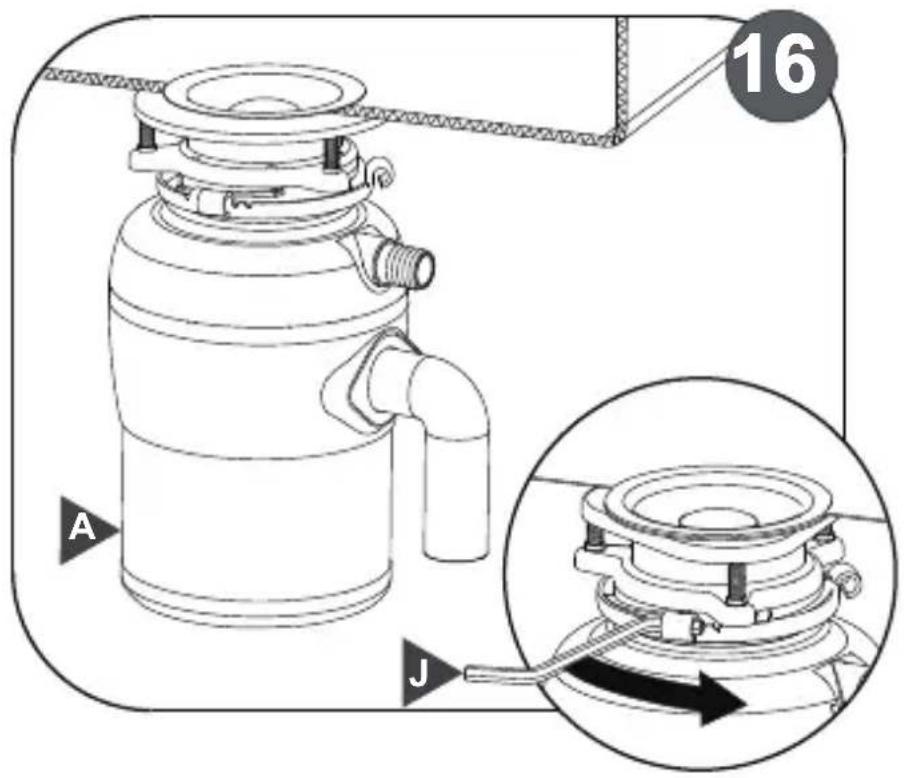
Use the wrench (J) to secure the mounting ring tightly.
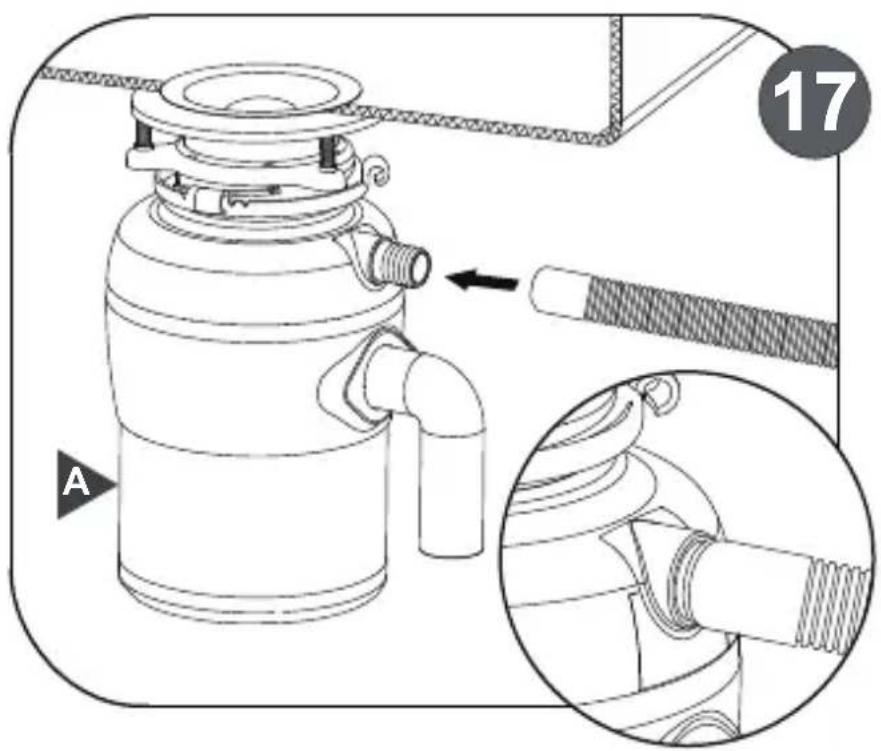
Place dishwasher tube into dishwasher Inlet.
Secure with hose clamp.
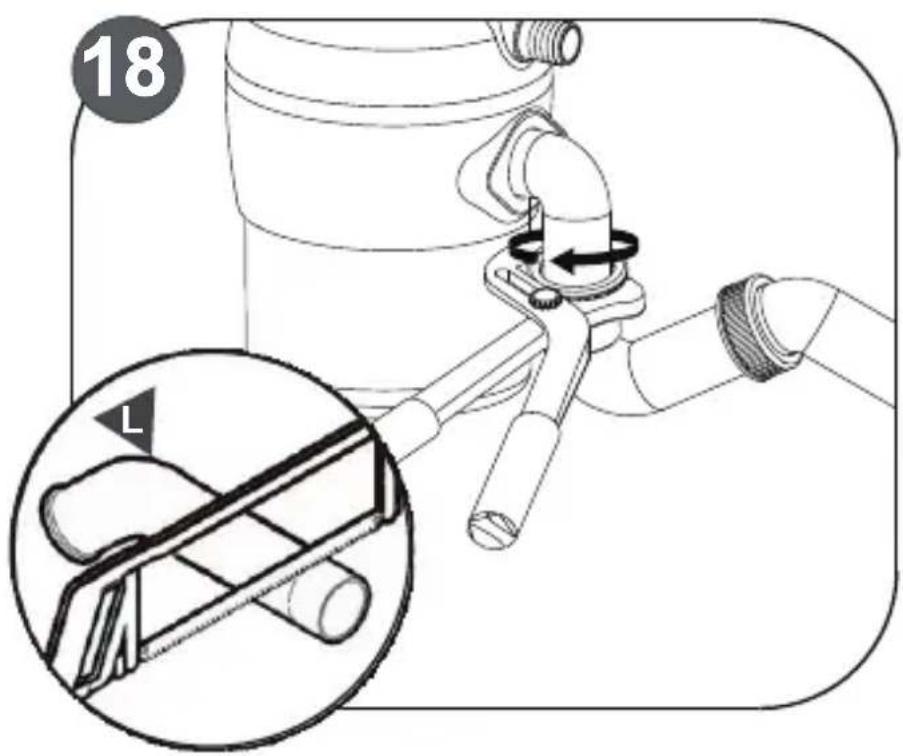
You may need to trim hose clamp.
Discharge tube to ensure proper fit.
Make sure anti-vibration tailpipe mount is straight.
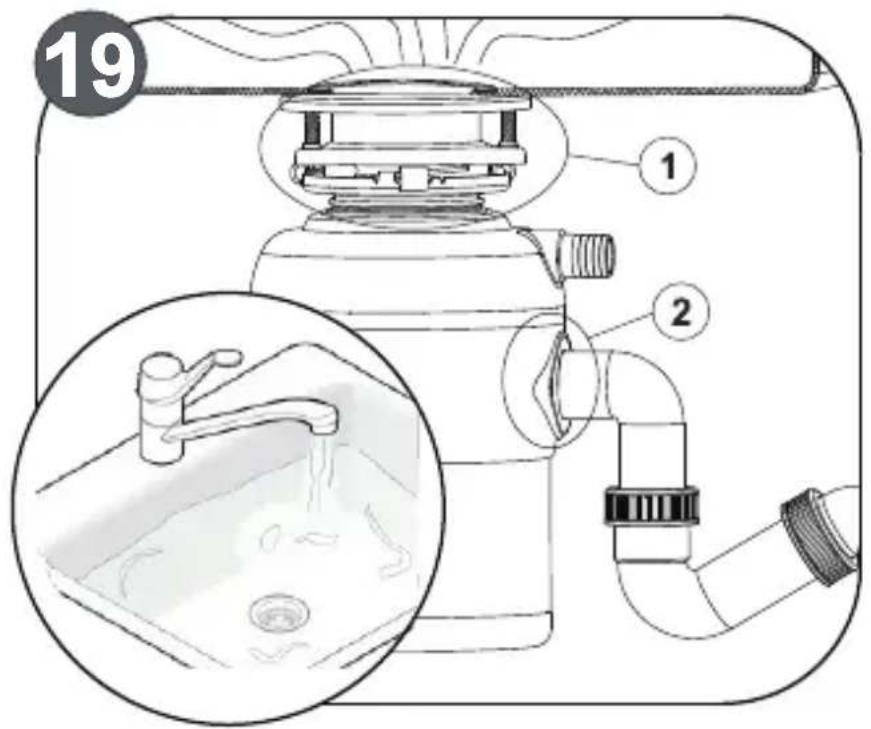
Test for leaks after Installation:
Fill 2/3 of the sink with tap water, turn on the disposer and then release the water.
Check for leaks on connections spots (1) and (2) as indicated on the picture.
An accessory can be installed on the garbage disposer which will automatically turn it on using an air switch.
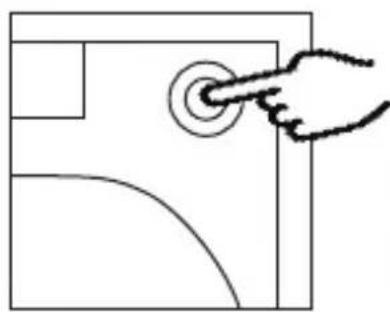
An Air Switch is a push button installed on the countertop or sink to control the operation of the garbage disposer.
To order contact Customer Service.
Air Switch Kit (GDAS-01)
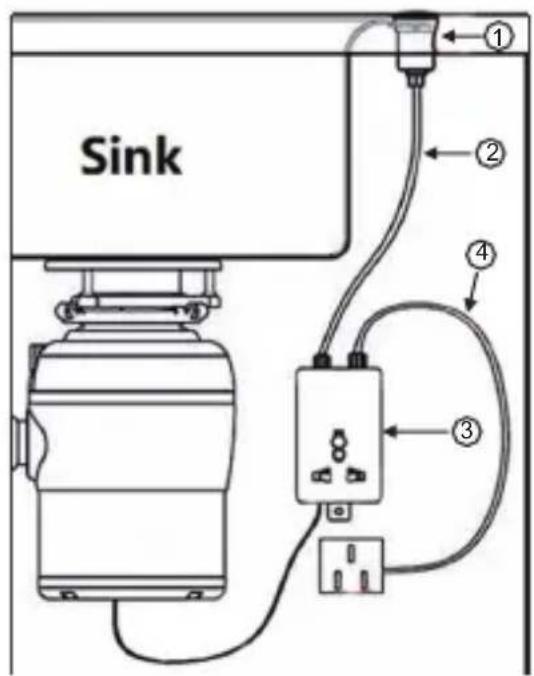
- Air Switch
- Air Tube
- Power Box
- Power Cord
natural_image
Simple line drawing of a hand pointing at a button on a computer monitor (no text or symbols)Top View
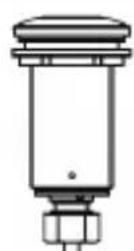
Side View
Operation
Before using the garbage disposer, ensure that it has been installed correctly under the sink with the required electrical connection.
Use the garbage disposer to discard only organic items, such as fruit and vegetable debris:
- Turn on the faucet and let the water run in the sink.
- Press the switch for the garbage disposer.
- Put the food debris into the garbage disposer opening, a small quantity at a time.
- After a few minutes, when the debris has been cleared, turn off the switch and then the faucet.
Do Not put the following types of items through the garbage disposer:
- Glass, metal
- Paper, plastic
• Large bones, thick chunks of food
DO NOT PUT YOUR HANDS INTO THE GARBAGE DISPOSER OPENING.
If a utensil has accidentally gone into the garbage disposer opening or if the drain is clogged, turn off the power and call a technician to fix the problem.
When not in use, place a sink strainer over the garbage disposer opening.
- 360° Clean Rinse: Every time the disposer is used, water needs to be run through it. The grinding disc utilizes centrifugal force and the combination of water to create a scrubbing action for self-cleaning.
- Auto Shut off: The disposer automatically shuts o f after running for 25 minutes to prevent it from being left on accidentally.
- Manual Reset: The reset button is located at the bottom of the disposer and is red in color.
Technical Specifications
| Model | GD 075 |
| Grinding Chamber Capacity | 1 Quart (1000 ml) |
| Electrical | 120V / 60Hz |
| RPM | 1700 RPM |
| Horse Power | 3/4 HP |
| Net Weight (lbs) | 17.2 |
| Product Dimensions (HxWxD) | 12.2 x 7.1 x 7.1 (inch) |
California Proposition 65
WARNING: This product contains chemicals known to the State of California to cause cancer and birth defects or other reproductive harm.

natural_image
Simple geometric diagram of a circle with a horizontal line crossing through it (no text or symbols)EQUATOR®
ADVANCED Appliances ≡
Equator Advanced Appliances USA, founded in 1991, offers Efficient, High-Quality, and Innovative household appliances.
Our Mission is to simplify domestic chores and save Time, Space, and Energy.
Our Vision is to enhance our Customer's Quality of Life!
Air Switch Set Installation
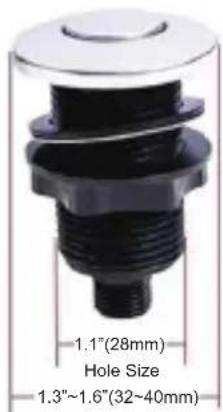
Installation Steps
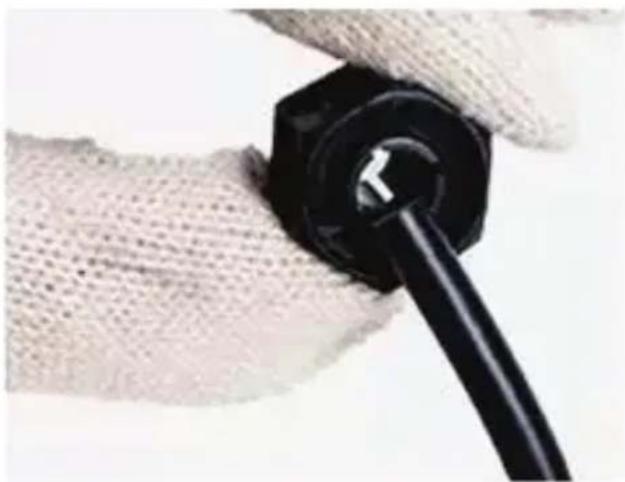
- Thread the air tube through the air tube as shown and tighten the knob.
natural_image
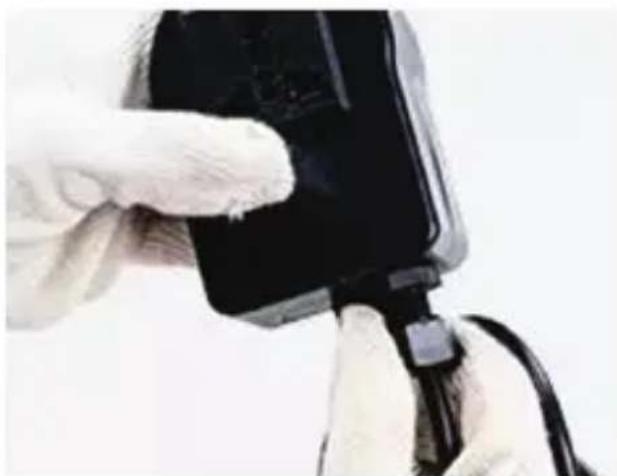
Close-up of a black plastic clip securing a textured white mesh material (no text or symbols visible)- Fit the air tube onto the power box and tighten.
natural_image
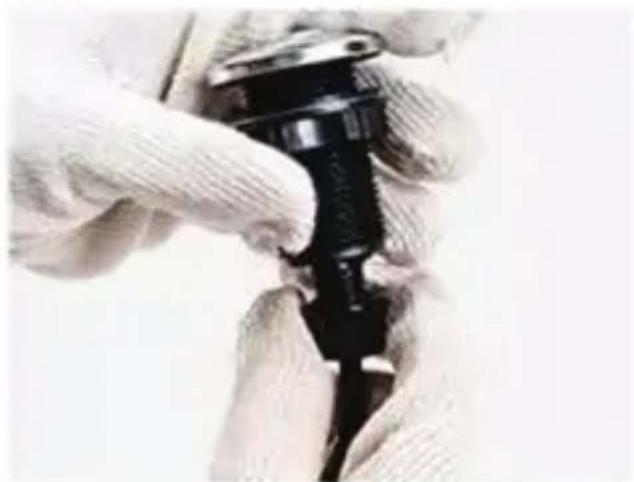
Close-up of gloved hands holding a black electronic device with cable (no visible text or symbols)- Fit the air tube onto the start button and tighten.
natural_image
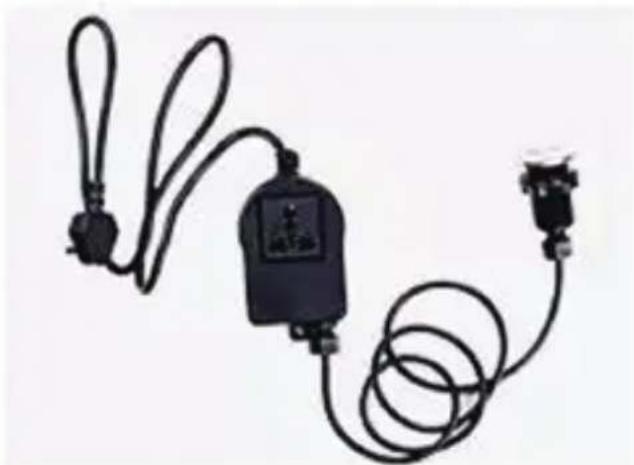
Close-up of gloved hands holding a black mechanical component (no visible text or symbols)- The correct connection of the air switch is shown in the picture.
natural_image
Simple line drawing of a pressure sensor with two leads and a coiled cable (no text or symbols)Installation Position
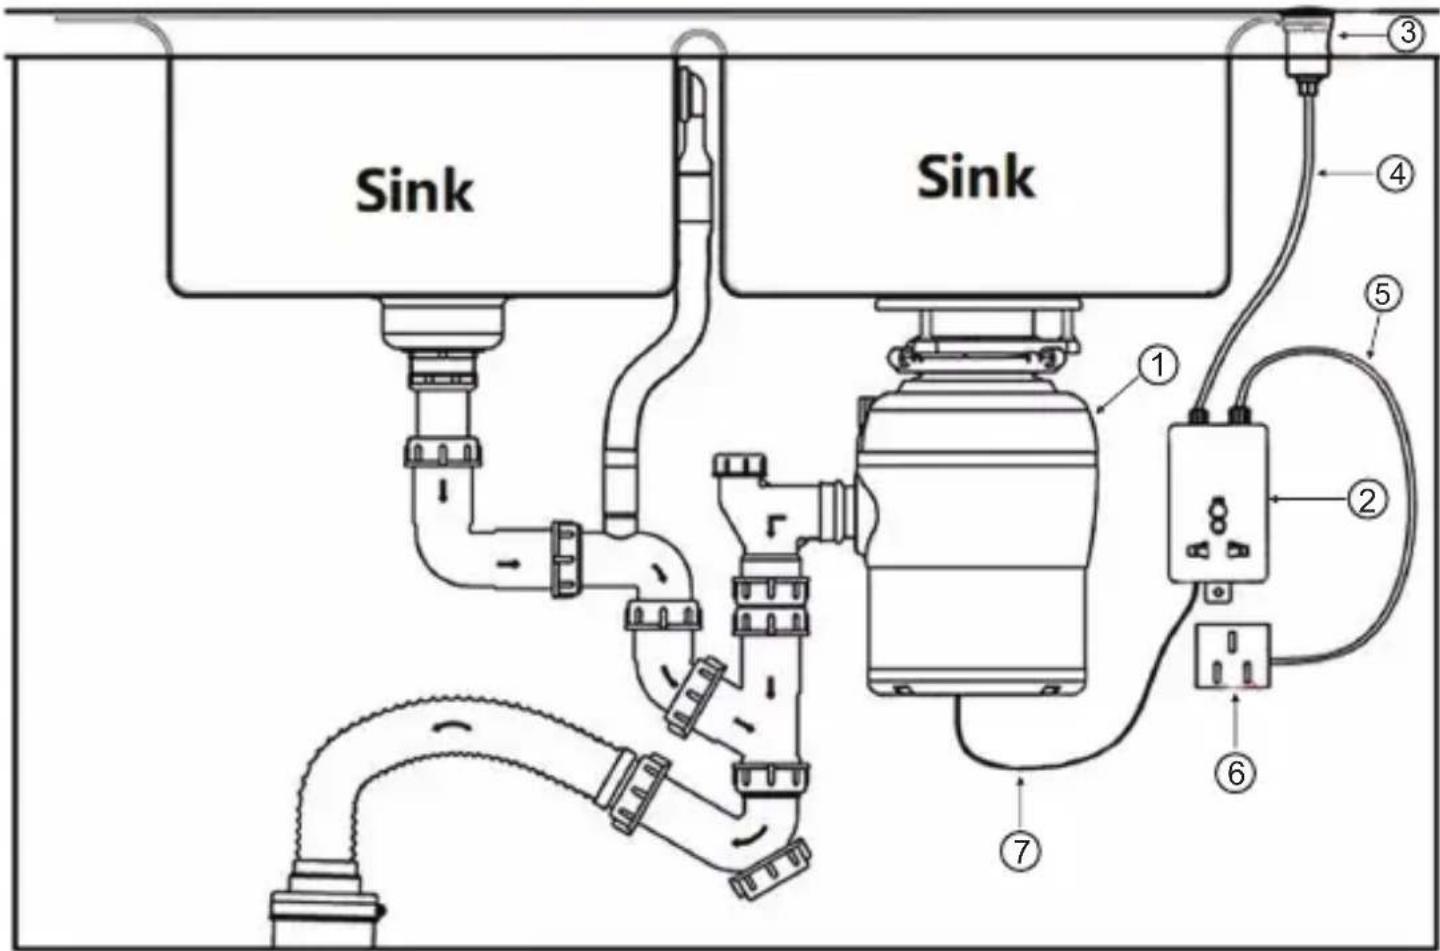
-
Food waste disposer
-
Air switch power cord
-
Air switch power box
-
Wall reserved socket
-
Air switch button
-
Disposer power cord
-
Air switch air tube
- OWNER'S MANUAL
- Exclusions
- Equator Appliances
- For Service:
- GENERAL
- Safety
- Installation Instructions
- Stop and read
- Air Switch Kit (GDAS-01)
- Operation
- DO NOT PUT YOUR HANDS INTO THE GARBAGE DISPOSER OPENING.
- California Proposition 65
- EQUATOR®
- ADVANCED Appliances ≡
- Air Switch Set Installation
- Installation Steps
- Installation Position
Brand : Equator
Model : GD 075
Category : Dishwasher