
Pure D9 PD91GREENT - Vacuum Cleaner ELECTROLUX - Free user manual and instructions
Find the device manual for free Pure D9 PD91GREENT ELECTROLUX in PDF.


| Product Type | Canister Vacuum Cleaner |
| Brand | Electrolux |
| Model | Pure D9 PD91GREENT |
| Dimensions (L x W x H) | 300 x 400 x 250 mm |
| Weight | 5.5 kg |
| Power Consumption | 700 W |
| Dust Capacity | 1.5 L (bagless) |
| Filtration System | HEPA filter (washable) |
| Noise Level | 78 dB |
| Cord Length | 8 m |
| Suction Control | Electronic slider on handle |
| Cleaning Principle | Cyclonic action |
| Included Accessories | Crevice tool, dusting brush, upholstery nozzle |
| Floor Nozzle | Combination floor/bare floor nozzle |
| Filter Maintenance | Wash filter every 3-6 months; replace annually |
| Dust Bin Emptying | Press release button, empty over bin |
| Safety Features | Thermal cut-off; do not vacuum liquids |
| Repairability | Replaceable filter and brush roll; spare parts available |
| Warranty | 2 years (manufacturer) |
Frequently Asked Questions - Pure D9 PD91GREENT ELECTROLUX
User questions about Pure D9 PD91GREENT ELECTROLUX
0 question about this device. Answer the ones you know or ask your own.
Ask a new question about this device
Download the instructions for your Vacuum Cleaner in PDF format for free! Find your manual Pure D9 PD91GREENT - ELECTROLUX and take your electronic device back in hand. On this page are published all the documents necessary for the use of your device. Pure D9 PD91GREENT by ELECTROLUX.
USER MANUAL Pure D9 PD91GREENT ELECTROLUX
Canister vacuum cleaner

natural_image
Exterior view of a black Electrolux vacuum cleaner (no text or symbols on body)GB INSTRUCTION BOOK 4
CS 说明书 7
CT 說明手冊 10
ID BUKU PETUNJUK
KO 설명서

natural_image
Illustration of a hand using a tool to clean or install a vacuum cleaner inside a device (no text or symbols visible)


natural_image
Illustration of a hand holding a handheld device with a blue directional arrow indicating motion (no text or symbols)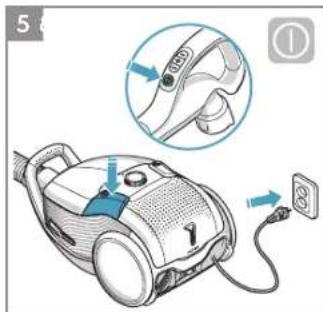


natural_image
Illustration of a hand cleaning a vacuum cleaner with a tool, showing no text or symbols
natural_image
Technical line drawing of a vacuum cleaner with attached hoses and labeled component A (no text or symbols beyond label)


natural_image
Illustration of a vacuum cleaner with a blue grid socket and directional arrow (no text or symbols)
natural_image
Illustration of hands using a tool to clean or install an open airbag (no text or symbols visible)

natural_image
Illustration of two mechanical clamps with a play button and lightbulb icon, no text or symbols present
natural_image
Illustration of a hand holding a device with a handle, no text or symbols visible
natural_image
Illustration of hands using crimping tools to adjust a mechanical component (no text or symbols present)


ENGLISH
Thank you for choosing Electrolux PURED9 vacuum cleaner. Always use original accessories and spare parts to get the best results. This product is designed with the environment in mind. All plastic parts are marked for recycling purposes.
BEFORE STARTING
- Read this manual carefully.
- Check that all parts described are included.
• Pay special attention to the safety precautions!
DESCRIPTION OF PURED9 VACUUM CLEANER
A. Display (see versions later)
B. Exhaust filter lid
C. Exhaust filter
D. Parking slots
E. Power cord
F. Motor filter
G. Motor filter holder
H. S-bag ®
I. S-bag ® holder
J. Dust compartment cover
K. AeroPro 3in1 tool
L. AeroPro hose
M. AeroPro handle (see versions later)
N. AeroPro telescopic tube
O. Parking clip
P. Display for models with rotary knob manual control*
Q. Display for models with remote control*
R. Display for models with remote control and AUTO function*
S. AeroPro Classic handle*
T. AeroPro Ergo handle*
U. AeroPro Remote Control handle*
V. FlowMotion nozzle*
W. FlowMotion LED (high) nozzle (with front lights)*
X. AeroPro Turbo nozzle*
Y. AeroPro Mini Turbo nozzle*
Z. ParkettoPro nozzle*
AA. AeroPro FlexProPlus nozzle*
AB. AeroPro Long crevice nozzle*
* Certain models only
HOW TO USE THE VACUUM CLEANER
1 Open the dust compartment cover by pulling the S-BAG button. Check that the dust bag (s-bag) is in place.
2 Insert the hose into the cleaner (to remove it, press the lock buttons and pull). Insert the hose into the hose handle until the lock button clicks (to release it, press the lock button and pull).
3 Attach the telescopic tube to the nozzle. Attach the telescopic tube to the hose handle (to remove it, press the lock button and pull).
4 Adjust the telescopic tube by holding the lock with one hand and pulling the handle with the other hand.
START/STOP THE VACUUM CLEANER AND ADJUST SUCTION POWER
5 Pull out the power cord and plug it into the mains. Press the ON/OFF button to turn the cleaner on/off. Indicators light up, MIN/MAX indicator lights up from left to right and back (auto function models).* Models with remote control can also be operated by the ON/OFF button on the handle.*
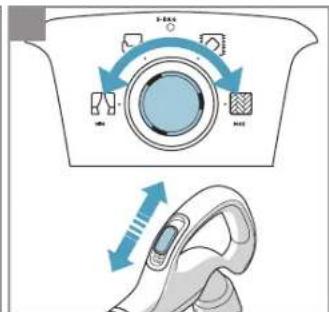
6 Adjust suction power (manual control models): Turn the rotary knob on the cleaner or use the air valve on the handle.*
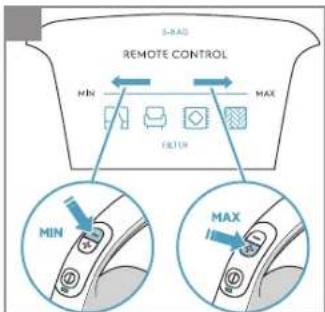
7 Adjust suction power (remote control models): Press +/- button on the handle. MIN/MAX and symbols indicators on display will show level of power.*
8 Adjust suction power (remote control models with AUTO): The cleaner starts in AUTO mode (automatic power regulation). AUTO indicator is illuminated on the display and MIN/MAX indicator pulses. To regulate power manually press +/- button on handle. Press AUTO button to return to auto-function.*
9 After cleaning, push the REWIND button to rewind the cable.
PARKING POSITIONS
10 Use parking position on the side (A) or underneath (C) to carry and store the cleaner, or at the back when you want to pause cleaning.
REPLACING THE DUSTBAG, S-BAG®
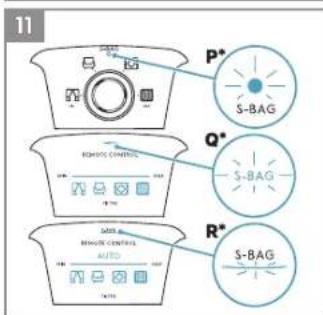
11 Replace the s-bag when
- P* Models with rotary knob: S-BAG indicator lights up in red
- Q* Models with remote control: S-BAG symbol lights up red.
- R* Models with remote control and AUTO: S-BAG indicator lights
up in red (green light: bag is OK, yellow light: soon time to replace bag).
NB: Always change the s-bag when S-BAG indicator is illuminated or
has red light even if the s-bag is not full (it may be blocked) and after using carpet cleaning powder. For best possible performance, use the Ultra Long Performance bag which is especially developed for your cleaner. Other synthetic s-bags can also be used. Do not use paper dust bags! www.s-bag.com
12 Pull the S-BAG button to open the dust compartment. The handle of the s-bag holder goes up. Pull the handle to remove the s-bag with holder. Do not press the release button.
13 Hold the s-bag with holder over a dust bin. Press the button to release the s-bag. Insert a new s-bag to the holder by inserting the cardboard/plastic at the back of the holder.
14 Insert the s-bag with holder by pushing it straight down in its tracks. Make sure the s-bag is not stuck under the holder. Close the lid. If the s-bag is not properly placed or is missing, the lid will not close.
NB: When you start the cleaner after s-bag replacement, It takes 10 seconds before the S-BAG indicator turns off (P* Models with rotary knob and Q* Models with remote control) or turns green (R* Models with remote control and AUTO).
REPLACING THE FILTERS
15 Replace/clean** the filter when (**washable filter only)
- P* Models with rotary knob: you have changed the s-bag 5 times
- Q* Models with remote control: FILTER symbol lights up in red
- R* Models with remote control and AUTO: filter indicator lights up in red. Green light indicates that the filter is ok. It lights up briefly when you start the vacuum cleaner.
16 Pull the FILTER button to open the filter lid. Use original s-filters.
Remove the filter and check the reference on the frame to define type. Replace with a new filter or clean it**. Rinse the inside (dirty side) in lukewarm tap water. Tap the filter frame to remove the water. Repeat the process four times. (**washable filter only)
NB: Do not use cleaning agents. Avoid touching the filter surface. Let the filter dry completely (min. 24 h in room temperature) before putting back! Change the washable filter at least once a year or when it is very dirty or damaged. Do not remove the L-shaped foam under the filter.
17 After replacing the filter, close the filter lid until it is clicked back into place. If the filter lid comes off, position the hinges at the bottom and push the filter lid until it is clicked back into place.
NB: When you start the cleaner after filter replacement, It takes 10 seconds before the FILTER indicator turns green (models with remote control and AUTO function) or turns off (remote control models).*
18 Replace the motor filter when dirty or after every 5th s-bag. Push the filter holder down and pull it out. Exchange the filter and close the lid.
VACUUMING WITH THE UNIVERSAL NOZZLE (V\*, W\*)
19 Change nozzle setting with the pedal. Icon illustrates recommended floor type.
20 FlowMotion LED (high) nozzle*: Move the nozzle forward. The front light turns on automatically after a few seconds. When the nozzle is not used, the light turns off automatically after a few seconds.
CLEANING THE UNIVERSAL NOZZLE (V\*, W\*\*)
21 Disconnect the nozzle from the tube. Clean with the hose handle.
CLEANING THE TURBO NOZZLE (X\*)
22 Disconnect the nozzle from the tube and remove entangled threads etc by snipping them away with scissors. Use the hose handle to clean the nozzle. *
3IN1 ACCESSORY TOOL
23 Pull the textile tab to take out 3in1 tool. The tool has 3 functions, see pictures on next page.
24 After usage, put it back in its place.
CHANGING THE BATTERIES\*
25 Nozzle with front lights*: Change batteries when front lights start blinking fast. Use 2 AA batteries.
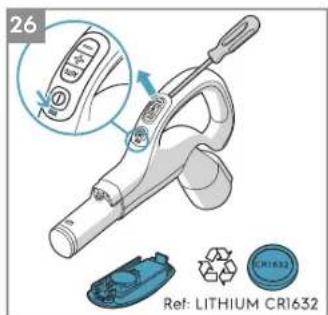
26 Handle with remote control*: Change battery when light indicator turns red or is not responding when pressing any button. Use only batteries type LITHIUM CR1632.
NB: Remove the batteries from the product before scrapping. Follow your country's rules for collection of batteries and electrical products.
Enjoy a great cleaning experience with PURED9!
Electrolux reserves the right to change products, information and specifications without notice.
TIPS ON HOW TO GET THE BEST RESULTS
| NOZZLE/ACCESSORY USE FOR: NOZZLE/ACCESSORY USE FOR: | |||
K. 3In1 accessory tool* 1 2 3 1 2 3 | 3 tools in 1:1. Dusting tool for hard surfaces(bookshelves, skirting boards etc).2. Upholstery tool for textiles(curtains, upholstery etc).3. Crevice tool for narrow spaces(behind radiators etc). | V. FlowMotion nozzle*W. FlowMotion LED(high) nozzle(with front lights)* 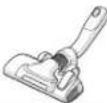 | Universal nozzle:- For all floor types, best dust pick up onboth carpets and hard floors.- Change nozzle setting with the pedal.Icon will show recommended floor type.- Front light helps to detect dust anddirt in dark spaces (under furniture etc).FlowMotion LED (high) nozzle only |
X. Turbo nozzle* Carpet nozzle: | - Brushes and vacuums at the sametime (best pick up of hair, fibresetc).- Brush roller is driven by the airflowof the vacuum cleaner.- Not suitable for carpets with verydeep piles and long fringes, anti-slip carpets like door mats or waterresistant carpets. Use universalnozzle instead. | Y. Mini Turbo nozzle* Upholstery nozzle:[IMAGE] | - Brushes and vacuums at the same time(best pick up of hair, fibres etc).- For textile furniture, car seats, mattressesetc.- Brush roller is driven by the airflow of thevacuum cleaner.- Not suitable for carpets with very deeppile and long fringes as it can get stuck inthe rotating brush roll. |
Z. ParkettoPro nozzle* Hard floor nozzle: | - For gentle cleaning of hard floor(parquet, wooden floor, tiles etc).- Best dust pick up on hard floorwith crevices. | AA. FlexProPlus nozzle* Hardfloor nozzle: | - For reach under/between furniture,corners and other obstacles.- Can easily turn 180 degrees to accessnarrow spaces. |
AB. Long crevice nozzle* Extra long tool: | - For areas hard to reach (top ofshelves etc).- For narrow spaces (behindradiators, under car seats etc). | ||
Models with manual power regulation
– follow graphics on cleaner for optimal performance.
Models with AUTO-function automatically adjust the suction power
in order to give an optimal cleaning performance and comfort on every surface. For manual regulation, follow graphics for optimal performance.
TROUBLESHOOTING
| PROBLEM SOLUTION | |
| The vacuum cleaner does not start | Check that the cable is connected to the mains.Check that the plug and cable are not damaged.Check for a blown fuse.Check if the battery indicator lamp in the remote control handle responds (certain models only). |
| The s-bag® indicator light is illuminated | Check if the s-bag* is full or blocked.If you have already changed the s-bag*, change the motor filter. |
| The filter indicator light is illuminated(only at specific models) | Change, or wash (if washable), the exhaust filter. |
| The cleaner stops | The cleaner might be overheated: disconnect it from the mains; check if the nozzle, tube, hose or filters are blocked. Let the cleaner cool down for 30 minutes before plugging it in again.If the cleaner still does not work, contact an authorized Electrolux service centre. |
| Reduction of suction capacity versus normal | Check if the s-bag is full or blocked.Check if the motor filter is clogged and needs changing.Check if nozzle is blocked and needs to be cleared.Check if hose is blocked by squeezing it gently. However, be careful in case the obstruction has been caused by glass or needles caught inside the hose.Note: The warranty does not cover any damage to the hose caused by cleaning it. |
| Water has been sucked into the vacuum cleaner | It will be necessary to replace the motor at an authorized Electrolux service centre.Damage to the motor caused by the penetration of water is not covered by the warranty. |
| For any further problems, contact an authorized Electrolux service centre. | |
SAFETY PRECAUTIONS
This appliance is not intended for use by persons (including children) with reduced physical, sensory or mental capabilities, or lack of experience and knowledge, unless they have been given supervision or instruction concerning use of the appliance by a person responsible for their safety.
Children should be supervised to ensure that they do not play with the appliance.
Cleaning and maintenance should not be undertaken by children without supervision.
WARNING: Turbo nozzles* have a rotating brush where parts can get entrapped. Please use them with caution and only on intended surfaces. Please turn the vacuum cleaner off before removing entrapped parts or cleaning the brush.
Batteries must be removed from the remote control in the handle* / LED lighted nozzle* before scraping the product**.
*Certain models only.
**Information on how to remove the battery in the fold-out part section 25 and 26.
Always disconnect the plug from the mains before cleaning or maintaining the appliance or when removing the battery. The battery is to be disposed of safely.
If the cord is damaged, it must be replaced only by an authorized Electrolux service centre in order to avoid a hazard.
PURED9 should only be used indoors for normal vacuuming and in a domestic environment. Make sure the vacuum cleaner is stored in a dry place.
All service or repairs must be carried out by an authorized Electrolux service centre.
Packaging material, e.g. plastic bags should not be accessible to children to avoid suffocation.
Never use the vacuum cleaner:
In wet areas.
Close to flammable gases, etc.
When the product shows visible signs of damage.
On sharp objects or fluids.
When the floor nozzle shows visible signs of a damages.
On hot or cold cinders, lighted cigarette butts, etc.
On fine dust, for instance plaster, concrete, flour, hot or cold ashes.
Do not leave the vacuum cleaner in direct sunlight.
Avoid exposing the vacuum cleaner to strong heat or freezing temperatures.
Never use the vacuum cleaner without its filters.
Do not try to touch the brush roll while the cleaner is switched on and the brush roll is turning.
When the wheels are blocked.
Power cord precautions
Check the plug and cord regularly. Never use the vacuum cleaner if the plug or cord is damaged.
Damage to the vacuum cleaner's cord is not covered by the warranty.
Never pull or lift the vacuum cleaner by the cord.
Using the vacuum cleaner in the above circumstances may cause serious personal injury or damage to the product. Such injury or damage is not covered by the warranty or by Electrolux.
SERVICING AND WARRANTY
All service or repairs must be carried out by an authorized Electrolux service centre.
Damage to the vacuum cleaner's cord is not covered by the warranty. Damage to the motor caused by; vacuuming liquid, immersing appliance in liquid or using appliance with a damaged hose and nozzle is not covered by the warranty.
Always use original s-bag dust bags suitable for this particular vacuum cleaner, see section 11. Damages caused to the cleaner by incorrect use of none-original dust bags is not covered by the warranty.
DISPOSAL
This symbol on the product indicates that this product contains a battery which shall not be disposed with normal household waste.
This symbol on the product or on its packaging indicates that the product may not be treated as household waste.
To recycle your product, please take it to an official collection point or to an Electrolux service center that can remove and recycle the battery and electrical parts in a safe and professional way. Follow your country's rules for the separate collection of electrical products and rechargeable batteries.
Hereby, Electrolux Home Care and SDA, declares that the Vacuum Cleaner with radio equipment type HER2 and HER3 is in compliance with Directive 2014/53/EU.
简体中文
MÔ TÀ VỀ MÁY HÚT BỤI PURED9
BẠT/TẮT MÁY HÚT BUI VÀ ĐIỀU CHÍNH LỰC HÚT
Electrolux Korea limited
9F, Pine Avenue B,
100 Euljiro, Jung-gu, Seoul, Korea 04551
Tel : +(82) 2 6020-2200
Fax: +(82) 2 6020-2271-3
Customer Care Services : +(82) 1566-1238
Email: homecare.krh@electrolux.com
Website: www.electrolux.co.kr
INDONESIA
Electrolux Indonesia
Electrolux Building
Electrolux Philippines Inc.
10th Floor. W5th Avenue Building
5th Avenue Corner 32nd Street
Bonifacio Global City,
Taguig Philippines 1634
Tel: +(63) 2 737 4757
Domestic Toll Free : 1 800 10 845 care 2273
Customer Care Services: +(63) 2 845 care 2273
Email: wecare@electrolux.com
Website: www.electrolux.com.ph
THAILAND
Electrolux Thailand Co Ltd
Electrolux Building
14th Floor 1910 New Petchburi Road
Bangkapi, Huay Kwang
Bangkok 10310
Thailand
Tel: +(66) 2 725 9100
Fax: +(66) 2 725 9299
Customer Care Services: +(66) 2 725 9000
Email: customercarethai@electrolux.com
Website: www.electrolux.co.th
VIETNAM
Electrolux Vietnam Ltd
Floor 9th, A&B Tower
76 Le Lai Street
Ben Thanh Ward - District 1
Ho Chi Minh City
Vietnam
Tel: +(84) 8 3910 5465
Fax: +(84) 8 3910 5470
Customer Care Services: 1800-58-8899
Email: vncare@electrolux.com
Website: www.electrolux.vn
MALAYSIA
Electrolux Home Appliances Sdn Bhd
Lot C6, No. 28, Jalan 15/22,
Taman Perindustrian Tiong Nam,
40200 Shah Alam, Selangor
Malaysia
Customer Care Hotline: 1300-88-11-22
Customer Care Services Tel: (+60 3) 5525 0800
Customer Care Services Fax: (+60 3) 5524 2521
Email: malaysia.customercare@electrolux.com
Website: www.electrolux.com.my
SINGAPORE
Electrolux SEA Pte Ltd
1 Fusionopolis Place, Galaxis #07-10 (West Lobby)
Singapore 138522
Fax: +(65) 6727 3611
Customer Care Services: +(65) 6727 3699
Email: customer-care.sin@electrolux.com
Website: www.electrolux.com.sg
HONG KONG PRC
大昌貿易行有限公司
電器維修中心
香港九龍灣啟祥道20號
大昌行集團大廈5樓
163 O'Riordan Street, Mascot, NSW 2020, Australia
Customer Service Phone: 1300 365 305
Website: www.electrolux.com
NEW ZEALAND
Electrolux Home Care & Small Domestic Appliances
A division of Electrolux (NZ) Limited
3-5 Niall Burgess Road, Mt Wellington,
Auckland, New Zealand
Phone: (09) 573 2220
Customer Service Phone: 0508 730 730
Website: www.electrolux.com


Get usage advice, brochures, trouble shooter, service information: www.electrolux.com

Register your product for better service: www.electrolux.com/productregistration

Buy Consumables & Accessories for your appliance: www.electrolux.com/shop
CONSUMABLES & ACCESSORIES
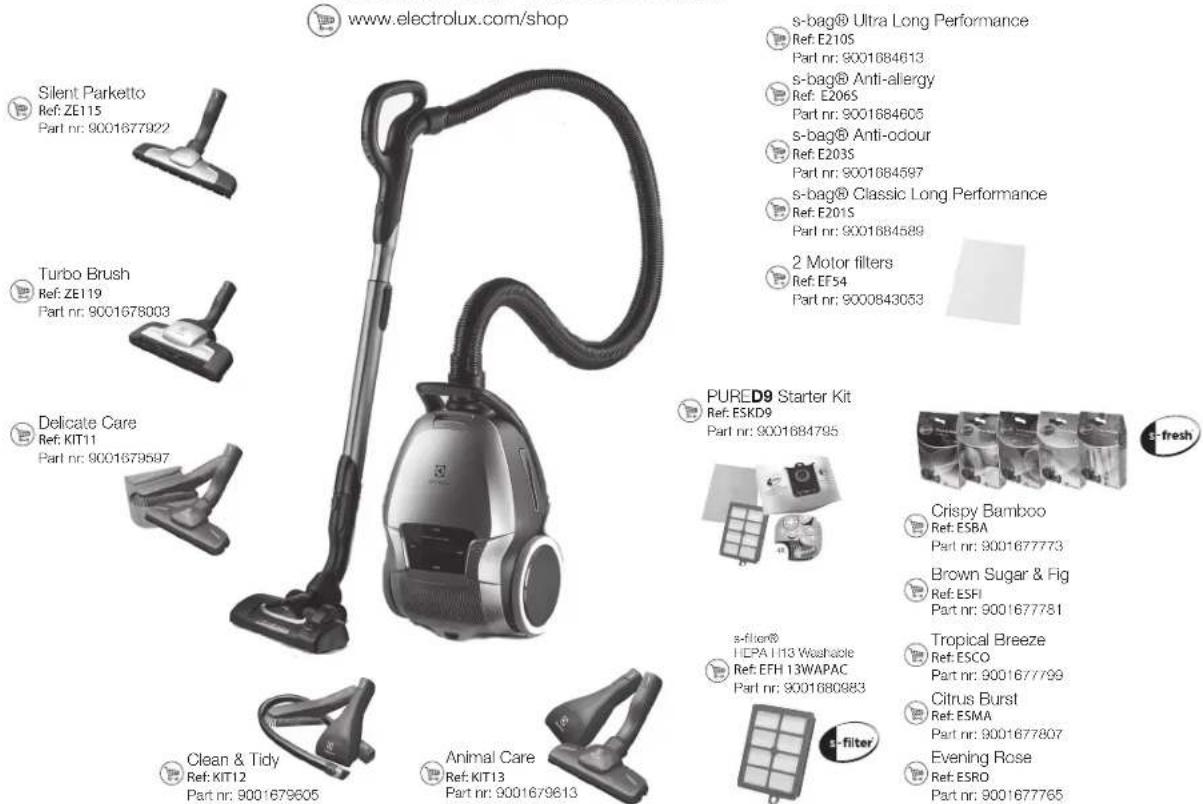
Availability of Electrolux Webshop and Consumables & Accessories varies by region and country. Please refer to our local Electrolux website for more details or contact local customer service hotline for support.
CUSTOMER CARE AND SERVICE
When contacting Service, ensure that you have the following data available:
- Model Number
- PNC number
- Serial number
The information can be found on the rating plate.

electrolux.com/shop Electrolux Appliances AB

S:t Göransgatan 143
S-105 45 Stockholm
Sweden
www.electrolux.com
- Canister vacuum cleaner
- ENGLISH
- BEFORE STARTING
- DESCRIPTION OF PURED9 VACUUM CLEANER
- HOW TO USE THE VACUUM CLEANER
- START/STOP THE VACUUM CLEANER AND ADJUST SUCTION POWER
- PARKING POSITIONS
- REPLACING THE DUSTBAG, S-BAG®
- REPLACING THE FILTERS
- VACUUMING WITH THE UNIVERSAL NOZZLE (V\*, W\*)
- CLEANING THE UNIVERSAL NOZZLE (V\*, W\*\*)
- CLEANING THE TURBO NOZZLE (X\*)
- 3IN1 ACCESSORY TOOL
- CHANGING THE BATTERIES\*
- Models with manual power regulation
- Models with AUTO-function automatically adjust the suction power
- SAFETY PRECAUTIONS
- Never use the vacuum cleaner:
- Power cord precautions
- SERVICING AND WARRANTY
- DISPOSAL
- 简体中文
- MÔ TÀ VỀ MÁY HÚT BỤI PURED9
- BẠT/TẮT MÁY HÚT BUI VÀ ĐIỀU CHÍNH LỰC HÚT
- INDONESIA
- THAILAND
- VIETNAM
- MALAYSIA
- SINGAPORE
- HONG KONG PRC
- NEW ZEALAND
- CUSTOMER CARE AND SERVICE
Brand : ELECTROLUX
Model : Pure D9 PD91GREENT
Category : Vacuum Cleaner