
FFV6TEE - Oven LOFRA - Free user manual and instructions
Find the device manual for free FFV6TEE LOFRA in PDF.


| Product Type | Built-in Electric Oven |
| Brand | Lofra |
| Model | FFV6TEE |
| Installation | Built-in |
| Energy Source | Electric |
| Oven Capacity | 65 Litres |
| Oven Dimensions (H x W x D) | 59.5 x 59.5 x 55 cm |
| Net Weight | 34 kg |
| Power Consumption | 2.5 kW |
| Functions | Conventional, Fan-assisted, Grill, Pizza, Defrost |
| Temperature Range | 50°C – 250°C |
| Cleaning | Catalytic liners (back wall) |
| Safety Features | Child lock, Cool touch door, Automatic shut-off |
| Display | LED touch control |
| Accessories Included | 2 wire shelves, 1 baking tray |
| Energy Class | A+ |
| Warranty | 2 years |
| Spare Parts Availability | 7 years after purchase |
| Repairability Index | 8.5/10 |
Frequently Asked Questions - FFV6TEE LOFRA
User questions about FFV6TEE LOFRA
0 question about this device. Answer the ones you know or ask your own.
Ask a new question about this device
Download the instructions for your Oven in PDF format for free! Find your manual FFV6TEE - LOFRA and take your electronic device back in hand. On this page are published all the documents necessary for the use of your device. FFV6TEE by LOFRA.
USER MANUAL FFV6TEE LOFRA

natural_image
Cross-sectional diagram of a mechanical or architectural component with directional arrows indicating movement (no text or symbols)Fissaggio forno
natural_image
Simple line drawing of a cable or wire with a base and a labeled point B, no text or symbols present.natural_image
Diagram of a refrigerator with labeled component C (no text or symbols beyond label)natural_image
Close-up of a mechanical component with labeled point A, showing internal structure and no readable text or symbols.3.6 GRIGLIE CON DISPOSITIVO ANTICADUTA
natural_image
Diagram showing three steps of a mechanical or electrical component assembly (no text or symbols)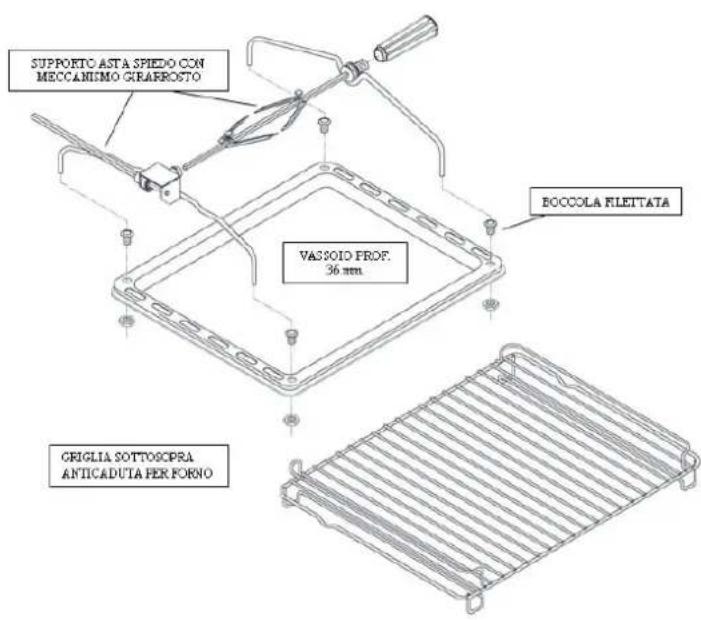
3.7 MONTAGGIO MECCANISMO GIRARROSTO
natural_image
Close-up of a transparent glass table with a metallic handle and a small metallic object on top (no text or symbols visible)natural_image
Symbol of a trash bin crossed with a diagonal line, representing no waste or discharge (no text or labels)
Lofra guarantees the quality of its products sold and their proper operation in normal conditions of use for the period of the warranty, which shall be in accordance with and comply with the rights of consumers under the provisions of EU Council Directive 1999/44/CE. Conditions are reported in a pamphlet apart. Warranty does not apply to the product which has been damaged or defaced, subject to any type of damage derived from improper voltage or other misuse, abnormal service or handling and alterations or modifications in design.
INDEX
SAFETY INSTRUCTIONS AND SUGGESTIONS ...... 24
1. INSTALLATION....29
1.1 CHOOSING A LOCATION FOR YOUR OVEN 29
1.2 ELECTRICAL CONNECTION ....31
2. MAINTENANCE 31
2.1 SUPPLY CABLE 31
2.2 ACCESS TO THE ELECTRICAL COMPONENTS....31
2.3 OVEN DOOR REMOVAL....31
2.4 REPLACEMENT OF THE LIGHT BULB 32
3. HOW TO USE YOUR OVEN 32
3.1 GRILL 32
3.2 ROTISSERIE....32
3.3 HOW TO USE MULTIFUNCTION OVENS 33
3.4 LIST OF COOKING FUNCTIONS....33
3.5 TELESCOPIC GUIDES....37
3.6 RAY WITH ANTI-FALL DEVICE....37
3.7 MOUNTING MECHANISM ROTISSERIE 37
4. CLEANING AND CARE 38
5. ADVICE ON ENERGY SAVING AND RESPECT FOR THE ENVIRONMENT 38
TECHNICAL SPECIFICATIONS....39
Lofra reserves the right to modify the product without any notice.
SAFETY INSTRUCTIONS AND SUGGESTIONS
Please read the entire service manual before installing and using the oven.
- This appliance has been specifically designed for domestic use only.
• These instructions are specific for the country of destination indicated on the label inside the oven.
IMPORTANT!
Installation, regulations, alterations and maintenance procedures must be done by qualified personnel only in accordance to this manual and laws in force. The company will not be liable for any type of damage derived from improper voltage or other misuse, abnormal service or handling and alterations or modifications in design.
• Technical specifications
Information regarding the model can be obtained from the technical data
plate on the appliance or by consulting the charts.
- When obtaining service be sure to show the technician, along with the warranty, the
document stating the date of purchase or the date of delivery.
Prior to proceeding with any kind of alteration or maintenance be sure to unplug the oven from the mains. In case the replacement of parts/accessories is needed use original replacement parts by Lofra only. Trust qualified personnel only.
- It's recommended to save this instruction manual for future reference and have the appliance checked yearly by the service centre.
- Be sure to remove the protective film which may cover some parts of the oven (steel, aluminium, enamelled,...) prior to use. It's recommended to proceed with the removal of the film very carefully to avoid any damage to the protected parts.
- If the supply cord is damaged, it must be replaced by the manufacturer, its service agent or similarly qualified persons in order to avoid a hazard.
- It’s recommended to disconnect the oven before cleaning it. Clean the oven using tepid water and a neutral detergent; rinse well using a damp cloth. Wash the oven’s accessories
separately in a dishwasher or by using tepid water and a neutral detergent; dry them with a soft cloth.
- Before using the oven for the first time it's recommended to turn it on to the maximum temperature and leave it to heat for an hour. During this period there may be some smell and smoke due to the oven's thermal insulation adhesives and oils. It is recommended to leave a window open for the air to circulate.
When using the oven its surfaces will get hot: always keep children and people with learning disabilities at a safe distance and avoid letting them operate the oven.
This appliance can be used by children aged from 8 years and above and persons with reduced physical, sensory or mental capabilities or lack of experience and knowledge if they have been given supervision or instruction concerning use of the appliance in a safe way and understand the hazards involved. Children shall not play with the appliance.
Cleaning and user maintenance shall not be made by children without supervision.
During use the appliance becomes hot. Care should be taken to avoid touching heating elements inside the oven.
Warning: Accessible parts may become hot during use. Young children should be kept away.
⚠️ Don not sit on top of the oven door or place heavy objects on it, it could cause serious damage to the hinges.
If oil and fat are frequently used at high temperatures it's recommended to have the oven checked periodically to ensure that eventual squirts don't catch fire.
To avoid any damage to the internal enamel refrain from using the bottom part of the oven for cooking.
- Don’t dispose of the packaging, accessories or anything else inherent to the appliance in the environment.
Use the appropriate bins in accordance to the laws in force.
- In case you notice an abnormal cooking temperature have the oven checked by a
qualified technician, who will proceed with the replacement of the thermostat as necessary.
- Don’t dispose of the packaging, accessories or anything else inherent to the appliance in the environment.
Use the appropriate bins in accordance to the laws in force.
- In case you notice an abnormal cooking temperature have the oven checked by a qualified technician, who will proceed with the replacement of the thermostat as necessary.
- The instructions show the proper installation of grids and trays (see 3.5 and 3.6)
- Stationary appliances not fitted with means for disconnection from the supply mains having a contact separation in all poles that provide full disconnection under overvoltage category III, the instructions state that means for disconnection must be incorporated in the fixed wiring in accordance with the wiring rules
- Do not use harsh abrasive cleaners or sharp metal scrapers to clean the oven door glass since they can scratch the surface, which may result in shattering of the glass.
- A steam cleaner is not be used.
- Warning: Ensure that the appliance is switched off before replacing the lamp to avoid
the possibility of electric shock (see “Replacing the light bulb”)
- To clean the appliance, refer to the corresponding chapter in this manual.
This instruction manual is also available on the website www.lofra.it
1. INSTALLATION
Installation, regulation, transformation and maintenance procedures must be done by qualified personnel in accordance to this manual and laws in force. The company will not be liable for any type of damage derived from improper voltage or other misuse, abnormal service or handling and alterations or modifications in design or construction..
The equipment you have purchased is designed to fit into a standard enclosure approximately 600mm wide (60 ovens) or 900mm wide (90 ovens). The enclosure, adjacent furniture, and all materials used for installation must be capable of withstanding a temperature of 150^ C ( 302^ F) and adequate ventilation must be provided to prevent overheating. In addition, adjacent furniture doors must not interfere with the oven.
Translated with www.DeepL.com/Translator (free version) ⚠️ WARNING
- Check that the electrical system meets the requirements shown on the data plate of the appliance.
1.1 CHOOSING A LOCATION FOR YOUR OVEN
The unit can be fitted either underneath a work surface or in a column unit.
Fitting measurements are shown in the pictures below..
Ovens door need to be fitted using 4 screws
Don't lever against the oven door during the installation process.

60 cm

90 cm

natural_image
Diagram of a room interior with directional arrows indicating movement or flow (no text or symbols)
natural_image
Diagram of a room interior with directional arrows indicating movement or flow (no text or symbols)Put the oven inside the furniture and open the door.
Insert four self-threading burnished screws for wood with washer salvo-enamel edge in four holes of diameter 9mm from the front.
Close the oven door.
1.2 ELECTRICAL CONNECTION
Connection to the electrical system must be done using the oven's cable. If it should become necessary to replace the electric power cable, it should be noted that the correct type to use for connecting to the grid is: H05VV - F 3x1.5 mm², With dimensions 90 cm using cable 3x2.5 mm². Do not position the cable on parts of the oven which get to a temperature above 50C room temperature (top and sides); install a switch in overvoltage category III.
Use the yellow-green cable for earthing. If the cable is not long enough, replace it with a cable at least as thick as required in the chart.
The company does not accept any liability for accidents derived from faulty or inexistent earthing.
2. MAINTENANCE

WARNING :
Prior to proceeding with any kind of maintenance or alteration be sure to disconnect the oven from the electricity system, either by using the appropriate switch or by unplugging the plug from the mains. In case some accessories and/or parts of the oven need to be replaced, use replacement parts by Lofra only.
2.1 SUPPLY CABLE
In case replacement of the supply cable is needed; leave enough cable length to facilitate maintenance; the earth cable (yellow-green) must be at least 2cm longer than the other two.
This expedient ensures electrical safety in case the supply cable is accidentally damaged. Refer to the chart for the cable's specifications.

natural_image
Simple line drawing of a plant stem with a base and a circular symbol (no text or labels)2.2 ACCESS TO THE ELECTRICAL COMPONENTS

natural_image
Technical line drawing of a mechanical device with labeled component C (no text or symbols beyond label)In order to proceed with maintenance/replacement of the electrical components situated at the back or on the upper part of the oven (i.e. lamp holder, roasting jack, supply cable, A.E. generator, resistances) remove the back or upper protection panel, respectively, by unscrewing the screws that fasten them to the sides.
In case maintenance/replacement is needed for the components situated behind the dashboard (i.e. keypad,
programmer,...) remove the dashboard along with the upper panel; this is done by removing the knobs and unscrewing the screws on the two sides of the dashboard. At this point simultaneously pull the dashboard vertically and towards you.
To re-attach the panels/dashboard reverse the directions.
2.3 OVEN DOOR REMOVAL
Open completely the oven door, put in the apposite hinge hole a pin block-movement of rotation (A) as indicated in the picture. Catch the door at sides and close it slowly until You feel a sort of resistance, at this moment lift up the door in order to free the hinge dap from the oven body and to take it off.

natural_image
Close-up of a mechanical component with labeled parts (A), showing metal clamping and wiring (no readable text or symbols)For the assembly carry out vice versa the indications above described paying attention the hinge hole is put in its own seat.
N.B. Attention, reassembling the windows, the writing "REFGLASS" must be read with the door open.
2.4 REPLACEMENT OF THE LIGHT BULB
Prior to replacing the light bulb disconnect the appliance from the power supply.
Open the oven door, pull down the protective glass from the side of the fixing screw, replace the bulb (220V – E14 – 25W – T300) and fit the protective glass back on.
3. HOW TO USE YOUR OVEN
3.1 GRILL
Place the food on top of the oven's grid.
Place the grid on the dripping pan and the put the food on top of it.
Select the desired function and temperature.
Pre-heat the grill resistance for about 5 minutes with the door shut.
Place the grid in the oven along with the dripping pan on shelf level 3 or 4 for flat types of food or on shelf level 1 or 2 for bigger quantities of food.
Close the oven door.
How to use the electric grill:
Turn the function knob clockwise on the desired grill cooking type and set the temperature to 200^ C on the programmer. The oven door has to remain shut.

WARNING: Accessible parts of the oven can become very hot while the grill is operating. Keep children at a safe distance.
3.2 ROTISSERIE
The rotisserie is used for a skewer type of cooking using the oven and the grill.
To do so follow these instructions:
- Place the dripping pan on the lowest level;
- Slide the appropriate fork onto the spit (made of insulated material), which will also be used to remove the skewer when done.
Slide one of the of the forks onto the spit; put the piece of meat to be roasted onto the spit; slide the second fork onto the spit and tighten it along with the first one.
Position the meat so its weight is spreaded evenly on the fork in order to avoid unnecessary strain to the rotisserie
- Unscrew the skewer knob and insert the spit in the rotisserie's turning mechanism situated on the back of the oven;
- Select the desired cooking method.
3.3 HOW TO USE MULTIFUNCTION OVENS
Multifunction ovens are characterized by the fact that the heat can spread both in a natural way (conventional) or in a forced way (fan assisted).
CONVENTIONAL COOKING: The heat that warms the oven up is produced by the resistances placed on the upper and bottom part.
These resistances can work both individually or together. This method results in a more even cooking. The temperature is always kept constant by the thermostat in accordance to the selected temperature ranging from 50^ C and 250^ C. During this type of cooking humidity loss in the food is slow and even.
FAN ASSISTED COOKING: Heat is obtained by a forced flow of hot air inside the oven.
The air is warmed by a circular resistance adjacent to the fan. Its circulation is made possible by the fan which spreads it quickly and evenly.
This method guarantees a quicker cooking compared to the conventional one and with temperatures 10-20°C lower. The thermostat assures a constant temperature inside the oven.
Pre-heating of the oven is necessary only for pastry making, all other types of cooking do not require it. It's ideal to defrost foods or cook simultaneously more than one dish without altering the flavours.
This feature allows different types of cooking with separate regulation of the temperature (ranging from 50^ C to 250^ C) by operating the function knob or the touch panels.

3.4 LIST OF COOKING FUNCTIONS
| MODE | T. MIN. | PRE-SET (°C) | T. MAX. (°C) | NAME: | |
| 1 |  | 35 | def | 60 | DefrostFan active to defrost foods. If temperature increased, bottom heat is activated |
| 2 |  | 50 | 180 | 250 | Fan oven cookingCircular heating element and fan, suitable for cooking an entire dinner, saving energy and |
| 3 |  | 50 | 200 | 280 | Special cookingBottom heat and fan, suitable for soufflés and pizzas |
| 4 |  | 50 | 200 | 280 | Special cookingTop heat and fan |
| 5 |  | 50 | 180 | 250 | CookingTop and bottom heat active, the most commonly used function |
| 6 |  | 50 | 180 | 260 | Conventional cookingTop and bottom heat and fan active, used for baking |
| 7 |  | 50 | 170 | 240 | Bottom heat active, for keeping food warm |
| 8 |  | 50 | 170 | 240(230 con dim. 90) | Top heatTop heat active, for keeping food warm |
| 9 |  | 50 | 220 | 240 | Conventional grillGrill active, ideal for toasting, browning and grilling |
| 10 |  | 50 | 200 | 240 Fanned grillingTop heat and fan, ideal for steaks, hamburgers, chicken pieces or breasts | |
| 11 |  | 50 | 240 | 250 | Grill and top heatInner and outer top elements, ideal for heating up fast |
| 12 |  | 50 | 240 | 250 | Grill, top heat and fanInner and outer top elements, ideal for fast cooking of pizzas or steaks |

The spit roasting function and visualisation of its symbol on the display works as follows: for programmes 9, 10, 11 and 12 (which have grill function) this function can be switched on/off by simultaneously pressing + and — beside “P” (see image on next page)
PROGRAMMING YOUR COOKING

To switch the oven light on/off, touch + underneath the clock for more than 2 seconds.
Regulating the clock
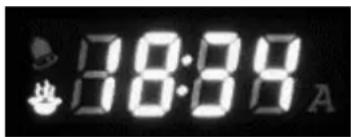
When switched on for the first time, the clock will flash 12:00 and you can set it to the right time.
To re-enter function at any time, touch until "hour" appears on display
Touch + and - to set the correct time. Hold the keys to go faster.
After a few seconds, the hour will begin to flash - wait until the new time stops flashing.
Setting the timer
Touch ⚙ until "bell" appears on display. Wait until default time appears, then use + and — to adjust the time. Hold the keys to go faster.
Timer is pre-set to 10 minutes. It can be modified within a range of 0 to 240 minutes. The timer is not connected to oven settings and can be set even if the oven is off.
The time of day is always visualised as priority and the bell symbol ➕ in the top left-hand corner of the clock display shows the timer is set.
When the cooking time has ended, the ➕ symbol flashes, “End” appears and the oven gives a warning signal (one beep per second).
Press to stop beeping.
Manual setting of an oven function
- Press (On/Off) to activate the oven ready for use. The display shows "On" for a few seconds, then the time and a square appear on the icon display.
- Touch P+ or P- to selected desired type of cooking. The clock display will show "Pr**" (** is the number of function chosen – see list of functions above).
The icon display will show the oven elements used for each function, while the temperature display will show the temperatures pre-set for each function. - To change temperature touch C^+eC^- . The temperature will begin to flash on the display. Now you can choose your temperature, within the minimum and maximum range for the type of cooking chosen (see table)
- The desired selection will shortly be confirmed automatically.

As soon as the oven is turned on, the preheating bars on the temperature display gradually light up, to show that the oven is at 25%, 50%, 75%, then 100% of the temperature set. As each level is reached, the corresponding bar becomes solid, while the next bar begins to flash. When preheating is complete, all four bars are solid.
Whenever a function is active, the icon display shows which elements of the oven are in use (heaters, fan, spit).
Touch ⚙ (On/Off) to stop oven activity instantly. The clock display will show “OFF” and the temperature display will show any residual heat.
Automatic setting of an oven function
Choose the function as described above. The oven can be programmed to cook at pre-selected times. The clock will stay programmed even if the function is changed
The following possibilities are available:
- Timed cooking - set cooking time (length)
- Timed cooking - set end of cooking time (stop time)
- Delayed cooking, set length and stop time.
Touch several times to pass from length of cooking (cooking time) to end of cooking time (switch-off time) - "dur" or "End" will show respectively on the clock display.
Press + or – beside to modify length of cooking or switch-off time, when corresponding parameter appears:
- When “dur” shows, the display will show 10' as standard cooking time. Press + or – to set desired cooking time between 0 and 240 minutes. Once time is accepted, the display reverts to clock mode.
At this point it shows the time of day, the saucepan symbol ⚙ and the letter ⚠ to indicate that timed cooking is under way. The end of cooking time is automatically adjusted.
- When "End" shows, the display shows the starting time as switch-off time. To set the real switch-off time within the next 24 hours: use + and – to set switch-off time. Once time is accepted, the display reverts to clock mode.
At this point it shows the time of day, the saucepan symbol ⚙ and the letter ⚠ to indicate that timed cooking is under way. Cooking time is automatically adjusted.
- Proceed as for point 1, then touch ⏻ until "End" appears. The display shows as initial switch-off time the current time + cooking time. End of cooking time cannot be brought forward.
To set the real end of cooking time within the next 24 hours:
Touch + or - ⏻ to set end of cooking time within next 24 hours. The time set and "End" will flash alternately
for a few seconds, the current time will show and will appear to show that delayed cooking has been programmed.
After a few seconds, the oven will switch on and function for the pre-set cooking time.
The symbol will appear. When any type of timed cooking is completed, the oven switches off and an acoustic signal (two short beeps every 3 seconds) lasting maximum
5 minutes warns you it has finished. The icons which were on the display ( ", A) begin to flash.
Touch any key to deactivate the acoustic signal and cancel warning message.
Touch to stop all activity.
N.B. A child safety lock can be activated by pressing ⚙ for 4 seconds. The display will show “n - - 0”, then “On” and a padlock ⏻ in the temperature display. To deactivate the function, press again for 4 seconds.
3.5 TELESCOPIC GUIDES
Telescopic guides offer a higher stability to the oven's accessories. Placing the food on top of the grid or pan will be simpler and safer.
The grids and the pans must be secured correctly to the guide mechanism.
It is recommended to use oven gloves when the oven is operating.
3.6 RAY WITH ANTI-FALL DEVICE
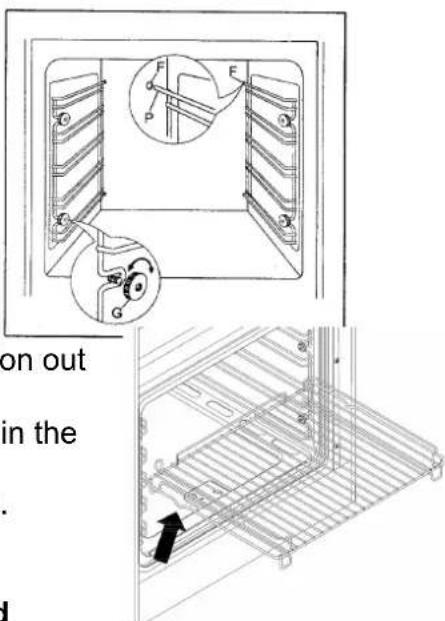
The tray are equipped with safety system to prevent its extraction out of the oven.
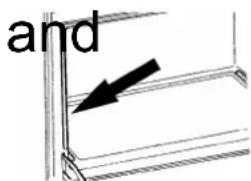
Inserting check that the anti-fall device (see picture) is always in the back.
The tray are extracted from the oven only if raised before.

natural_image
Diagram showing three rectangular panels with arrows indicating direction of movement or process (no text or symbols)For insertion of the trays on the grid please follow the directions as per image, which can be positioned either at the top or bottom.
3.7 MOUNTING MECHANISM ROTISSERIE
Attach the tray 4 threaded bushings with nuts. Place the media and the skewer through the holes of the bushings previously attached to the tray. Place the tray with the mechanism mounted on the rotisserie grill upside down as shown in the bottom shelf of the oven.

4. CLEANING AND CARE
Prior to cleaning the oven make sure it has cooled down and is unplugged from the mains. It is recommended to clean the oven after each use to prevent incrustation which may be difficult to remove and may damage the oven surfaces.
It is recommended to use a damp cloth or sponge to clean all the steel, enamel and glass parts as well as the control panel. Avoid using any kind of abrasive and corrosive substances which could scratch the materials.
To maintain the internal enamel shine clean those parts using tepid water and a neutral detergent, rinse well with a damp cloth; wash the accessories separately in the dishwasher or by using tepid water and a neutral detergent. The rail positions' guides can be removed by unscrewing the ring nuts G (refer to the image in chapter 3.6) allowing more accurate cleaning; to reattach the ring nuts insert the two lateral guides' extensions P in the F holes on the bottom of the oven, align the two anterior guides' eyelets to the screws on the flanks, fasten the guides to the ring nuts G; to simplify the cleaning process the oven door may be removed following the instructions given in chapter 2.3; don't soak the oven door in water; dry the oven and its accessories completely using a damp cloth. Don't clean the oven while it's still hot and do not use abrasive/corrosive substances.
WARNING: Do not use steam cleaners to clean the oven.
Do not allow alcaline or acid substances (i.e. VINEGAR, COFFEE, MILK, SALTED WATER, LEMON JUICE, TOMATO JUICE,...) to stay on enamelled surfaces for too long.
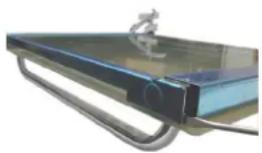
To clean the internal parts of the oven door remove the upper border with a screwdriver as shown in the picture and detach the glass from its guides. Proceed with maximum care.
FOR THE INNER CLEANING OF THE OVEN DOOR, REMOVE THE UPPER SECTIONS HELPING YOURSELF WITH A SCREWDRIVER, AS INDICATED IN THE PICTURE, UNTHREAD GLASSES FROM THE GUIDES. CARRY OUT THESE WORKINGS WITH EXTREME CAUTION AND PRECISION.
natural_image
Close-up of a transparent glass container with metal handles and a small metallic object on top (no visible text or symbols)It recommends to carry out with extreme caution the inner cleaning of the oven upper part, paying special attention to not force temperature feeler. In case of damage it could happen oven misworking.
5. ADVICE ON ENERGY SAVING AND RESPECT FOR THE ENVIRONMENT
Pre-heat the oven for 10-15 minutes prior to placing the food into it. Choose the appropriate temperature ( refer to the Times and Temperatures chart ).
Periodically check the integrity of the oven door's basket.
Turn the oven off 10 minutes before the scheduled end cooking time to take advantage of the thermal inertia..
The packaging of the appliance must be taken to the allocated recycling areas
The electrical appliance no longer in use must be taken to the appropriate rubbish collection area.
The presence of the following symbol means that the appliance is considered as a “new type of waste” an thus is subject to the separate collection of rubbish.
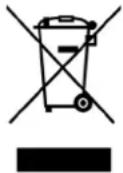
According to the art.13 of Legislative Decree 25 July 2005, n.151 “Carrying out Regulations 2002/95/CE, 2002/96/CE and 2003/108/CE, relative to reduction of dangerous substances using in electric and electronic devices, as well as to the getting rid of waste.
The symbol of rubbish skip indicated on the device or on the packing, shows that the product at the end of its life must be gathered separately respect the other waste. So the user must take the dead device to the right centres of differentiated collections of electric and electronic waste, or hand back it to the shopkeeper atb the moment of the purchase of a new equivalent device, in reason one by one. The right differentiated collection for the following starting of the removed device to recycling, to treatment and getting rid compatible with ambient helps in avoiding possible negative effects on ambient and on human health and favour the reusing and the recycle of the material's device.
The abusive getting rid of device by the user causes the application of administrative sanctions provided by the regulations in force.
TECHNICAL SPECIFICATIONS
| Model | Vol. [It] | Total power of the elements [Kw] | I res  | E in res  | res  | M a rill res  | C re  |
| FLEXO 90 | 360 | 0 W 1000 | W 1750 | W 2000 W | 3000 W 25 | 00 W |
Sede Via Montegrotto, 125 – 35038 TORREGLIA (PADOVA) – ITALY
Tel.: +39 049 9904811
Telefax: +39 049 9904800

- Fissaggio forno
- GRIGLIE CON DISPOSITIVO ANTICADUTA
- MONTAGGIO MECCANISMO GIRARROSTO
- INDEX
- SAFETY INSTRUCTIONS AND SUGGESTIONS ...... 24
- INSTALLATION....29
- MAINTENANCE 31
- HOW TO USE YOUR OVEN 32
- CLEANING AND CARE 38
- ADVICE ON ENERGY SAVING AND RESPECT FOR THE ENVIRONMENT 38
- TECHNICAL SPECIFICATIONS....39
- SAFETY INSTRUCTIONS AND SUGGESTIONS
- Please read the entire service manual before installing and using the oven.
- IMPORTANT!
- INSTALLATION
- CHOOSING A LOCATION FOR YOUR OVEN
- ELECTRICAL CONNECTION
- MAINTENANCE
- WARNING :
- SUPPLY CABLE
- ACCESS TO THE ELECTRICAL COMPONENTS
- OVEN DOOR REMOVAL
- REPLACEMENT OF THE LIGHT BULB
- HOW TO USE YOUR OVEN
- GRILL
- ROTISSERIE
- HOW TO USE MULTIFUNCTION OVENS
- LIST OF COOKING FUNCTIONS
- PROGRAMMING YOUR COOKING
- Regulating the clock
- Setting the timer
- Manual setting of an oven function
- Automatic setting of an oven function
- TELESCOPIC GUIDES
- RAY WITH ANTI-FALL DEVICE
- MOUNTING MECHANISM ROTISSERIE
- CLEANING AND CARE
- ADVICE ON ENERGY SAVING AND RESPECT FOR THE ENVIRONMENT
- TECHNICAL SPECIFICATIONS
Brand : LOFRA
Model : FFV6TEE
Category : Oven