
HP4883 - Hair Straightener PHILIPS - Free user manual and instructions
Find the device manual for free HP4883 PHILIPS in PDF.

| Product Type | Hair Dryer |
| Brand | Philips |
| Model | HP4883 |
| Power | 2000 W (estimated) |
| Power Supply | Mains plug, check voltage on device |
| Cord Length | 1.8 m (estimated) |
| Weight | Approximately 500 g |
| Dimensions | Not specified |
| Main Functions | JetSet Control ION, 3 temperature settings (Quick Dry, Protection, Fix), 2 speeds (I, II), Jet position (extra-powerful air), Set position (cool air), activatable/deactivatable ion generator |
| Included Accessories | Air concentrator, volume diffuser (HP4883 only) |
| Maintenance and Cleaning | Unplug before cleaning; do not rinse; removable air inlet grid to remove lint; clean device with a dry cloth, accessories with a damp cloth |
| Safety | Automatic shut-off in case of overheating; do not use near water; recommended to plug into a socket protected by a 30 mA circuit breaker |
| Repairability | Power cord replaceable only by Philips or authorized service center |
| Warranty | International warranty (see brochure) |
Frequently Asked Questions - HP4883 PHILIPS
User questions about HP4883 PHILIPS
0 question about this device. Answer the ones you know or ask your own.
Ask a new question about this device
Download the instructions for your Hair Straightener in PDF format for free! Find your manual HP4883 - PHILIPS and take your electronic device back in hand. On this page are published all the documents necessary for the use of your device. HP4883 by PHILIPS.
USER MANUAL HP4883 PHILIPS
natural_image
Woman holding a JFSET CONTROL air conditioner against a pink background (no text or symbols on the device)
flowchart
graph TD
    A["Open Book"] --> B["Grid Layout"]
    B --> C["Arrow Right"]
    C --> D["Open Book"]
    D --> E["Grid Layout"]
    E --> F["Arrow Left"]
    F --> G["Open Book"]
ENGLISH 6
DEUTSCH 12
FRANÇAIS 19
NEDERLANDS 25
ESPAÑOL 31
ITALIANO 37
PORTUGUÊS 43
NORSK 49
SVENSKA 55
SUOMI 61
DANSK 67
ΕΛΛΗΝΙΚΑ 73
TÜRKÇE 80
Introduction
The Philips JetSet Control ION has been specially designed to meet your personal needs, giving you frizz-free, beautiful and shiny hair. The ioniser inside the hairdryer emits negatively charged ions that surround your hair. Negative ions reduce the build-up of static electricity and help to keep your hair in good condition, making it frizz-free and smooth.
Next to the lon function, this hairdryer offers you a variety of heat and speed settings. In addition, this hairdryer has a Jet position for an ultra-strong airflow and a Set position for a cool shot. This gives you optimal styling freedom and optimal control over your hairstyle.
You can visit our website at www.philips.com/beauty for more information about this product or any other Philips beauty product.
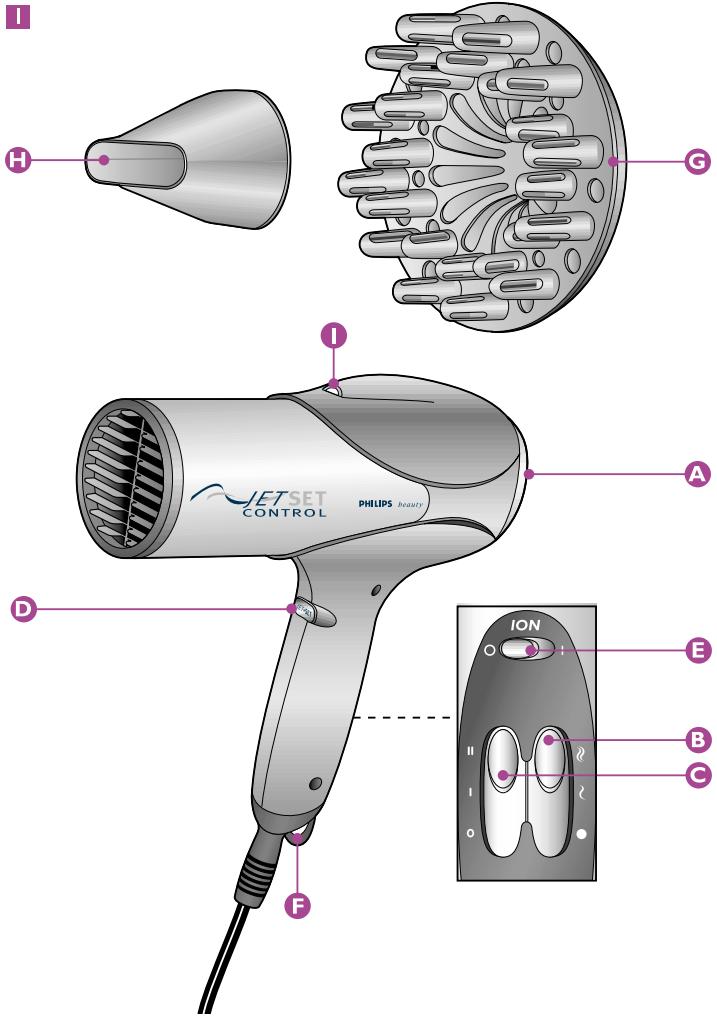
General description (fig. I)
A Air inlet grille
B Temperature slide switch
- ℰ = Quick-Dry setting
- = Caring setting
- ● = Fixation setting
Airflow slide switch
- = off
- I = low airflow especially intended for styling
- ll = strong airflow for quick drying
D JetSET switch
- Jet = position for extra-powerful airflow
- ● = off
- SET = position for fixation by means of cool airflow
E lon slide switch
- 0 = off
- | = on
F Hanging loop
G Volume diffuser (HP4883 only)
H Concentrator
Ion indicator light
Important
Read these instructions for use carefully before using the appliance and save them for future reference.
Check if the voltage indicated on the appliance corresponds to the local mains voltage before you connect the appliance.
Check the condition of the mains cord regularly. Do not use the appliance if the plug, the cord or the appliance itself is damaged.
If the mains cord is damaged, it must be replaced by Philips, a service centre authorised by Philips or similarly qualified persons in order to avoid a hazard.
Keep this appliance away from water! Do not use this product near or over water contained in baths, washbasins, sinks etc. When used in a bathroom, unplug the appliance after use since the proximity of water presents a risk, even when the hairdryer is switched off.
For additional protection, we advise you to install a residual current device (RCD) with a rated residual operating current not exceeding 30mA in the electrical circuit supplying the bathroom. Ask your installer for advice.
Keep the appliance out of the reach of children.
▶ Never block the air grilles.
If the appliance overheats, it will switch off automatically. Unplug the appliance and let it cool down for a few minutes. Before you switch the appliance on again, check the grilles to make sure they are not blocked by fluff, hair, etc.
Always switch the appliance off before putting it down, even if it is only for a moment.
▶ Always unplug the appliance after use.
Do not wind the mains cord round the appliance.
You may notice a characteristic odour when using this hairdryer. This is caused by the ions that are generated and it is not harmful to the human body.
Do not probe the ion generator with metal objects.
Using the appliance
Drying
I Put the plug in the wall socket.
2 Switch the appliance on by selecting the desired airflow setting:
- Set the slide switch to airflow setting II for ultra-quick drying.
- Set the slide switch to airflow setting I for drying short hair or styling your hair.
You can also use the Jet position of the JetSet switch for an extra-powerful airflow (fig. 2).
3 Set the temperature slide switch to the Quick-Dry, Caring or Fixation setting.
The Quick-Dry setting
The Quick-Dry setting enables you to dry shower-wet hair very quickly (fig. 3).
It is recommended to use the Quick-Dry setting only on shower-wet hair and to select the Caring setting when the hair is almost dry in order to reduce the risk of overdrying.
The Caring setting
The Caring setting gently dries the hair at a caring temperature (fig. 4).
The Fixation setting ●
The Fixation setting fixes the style you have created (fig. 5).
For long-lasting styling results, set the switch to the Fixation setting and direct the cool airflow at your hair to fix your style.
You can also use the Set position of the JetSet switch to fix your style (fig. 6).
4 Switch the lon function on or off by means of the lon on/off switch.
The ion function reduces frizz and static electricity and is particularly suitable for dry and almost-dry hair:
5 Dry your hair by making brushing movements with the hairdryer at a small distance from the hair (fig. 7).
Attachments
Concentrator
The concentrator enables you to direct the airflow straight at the brush or comb with which you are styling your hair.
Connect the concentrator by simply snapping it onto the appliance. Disconnect it by pulling it off (fig. 8).
2 Switch the appliance on by setting the airflow slide to position I or II.
3 While you are drying your hair with the concentrator, you can use a brush or comb to style your hair (fig. 9).
Volume diffuser (HP4883 only)
The volume diffuser has been specially developed to gently dry both straight and curly or wavy hair.
The volume diffuser emits a gentle airflow and allows you to give your style volume and bounce (fig. 10).
Connect the diffuser by simply snapping it onto the appliance and align the arrows on the diffuser and the barrel. Disconnect it by pulling it off (fig. 11).
To add volume at the roots, insert the pins into your hair in such a way that they touch your scalp (fig. 12).
2 Make rotating movements with the appliance to distribute the warm air evenly through your hair (fig. 13).
Curly or wavy hair
When you are styling curly or wavy hair, hold the diffuser at a distance of 10-15 cm from your head to let the hair dry gradually (fig. 14).
- In the meantime you can style your hair with your free hand or with a comb.
- You can also scrunch locks of hair in your hand to model the curls and waves while drying. This will prevent the curls from sagging or becoming frizzy.
Long hair
To dry long hair, you can spread out locks of hair on top of the diffuser (fig. 15).
Alternatively, you can comb the hair downwards with the pins of the diffuser while drying (fig. 16).
Cleaning
Always unplug the appliance before cleaning it.
Never rinse the appliance with water.
Open the inlet grille to remove hairs and dust.
- Clean the appliance with a dry cloth.
- Clean the attachments with a moist cloth or by rinsing them under the tap.
Remove the attachments from the appliance before cleaning them.
Storage
Always unplug the appliance before storing it.
Put the appliance in a safe place and let it cool down.
Do not wind the mains cord round the appliance.
The appliance can be stored by hanging it from its hanging loop.
Guarantee & service
If you need information or if you have a problem, please visit the Philips website at www.philips.com or contact the Philips Customer Care Centre in your country (you will find its phone number in the worldwide guarantee leaflet). If there is no Customer Care Centre in your country, turn to your local Philips dealer or contact the Service Department of Philips Domestic Appliances and Personal Care BV.
Troubleshooting
If problems should arise with your hairdryer and you are unable to solve them by means of the troubleshooting guide below, please contact the nearest Philips service centre or the Philips Customer Care Centre in your country.
| Problem | Solution |
| The appliance does not work at all. | Perhaps the socket to which the appliance has been connected is not live: |
| Make sure the socket is live. | |
| The appliance may have overheated and switched itself off: | |
| Unplug the appliance and let it cool down for a few minutes. Before you switch the appliance on again, check the grilles to make sure they are not blocked by fluff, hair, etc. | |
| The appliance may not be suitable for the voltage to which it has been connected: | |
| Make sure that the voltage indicated on the type plate of the appliance corresponds to the local mains voltage. | |
| The mains cord of the appliance may be damaged: | |
| If the mains cord is damaged, it must be replaced by Philips, a service centre authorised by Philips or similarly qualified persons in order to avoid a hazard. |
Einleitung
- ♘ = Quick-Dry innstilling
- = Caring innstilling
- ● = Fixation innstilling
© Skyvebryter for luftstrøm