
CZ-RTC4A - Remote control PANASONIC - Free user manual and instructions
Find the device manual for free CZ-RTC4A PANASONIC in PDF.


| Product Type | Timer Remote Controller |
| Model | CZ-RTC4A |
| Brand | Panasonic |
| Dimensions (H x W x D) | 120 mm x 120 mm x 24.75 mm (including protrusion) |
| Weight | 160 g |
| Power Source | DC 16 V (supplied by indoor unit) |
| Clock Precision | ±30 seconds/month (at 25°C) |
| Clock Holding Time | 24 hours (fully charged, approx. 8 hours for full charge) |
| Number of Connectable Indoor Units | Up to 8 units |
| Operating Temperature Range | 0°C to 40°C |
| Operating Humidity Range | 20% to 80% (no condensation) |
| Weekly Timer | Yes, up to 6 programs per day, 42 per week |
| Outing Function | Yes, automatic temperature maintenance when unoccupied |
| Sleeping Function | Yes, off timer 1–10 hours |
| ECONAVI Function | Yes, optional sensor detects human activity for energy saving |
| nanoe™X Function | Yes, can be turned on/off via remote |
| Remote Control Sensor | Yes, temperature can be detected around remote |
| Filter Reset | Yes, button to reset filter sign after cleaning |
| Safety Precautions | Do not use in explosive atmosphere; do not repair yourself; keep away from children under 8 without supervision |
| Maintenance | Clean with dry cloth; do not wash with water; only user maintenance is filter cleaning |
| Spare Parts / Repairability | Contact dealer for repair; no user-serviceable parts inside |
Frequently Asked Questions - CZ-RTC4A PANASONIC
User questions about CZ-RTC4A PANASONIC
0 question about this device. Answer the ones you know or ask your own.
Ask a new question about this device
Download the instructions for your Remote control in PDF format for free! Find your manual CZ-RTC4A - PANASONIC and take your electronic device back in hand. On this page are published all the documents necessary for the use of your device. CZ-RTC4A by PANASONIC.
USER MANUAL CZ-RTC4A PANASONIC
Operating Instructions Timer Remote Controller
Model No. CZ-RTC4A

https://eu.datanavi.ac.smartcloud.panasonic.com/documents/index.htm?model=CZ-RTC4A


ENGLISH
Before operating the unit, read these operating instructions thoroughly and keep them for future reference.
Installation Instructions Separately Attached.
CONTENTS
Page
Thank you for purchasing the Panasonic timer remote controller.
- Read the Operating Instructions carefully for safe use. This manual describes the Operating Instructions of the timer remote controller. Read this manual as well as operating instructions supplied with indoor units and outdoor units.
- Be sure to read the “Safety Precautions” (P.3) before using.
- Keep this manual with operating instructions supplied with indoor units and outdoor units in a safe place.
- Be sure to keep this manual in a place easily accessible by users. In the case of user change, be sure to give this manual to the new user.
NOTICE
The English text is the original instructions. Other languages are translation of the original instructions.
- Safety Precautions ....3 • Part Names ....4 • Control panel ....4
- Screen display ....5
- Basic Operations ......6 • How to Operate ......6
- Setting the Present Time ....8
- Weekly Program Function ......9
- Checking the Weekly Timer ......9
- Changing the Program Timer ......10
- Deleting the Program Timer ....12
- Invalidating the Program Timer ......13 • Duplicating the Program Timer .....14 • Before Asking Repair Work .....15
- Outing Function ......16
- Setting the Outing Function .....17
- Sleeping Function ......18 • ECONAVI Function .....21
- nanoe™X/ECONAVI Function ......22
- ON/OFF setting of nanoe™X/ ECONAVI function....22
- Troubleshooting ....23
- Specifications......25
Safety Precautions

WARNING
This symbol refers to a hazard or unsafe practice which can result in severe personal injury or death.

CAUTION
This symbol refers to a hazard or unsafe practice which can result in personal injury or product or property damage.

Matters to be observed Prohibited matter


WARNING

Do not use this appliance in a potentially explosive atmosphere.

In case of malfunction of this appliance, do not repair by yourself. Contact the sales or service dealer for repair.

In case of emergency, remove the power plug from the socket or switch off the circuit breaker or the means by which the system is isolated from the mains power.


CAUTION

This appliance is not intended for use by persons (including children) with reduced physical, sensory or mental capabilities, or lack of experience and knowledge, unless they have been given supervision or instruction concerning use of the appliance by a person responsible for their safety. Children should be supervised to ensure that they do not play with the appliance.
This appliance can be used by children aged from 8 years and above and persons with reduced physical, sensory or mental capabilities or lack of experience and knowledge if they have been given supervision or instruction concerning use of the appliance in a safe way and understand the hazards involved. Children shall not play with the appliance. Cleaning and user maintenance shall not be made by children without supervision.

- Do not operate with wet hands.
- Do not wash with water.
Part Names
Control panel
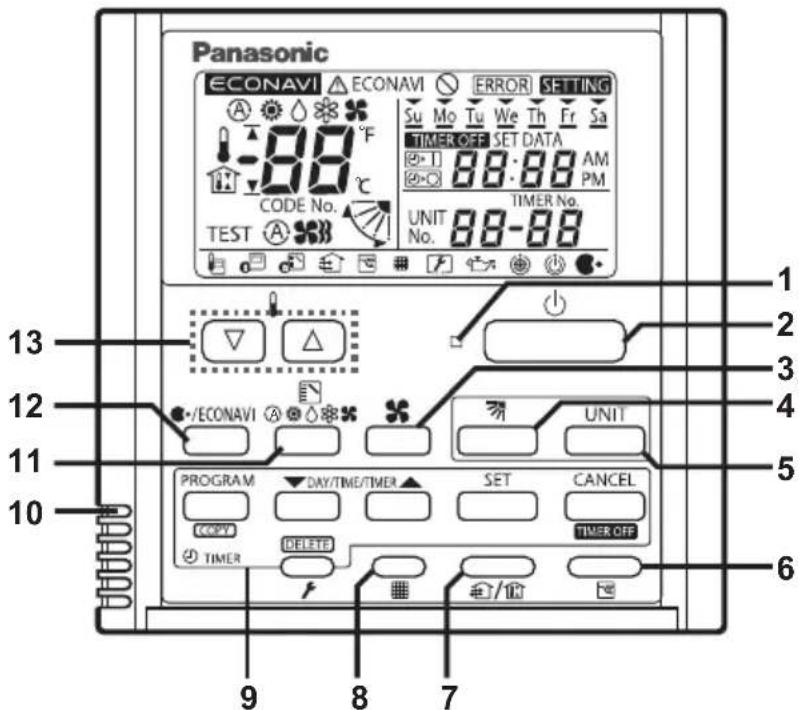
1 Operation indicator
Illuminates during operation. Blinks during alarm.
2 Start/Stop button
Starts/Stops operation.
3 Fan speed
Changing the fan speed.
4 Swing/Air direction
Use this button to set the auto swing or air direction to a specific angle.
5 Unit select
When more than one indoor unit is operated by one remote control unit, this button is used to select a unit when adjusting the air direction.
6 Sleeping
7 Ventilation
Use this button when you installed a fan available in the market. Pressing this button turns on and off the fan. When turning off the air conditioner, the fan will be also turned off.
8 Filter reset
Use this button to reset the filter sign. When ☐ is displayed, press this button after cleaning the filter.
9 Timer setting buttons
10 Remote control sensor
Normally, the temperature sensor of the indoor unit is used to detect the temperature.
However, it is also possible to detect the temperature around the remote control unit.
11 Mode select
Pushing this button selects an operation mode.
12 nanoe™X/ECONAVI
Use this button to turn on/off the nanoe™X/ECONAVI function.
13 Temperature setting buttons
Changing the temperature setting.
Part Names
Screen display

1 Displayed if the selected feature was disabled during installation. 2 Displayed when a mistake is made during timer setting. 3 Appears when the timer program is being set. 4 Indicates today's day of the week. 5 Displayed when the timer has been turned OFF. 6 Timer program indication
: The indoor unit starts operation at the programmed time. : The indoor unit stops operation at the programmed time.
7 Displays the present time on a 24-hour clock. Also, displays settings in the various setting modes.
8 Appears when the time program is being set. 9 Indicates the unit No. of the selected indoor unit. 10 Appears when nanoe™ X is being set to ON. Appears with displaying 28 if there is a problem on nanoe™ X. 11 Appears during the peak cut mode (Demand) if an electric heat pump (EHP) air conditioner is used or during standby if a gas heat pump (GHP) air conditioner is used. 12 Appears when the fan of the indoor unit is stopped or in low fan speed. 13 The engine oil needs to be replaced. (Only when using a gas heat pump air conditioner.) 14 Appears when the maintenance function (monitoring sensor temperatures) is activated. 15 The indoor unit filter needs to be cleaned. 16 Appears during the sleeping function. 17 Appears when a fan available in the market is installed and is operating. 18 Switching operation modes is prohibited. (Switching to Auto mode is also prohibited.) 19 Remote control operation is restricted by a central control device. 20 Appears when the remote control sensor is used. 21 The selected fan mode is displayed. 22 Appears while in test operation. 23 Indicates the flap position. 24 Indicates the set temperature. 25 Appears during the outing function. 26 Displays the selected operation mode.
(AUTO Ⓐ /HEAT☀️/DRY 🔒/COOL

27 Appears when ECONAVI is being set to ON. 28 When inspection is required. 29 Appears with displaying 27 if there is a problem on ECONAVI.
Basic Operations
How to Operate
Turn on the indoor unit before operation. See operating instructions of the indoor unit.
Start/Stop operation / Operation mode
- Press [Start/Stop] to start operation.
- Press the mode select button to select the mode among AUTO, HEAT, DRY, COOL, and FAN.
* Auto: The mode is automatically switched to Cool or Heat to achieve the set temperature.

Set temperature
Press [V] to set the desired temperature.
Cannot be set in Fan mode.

Fan speed
Press the fan speed button to set the fan speed.
A: Automatically switches the fan speed.
Press the flap button to adjust the flap position.

Basic Operations
Note
- If the heating performance is insufficient in Low fan speed, change the fan speed to Medium or High.
- The temperature range that can be set varies depending on the model.
- Temperature sensor detects temperature in the vicinity of the air inlet of the indoor unit. The detected temperature slightly differs from the room temperature depending on the installation condition. The set temperature is a guideline of room temperature.
Basic Operations
Setting the Present Time
1 Press and hold [SET] for more than 2 seconds to enter the present day and time setting mode.
Once you enter the setting mode, "SETTING", "▼"(day) and "time" flash.
Set “▼” to today’s day of the week.
Press [▲] to move “▼” (flashing on the display) in the order of: Su → Mo → Tu → .... Press [▼] to move it in the order of: Su → Sa → Fr → .... Press [SET] to store.
3 Press [▼/▲] to change the present "hour" in the range of 0 to 23*1.
Set the present hour and press [SET]. The "hour" digits light up, and the "minute" digits start flashing.
*1 If the clock uses the 12 hours AM/PM setting, the hour is displayed in the range of AM 1 to 12 / PM 1 to 12.
4 Press [▼/▲] to change the present "minute" in the range of 0 to 59.
Set the present minute and press [SET]. The day and time are set and the unit finishes the setting mode.

Note
- If the present time is invalid, “— : —” is displayed. If the power failure occurs, check if the set data of day and time are valid.
Weekly Program Function
Checking the Weekly Timer
Set the weekly program by assigning a timer to each day of the week. You can set up to 6 programs per day and 42 programs per week. Select the day and the TIMER number you want to program.
1. Press [PROGRAM] to enter the program confirmation mode "CH" and start setting.
Once you enter the program confirmation mode, the current day is indicated as TIMER No. "1".
Select the day.
Press [▼/▲] to move the "▼" horizontally on the day to select.
Press [▲] to move "▼" (flashing on the display) in the order of: Su → Mo → Tu...
Press [▼] to move it in the order of: Su → Sa → Fr...
"--:--" is displayed when the program is not set.
Press [SET] to fix the day.
Select a Timer number.
Press [▼/▲] to select a TIMER No. from 1 to 6.
Press [▲] to move up from 1.
Press [▼] to move down from 6.


Weekly Program Function
Changing the Program Timer
To set the weekly program, follow the steps.
1. Select the program you want to set in the program confirmation mode, and press [SET]. This enters the setting mode of the program currently displayed.
* In the program setting mode, [SETTING], "hour", "minute" and "item" flash on the display.
2. Set the "hour". (Program step 1)
Press [▼/▲] to set the "hour". Confirm the "hour" and press [SET]. This enters the program changing mode P2 (setting of the "minute").
2. Set the "minute". (Program step 2)
Press [▼/▲] to set the "minute". Confirm the "minute" and press [SET]. The unit enters P (the program pattern selection mode).

2/3/4 1/2/3/4
Program step 1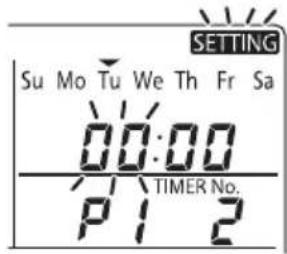
Program step 2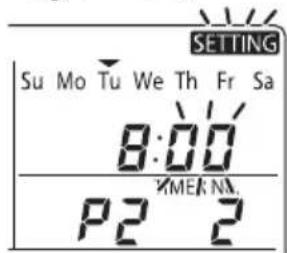
![graph TD A["normal remote controller"] --> B["PROGRAM"] B --> C["CANCEL"] C --> D["CH Program check"] D --> E["SET"] E --> F["P1 Changing hour digits"] F --> G["SET"] G --> H["P2 Changing minute digits"] H --> I["SET"] I --> J["P3 Changing patterns"] J --> K["SET"] K --> L["CANCEL"] L --> M["PROGRAM…](/content/2026/05/1012615/images/7adb26104418ca748c34fd5ce4b217048cf9796a2d388ac66a6bc27a139bfbb0.jpg)
Weekly Program Function
4. Set the program pattern. (Program step 3)
There are 4 program patterns.
Pressing [▼/▲] repeats the following display patterns.
Pattern 1 (Default display)![graph TD A["The indoor unit starts operation at the programmed time."] --> B["Setting: Su Mo Tu We Th Fr Sa 8:30 / TIMER No. P3 2"] B --> C["The indoor unit stops operation at the programmed time."] C --> D["Setting: Su Mo Tu We Th Fr Sa 8:30 / TIMER No. P3 2"] D --> E["Pattern 4: 24°C"] E --> F["Se…](/content/2026/05/1012615/images/36911fb5c645503757458b2fa946792cdcb39a6aebb0523045014f78de8a4ab4.jpg)
Pattern 2
The indoor unit stops operation at the programmed time.
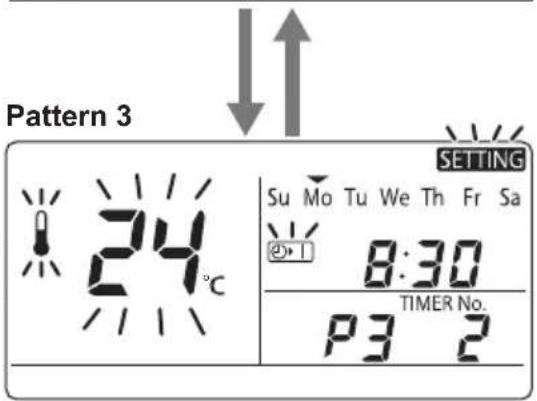
For Pattern 3 and Pattern 4: Press [V] to change the temperature setting.
5 Select the program pattern and press [SET].
The program timer setting is confirmed and the unit enters the confirmation mode [H].
Note
- If you press [CANCEL] during the setting, it returns to the program confirmation mode.
- If there is no operation made for 10 minutes during the setting, it returns to the normal mode.
In this case, all the settings in progress will be invalid.
Weekly Program Function
Deleting the Program Timer
To delete the program timer setting, follow the steps below.
1 Press [PROGRAM] to enter the program confirmation mode. 2 Press [▼/▲] to select the day of the program you want to delete. Press [SET] to fix the day. 3 Press [▼/▲] to select a TIMER No. (from 1 to 6). 4 Press [SET] to display the program setting mode P1. 5 Press [DELETE] to delete the program.

Note
- After deleting, the unit returns to the program confirmation mode [H].
- If you press [CANCEL] during the setting, the unit returns to the program confirmation mode.
- If there is no operation made for 10 minutes during the setting, the unit returns to the normal mode.
Weekly Program Function
Invalidating the Program Timer
If you want to stop the program operation for more than 1 week, you can invalidate all the timer settings.
Once the timer settings are invalidated, the program will not be operated until the invalidation is cancelled.
How to invalidate the program timer
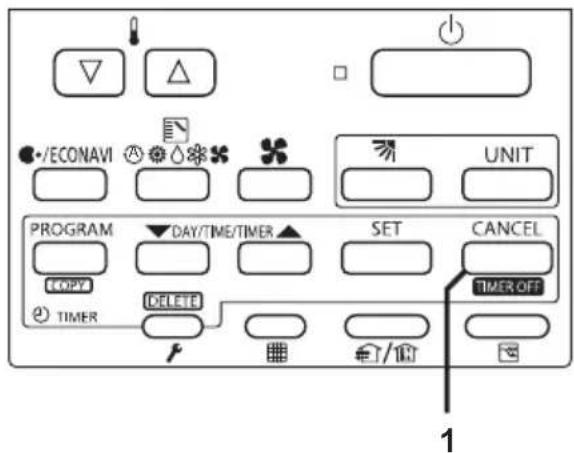
1. Press and hold [CANCEL]([TIMER OFF]) for more than 2 seconds.
[TIMER OFF] is displayed and the programs will be invalidated from the next one.

How to cancel the program timer invalidation
1. Press and hold [CANCEL]([TIMER OFF]) for more than 2 seconds.
[TIMER OFF] disappears and the programs will be validated from the next one.
■ If Power Failure Occurred
If the power recovers in a short time period, the program after the recovered time will be valid.
If more than one hour has passed for power return after power failure, the present time information will be lost. In this case, the program will not be operated.
Weekly Program Function
Duplicating the Program Timer
You can duplicate the preset program by day.
■ Select the copy source.
1 If PROGRAM is pressed in program checking mode H , it enters the copy mode (Selecting the copy source I ) of the program timer.
While in the copy mode of the program timer, [SETTING] and ▼(day) of the copy source flash on the display.

12/43/4
2 Press [▼/▲] to select the day of the copy source.
Select the copy destination.
3 If [SET] is pressed in the mode of selecting the copy source [1], it enters the copy mode (Selecting the copy destination [2]) of the program timer.
4 Press [▼/▲] to select the day of the copy destination. Then, press [SET] to complete copying and return to the program checking mode.
![SETTING Su Mo Tu We Th Fr Sa - - : - - [1]](/content/2026/05/1012615/images/d6665d66dc3fdeab6d170fa9dccc112d3b37674077c02209c8e7bd623e2411c9.jpg)
![SETTING Su Mo Tu We Th Fr Sa [2]](/content/2026/05/1012615/images/ba82a78e1bf39c662fa36cc7e96d472a472ed94b4e04686689610c1893abea29.jpg)
Note
The program will be overwritten if the preprogrammed day is selected as a copy source.
Weekly Program Function
Before Asking Repair Work
Before asking repair work, please check the following.
| Trouble | Possible Cause/Remedy |
| “ERROR” is displayed when the minute digits are entered. | If there is another TIMER No. which has the program of the same time and same day, you cannot overlap the setting. |
| The set data is not stored. | The stored programs are automatically sorted by the time. Check if the data is stored in the other TIMER No. |
| Program does not function. | Check if the time indication is not “- - : - -”.When the time is invalid, the program is also invalid. |
| Check the remote controller prohibition inside.In that case, the program is invalid. |
Outing Function
Outing function is a function that prevents the room temperature from increasing too much (or decreasing too much) when no one is in the room. An air conditioner works automatically if this function is set effective.
General Performance of the Outing Function
COOL / DRY
① The air conditioner starts operation when the room temperature increases up to -1°C of the upper limit. ② The air conditioner stops operation when the room temperature decreases up to -2°C of the upper limit.
Outing function upper limit
Room temperature
HEAT
① The air conditioner starts operation when the room temperature decreases up to +1°C of the lower limit. ② The air conditioner stops operation when the room temperature increases up to +2°C of the lower limit.
Room temperature
Outing function Lower limit
[Precautions]
- The outing control only starts/stops the air conditioner. It does not change the operation mode/temperature setting.
Therefore, the operation mode/temperature needs to be set beforehand so that the outing function turns on the air conditioner with your desired operation mode/temperature setting.
- If the room temperature rapidly changes, the room temperature may get over the upper or lower limit when the outing function is activated.
- The outing function is invalid during FAN/AUTO operation mode.
- The air conditioner's stop order (stated in ② / above) is valid only when the outing function is operated.
If operated using other remote control unit (or a centralized control device such as a system control), the outing function does not work.
- Outing function indication
| Outing function indication | Status |
| Off The outing function is not set. | |
| Flashing [IMAGE] | The outing function is now being set or under operation. |
| Lighting [IMAGE] | Although the outing function is set, it is not under operation. |
Note
A remote controller may lose outing function operation information when it is cut for more than 24 hours during the outing function operation by electricity. It reverts from the blackout, and an air conditioner does not drive in outing function when operation is started. At this time, an air conditioner does not stop at outing function.
Outing Function
Setting the Outing Function
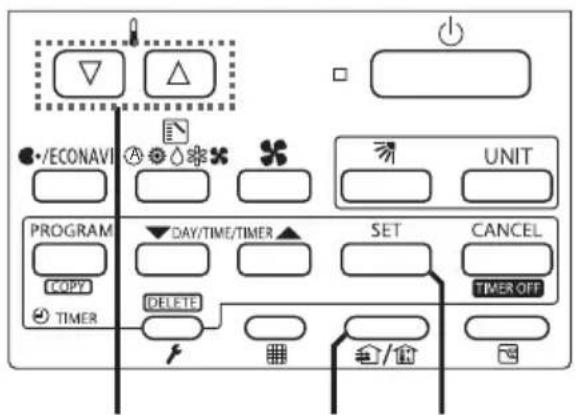
1 Press and hold [Ventilation] for more than 2 seconds to display the upper limit temperature setting screen. [SETTING], and the upper limit temperature start flashing. (The default value of the upper limit temperature is 38 °C.) 2 Press [7] to select the upper limit temperature, and press [SET] to fix the value. The lower limit temperature setting screen is displayed. 3 Press [V] to select the lower limit temperature, and press [SET] to fix the value. The outing function setting is completed.
(The default value of the lower limit temperature is 10 °C.)
1 2 / 32 / 3

2

3
* The unit returns to the normal mode if [CANCEL] is pressed or there is no operation made for 3 minutes during the setting. In this case, all the settings in progress will be lost.
Canceling the outing function
- Press and hold [Ventilation] for more than 2 seconds while the outing function is set.

1
Sleeping Function
This function leads you to a comfortable sleep and changes the room temperature during your sleep.
- You can set the off timer every one hour from 1 to 10 hours. ■ Display of remote control unit (during the time setting)

■ Display of remote control unit (during sleeping function setting)

* If no operation is made for 3 minutes, the time setting mode will be automatically finished.
Sleeping Function
Ex. In case of 7 hours timer
1 Press [Sleeping].
• Each time the button is pressed, the indication changes in the following order.
![graph LR A["7H"] --> B["6H"] B --> C["1H"] C --> D["10H"] D --> E["8H"] E --> F["(every one hour)"]](/content/2026/05/1012615/images/5e75b9af9c86d43fc30a9a514c76b7481b812f52c5179b1d9cf13cc4405c0dfc.jpg)
(Press [CANCEL] to stop the time setting.)
Press [SET].
• The sleeping operation starts.

■ When the off time comes:
• The indoor unit stops.
* The temperature returns to the setting at the time when sleeping function operation started.
To cancel the sleeping function operation
1. Press [Sleeping].
* The temperature setting remains at the time cancelled.

- The following buttons also cancel the sleeping function operation.
[Start/Stop] button
Stops the indoor unit after the sleeping function operation is cancelled.
[Mode select] button
Changes the operation mode after the sleeping function operation is cancelled.
Sleeping Function
■ If [Sleeping] button does not work.
Or, in the case of operation not being started even if [SET] is pressed.
Check the following table.
| Item | Display of the remote control unit (Lighting/fl ashing indication) | Contents |
| 1 | ERROR The Error indication fl ashes (for several seconds). | The clock is not set. |
| 2 | “This function is not available” indication lights up (for several seconds). | When the operation mode is set to AUTO or FAN, this function is not available. |
| 3 | Centralized control indication fl ashes (for several seconds). | The centralized control device is prohibited from starting/stopping the unit or changing the temperature setting. |
The sleeping function operation will be cancelled in the following cases:
1: When the unit is operated to stop or change the temperature setting by the other remote control unit or centralized control device.
2: When the unit is operated to stop or change the temperature setting with the weekly program function / outing function.
3: When the centralized control unit is prohibited from stopping the unit or changing the temperature setting.
Note
| Trouble Possible Cause/Remedy | |
| The temperature setting does not decrease (increase). | The temperature over the upper or lower limit or each operation mode cannot be set. |
| Operation under the sleeping function does not fi nish. | Note if you change the time after the sleeping function started. The operation does not fi nish until it reaches to the set starting time. |
ECONAVI Function
This function is available by attaching an optional ECONAVI sensor.
The ECONAVI sensor detects human activity and conserves energy based on the activity level.
Overview of the ECONAVI function
| High activity | ·Cooling: Target temperature is the same as the set temperature.·Heating: Target temperature is 1 °C lower than the set temperature. |
| Low activity | ·Cooling: Target temperature is 1 °C higher than the set temperature.·Heating: Target temperature is the same as the set temperature. |
| No one in the room No | one in the room for 20 minutes·Cooling: Target temperature is 2 °C higher than the set temperature.·Heating: Target temperature is 2 °C lower than the set temperature.No one in the room for 3 hours·Cooling: Cooling will stop and the unit will be in fan only mode.·Heating: Heating will stop and the unit will be in fan only mode. |
| * When the sensor detects movements in the room which have been empty, it will resume operation to match with the activity level. |
Note
- Even when target temperature is changed through the ECONAVI function, the set temperature shown in the remote controller does not change.
- Even when Cooling/Heating is changed to Fan through the ECONAVI function, the operation mode shown in the remote controller will still be Cooling/Heating.
- It is possible to choose from the following options for the operation to be performed after a lapse of 3 hours since the room has been empty.
- Operates in the Fan mode only.
- Stops and resumes operations after human movements are detected.
- Stops and will not resume operations even after human movements are detected.
- Continues to operate in the current mode. If you need to do so, please contact the dealer.
nanoe™X/ECONAVI Function
ON/OFF setting of nanoe™X/ECONAVI function
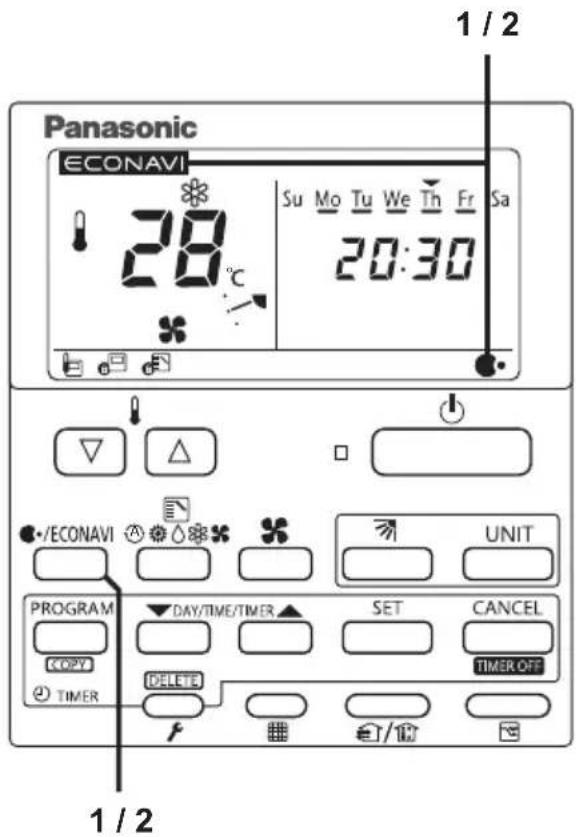
Using the remote controller, you can switch the nanoe™X/ECONAVI function ON/OFF.
1 Press [nanoe™X/ECONAVI]
• Each time the button is pressed, the function changes in the following order.
![graph TD A["nanoe™X ON"] --> B["ECONAVI ON nanoe™X OFF"] B --> C["ECONAVI ON nanoe™X ON"] C --> D["Exit setting"]](/content/2026/05/1012615/images/8783bb98e64c22f49c2509484bb6b752feada8057e1a2e4bff91fc83838b59ed.jpg)
* When nanoe™X/ECONAVI is enabled,
• ECONAVI r.
2 * When the indoor unit is stopped, C·ECDNAVpear.
Note
- Turn the ECONAVI function OFF if:
- You want to maintain the room temperature at a set temperature.
- You want to keep air conditioner running while nobody is in a room.
- The sensor fails.
- Only infants, babies, or people with disabilities are in the room.

WARNING
Do not use the ECONAVI function in a room with disabled persons or infants only. Due to their limited motions, the ECONAVI sensor may judge no person is present, causing the indoor unit to stop the operation.
Troubleshooting
If operation does not start by pressing [Start/Stop] button ...
Check the following before asking for repair.
Blackout?
Is the circuit breaker turned off?
Is SETTING?
Is ▲displayed?
Cannot stop the operation. Or the unit starts to run automatically even if [Start/Stop] (Off) is pressed.
- After recovery from blackout, press [Start/Stop] again. → If operation does not start, turn off the circuit breaker and consult the dealer of purchase about the symptom and Model No.
- Turn it on and press [Start/Stop] again.
→ If operation does not start, turn off the circuit breaker and consult the dealer of purchase about the symptom and Model No.
- After blinking stops, press [Start/Stop] again.
→ If operation does not start, turn off the circuit breaker and consult the dealer of purchase about the symptom and Model No.
- If any of the following alarm indications appears, stop operation once and restart approx. 1 minute later. (Alarm indication, off) [•E04 •E06 •P10 •P20 •H06]
→ If the indication does not reappear, use the unit. → If the indication reappears or an alarm indication other than the above (combination of numbers and characters such as E, F, H, L and P) appears, stop operation, turn off the circuit breaker and consult the dealer of purchase about alarm indication, Model No. and indoor unit No.
- Check if the outing function is activated or not. (💡) - Check control by central control device.
Troubleshooting
The remote controller screen displays a flashing
“ ECONAVI ”.
- Faulty sensor or incorrect installation. Turn OFF the ECONAVI function with the remote controller and contact the retailer or point of purchase with the Model No. and problem.
The remote controller screen does not display the
• or ECONAVI.
- The indoor unit has stopped. Turn on the indoor unit.
- The unit is in Fan mode. The ECONAVI function does not operate in Fan mode.
- The nanoe TM X/ECONAVI function is set to OFF. Turn the nanoe TM X/ECONAVI function ON with the remote controller.
- The indoor unit may not support the ECONAVI function. If you turn the ECONAVI function ON with the remote control but there is no change, the indoor unit does not support the ECONAVI function.
The indoor unit may not support the nanoe™ X function. If you turn the nanoe™ X function ON with the remote
control, Ⓧ will appear instead.
Please contact the dealer.
- If you need to contact for servicing, check the back cover of the operating instructions for indoor units or outdoor units.
Specifications
| Model No. | CZ-RTC4A | |
| Dimensions | (H) 120 mm x (W) 120 mm x (D) 20 + 4.75 mm | |
| Weight | 160 g | |
| Temperature/ Humidity range | 0 °C to 40 °C / 20 % to 80 % (no condensation)*Indoor use only. | |
| Power Source | DC16 V (supplied with indoor unit) | |
| Clock | Precision | ± 30 seconds/month (at normal temperature 25 °C)*Adjust periodically. |
| Holding time | 24 hours (when fully charged)*Approx. 8 hours are required for full charge. | |
| Number of connected indoor units | Up to 8 units | |
Memo
Memo
Website: http://www.panasonic.com
© Panasonic Corporation 2023

- ENGLISH
- CONTENTS
- NOTICE
- SAFETY PRECAUTIONS
- WARNING
- CAUTION
- PART NAMES
- CONTROL PANEL
- SCREEN DISPLAY
- BASIC OPERATIONS
- HOW TO OPERATE
- START/STOP OPERATION / OPERATION MODE
- SET TEMPERATURE
- FAN SPEED
- NOTE
- SETTING THE PRESENT TIME
- WEEKLY PROGRAM FUNCTION
- CHECKING THE WEEKLY TIMER
- PRESS [PROGRAM] TO ENTER THE PROGRAM CONFIRMATION MODE "CH" AND START SETTING
- SELECT THE DAY
- SELECT A TIMER NUMBER
- CHANGING THE PROGRAM TIMER
- SET THE PROGRAM PATTERN. (PROGRAM STEP 3)
- SELECT THE PROGRAM PATTERN AND PRESS [SET]
- DELETING THE PROGRAM TIMER
- INVALIDATING THE PROGRAM TIMER
- HOW TO INVALIDATE THE PROGRAM TIMER
- PRESS AND HOLD [CANCEL]([TIMER OFF]) FOR MORE THAN 2 SECONDS
- HOW TO CANCEL THE PROGRAM TIMER INVALIDATION
- IF POWER FAILURE OCCURRED
- DUPLICATING THE PROGRAM TIMER
- BEFORE ASKING REPAIR WORK
- OUTING FUNCTION
- GENERAL PERFORMANCE OF THE OUTING FUNCTION
- COOL / DRY
- HEAT
- [PRECAUTIONS]
- OUTING FUNCTION INDICATION
- SETTING THE OUTING FUNCTION
- CANCELING THE OUTING FUNCTION
- SLEEPING FUNCTION
- EX. IN CASE OF 7 HOURS TIMER
- PRESS [SLEEPING]
- PRESS [SET]
- WHEN THE OFF TIME COMES
- TO CANCEL THE SLEEPING FUNCTION OPERATION
- [START/STOP] BUTTON
- [MODE SELECT] BUTTON
- ECONAVI FUNCTION
- NANOE™X/ECONAVI FUNCTION
- ON/OFF SETTING OF NANOE™X/ECONAVI FUNCTION
- PRESS [NANOE™X/ECONAVI]
- TROUBLESHOOTING
- BLACKOUT
- SPECIFICATIONS
- MEMO
Brand : PANASONIC
Model : CZ-RTC4A
Category : Remote control