
LS550UEH-EG - Screen Dahua Technology - Free user manual and instructions
Find the device manual for free LS550UEH-EG Dahua Technology in PDF.


| Product Type | Commercial Display Screen |
| Brand | Dahua Technology |
| Model | LS550UEH-EG |
| Screen Size | 55 inches (diagonal) |
| Resolution | 3840 x 2160 (4K UHD) |
| Display Technology | LED-backlit LCD |
| Brightness | 350 cd/m² |
| Contrast Ratio | 4000:1 |
| Viewing Angle | 178° horizontal / 178° vertical |
| Dimensions (W x H x D) | 1232 x 707 x 30 mm |
| Weight | 15.5 kg |
| Power Consumption | 150 W (typical) |
| Input Voltage | AC 100-240V, 50/60Hz |
| Video Inputs | HDMI x2, DisplayPort x1, VGA x1 |
| Audio Inputs/Outputs | 3.5mm audio out x1, built-in speakers (10W x2) |
| Control Interface | RS-232C, IR remote |
| VESA Mount | 400 x 400 mm |
| Operating Temperature | 0°C to 40°C |
| Storage Temperature | -20°C to 60°C |
| Cleaning Instructions | Clean with a soft, dry cloth. Do not use harsh chemicals. |
| Safety Precautions | Use a grounded outlet; avoid exposure to rain or moisture. |
| Spare Parts Available | Remote control, power cable, stand (optional) |
| Repairability | Serviceable by authorized technicians only |
Frequently Asked Questions - LS550UEH-EG Dahua Technology
User questions about LS550UEH-EG Dahua Technology
0 question about this device. Answer the ones you know or ask your own.
Ask a new question about this device
Download the instructions for your Screen in PDF format for free! Find your manual LS550UEH-EG - Dahua Technology and take your electronic device back in hand. On this page are published all the documents necessary for the use of your device. LS550UEH-EG by Dahua Technology.
USER MANUAL LS550UEH-EG Dahua Technology
LCD Display Wall Unit
User's Manual

natural_image
Abstract geometric composition with gray and blue color blocks (no text or symbols)Foreword
General
This manual introduces the maintenance and configuration of the LCD Display Wall Unit (hereinafter referred to as "the Device"). Read carefully before using the Device, and keep the manual safe for future reference.
Safety Instructions
The following signal words might appear in the manual.
| Signal Words Meaning | |
 DANGER DANGER | Indicates a high potential hazard which, if not avoided, will result in death or serious injury. |
 WARNING WARNING | Indicates a medium or low potential hazard which, if not avoided, could result in slight or moderate injury. |
 CAUTION CAUTION | Indicates a potential risk which, if not avoided, could result in property damage, data loss, reductions in performance, or unpredictable results. |
 TIPS TIPS | Provides methods to help you solve a problem or save time. |
 NOTE NOTE | Provides additional information as a supplement to the text. |
Revision History
| Version | Revision Content | Release Time |
| V1.0.3 | Updated maintenance tips. | December 2022 |
| V1.0.2 | Updated temperature requirement. | July 2022 |
| V1.0.1 | Updated product name. | April 2022 |
| V1.0.0 | First release. | December 2020 |
Privacy Protection Notice
As the device user or data controller, you might collect the personal data of others such as their face, fingerprints, and license plate number. You need to be in compliance with your local privacy protection laws and regulations to protect the legitimate rights and interests of other people by implementing measures which include but are not limited: Providing clear and visible identification to inform people of the existence of the surveillance area and provide required contact information.
About the Manual
- The manual is for reference only. Slight differences might be found between the manual and the product.
- We are not liable for losses incurred due to operating the product in ways that are not in compliance with the manual.
- The manual will be updated according to the latest laws and regulations of related jurisdictions. For detailed information, see the paper user's manual, use our CD-ROM, scan the QR code or visit our official website. The manual is for reference only. Slight differences might be found between the electronic version and the paper version.
- All designs and software are subject to change without prior written notice. Product updates might result in some differences appearing between the actual product and the manual. Please contact customer service for the latest program and supplementary documentation.
- There might be errors in the print or deviations in the description of the functions, operations and technical data. If there is any doubt or dispute, we reserve the right of final explanation.
- Upgrade the reader software or try other mainstream reader software if the manual (in PDF format) cannot be opened.
- All trademarks, registered trademarks and company names in the manual are properties of their respective owners.
- Please visit our website, contact the supplier or customer service if any problems occur while using the device.
- If there is any uncertainty or controversy, we reserve the right of final explanation.
Important Safeguards and Warnings
This section introduces content covering the proper handling of the Device, hazard prevention, and prevention of property damage. Read carefully before using the Device, and comply with the guidelines when using it.
Installation Requirements

- This is a class A product. In a domestic environment this may cause radio interference in which case you may be required to take adequate measures.
- Do not place the Device in a place exposed to sunlight or near heat sources.
- Keep the Device away from dampness, dust, and soot.
• Install the Device on a stable surface to prevent it from falling. - Install the Device in a well-ventilated place, and do not block its ventilation.
- The power supply must conform to the requirements of ES1 in IEC 62368-1 standard and be no higher than PS2. Note that the power supply requirements are subject to the device label.
- The Device is a class I electrical appliance. Make sure that the power supply of the Device is connected to a power socket with protective earthing.
- The appliance coupler is a disconnection device. Keep it at a convenient angle when using it.
Operation Requirements

WARNING
- Improper use of the battery might result in a fire or explosion.
- Replace unwanted batteries with new batteries of the same type and model.
- Use the standard power adapter. We will assume no responsibility for any problems caused by the use of a nonstandard power adapter.
- Use the power cords that are recommended for the region and conform to the rated power specifications.

- Do not drop or splash liquid onto the Device, and make sure that there is no object filled with liquid on the Device to prevent liquid from flowing into it.
- Operate the Device within the rated range of power input and output.
- Do not disassemble the Device without professional instruction.
- Use the Device under allowed humidity and temperature conditions.
- Operating temperature: 0 °C–40 °C (32 °F–104 °F).
Table of Contents
Foreword....I
Important Safeguards and Warnings.... III
1 Maintenance .... 1
1.1 Environmental Requirement .... 1
1.2 Maintenance Tips....1
2 Packing List....4
3 Device Introduction.... 5
3.1 Appearance 5
3.2 Port 5
3.3 Remote Control....6
4 Menu Configuration 8
4.1 Picture 8
4.1.1 Image Mode....9
4.1.2 Contrast 9
4.1.3 Brightness....10
4.1.4 Saturability 10
4.1.5 Sharpness....11
4.1.6 Color Temperature....11
4.1.7 Aspect Ratio....12
4.1.8 Noise Reduction....13
4.2 Geometry....13
4.3 Sound 16
4.4 Advanced 17
4.4.2 Advanced Menu 18
4.4.3 Software Update (USB) 19
4.4.4 Mirror Image....19
4.5 System....19
4.5.1 OSD Language 20
4.5.2 OSD Duration 20
4.5.3 OSD Blending 21
4.5.4 Backlight Mode....21
4.5.5 Soft Address Switch 22
4.5.6 Restore Settings....22
4.6 Input Source....23
5 FAQ 25
Appendix 1 Cybersecurity Recommendations....26
1 Maintenance
1.1 Environmental Requirements
- The Device can only be installed indoors. We recommend the room where the Device is installed be equipped with air conditioner. The Device cannot be operated in environment with high humidity and heavy dust.
- Do not block the vent of the Device and the airflow around it; otherwise the temperature of the Device will increase, and fire might occur.
1.2 Maintenance Tips
Comply with the maintenance rule strictly to prolong the life span of the Device and to implement energy conservation and emission reduction.
Operating Time
Because of high temperature, electronic products will age rapidly if they are operated for a long time. The relation of operating time and performance of the Device is as follows.
Figure 1-1 Performance
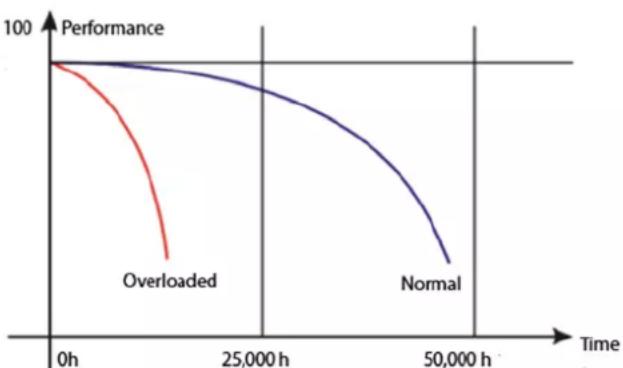
line
| Time | Overloaded | Normal | | -------- | ---------- | ------ | | 0h | 100 | 100 | | 25,000 h | ~80 | ~95 | | 50,000 h | ~40 | ~70 |To prolong the life span of the Device and save maintenance expenses, follow the suggestions bellow.
- If the Device has worked for 10 hours, turn it off and then turn it on after 15–30 minutes.
- If the Device has worked for 7 × 24 hours, turn it off and then turn it on after 2 hours.
Temperature, Humidity and Ventilation
- The appropriate ambient temperature range for the Device is 22 ± 4 °C, and the appropriate relative humidity range is 30%–70%, no condensation. There must be no great temperature and humidity difference.
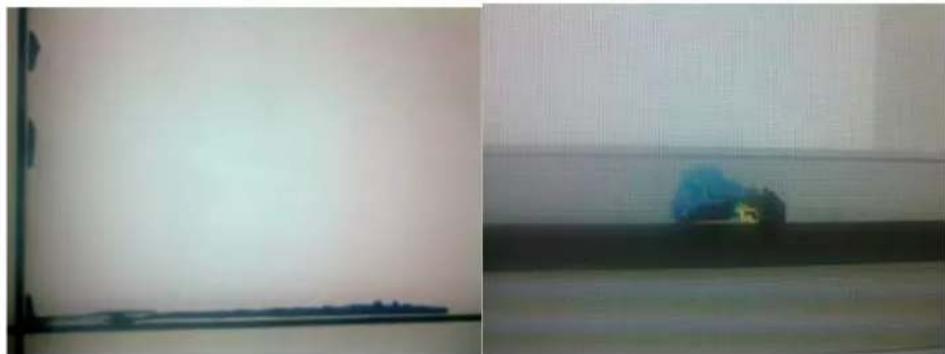
- If the Device is used in environment with high temperature and humidity, there will be tiny water drops on the surface and frame of the Device. The water drops will flow inside the Device. As a
result, the glass structure will be damaged, and the liquid crystal molecule aggregation and outflow will occur. The phenomenon is displayed in Figure 1-2.
Figure 1-2 Liquid crystal leakage
natural_image
Two-panel image showing a dark object on the left and a small blue object on the right, both without any visible text or symbols.During the operation, pay attention to the bellow points.
- Before turning off the Device, make sure that the temperatures of the air conditioners in the server room and the room where the Device is installed are the same.
- If the Device has been off for a long time, check if there are water drops on the surface. If there are water drops, do not dry the surface with wet cloth. Dry the surface with absorbent paper, do not power the device, and contact the after-sales personnel.

Free warranty service is not applicable to damage (includes but not limited to the damage to the Device and damage to the user or the third party) caused by incorrect use and maintenance.
Cleaning
• Use degreasing cotton or cloth to clean the screen.
- The ideal detergent is isopropanol or n-hexane. Do not use ketone (such as acetone) to clean the screen.
● Before you clean the screen, pull the plug out of the socket.
- Wet cloth is not allowed to clean the Device because there will be tiny water drops on the surface and frame of the Device. The water drops will flow inside the Device. As a result, the glass structure will be damaged, and the liquid crystal molecule aggregation and outflow will occur.
- The panel is fragile. As a result, you cannot press or scratch the surface of the screen with great force.
Power Supply
Stable 100–240 V single phase power supply is needed; otherwise the Device cannot work normally. To get stable voltage and prevent damage result from electrical surge, use the stabilized voltage supply.
Storage Requirement
- If the Device is not in use for a long time, cover it with the dust-cloth.
- If the Device has not been used for over six months before you start to use it again, do dust removal first, or contact professional company to do the maintenance.

If the Device is not in use for a long time, it will gather dust and heat radiation will be influenced.
Dust-Proof Requirements
During debugging and operation, the dust concentration of the working area should not exceed 10 mg/m ^3 .
If the Device must be used in environment with high temperature and high humidity, or the Device must be in single display mode for a long time, we strongly recommend you to contact engineers of our company to get suggestions. Otherwise the reliability and performance could be greatly influenced.

Airports, banks and stock markets are places with great dust and wide differences in temperature and humidity.

Playing a static image for a long time can cause a burning screen. If you want to play a static image, switch to a dynamic video every 2 hours and play it for more than 15 minutes.
Screen Usage Requirements
Playing static images for a long time can damage the screen and cause images to glitch. If this cannot be avoided, take the following measures:
- Avoid playing static images 24/7.
• We recommend playing static and motion images alternately.
For example, you can alternate between playing static images for 5 minutes and motion images for 10 seconds. - When the screen is connected to a computer, use motion images as the screen saver.
2 Packing List
Check Table 2-1 to see whether the components are complete.

The appearance, items, or quantity might be different depending on the model that you purchased.
Table 2-1 Packing list
| Component Quantity | |
| LCD display wall unit 1 | |
| AC power cable 1 | |
| HDMI cable 1 | |
| Network cable 1 | |
| Remote control 1 | |
| AAA battery 2 |
3 Device Introduction
3.1 Appearance
Figure 3-1 Appearance
natural_image
Gradient gray background with no text, symbols, or identifiable objects3.2 Port
Figure 3-2 Port

Table 3-1 Port description
| No. | Port | Function |
| 1 | Power input port | Inputs AC power. |
| 2 | Power switch | Controls the on and off of the AC input port. |
| 3 | LAN in | An RJ-45 port that inputs RS-232 signals. It controls the screen. |
| 4 | LAN out | An RJ-45 port that outputs RS-232 signals. |
| 5 | USB2.0 port | For multimedia playing and upgrade. |
| 6 | IR port | Connected to the IR extension cord. |
| 7 | Audio in | Inputs audio signals. |
| 8 | Audio out | Outputs audio signals. |
| 9 | CVBS input | Inputs CVBS signals. |
| 10 | CVBS output | Outputs CVBS signals. |
| 11 | VGA in | Inputs VGA signals. |
| 12 | VGA out | Outputs VGA signals. |
| 13 | DVI in | Inputs DVI signals. |
| 14 | HDMI in | Inputs HDMI signals. |
| 15 | HDMI out 1 | Outputs HDMI signals. |
| 16 | HDMI out 2 | Outputs HDMI signals. |
3.3 Remote Control
Remote control is a must-have device. For functions of its buttons, see Table 3-2.

Make sure to keep the remote control safe if the Device is installed in public areas.
Table 3-2 Button functions
| Picture | No. | Name | Function |
| 135891112 | 1 | Power | Power on/Standby. |
| 2 Address | Address setting (dedicated to monitors). | ||
| 3 | Signal source | Signal source selection.TV1: Switch signals to CVBS signal.TV2: Switch signals to CVBS signal.VGA: Switch signals to VGA signal.HDMI: Switch signals to HDMI signal.DVI: Switch signals to DVI signal. | |
| 4 FRZ | Pause button, used to stop playing videos. | ||
| 5 | Signal format | Displays current input signals. | |
| 6 Version info | Displays version of the system. | ||
| 7 Menu | Press Menu to display or exit the menu. | ||
| Press Menu to confirm the operation you have done. | |||
| 8 | Direction button | Left and right direction button:Use direction buttons to select items on the left or right of the current parameter on the screen (if you have selected voice, you can use these buttons to adjust the volume). | |
| Up and down direction button:Use it to select items up or below the current item you have selected on the screen. | |||
| 9 | Image mode | Select image mode. | |
| 10 | Brightness | Select brightness mode. | |
| 11 | Number buttons | Press number buttons to enter numbers. | |
| 12 Enter | Press Enter to confirm and enter the multimedia page. | ||
| 13 Return | Press Return to exit the multimedia page. | ||
4 Menu Configuration
Use the remote control to configure parameters for the Device. Press the Menu button to bring up the menu.
Figure 4-1 Menu
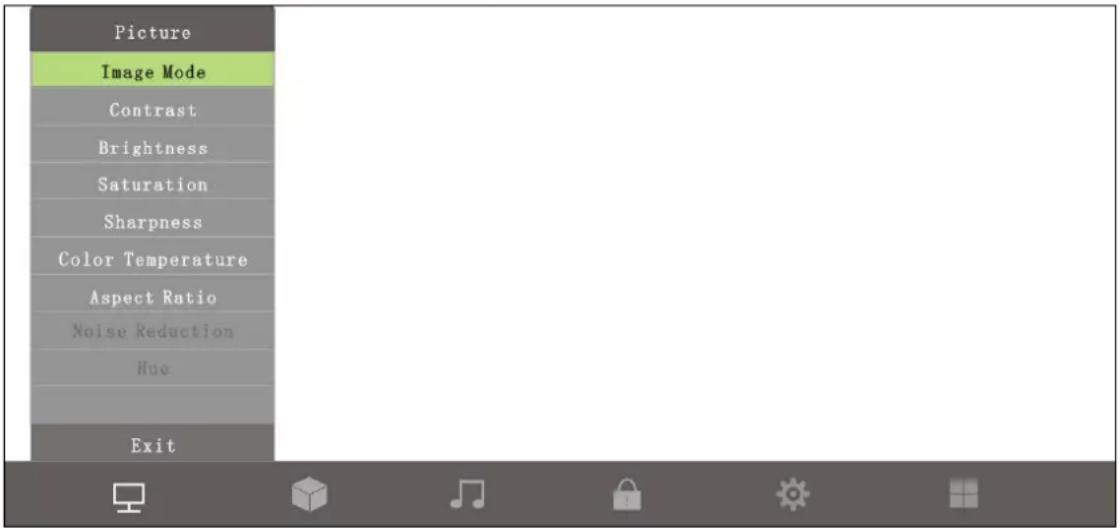
Table 4-1 Icon description
| Icon Description | ||
 | Image icon, used to set imaging effect for the Device. | |
 | Geometric icon, used to set positions for images. | |
 | Sound icon, used to adjust volume for the videos played on the Device. | |
 | Advanced icon, used to do advanced settings to images. Advanced options must be set by professional personnel. | |
 | System icon, used to configure parameters for the system. | |
 | Input source icon, used to select signal mode. | |

- Press Menu on the remote control, the menu bar is displayed on the Device, and then you can adjust relevant parameters.
- Press Menu on the remote control or select Menu on the menu bar to exit the current menu.
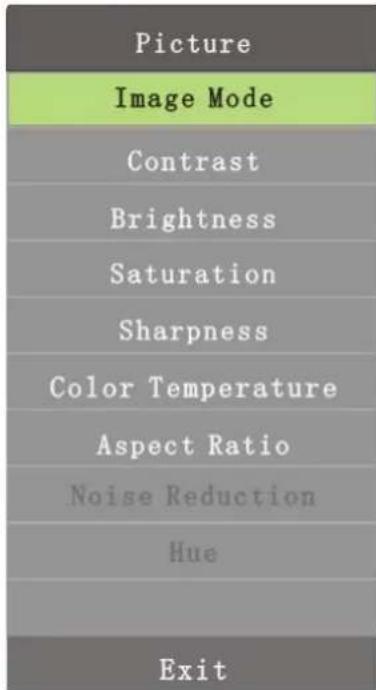
4.1 Picture
Press Menu on the remote control, and then the Picture menu bar is displayed by default.
Figure 4-2 Picture
4.1.1 Image Mode
You can adjust the overall effects of images through image mode.
Step 1 Press Menu on the remote control.
Figure 4-3 Image mode
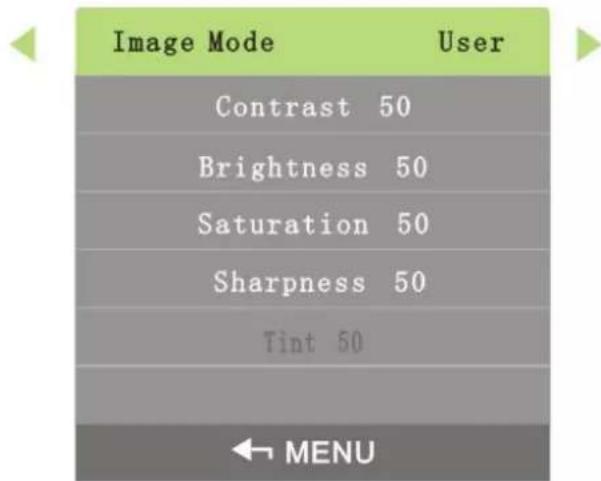
Step 2 Adjust the image mode by the left and right buttons on the remote control according to your requirement.

- There are four image modes: user mode, dynamic mode, standard mode, and soft light mode.
- You can only adjust contrast, brightness, saturability, and acutance in the user mode.
4.1.2 Contrast
You can adjust the luminance or color of images to make objects in images distinguishable by adjusting contrast.
Step 1 Select Image > Contrast.
Figure 4-4 Contrast
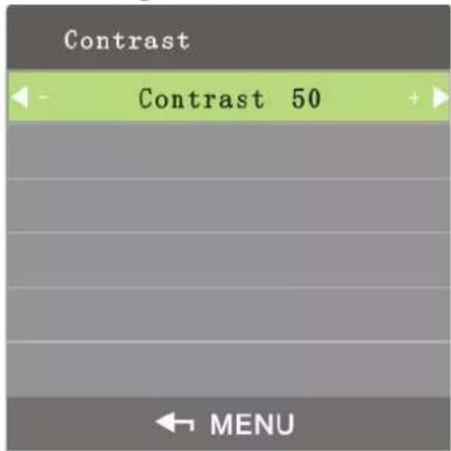
Step 2 Adjust the contrast by the left and right buttons on the remote control according to your requirement.

The range of contrast is 0–100.
4.1.3 Brightness
You can adjust the brightness of images.
Step 1 Select Image > Brightness.
Figure 4-5 Brightness
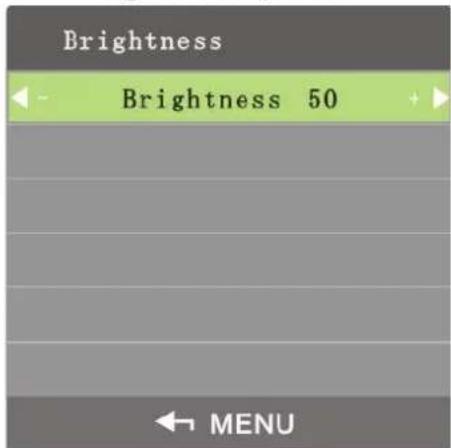
Step 2 Adjust the brightness by the left and right buttons on the remote control according to your requirement.

The range of brightness is 0–100.
4.1.4 Saturability
You can adjust lightness and darkness of images by adjusting saturability.
Step 1 Select Image > Saturability.
Figure 4-6 Saturability
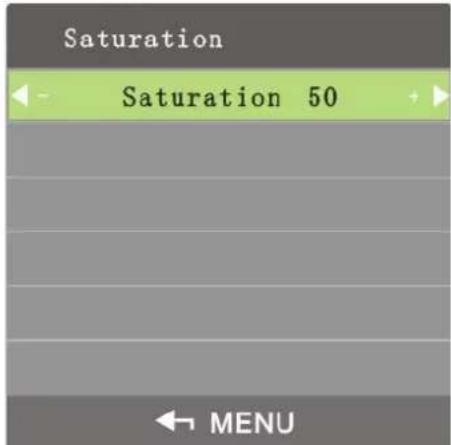
Step 2 Adjust the saturability by the left and right buttons on the remote control according to your requirement.

The range of saturability is 0–100.
4.1.5 Sharpness
Definition of images can be adjusted by adjusting sharpness. The higher the sharpness is, the clearer the images are, and image noise might occur.
Step 1 Select Image > Sharpness.
Figure 4-7 Sharpness
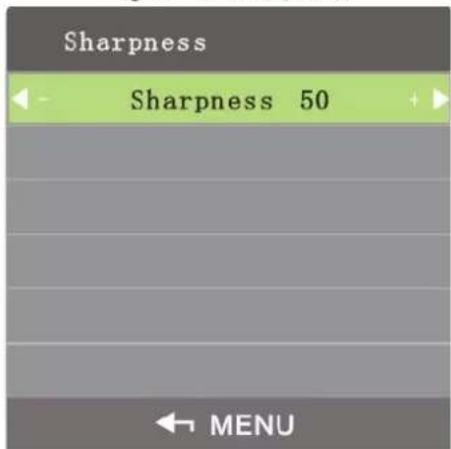
Step 2 Adjust the sharpness by the left and right buttons on the remote control according to your requirement.

The range of sharpness is 0–100.
4.1.6 Color Temperature
You can adjust color temperature of images.
Step 1 Select Image > Color Temperature.
Figure 4-8 Color temperature
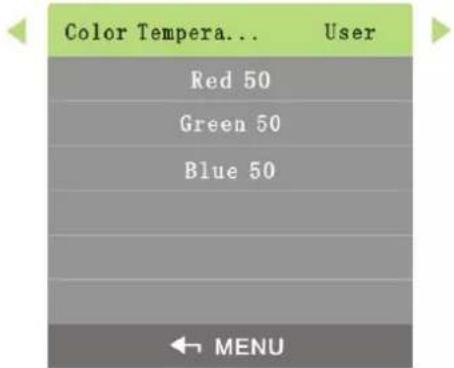
Step 2 Adjust color temperature by the left and right buttons on the remote control according to your requirement.

• Color temperature has four types: cool, standard, warm, and personal.
- Only in user mode can you adjust the value of red, green, and blue.
4.1.7 Aspect Ratio
Display scales can be adjusted by adjusting aspect ratio.
Step 1 Select Image > Aspect Ratio.
Figure 4-9 Aspect ratio
| Aspect Ration | Aspect Ration |
| Auto | Panorama |
| 4:3 | PointToPoint |
| 16:9 | |
| Zoom1 | |
| Zoom2 | |
| Just Scan | |
| ← MENU | ← MENU |
Step 2 Select Aspect Ratio by the up and down buttons on the remote control according to your requirement.
Table 4-2 Parameters of zoom mode
| Parameter Descriptions | |
| Auto | Display scales are automatically adjusted. |
| 4:3 | Images are displayed on the scale of 4:3. |
| 16:9 | Images are displayed on the scale of 16:9. |
| Zoom 1 | Magnifies images on a certain scale. |
| Zoom 2 | Magnifies images on a certain scale. Scales in Zoom 2 are larger than scales in Zoom 1. |
| Just Scan | Display the same native resolution as the video source. |
| Panorama | Display in full screen. |
| PointToPoint | Point to point display. |

Different signal modes have different zoom modes.
Step 3 Press Menu on the remote control to complete the setting.
4.1.8 Noise Reduction
To improve quality of images, adjust the noise reduction.

Only in CVBS signal mode can you select image noise deduction function.
Step 1 Select Image > Noise Reduction.
Figure 4-10 Noise reduction
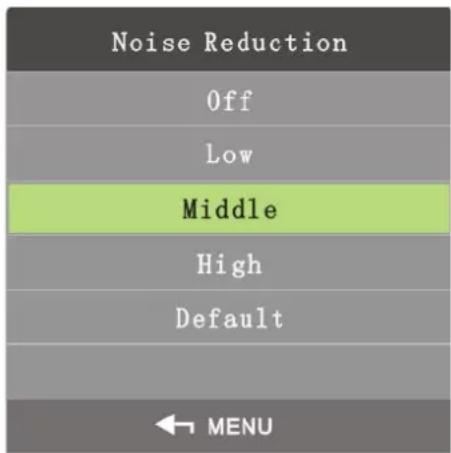
Step 2 Select noise reduction parameters by the up and down buttons on the remote control according to your requirement.
Step 3 Press Menu on the remote control to complete the setting.
4.2 Geometry
Different signal modes have different geometry parameters.
DVI/HDMI/CVBS Signal
You cannot set Geometry parameters in DVI, HDMI, and CVBS signal modes.
VGA Signal
On the main menu, press the left and right direction buttons until the Geometry page is displayed.
Figure 4-11 Geometry (VGA)
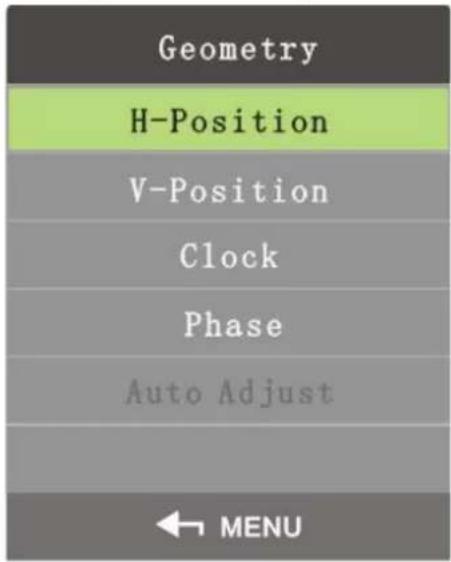
H-Position
H-Position is used to adjust the horizontal position of the Device.
Step 1 On the Geometry menu, select H-Position.
Figure 4-12 H-position
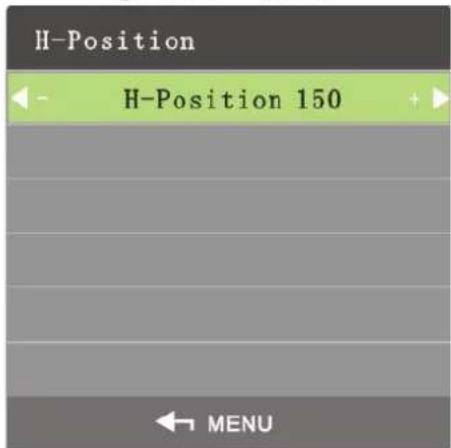
Step 2 Adjust the horizontal position by the left and right buttons on the remote control according to your requirement.
V-Position
You can adjust the vertical position of the Device by adjusting v-position.
Step 1 On the Geometry menu, select V-Position.
Figure 4-13 V-Position
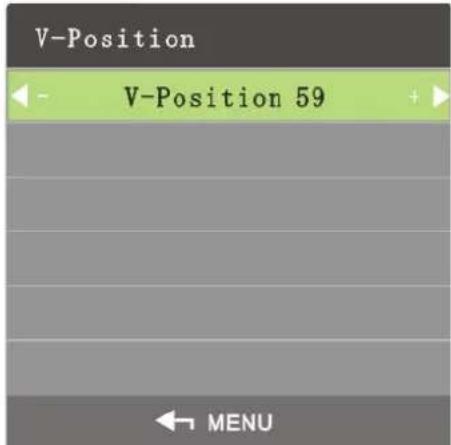
Step 2 Adjust the vertical position by the left and right buttons on the remote control according to your requirement.
Sampling Frequency
Sampling frequency is the number of samples per second taken from a continuous signal. The higher the frequency, the more accurate the signals are.
Step 1 On the Geometry menu, select Sampling Frequency.
Figure 4-14 Sampling frequency
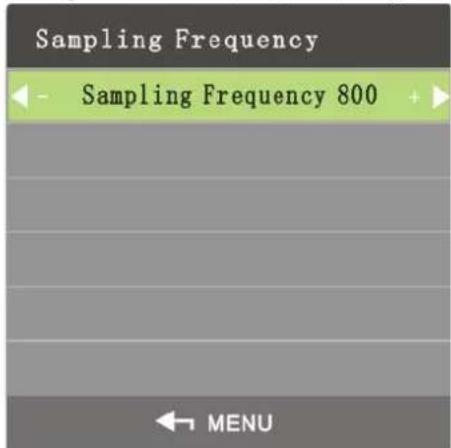
Step 2 Adjust the sampling frequency by the left and right buttons on the remote control according to your requirement.
Phase
Phase is the position of a point in time on a waveform cycle.
Step 1 On the Geometry menu, select Phase.
Figure 4-15 Phase
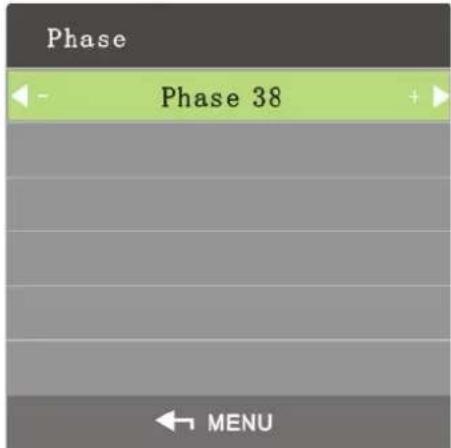
Step 2 Adjust phase by the left and right buttons on the remote control according to your requirement.
Auto Adjust
The position of the Device can be automatically adjusted.
Step 1 On the Geometry menu, select Auto Adjust.
Figure 4-16 Auto adjust
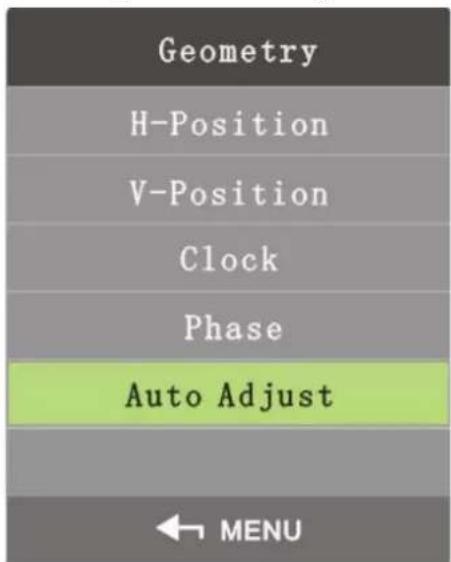
Step 2 Press Menu on the remote control, and then the position of the screen will be automatically adjusted.
4.3 Sound
On the main menu, press the left and right direction buttons until the Sound page is displayed.
Step 1 Press the left and right direction buttons on the remote control to select Sound.
Figure 4-17 Sound
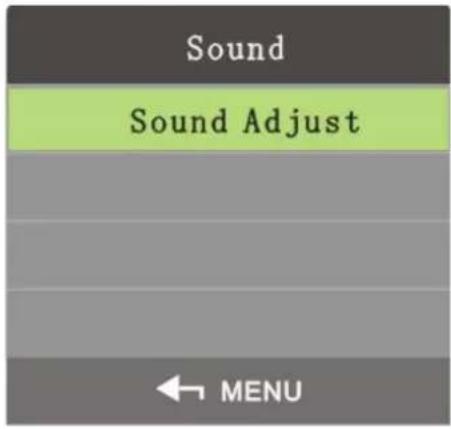
Step 2 Select Sound > Sound Adjust.
Figure 4-18 Sound adjust
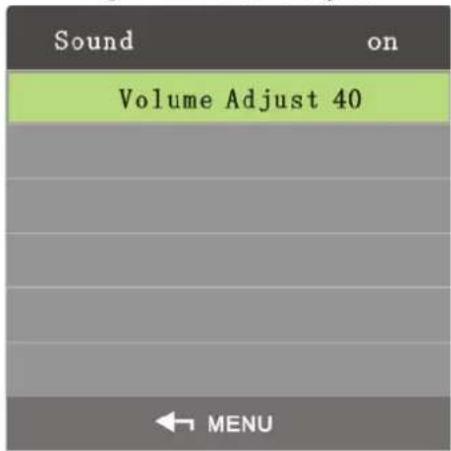
Step 3 Adjust the on and off status of the sound adjust by the left and right buttons on the remote control.

If you select off, then the Device is in silent mode.
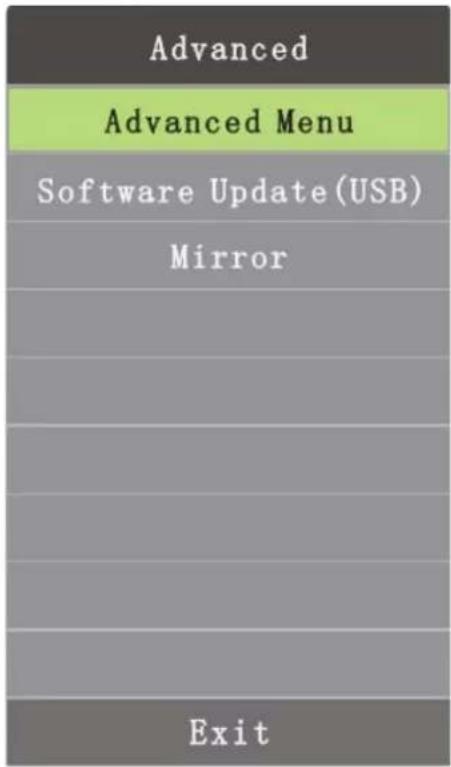
4.4 Advanced
On the main menu, press the left and right direction buttons until the Advanced page is displayed.
Figure 4-19 Advanced
4.4.2 Advanced Menu

If you are not professional personnel, do not change parameters in the Advanced menu.
You can select Advanced by the up and down buttons on the remote control.
Figure 4-20 Enter passwords
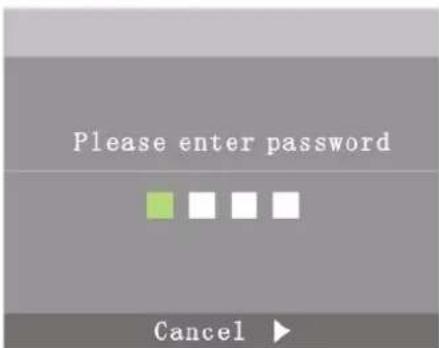

The default password is 8888.
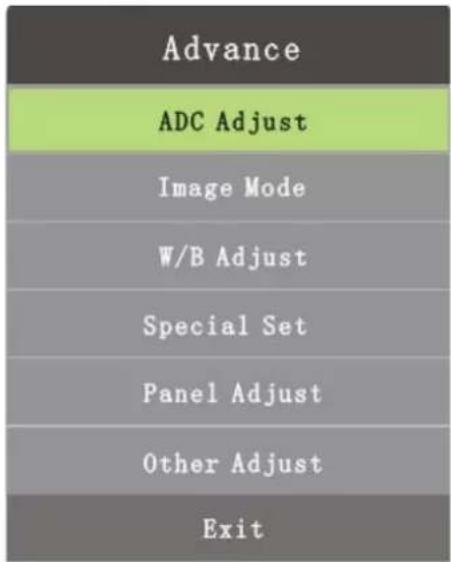
On the Advanced page, technical personnel can configure parameters for ADC calibration, image mode, white balance, special settings, screens and more.
Figure 4-21 Advanced
4.4.3 Software Update (USB)
Press the up and down direction buttons on the remote control to select Software Update (USB), and the system will search USB storage device.

The software update files must be stored at the first level directory; otherwise, the files cannot be identified.
4.4.4 Mirror Image
Press the up and down direction buttons on the remote control to select Mirror Image. And then the image will be inverted, and you can do actions according to your requirement.
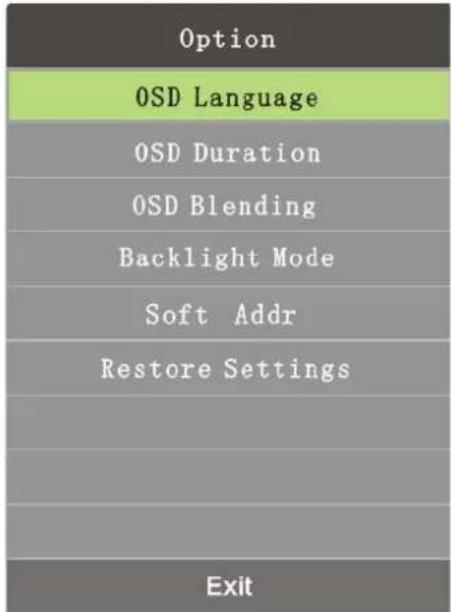
4.5 System
On the main menu, press the left and right direction buttons until the System is displayed.
Figure 4-22 System
4.5.1 OSD Language
You can set on screen display language.
Step 1 Select System > OSD Language.
Figure 4-23 OSD language
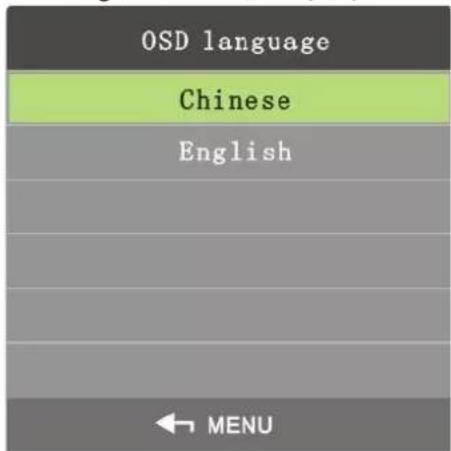
Step 2 Select the OSD language by the left and right buttons.

OSD language includes English and Chinese.
Step 3 Press Menu on the remote control to complete the setting.
4.5.2 OSD Duration
OSD duration is the time displayed on the screen.
Step 1 Select System > OSD Duration.
Figure 4-24 OSD duration
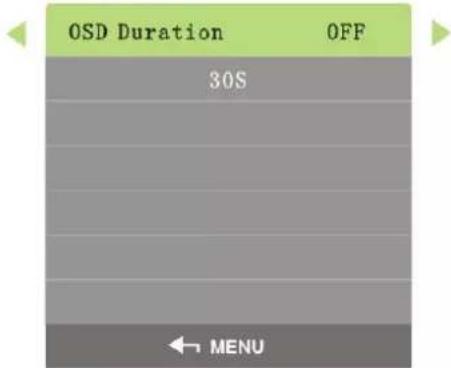
Step 2 Set OSD duration by the left and right buttons on the remote control according to your requirement.

- There are four choices for the OSD duration: off, 30 s, 60 s, and 180 s.
- If you select off, the menu will not disappear automatically.
4.5.3 OSD Blending
OSD blending is used to set the transparency for the menu.
Step 1 Select System > OSD Blending.
Figure 4-25 OSD blending
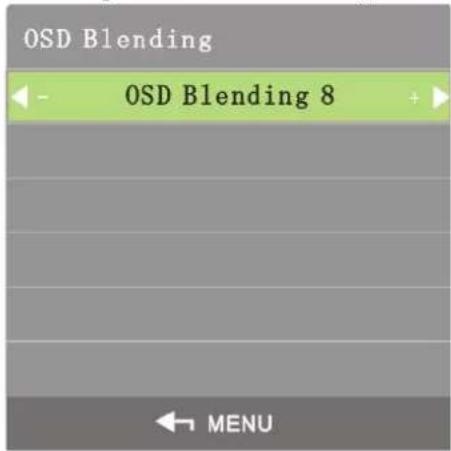
Step 2 Adjust the menu transparency by the left and right buttons on the remote control according to your requirement.
4.5.4 Backlight Mode
Backlight mode is used to set the backlight luminance for screens.
Step 1 Select System > Backlight Mode.
Figure 4-26 Backlight mode
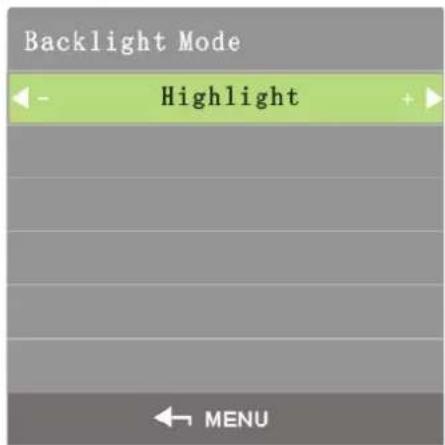
Step 2 Adjust backlight mode by the left and right buttons on the remote control according to your requirement.

There are three backlight modes: Highlight, Normal, and Eco.
4.5.5 Soft Address Switch
Soft address switch is used to set soft address switch.
Step 1 Select System > Soft Address Switch.
Figure 4-27 Soft address switch
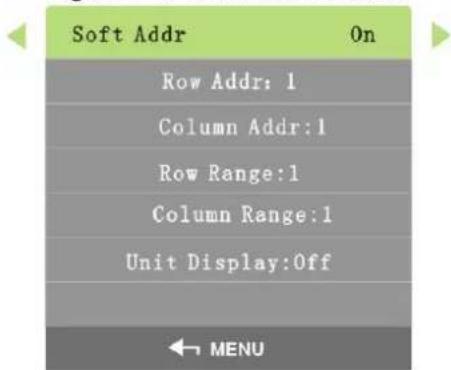
Step 2 Set soft address by the left and right buttons on the remote control according to your requirement.
Table 4-3 Soft address parameters.
| Parameter Descriptions | |
| Row address | Row address of the screen. |
| Column address | Column address of the screen. |
| Row range | Row range of the screen. |
| Column range | Column range of the screen. |
| Unit display | There are two options: On and Off. |
Restore settings is used to restore the system to factory settings.
Step 1 Select System >Restore Settings.
Figure 4-28 Restore to factory settings
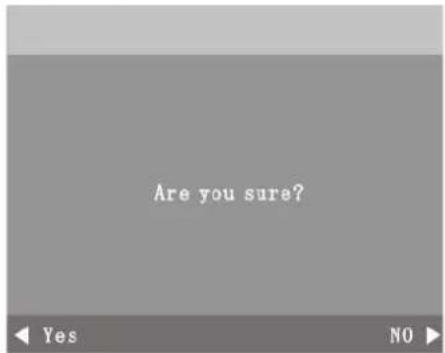
Step 2 Select whether to restore to factory settings by the left and right buttons on the remote control according to your requirement.
Step 3 Press Menu on the remote control to complete the setting.
4.6 Input Source
You can select input signal source types for the Device.
Step 1 On the main menu, press the left and right direction buttons until the Input Source page is displayed.
Figure 4-29 Input source
| Input Source |
| VGA |
| HDMI |
| DVI |
| CVBS |
| USB |
| EXIT |
Step 2 Select input signal source types by the up and down buttons.
- VGA, HDMI, DVI, and CVBS Press Menu to select the needed input signal source types.
- USB
1) Press Menu, and the multimedia play setting page is displayed.
Figure 4-30 Multimedia (1)
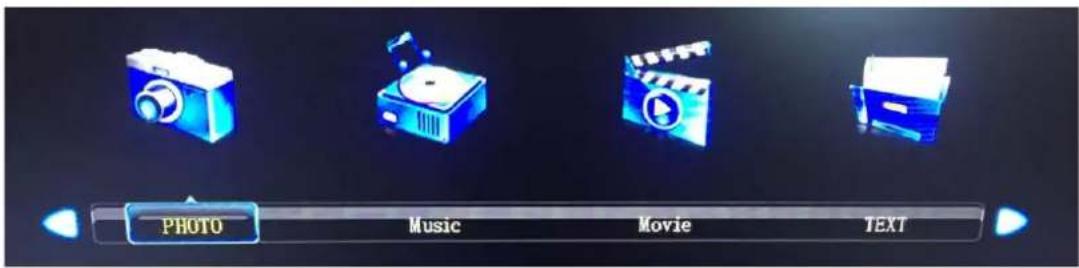
2) Select photo, music, movies, and texts by the left and right buttons on the remote control, and then press Enter.
Figure 4-31 Multimedia (2)
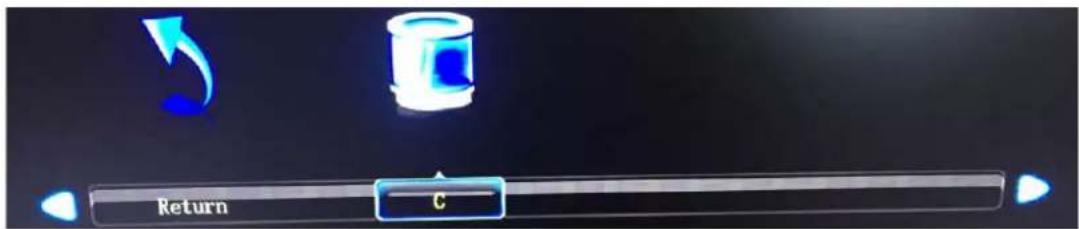
3) You can also change settings for the pictures, music, movies, and files that are to be played.
Figure 4-32 Multimedia (3)

5 FAQ
Most problems can be solved by the following solutions. If problems that you encountered do not belong to the following descriptions, contact after sales personnel.
Table 5-1 FAQ
| Problems Solutions | |
| When you turn on the Device, there are no images on the screen (blank screen). | Check whether the power source (220 VAC) is connected to alternating current.Check whether the power cable is broken.Check whether the power switch is on.Check whether the power switch is broken.Check whether the indicator light is on. |
| Blank screen (no signal displayed). | Check whether the signal wires are in bad contact.Check whether there is signal source output.Check whether the signal wires are broken.Check whether the input signal type does not belong to the types allowed by the Device. |
| Color missing. | Check whether the signal wires are in bad contact.Check whether the signal wires are broken. |
| Remote control cannot control the screen. | Check whether buttons on the remote control is broken or stuck.Check whether batteries of the remote control are installed correctly. |
| Temperature of the Device is too high. | Check whether the ventilation around the Device is good. |
Appendix 1 Cybersecurity Recommendations
Mandatory actions to be taken for basic device network security:
1. Use Strong Passwords
Please refer to the following suggestions to set passwords:
● The length should not be less than 8 characters.
- Include at least two types of characters; character types include upper and lower case letters, numbers and symbols.
- Do not contain the account name or the account name in reverse order.
- Do not use continuous characters, such as 123, abc, etc.
- Do not use overlapped characters, such as 111, aaa, etc.
2. Update Firmware and Client Software in Time
- According to the standard procedure in Tech-industry, we recommend to keep your device (such as NVR, DVR, IP camera, etc.) firmware up-to-date to ensure the system is equipped with the latest security patches and fixes. When the device is connected to the public network, it is recommended to enable the "auto-check for updates" function to obtain timely information of firmware updates released by the manufacturer.
- We suggest that you download and use the latest version of client software.
"Nice to have" recommendations to improve your device network security:
1. Physical Protection
We suggest that you perform physical protection to device, especially storage devices. For example, place the device in a special computer room and cabinet, and implement well-done access control permission and key management to prevent unauthorized personnel from carrying out physical contacts such as damaging hardware, unauthorized connection of removable device (such as USB flash disk, serial port), etc.
2. Change Passwords Regularly
We suggest that you change passwords regularly to reduce the risk of being guessed or cracked.
3. Set and Update Passwords Reset Information Timely
The device supports password reset function. Please set up related information for password reset in time, including the end user's mailbox and password protection questions. If the information changes, please modify it in time. When setting password protection questions, it is suggested not to use those that can be easily guessed.
4. Enable Account Lock
The account lock feature is enabled by default, and we recommend you to keep it on to guarantee the account security. If an attacker attempts to log in with the wrong password several times, the corresponding account and the source IP address will be locked.
5. Change Default HTTP and Other Service Ports
We suggest you to change default HTTP and other service ports into any set of numbers between 1024–65535, reducing the risk of outsiders being able to guess which ports you are using.
6. Enable HTTPS
We suggest you to enable HTTPS, so that you visit Web service through a secure communication channel.
7. MAC Address Binding
We recommend you to bind the IP and MAC address of the gateway to the device, thus reducing
the risk of ARP spoofing.
8. Assign Accounts and Privileges Reasonably
According to business and management requirements, reasonably add users and assign a minimum set of permissions to them.
9. Disable Unnecessary Services and Choose Secure Modes
If not needed, it is recommended to turn off some services such as SNMP, SMTP, UPnP, etc., to reduce risks.
If necessary, it is highly recommended that you use safe modes, including but not limited to the following services:
- SNMP: Choose SNMP v3, and set up strong encryption passwords and authentication passwords.
- SMTP: Choose TLS to access mailbox server.
- FTP: Choose SFTP, and set up strong passwords.
● AP hotspot: Choose WPA2-PSK encryption mode, and set up strong passwords.
10. Audio and Video Encrypted Transmission
If your audio and video data contents are very important or sensitive, we recommend that you use encrypted transmission function, to reduce the risk of audio and video data being stolen during transmission.
Reminder: encrypted transmission will cause some loss in transmission efficiency.
11. Secure Auditing
- Check online users: we suggest that you check online users regularly to see if the device is logged in without authorization.
- Check device log: By viewing the logs, you can know the IP addresses that were used to log in to your devices and their key operations.
12. Network Log
Due to the limited storage capacity of the device, the stored log is limited. If you need to save the log for a long time, it is recommended that you enable the network log function to ensure that the critical logs are synchronized to the network log server for tracing.
13. Construct a Safe Network Environment
In order to better ensure the safety of device and reduce potential cyber risks, we recommend:
- Disable the port mapping function of the router to avoid direct access to the intranet devices from external network.
- The network should be partitioned and isolated according to the actual network needs. If there are no communication requirements between two sub networks, it is suggested to use VLAN, network GAP and other technologies to partition the network, so as to achieve the network isolation effect.
- Establish the 802.1x access authentication system to reduce the risk of unauthorized access to private networks.
- Enable IP/MAC address filtering function to limit the range of hosts allowed to access the device.
- LCD Display Wall Unit
- User's Manual
- Foreword
- General
- Safety Instructions
- Revision History
- Privacy Protection Notice
- About the Manual
- Important Safeguards and Warnings
- Installation Requirements
- Operation Requirements
- WARNING
- Table of Contents
- Foreword....I
- Important Safeguards and Warnings.... III
- Maintenance .... 1
- Packing List....4
- Device Introduction.... 5
- Menu Configuration 8
- Geometry....13
- Sound 16
- Advanced 17
- System....19
- Input Source....23
- FAQ 25
- Appendix 1 Cybersecurity Recommendations....26
- Maintenance
- Environmental Requirements
- Maintenance Tips
- Operating Time
- Temperature, Humidity and Ventilation
- Cleaning
- Power Supply
- Storage Requirement
- Dust-Proof Requirements
- Screen Usage Requirements
- Packing List
- Device Introduction
- Appearance
- Port
- Remote Control
- Menu Configuration
- Picture
- Image Mode
- Contrast
- Brightness
- Saturability
- Sharpness
- Color Temperature
- Aspect Ratio
- Noise Reduction
- Geometry
- VGA Signal
- H-Position
- V-Position
- Sampling Frequency
- Phase
- Auto Adjust
- Sound
- Step 2 Select Sound > Sound Adjust.
- Step 3 Adjust the on and off status of the sound adjust by the left and right buttons on the remote control.
- Advanced
- Advanced Menu
- Software Update (USB)
- Mirror Image
- System
- OSD Language
- OSD Duration
- OSD Blending
- Backlight Mode
- Soft Address Switch
- Input Source
- FAQ
- Appendix 1 Cybersecurity Recommendations
- Mandatory actions to be taken for basic device network security:
- Use Strong Passwords
- Update Firmware and Client Software in Time
- "Nice to have" recommendations to improve your device network security:
- Physical Protection
- Change Passwords Regularly
- Set and Update Passwords Reset Information Timely
- Enable Account Lock
- Change Default HTTP and Other Service Ports
- Enable HTTPS
- MAC Address Binding
- Assign Accounts and Privileges Reasonably
- Disable Unnecessary Services and Choose Secure Modes
- Audio and Video Encrypted Transmission
- Secure Auditing
- Network Log
- Construct a Safe Network Environment
Brand : Dahua Technology
Model : LS550UEH-EG
Category : Screen