
LM27-F410 - Screen Dahua Technology - Free user manual and instructions
Find the device manual for free LM27-F410 Dahua Technology in PDF.


| Product Type | Monitor |
| Brand | Dahua Technology |
| Model | LM27-F410 |
| Screen Size | 27 inches |
| Resolution | 1920 x 1080 (Full HD) |
| Refresh Rate | 60 Hz |
| Panel Type | IPS |
| Aspect Ratio | 16:9 |
| Brightness | 250 cd/m² |
| Contrast Ratio | 1000:1 (typical) |
| Response Time | 5 ms |
| Viewing Angle | 178° / 178° |
| Connectivity | HDMI, VGA, Audio Out |
| Power Supply | AC 100-240V, 50/60Hz |
| Power Consumption | ≤ 25W (typical) |
| Weight (with stand) | Approx. 4.5 kg |
| Dimensions (with stand) | 615 x 450 x 180 mm |
| VESA Mount | 100 x 100 mm |
| Main Functions | On-Screen Display (OSD) controls, Blue light filter, Flicker-free |
| Cleaning | Wipe with a soft, dry cloth. Do not use chemicals. |
| Safety | Use only provided power adapter. Do not open the cabinet. |
| Spare Parts & Repairability | Contact Dahua support for service. No user-serviceable parts. |
Frequently Asked Questions - LM27-F410 Dahua Technology
User questions about LM27-F410 Dahua Technology
0 question about this device. Answer the ones you know or ask your own.
Ask a new question about this device
Download the instructions for your Screen in PDF format for free! Find your manual LM27-F410 - Dahua Technology and take your electronic device back in hand. On this page are published all the documents necessary for the use of your device. LM27-F410 by Dahua Technology.
USER MANUAL LM27-F410 Dahua Technology
UHD LED MONITOR
User Manual
Contents
Important Information....2
Safety Warning....2
Notes....3
Introduction to the Product....4
Product Appearance 4
Performance Features 4
External Connections....5
Main Menu....6
Main Menu 6
Picture Menu....7
Sound Menu 7
Option Menu 7
Screen Menu....8
Channel Selection 9
How to Clean Product 9
Troubleshooting....9
Important Information
Safety Warning
To use the product safely, correctly, and to keep users from suffering injury or property loss, please observe the following safety precautions when installing, using or maintaining.
Please read this handbook before operating the product and keep the handbook for future reference.
- Notice and observe all the warnings and illustrations.
- Do not adjust, maintain or modify if you do not have appropriate qualifications.
- Do not open or remove the rear cover, box or cover board of the product. Please contact the dealer or after-sales service center when in need of adjustment or maintenance.
- Do not place any items on the product. The product may be damaged if foreign objects enter the internal unit.
- Do not tread on or squeeze the power line, especially the plug or connection point of the power line to the product.
- Do not put the product in flammable or corrosive gaseous environment, which may cause fire or damage the product. Placing the product in proximity to flammable gas can easily result in a dangerous explosion.
- Please turn off power or unplug the power cable immediately if there is smoking, off-odor, or abnormal noise. Contact the after-sales service center for maintenance after confirming there is no more smoke or odor. Further use could result in fire.
- Only qualified service people can maintain. If the product gets any kind of damage, such as damage to the plug, foreign matter or liquid into the unit, exposure to rain or humidity, loss of function, or dropped, please contact dealer or after-sales service center.
- Do not expose the product to rain or chemicals. If the product is moist, allow to fully dry before plugging in or turning on power.
● Turn off the power when cleaning the product. - Failure to properly secure all screws during installation can result in a fall of the product. Ensure all mounting hardware and other installation accessories are properly secured during installation.
- Do not touch any fixed components inside the product. Failure to do so can result in damage to the product or person.
- Be careful during maintenance of product even if the power is off. Some components are equipped with UPS, and can continue to supply power which is dangerous to people.
Notes
- Please put the product in a flat, stable and dry place. Avoid direct sunlight, high temperature, humidity, dust, and corrosive gas.
- If the product is installed on the wall, please make sure the wall's load bearing capacity is sufficient. To avoid falling and injuring people, install according to the included instructions with mounting hardware.
- The LCD may experience image distortion or color decay when the temperature variation is too large. Wait for a moment (with power on) and the distortion should disappear.
- Do not block the ventilation opening. Install the product according to this handbook.
- Do not install the product near any heat source such as a radiator, heat register or stove.
- Do not use uncertified connecting lines, which might cause equipment failure.
- Do not press, stretch or heat the connecting lines, which might cause damage to it.
- Please firmly grasp the plug of the connecting line when inserting and removing. Pulling the connecting line might cause damage to it.
- Cut off power and the connecting line immediately and contact the after-sales service center if the product or the connecting line is damaged for some reason. Continued use without maintenance might cause smoking or off-odor.
- Do not hang or lean on the product. Doing so can cause the product to fall or become damaged. It may also cause injury to people. Pay special attention when children are nearby.
- Please turn off power for safety if not using the product for a long time.
- Do not let the connecting line get squeezed, buckled, pulled or twisted.
- Make sure the power is turned off and the connecting lines are removed when moving the product.
- Avoid collisions with the product. This may cause equipment failure.
Introduction to the Product
Product Appearance
natural_image
Empty white rectangle with a thin gray border (no text or symbols)(Photos are for reference only)
Performance Features
● Professional commercial display.
● 4K Ultra HD 3840 x 2160 resolution..
● Low energy consumption, long service life.
● High contrast ratio and high luminance.
● Rapid response times, no trailing image.
● Support HDMI2.0 and DP1.2a, Support PIP and PBP function
● 4K Ultra HD LCD panel with top-ranking video processing chip..
External Connections
Please connect the monitor to external devices according to the following I/O interface list.
Choose the corresponding incoming signal channel.
Port A:

Port B:
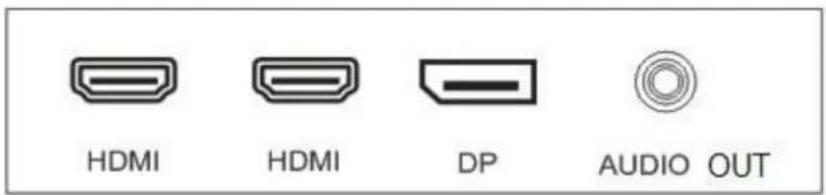
HDMI (x2): HDMI Connector
DP: DisplayPort Connector
VGA IN: D-SUB 15-pin Connector
AUDIO IN: Phone Jack, Stereo
AUDIO OUT: Phone Jack, Stereo
RS232 IN/OUT: EIA-RS-232
I/O boards may differ depending on model.

Attention
Please turn off the power of the external device and the product when connecting.
Main Menu
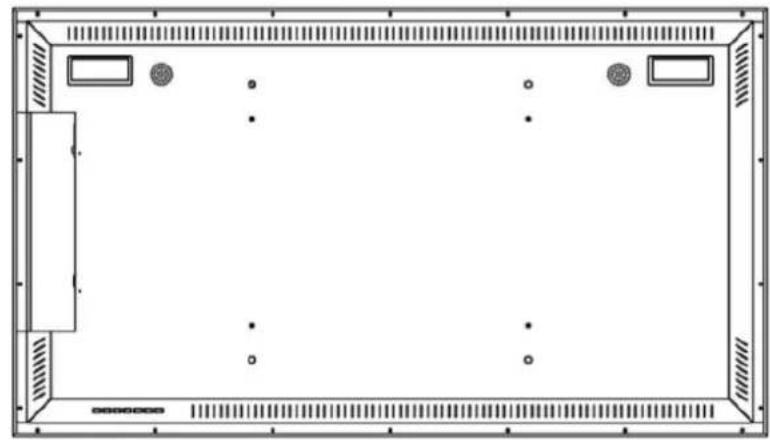
To activate, press the menu button on the bottom left of the bezel. The sub-menus of the main menu are: PC Menu, Picture menu, Audio menu, OSD menu, Function menu and Geometry menu.
Press the menu button to select the sub-menu item. The selected menu item will show a bordered wireframe. Press the ▲▼ button to move among the secondary menu items of the sub-menu.
natural_image
Front view of a rectangular electronic device with ventilation grilles and control panel (no text or symbols)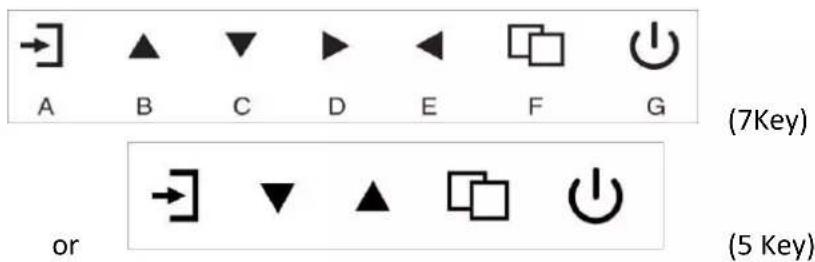
A. "Source" button
● Press the button to display all the signal channel menus.
- Press the button to Exit the OSD menu.
B. "Upward" button
- Press the button to move the cursor to the needed function.
- Press the button to change the selected function in OSD menu item.
C. "Downward" button
- Press the button to move the cursor to the needed function.
- Press the button to change the selected function in OSD menu item.
D. "Rightward" button
- Press the button to move the cursor to the needed function.
- Press the button to change the selected function in OSD menu item.
E. "Leftward" button
- Press the button to move the cursor to the needed function.
- Press the button to change the selected function in OSD menu item.
F. "Menu" button
- Press the button to display the OSD main menu.
- Press the button to Confirm entry menu item.
G. "Power" button
- Press the button to turn on or turn off the display.
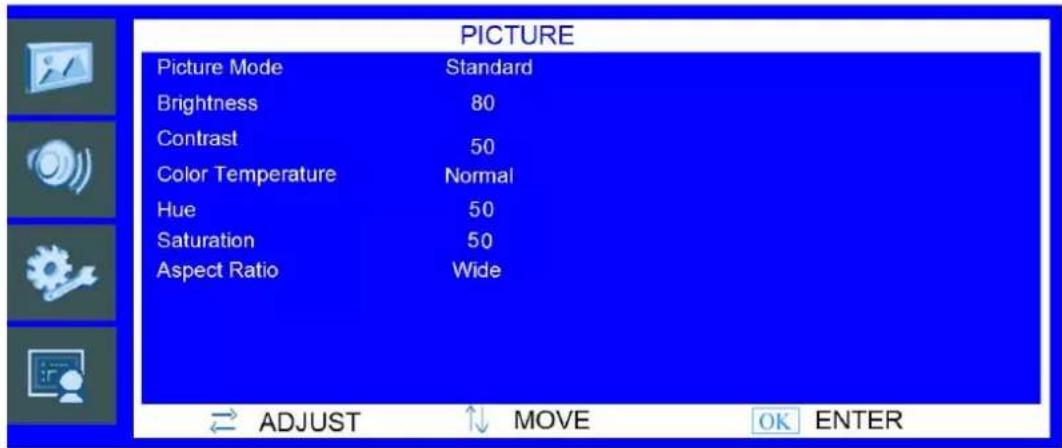
Picture Menu
Picture menu can set Picture mode, brightness, contrast, color temperature....Press ▲▼ button to adjust value when item is selected.
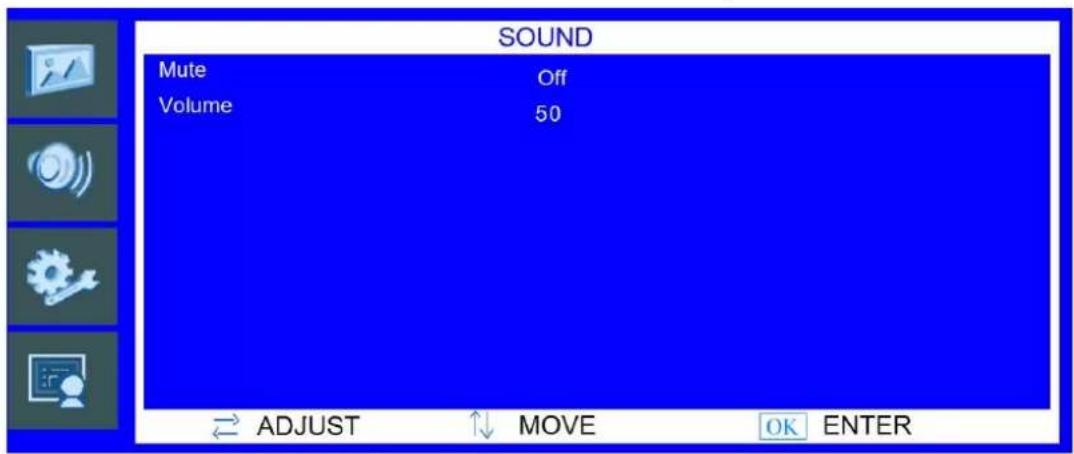
Sound Menu
Audio menu can set mute and volume. Press ▲▼ button to adjust value when item is selected.
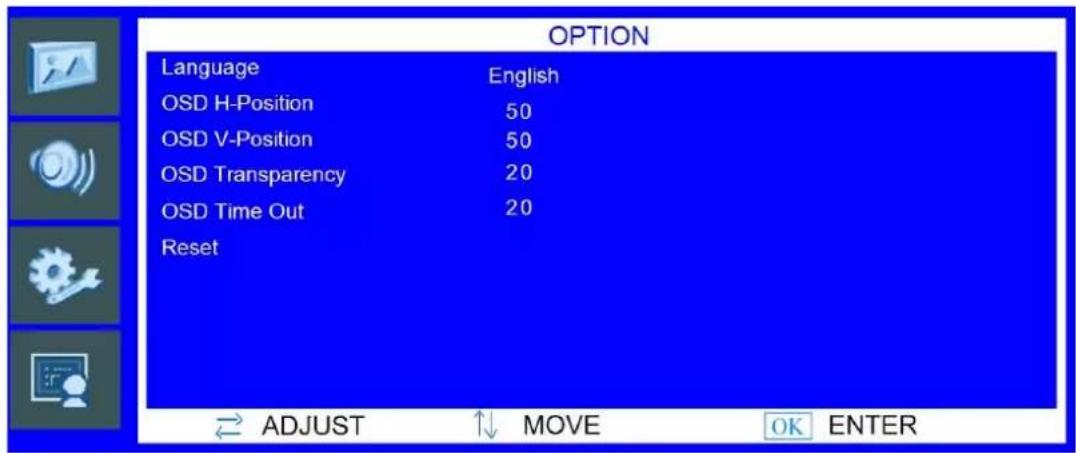
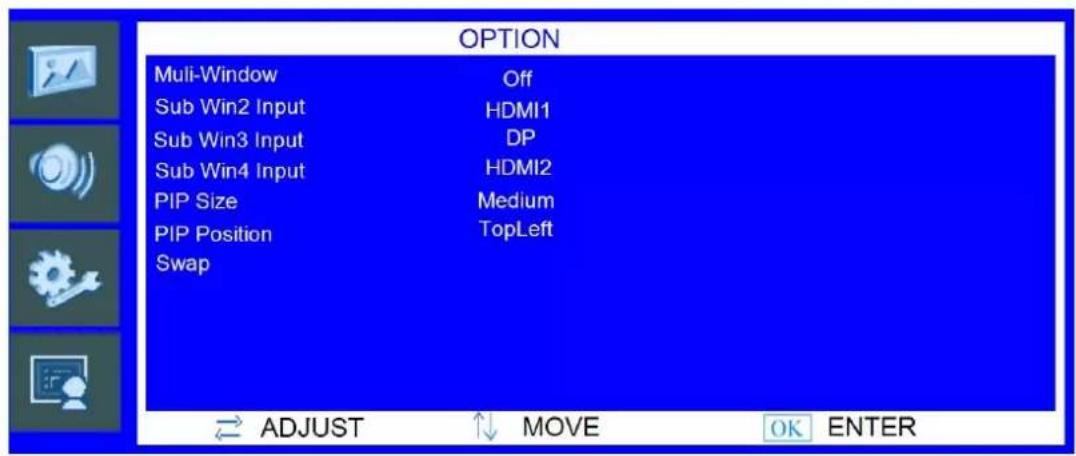
Option Menu
Option menu can adjust OSD language set, reset, OSD position, adjust OSD transparency, and adjust PIP BPB function. Press ▲▼ button to adjust value when item is selected.
Screen Menu
Screen menu can adjust the H-position, V-position, clock, phase and auto adjust the position of the image within the unit. Press ▲▼ button to adjust value when item is selected.
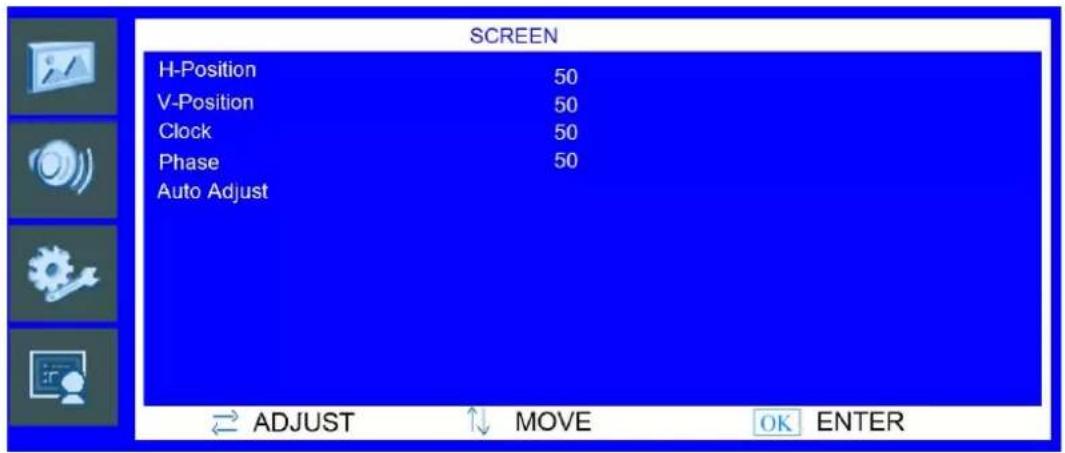
Channel Selection
"Source" menu can select channel (input). The options include VGA, HDMI and DP. Press ▲▼ button to adjust value when item is selected, press menu button to exit.
How to Clean Product
- Please wipe dust and other particles off with a clean soft towel.
- If it is still not clean, please use a neutral cleaner along with the clean soft towel. Wipe dry after cleaning it.
- Rubbing or scrapping the housing with fingernails or other hard objects might scratch the housing.
Troubleshooting
Before consulting service staff, please use the following chart to attempt to diagnose the issue.
| Problem | Fix | |||||||||
| 1 | 2 | 3 | 4 | 5 | 6 | 7 | 8 | 9 | 10 | |
| No image or sound | ⊕ | ⊕ | ⊕ | ⊕ | ⊕ | ⊕ | ||||
| Inferior sound, normal image | ⊕ | ⊕ | ⊕ | ⊕ | ⊕ | |||||
| Inferior image, normal sound | ⊕ | ⊕ | ⊕ | ⊕ | ⊕ | ⊕ | ||||
| Poor signal | ⊕ | ⊕ | ⊕ | ⊕ | ⊕ | |||||
| Vague image | ⊕ | ⊕ | ⊕ | ⊕ | ||||||
| Double image | ⊕ | ⊕ | ⊕ | ⊕ | ||||||
| Interfering lines in image | ⊕ | ⊕ | ⊕ | ⊕ | ||||||
| Twisty image | ⊕ | ⊕ | ⊕ | ⊕ | ||||||
| Poor signal | ⊕ | ⊕ | ⊕ | ⊕ | ⊕ | ⊕ | ||||
| Rung stripe in image | ⊕ | ⊕ | ||||||||
| Image vertically scrolls | ⊕ | ⊕ | ⊕ | ⊕ | ||||||
| Inferior color | ⊕ | ⊕ | ⊕ | ⊕ | ⊕ | ⊕ | ⊕ | ⊕ | ||
| No color | ⊕ | ⊕ | ⊕ | ⊕ | ⊕ | |||||
| Fix | |
| 1 | Switch to another channel or input. |
| 2 | Check whether the audio signal line is connected. |
| 3 | Check whether the video signal line is connected. |
| 4 | Interference from by other electric appliance may be present. |
| 5 | Adjust fine tuning setting. |
| 6 | Adjust luminance setting. |
| 7 | Adjust contrast ratio setting. |
| 8 | Adjust color setting. |
| 9 | Check whether the system is set-up properly. |
| 10 | Check whether the power is on. |
| certificate of approval |
| Inspector: |
| Inspector date: |
| The product accords with the technical criteria and is allowed to sell |
OPERATION WARRANTY
Dear customers:
We appreciate you very much for your choice of our monitors. In order to guarantee the good quality, all the monitors have been checked strictly before they leave factory. On behalf of our company, we promise you a good quality and completion of monitor components. If there appears any operation problem, please contact with our appointed agents in time to arrange the reparation. The operation warranty time counts from the day you purchase the monitor to the twelfth month ended with the same date when you purchased the monitor. By this warranty card, we will fix your monitor free of charge during this year. The free ranges from manual fee to spare parts fee(excluding panel).
When your reparation need transportation you should use the original packing and quake proof packing. At the same time never forget to put the warranty card inside. In caes of the following conditions, the operation warranty will not work:
- The monitor is damaged by wrong operation, accident of natural disaster;
- The monitor has been fixed or re-equipped by other company s' Technicians;
- The Series NO.has been changed or eliminated;
- The monitor has not beet equipped in accord with the directions provided.
The operation warranty service time will the not be extended. By the finalization of twelve months operation warranty, we will start another warranty(reparation) for three years, But the spare parts fee will be charged for this warranty.
CERTIFICATE
Commodity: color monitor
Production Date:
Tester
Through the test of Quality Control Department in our company, the product has been proved that the function parameter has reached the technique criteria. They are permitted to leave factory.

REPARATION WARRANTY
Customer Name ____
Product Model ____
Contact Tel ____
Purchasing Date ____
Series No ____
Sel ler
- UHD LED MONITOR
- Contents
- Important Information
- Safety Warning
- Notes
- Introduction to the Product
- Product Appearance
- Performance Features
- External Connections
- Attention
- Main Menu
- "Source" button
- "Upward" button
- "Downward" button
- "Rightward" button
- "Leftward" button
- "Menu" button
- "Power" button
- Picture Menu
- Sound Menu
- Option Menu
- Screen Menu
- Channel Selection
- How to Clean Product
- Troubleshooting
- OPERATION WARRANTY
- CERTIFICATE
- REPARATION WARRANTY
Brand : Dahua Technology
Model : LM27-F410
Category : Screen