GT1800Li - Uncategorized Texas - Free user manual and instructions
Find the device manual for free GT1800Li Texas in PDF.

| Product Type | Cordless Grass Trimmer / Brushcutter |
| Brand | Texas |
| Model | GT1800Li |
| Power Source | Lithium-Ion Battery |
| Battery Voltage | 18 V |
| Cutting Width | 30 cm (12 inches) |
| Cutting System | Dual line bump feed |
| Line Diameter | 1.6 mm |
| Handle Type | Adjustable loop handle |
| Weight (with battery) | 2.5 kg |
| Battery Capacity | 2.0 Ah |
| Charging Time | 60 minutes |
| Run Time | Up to 30 minutes |
| Noise Level | < 80 dB(A) |
| Safety Features | Safety switch and guard |
| Maintenance | Clean after use, replace line as needed |
| Spare Parts Availability | Battery, charger, cutting line, and spool available |
| Warranty | 2 years |
Frequently Asked Questions - GT1800Li Texas
User questions about GT1800Li Texas
0 question about this device. Answer the ones you know or ask your own.
Ask a new question about this device
Download the instructions for your Uncategorized in PDF format for free! Find your manual GT1800Li - Texas and take your electronic device back in hand. On this page are published all the documents necessary for the use of your device. GT1800Li by Texas.
USER MANUAL GT1800Li Texas
natural_image
Black metal tool with yellow handle and base, isolated on white background (no text or symbols)
natural_image
Two black electronic devices with yellow and black buttons crossed out by a red prohibition symbol (no text or labels)BEMÆRK! BATTERI OG LADER F∅LGER IKKE MED TIL SOLO MASKINER
NOTE! BATTERY AND CHARGER ARE NOT INCLUDED FOR SOLO MACHINES
text_image
Labeled diagram of a manual tool with numbered parts for identification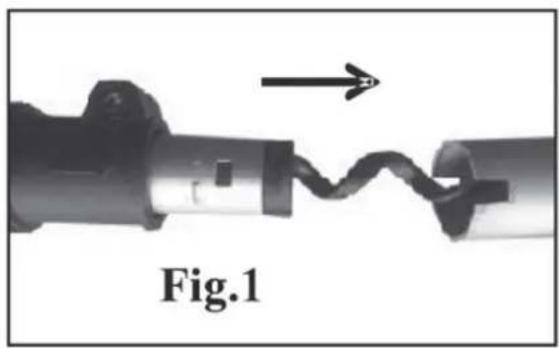
natural_image
Close-up of a mechanical component with a zigzag line and an arrow indicating direction (no text or symbols on the object itself)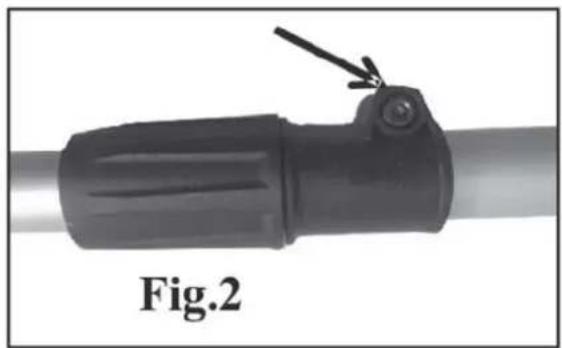
natural_image
Close-up of a black mechanical component with a lever and a small protrusion, labeled Fig.2 (no text or symbols on the object itself)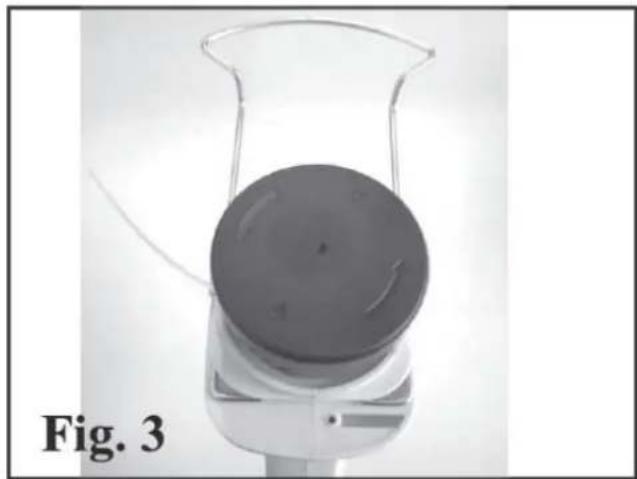
natural_image
Top-down view of a laboratory beaker with a circular component, labeled 'Fig. 3' (no other text or symbols visible)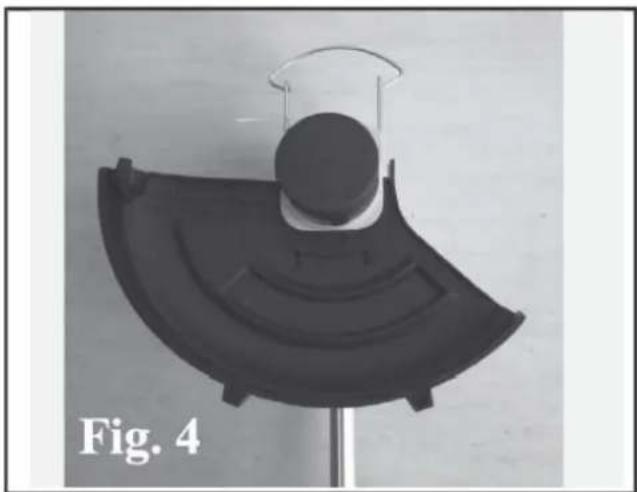
natural_image
Black plastic object with curved base and circular top, labeled 'Fig. 4' (no other text or symbols)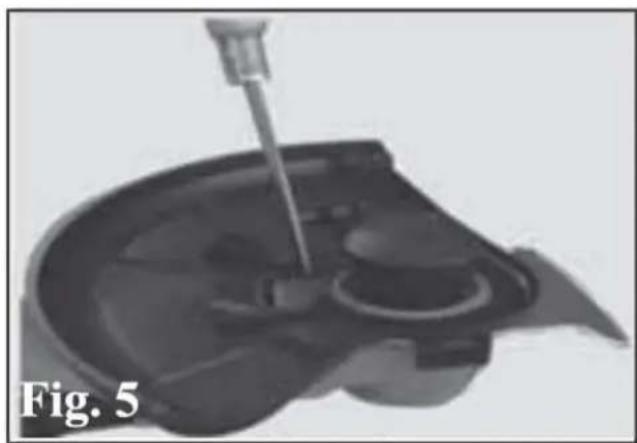
natural_image
Medical illustration showing a needle inserted into a patient's liver (no text or symbols)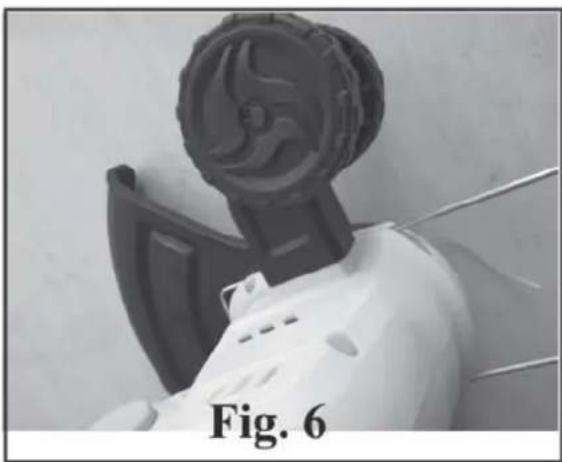
natural_image
Close-up of a robotic device with a circular head and mechanical components, labeled 'Fig. 6' (no other text or symbols visible)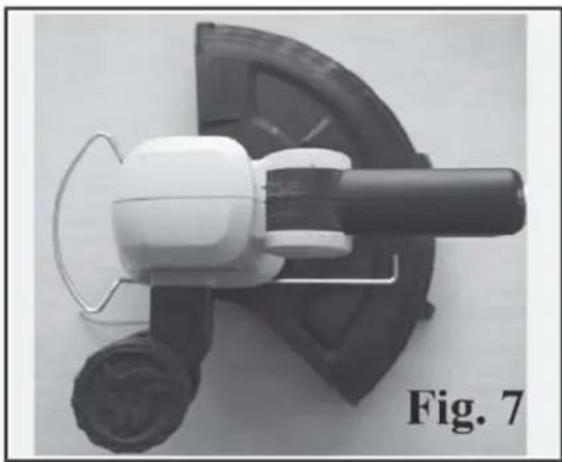
natural_image
Close-up of a white electric shaver with black handle and circular base, labeled 'Fig. 7' (no other text or symbols)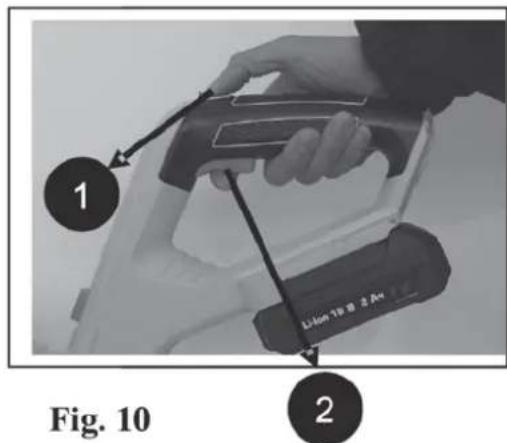
text_image
1 Lithon 18 @ 2 Am 2 Fig. 10
natural_image
Close-up of a black mechanical component with a cylindrical end and a small protrusion, labeled 'Fig. 11' (no other text or symbols visible)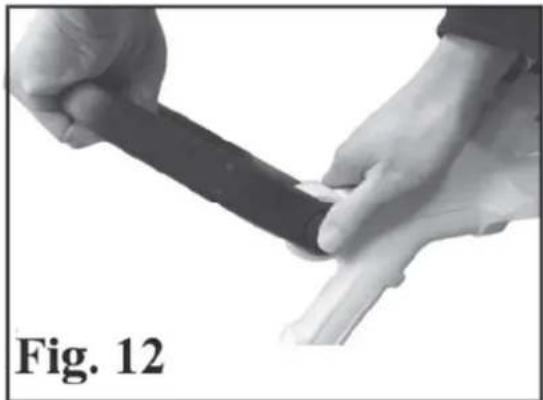
natural_image
Close-up of hands performing a manual manipulation or tool on a human foot, labeled 'Fig. 12' (no other text or symbols visible)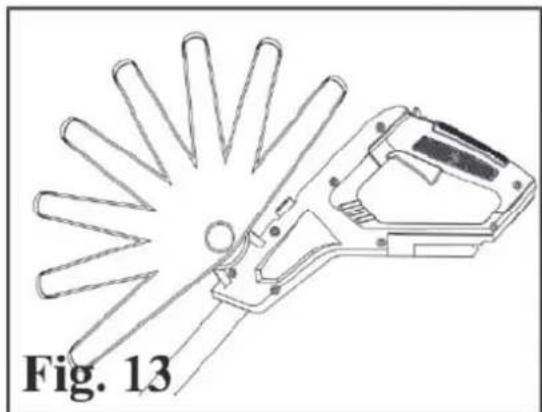
natural_image
Technical line drawing of a mechanical tool with radial blades, labeled Fig. 13 (no text or symbols on the diagram itself)
natural_image
Close-up of a hand using a power tool to clean or adjust a mechanical component, labeled 'Fig. 14' (no other text or symbols visible)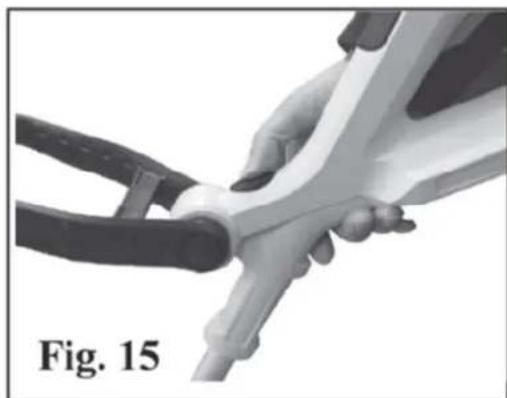
natural_image
Close-up of hands using a tool to adjust or install a mechanical component, labeled 'Fig. 15' (no other text or symbols visible)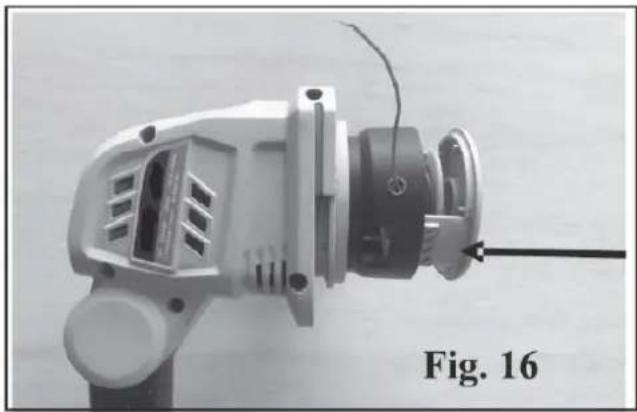
natural_image
Close-up of a mechanical power tool with visible internal components and a black arrow pointing to a component (no text or symbols on the device itself)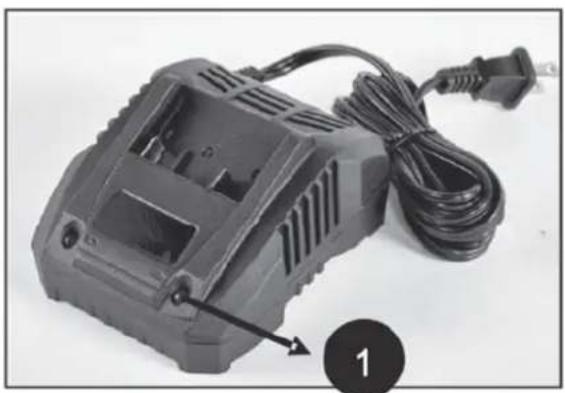
natural_image
Black plastic electrical contactor with attached cable and plug, labeled with number 1 (no text or symbols on device body)Fig. 17

natural_image
Black handheld electronic device with attached cable and power cord (no visible text or symbols)DK - Original brugsanvisning
GB - Original instructions
Warning symbols 2
Illustrations 3
- Safety.... 10
- Identification of the machine and components ..... 10
- Unpacking and assembly 10
- Battery....11
- Charger 11
- Use....11
- Clothing 12
- Tips and advices 12
- Maintenance.... 12
- Storage.... 12
- Specifications 12
- Warranty terms and conditions.... 12
- Troubleshooting 17
EC Declaration of conformity.... 18
Spare parts
Spare part drawings for the specific product can be found on our website www.texas.dk If you find the part numbers yourself, this will facilitate more rapid service.
For purchase of spare parts, please contact your dealer.
1. Safety
How to read the manual
Please read this instruction manual carefully, especially the safety warnings marked with the symbol:

When using the product, the safety instructions must be closely followed. Read this manual carefully before starting the machine. Make sure that you know how to stop and switch off the engine in case of accident. All instructions regarding safety and maintenance of the machine are for your own safety.
The warnings, precautions and instructions given in this manual, cannot cover all situations that the product can be placed in. The user must therefore present common sense and caution when using the product.
Safety in the work area
- Only use the product in clean and well lit areas
- Do not use the product in areas with explosive danger or where there is flammable fluids, gas or dust present.
- The person that uses the machine is responsible to other persons in the work area. Never use the machine when others, especially children or animals are near.
- This machine is an electric product. It is therefore important, that it ever comes in contact with water or is used in wet surroundings.
Use and maintenance of the product
- This machine must not be used for other work than as described in this manual.
-
Only use original spare parts. Mounting of non-approved parts may lead to increased risk and are therefore not legal. Any liability is renounced for accidents or other damage that has happened due to the use of unauthorised parts.
-
Before using the machine, the dealer or other qualified person should instruct you in the use of the machine.
- Minors may not work the machine.
- The machine may only be lent to people who know how to work the machine. This manual should follow the machine under all circumstances.
- The machine may only be used by persons who are rested, well and fit. If the work is tiring, frequent brakes should be made. Do not use the machine under influence of alcohol.
- Always check before start, that all bolts and nuts are tighthened.
- Always wear eye protection when using the machine.
- Keep the trimmer head clean and free from wrapped grass or weed.
- Keep children and other persons at a distance of at least 5 metres from the work area.
- The battery should always be removed when:
- maintenance is made.
- the machine is left unattended
- During transport, the main switch must be switched off.
2. Identification of the machine and components
See Fig. A
- Safety lock
- On/off switch
- Operating handle
- Battery pack*
- Shaft adjustment collar
- Safety hood
- Trimmerhead
- Flower guard
- Nylon wire
- Cutting head
- Lock for cutting head inclination
- Front handle
- Push button for adjusting front handle
- Lock for cutting head rotation
*Battery/charger are not included for solo machines
3. Unpacking and assembly
- Unpack all parts and lay them on a flat, stable surface.
- Remove all packing materials and shipping devices, if applicable.
- Make sure the delivery contents are complete and free of any damage. If you find that parts are missing or show damage do not use the product but contact your dealer. Using an incomplete or damaged product represents a hazard to people and property.
- Ensure that you have all the accessories and tools needed for assembly and operation. This also includes suitable personal protective equipment.
Assembly the shaft. See Fig. 1+2
Align the shaft ends and assemble upper shaft into the telescopic shaft. Use a hex key to tighten the bolt.
Fitting the flower guard. See Fig. 3
Attach the flower guard (8) to the motor housing.
Fitting the safety guard. See Fig. 4+5
Turn the grass trimmer upside down. Mount the protective hood on the motor head, then fix the safety guard with a screw.
This guard is intended to prevent loose objects from being thrown towards the operator. The guard also protects the operator from accidental contact with the trimmer head.
Check that the guard is undamaged and not cracked. Replace the guard if it has been exposed to impact or is cracked.
Fitting the support wheel. See Fig. 6+7
When in edging mode, the support wheel needs to be fitted on grass trimmer. Insert the support wheel into the slot on the motor housing. Make sure it is firmly connected.
Setting the length of the unit. See Fig. 11
Slacken the shaft adjustment collar (5), pull the telescopic pole to the desired length. Retighten the shaft adjustment collar again.
Adjusting the front handle. See Fig 12+13
Push the button (13) both sides. Adjust the front handle to the required angle. Release the button and ensure the handle clicks into a locked position.
Setting the angle of the cutting head. See Fig. 14+15
To switch from trimming to edge cutting: Press in and hold the locking button (11). Tilt the cutting head to the required position. Release the locking and ensure the head clicks into a locked position.
To turn the cutting head, press the lock button (14) and turn the shaft left.
4. Battery
Battery is not included for solo machines
Warning: Do not try to disassemble, short circuit or put it to extreme heat or fire, as it can cause serious inquiry and permanent damage to the battery!
Charging
- Only use the original charger with art. no. 443711 (standard charger).
- Before the battery is being used the first time, it is recommended to full charge it first.
Note: The battery does not have any power indicator.
Important
To protect the battery from total discharge, the machine will stop, when the battery is nearly empty. The machine must not be started up again after automatic shutdown, as it can damage the battery. The battery must be recharges before the work can continue.
5. Charger
Charger is not included for solo machines
Only use the original charger, which is included with the product and do not try to charge other type of batteries in the charger, other than the original battery with art. no. 443547 (3.0Ah).
4 Keep the charger in a dry and warm environment (10-25 degrees C) and only use it indoor. It should be connected to a normal 230V AC socket.
Before the battery is being used the first time, it is recommended to charge it fully.
The surface of the battery can become warm during charging. This is normal.
Do not cover battery or charger during charging. Allow free ventilation of air.
Fig. 17:
Insert the battery into the slots of the charger and slide it into place until it locks.
There are 2 lights on the charger indicating the status and state of charge of the battery:
- Constant green light: The charger is ready for use, but no battery is connected
• Constant red light: Battery is charging - Constant green light: Battery is fully charged and should be removed from charger.
The charger will stop, when the battery is full. However, it is not recommended to leave the battery in charger for more than 24 hours.
It is recommended to drain the battery 80% and fully charge it whenever possible, as it can increase the health of the battery. But partial charge will not damage the battery.
To remove the battery from the charger, simply pull the battery out.
During winter storage, the battery should be fully charged and kept dry and warm at 10-15 degrees C. Charge the battery every 3 months to maintain the battery's capacity and to extend the lifetime. Make sure to keep ventilation holes clean and free from dirt.
A full charge of battery takes around 150 min (3.0Ah battery).
The battery cells will go to sleep-mode if ont used for long time and must be activated again t oreach full capacity. The battery will reach its full power after 5 full recharge cycles. Therefore, you might experience that for the first few times uses, the battery's operating time is a few minutes less than when it reaches its full power/capacity. This is also the case after long times winter storage.
6. Use
Before use, make sure that the battery is fitted properly with the battery lock in place.
To start the machine first press the safety lock (1) and then the on/off switch (2) Stop the machine by releasing the on/off switch. Fig. 10
7. Clothing
When using the machine, wear tight-fitting work clothes, strong working gloves, hearing protectors, safety goggles and boots with non-skid soles
8. Tips and advices
Trimming.
Hold the trimmer head just above the ground at an angle. It is the end of the line that does the work. Let the line work at its own pace. Never press the line into the area to be cut.
Cutting.
The trimmer is ideal for cutting grass that is difficult to reach using a normal lawn mower. Keep the line parallel to the ground when cutting. Avoid pressing the trimmer head against the ground as this can ruin the lawn and damage the tool.
Do not allow the trimmer head to constantly come into contact with the ground during normal cutting, as this can cause damage and wear to the trimmer head.
10. Maintenance
- Before any service and maintenance is done, the power must be disconnected, it means the battery removed from the tool.
- Remove the battery before you clean and store the machine.
- Clean the housing and other parts with a soft brush and a moist cloth. Never use aggressive cleansers or solvents.
- Prevent water from getting into the machine.
Replacing nylon spool
Once nylon wire is used up, you need to replace nylon spool or wind with new wire on existing spool.
- Press the two clips on the spool bottom, remove it and pull out the spool. Fig. 16.
- Pull out the old nylon spool and replace it with a new one.
- Put the wire through the hole on the spool cover. Push the nylon spool into the spool cover. The nylon line will automatically come out wwhen you start the grass trimmer
- Press the two clips on the spool bottom and reinstall it.
- New nylon wire can also be rolled on the existing spool. Cut and use 5 m new wire.
New nylon spool with wire: Art. no. 451131
Nylon wire (∅1.6 mm, 15 m: Art. no. 5012-00
11. Storage
Store the trimmer dry and unavailable for children. It is recommended not to let it rest on the trimmer head. Hang it on a wall in the handle.
12. Specifications
| Model GT1800Li | |
| Battery type Lithium Ion | |
| Battery voltage 18V | |
| Capacity | (3 Ah) |
| Cutting width 30 cm | |
| Engine effect 8000 min | -1 |
| Net weight (tool only) 2.1 kg | |
13. Warranty terms and conditions
The warranty period is 2 years for private end users in EU countries. Products sold for commercial use, only have a warranty period of 1 year.
The warranty covers material and/or fabrication faults.
Restrictions and requirements
Normal wear and replacement of wearing parts are NOT covered by the warranty.
Wearing parts, which are NOT covered for more than 12 months:
• Cutting guard and trimmerhead/nylon wire
- Battery: If the battery is not stored correct (frost-free and recharged every 3 months), the durability is only guaranteed for 6 months.
The warranty does NOT cover damages/faults caused by:
- Lack of service and maintenance
• Structural changes - Exposure to unusual external conditions
- If the machine has been improperly used or overloaded
- Use of unoriginal spare parts.
- Other conditions where Texas cannot be held responsible.
Whether a case is a warranty claim or not is determined in each case by an authorized service center. Your receipt is your warranty note, why it should always be kept safe.
REMEMBER: The purchase of spare parts as well as any request for warranty repair, art. number (e.g. 90063XXX), year and serial number should always be informed.
* We reserve the right to change the conditions and accept no liability for any misprints.
| Symptom Possible causes Possible solution | ||
| Device does not work | Battery not slotted in correctly? | Slot battery into place |
| Battery pack discharged? | Charging the battery pack | |
| Battery pack defective?Is the device defective? | Contact Texas customer service or service workshop | |
14. Fehlersuche
2006/42/EC - 2014/30/EU - 2000/14/EC amended by 2005/88/EC
text_image
Henry T. D. T. D.Johnny Lolk Managing Director

text_image
TEXAS EQUIPMENTResponsible for documentation Johnny Lolk