PSWWM90 - Sports Watch Pyle - Free user manual and instructions
Find the device manual for free PSWWM90 Pyle in PDF.


| Product Type | Sports Watch with Multi-Sensor |
| Brand | Pyle |
| Model | PSWWM90 |
| Power Source | 1 x CR2032 3V Lithium Battery |
| Battery Life | Approximately 1.5 years (under typical use) |
| Display Type | Digital LCD with EL Backlight |
| Time Format | 12-hour or 24-hour, hour/minute/second, AM/PM, day of week, month, day |
| Alarm | 2 daily alarms with hourly chime |
| Chronograph | 1/100 second resolution, up to 23h59m59.99s, 10 lap memories |
| Countdown Timer | 1 second resolution, quick set presets (3,5,10,15,45 min), user-definable up to 23h59m59s |
| Yacht Racing Timer | 3-phase countdown timer, programmable phases (0-30 min, 0-39 min, 0-89 min) |
| Altimeter | Resolution 1m (3.25ft), range 0 to 9000m (29527ft), absolute/relative altitude, calibration |
| Barometer | Resolution 0.1 hPa (0.01 inHg), range 300-1100 hPa (8.86-32.48 inHg), pressure tendency graph |
| Thermometer | Range -10°C to 60°C (14°F to 140°F), resolution 0.1°F/°C |
| Wind Speed | Units: km/h, mph, knots, m/s, fps; range 0-200 km/h; average, max, wind chill display |
| Compass | Mechanical compass using colored propeller blade, 8 bearing marks |
| Backlight | Electro-Luminescent (EL) |
| Low Battery Indicator | Display icon when voltage < 2.2V ± 0.2V |
| Accessories Included | Wrist strap, neck cord, plastic clipper, nylon pouch, nylon cover |
| Care Instructions | Keep propeller clean, avoid extreme conditions, use nylon cover during rugged activities |
| Repair | Battery replacement and servicing only by certified agency; do not open case |
Frequently Asked Questions - PSWWM90 Pyle
User questions about PSWWM90 Pyle
0 question about this device. Answer the ones you know or ask your own.
Ask a new question about this device
Download the instructions for your Sports Watch in PDF format for free! Find your manual PSWWM90 - Pyle and take your electronic device back in hand. On this page are published all the documents necessary for the use of your device. PSWWM90 by Pyle.
USER MANUAL PSWWM90 Pyle
"Recreational Gear For The Great Outdoors"
IMPORTANT: Pack carefully in original package it possible. We are not responsible for damage incurred in returning items for repair. A letter stating your exact street address, daytime phone number, and the problem you are experiencing should be included. You must also enclose a copy of the original receipt a proof of date of purchase

"Recreational Gear For The Great Outdoors"

Front CoverBack Cover
1.0 Introduction

Thanks of your purchase of the WMNIMASTILR.
Your 70% DNA SIL-1 is shown a bit from sensor and a hybrid sensor. Full measures the outer conditions such as temperature, pressure, altitude, compass directions and wind speed.
Your WINDMASTER provides the essential information at the time during you are performing hiking, climbing, wind surfing and other winter activities.
You - WINNAS TER also includes a normal time, where,
Your WINDMASTER is carefully designed and produced for outdoor activities. In order to utilize the functions of your WINDMASTER, it is observable to read the following:
- Read the instruction before you use the 'Winkster.
- Keep the propeller close to prevent dirt get into it.
- Keep the proper unit in its normal position; only 1p
Cover your Windfaster with the nylon cover when take part in activities like mounting biling, the cover keeps your Windfaster away from dust and girl.
Avoid exposing your WindMaster to extreme conditions
at an internosectorial line.
Alicia 105, 1986 or severe impact to your healthiness.
- Do not open the WindMaster's case unless a certified service agency because this WindMaster contains precise
electronic sensors and components.
- Close your Windblaster with a sol. 1:100 cost surely,
that although the simple can be
Store your 'varianage' in a my past month it is not in U.S.
2.0 The WindMaster Parts and Its Functions

Mode Button
To select among real Time and different time keeping
Adjust Button
Press and hold for 2 seconds enter setting modes.
- To recall lap memories in Chorograph Mode.
- To swing between Timer 1 and Timer 2
Startup Button
- To start I stop the chronograph and time.
- To switch between units e. annan transaktion, mules.
To select the items in setting modes.
Select Button
To select among real Time and different sensor modes
- To increase value in setting models.
To record lap memory in Chronograph Mode.
- Press and hold for 2 seconds to read top memory in
To select times preset value
Light Button
- To turn on the EL back light for few seconds.
Propeller Blade
- To indicate the boating directions.
Propeller Release Buttons
- To release the propeller
3.0 Change from Mode to Mode
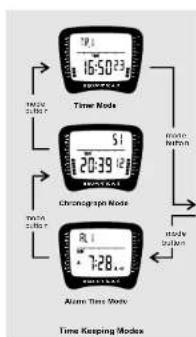
flowchart
graph TD
    A["Timer Nodes"] --> B["Chromatops Mode"]
    B --> C["Alarm Time State"]
    A --> D["Time 2.10.7"]
    B --> E["Time 2.10.7"]
    C --> F["Time 2.10.7"]
    D --> G["16:50.23"]
    E --> H["120:39.12"]
    F --> I["7:28.4"]
    G --> J["16:50.23"]
    style A fill:#f9f,stroke:#333
    style B fill:#f9f,stroke:#333
    style C fill:#f9f,stroke:#333
    style D fill:#f9f,stroke:#333
    style E fill:#f9f,stroke:#333
    style F fill:#f9f,stroke:#333
    style G fill:#f9f,stroke:#333
    style H fill:#f9f,stroke:#333
    style I fill:#f9f,stroke:#333
    style J fill:#f9f,stroke:#333

flowchart
graph TD
    A["Sensor Force motor"] --> B["Speedometer"]
    A --> C["Wind Speedometer"]
    A --> D["Sensor Current"]
    B --> E["+12:38/26/50/76/92/12:50/20"]
    C --> F["+10:37/56/92/12:50/20"]
    D --> G["+12:50/20"]
    E --> H["+12:38/26/50/76/92/12:50/20"]
    F --> I["+10:37/56/92/12:50/20"]
    G --> J["+12:50/20"]
    H --> K["+12:38/26/50/76/92/12:50/20"]
    I --> L["+10:37/56/92/12:50/20"]
    J --> M["+12:50/20"]
    K --> N["+12:38/26/50/76/92/12:50/20"]
    L --> O["+10:37/56/92/12:50/20"]
    M --> P["+12:50/20"]
    N --> Q["+12:38/26/50/76/92/12:50/20"]
    O --> R["+10:37/56/92/12:50/20"]
    P --> S["+12:50/20"]
    Q --> T["+12:38/26/50/76/92/12:50/20"]
    R --> U["+10:37/56/92/12:50/20"]
    S --> V["+12:50/20"]
4.0 Real Time Mode - Date/Time Display & Pressure Tendency /Time Display

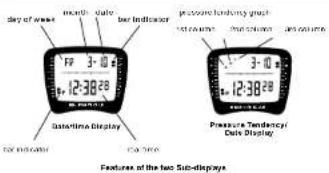
Real Time Mode Sub-display
Real Time Mode has two sub-displays: Data Time Cusplay and Presound (fenergy) Time Cusplay
- Press for (a) turbite is p) butam once to switch but be seen in Data Time Display and the Pressure Tendency/ Time Connection.
Data' Time Display
- This is Time Display, since the day of week, month and day in the lap now at the display.
The bottom row of the display shows current time in hour, minute and second.
- The bar indicators on the left and right sides of the display simulates the area of record.
Pressure Tendency! Time Display
The 1st column of the graph shows the relative pressure of the last 5 to 9 hours.
- The 2nd column of the graph shows the relative pressure of the last 5 to 6 hours.
- The 50 column of the graph shows the relative pressure of the last 3 hours.
Check the 'Impression of the Pressure Tendency Graph section for more detail.
5.0 Alarm Time Mode - Alarm Time 1 & 2 Display, & Setting the Chime/Alarm On/Off

Alarm Time Mock
Alarm Time Mode has two sub-displays: Alarm Time 1 and the Alarm Time 2.
- Alarm Time 1 and Alarm Time 2 were independently.
-Prax the [laptop] button in switch between the Alarm Time 1 Display and Alarm Time 2 Display.
To Set the Alarm and Chime On or Off
-In the Alarm Time 1 Display or Alarm Time 2 Display, upon the installed button to address the ONCFE status of
the highly clinic and clinic.
the present storm time each day.
- To stop the sound press any bell on to shop the alarm. When the chimo is ON, the WindMaster beeps every hour on the hour.
4.1 Real Time Mode - Setting the Time and Date


To Set the Time and Date
To set the data and data, press and hold the [adjusted] carbon for 2 seconds to change from Date Time Display or Pressure TendencyTime Display to DateTime Setting Display.
The second data flush on the display because they are being selected.
The Setting Procedures
- (Paw: petribent) balloon in charge the selection set in the Real Time Swing Sequence.
While digits are pushing a keyboard, press the brand button to increase the number. Hold down the [select] button to change the number at a higher speed.
-While 12 or 24 hour normal setting is being selected please the [rated] button to search between the two inwards.
While display contrast setting is being selected, press the [select] button to select the contrast from 0 to 15. 15 stands a darker display; 0 stands a lighter display
- Ahe yin, sat the arm, dha, display arm and endby central, press the actual lallen to eat. For Real Time Sailing Sequence
If no any key operation in the setting display for about 3 minutes, the 'Wind4aster will return to the Real Time Mode automatically
5.1 Alarm Time Mode - Setting the Alarm Time 1 and 2

To Set The Alarm Time 1
- Phone and hold the [school] built for 2 seconds to change from Alarm Time1 Display to Alarm Time1 Setting Display.
- The minute digits flash on the display because it is being selected.
The Setting Procedures
- Prosa [rabishop] Itonin to change the adhesion in the Amera Ture Section Summary
- While any digits are flashing (selected), press (selected) button
to increase the number. Held down charge the number at a higher speed.
- Also you do the alarm time, prove the [septol] inflation in sat
If no any key operation in the setting display for about 3 minutes, the WindMaster will return to the Alarm Time Mode automatically.
- Set the Alarm Time 2 in the same manner as Alarm Time 1
6.0 Chronograph Mode - Start/Stop the Chronograph

flowchart
graph TD
    A["Chernograph Display"] -->|Start step| B["Checkmark Running Display"]
    B -->|Start step| C["Checkmark Step Display"]
    C -->|End step| A
Chronograph Mode
- The Chromograph measures elapsed times and lap-1000
The display shows the 'All Zeros' display when the chronograph is being selected the first time or the chronograph is next.
- The chronograph resolution in 1:100 second.
To Start/Stop the Chronograph
When the chronograph is dic, press the [star/stop] button to start the chronograph; press the [star/stop] button once again to stop the chronograph.
- The elapsed time between the 2-startstop/kystone will be appeared on the display.
- Repeat the steps obtained above to get another set of squared time.
To Reset the Chronograph
- Record a new set of elapsed time, press and hold the [select] button for 2 seconds to reset: the chronograph to 'All Zurus' display after the chronograph was stopped.
7.0 Timer Mode - Timer 1 and Timer 2 Display (Yacht Racing Timer)
![Timer 1 Display 0.0 100 ← w/er → Timer 2 Display [Track Racing Timer] Switch between Timer Sub-display](/content/2026/05/1009448/images/ea4b268ba9685ed5767ebf49ae7ac2fdd3c6e0a891657ce6c5170045ad9fed44.jpg)
Timer Mode
Timer Mode has two sub-clushes. Timer 1 Display and Timer 2 Yacht Racing Timer; Display.
- Press the [adjust] button once to switch between the Timer 1 Display and Timer 2 Display.
To set the Timer 1
- Press the [select] button to select one of the 5 project values and the existing User Preset Value (UPV) as in the Timer 1 Getting Sequence.
- In see the value, other than the 5 present value and the starting LPN, check the 'In See the User Present Value' sector.

Timer 1 Setting Sequence
6.1 Chronograph Mode - Record/Recall a Lap Time

flowchart
graph LR
    A["Pre-Lip Reading"] --> B["Post-Lip Reading"]
    B --> C["Chenograph Reading Display"]
    B --> D["Chenograph Lap Display"]
    C --> E["To record the Lap Time"]
    D --> F["To record the Lap Time"]
To Record Lap Time
The Chronograph Mode allows the user to record up to 10 lap times.
- If the near islands to record a too time, press the [select] but once once. In record the lap-in and swing the display in the Lap Display, in the crumach Running Display.
- The top number and top time will appear on the display for S search. During the top number and top time displaying the chronograph a counting continuously.
Repeat the steps mentioned above to get another lap time.
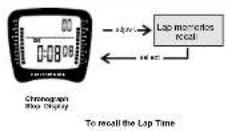
To Recall Lap-Time
- If the user intends to review the recorded lap times, press the [adjusted] button to review the recorded lap times, in the chronograph Stop Display.
To Reset Lap-Time
- In regard a new set of lap time recrue, price and holds the [select] button for 2 seconds to reset all chromatach time lap motions, in the chromatograph Shop Blocks.
7.1 Timer Mode - Setting the Timer 1

To Set the User Pre-set Value
-Press and half the [squal] to run 1st 2 seconds to change the display to User Pre-set Value Selling Display.
- The second digit is each in the display because it is being selected.
The setting procedure
- Press [start/stop] button to change the selection as in the User Pre-set Value Setting Sequence.
- While digits are being annotated (clothing), price the [select] is then to increase the number. Held down the [select] but to change the number at a higher speed.
After you set the timer time, press the [act.st] button to exit the calling sequence.
- If no any key operation in the selling display, for about 3 minutes, the WindWaste will return to the Timer Mode automatically.

User Pre-set Value Setting Sequence
7.2 Timer Mode - Using the Timer 1
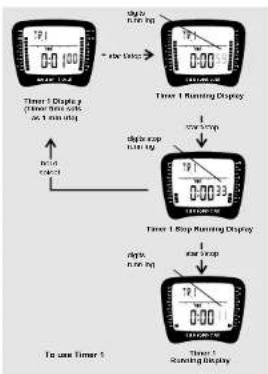
flowchart
graph TD
    A["Timer 1 Display (time, run) as 1 min lag"] --> B["Timer 1 Running Display"]
    B --> C["Timer 1 Stop Running Display"]
    C --> D["Timer 2 Stamping Display"]
    D --> E["To use Timer 1"]
To Use the Timar 1
When the Timer 1 is set, press the [start/stop] button to start the time. I press the [start/stop] button sign in stop the time.
The countdown time will be appeared on the display. The timer starts to keep every second when it is 6 seconds in the end of the countdown.
- As condition time is needed, a long loop set for 2 seconds will be heard. Keeping any button in this period will terminate for loop sound continuously. Our peak time will be loaded automatically at the end of the loop sound
To Reset the Timer 1
- Press and hold the [well] button for 3 seconds to read the time after it was stopped.
7.3 Timer Mode - Setting the Timer 2 (Yacht Racing Timer)

The Timer 2 - Yacht Racing Timer
- Time 2 is a three-phase count-down time, it is specially designed for yard racing of those activities that require five plates contacting.
- When the Timer 2 is being selected, you can make use of the 3-phase-dimer to control the countdown time in 3 separate phases.
- The 1st capita subsale the 1st time phase.
- The middle digits indicate the 2nd time phase - The right digits indicate the 3rd time phase.
To set the Timer 2 - Yacht Timer
- To set the Time 2, press and held the [actual] button to charge the display from Time 2 Display to Time 2. Setting Display.
The digits flash on the display because they are being selected. Press [start/stop] buttons to change the selection as in the Timer 2 Swing Sequence.
- Write right are having (selected), power [select] button to increase the number. Hold down the [selected] button to change the number at a higher speed
- After you set the time time, price the (adjusted) batters is well the setting sequence. If no any key quantum in the setting display for about 8 minutes, the WindMaster will return to the Timer Mode automatically.
Timer 2 Setting Range
- The 1st time phase can be well below the 0 in 3D motion
This 2nd time phase can be set between 0 to 39 minutes
- The 3rd time phase can be set between 0 to 89 minutes.
7.4 Timer Mode - Using the Timer 2 (Yacht Racing Timer)

flowchart
graph TD
    A["Time 2 Display y"] --> B["Start: 3.21"]
    B --> C["Time 2 Display z"]
    C --> D["Stop: 2.21"]
    D --> E["Time 2 Running Display"]
    E --> F["Stop: 0.00"]
    F --> G["Time 2 Stop Running Display/Time"]
    G --> H["Stop: 0.031"]
    H --> I["Time 2 Running Display"]
    I --> J["Stop: 0.00"]
To Use the Timer 2 - Yacht Racing Timer
When the Timer 2 is set, press the start/stop] balloon in stop the time 2. From the start/stop] balloon again in stop the timer.
- Flashing digits in a particular phase indicate that the
left at first. As countdown time is less than 40 seconds
for phase 1 or 60 for phase 2 and 3, it changed represent the number of seconds left instead.
- Earth has increased on the left hand size n' for double
representing 10 seconds; each bar is a series in the right-hand side of the direction towards a row
-Number of seconds in a minute is equivalent to
(number of bar indicators on the left hand side X10) + number of bar indicators on the right hand side seconds
- Whenever the 1st or 2nd place inner counts to zero.
the alarm start rate and the timer start is in round-train the next time phase.
(1) 2013 (Millions of dollars)
- When the 3rd phase timer cranks to arm, the alarm
To Reset the Timer 2
- Press and hold the (seal) button for 2 seconds to read the time to the previous setting after the time was dropped.
8.0 Altimeter Mode - Using the Altimeter

Altimeter Node
- In the Almear Med, the all-ocn dispept on the top debt issue of the division
- I'm uncertain! Interactions, anism, things, so, I'm too bad
to be of the ranking;
The current time displays in the bottom row of the
IMPORTANT: If the user intends to get an accurate reading of air temperature, the user must taken off the watch from the wrist for 20 lc 30 minutes before the actual measurement. It allows no body temperature effect on the wards.
Absolute and Relative Altitude
- The altimeter can be operated in both absolute and
Relative models
- Absolute altitude is the difference between your current altitude and SEA LEVEL (assuming that air pressure at sea level is 9013.21mbar).
- Relative attitude is the difference between your current altitude and the altitude of a specific altitude level where your set the altimpler to 'Zero'.
- For expert users who intend to measure relative utility, check the "low in manxare balance planar section for detail."
To Switch Between Units
- The WindMaster can display altitude in meter (ml) or feet (ft); the WindMaster can display temperature in Celsius (°C) or Fahrenheit (°F).
- (Prior search) Inlon to range the units in the units selected sequence.

Timer 2 Setting Sequence

Unit Selection Sequence
8.1 Altimeter Mode - Calibrate the Altimeter

Why the A timeter Need to be Calibrated
As the absolute altitude is calculated from the air pressure.
7.1.1.
be oriented from time to time as pressure may change
Before Celebrating the A limiter
- Contrace the slutter at a point where the slutter is
continued, both as soon as to my 3- and 4- all unimided sign pts (e.g. 89 mi, because last utility will be imputed
and the Writtoeke being the call written present.
IMPORTANT: Input an incorrect attitude during the calibration
Calibration Procedures
- Press and hold the [actual] button for 2 seconds in charge
The display from Armardi which is Armardi call. Display, the rightmost dial and flashing in the discles.
- If the digit is flashing, it is selected. Press the [select]
(一)本次股东大会的召集和召开程序
- The second part of the main project, please note that the project is subject to make a split-up adjustment.
After you get the altitude, press the [adjusted] button to exit the
(1) 2017年1月1日
NOTE: F. Be user friends to set the Altmeter back to absolute altitude (heights) is calculated from the apparent air measure
after the information, prices and build the [period] barrel in
changes the circle, 10 a circular shape, is all their proper the lature, after one year to sell the circle within the
any number.
9.0 Barometer Mode - Pressure Tendency/Baro Display


Five Trend Survey; Trend Fall: Trend
ed FW Trend
Pressure Tendency Graph
Hammer Mole
Barometer Mode heat two sub-displays: Pressure
(1) 2017年1月1日
(1) 2016.10.28, 19:30:45
-in Hammerser Mode, the pressure depends on the top
Right corner of the clopy
- The corelink hierarchy graph deploys on the top edge
kulian cue of 000 diamonds.
Brew to Tenderson Graph
The 24 colour of the earth down by within every
of the last 6 to 8 hours
- The 2nd column of the graph shows the relative positions
in the fact 2-15 p.
The 3rd column of the graph shows the relative pressure of the last 3 hours.
- For paper, users who think to school the best place of the pressure in demand, check the Pressum London, Vake.
and How in the Pressure Tendency Volume for selling 150
- 2017年1月1日
Implications of the Pressure Tensley Graph
-In general a rise trend in the Pressure Tendency Graph
forecasts a good weather ahead.
- A kindly irred in the pressure lendency Graph
The following is solely a member
A full trend in the Pressure Tendency Graph
10.2.2016 2:357-1984
• Important to get an accurate result. The best
and the same climate for over 2 years.
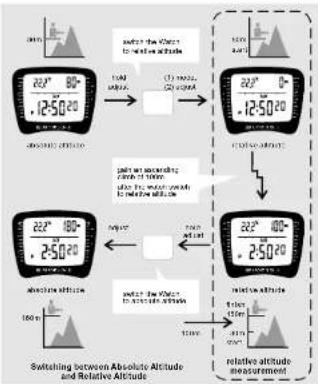
8.2 Altimeter Mode - Measure Relative Altitude
flowchart
graph TD
    A["Start: 22° 80' to -1250' altitude"] --> B["Step 1: 100 m/s altitude, 10 m/s (20 m/s), 30 m/s (25 m/s)"]
    B --> C["Step 2: 22° 80' to -1250' altitude"]
    C --> D["Step 3: 22° 80' to -250' altitude"]
    D --> E["Step 4: 22° 80' to -250' altitude"]
    E --> F["Switching between Absolute and Relative Altitude"]
    F --> G["End: 100 m/s altitude, 10 m/s (10 m/s), 30 m/s (25 m/s)"]
To Kmaxura the Relative Altitude
- 19.46.2018年1月1日
carr-pu. T can make the setting of secondary black hexagon for studies and for finite cases of
e. tel.
- To measure the ascending or descending altitude of a
ral by being the strike to be 5:3; a reference part such as the slaring point of the last
To Set the Altimeter In Zero
Pure and hold the first button for a copy to change
the display from Atimeter Mode to Atmeter Calibration
2.2.17
- Press the [mode] entire once to switch for which is
2016 Thesis of 2015
After the 'Windblaster is set to 'Zure', press [adjust]
-
- The Youth will display the relative which occasionally
Theorem 2.1 is also to be a member of the following of descending attitude by that number.
To Set the Altimeter back to Absolute Altitude
If the income proceeds and the income has been approximately
altitude (altitude is calculated from the arhisel at person)
After a rescue environment, the best health and nutrition is chosen for display in the interpretation of the
him prins the [b]alal butan ona again to set the chasley
(1) 本说明仅供参考。
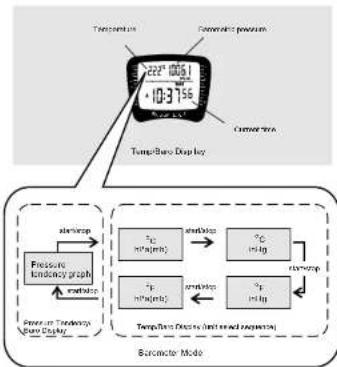
9.1 Barometer Mode - Temp/Baro Display
flowchart
graph TD
    A["Temperature Sensor"] --> B["Tump/Baro Display"]
    B --> C["Sensor Area"]
    C --> D["Pressure Tolerance Graph"]
    D --> E["Power of Temperature Baro Display"]
    E --> F["Sensor Mode Output"]
    F --> G["Temperature Range Data (set based request)"]
    G --> H["Sensor Area"]
    H --> I["Pressure Tolerance Graph"]
    I --> J["Power of Temperature Baro Display"]
    J --> K["Sensor Area"]
    K --> L["Temperature Range Display"]
    L --> M["Sensor Area"]
    M --> N["Pressure Tolerance Graph"]
    N --> O["Power of Temperature Baro Display"]
    O --> P["Sensor Area"]
    P --> Q["Temperature Range Display"]
    Q --> R["Sensor Area"]
    R --> S["Temperature Range Display"]
The Change is Ampillars Diagay and Switch Between links
-Class isisthevel Indian or in a course, the course in
[Startstop] button once again to change the units as in the unit select sequence.
TempBaro Display
- In ampalism display, the preexum appears on the top right corner of the display. The current temperature is displayed on the top left corner of the display. The current line displays in the bottom row of the display.
IMPORTANT: If the user intends to get an accurate reading of air temperature, the user must taken off the watch from the wrist for 20 to 30 minutes before the actual measurement. It allows no body temperature effect on the watch.
Pressure Tendency Value (PTV)
-The PTV adjusts the sensitive of the pressure
there may go up. The 70rd Moist from a car seat. F12
value of 2.00 m/s ^2 . A small F19 mm² in
the pressure is bound to 4 h ago. FTV implies that the
pressure tendency graph will become less conservative to
de pressure change
In Set the Pressure Tendency Value (FTV)
- Press and hole the [lateral] button to change the circle.
from Barumaker Audio to Barumaker Sailing Display. Tra
high best of I will San Francisco. Press and Jansen
button to select the next call for adjustment when the
previous nipont hua benn
After you set the value, press the [adjust] button to exit
the coding sequence. If no any key operation in the
coming display for about 3 minutes, the return in the parameter Move automatically
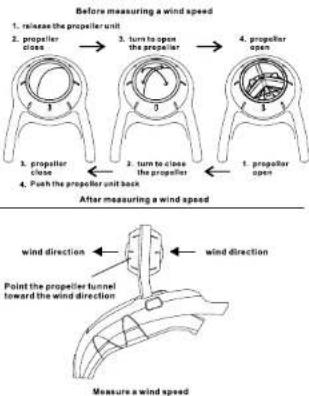
10.0 Wind Speed Mode - Before Measuring a Wind Speed
flowchart
graph TD
    A["1. release the propeller unit"] --> B["2. propeller close"]
    B --> C["3. turn to open the propeller"]
    C --> D["4. propeller open"]
    D --> E["5. turn to close the propeller"]
    E --> F["6. push the propeller unit back"]
    F --> G["After measuring a wind speed"]
    G --> H["Wind direction left"]
    H --> I["Point the propeller tunnel toward the wind direction"]
    I --> J["Measure a wind speed"]
How WindMaster Measures Wind Speed
Windknaker features a propeller that is similar to an aerodynamic. When the propellers facing the wind, it becomes at a rate but is closed properties in the yard usual.
Before Measuring a Wind Speed
- Press the both Propeller Release Buttons together to
- Turn the ballerace proper by your thanks and none. I get to the computer clakes are entirely opened to suit pumers, and is not sheltered by the case.
To Measure Wind Speed
- Select Wind Speed Mode
-Point: The property's barrel direct below the wall
Make sure that the propeller blades are free to rotate.
- Whenever the wind pass through the propeller, the blocks remain.
The WindMaster starts to measure and shows the average wind speed or wind chill factor, maximum one camera, wind speed.
After Measuring a Wind Speed
- /mbar/501 speed measurement close the
- Push the proper arc back to its normal position until a 'click' sound.
10.1 Wind Speed Mode - Wind Chill Display & Average Speed Display

Wind Speed Mode
- Wind Speed Modulator: 100 mm subsamples: Wind Cell Factor Display and Average Wind Speed Display.
- Press [star/stop] button to switch between the Wind Ctrl Factor Display and Average Wind Speed Display.
Average Wind Speed Display
- When the average wind speed display is being selected, the average wind speed will be displayed on the top left corner of the display. The maximum wind speed displays on the top-right corner of the display. The current wind speed displays on the bottom row of the display.
- This has continued on the rail side of the damping indicators. The current wind speed in Baueberi, Slovakia
Wind Chill Display
When Wind Chill Display is being selected, the wind chill factor will be displayed on the top left corner of the display. The maximum wind sound displays on the top right corner of the display. The current wind sound displays on the bottom row of the display.
- The bar indicators on the both sides of the display indicate the normal wind speed in Rated Eats
IMPORTANT: If the water receives to get an accurate needling of air temperature as well as wind chill heater, the water must be taken off the watch from the wire for 20 to 30 minutes before the actual measurement. It allows no body temperature effect on the watch.
To Reset the Maximum Wind Speed
- Press and held the [Adjust] button for 2 seconds to meet. In maximum and speed, when the maximum wind speed is displaying
10.2 Wind Speed Mode - Wind Chill Factor & Beaufort Scale
| Resort number | m/s | MPR | Interactional Description | Observed conditions |
| 0 | 4-1 | <1 | Calm | Calm, smoke rises vertically. |
| 1 | 1-3 | 1-3 | Light air | Direction of smoke shown by smoke (with dust for by wind erosion). |
| 2 | 2-6-7 | 4-7 | Light breeze | Waves before air, leaves flare-like, valves moved by air. |
| 3 | 4-9-12 | Garden breeze | Leaves and small bags in constant motion, with air and exhaust light fire. | |
| 4 | 7-12-18 | Moderate | Rates duct, loose paper, small branches moved | |
| 5 | 10-18-24 | Frost | Stress in the air, being fast to away, created wetlands form or indoor waters. | |
| 6 | 12-25-31 | Strong | Large branches in motion, whistling board, in contact with air, wetlands used with a flight. | |
| 7 | 15-32-38 | Near gear | Whole trees in motion, resilience fell walking against air. | |
| 8 | 18-38-48 | Gare | Breaks height off trees, impades walking. | |
| 9 | 20-47-54 | Strong gear | Slight structural damage occurs | |
| 10 | 20-55-63 | Storm | Trees posted, considerable damage. | |
| 11 | 30-84-72 | Violent storm | Wheepened damage. | |
| 12 | ≥83- | >73 | Hurricane |
Beaufort Scale

Unit Selection Sequence
What is Wind Chill Factor
The wind chill factor is a temperature factor that combines the temperature and wind blowing effects. As blowing wind makes you feel as though the temperature is bottom than the actual one.
-For radar, if it is 10 degree Celsius and the wind lines at 10 miles an hour, people feel as if the temperature is minus 9 degree Celsius at no wind condition. In this case, the wind chill factor is minus 9 degree Celsius.
What is Beaufort Scale
- Baruket Stock is the longest and most widely used at a criterion to describe the mind.
Beaufort Goal is a standard that describes wind conditions and its effects on land as well as sea. Because Scale standardizes the wind speed into 15 categories, from 0 (cath) to 12 (hurricane).
- Check the 'Beaufort Sosie' table for detail
To Switch among Units
- The WindMaster displays wind speed in Kmin (diameter per cent), mph (m/s per hour), knots, m/s (meter per second) and fps (feet per second) unit
- Please use a role [start step] balloon is change the unit, as in the unit selection sequence. For instance the balloon can desire and was displayed.
Wind Speed Mode Auto Return
-in Wind Speed Move, if there is no way operation for 30 minutes and the current wind speed is zero, the WindMaster will return to Real Time Move.
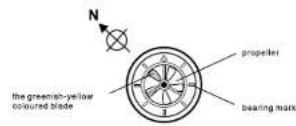
11.0 Mechanical Compass - Use the Propeller as a Mechanical Compass
Use the Propeller as a Mechanical Compass
Use the Propeller as a Mechanical Compass
- Year WINGMA SILK measures temperature, pressure altitude, wind speed, the WindMaster tells compass directions as well.
- One of the propeller blades was colored to indicate the north pole.
Light bearing marks. North, North-East, East, South-East, South-West, West, and North-west) were improved on the propeller unit as reference points.
To use the Mechanical Compass
-To check bearing, make sure the propeller is opened and the propeller unit is it's normal passion.
- Til your Wind Meter until the propeller blades are parallel to horizons. The propeller blades should be free to rotate.
- Minimize the air current pass through the propeller tunnel
The greenish yellow coloured blade of the propeller indicates the direction of north pole.
- Make use of the hearing marks on the proper unit to check out other druggins.
12.0 Accessories - Accessories and its Use


Асехахопия
Your box contains a rock cord and a plastic clipper. These instances are included for the user to wearing the WindMaxler on their neck or line likewise
Your box also contains two soft nylon clothes. One is a nylon pouch which you can knock your WindMaster and its accessories while travelling. Another one is a myen cover which you can cover your WindMaster while taking part in activities like mounting biling. This cover keeps your WindMaster away from dust and dirt.
- Your organization was passed to reach the paper cover. Let up that move by passing the paper that printed with a 'PRESS' or the slides of the cover.
To Detach Wrist Strap from the WindMaster
- Cut such the upper and bottom wire lengths from the WindMaster by using a small screw driver.
- Insert the tip of the screw driver into the notch of the using bar.
Press the coming bar towards to centre, then lightly lit. In what alone, the word alone will be done from the back.
How to Attach the Plastic Clipper to WindMaster
- Barmore the spring bars from the west-stinger and iron these two spring bars back into the plan to clipper's scoring bar holder
- Price for public: cheaper or the back of the WindBoxer as a custom
Insert the tip of the screw driver into the notch of the starting bar
- Press in a spring bar towards the center, then lightly lower the plastic slippers until it edges into the box
13.0 Battery Low Detection

Low Battery Detection
- When a battery box indicator appears on the display, it means that the capacity of the battery is low. It is recommended to replace a new battery (OR 2032).
- Complete the battery replacement by a certified service agency, because this WindMaster contains precise electronic services and components
- However, if the temperature of battery is greater is caused by an extremely low temperature, the indicator will be disappeared when normal temperature returns.
14.0 Specifications
Real Time Mode
Hour, minute, second, am, pm, month, day, day of week or hour one in the next week is lengthy to play. [5th Oct 1st] between day of week]
Tun Sealau
12-hour or 24-hour format
Calendar System
- Auto-Center the 2010 program meal from that year 1937 in 2048
Alarm Mode
-2 daily alarms
- Hardy crati
Alarm Sounds
- Sounds for 30 seconds at preset time of real time clock
Chronograph Mode
- 14100 second resolution
Range
23 hours 50 minutes 59.00 seconds
Measuring Mode
10 lap memories
- Recall up memories and total time
Timer Mode
- 1 second resolution
Count Down Timer
Quick set function (3, 5, 10, 15 and 45 minutes)
- One use define door up to 23 hours 69 minutes 68
2013.12.15
Operation Tools
Cord Com
Timer Sounds
Sounds for 2 seconds when count to zero
Yacht Racing Times
Programmable from 0 to 38 minutes
Step 2
Programmable from 0 to 88 minutes
She
Programmable from 0 to 68 minutes
Operation Mode
Court down
Tiger Sounds
- Step 1: Two bceps per second for 2 seconds when count
to are
14.0 Specifications
- Sep 2: Prom interp per second or 2 sec rdx a##
13.36.15 20%
-Step 3: Four beeps per second for 15 seconds when
column to 28°C
- (It current step is the last one, the inner rounds same as
[Unreadable]
Altimeter Moda
-1m or 3.25ft resolution
Bange
• William to H&M or ZHIWI in 2018, June 29
- 10:31 5th number and lim
Altitude Reference Setting
Cm to 2600m x Cm to 2900m
Sampling interval
- First 2 minutes. 1 reused
After 3 minutes: 1 minute
Barometer Mode
0.1 HParmosr ur 0.01 inHg resolution
Range
- 300.0 hPalmbar to 1100.0 hPalmbar or 0.04 inHg to 32.44
Pressure Tendency Setting
0.01 "Pamber neckto"
• ICS bPaimpar to NH NH bPaimbar
Sampling Interval
First 2 min (vs. 1 aword)
Mitar 5 mleuiras 4 mleuto
Thermometer
0.1 °C or 0.18 °F resolution
Range
- -10.0 °C in 89.9 °C or 14.0 °C to 240.0 °C
Sampling Interval
First 2 minutes: 1 second
After 3 minutes: 1 minute
14.0 Specifications
Wind Speed Mode
- 0.1 Km/h resolution
Range
- 0.0 Km/h to 200.0 Km/h
Selectable units
- -30.0 °C to + 80.0 °C or -22.0 °F to +176.0 °F
Back light
- Electro-Luminescent (EL) back light
Battery
- Single 3V lithium battery (CR2032)
Battery Life
- Approximately 1.5 years under the following conditions
30 seconds alarm operation per day
5 seconds EL back light operation per day
3 minutes sensor mode operation per day
Battery Low Detection
- Battery voltage less than 2.2V +/- 0.2V
- "Recreational Gear For The Great Outdoors"
- Introduction
- The WindMaster Parts and Its Functions
- Change from Mode to Mode
- Real Time Mode - Date/Time Display & Pressure Tendency /Time Display
- Real Time Mode Sub-display
- Data' Time Display
- Pressure Tendency! Time Display
- Alarm Time Mode - Alarm Time 1 & 2 Display, & Setting the Chime/Alarm On/Off
- Alarm Time Mock
- Real Time Mode - Setting the Time and Date
- To Set the Time and Date
- The Setting Procedures
- Alarm Time Mode - Setting the Alarm Time 1 and 2
- To Set The Alarm Time 1
- Chronograph Mode - Start/Stop the Chronograph
- Chronograph Mode
- To Start/Stop the Chronograph
- To Reset the Chronograph
- Timer Mode - Timer 1 and Timer 2 Display (Yacht Racing Timer)
- Timer Mode
- To set the Timer 1
- Chronograph Mode - Record/Recall a Lap Time
- To Record Lap Time
- To Recall Lap-Time
- To Reset Lap-Time
- Timer Mode - Setting the Timer 1
- To Set the User Pre-set Value
- The setting procedure
- Altimeter Mode - Calibrate the Altimeter
- Barometer Mode - Pressure Tendency/Baro Display
- Altimeter Mode - Measure Relative Altitude
- Barometer Mode - Temp/Baro Display
- Wind Speed Mode - Before Measuring a Wind Speed
- Wind Speed Mode - Wind Chill Display & Average Speed Display
- Wind Speed Mode - Wind Chill Factor & Beaufort Scale
- Mechanical Compass - Use the Propeller as a Mechanical Compass
- Accessories - Accessories and its Use
- Асехахопия
- Battery Low Detection
- Low Battery Detection
- Specifications
- Real Time Mode
- Tun Sealau
- Alarm Mode
- Range
- Measuring Mode
- Count Down Timer
- 2013.12.15
- Timer Sounds
- Yacht Racing Times
- Operation Mode
- Tiger Sounds
- [Unreadable]
- Altimeter Moda
- Bange
- Sampling interval
- Barometer Mode
- Pressure Tendency Setting
- Thermometer
- Wind Speed Mode
- Selectable units
- Back light
- Battery
- Battery Life
- Battery Low Detection
Brand : Pyle
Model : PSWWM90
Category : Sports Watch