
EIP 60 - Cooker EICO - Free user manual and instructions
Find the device manual for free EIP 60 EICO in PDF.


| Product Type | Freestanding Cooker |
| Brand | EICO |
| Model | EIP 60 |
| Energy Type | Electric |
| Hob Type | Ceramic Glass with 4 Cooking Zones |
| Oven Type | Electric Fan Oven |
| Oven Capacity | 71 Liters |
| Dimensions (W x D x H) | 60 cm x 60 cm x 85 cm |
| Weight | 52 kg |
| Power Supply | 220-240 V, 50/60 Hz |
| Total Power Consumption | 10.5 kW |
| Oven Functions | Convection, Grill, Defrost, Warm, Top/Bottom Heat |
| Hob Controls | Touch Controls with Residual Heat Indicator |
| Timer | Digital Timer with Automatic Switch-Off |
| Safety Features | Child Lock, Automatic Shut-Off, Overheat Protection |
| Cleaning & Maintenance | Easy-Clean Enamel Interior, Removable Oven Door |
| Energy Efficiency Class | A+ |
| Spare Parts Availability | Original EICO Parts Available Online |
| Included Accessories | Oven Grill, Baking Tray, Wire Shelf |
Frequently Asked Questions - EIP 60 EICO
User questions about EIP 60 EICO
0 question about this device. Answer the ones you know or ask your own.
Ask a new question about this device
Download the instructions for your Cooker in PDF format for free! Find your manual EIP 60 - EICO and take your electronic device back in hand. On this page are published all the documents necessary for the use of your device. EIP 60 by EICO.
USER MANUAL EIP 60 EICO
natural_image
Pure black background with faint white curved lines and a small red dot at the bottom center (no text or symbols)EIP 60
CE
Fig.1





natural_image
Isometric illustration of a four-circled stove with a hand holding a tool, labeled Fig.10 (no text or symbols on the diagram itself)![F B — ○ [0.] D — - + C ○ [0.] B E EA B I Fig.9](/content/2026/05/1007800/images/e933bad9b29a58d395fe5872fb01c33ad1af9b6cafbd73a788ac20d858ab6179.jpg)
Dansk
DK
General information
Carefully read the contents of this leaflet since it provides important instructions regarding safety of installation, use and maintenance. Keep the leaflet for possible future consultation. All the operations relating to installation (electrical connections) must be carried out by specialised personnel in accordance with current regulations.
SAFETY INSTRUCTIONS
This apparatus is not suitable for use by children or people who need supervision.
For safety reasons, never place large ferromagnetic objects (e.g. oven plates for cakes) on the cooking zone of the fibreglass top. People carrying pacemakers are advised to consult a doctor before using the induction cooking zones.
Metal objects such as knives, forks, spoons or covers must not be placed on the surface of the cooking top because they can become heated.
IMPORTANT:
After use, switch the cooking top off with the command device.
IMPORTANT:
- Avoid spilling liquid, therefore to boil or heat liquids, reduce the heat.
- Please ensure when the appliance is turned on, that there are no empty pots left on top.
- When you have finished cooking, switch off the relevant heating element with the command indicated below.
WARNING
If the surface of the hob is cracked, turn off the appliance and disconnect from the electrical main in order to avoid any possible electric shocks.
INSTALLATION INSTRUCTIONS
These instructions are for a specialized installer and are a guide for the installation process, regulations and maintenance in accordance with the law and current standards.
If the built-in oven or any other appliances that produce heat, need to be installed directly underneath the cooking hobs in ceramic glass, IT IS NECESSARY THAT THE APPLIANCE (oven) AND THE COOKING HOBS IN CERAMIC GLASS ARE ADEQUATELY ISOLATED, in such a way that the heat generated from the oven, measured on the right hand side of the bottom of the cooking hobs, does not exceed 60°C.
Failure to follow this precaution, could cause a malfunction in the TOUCH CONTROL system.
POSITIONING
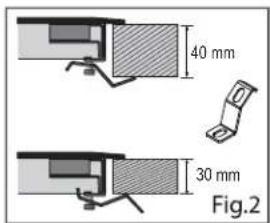
The domestic appliance was built in order to be encased on a work surface, the way it is illustrated in the graph (Fig.1). Predispose sealing material (Fig.4) along the whole perimeter (for dimensions of the cut see Fig.1). Lock the domestic appliance into place with 4 supporters, keeping in mind the width of the surface (Fig.2). If the lower part of the appliance after installation, is accessible via the lower part of the furniture, it is necessary to mount a separating panel keeping in mind the distances indicated (Fig.3).
• VENTILATION (Fig.5)
the distance between the cooktop and built-in kitchen's furnitures or cooking apparatuses must guarantee sufficient ventilation of the air. Not to use the cooktop if in the oven is in course the pyrolysis process.
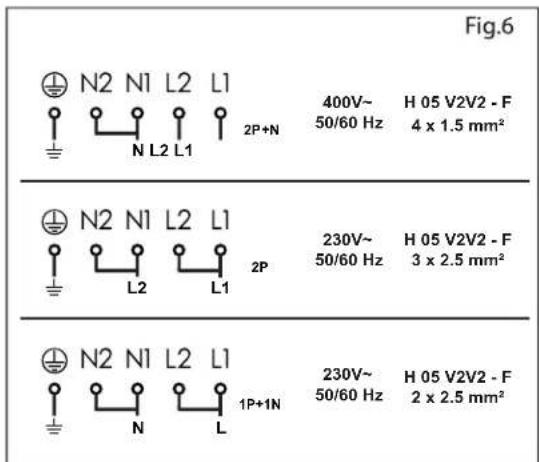
• ELECTRICAL CONNECTIONS Fig.6)
Before making the electrical connections, check that:
- the system ratings meet the ratings indicated on the identification plate fixed on the lower part of the worktop;
- the system is fitted with efficient ground wires in accordance with the laws and current standards.
Grounding is mandatory by law. If the domestic appliance is not supplied with a cable and/or suitable plug, use material suitable for the absorption value indicated on the identification plate and the operating temperature. If wishing to make a direct connection to the mains, an omnipolar switch must be installed with a minimum 3 mm opening between the contacts and appropriate for the load indicated on the plate and in accordance with current standards (the yellow/green ground conductor must not be disconnected by a switch). When the appliance has been installed, the omnipolar switch must be easily reachable.
USE
The fundamental characteristic of the induction system is the direct transference of heat from the generator to the cooking recipient.
Advantages:
- The transference of power takes place only when the recipient is placed on the cooking zone.
- The heat is generated only at the base of the recipient and transferred directly to the food to be cooked.
- Reduced heating time and low consumption of power during the beginning of cooking, allowing a global saving of power.
- The fibreglass top remains cold, the heat felt on the cooking top is that reflected from the base of the recipient.
COOKING RECIPIENTS
The use of appropriate recipients is an essential factor for induction cooking. Check that your pots are suitable for the induction system.
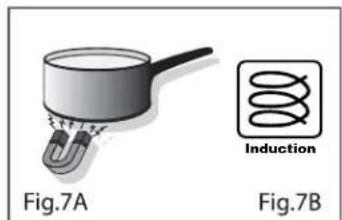
The recipients must contain iron. You can check whether the material of the pot is magnetic with a simple magnet (Fig.7A) or symbol below pot (Fig.7B).
We advise recipients having a flat base (Fig.8A).
This way you can use the power optimally.
Do not use recipients with a rough base to avoid scratching the thermal surface of the top.
A very important factor in induction cooking is the dimension of the pot compared to the plate used (Fig.8B). The cooking zones allow the use of recipients with bases of various diameters. It is, however, preferable to use the appropriate cooking zone for the dimension of the pot.
SWITCHING THE COOKING TOP ON
- Connect the stovetops to the mains

A. - On / Off
B. - Cooking zone
C. - “+”
D. - "-"
E. - Cooking zone display
• SWITCHING THE COOKING TOP ON
Press key to switch the top on.
All the displays relative to the cooking zones switch on in the standby position.
The control unit remains active for 20 seconds.
If no cooking zone is selected within this time, the cooking top switches off automatically
• SELECTING THE COOKING ZONE
To select the required cooking zone, you have to press of B keys.
To increase / decrease the power of the cooking zone selected the key - (C) D)+The power can be set from 0 to 9.
• QUICK / BOOSTER HEATING
This function further reduces cooking time in a given area taking the temperature to the maximum power for a 10 minute interval. At the end of this interval, the cooking area power automatically returns to level 9.
The use of this function is indicated for the short time heating of large quantities of liquid (eg water for cooking pasta) or dishes. While adjusting power level of the selected cooking zone after level 9 you get into the mode indicated by BOOSTER
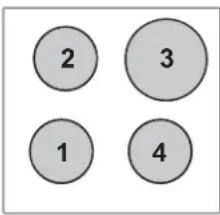
The function is available only in cooking zones upper right and lower left.
• TIMER USE
After selecting the cooking zone, press simultaneously the keys C and D, the displays will show □ □.
Press the keys C or D to increase or decreasing the time (in minutes: 00 min. 99 min.), That procedure shall be activated for each cooking zone.
• RESIDUAL HEAT
If the temperature of the cooking zone is still high (over 50°) after it has been switched off, the relative display will indicate the symbol (residual heat). The symbol will only switch off when the burn risk in no longer present.
- POT DETECTION
If the symbol 📋 should appear on one of the cooking area
displays, it means that:
1) The recipient being used is not suitable for induction cooking.
2) The diameter of the recipient used is inferior to that allowed by the appliance.
3) No recipient is present.
| COOKING ZONE DIAMETER | MINIMUM PAN DIAMETER |
| 160 mm | 130mm |
| 200 mm | 145mm |
• EGG TIMER / REMINDER
Is it possible to set a reminder tone.
Press simultaneously the keys C and D, to set a time for the reminder from 1 to 99 minutes using C or D keys. When the time set will sound an audible alarm that can be turned off by pressing any of the commands. The cooking areas on previously will remain active. The EGG TIMER function remains active even after the unit is turned off. To disable this function, you must state ☐ ☐ the timer display with D key.
• SWITCHING THE COOKING AREA OFF
To switch off a cooking zone, select the zone, press simultaneously the keys C e D or press D key until the display show □.
• SWITCHING THE COOKING TOP OFF
To turn off the cooking top entirely hold down the Key.
• CHILD LOCK
It is possible to block the controls to prevent the risk of unintentional modification of the settings (children, cleaning etc.). To activate the control panel lock press simultaneously the B key at the lower right and the D key, then press again the B key. The 2 leds will show the symbol [L]. To temporarily release the controls and change the settings (e.g. interrupt cooking), press simultaneously the B key at the lower right and the D key.
The 2 leds will show a flashing [O], then it will be possible to modify the settings. The cooking top can however be switched off even when the controls block is activated. In this case the controls block remains active when the top is switched on again.
To definitely switch the control panel lock off press simultaneously the B key at the lower right and the D key, then press again the
D key. The cooking top switches off. The control panel lock is not active when the top is switched on again.
• SAFETY SWITCH
The appliance has a safety switch that automatically switches off the cooking zones when they have been operating for a certain amount of time at a given power level.
| POWER LEVEL | OPERATING TIME LIMIT (hours) |
| 1 - 2 | 6 |
| 3 - 4 | 5 |
| 5 | 4 |
| 6 - 7 - 8 - 9 | 1,5 |
• MAINTENANCE
Remove any residues of food and drops of grease from the cooking surface by using the special scraper supplied on request (Fig.10).
Clean the heated area as thoroughly as possible using suitable products, and a cloth/paper, then rinse with water and dry with a clean cloth.
Using the special scraper immediately remove any fragments of aluminium and plastic material that have unintentionally melted on the heated cooking area, or residues of sugar or food with a high sugar content.
In this way, any damage to the cooktop surface can be prevented. Under no circumstances should abrasive sponges, or corrosive chemical detergents, such as oven sprays or stain removers, be
used.
WARNING: STEAM CLEANERS MUST NOT BE USED.
TIPS ON SAVING ENERGY
- Use a lid whenever possible to minimise heat loss.
- Select a smaller pan when cooking small quantities.
A smaller pan uses less energy than a larger pan with very little in it.
• Cook with as little water as possible. - Once food has come to the boil or the oil in the pan is hot enough for frying, reduce the heat to a lower setting.
- Use a pressure cooker to reduce cooking times.
DISPOSAL OF OLD ELECTRICAL APPLIANCES
The European Directive 2002/96/EC on Waste Electrical and Electronic Equipment (WEEE), requires that old household electrical appliances must not be disposed of in the normal unsorted municipal waste stream. Old appliances must be collected separately in order to optimise the recovery
and recycling of the materials they contain and reduce the impact on human health and the environment.
The crossed-out dustbin symbol on the product reminds you of your obligation regarding separated waste collection. Consumers should contact their local public service or their local dealer for more information on the correct disposal of exhausted household appliances.
THE MANUFACTURER DECLINES ALL RESPONSIBILITY FOR EVENTUAL DAMAGES CAUSED BY BREAKING THE ABOVE WARNINGS. THE WARRANTY IS NOT VALID IN THE CASE OF DAMAGE CAUSED BY FAILURE TO COMPLY WITH THE ABOVE-MENTIONED WARNINGS.
| Information for household electric hobsIn acc. with regulation (EU) No. 66/2014 | |
| Model name/ identifier | EIP 60 |
| Type of hob built-in | |
| Number of cooking zones and/or areas 6 | |
| Heating technologyInduction cooking zones and cooking areas, radiant cooking zones. | 1. = Induction2. = Induction3. = Induction4. = Induction |
| For circular cooking zones:diameter of useful surface area/mm cooking zoneFor non-circular cooking zones or areas: lenght and width of useful surface area per electric cooking zone or areamm | 1. = ∅ 1602. = ∅ 1603. = ∅ 2004. = ∅ 160 |
| Energy consumption per cooking zone or area calculated per Kg( EC_electric cooking )Wh/Kg | 1. = 168,002. = 160,003. = 177,004. = 160,00 |
| Energy consumption for the hob calculated per kg ( EC_electric cooking )Wh/Kg | 166,25 |
Suomi
FI
YLEISTÄ



- Dansk
- DK
- General information
- SAFETY INSTRUCTIONS
- IMPORTANT:
- WARNING
- INSTALLATION INSTRUCTIONS
- POSITIONING
- • VENTILATION (Fig.5)
- • ELECTRICAL CONNECTIONS Fig.6)
- USE
- Advantages:
- COOKING RECIPIENTS
- SWITCHING THE COOKING TOP ON
- WARNING: STEAM CLEANERS MUST NOT BE USED.
- TIPS ON SAVING ENERGY
- DISPOSAL OF OLD ELECTRICAL APPLIANCES
- Suomi
- FI
- YLEISTÄ
Brand : EICO
Model : EIP 60
Category : Cooker