
NV-SJ407EE - VCR PANASONIC - Free user manual and instructions
Find the device manual for free NV-SJ407EE PANASONIC in PDF.



| Product Type | VHS Video Cassette Player/Recorder |
| Brand | Panasonic |
| Model | NV-SJ407EE |
| Video Head System | 4-head helical scan |
| Recording Format | VHS (NTSC/PAL compatible) |
| Playback Speed | SP (Standard Play), LP (Long Play), EP (Extended Play) |
| Dimensions (W x D x H) | 430 x 280 x 95 mm |
| Weight | 3.5 kg |
| Power Supply | AC 220-240V, 50/60 Hz |
| Power Consumption | 20 W (typical) |
| Connections | SCART (RGB), RF Out, Audio/Video RCA, S-Video Out |
| Timer Recording | Up to 8 programs, 1 year ahead |
| Special Features | Auto Tracking, Digital Auto Tracking, Still Frame, Slow Motion, Index Search |
| Remote Control | Infrared remote control included |
| Head Cleaning | Automatic head cleaning system |
| Safety | Auto power-off, child lock |
| Operating Temperature | 5°C to 40°C |
| Supported Tape Length | Up to 180 minutes (E-180) |
| Included Accessories | RF cable, SCART adapter, remote control, batteries |
| Spare Parts Availability | Belts, idler tires, heads available from service centers |
Frequently Asked Questions - NV-SJ407EE PANASONIC
User questions about NV-SJ407EE PANASONIC
0 question about this device. Answer the ones you know or ask your own.
Ask a new question about this device
Download the instructions for your VCR in PDF format for free! Find your manual NV-SJ407EE - PANASONIC and take your electronic device back in hand. On this page are published all the documents necessary for the use of your device. NV-SJ407EE by PANASONIC.
USER MANUAL NV-SJ407EE PANASONIC
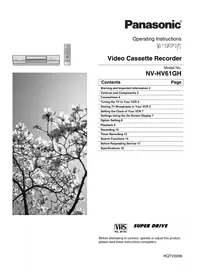
Video Cassette Recorder
NV-SJ407EE

SUPER DRIVE MULTI-INTELLIGENT CONTROL II
Dear Customer
May we take this opportunity to thank you for purchasing this Panasonic Video Cassette Recorder.
We would particularly advise that you carefully study the Operating Instructions before attempting to operate the unit and that you note the listed precautions.
Plug in Auto Tuning
All broadcasting stations that can be received in the area are automatically tuned and stored in memory.
- Do not turn off the VCR halfway. (See page 10.)
![graph LR A["On Screen Display"] --> B["CH1 SEARCH 21 END:MENU"] B --> C["Plug in Auto Tuning is completed."]](/content/2026/05/1006372/images/148d70a4886fe10019a44042e78416ffacf5b9db44b1c846c3005ae7952c37c6.jpg)
Positions of Controls and Components
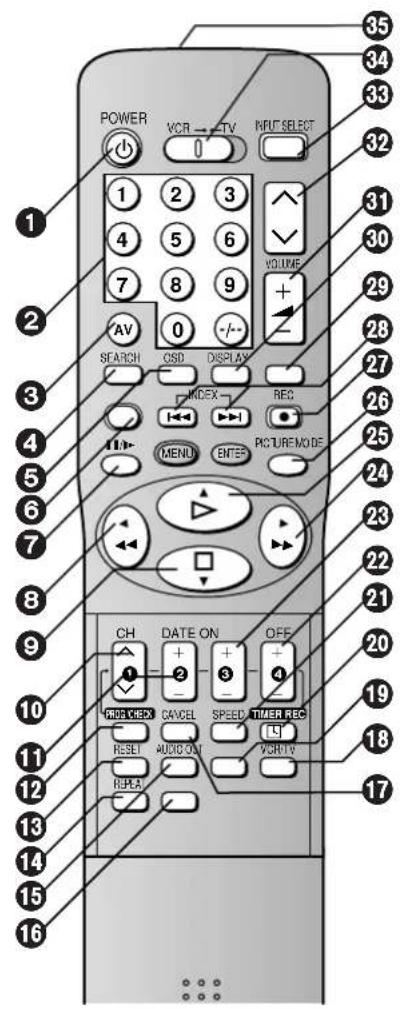
Keep this page open as you read through the Operating Instructions. Refer to it for the control and component names and numbers which appear in the text.

As this equipment gets hot during use, operate it in a well ventilated place; do not install this equipment in a confined space such as a book case or similar unit.
IMPORTANT
Your attention is drawn to the fact that the recording of pre-recorded tapes or discs or other published or broadcast material may infringe copyright laws.
WARNING
TO REDUCE THE RISK OF FIRE OR SHOCK HAZARD, DO NOT EXPOSE THIS EQUIPMENT TO RAIN OR MOISTURE.
FOR YOUR SAFETY
DO NOT REMOVE OUTER COVER.
To prevent electric shock, do not remove cover. There are no user serviceable parts inside. Refer all servicing to qualified service personnel.
Remarks
- This VCR is also capable of receiving SECAM type broadcasting programmes (SECAM B/G) and recording/playing back its colour television signals.
- When a cassette which has been recorded on this VCR is played back on a SECAM VCR, the picture may be reproduced in black and white. When it is played back on a PAL VCR without SECAM capability, the picture may be not reproduced in normal colour.
- When cassette recorded on a SECAM VCR or SECAM pre-recorded cassettes are played back on this VCR, the picture is reproduced in black and white.
- This VCR is not designed for use in France, where a SECAM VCR should be used instead.
Press the POWER button 1 to switch the VCR from on to standby mode or vice versa. In the standby mode, the VCR is still connected to the mains.
Before Use
Positions of Controls and Components .... 3 Introduction to Controls and Components .... 5 Preparing the Remote Control.... 6
Setting Up
Setting the Remote Control to Operate Your TV....7 Connections....8 Tuning the TV to Your VCR....9 Storing TV Broadcasts in Your VCR....10 Language Setting of the On Screen Display....14 Setting the Clock of Your VCR....14 Settings Using the On Screen Display....15 • Option Setting....16 Setting the System....18
Basic Operations
Playback ....19 Manual Recording ....21 • To Select the Recording Duration and Perform Timer Recording (OTR Recording) ....22
Advanced Operations
Timer Recording 23 ●4-Key Programming .....23 Search Functions.... 26 - Searching Timer-Recorded Programmes (Programme List Search) ......26 ●To Find the Beginning of Each Recording (VHS Index Search System) 27 - Searching while Checking the Video Cassette Contents (Intro-Jet Scan) ......27 Editing 28 ●Assembly Editing 28 ●Audio Dubbing 29
Helpful Hints
Before Requesting Service ....30 • Adjusting the Playback Picture ....31 Usage Precautions....32 Specifications....33

Introduction to Controls and Components
VCR Operation
When you want to operate the VCR, set the VCR/TV switch
34 to "VCR".
② Numeric buttons
To select the programme positions (1–99) of the VCR.
Example:


To enter numbers for various settings.
⑥ No function
⑬ RESET button
To reset the tape counter (elapsed time) to "0:00.00".
- The tape counter is automatically reset to "0:00.00" when a video cassette is inserted.
15 AUDIO OUT button
This button does not operate on this VCR.
16 No function
⑱ VCR/TV button
This button does not operate on this VCR.
19 No function
29 No function
35 Infra-red transmitter
⑲ Child Lock Function buttons
(Convenient function to prevent unauthorized use)
This function deactivates all buttons on the VCR and the remote control. Use this function, when you do not want other people to operate the VCR.
To Activate the Child Lock Function:
1 Hold down the ENTER and the OFF (+) buttons 39 simultaneously until the "×" hold" indication appears in the VCR display.
- If you press a button while the Child Lock function is on, the “▷◀ hold” indication appears in the VCR display to inform you that no operation is possible.

Indication when the Child Lock function is activated
To Cancel the Child Lock Function:
1 Hold down the ENTER and the OFF (+) buttons 39 simultaneously until the "×" hold" indication disappears.
40 Cassette compartment
47 Infra-red Remote Control Receiver window
48 CVC (Crystal View Control) Indicator
The crystal view control function ensures that you always obtain the optimum picture quality so that you get the best picture automatically.
While the VCR is turned on, the CVC indication 48 is always displayed to show that the Crystal View Control is activated.
49 VCR display
Inserting Remote Control Batteries

If the Sliding Cover of the Remote Control Becomes Detached
If the sliding cover of the remote control becomes detached accidentally, fit it securely in place by placing it on the top of the remote control at the position shown in the illustration below, and pushing it down until it clicks into position.
- It is not possible to fit the sliding cover in place by pushing or sliding it on from the bottom end of the remote control.

Notes for Battery Replacement:
- The service life of the batteries is approximately 1 year. However, it varies considerably depending on the frequency of use.
- When they are exhausted, replace them with two AA, UM3, or R6 size batteries.
- When the batteries are exhausted, remove them immediately and dispose of them correctly.
- Make sure that the batteries are inserted with the polarity (⊕ and ⊖) correctly aligned.
- Do not mix old battery with new battery.
- Do not mix different battery types, i.e. Alkaline and Manganese.
- Do not use rechargeable (Ni-Cd) batteries.
- Do not heat or short-circuit the batteries.
- When you do not use the remote control for a long time, take out the batteries and store them in a cool, dry place.
TV Operation
The explanations below show you what functions individual buttons have when the VCR/TV switch 34 is set to "TV".
① POWER button
To switch the TV on from standby mode (OFF) or vice versa.
On some TVs it is only possible to switch the TV to standby mode (OFF) with this button, but not on. In this case, try to turn the TV on with one of the following buttons:
Numeric buttons ②
AV button ③
Channel button 32
② Numeric buttons
To select the programme positions (1–99) on the TV.
③ AV button
To select the desired AV input on the TV.
③1 VOLUME button
To adjust the volume of the TV.
③2 Channel button
To select the desired programme position (TV station) on the TV.
You can operate the TVs of the manufacturers listed below with the remote control after setting it.
This setting procedure allows you to operate the TVs of some manufacturers using the supplied remote control.
Preparation
- Set the VCR/TV switch 34 to "TV".
Operations
1 Find the manufacturer number of your TV while referring to the following table.
2 While holding down the POWER button ①, use the Numeric buttons ② to enter the manufacturer number. This completes the settings for the TV manufacturer.
- Be sure to enter the number in two digits.
Example: 1 → 01
3 To confirm the correct settings were made, check whether the TV can be operated properly.
- When a manufacturer has multiple numbers in the following table, try entering other numbers if the TV operations cannot be performed properly, and then select the optimal number.
Notes:
- If you are using a Panasonic TV, this setting has already been made, and so you do not need to perform the above setting procedure. However, this remote control may not work with some Panasonic TVs.
- Some TV models cannot be operated using this remote control (including all TVs non-remote compatible).
01 Panasonic/National
02 Panasonic/National
03 Panasonic/National
04 Panasonic/National
05 SONY
06 TOSHIBA
07 JVC
08 HITACHI
09 MITSUBISHI
10 MITSUBISHI
11 SHARP
12 PHILIPS, SAMSUNG
13 NEC
14 SANYO
15 GOLDSTAR/LG
16 GOLDSTAR/LG
17 SAMSUNG
18 SAMSUNG
19 SANYO
This section shows you how to connect the VCR to an aerial, TV, etc.
When the VCR is turned on after unpacking and connecting the aerial cable and the mains lead, Plug in Auto Tuning starts automatically.
Basic Connections
The following connections are required to record and play back the video cassette through the TV.

Important Information
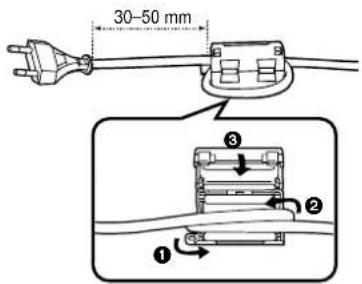
In order to prevent electromagnetic interference from the power supply, install the accessory clamp filter on the AC Mains Lead as shown in the figure on the right.
- After passing the AC Mains Lead through the clamp filter and looping it around once, close the clamp filter until it clicks into place.
Connection to a TV using the 21-Pin Scart Socket
Set the RF output channel of the VCR to “—” (RF OFF) when the VCR is connected to the TV via the 21-Pin Scart cable. (See page 9.)
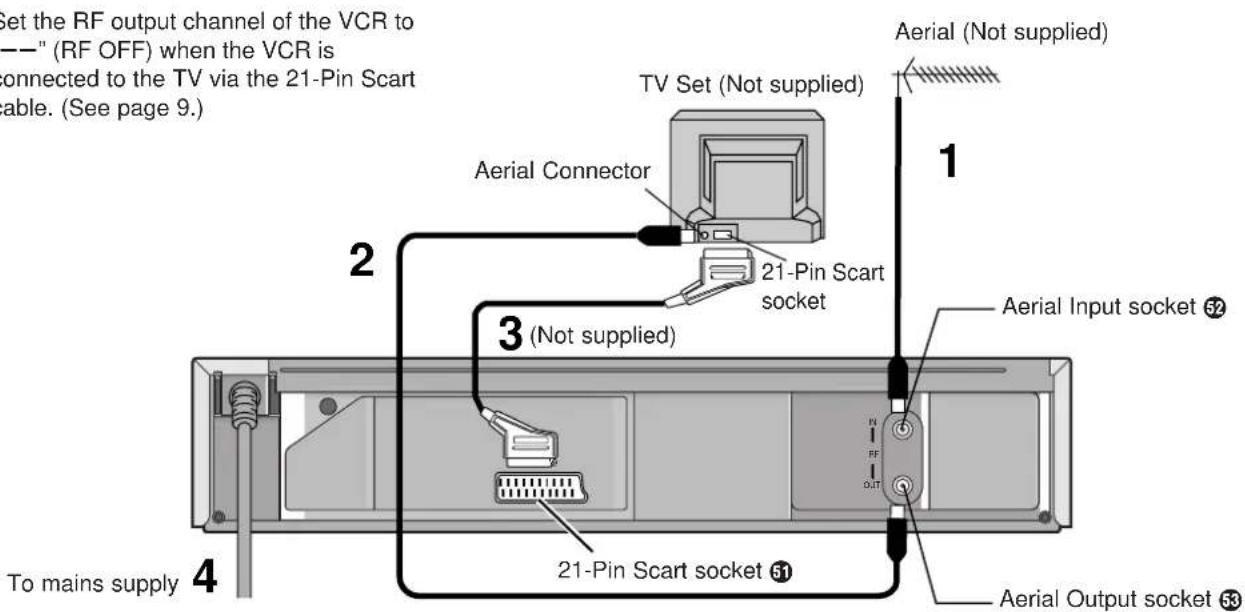
The VCR supplies a signal to the TV via the RF coaxial cable on channel E21–E69.
It is possible to view the video picture on your TV in the same way that you watch TV broadcasts.
If you have connected the VCR to the TV through the 21-Pin Scart socket, then you do not need to follow the procedure below.
When the VCR is turned on after unpacking and connecting the aerial cable and the mains lead, Plug in Auto Tuning starts automatically.
Notes:
- If the VCR is turned on with the aerial not connected, all channels are skipped. Therefore, firmly connect the aerial and then turn the VCR off and on again to execute Auto Tuning.
- When Auto Tuning is cancelled halfway, Auto Tuning is not executed even if the VCR is turned off and then turned on again. In this case, see page 10 "To Restart Plug in Auto Tuning".
Operations
1 Turn on the TV and the VCR.
2 Set the TV to an unused position which you wish to use for your video playback.
- Tune the TV until the display shown below appears on the screen. (Please refer to the TV manufacturer's operating instructions regarding tuning.)
- Set "RF SELECT" by pressing the Cursor buttons (◀▶) 38 to select the colour TV system used by the TV set to be connected.
BG: PAL B.G.H/SECAM B.G
I: PAL I
DK: PAL D/SECAM D.K.K1
On Screen Display
During Plug in Auto Tuning After Plug in Auto Tuning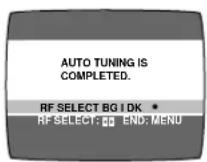
3 Press the MENU button 38.
To Change the RF output Channel
In some rare cases after tuning the TV to your VCR, interference may be visible on the picture. To get rid of this interference, you can manually adjust the RF output channel a few channels up and down from the current setting. The procedure is described below.
Operations
1 Hold down the MENU button 38 for 5 seconds or more.
- The VCR display changes as shown below and the VCR picture on the TV displays this pattern.

2 Enter the desired channel number (E21–E69) by the Channel button 32.
- Ensure that the VCR/TV switch 34 is set to "VCR".
(RF OFF)
- Set the RF output channel of the VCR to “—” (RF OFF) when the VCR is connected to the TV via the 21-Pin Scart cable.
Press the Channel button 32 to display “—”.
- It is also possible to select by pressing the Numeric buttons ②.
Example:
28:

3 Press the MENU button 38 to finish the setting mode.
4 Retune your TV to the new RF channel for the VCR.
Note:
- Even if the RF output channel has been changed, it is not necessary to perform Auto Tuning.
The VCR is fitted with its own tuner (just like a normal TV) and can be preset to receive up to 99 TV broadcast stations.
Plug in Auto Tuning
When the VCR is turned on after connecting the aerial cable and the mains lead, Auto Tuning starts.

Auto tuning searches for TV stations from VHF minimum to UHF maximum and memorizes every tuned programme position.
- If you turn the VCR off during Auto Tuning, Auto Tuning will stop halfway.
- If the VCR starts playback during Auto Tuning, Auto Tuning will stop halfway.
To Cancel Auto Tuning Mid-Operation:
Press the MENU button 38 during Auto Tuning. Auto Tuning is cancelled.
To Restart Plug in Auto Tuning:
1 Press the EJECT button 41 and remove the video cassette.
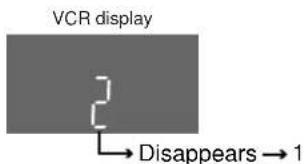
2 Keep the Channel buttons Ⓜ on the VCR pressed simultaneously for 3 seconds or more during the VCR on. • The channel displayed on the VCR display disappears for a moment then changes to 1.
3 Disconnect the mains lead and then reconnect it.
4 Turn off the VCR and then turn it on.
• Auto Tuning commences.
If Auto Tuning stops halfway by turning the VCR off, playback or a power failure:
1 Disconnect the mains lead and then reconnect it.
2 Turn off the VCR and then turn it on.
• Auto Tuning commences.
Auto Tuning Using the On Screen Display
Introduction
The VCR is tuned automatically by Plug in Auto Tuning. However, Auto Tuning using the On Screen Display should be performed according to the following method if necessary.
Preparations
- Confirm that the TV is on and the VCR viewing channel is selected.
- Turn on the VCR and select any programme position except A1 or A2.
Operations
1 Press the MENU button 38 to display the Main menu on the TV screen.

2 Press the Cursor buttons ( ▲▼) 36 to select "TUNER PRESET" then press ENTER button 37.

3 Press the Cursor buttons ( ▲▼) 36 to select "AUTO TUNE" then press the Cursor buttons (◀▶) 36 to start the Auto Tuning.

- When Auto Tuning is completed, the On Screen Display disappears and programme position 1 is selected.

The number displayed here is the number of channels still to be auto tuned.
Channels that can be Received
| SYSTEM VHF CATV UHF | ||||
| BG | CCIR STD(B.G.H) | E2-E12 | S01-S05M1-M10U1-U10S21-S41 | E21-E69 |
| I | Hong KongSpecialAdministrativeRegion of China,UK (I) | - | - | E21-E69 |
| DK | EAST EUROPE(D.K.K1) | R1-R12 | 44-470 MHz | E21-E69 |
Notes:
- Auto Tuning searches for TV stations from VHF minimum to UHF maximum and memorizes every tuned programme position. Other programme positions are skipped.
- Auto Tuning takes five or more minutes to complete its search.
- If the VCR is not correctly tuned by Auto Tuning, follow the procedure on the next page.
Preparations
- Confirm that the TV is on and the VCR viewing channel is selected.
- Turn on the VCR and select any programme position except A1 or A2.
- Set the VCR/TV switch 34 to "VCR".
Manual Audio System Setting Procedure
1 Select desired programme position by pressing the Channel button 32. 2 Press the MENU button 38 to display the Main menu on the TV screen. 3 Press the Cursor buttons ( ▲▼) 36 to select "TUNER PRESET" then press ENTER button 37. 4 Press the Cursor buttons ( ▲▼) 36 to select "AUDIO SYSTEM" then select the broadcasting system by pressing the Cursor buttons ( ◀▶ ) 18
• BG: PAL B.G.H/SECAM B.G
• I: PAL I
• DK: PAL D/SECAM D.K.K1
5 Press the MENU button 38 twice to exit the On Screen Display.
Manual Colour System Setting Procedure
1 Select desired programme position by pressing the Channel button 32. 2 Press the MENU button 38 to display the Main menu on the TV screen. 3 Press the Cursor buttons ( ▲▼) 36 to select "TUNER PRESET" then press ENTER button 37. 4 Press the Cursor buttons ( ▲▼) 36 to select "COLOUR SYSTEM" then select "MESECAM" or "PAL" by pressing the Cursor buttons (◀▶) 36 5 Press the MENU button 38 twice to exit the On Screen Display.
Manual Tuning Procedure
1 Press the MENU button 38 to display the Main menu on the TV screen. 2 Press the Cursor buttons (▲▼) 36 to select "TUNER PRESET" then press ENTER button 37. 3 Press the Cursor buttons (▲▼) 36 to select "CH" then select the channel number you want tuned by pressing the Cursor buttons (◀▶) 36. 4 Confirm that "CLEAR" is set to "OFF".
5 Press the Cursor buttons (▲▼) 36 to select "AUDIO SYSTEM" then select the broadcasting system by pressing the Cursor buttons (◀▶) 36.
• BG: PAL B.G.H/SECAM B.G
• I: PAL I
• DK: PAL D/SECAM D.K.K1
6 Press the Cursor buttons (▲▼) 36 to select "COLOUR SYSTEM" then select "AUTO" by pressing the Cursor buttons (◀▶) 36.
- The VCR automatically distinguishes between PAL and SECAM broadcasts.
- If the picture lacks colour when "AUTO" is selected, select "MESECAM" or "PAL".
7 Press the Cursor buttons (▲▼) 36 to select "SEARCH" then press the Cursor buttons (◀▶) 36 to start the Manual Tuning.
- If the desired TV station has not been tuned, press the Cursor buttons (◀▶) 36 again.
- Press the MENU button 38 and repeat steps 3–7 for each programme position you want to tune to a station.

8 Press the MENU button 38 three times to exit the On Screen Display.
Direct Tuning
1 Press the MENU button 38 to display the Main menu on the TV screen. 2 Press the Cursor buttons (▲▼) 36 to select "TUNER PRESET" then press ENTER button 37. 3 Press the Cursor buttons (▲▼) 36 to select "CH" then select the channel number you want tuned by pressing the Cursor buttons (◀▶) 36. 4 Confirm that "CLEAR" is set to "OFF". 5 Press the Cursor buttons (▲▼) 36 to select "SEARCH". 6 Press the Numeric buttons ② to enter the number of the desired programme position. - For other channels that require tuning, repeat steps 3–6. 7 Press the MENU button 38 twice to exit the On Screen Display.
Fine Tuning Procedure
1 Press the MENU button 38 to display the Main menu on the TV screen. 2 Press the Cursor buttons ( ▲▼) 36 to select "TUNER PRESET" then press ENTER button 37. 3 Press the Cursor buttons ( ▲▼) 36 to select "CH" then select the channel number you want tuned by pressing the Cursor buttons (◀▶) 36. 4 Press the Cursor buttons ( ▲▼) 36 to select "FINE" then press the Cursor buttons (◀▶) 36 to obtain the best tuning condition.
- Press the ENTER button 37 to return the tuning to its former state.
5 Press the MENU button 38 to exit the On Screen Display.
On Screen Display

Blanking of Unused Programme Positions
1 Press the MENU button 38 to display the Main menu on the TV screen. 2 Press the Cursor buttons ( ▲▼) 36 to select "TUNER PRESET" then press ENTER button 37. 3 Press the Cursor buttons ( ▲▼) 36 to select "CH" then select the channel number you want tuned by pressing the Cursor buttons (◀▶) 36. 4 Press the Cursor buttons ( ▲▼) 36 to select "CLEAR" then press the Cursor buttons (◀▶) 16 to select "ON".
- Repeat steps 3–4 for other unused programme positions to skip during the selection of programme positions.
- To cancel the blanking of a programme position select that programme position then set "CLEAR" to "OFF".
5 Press the MENU button 38 twice to exit the On Screen Display.
To Add and Delete the Channel
Preparations
- Confirm that the TV is on and the VCR viewing channel is selected.
- Turn on the VCR and select any programme position except A1 or A2.
Example:
If you want to add a new channel between Channel 4 and Channel 6,
1 Press the MENU button 38 to display the Main menu on the TV screen.

2 Press the Cursor buttons ( ▲▼) 36 to select "CH ADD&DELETE" then press the ENTER button 37.

3 Press the Cursor buttons ( ▲▼) 36 to select the desired programme position (example CH3) then press the Cursor button (▶) 36 to select "ADD".
Example:
If you want to delete Channel 6,
1 Press the MENU button 38 to display the Main menu on the TV screen.
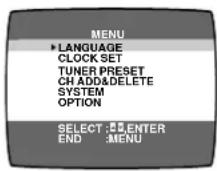
2 Press the Cursor buttons ( ▲▼) 36 to select "CH ADD&DELETE" then press the ENTER button 37.

3 Press the Cursor buttons ( ▲▼) 36 to select the desired programme position (example CH3) then press the Cursor button (◀) 36 to select "DELETE".
![graph LR A["CH 3<br>CH ADD&DELETE<br>ADD: DELETE:<br>CH SELECT: END: MENU"] <--> B["CH 3<br>CH ADD&DELETE<br>ADD: DELETE:<br>CH SELECT: END: MENU"] C["Programme Position Channel"] --> D["1 2"] C --> E["2 4"] C --> F["3 6"] C --> G["4 8"] C --> H["5 10"] C --> I["6 12"] C --> J["7 -"] C --> K["8 -"]…](/content/2026/05/1006372/images/7dd257c82809cdce19931196366cec5a80b07ce666f977ecdbfb691c08b6be07.jpg)
- Adding a channel shifts the programme positions of Channel 6 to Channel 12 up, as shown in the list above.
- The list of the programme positions do not appear on the On Screen Display.
4 After adding, tune the added channel. (See steps 3–7 in Manual Tuning Procedure on page 11.)
- Press the MENU button 38 twice and repeat steps 3–4 for each of the other programme positions.
5 Press the MENU button 38 four times to exit the On Screen Display.
![graph TD A["CH 3<br>CH ADD&DELETE"] <--> B["CH 3<br>CH ADD&DELETE"] C["Programme Position Channel"] --> D["1:2"] C --> E["2:4"] C --> F["3:6"] C --> G["4:8"] C --> H["5:10"] C --> I["6:12"] C --> J["7-"] C --> K["8-"] L["Programme Position Channel"] --> M["1:2"] L --> N["2:4"] L --> O["3:8"] L --> P…](/content/2026/05/1006372/images/663c9bd5e1150a88ef4753ac11714042e9cb528217c4a785a7bd61c6137dd8dd.jpg)
- Deleting a channel shifts the programme positions of Channel 8 to Channel 12 down, as shown in the list above.
- The list of the programme positions do not appear on the On Screen Display.
- Repeat step 3 for each of the other programme positions.
4 Press the MENU button 38 twice to exit the On Screen Display.

Language Setting of the On Screen Display
Select one of the 4 languages displayed: English, Polish, Czech and Hungarian.
Preparations
- Confirm that the TV is on and the VCR viewing channel is selected.
- Turn on the VCR.
Operations
1 Press the MENU button 38 to display the Main menu on the TV screen. 2 Press the Cursor buttons ( ▲▼) 36 to select "LANGUAGE" then press the ENTER button 37. 3 Press the Cursor buttons ( ▲▼) 36 to select the desired language. 4 Press the MENU button 38 twice to exit the On Screen Display.
On Screen Display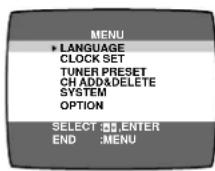

Setting the Clock of Your VCR
The clock will operate for at least 3 years in total after it has been set, - in the event of a power failure, it will operate on its backup system. After 3 years, it will only operate for 1 hour on its backup system.
Preparations
- Confirm that the TV is on and the VCR viewing channel is selected.
- Turn on the VCR.
Example:
Date: 16 October, 2005
Time: 20:15
Operations
1 Press the MENU button 38 to display the Main menu on the TV screen.

2 Press the Cursor buttons (▲▼) 36 to select "CLOCK SET" then press the ENTER button 37.

3 Set each item by pressing the Cursor buttons (▲▼▶) 36. Press the Cursor button (◀) 36 to return to the previous item.

At the set time (H:M) point:
- When it is kept pressed, the indication changes in 30 minute steps.
- There is no need to press the Cursor button (▶) 36.
4 Press the MENU button 38.
- The clock starts.
VCR display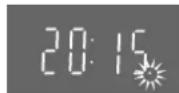
Time Reset Function
If the clock is less than two minutes slow or fast, it can easily be reset to the proper time.
Example:
Resetting the clock to 12:00.00
1 Press the MENU button 38 to display the Main menu on the TV screen. 2 Press the Cursor buttons ( ▲▼) 36 to select "CLOCK SET" then press the ENTER button 37. 3 When the current clock display on the VCR is between 11:58.00 and 12:01.59, press the MENU button 38 as soon as you hear the 12:00.00 signal. This resets the time to 12:00.00.
Preparations
- Confirm that the TV is on and the VCR viewing channel is selected.
- Turn on the VCR.
To Make Various Indicators Appear On Screen Display
At a press of the OSD button ⑤, the following indications appear on the TV screen.
- Press the OSD button ⑤ again to make the on screen display disappear.

①Programme position ②Edit mode
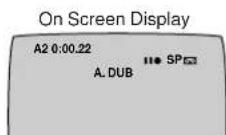
When edit mode (Audio Dubbing) is set, the On Screen Display appears A.DUB: Audio Dubbing
③Tape running display
Stop, Eject
Rewind, Review ◀◀
Fast Forward, Cue ▶▶
Playback ▶
Still playback
Recording, Audio dubbing ●
Recording pause, Audio dubbing pause ■■
Slow playback
Repeat playback R ▶
④Present time/Tape counter/Remaining tape time/Index Search/OTR indication/Play-Off Timer
| Information Display | |
| Present time 17:24 | |
| Tape counter -2:35.47 | |
| Remaining tape time REMAIN 2:34 | |
| Index Search S 01 | |
| OTR indication | OTR 60 |
| Play-Off Timer | OFF 60 |
⑤Tape speed indicator (SP/LP/EP) ⑥Cassette-in indicator
⑦Colour system indicator
Any selected colour TV system except "AUTO" appears on screen display. (See pages 11, 15 and 18.)
⑧Picture mode indicator
At each press of the PICTURE MODE button 26, the selected picture mode is set and following picture mode indicators appear.
Example:
STANDARD: For TV Programme recorded
DYNAMIC: For Scenery, Sports
SOFT: For Rental soft tape
CARTOON: For Cartoon
Note:
- The on-screen display may be disturbed or disappear during special playback.
Preparations
- Confirm that the TV is on and the VCR viewing channel is selected.
- Turn on the VCR.
To Set the Colour TV System
1 Press the MENU button 38 to display the Main menu on the TV screen. 2 Press the Cursor buttons (▲▼) 36 to select "SYSTEM" then press the ENTER button 37.
3 Press the Cursor buttons (▲▼) 36 to select "AUTO".
- The VCR automatically distinguishes between "PAL", "SECAM/MESECAM" and "NTSC" signals. If the picture lacks colour during AV external recording or playback, set to "PAL", "MESECAM" or "NTSC".
- When you want to record or play back in black and white, set to "B/W".
4 Press the MENU button 38 twice to exit the On Screen Display.

Option Setting
To Select the Corresponding Video Cassette Tape Length to Display the Approximate Remaining Tape Time
(TAPE SELECT)
1 Press the MENU button 38 to display the Main menu on the TV screen.
On Screen Display
2 Press the Cursor buttons ( ▲▼) 36 to select "OPTION" then press the ENTER button 37.
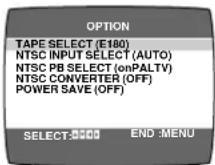
3 Press the Cursor buttons (▲▼) 36 to select "TAPE SELECT" then select the corresponding video cassette tape length by pressing the Cursor buttons (◀▶) 16

E180: For E30, -60, -90, -120, -150 and -180 tapes
E195: For E195 tape
E240: For E240 tape
E260: For E260 and -300 tapes
- The remaining tape time may not be displayed correctly depending on the tape used.
4 Press the MENU button 38 twice to exit the On Screen Display.
To Select the Colour TV System of the TV Used to Record NTSC Signals
Follow steps 1 to 2 of TAPE SELECT.
3 Press the Cursor buttons ( ▲▼) 36 to select "NTSC INPUT SELECT" then select "AUTO" by pressing the Cursor buttons (◀▶) 36 Allows NTSC "4.43" or "3.58" signals to be distinguished automatically.

- If the tape has not recorded correctly, select 4.43 or 3.58.

4.43: When recording NTSC 4.43 signals.
3.58: When recording NTSC 3.58 signals. Some programmes on NTSC 3.58 system cannot be recorded correctly at this position.
4 Press the MENU button 38 twice to exit the On Screen Display.
To Select the Colour TV System of the TV Used to Play Back a Tape Recording NTSC Signals
Follow steps 1 to 2 of TAPE SELECT.
3 Press the Cursor buttons ( ▲▼) 36 to select "NTSC PB SELECT" then select the desired position according to the colour TV system of the TV by pressing the Cursor buttons (◀▶) 16

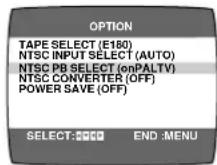
on PAL TV: For TVs that can receive PAL signals.
4.43: For TVs that can receive NTSC 4.43 signals.
3.58: For TVs that can receive NTSC 3.58 signals.
4 Press the MENU button 38 twice to exit the On Screen Display.
To Play a NTSC Game on PAL System TV
Follow steps 1 to 2 of TAPE SELECT.
3 Press the Cursor buttons ( ▲▼) 36 to select "NTSC CONVERTER" then select "ON" or "OFF" by pressing the Cursor buttons ( ◀▶ ) 36
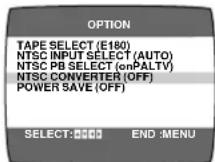
OFF: Initially set at this position.
ON: PAL TV can receive signals from NTSC 3.58 signal source (e.g., NTSC game machines) connected to the VCR main unit. However, when recording, this function does not work.

- When receiving NTSC 4.43 signals, this function does not work correctly.
4 Press the MENU button 38 twice to exit the On Screen Display.
To Reduce the VCR's Power Consumption When the VCR Is Switched Off
Follow steps 1 to 2 of TAPE SELECT.
3 Press the Cursor buttons ( ▲▼) 36
to select "POWER SAVE" then select "ON" or "OFF" by pressing the Cursor buttons (◀▶) 36
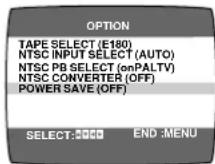
ON: This setting makes the display disappear when the VCR is off. It will not operate in the Timer standby mode. After recording all programmed data, the VCR will go into Power save mode.

OFF: This setting does not save power when the VCR is off.
4 Press the MENU button 38 twice to exit the On Screen Display.
Setting the System for Playback
This VCR can play back tapes recorded in the video system of PAL, MESECAM or NTSC. Set the System according to the video system of a tape you want to play back.
When you play back a tape, make sure that the system is set properly.
| Video system of a playback tape | System Setting | Output Colour | ||
| SYSTEM1 | NTSC PB SELECT2 | Video Output | Aerial Output | |
PAL | AUTO *3PALMESECAMNTSC | —— | PAL | PALB.G / I / DK5.5 6.0 6.5 |
MESECAM | AUTOPALMESECAMNTSC | —— | SECAM | SECAMB.G / I / DK5.5 6.0 6.5 |
NTSC | AUTOPALMESECAMNTSC | NTSC PB SELECT (on PAL TV) | Quasi-PAL | Quasi-PALB.G / I / DK5.5 6.0 6.5 |
| AUTOPALMESECAMNTSC | NTSC PB SELECT (4.43) | NTSC 4.43 | NTSC 4.43B.G / I / DK5.5 6.0 6.5 | |
| AUTOPALMESECAMNTSC | NTSC PB SELECT (3.58) | NTSC 3.58 | NTSC 3.58B.G / I / DK5.5 6.0 6.5 | |
Setting the System for Recording
The System should be set also when you make a TV programme recording or AV external recording. When you make a recording or a timer programme recording, make sure that the system is set properly.
| System TUNER PRESET | System Setting | Recorded Tape | |||
| *4 (AUDIO SYSTEM) | SYSTEM*1 | NTSC INPUT SELECT *5 | |||
| *6 BROADCASTS | PAL B/GPAL IPAL D | AUDIO SYSTEM (BG)orAUDIO SYSTEM (I)orAUDIO SYSTEM (DK) | —— | NTSC INPUT SELECT (AUTO) | PAL |
| SECAM B/GSECAM D/K | AUDIO SYSTEM (BG)orAUDIO SYSTEM (DK) | —— | NTSC INPUT SELECT (AUTO) | MESECAM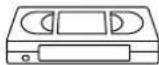 | |
| LINE IN | PAL | —— | ● AUTO PAL MESECAM NTSC | NTSC INPUT SELECT (AUTO) | PAL |
| NTSC 3.58 | —— | ● AUTO PAL MESECAM NTSC | NTSC INPUT SELECT (AUTO) | NTSC | |
| NTSC 4.43 | —— | ● AUTO PAL MESECAM NTSC | NTSC INPUT SELECT (AUTO) | ||
Preparations
- Confirm that the VCR is on.
- Confirm that the TV is on and the VCR viewing channel is selected.
- Insert a recorded video cassette.
- Make sure that the system is set properly. See page 18.
For Normal Playback:
Press the Play button 25.
VCR display
For Cue Playback:
During playback, tap the Fast Forward button 24.
- To return to normal playback, press the Play button 25.
- If you press and hold down the Fast Forward button 24, cue playback continues for as long as you keep the button pressed, and operation returns to normal playback when the button is released.

For Review Playback:
During playback, tap the Rewind button Ⓤ.
- To return to normal playback, press the Play button 25.
- If you press and hold down the Rewind button ⑧, review playback continues for as long as you keep the button pressed, and operation returns to normal playback when the button is released.

For Still Playback:
During playback, press the Pause/Slow button ⑦ or the PAUSE/STILL button ④5.
- To return to normal playback, press the Play button 25, the Pause/Slow button 7 or the PAUSE/STILL button 45.

For Slow Playback:
During playback, keep the Pause/Slow button ⑦ or the PAUSE/STILL button ④5 pressed for 2 seconds or more.
- To return to normal playback, press the Play button 25.

Fast-forwarding or Rewinding the Tape:
To fast-forward the tape:
Press the Fast Forward button 24 in the stop mode.
To rewind the tape:
Press the Rewind button Ⓤ in the stop mode.
- To stop fast-forwarding or rewinding, press the Stop button ⑨.
- To briefly view the picture during fast-forwarding or rewinding, press and hold down the corresponding button.
To Stop Playback
Press the Stop button ⑨.
To Stop Playback Automatically (Playback Off Timer Function)
Whenever you are playing back and wish to stop the tape automatically, simply set the playback duration by pressing the PLAY OFF TIMER button on the VCR repeatedly. The duration indicated on the VCR display changes by pressing the PLAY OFF TIMER button as follows.
![graph LR A["Counter display\n(normal playback mode)"] --> B["30\n(min.)"] B --> C["60\n(min.)"] A --> D["240\n(min.)"] D --> E["180\n(min.)"] E --> F["120\n(min.)"] F --> G["120\n(min.)"]](/content/2026/05/1006372/images/8e4f1878567acb3300b783a71b20192e929a06ada18e2ab07342d71685f58cf5.jpg)
Press the PLAY OFF TIMER button 42 on the VCR during playback.
- The VCR will automatically switch off when Play-Off Timer is completed. To turn the VCR on again, press the POWER button ①.
Notes:
●The Play-Off Timer function works during normal playback. - When the tape reaches its end during Play-Off Timer, the tape will be rewound to the start and the VCR will turn itself off. - Repeat Playback function does not work during Play-Off Timer.
To Stop Midway:
Press the Stop button ⑨.
To Play Back a Recorded Part Repeatedly
Press the REPEAT button 14.
The "R ▶" indication appears on the On Screen Display.
![graph TD A["Beginning of Tape"] --> B["Repeat Playback PLAY"] B --> C["End of Recorded Part"] C --> D["Control Signal Interruption (at least 5 sec.)"] D --> E["REWIND"]](/content/2026/05/1006372/images/074c7f25477ad9490c6514f2b0ddf996ac4305b6b11cb79c541033aeb8312ffb.jpg)
- Repeat Playback function does not work during Play-Off Timer.
To Cancel the Repeat Playback Mode:
Press the Stop button ⑨.
NTSC Playback
Tapes recorded in the NTSC system can be played back with this VCR via a PAL system TV.
- Make sure that the system is set properly. See page 18.
- Select "NTSC PB SELECT" from the on-screen display according to the colour TV system of the TV. (See page 16.)
on PAL TV: For TVs that can receive PAL signals.
4.43: For TVs that can receive NTSC 4.43 signals.
3.58: For TVs that can receive NTSC 3.58 signals.
- NTSC 3.58 recording requires "NTSC INPUT SELECT" to be in the "AUTO" or "3.58" position (see page 16), however if "NTSC INPUT SELECT" is in this position when recording a NTSC 3.58 signal, no colour is available for the PAL TV. Once the recording is completed, you then need to select "on PAL TV" to view the recording in colour on PAL TV.
When playing back PAL tapes:
You do not need to set "NTSC PB SELECT".
Note for NTSC Playback only on PAL system TV
This function is designed to allow only the playback of tapes recorded by NTSC signals on a PAL system TV. The NTSC signal is not completely converted to a PAL signal. For this reason, images played back by this function cannot be recorded correctly on other VCRs.
Notes:
- Cue, review or slow playback will be automatically cancelled after 10 minutes, and still playback after 5 minutes.
- On some TVs, the playback picture may roll up or down; adjust this using the V-HOLD control on the TV. TVs not equipped with a V-HOLD control cannot correct this condition. The playback picture may shrink vertically, and black bars may appear both on the top and bottom of the screen. This does not indicate a malfunction.
- In Cue and Review playback, noise bars and distortions may occur on the screen. However, this is not a malfunction.
- During cue, review, still or slow playback, the picture may not be in colour. Alternatively, the top of the TV screen may be distorted.
- During playback function other than normal playback, horizontal noise bars may appear in the picture, the colour of the picture may be unstable, or the picture may be otherwise distorted.
- When you play back a tape recorded in the LP mode, the picture may be in black and white.
- When you play back a tape recorded in the EP mode, the picture and the sound may be unstable. However, these are not malfunctions.
- When playing back a tape which was recorded on another VCR, it may be necessary to adjust tracking control. In some cases the picture quality may still be inferior. This is due to format constraints.
- Depending on the TV set used, the playback picture may roll up or down during special playback (Pause, Cue, Review, or Slow playback mode). However, this is not an indication of a malfunction.
Convenient Automatic Functions
VCR Auto Power On
When you insert a video cassette, the VCR switches on automatically.
Auto Playback Start
When you insert a video cassette with a broken erasure prevention tab, playback start automatically without having to press the Play button 25.
VCR-off Playback
When the VCR is off, an inserted cassette can be played back by pressing the Play button 25.
Auto Rewind
When the tape reaches the end, the VCR automatically rewinds it to the beginning.
- This function does not work during timer recording and OTR.
Automatic Switching Off and Ejection
When the VCR is switched off, an inserted cassette can be ejected simply by pressing the EJECT button 41. The VCR will eject the cassette and automatically turn itself off again.
VCR-off Search
When the VCR is off, the VCR starts intro-jet scan of an inserted cassette by pressing the SEARCH button ④.
To Play back in the Desired Picture Quality (Picture Mode)
This function reproduces optimum playback picture from various kind of recorded tapes and contents.
Press the PICTURE MODE button 26 and select the corresponding Picture Mode as follows.
Example:
| Mode Characteristic Example for Purpose |
| STANDARD Normal TV Programme recorded |
| DYNAMIC Clear & Vivid Scenery, Sports |
| SOFT Mild Rental soft tape |
| CARTOON Delicate Cartoon |
- Pressing the PICTURE MODE button 26 once makes the On Screen Display appear; after that, pressing it repeatedly changes the indication in the following order:
![graph LR A["STANDARD\n(Initial Setting)"] --> B["DYNAMIC"] C["CARTOON"] <--_D["SOFT"]](/content/2026/05/1006372/images/4cfd5a81c7d85737e084dda80f9a8c7fccba83ff07120399e29a1d7b4e3a5fae.jpg)
Preparations
- Confirm that the VCR is on.
- Confirm that the TV is on and the VCR viewing channel is selected.
- Set the VCR/TV switch 34 to "VCR".
- Make sure that the system is set properly. See page 18.
Operations
1 Insert a video cassette with an intact erasure prevention tab.
- If it has already been inserted, press the POWER button ① to turn the VCR on.
2 Select the TV station using the Channel button 32.
- It is also possible to select by pressing the Numeric buttons ②.

3 Press the REC (REC/OTR) button ⑲ (50) to start recording.

4 Press the Stop button Ⓗ to stop recording.
To Select the Desired Tape Speed
Press the SPEED button 21 before recording.
- SP provides standard recording time, optimum picture and sound quality. LP provides doubled recording time with slightly reduced picture and sound quality. EP provides tripled recording time with slightly reduced picture and sound quality. When you play back a tape recorded in the EP mode, the monaural sound may be unstable.
When you start the recording in the EP mode, "EP" indication on the VCR display flashes for about 8 seconds.
EP mode means Super Long Play (SLP).
To Pause Recording
Press the Pause/Slow button ⑦ or the PAUSE/STILL button
45 during recording.
Press it again to continue recording.
To View One TV Programme while Recording Another TV Programme
After pressing the REC button 27 to start recording, select on your TV the programme position of the TV programme that you want to view.
To Display the Approximate Remaining Tape Time
The remaining tape time can be displayed in the VCR display.
1 Select "TAPE SELECT" from the on screen display and select the corresponding video cassette tape length. See page 16. 2 Press the DISPLAY button 30 repeatedly until the Remaining Tape Time appears on the VCR display.


For certain cassettes, the remaining tape time may not be displayed correctly.
Notes:
- When playing back a cassette recorded in the LP or EP mode, some picture and sound distortion may occur. However, this is not a malfunction.
- The recording pause mode will be automatically cancelled after 5 minutes and return to the stop mode.
- The tape recorded in the EP mode on this VCR cannot be played back on the other VCR without EP mode function.
- On the other VCR (even with EP mode function), when you play back the tape recorded in the EP mode, the picture and the sound may be distorted. However, this is not a malfunction.
- When a video cassette with a broken off erasure prevention tab is inserted, the indication will flash to indicate that recording is not possible even if the REC (REC/OTR) button 27 (50) is pressed.
To Select the Recording Duration and Perform Timer Recording (OTR Recording)
OTR means One-Touch Recording and is called this way because you can start recording and select the recording duration by repeatedly pressing a single button. This is very convenient, for example when you want to start recording immediately but need to go out or want to go to bed. After the selected recording duration has elapsed, recording stops and the VCR automatically switches off.
To Perform OTR Recording:
1 Display the VCR picture on the TV. 2 Insert a video cassette with an intact erasure prevention tab. 3 Press the Channel button 32 to select the programme position on which the TV programme to be recorded will be broadcast. 4 Press the REC/OTR button 50 to start recording. 5 Press the REC/OTR button 50 repeatedly to select the desired recording duration.
- Every time you press this button, the recording duration indicated in the VCR display changes in the following order.
- For example, if you select "30", the VCR records a programme from that moment on for 30 minutes.
![graph LR A["Counter display\n(normal recording mode)"] --> B["30 (min.)"] B --> C["60 (min.)"] C --> D["120 (min.)"] D --> E["180 (min.)"] E --> F["240 (min.)"] F --> A](/content/2026/05/1006372/images/c26e72ace8f68b858f113cf1242af929e469dbea54d18a8bf7819164f78da84e.jpg)
To Stop the OTR Recording Before the End:
Press the Stop button ⑨.
Notes:
- The OTR function works during normal recording.
- When the tape reaches its end during OTR, the VCR will turn itself off.
4-Key Programming
Up to 8 timer programmes, including weekly and daily programmes, can be recorded up to one month in advance by setting the timer.
Preparations
- Confirm that the VCR is on.
- Confirm that the TV is on and the VCR viewing channel is selected.
- Insert a video cassette with an intact erasure prevention tab.
- Check that the clock is set to the correct time. If it has not been set, refer to page 14. ●Make sure that the system is set properly. See page 18.
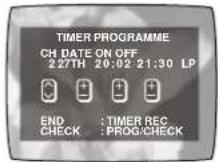
Example:
Programme position (channel); 2
Date: 27 October
Starting time; 20:02
Ending time; 21:30
Tape speed; LP
(Present date; 16 October)
Operations
1
Press the PROG./CHECK button ⑫ to display the menu for timer programme on the TV screen.

2
Press the CH button 10 to select the programme position of the desired TV station.
- Every time you select the programme position, the background changes.

The next item will flash after about 2 seconds.
3
Press the DATE button ⓘ to set the date on which the TV programme will be broadcast.

4
Press the ON button 23 to set the starting time.
- When it is kept pressed, the indication changes in 30 minute intervals.

5
Press the OFF button 22 to set the ending time.

6
Press the SPEED button 21 to set the desired tape speed.
- SP provides standard recording time, optimum picture and sound quality. LP provides double recording time with slightly reduced picture and sound quality.
EP provides triple recording time with slightly reduced picture and sound quality.
Regarding the "A" indication, refer to page 24. When you play back a tape recorded in the EP mode, the monaural sound may be unstable.
7
Press the TIMER REC button ⑳ to switch the VCR over to the timer recording standby mode.
- The "PROGRAMME IS COMPLETE." message appears.
- The VCR will be set to the timer recording standby mode after about 1 minute if the TIMER REC button 20 is not pressed.
To Suspend the Timer Recording Standby Mode
When you want to use the VCR for playback, normal recording or some other operation before the programmed timer recording will be performed, you can temporarily suspend the timer recording standby mode by pressing the TIMER REC button 20 so that the "☐" indication on the VCR display disappears.
However, after you have finished using the VCR, be sure to reactivate the timer recording standby mode by pressing the TIMER REC button 20 again otherwise the programmed timer recording will not be performed.
Weekly Timer Recording
In step 3 of 4-Key Programming, select the desired day by pressing the DATE — button ⓘ.
For example, SU (Sunday)
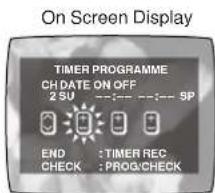
(SU=Sunday, MO=Monday, TU=Tuesday, WE=Wednesday, TH=Thursday, FR=Friday, SA=Saturday)
Daily Timer Recording
For this timer function, several groups of days can be selected.
Ⓐ Daily recording from Monday to Friday (MO-FR)
⑧ Daily recording from Monday to Saturday (MO-SA)
© Daily recording from Sunday to Saturday (SU-SA)
In step 3 of 4-Key Programming, select the desired days by pressing the DATE — button ⓘ.

Timer Recording from an External Signal Source
If timer recording is performed by a unit connected to the 21-Pin Scart socket, select the A1 or A2 indicator in step 2 of 4-Key Programming for the programme position.

Setting other Programmes in Succession
Repeat steps 1–7 of 4-Key Programming.
Programming a Timer Recording of a TV Programme Until its End (Tape Speed Auto Change Function)
If the VCR determines that the remaining tape time is insufficient to record the programme to its end during a timer recording performed in the SP mode, this function automatically changes the tape speed to ensure that the whole programme will be recorded.
The tape speed will change as follows.
PAL system: SP → LP
NTSC system: SP → EP
- This function cannot change the recording speed to the EP mode for PAL system.
Depending on the remaining tape length, recording may be performed in the LP (EP) mode from the start. However, if the remaining tape time is still not sufficient in this case, the programme cannot be recorded to the end.
Example of PAL system (Remaining Tape Time 60 min.):![graph TD A["Video Tape"] --> B["1st Programme"] B --> C["2nd Programme"] C --> D["End of Tape"] B -->|30 min. Recording by SP mode| E["30 min."] C -->|15 min. Recording by SP mode| F["45 min."] E --> G["3rd Programme will not be recorded."] F --> G](/content/2026/05/1006372/images/2f9c272f20bd3d98847b1302e1b4255b08ff5f8547cc4e6a9107b3f40a1c580b.jpg)
- The tape length must be set correctly. (See page 16.)
- Some tapes may not work correctly.
- If the recording speed changes from SP to LP during a timer recording, some brief picture distortion occurs at that point.
To Activate the Tape Speed Auto Change Function: Press the SPEED button 21 to select "A".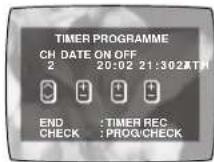
- Every time you press the SPEED button 21, the indication changes in the following order:
PAL system:
![graph LR A["SP"] --> B["LP EP"] B --> C["A"] C --> D["SP"] D --> E["EP"] E --> F["A"]](/content/2026/05/1006372/images/117592205f0ac72409f73328dea0b00ef6d345f186c0b6c95a0c395e1890c011.jpg)
NTSC system:
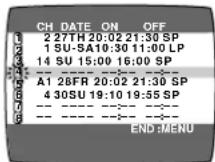
Checking a Timer Programme
- The VCR must be turned on, or in timer recording standby mode.
- Confirm that the TV is on and the VCR viewing channel is selected.
1 Press the PROG./CHECK button ⑫ twice.
2 Press the MENU button 38 to exit the On Screen Display.

Cancelling a Timer Programme
- The VCR must be turned on, or in timer recording standby mode.
- Confirm that the TV is on and the VCR viewing channel is selected.
1 Press the PROG./CHECK button ⑫ twice.

2 Press the PROG./CHECK button 12 repeatedly until the desired timer programme number flashes on and off.

3 Press the CANCEL button 17.
4 Press the MENU button 38 to exit the On Screen Display.
Note:
- If timer recording is not completed (due to insufficient tape or cancellation by the user), the programmed timer recording data will be cancelled from the memory by 4 A.M two days later.
However, if the timer recording function is activated at that time, the programmed timer recording data will not be cancelled.
Searching Timer-Recorded Programmes
(Programme List Search)
Searching Using the Programme List Search Function
When timer programmes are recorded by this VCR, the VCR stores the programming details, and the programmes are selected and searched by the programme list search function.
Preparations
- Confirm that the VCR is on.
- Confirm that the TV is on and the VCR viewing channel is selected.
- Release the standby mode for timer programme recording.
- Set the VCR/TV switch 34 to "VCR".
Operations
Displaying the PROGRAMME LIST SEARCH Screen
Press the SEARCH button 4.
On Screen Display![graph LR A["PROGRAMME LIST SEARCH<br>CH 21 TO 00...74V..."] --> B["PROGRAMME LIST SEARCH<br>CH 21 TO 00...845..."] B --> C["END:MENU"]](/content/2026/05/1006372/images/51a94eb2936c0b7592508bf9cc73f40a587046f49db3dcf5460bd0f58edd650f.jpg)
- The details of the timer-recorded programmes on this video cassette are displayed on the PROGRAMME LIST SEARCH screen in the sequence in which the programmes were recorded.
- When no further operations are undertaken for about 3 or more seconds, the search for the last timer-recorded programme is commenced.
- Upon completion of the search, playback starts from the searched point on the tape.
Searching other programmes
Press the SEARCH button ④ several times to select the programme which is to be searched.
- When the SEARCH button 4 is pressed once, the timer-recorded programme which was recorded last is selected. Each time the SEARCH button 4 is subsequently pressed, the programme before (or above on the list shown on the screen) is selected.
- If the SEARCH button 4 is pressed again when the top programme is selected, the bottom programme will be selected.
- Another programme can be selected by pressing the SEARCH button ④ even after a search has been commenced.
To stop the search at any time
Press the MENU button 38 and clear the PROGRAMME LIST SEARCH screen.
Notes:
- This function does not work during timer recording standby mode.
- This function works only for video cassettes containing timer-recorded programmes.
- Since this function works only for the currently loaded video cassette, all the programming list details will be cleared when the video cassette is ejected or replaced with another one. At times like this, use the VHS index search system or the intro-jet scan function. (See page 27.)
- The programme list search function may not work properly when recorded programmes run for 15 minutes or less.
- In the EP mode, a programme of at least 25 minutes must be recorded on the tape.
- Ensure that "TAPE SELECT" for "OPTION" on the "MENU" is set correctly, as otherwise, this function will not operate correctly. (See page 16.)
- When the SEARCH button ④ is pressed during playback, playback stops immediately, and the PROGRAMME LIST SEARCH screen appears.
- Up to 8 programmes can be displayed on the PROGRAMME LIST SEARCH screen. If the timer is used to record more than 9 programmes, the oldest programme will be deleted on the PROGRAMME LIST SEARCH screen, and a new timer-recorded programme will be entered and displayed.
- This function may not work properly depending on the tape position when you press the SEARCH button ④.
- This function may not work properly when for example, you try to record over a programme with another programme that is timer-recorded on the same portion of the tape.
To Find the Beginning of Each Recording
(VHS Index Search System)
This VCR automatically records special index signals on the tape every time a recording is started. The Index search function makes use of these index signals to let you find the beginning of a desired programme quickly and easily.
Index signals are automatically recorded in the following cases:
- When you start a recording by pressing the REC button 27 or REC/OTR button 50.
- When a timer recording starts.
- When you press the REC button 27 on the remote control during recording.
Conditions for correct operation of the Index search function:
- The VCR must be in the stop mode or in the playback mode.
- Each programme recorded on the tape must be at least 5 minutes long.
Preparations
- Display the VCR picture on the TV.
- Insert a recorded video cassette.
- Display the VCR picture on the TV. - Insert a recorded video cassette.
Operation
1 Press the INDEX button 28
(that corresponds to the direction from the current tape position in which the desired programme is located on the tape) to start the index search.
VCR display
For example, if you want to search for the 2nd recorded programme in forward direction, press the INDEX ▶▶1 button 28 twice.
- The VCR fast-forwards or rewinds the tape and searches for the specified index signal (the beginning of the desired recorded programme).
When it has been found, playback starts automatically.
To Cancel the Index Search or to Stop Playback:
Press the Stop button ⑨.
Notes:
- Searching in either direction is possible up to the 20th index signal.
- If you press either of the INDEX button 28 too many times, simply press the other INDEX button 28 (indicating the opposite direction) to correct it. In this way, you can reduce the displayed figure down to 1.
- The figure on the VCR display decreases by 1 every time an index signal is located.
Searching while Checking the Video Cassette Contents (Intro-Jet Scan)
This VCR automatically records special index signals on the tape every time a recording starts. The Intro-Jet Scan function makes use of these index signals to play back the beginning of each programme recorded on the cassette one after another at high speed. This lets you quickly and easily check the contents of a cassette and find a desired programme.
Index signals are automatically recorded in the following cases:
- When you start a recording by pressing the REC button 27 or REC/OTR button 50.
- When a timer recording starts.
- When you press the REC button 27 on the remote control during recording.
Conditions for correct operation of the Intro-Jet Scan function:
- VCR must be switched on, be in the playback mode or be in the standby mode.
- Each programme recorded on the tape must be at least 15 minutes long.
- The cassette must have been ejected after the timer recordings were performed.
Preparations
- Display the VCR picture on the TV.
- Insert a recorded video cassette.
- Display the VCR picture on the TV. - Insert a recorded video cassette.
Operations
1 Press the SEARCH button ④ to start the Intro-Jet Scan.
- After rewinding the tape to the beginning, the VCR plays it back at high speed for approximately 10 seconds. It then fast-forwards the tape to the next tape position marked by an index signal (beginning of a programme), and every time an index signal is found, the VCR switches over to high-speed playback (Cue) for about 10 seconds.

2 When you have found the programme that you want to view, press the Play button 25 to start normal playback.
To Cancel the Intro-Jet Scan or to Stop Playback: Press the Stop button ⑨.
Note:
- If you press the SEARCH button ④ after a timer recording has finished, but before ejecting that cassette, the Programme List Search (for details, see page 26) will be activated instead of the Intro-Jet Scan.
Assembly Editing
This function can be used to make up an edited tape from other recordings or video sources.
A new scene can be added to the end of previous one.

Preparations
- Connect a video movie camera or another VCR to this VCR as shown.
- Display the VCR picture on the TV.
- Insert the cassette on which the copying is to be performed, and make sure that its erasure prevention tab is not broken out.
- Make sure that the system is set properly. See page 18.
- Select the audio source required by pressing the INPUT SELECT button 33 to set A1 or A2.
A1: Through the AV1 (21-Pin Scart) socket.
A2: Through the AV2 (AUDIO IN/VIDEO IN) sockets on front panel.
Operations
1 Press the Play button 25 to start playback. 2 At the point where you want to join a new scene, press the Pause/Slow button ⑦ to put it in the still playback mode. 3 Press the REC button 27 to put it in the recording pause mode. 4 Start playback on the source unit and search for the point from which you want to record (copy) onto this VCR. 5 When that point is reached, press the Pause/Slow button ⑦ again to start recording the new picture and sound from the playback unit. 6 To record (copy) additional scenes, press the Pause/ Slow button ⑦ to put this VCR in the recording pause mode and then perform above steps 4 and 5 again. 7 At the point where you want to stop recording, press the Stop button ⑨ to finish recording.
Note:
- If you leave the VCR in the recording pause mode for more than 5 minutes in step 3 or 6, the VCR automatically switches over to the stop mode to protect the video heads.
Audio Dubbing
This function lets you insert narration, background music or special sound effects in previously made recordings. However, this automatically erases the original sound in the tape portions, on which you perform audio dubbing.
![graph TD A["1: Hand movement"] --> B["2: Hand movement"] B --> C["3: Hand movement with musical notes"] C --> D["4: Hand movement with string, motion, and rhythm"] D --> E["5: Hand movement with string, motion, and rhythm"] E --> F["6: Hand movement with string, motion, and rhythm"]](/content/2026/05/1006372/images/6be0ceacd637862389322e80de6a84626fbbf0c014d5e9d3953eae15f90137eb.jpg)
Preparations
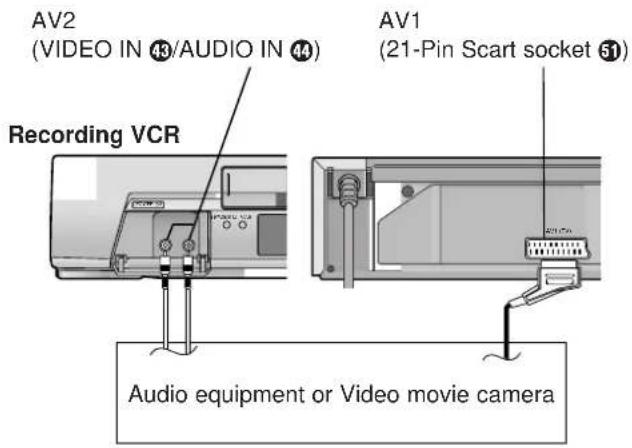
- Connect the audio equipment or a video movie camera to this VCR with an audio cable.
- Display the VCR picture on the TV.
- Insert the cassette on which the audio dubbing is to be performed, and make sure that its erasure prevention tab is not broken out.
- Select the audio source required by pressing the INPUT SELECT button Ⓤ to set A1 or A2.
A1: Through the AV1 (21-Pin Scart) socket.
A2: Through the AV2 (AUDIO IN/VIDEO IN) sockets on front panel.
Operations
1 Press the Play button 25 on this VCR to start playback to search for the point from which you want to start audio dubbing. 2 At the point from which you want to perform audio dubbing, press the Pause/Slow button ⑦ on this VCR to put it in the still playback mode. 3 Press the A.DUB button 46 on this VCR to put it in the recording pause mode.
4 Start playback on the source unit so that you can hear the sound. 5 When you reach the point from which you want to start audio dubbing, press the Pause/Slow button ⑦ on this VCR again to start recording the new sound or start your narration. 6 At the point where you want to stop audio dubbing, press the Stop button ⑨ to finish recording.
Hint:
- For audio dubbing with narration, you can use the built-in microphone of the connected video movie camera.

Before requesting service, check the following points again.
Message of On Screen Display

On screen display messages are displayed.
The error message is indicated in brackets [ ].
[PLEASE PUT IN A VIDEO CASSETTE.]
REC/OTR button 50 (REC button 27) or TIMER REC button 20 has been pressed without a video cassette inserted. Insert a video cassette.
[PLEASE STOP THE TAPE.]
“TUNER PRESET” has been selected during playback. Stop the tape.
[PLEASE SET THE CLOCK.]
157 TIMER REC button 20 or PROG./CHECK button 12 has been pressed when the clock is not set. Set the clock.
[PLEASE USE A CASSETTE WITH TAB.]
REC/OTR button 50 (REC button 27) or TIMER REC button 20 has been pressed without a video cassette with an intact erasure prevention tab. Use a video cassette with an intact erasure prevention tab.
[NO TIMER RECORDING HAS BEEN SET.]
TIMER REC button 20 has been pressed with no timer programmes. Set timer recording.
[VCR IS IN THE TIMER STANDBY MODE.]
POWER button 1 has been pressed during the timer standby mode. Press the TIMER REC button 20 to release the VCR from the timer standby mode.
The VCR will not operate correctly
The symptom description is indicated in quotations “”.
"The VCR display is not illuminated."
The mains lead has not been connected. Connect the mains lead to the mains supply. Power save setting is "ON". Set "POWER SAVE" to "OFF". See page 17.
"The VCR display is illuminated but the VCR will not operate."
The VCR is in the timer mode. Press the TIMER REC button 20 to operate the VCR manually. Safety devices are operating. Disconnect the mains lead and wait for 1 minute. Reconnect the mains supply and check functions.
"An unknown language appears on the TV screen."
The language setting has been set to an unknown language. Select the desired language. See page 14.
Playback will not operate correctly
The symptom description is indicated in quotation “”.
"The picture is noisy or is not in color.
Horizontal bars or lines run down the screen."
Tracking is not correct. Adjust the tracking. See page 31. The TV has not been tuned to the VCR. Tune the TV to the VCR. See page 9. The video heads are clogged or worn. Consult your dealer for further advice. The playback picture is distorted when using an E300 type video cassette that was recorded in the LP or EP mode. We recommend that you use video cassettes other than type E300. The playback picture is distorted when you record the tape in the EP mode using MESECAM system. However, this is not a malfunction. We recommend PAL system for recording in the EP mode.
Recording will not operate correctly
The symptom description is indicated in quotations “”.
"The oo indication flashes whenever recording is attempted."
The erasure prevention tab on the video cassette has been broken off. Use a tape with an intact erasure prevention tab, or cover the tab hole with adhesive tape, if the original recording is no longer required.
"The picture is recorded with noise or a blank screen."
The aerial or aerial cable is defective. Check the aerial connection to the VCR. See page 8. Check your normal TV picture. If there is no picture, check your aerial. The VCR is not correctly tuned. Retune the VCR. See pages 10–13. A1 or A2 has been selected. Select the required TV programme.
"Timer recording cannot be performed."
The clock or calendar has been incorrectly set. Check the clock and calendar. Set them to the present time. (Note that this is a 24-hour clock.) See page 14.
The recording starting or ending time setting is incorrect.
Set the recording starting and ending time correctly.
The VCR has not been set for timer recording.
Press the TIMER REC button 20 after programming for timer recording.
"AV external recordings cannot be made."
A1 or A2 has not been selected. Select A1 or A2 by pressing the INPUT SELECT button 33.
External AV connections are incorrect.
Check that the connections for external video and audio sources are correct. See page 28.
The remote control will not operate correctly
The symptom description is indicated in quotation “”.
"The remote control does not operate correctly."
The remote control transmitter beam is not reaching the VCR. Ensure that the remote control is being pointed at the VCR and that the transmitter beam is not obstructed.
The distance is too far.
Use the remote control within 7 m of the VCR.
The batteries are exhausted.
Replace the batteries. Note the precautions for replacement on page 6.
The batteries are incorrectly fitted with (+/-) reversed.
Fit the batteries correctly as shown on page 6.
Adjusting the Playback Picture
Under normal conditions, the VCR automatically adjusts the playback picture for optimum quality. However, in some cases it may be necessary to adjust it manually.
If the Picture Contains Noise Bars and It Is Not Clear to See (Tracking adjustment):
If noise bars appear during normal playback, slow playback or still playback, follow the operations below.
During normal or slow playback, press the Channel button 32 √ (−) or ∧ (+) until the noise bars disappear.
- If the noise bars appear during still playback, switch the VCR over to the slow playback mode and then adjust the tracking as explained above.
TV screen Playback picture containing noise bars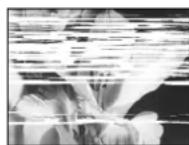
To Return to Auto Tracking:
Press the Channel buttons 32 ∨ (−) and ∧ (+) simultaneously.
If the Still Picture Scrolls Up or Down (V-Lock Adjustment):
If the still picture scrolls up or down, perform the following operation.
During still playback, keep the Channel button 32 √ (−) or ∧ (+) pressed until the picture stops scrolling.
Precautions:
- With certain TV models and tapes, it may not be possible to adjust the tracking.
- If you play back a cassette that was recorded on another VCR, the picture quality may be inferior and it may be necessary to adjust the tracking. Also, on some TVs, the picture may scroll up and down in the special playback functions.
However, these are not malfunctions.
Please read these precautions before you operate this VCR.
Avoid Sudden Changes in Temperature
If the VCR is suddenly moved from a cold to a warm place, dew may form on the tape and inside the VCR.
Humidity and Dust
Avoid places where there is high humidity or much dust, which may cause damage to internal parts.
Do Not Obstruct the Ventilation Holes
The ventilation holes prevent abnormal increases in temperature. Do not block or cover these holes. Avoid covering the holes with soft materials such as cloth or paper.
Avoid High Temperature
Keep the VCR away from extreme heat sources such as direct sunlight, heating radiators, or closed automobiles.
Avoid Magnets or Magnetized Objects
Never bring a magnet or magnetized object near the VCR as it will adversely affect its performance. Keep the VCR away from other equipment as much as possible when using it, to avoid any adverse effect on performance for both the VCR and the equipment.
Do Not Place Fingers or Other Objects Inside
Do not attempt to disassemble the VCR. Touching internal parts of this VCR is dangerous, and may cause serious damage. There are no user-serviceable parts inside.
Avoid Water
Keep the VCR away from flower vases, tubs, sinks, etc. If liquids are spilled into the VCR, serious damage could occur. If you spill any liquid into the VCR, consult qualified service personnel.
Lightning
To avoid damage by lightning, disconnect the aerial plug from the VCR.
Cleaning the VCR
Wipe the VCR with a clean, dry cloth. Never use cleaning fluid or other chemicals. Do not use compressed air to remove dust.
Stacking
Place the VCR in a horizontal position, and do not place anything heavy on it.
If Dew Forms in the VCR
Dew may form in the VCR if:
- The VCR is in a room where the heater has just been turned on.
- The VCR is in a room with steam or high humidity.
- The VCR is brought from cold surroundings into a well-heated room.
- The VCR is suddenly brought from cool surroundings, such as an air-conditioned room or car, to a place which is hot and humid.
Note:
- Do not operate the VCR for at least 1 hour if any of the above conditions occur. This VCR does not incorporate a dew sensor.
Dirt on the video heads
If the video heads get dirty, pictures will not be recorded or played back clearly.
(See the following conditions.)

If this happens, insert and eject a cassette 5–10 times successively to remove the dirt from the video heads. If the problem still persists after performing the above, contact a service personnel to request assistance.
NV-SJ407EE
Power Source:
110–240 V AC 50/60 Hz
Power Consumption: 16 W
Video Recording System: 2 rotary heads, helical scanning system
Video Heads: 4 heads
Tape Speed: PAL SP; 23.39 mm/s LP; 11.7 mm/s
NTSC SP; 33.3 mm/s
Tape Format: VHS tape
Record/Playback Time: PAL SP; 240 min with NV-E240
PAL LP; 480 min with NV-E240
FF/REW Time: approx. 60 s with NV-E180
VIDEO
Television System: CCIR; 625 lines, 50 fields, PAL colour signal
EIA; 525 lines, 60 fields, NTSC colour signal
Modulation System: Luminance; FM azimuth recording
Colour signal; converted subcarrier phase shift recording
75 ohm, terminated
VIDEO IN (AV2) (PHONO); 1.0 Vp-p, 75 ohm, terminated
Output Level: AV1; 1.0 Vp-p, 75 ohm, terminated
RF Modulated; UHF channel (E21–E69), 75 ohm
AUDIO
| Input Level: | AV1; | -6 dBV, | more than 10 kohm |
| AUDIO IN (AV2) (PHONO); | -6 dBV, | more than 47 kohm | |
| Output Level: | AV1; | -6 dBV, | less than 1 kohm |
Audio Track: 1 track (Normal–mono only)
Video Horizontal Resolution: Colour; more than 240 lines (SP)
Signal-to-Noise Ratio: Video; more than 43 dB (SP)
Audio; more than 43 dB (SP)
Audio Frequency Response: 80 Hz–8 kHz (SP)
Operating Temperature: 5°C–40°C
Operating Humidity: 35%–80%
Weight: 3.5 kg
Dimensions: 430 (W) × 87 (H) × 283 (D) mm
Standard Accessories: 1 pc. RF Coaxial cable
1 pc. Remote Control
2 pcs. R6 size batteries
1 pc. Clamp filter
Weight and dimensions shown are approximate.
Specifications are subject to change without notice.
Note to electrical appliance dealers only
To Demonstrate "Programme List Search"
1 Eject a video cassette, if it has been inserted. 2 Keep pressing the SEARCH button ④ on the remote control for at least 5 seconds. 3 Then, the demonstration mode will be displayed on the TV screen. 4 Press the MENU button 38 to stop the demonstration.
On Screen Display
- DEAR CUSTOMER
- POSITIONS OF CONTROLS AND COMPONENTS
- IMPORTANT
- WARNING
- FOR YOUR SAFETY
- DO NOT REMOVE OUTER COVER
- REMARKS
- BEFORE USE
- SETTING UP
- BASIC OPERATIONS
- ADVANCED OPERATIONS
- HELPFUL HINTS
- INTRODUCTION TO CONTROLS AND COMPONENTS
- VCR OPERATION
- ② NUMERIC BUTTONS
- ⑬ RESET BUTTON
- AUDIO OUT BUTTON
- ⑱ VCR/TV BUTTON
- INFRA-RED TRANSMITTER
- ⑲ CHILD LOCK FUNCTION BUTTONS
- TO ACTIVATE THE CHILD LOCK FUNCTION
- TO CANCEL THE CHILD LOCK FUNCTION
- INFRA-RED REMOTE CONTROL RECEIVER WINDOW
- CVC (CRYSTAL VIEW CONTROL) INDICATOR
- INSERTING REMOTE CONTROL BATTERIES
- IF THE SLIDING COVER OF THE REMOTE CONTROL BECOMES DETACHED
- NOTES FOR BATTERY REPLACEMENT
- TV OPERATION
- ① POWER BUTTON
- ③ AV BUTTON
- ③1 VOLUME BUTTON
- ③2 CHANNEL BUTTON
- PREPARATION
- OPERATIONS
- NOTES
- BASIC CONNECTIONS
- IMPORTANT INFORMATION
- CONNECTION TO A TV USING THE 21-PIN SCART SOCKET
- WHEN THE VCR IS TURNED ON AFTER UNPACKING AND CONNECTING THE AERIAL CABLE AND THE MAINS LEAD, PLUG IN AUTO TUNING STARTS AUTOMATICALLY
- TURN ON THE TV AND THE VCR
- SET THE TV TO AN UNUSED POSITION WHICH YOU WISH TO USE FOR YOUR VIDEO PLAYBACK
- PRESS THE MENU BUTTON
- TO CHANGE THE RF OUTPUT CHANNEL
- NOTE
- PLUG IN AUTO TUNING
- TO CANCEL AUTO TUNING MID-OPERATION
- TO RESTART PLUG IN AUTO TUNING
- IF AUTO TUNING STOPS HALFWAY BY TURNING THE VCR OFF, PLAYBACK OR A POWER FAILURE
- AUTO TUNING USING THE ON SCREEN DISPLAY
- INTRODUCTION
- PREPARATIONS
- MANUAL AUDIO SYSTEM SETTING PROCEDURE
- MANUAL COLOUR SYSTEM SETTING PROCEDURE
- MANUAL TUNING PROCEDURE
- DIRECT TUNING
- FINE TUNING PROCEDURE
- BLANKING OF UNUSED PROGRAMME POSITIONS
- TO ADD AND DELETE THE CHANNEL
- EXAMPLE
- LANGUAGE SETTING OF THE ON SCREEN DISPLAY
- SETTING THE CLOCK OF YOUR VCR
- AT THE SET TIME (H:M) POINT
- TIME RESET FUNCTION
- TO MAKE VARIOUS INDICATORS APPEAR ON SCREEN DISPLAY
- TO SET THE COLOUR TV SYSTEM
- OPTION SETTING
- TO SELECT THE CORRESPONDING VIDEO CASSETTE TAPE LENGTH TO DISPLAY THE APPROXIMATE REMAINING TAPE TIME
- (TAPE SELECT)
- TO SELECT THE COLOUR TV SYSTEM OF THE TV USED TO RECORD NTSC SIGNALS
- TO SELECT THE COLOUR TV SYSTEM OF THE TV USED TO PLAY BACK A TAPE RECORDING NTSC SIGNALS
- TO PLAY A NTSC GAME ON PAL SYSTEM TV
- TO REDUCE THE VCR'S POWER CONSUMPTION WHEN THE VCR IS SWITCHED OFF
- SETTING THE SYSTEM FOR PLAYBACK
- SETTING THE SYSTEM FOR RECORDING
- FOR NORMAL PLAYBACK
- FOR CUE PLAYBACK
- FOR REVIEW PLAYBACK
- FOR STILL PLAYBACK
- FOR SLOW PLAYBACK
- FAST-FORWARDING OR REWINDING THE TAPE
- TO FAST-FORWARD THE TAPE
- TO REWIND THE TAPE
- TO STOP PLAYBACK
- TO STOP PLAYBACK AUTOMATICALLY (PLAYBACK OFF TIMER FUNCTION)
- TO STOP MIDWAY
- TO PLAY BACK A RECORDED PART REPEATEDLY
- TO CANCEL THE REPEAT PLAYBACK MODE
- NTSC PLAYBACK
- NOTE FOR NTSC PLAYBACK ONLY ON PAL SYSTEM TV
- CONVENIENT AUTOMATIC FUNCTIONS
- VCR AUTO POWER ON
- AUTO PLAYBACK START
- VCR-OFF PLAYBACK
- AUTO REWIND
- AUTOMATIC SWITCHING OFF AND EJECTION
- VCR-OFF SEARCH
- TO PLAY BACK IN THE DESIRED PICTURE QUALITY (PICTURE MODE)
- INSERT A VIDEO CASSETTE WITH AN INTACT ERASURE PREVENTION TAB
- SELECT THE TV STATION USING THE CHANNEL BUTTON
- PRESS THE REC (REC/OTR) BUTTON ⑲ (50) TO START RECORDING
- PRESS THE STOP BUTTON Ⓗ TO STOP RECORDING
- TO SELECT THE DESIRED TAPE SPEED
- TO PAUSE RECORDING
- TO VIEW ONE TV PROGRAMME WHILE RECORDING ANOTHER TV PROGRAMME
- TO DISPLAY THE APPROXIMATE REMAINING TAPE TIME
- TO SELECT THE RECORDING DURATION AND PERFORM TIMER RECORDING (OTR RECORDING)
- TO PERFORM OTR RECORDING
- TO STOP THE OTR RECORDING BEFORE THE END
- KEY PROGRAMMING
- TO SUSPEND THE TIMER RECORDING STANDBY MODE
- WEEKLY TIMER RECORDING
- DAILY TIMER RECORDING
- TIMER RECORDING FROM AN EXTERNAL SIGNAL SOURCE
- SETTING OTHER PROGRAMMES IN SUCCESSION
- PROGRAMMING A TIMER RECORDING OF A TV PROGRAMME UNTIL ITS END (TAPE SPEED AUTO CHANGE FUNCTION)
- CHECKING A TIMER PROGRAMME
- CANCELLING A TIMER PROGRAMME
- SEARCHING TIMER-RECORDED PROGRAMMES
- (PROGRAMME LIST SEARCH)
- DISPLAYING THE PROGRAMME LIST SEARCH SCREEN
- SEARCHING OTHER PROGRAMMES
- TO STOP THE SEARCH AT ANY TIME
- TO FIND THE BEGINNING OF EACH RECORDING
- (VHS INDEX SEARCH SYSTEM)
- OPERATION
- TO CANCEL THE INDEX SEARCH OR TO STOP PLAYBACK
- SEARCHING WHILE CHECKING THE VIDEO CASSETTE CONTENTS (INTRO-JET SCAN)
- TO CANCEL THE INTRO-JET SCAN OR TO STOP PLAYBACK: PRESS THE STOP BUTTON ⑨
- ASSEMBLY EDITING
- AUDIO DUBBING
- HINT
- MESSAGE OF ON SCREEN DISPLAY
- THE VCR WILL NOT OPERATE CORRECTLY
- PLAYBACK WILL NOT OPERATE CORRECTLY
- RECORDING WILL NOT OPERATE CORRECTLY
- THE REMOTE CONTROL WILL NOT OPERATE CORRECTLY
- ADJUSTING THE PLAYBACK PICTURE
- IF THE PICTURE CONTAINS NOISE BARS AND IT IS NOT CLEAR TO SEE (TRACKING ADJUSTMENT)
- TO RETURN TO AUTO TRACKING
- IF THE STILL PICTURE SCROLLS UP OR DOWN (V-LOCK ADJUSTMENT)
- PRECAUTIONS
- AVOID SUDDEN CHANGES IN TEMPERATURE
- HUMIDITY AND DUST
- DO NOT OBSTRUCT THE VENTILATION HOLES
- AVOID HIGH TEMPERATURE
- AVOID MAGNETS OR MAGNETIZED OBJECTS
- DO NOT PLACE FINGERS OR OTHER OBJECTS INSIDE
- AVOID WATER
- LIGHTNING
- CLEANING THE VCR
- STACKING
- IF DEW FORMS IN THE VCR
- DEW MAY FORM IN THE VCR IF
- DIRT ON THE VIDEO HEADS
- NV-SJ407EE
- NOTE TO ELECTRICAL APPLIANCE DEALERS ONLY
- TO DEMONSTRATE "PROGRAMME LIST SEARCH
Brand : PANASONIC
Model : NV-SJ407EE
Category : VCR