
Surazo VM 1056 - Vacuum Cleaner AMICA - Free user manual and instructions
Find the device manual for free Surazo VM 1056 AMICA in PDF.


| Product Type | Canister Vacuum Cleaner |
| Brand | Amica |
| Model | Surazo VM 1056 |
| Dimensions (L x W x H) | Approx. 40 x 25 x 30 cm |
| Weight | Approx. 5.5 kg |
| Power Supply | 220-240 V, 50/60 Hz |
| Motor Power | 700 W |
| Dust Capacity | 2.5 L |
| Filter Type | HEPA washable filter |
| Filtration System | Cyclonic filtration |
| Cord Length | 6 m |
| Cleaning Radius | 9 m |
| Noise Level | 75 dB(A) |
| Suction Power Control | Electronic, 2 levels |
| Attachments Included | Floor nozzle, crevice tool, upholstery brush, dusting brush |
| Dust Bag Indicator | Yes |
| Automatic Cord Rewind | Yes |
| Parking System | Vertical and horizontal parking |
| Handle | Ergonomic carry handle |
| Maintenance | Washable dust container and filter; HEPA filter replacement every 6 months |
| Safety Features | Overheat protection, motor thermostat |
| Repairability Index | 8.5/10 (spare parts available for 10 years) |
| General Information | Energy class A, suitable for carpets and hard floors |
Frequently Asked Questions - Surazo VM 1056 AMICA
User questions about Surazo VM 1056 AMICA
0 question about this device. Answer the ones you know or ask your own.
Ask a new question about this device
Download the instructions for your Vacuum Cleaner in PDF format for free! Find your manual Surazo VM 1056 - AMICA and take your electronic device back in hand. On this page are published all the documents necessary for the use of your device. Surazo VM 1056 by AMICA.
USER MANUAL Surazo VM 1056 AMICA
natural_image
Purple ultrasonic vacuum cleaner with white buttons and control panel (no visible text or symbols)PL INSTRUKCJA OBSŁUGI....6
EN OPERATING INSTRUCTIONS....13
CS NÁVOD K OBSLUZE....20
1


2

natural_image
Line drawing of a vacuum cleaner with attached hose and control panel (no text or symbols)
natural_image
Line drawing of a vacuum cleaner with a tool inserted, showing the component and mounting ring (no text or symbols)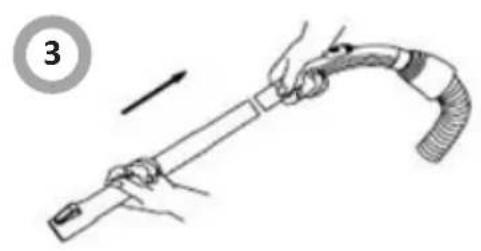
natural_image
Illustration of a hand holding a tool with a curved handle, no text or symbols present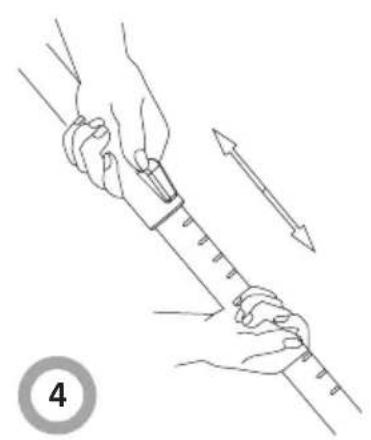
natural_image
Illustration of a hand holding a syringe with an arrow indicating upward motion (no text or symbols)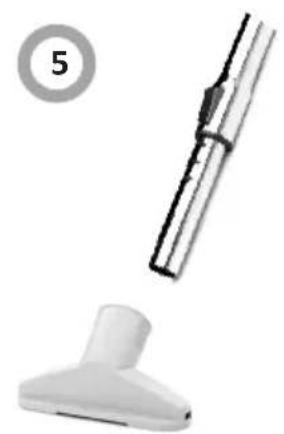
natural_image
Two white cleaning tools: a brush and a triangular tool, with no visible text or symbols.
natural_image
Line drawing of a vacuum cleaner with a black arrow pointing to the component (no text or symbols present)
natural_image
Line drawing of a vacuum cleaner with a black arrow pointing to the component (no text or symbols present)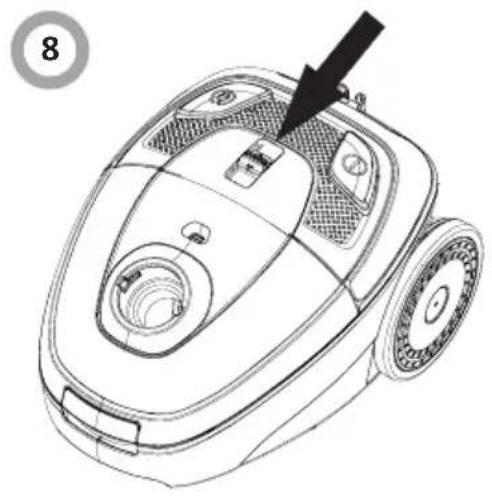
natural_image
Line drawing of a vacuum cleaner with labeled component (no text or symbols)
natural_image
Line drawing of a vacuum cleaner with a curved arrow indicating motion (no text or symbols)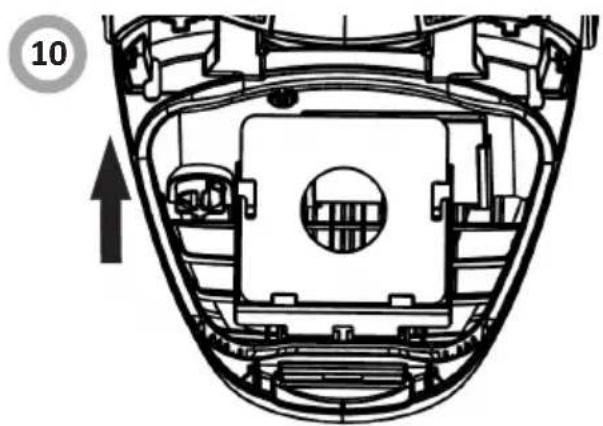
natural_image
Technical diagram of a mechanical component with internal structure and an upward arrow indicator (no text or symbols)
natural_image
Cross-sectional diagram of a car intake manifold showing internal compartments and structural elements (no text or labels)

natural_image
Mechanical assembly diagram showing a motor or fan unit with rotating components and a directional arrow (no text or symbols)3
DZIEKUJEMY ZA WYBÓR SPRZĘTU MARKI AMICA
natural_image
Simple line drawing of a three chasing recycling symbol (no text or labels)natural_image
Symbol of a trash bin crossed out by two diagonal lines (no text or labels)
natural_image
Illustration of a faucet spraying water onto a surface and another panel with liquid drops (no text or symbols)GWARANCJA I OBSŁUGA POSPRZEDAŻOWA
Gwarancja
THANK YOU FOR PURCHASING AN AMICA APPLIANCE
DEAR CUSTOMER,
Your Amica appliance is exceptionally easy to use and extremely efficient. Before being packaged and leaving the manufacturer, the appliance was thoroughly checked with regard to safety and functionality.
Before using the appliance, please carefully read these Operating Instructions
CONTENTS
SAFETY INSTRUCTIONS FOR USE....14
DISPOSING/SCRAPPING OF USED EQUIPMENT....16
DESCRIPTION OF THE APPLIANCE....18
CLEANING AND MAINTANCE....19
WARRANTY AND AFTER SALES SERVICE....19

The appliance is designed for household use only.
The manufacturer reserves the right to introduce changes, which do not affect operation of the appliance.
The pictures in this operating instructions are for illustration only.
Manufacturer's Declaration
The manufacturer hereby declares that this product meets the requirements of the following European directives:
- Low Voltage Directive 2014/35/EC
- Electromagnetic Compatibility (EMC) Directive 2014/30/EC
• ErP Directive 2009/125/EC
• Directive RoHS 2011/65/EC
and has thus been marked with the symbol and been issued with a declaration of compliance made available to market regulators.
Important! To minimize the risk of fire, electric shock or injury:
- Carefully read this instruction before using the appliance.
- Children do not realize the dangers that can arise when using electrical appliances; therefore keep the appliance out of reach of children.
- Do not immerse the body of the appliance in water or other liquids. Immersing in water may cause an electric shock.
- If water spills on the external components of the appliance, dry it thoroughly before switching back on. Do not touch wet surfaces in contact with the appliance connected to power supply, immediately disconnect it from the mains.
- Do not use the appliance if it shows any signs of damage to the power cord, or if the appliance has been dropped on the floor.
• After use, always pull out the plug from the socket, and also in case of any malfunction, before cleaning or before changing accessories. - When pulling out the plug from the wall outlet, never pull by the cord, only the plug, holding the socket with your other hand.
- The appliance is Class II fire protection electrical equipment.
- Do not attempt to remove any parts of the housing.
- To prevent damage to the power cord, do not place it over sharp edges or close to hot surfaces.
- Do not expose the appliance to rain or humidity, and do not use it outdoors. Do not operate the appliance with wet hands.
- If the power cord or plug is damaged, it should be replaced by a professional repair shop in order to avoid hazard.
- Never place the appliance on hot surfaces.
- Using attachments that were not supplied with the product may cause damage to the appliance.
- Never leave the appliance connected to the mains without supervision.
- The surface on which the appliance is used shall be levelled, clean and dry.
SAFETY INSTRUCTIONS FOR USE
- This appliance is not intended for use by persons (including children) with physical, mental or sensory handicaps, or by persons inexperienced or unfamiliar with the appliance, unless under supervision or in accordance with the instructions as communicated to them by persons responsible for their safety. Children shall not play with the appliance.
- Pull the plug from the wall outlet before replacing accessories.
- This appliance can be used by children aged 8 years and older or by persons with physical, mental or sensory handicaps, or by those who are inexperienced or unfamiliar with the appliance, provided they are supervised or have been instructed how to safely use the appliance and are familiar with risks associated with the use of the appliance. Ensure that children do not play with the appliance. Cleaning and maintenance of the appliance should not be performed by children unless they are 8 years or older and are supervised by a competent person.
• To switch the appliance on, press the power switch (Fig. 1, item 2). The complete appliance shutdown is possible by disconnecting the appliance from the power supply. - Do not pull the vacuum cleaner or move it by the cord, do not use the cord as a handle, do not close the door squeezing the cord, and do not drag the cord over sharp edges. Be careful not to move the vacuum cleaner on the cord.
- Do not insert any objects into the openings in the vacuum cleaner. Do not use the vacuum cleaner when any opening is blocked, dispose of dust, lint, hair and anything that may restrict air flow.
- Keep hair, loose clothing parts, fingers and other body parts away from the openings and moving parts.
- Do not use the vacuum cleaner to collect flammable substances such as petrol, and do not use it in places where similar substances may be present.
- Hold the plug when retracting the cord. Do not let the plug was left loose during retracting.
- Do not use the vacuum cleaner without a dust bag and/or filters.
SAFETY INSTRUCTIONS FOR USE
- Do not collect any items that burn or smoke, such as cigarettes, matches or hot ashes.
- If the opening, which sucks air, hose or telescopic tube are clogged, you should immediately switch the vacuum cleaner off. Before restarting the vacuum cleaner, first remove the blocking item.
- Do not use the vacuum cleaner too close to heaters, radiators, cigarette butts, etc.
- Before you put the plug into the wall outlet, make sure your hands are dry.
- Before using the vacuum cleaner, remove sharp objects from the floor to avoid damaging the dust bag (depending on the model).
- Do not collect fine particles such as: flour, gypsum, printer toners, etc., as this may clog filters and damage the vacuum cleaner.
- This vacuum cleaner is equipped with a power cord retractor.
DISPOSING/SCRAPPING OF USED EQUIPMENT
UNPACKING

natural_image
Simple line drawing of a three chasing recycling symbol (no text or labels)During transportation, protective packaging was used to protect the appliance against any damage. After unpacking, please dispose of all elements of packaging in a way that will not cause damage to the environment.
All materials used for packaging the appliance are environmentally friendly; they are 100% recyclable and are marked with the appropriate symbol.
Important! Packaging materials (bags, polyethylene, polystyrene, etc.) should be kept away from children during unpacking.
DISPOSAL OF OLD APPLIANCE

natural_image
Simple line drawing of a trash bin with two crossed lines indicating no waste or prohibition (no text or symbols)
In accordance with European Directive 2012/19/EU and local legislation regarding used electrical and electronic goods, this appliance is marked with the symbol of the crossed-out waste container. This marking indicates that the appliance must not be disposed of together with other household waste after it has been used.
The user is obliged to hand it over to waste collection centre collecting used electrical and electronic goods. The collectors, including local collection points, shops and local authority departments provide recycling schemes.
Proper handling of used electrical and electronic goods helps avoid environmental and health hazards resulting from the presence of dangerous components and the inappropriate storage and processing of such goods.
DESCRIPTION OF THE APPLIANCE
Appliance components (Fig. 1, item ...)
| 1. Wheels | (1) Telescopic tube 1 |
| 2. Power button | (2) All-purpose suction brush 1 |
| 3. Cord retractor button | (3) Book-dusting brush (2 in 1) 1 |
| 4. Air exhaust | (3) Suction head for narrow spaces 1(2 in 1) |
| 5. Power smooth control knob | (4) Dust paper bag 2l 1 |
| 6. Dust bag full indicator | (5) Hose 1 |
| 7. Cover lock | (6) EPA12 filter 1 |
| 8.Hose socket | (7) Suction head for upholstery 1 |
| (8) Miniturbo brush* 1 |
OPERATION (Fig. 3)
Preparing for vacuuming

Always unplug the appliance before attaching or removing attachments!
- Attaching flexible hose: insert the hose end into the inlet port. Push until the end falls into place with an audible click (Fig. 3, item 1).
- Removing the hose: press buttons on the hose end, unlatch and remove the hose from the inlet port (Fig. 3, item 2).
- Connect the telescopic tube with the hose (Fig. 3, item 3) and the proper attachment (Fig. 3, item 5), slide open the telescopic tube to a suitable length (Fig. 3, item 4).
- Grab the plug and pull the power cord while holding the appliance body, plug into a power outlet.
-
Before you start vacuuming, extend power cord cable to sufficient length and insert the plug into the wall socket. The yellow mark on the power cord indicates it is extended almost all the way. When you see the red mark do not pull the power cord any further.
-
Switch on the appliance with the on / off button. (Fig. 3, item. 6).
- Set the desired appliance power with the power control knob. (Fig. 3, item. 8).
- After finishing using the appliance, press the on/off button to turn off the vacuum cleaner (Fig. 3, item 6).
● Unplug the cord from the wall outlet. - Retract the power cord by pressing cord retractor button (Fig. 3, item 7). For this operation hold the cord to prevent it from tangling or bumping the plug on the vacuum cleaner housing.
- Disconnect the suction - cleaning head from the tube and disconnect the telescopic tube from the hose. (Fig. 3, item. 3, 5).
- Close the telescopic tube (Fig. 3, item. 4).
The vacuum cleaner may be stored in a vertical or horizontal position. The hose can remain attached to the vacuum cleaner, but please be careful not to bend it too much during storage.
Replacing the dust bag
Before replacing the dust bag, remove the power cord plug from the wall outlet. Always use the vacuum cleaner with a fitted dust bag. If you forget to insert a dust bag or it is fitted incorrectly, the cover cannot be closed completely - fix the position of a dust bag and close the cover
- After disconnecting flexible hose, open the front cover by lifting it upwards (Fig. 3, item 9, 10).
- Release the dust bag lock and remove the bag from the guides, if filled with dust.
- Insert a new or empty dust bag by sliding it into the guides.
- Close the cover by pressing it down until it clicks.
Cleaning and replacing the inlet filter
● Before cleaning the filter, remove the power cord plug from the wall outlet.
- The filter shall be cleaned when there are visible stains on it, wash the filter in warm water with no detergent. Use it only when completely dry.
● Always use the vacuum cleaner with a filter in place.
● Failure to install the filter may result in motor damage.
- Remove the dust bag.
- Remove the filter by sliding it up from the guides (Fig. 3, item 11).
- Clean the filter or replace.
- Replace the filter again placing it in the guides. Make sure that the filter before the foundation was completely dry.
If the dust bag full indicator (Fig. 1, ittem 6) goes on, check whether the suction brush or the cleaning head, hose or tube is not blocked with large items stopping the air flow. After removing the items, if present, restart the vacuum cleaner - if the dust bag full indicator is still replace the dust bag with a new one.
Cleaning and replacing the outlet filter EPA12
● Before cleaning the filter, remove the power cord plug from the wall outlet.
- Clean the filter when it is clearly soiled. Shake dirt off the filter and then brush it with a soft bristle brush. Then rinse in lukewarm water, without any detergent. Do not direct strong jet of water onto the filter. Use it only when completely dry. In case of heavy soiling or lasting damage, replace the filter with a new one.
- Depending on the intensity of use, it is recommended that you clean the filter once a month and replace it with a new one every six months.
- It is recommended that you only use original Amica filters for your vacuum cleaner.
- Open the air exhaust cover (Fig. 3, ittem 12, 13).
- Remove the filter, clean or replace it with a clean one.
- Close the air exhaust cover.
Filters cleaning.
Rinse the filter with lukewarm water and let dry completely

natural_image
Illustration of a pipe drain and a hanging sheet with water droplets (no text or symbols)WARRANTY AND AFTER SALES SERVICE
Warranty
Warranty service as stated on the warranty card.
The manufacturer shall not be held liable for any damage caused by improper use of the product.
BLAHOPŘEJEME VÁM K VÝBĚRU ZNAČKY AMICA
natural_image
Simple line drawing of a three chasing recycling symbol (no text or labels)natural_image
Symbol of a trash bin crossed out by two diagonal lines (no text or labels)
natural_image
Illustration of a faucet spraying water onto a surface and a hanging sheet of water with droplets (no text or symbols)Amica S.A.


- DZIEKUJEMY ZA WYBÓR SPRZĘTU MARKI AMICA
- GWARANCJA I OBSŁUGA POSPRZEDAŻOWA
- Gwarancja
- THANK YOU FOR PURCHASING AN AMICA APPLIANCE
- DEAR CUSTOMER,
- CONTENTS
- Manufacturer's Declaration
- Important! To minimize the risk of fire, electric shock or injury:
- SAFETY INSTRUCTIONS FOR USE
- UNPACKING
- DISPOSAL OF OLD APPLIANCE
- DESCRIPTION OF THE APPLIANCE
- OPERATION (Fig. 3)
- Preparing for vacuuming
- Replacing the dust bag
- Cleaning and replacing the inlet filter
- Cleaning and replacing the outlet filter EPA12
- Filters cleaning.
- WARRANTY AND AFTER SALES SERVICE
- Warranty
- BLAHOPŘEJEME VÁM K VÝBĚRU ZNAČKY AMICA
Brand : AMICA
Model : Surazo VM 1056
Category : Vacuum Cleaner