
SI 228B - Iron HYUNDAI - Free user manual and instructions
Find the device manual for free SI 228B HYUNDAI in PDF.


| Type of product | Steam iron |
| Brand | Hyundai |
| Model | SI 228B |
| Power consumption | 2200-2400 W |
| Voltage | 220-240 V, 50-60 Hz |
| Water tank capacity | 300 ml |
| Soleplate material | Stainless steel |
| Steam output | Continuous steam up to 40 g/min |
| Steam boost | Up to 150 g/min |
| Spray function | Yes |
| Vertical steaming | Yes |
| Anti-drip system | Yes |
| Auto shut-off | Yes, after 8 minutes of inactivity |
| Cord length | 2.5 m |
| Dimensions | 31 x 13 x 16 cm |
| Weight | 1.3 kg |
| Cleaning & descaling | Self-cleaning function; descale regularly with vinegar solution |
| Safety features | Thermal fuse, auto shut-off, anti-overheat |
| Spare parts availability | Soleplate, water tank cap, steam button available from authorized service centers |
| Manual languages | BG, CS, EN, PL, SK and many others via email request |
Frequently Asked Questions - SI 228B HYUNDAI
User questions about SI 228B HYUNDAI
0 question about this device. Answer the ones you know or ask your own.
Ask a new question about this device
Download the instructions for your Iron in PDF format for free! Find your manual SI 228B - HYUNDAI and take your electronic device back in hand. On this page are published all the documents necessary for the use of your device. SI 228B by HYUNDAI.
USER MANUAL SI 228B HYUNDAI
NÁVOD K POUŽITÍ
NÁVOD NA POUŽITIE
INSTRUKCJA OBSŁUGI
INSTRUCTION MANUAL
Obr. 2
ŽEHLENÍ VE SVISLÉ POLOZE
Obr. 3
KROPENÍ
Obr.4
Obr. 5
Obr. 2
ŽEHLENIE V ZVISLEJ POLOHE
Obr. 3
KROPENIE
Obr. 5
PRASOWANIE W POZYCJI PIONOWEJ
Rys. 3
Ostrzeżenie:
Rys. 4
Ostrzeżenie:

Rys. 5
Dear customer, thank you for purchasing our product. Please read the operating instructions carefully before putting the appliance into operation and keep these instructions including the warranty, the receipt and, if possible, the box with the internal packing.
General Safety Instructions
- The appliance is designed exclusively for private use and for the envisaged purpose. This appliance is not fit for commercial use.
- Keep it away from sources of heat, direct sunlight, humidity (never dip it into any liquid) and sharp edges. Do not use the appliance with wet hands. If the appliance is humid or wet, unplug it immediately. Do not put it in water.
- When cleaning or putting it away, switch off the appliance and always pull out the plug from the socket (pull on the plug, not the cable) if the appliance is not being used and remove the attached accessories.
- Do not operate the machine without supervision. If you should leave the workplace, always switch the machine off or remove the plug from the socket (pull the plug itself, not the lead).
- To protect children from the dangers posed by electrical appliances, make sure that the cable is hanging low and that children do not have access to the appliance.
- Check the appliance and the cable for damage on a regular basis. Do not use the appliance if it is damaged.
- Do not try to repair the appliance on your own. Always contact an authorized technician. To avoid the exposure to danger, always have a faulty cable be replaced only by the manufacturer, by our customer service or by a qualified person and with a cable of the same type.
- Pay careful attention to the following "Special Safety Instructions for this unit".
Special safety instructions for this unit
- Remove any sticker or protective cover from the soleplate before using the iron.
- Use for the firsttimeonanoldpieceoffabrictoensurethesoleplateandwatertankare completely clean.
- When firstusedsomevapourmaybeemitted,afterashortwhile,however,thiswillcease.
- Use iron only for its intended use.
• To protect against a risk of electric shock, do not immerse the iron in water or other liquids. - The iron should always be turned to minimum before plugging or unplugging from outlet. Never pull cord to disconnect from electrical outlet instead, grasp plug and pull to disconnect.
- The cord can be wrapped around the stowage facility at the rear of the iron.
- Do not touch hot surfaces. High temperatures are generated during use which could cause burns.
- Always use the handle and warn others (especially children) of the possible dangers of burns from steam, hot water or the soleplate, especially when ironing vertically.
• Always disconnect iron from electrical outlet when not in use.
- Store the unit out of reach of children.
- Do not allow the power cord to hang down over edges where it can be reached by children.
• Always switch off at the power outlet, then uuplug the appliance from the outlet:
- before filling with water or emptying it.
- before leaving it unattended
- before clearing and maintenance—unless otherwise specified in this boolet.
-
immediately after use.
-
The iron must be used and resetted on a stable surface
- When placing the iron on its stand, ensure that the surface on which the stand is placed is stable.
- The iron is not to be used if it has been dropped, if there are visible signs of damage or if it is leaking.
• Never iron or dampen cloths while wearing them.
- Do not use the appliance outdoors or in bathrooms.
- This appliance is not intended for use by persons (including children) with reduced physical. Sensory or mental capabilities, or lack of experience and knowledge, unless they have been given supervision or instruction concerning use of the appliance by a person responsible for their safety.
• Children should be supervised to ensure that they do not play with the appliance.
- To avoid a circuit overload, do not operate another high wattage appliance on the same circuit.
- If an extension cord is absolutely necessary, a 10-ampere cord should be used. Cords rated for less amperage may overheat. Care should be taken to arrange the cord so that it cannot be pulled or tripped over.
- Do not use chemical additive, scented substances or decalcifiers. Failure to comply with the above-mentioned regulations leads to the loss of guarantee.
Description of the controls

P1 Sparing nozzle
P2 Filling cover.
P3 Steam selektor knob
P4 Spray buton is conveniently positioned for a finemistspray.
P5 Surge of steam Button for an extra burst of steam.
P6 Temperature dial
P7 Power cord guard
P8 Pilot lamp
P9 Stainless steel soleplate
P10 Large 310 ml water tank.
P11 Self clean button
P12 Heating indicator
Instructions for Use
The product has many functions such as temperature regulating, spraying, dry ironing, variable steam, bursting steam, etc. When using the iron for the first time, you may notice a slight emission of smoke and hear some sounds made by the expanding plastics. This is quite normal and it stops after a short time. We also recommend passing the iron over an ordinary cloth before using it for the first time.
SETTING THE TEMPERATURE
First sort items to be ironed, according to the International Textile Care Labeling Code.
Use
- Stand the iron on its heel and turn the temperature dial to minimum. Plug the cord into an electrical outlet.
- Select the temperature setting required by rotating the temperature dial so that the desired setting is aligned with the heating indicator P12
- The heating indicator light will glow showing that the iron is heating up. When it goes out, the iron has reached the selected temperature and is ready for use. The light will glow and go out as the thermostat maintains the selected temperature.
| Noteon label means: "This article cannot be ironed!"(e.g. chlofofibre, acryl, elastodiene.) | |||
| label (with ironing instruction) | kind of textile | temperature dial | steam selector(advised position) |
| syntheticmodacry polypropylene polyurethaneacetate triacetatepolyamide(nylon) polyester modal viscose(rayon) | |||
| silkwool | |||
| cotton | |||
| linen | |||
Fig.1
Table A.
IMPORTANT:
The steam iron incorporate a thermal safety fuse to protect the steam iron from over-heating. However, the iron should not be left unattended while it is connected to an electrical outlet. Special care should always be taken when there are children in the home.
FILLING WITH WATER
- First ensure that the iron is disconnected from the electricity supply before fillingwithwater.
- Set the Steam Selector to position „0“.
- Open the water filling in letcover, hold the iron on an angle 45° . Slowly pour the water into the reservoir using the special filling beaker and taking care not to go over the maximum level (about 300ml) indicated by “MAX” on the reservoir.
- Push firmly to close the water filling inlet cover.
- During the ironing process, always ensure there is sufficient water in the water tank.
ANTI-CALC SYSTEM
A special resin filter inside the water reservoir softens the water and prevents scale build-up in the plate. The resin filter is permanent and does not need replacing. However, please note that the anti-calc filter will not completely stop the natural process of lime scale build-up.
Please note:
Use tap water only. Distilled and/demineralised water makes the anti-calc system ineffective. Failure to comply with the above-mentioned regulations leads to the loss of guarantee.
ANTI-DRIP SYSTEM
With conventional steam irons, water may leak from the soleplate if a too low temperature has been selected. This will then cause stains. However, your iron is fitted with an anti-drip system which is designed to prevent water escaping from the soleplate when the iron is too cold. During use the anti-drip system may emit a loud „click“, particularly dutiny heat-up or whilst cooling down. This is perfectly normal and indicates that the system is functioning correctly.
DRY-IRONING
Turn the steam selector to position „0“ this shuts off the steam flow, should there be any water-in the tank. Select the temperature setting most suitable for the fabric to be ironed. Once the temperature has been reached, ironing may commence. Ensure that there is sufficient water in the water tank if you wish to use the spray facility occasionally while dry-ironing. If dry-ironing for longer than 20 minutes, the water tank should be emptied to prevent over heating of any water present.
STEAM-IRONING
As per the indications on the temperature dial and the table A (see section „Setting the temperature“) that steam-ironing is only possible at higher ironing temperatures.
- Plug into the mains supply and switch on.
- Set the temperature dial at the required positron within the steam area (or) and wait until the heating indicator light has gone out.
- Set the steam selector to the required setting. You can then begin steam ironing.
SURGE OF STEAM
The Surge of Steam provides an extra burst of steam which is ideal for removal of stubborn
creases and wrinkles during STEAM or DRY ironing.
- Turn the temperature setting to the hottest setting within the steam area and wait until the heating indicator light goes out.
- Lift the iron slightly above the surface of the fabric, press the Surge of Steam button down firmly and then release it during ironing (Fig.2).
An intense „burst“ of steam penetrates deep into the fabric. For optimum steam quality, leave an interval of at least four seconds between pressing the Surge of Steam button.
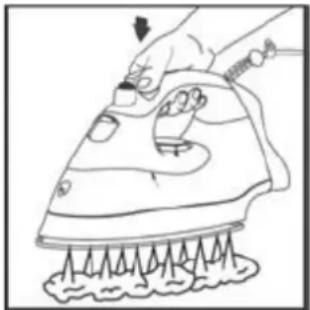
Fig. 2
NOTE: The Surge of Steam can be used when the Steam Selector is in maximum setting.
VERTICAL IRONING
The unique Vertical Steam System allows you to use the iron for vertical ironing. This is especially useful for getting wrinkles out of hanging clothes, curtains, wall hangings, etc.
Hold the iron vertically, in front of the item to be steamed and press the Surge of Steam buton (Fig. 3).
WARNING! Never iron clothes on the body! iron, and continue ironing.

Fig. 3
Warning:
The shot-steam function can only be used at high temperatures. Stop
the emission when the plate temperature control light P8 comes on, than start ironing again only after the light has gone off.
SPRAYING
Spray may be used to dampen difficult fabrics, dry areas, wool items and accidental creases.
Press the spray button firmly to produce a fine spray of water ahead of the iron, and continue ironing Fig 4..
Spray may also be used with delicate (synthetic) fabrics which are ironed at a low temperature and thus cannot be steam-ironed.

Fig.4
Warning:
For delicate fabrics, we recommend moistening the fabric beforehand using the spray function, or putting a damp cloth between the iron and the fabric. To avoid staining, do not use the spray on silk or synthetic fabrics.
ADVICE FOR GOOD IRONING
- We recommend using the lowest temperatures with fabrics that have unusual finishes (sequins, embroidery, flush, etc.).
- If the fabric is mixed (e.g. 40% cotton 60% synthetics), set the thermostat to the temperature of the fibre requiring the lower temperature.
- If you don't know the composition of the fabric, determine the suitable temperature by testing on a hidden corner of the garment. Start with a low temperature and increase it gradually until it reaches the ideal temperature.
- Never iron areas with traces of perspiration or other marks: the heat of the plate fixes the stains on the fabric, making them irremovable.
- To avoid marking silk, woolen or synthetic garments shiny, iron them inside out.
- To avoid marking velvet garments shiny, iron in one direction (following the fibre) and do not press down on the iron.
- The heavier the washing machine is loaded, the more garments come out creased. This also happens when the spin drying revolutions are very high.
- Many fabrics are easier to iron if they are not completely dry.
- For example, silk should always be ironed damp.
Cleaning and Maintenance
AFTER USE
- Set the steam selector knob to „0“.
- Disconnect from the mains supply.
- Open the water fillinginletcover.
- Invert iron and shake the iron to empty the water tank, and then stand the iron in a upright position to allow to cool.
- In order to save space, the power cord may be easily wound around the cord stowage facility after the iron has been cooled.
• Always store the iron (with water emptied from water tank) on its heel rest, not on the soleplate. Even the smallest amount of moisture will

Fig. 5
cause corrosion and staining of the soleplate if the iron is stored with the soleplate facing downwards.
- Any deposits, starch residue or size left on the plate can be removed using a damp cloth or an unabrasive liquid detergent.
- The plastic parts can be cleaned with a damp cloth then wiped over with a dry cloth.
Self-cleaning
Your iron will give the best ironing results and last longer if you apply „self-cleaning“ regularly (once or twice a month) to remove any scale or fluff.
- Set the steam selector knob to position „0“.
- Fill the water tank up to „max“ water level with water filling beaker supplied.
- Place the iron on its heel.
- Set the temperature dial to „MAX“.
- Plug into the mains supply.
- Allow the iron to heat up until the heating indicator light first goes out and then come son again.
- Remove the plug from the wall socket.
- Hold the iron over the sink, press and hold the self clean button P11 ang gently abake the iron to and from.
- Release the self clean button as soon as all the water in the tank has been used up.
CARE AND CLEANING
- Disconnect from the mains supply by removing the plug.
- Certain fabric finish residues may build up on the soleplate, these may be removed by cleaning with a rough cloth soaked in a vinegar water solution. Dry with a cloth.
- Do not use abrasives or scouring pads to clean the soleplate. Keep the soleplate smooth: avoid hard contact with metal objects. Do not scratch or damage the surface of the soleplate.
- Wipe the outside housing with a damp cloth and polish with a dry one. Do not use abrasives or harsh cleaners as they may damage the surface of the iron.
- Avoid scratching the plate with steel wool or metallic objects.
- Do not put vinegar or other descaling agents into the water tank.
- To clean steam holes - simply use a damp cloth to wipe away any build up of lint or starch from inside steam holes.
Troubleshooting
| Problem Possible cause Solution | ||
| The iron is plugged in but the soleplate is cold. | There is connection problem. | Check the main cord, the plug and the wall socket. |
| IThe iron does not produce any stream. | There is not enough water in the water tank. | Fill the water tank. |
| The stream kontrol has been set to positron „0“ | Set the stream control to higher position. | |
| The iron is not hot enough. | Selectan ironing temperature that is suitable for stream ironing. Put the iron on its heel and wait until the amber pilot has gone out before you start ironing. | |
| Water droplets drip onto the fabric. | The cap of the filling opening has not been closed properly. | Close the cap properly. You will hear a click |
| Flakes and impurities come out of the soleplate during ironing. | You have been using hard water, which has caused scale flakes to develop inside soleplate. | Use the self- clean function a few times. |
Technical specifications
- Steam iron
- Large stainless steel soleplate
- Variable steam 18-25 g/min
- Horizontal steam 80 g/min
- Self cleaning
- Anti-Calc function
- Anti-drip system to prevent water escaping from the soleplate
- Dry/steam/spray, variable steam, vertical steam
- Large 300 ml water tank.
- Long cord length 3 m
- Water fillbeaker
- Color: 228B white/blue, 228P white/pink
- Power supply 230 V \~ 50 Hz
- Power drain 2200 W
- Size: 29,5 x 15 x 12,2 cm
- Weight: 1,33 kg
We reserve the right to change technical specifications.

WARNING: Do not use this product near water, in wet areas to avoid fire or injury of electric current. Always turn off the product when you don't use it or before a revision. There aren't any parts in this appliance which are repairable by consumer. Always appeal to a qualified authorized service. The product is under a dangerous tension.
Old electrical appliances, used batteries and accumulators disposal

This symbol appearing on the product, on the product accessories or on the product packing means that the product must not be disposed as household waste. When the product/ battery durability is over, please, deliver the product or battery (if it is enclosed) to the respective collection point, where the electrical appliances or batteries will be recycled. The places, where the used electrical appliances are collected, exist in the European Union and in other European countries as well. By proper disposal of the product you can prevent possible negative impact on environment and human health, which might otherwise occur as a consequence of improper manipulation with the product or battery/ accumulator. Recycling of materials contributes to protection of natural resources. Therefore, please, do not throw the old electrical appliances and batteries/ accumulators in the household waste. Information, where it is possible to leave the old electrical appliances for free, is provided at your local authority, at the store where you have bought the product. Information, where you can leave the batteries and accumulators for free, is provided to you at the store, at your local authority.
- First ensure that the iron is disconnected from the electricity supply before fillingwithwater.
- Set the Steam Selector to position „0“.
- Open the water filling in letcover, hold the iron on an angle 45° . Slowly pour the water into the reservoir using the special filling beaker and taking care not to go over the maximum level (about 300ml) indicated by “MAX” on the reservoir.
- Push firmly to close the water filling inlet cover.
- During the ironing process, always ensure there is sufficient water in the water tank.
| Noteon label means: "This article cannot be ironed!"(e.g. chlofofibre, acryl, elastodiene.) | |||
| label (with ironing instruction) | kind of textile | temperature dial | steam selector(advised position) |
| syntheticmodacry polypropylene polyurethaneacetate triacetatepolyamide(nylon) polyester modal viscose(rayon) | |||
| silkwool | |||
| cotton | |||
| linen | |||
Table A.
СИСТЕМА ЗА АНТИ-КАЛЦИРАНЕ
Fig. 2
Fig. 3
Предупреждение:
Fig.4
Предупреждение:
Fig. 5
- ŽEHLENÍ VE SVISLÉ POLOZE
- KROPENÍ
- ŽEHLENIE V ZVISLEJ POLOHE
- KROPENIE
- PRASOWANIE W POZYCJI PIONOWEJ
- OSTRZEŻENIE
- GENERAL SAFETY INSTRUCTIONS
- SPECIAL SAFETY INSTRUCTIONS FOR THIS UNIT
- DESCRIPTION OF THE CONTROLS
- INSTRUCTIONS FOR USE
- SETTING THE TEMPERATURE
- USE
- IMPORTANT
- FILLING WITH WATER
- ANTI-CALC SYSTEM
- ANTI-DRIP SYSTEM
- DRY-IRONING
- STEAM-IRONING
- SURGE OF STEAM
- VERTICAL IRONING
- WARNING
- SPRAYING
- ADVICE FOR GOOD IRONING
- CLEANING AND MAINTENANCE
- AFTER USE
- SELF-CLEANING
- CARE AND CLEANING
- TECHNICAL SPECIFICATIONS
- OLD ELECTRICAL APPLIANCES, USED BATTERIES AND ACCUMULATORS DISPOSAL
- СИСТЕМА ЗА АНТИ-КАЛЦИРАНЕ
Brand : HYUNDAI
Model : SI 228B
Category : Iron