LED5062UHD PVR - Television Andersson - Free user manual and instructions
Find the device manual for free LED5062UHD PVR Andersson in PDF.


| Product Type | LED TV with PVR |
| Brand | Andersson |
| Model | LED5062UHD PVR |
| Screen Size (Diagonal) | 50 inches |
| Display Technology | LED |
| Panel Resolution | 3840 x 2160 (4K UHD) |
| Aspect Ratio | 16:9 |
| Refresh Rate | 120 Hz |
| Dynamic Contrast Ratio | 4000:1 to 5000:1 |
| Brightness (Typical) | 350-400 cd/m² |
| Response Time (G to G) | 6.5 ms |
| Viewing Angles (H/V) | 176° / 176° |
| Lamp Life | 30,000 hours |
| Wall Mount Pattern (LxW) | 400 x 400 mm |
| PVR Functionality | Yes (via USB, records DTV) |
| USB Support | FAT32, max 1 TB, transfer rate ≥ 5 MB/s |
| HDMI Inputs | 3 |
| Power Supply | AC 100-240V, 50/60Hz (est.) |
| Energy Efficiency Class | Not specified (likely A or similar) |
| Weight (with stand) | Approx. 15-20 kg (est.) |
| Dimensions (WxHxD with stand) | Approx. 112 x 70 x 25 cm (est.) |
| Cleaning Instructions | Unplug, clean with dry cloth |
| Safety Certification | Class II double insulation |
Frequently Asked Questions - LED5062UHD PVR Andersson
User questions about LED5062UHD PVR Andersson
0 question about this device. Answer the ones you know or ask your own.
Ask a new question about this device
Download the instructions for your Television in PDF format for free! Find your manual LED5062UHD PVR - Andersson and take your electronic device back in hand. On this page are published all the documents necessary for the use of your device. LED5062UHD PVR by Andersson.
USER MANUAL LED5062UHD PVR Andersson
natural_image
Large CRT television displaying a cityscape at sunset with illuminated skyscrapers and purple sky (no text or symbols visible)A NOTE ABOUT RECYCLING
This product's packaging materials are recyclable and can be reused. This product and the accessories packed together are the applicable product to the WEEE directive except batteries. Please dispose of any materials in accordance with your local recycling regulations. When discarding the unit, comply with your local rules or regulations. Batteries should never be thrown away or incinerated but disposed of in accordance with your local regulations concerning chemical wastes.


Copyright
This manual is the copyright of CI no 556520-4137. No part of this manual may be revised, copied or transmitted in any way without written permission from CI no 556520-4137.
Statement
This manual does not provide any warranty or related declarations. All information in this manual including the product specification, pictures and literatures is just for reference, CI no 556520-4137 reserves the rights to update contents of this manual without further notice.
ANGÅENDE ÅTERVINNING
Important Safety Instructions 4
Preparation 5-10
Connecting External Devices 11
General Operation 11-12
Customizing TV Settings 14-24
Using the features 25-26
PVR (Personal Video Recorder) 27-30
Entertainment 31-34
Specifications 35
Svenska
PVR (Personal Video Recorder) 91-94
Underholding 95-98
Spesifikasjoner 99

CAUTION: TO REDUCE THE RISK OF ELECTRIC SHOCK, DO NOT REMOVE THE COVER (OR BACK). NO USER SERVICABLE PARTS INSIDE. REFER SERVICING TO QUALIFIED SERVICE PERSONNEL.

WARNING: To prevent the spread of fire, keep candles or other open flames away from this product at all times.
This equipment is a class II or double insulated electrical appliance. It has been designed in such a way that it does not require a safety connection to electrical eath.
→Unwind and straighten the power cord before use.
→Place the product on a firm and level surface.
→Turn off the appliance during thunderstorms.
→To completely disconnect this product from the mains, disconnect the plug from the wall socket outlet. The mains plug is used to completely interrupt the power supply to the unit and must be within easy access by the user.
→Clean only with a dry cloth, unplug the outlet before cleaning. Do not use aggressive cleaners as these will damage the surface
→Only use attachments/accessories specified by the manufacturers.
→ Do not locate the appliance in the vicinity of a heat source or in direct sunlight. Do not place a naked flame source on or near this product.
→Repairs must only be performed by the manufacturer or its service agent or similarly qualified person.
→Do not immerse the main unit or any accessories in water or any other liquid.
→Do not expose this product to dripping or
splashing or stand any vessel containing liquid on or near this product.
→Warning: To reduce the risk of fire or electric shock, do not expose this apparatus to rain or moisture.
→The apparatus shall not be exposed to dripping or splashing and that objects filled with liquids, such as vases, shall not be placed on apparatus.
→Remove exhausted batteries from the product immediately.
→Remove the batteries from the product during periods of non-use.
→Replace only with batteries of the same type.
→ Do not mix old and new batteries.
→Do not mix alkaline, standard (carbonzinc) or rechargeable (nickle-cadmium) batteries.
→Batteries should be inserted with the polarity indicated on the battery compartment.
→Non-rechargeable batteries should not be recharged.
→ Dispose of batteries safely. Do not attempt to burn them. Use collection points where available.
→Make sure the battery compartment is secure.
→The battery (battery or batteries or battery pack) shall not be exposed to excessive heat.
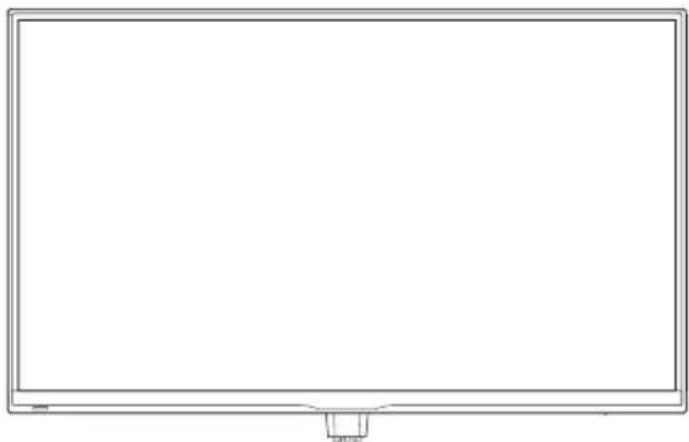
What's Included
natural_image
Front view of a blank flat-screen monitor with a small logo at the bottom (no text or symbols on the screen)TV Set

natural_image
Line drawing of a remote control with two batteries (no text or symbols)Remote Control with Batteries

natural_image
Simple line drawing of a rectangular object with three small dots above it (no text or symbols)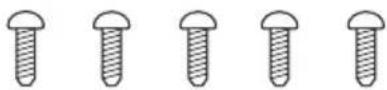
Five ScrewsBase Stand
User Manual
Quick Start Guide
User Manual Quick Start Guide
Front View

1. POWER Indicator
Illuminates blue when the TV is turned on. Illuminates red when the TV is in standby mode.
2. IR (Infrared Receiver)
Receive IR signals from the remote control.
Rear View

1. POWER
Switch the TV between On/Standby mode.
2. SOURCE
Press to select among different input signal sources
3. MENU
Display the OSD (on screen display) menu.
4. CH

Press to select a channel.
5. VOL +/-
Press to adjust the volume.
6. Headphone Socket
Plug in headphones.
7. PC AUDIO Input
Connect to a computer audio output.
8. VGA Input
Connect to a computer or other devices with a VGA interface.
9. SCART socket
You can connect your TV to devices with a SCART output such as a set top box.
10. DTV/TV Input
Connect to the antenna (75Ω VHF/UHF) socket with the RF coaxial cable
11. COAXIAL Digital Audio Output
Connect to the audio socket on the digital audio system.
12. Common interface slot
Your TV is equipped with a common interface slot that allows you to insert a subscription card (to be purchased separately) to view pay to view services.
13. MINI YPBPR
Connect to AV devices with Component /AV output sockets.
14. MINI AV
Connect to the composite VIDEO and AUDIO (L/R) output sockets on external video devices.
15. USB port
Connect to USB-devices
16. HDMI Inputs
Connect to a High-Definition (HD) signal output device.
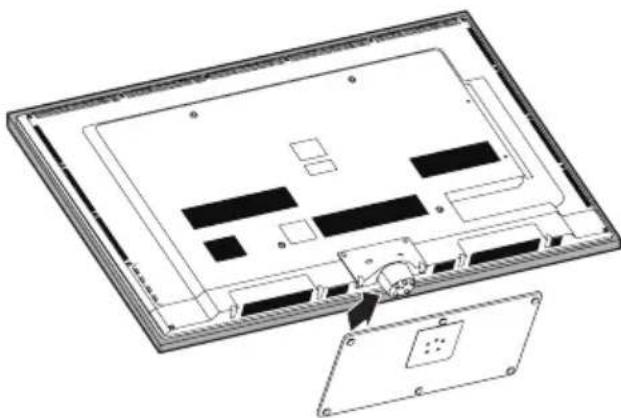
Installing the Stand
natural_image
Technical line drawing of an open laptop chassis showing internal components and a separate mounting bracket (no text or symbols)-
Lay the TV facedown on a flat, cushioned surface to avoid damage or scratching.
-
Fix the stand assembly to the TV using the 5 provided screws.
Removing the Stand for Wall-Mounting

natural_image
Diagram of a device layout with labeled components and an arrow indicating a component or connection (no text or symbols present)-
Lay the TV facedown on a flat, cushioned surface to avoid damaging or scratching.
-
Untighten the 6 screws holding the stand assembly and remove it.
-
Attach the wall-mount bracket to the TV using the mounting holes on the back of the TV. Mount this TV according to the instructions included in the wall-mount bracket.
Understanding the remote control buttons

- ⏻: Switch the TV between on and standby mode.
- ✗: Mute and restore your TV sound.
- TIMESHIFT: Turn on and off the Time shift function (DTV mode):
▶II : Press to start playback or pause (USB Mode).
■: Press to stop playback (USB mode).
FAV: Display the Favourite Channel list (ATV/DTV mode).
REC /●: One button recording function button. Press it to record the current DTV video.
EPG: Displays the EPG (Electronic Program Guide) (DTV mode).
- I◀◀: Press to skip to the beginning of the previous chapter or track (USB mode).
TTX: Turn on and off the teletext function (ATV/DTV mode).
◀◀ :Press to fast rewind (USB mode).
INDEX: Press to select the page number of the INDEX from teletext (ATV/DTV mode).
SUBTITLE: Display the subtitle which is broadcast with the program (ATV/DTV mode). Selects subtitles on the media (USB mode).
ASPECT Select from the following mode settings: 16:9/ Zoom1 / Zoom2 / Just Scan(Only HDMI Mode) / Auto / 4:3
- ▶▶▶: Press to skip to the beginning of the next chapter or track (USB mode).
HOLD: Freeze a multi-page passage on the screen in Teletext (ATV/DTV mode).
▶▶ :Press to advance playback rapidly (USB mode).
REVEAL Reveal hidden information such as the answer to a quiz in Teletext (ATV/DTV mode).
SUBPAGE: Display the subpage on the teletext screen (ATV/DTV mode).
SLEEP: Set the TV sleep timer
-
RED/GREEN/YELLOW/BLUE: Press the button to select corresponding function on the screen.
-
SOURCE: Select among the different input signal. SOURCES: DTV / ATV / AV / SCART / YPbPR / HDMI 1/HDMI2 / HDMI3 / PC/ USB.
- INFO: Display the present screen information such as the current channel and the input source.
- ◀▶▲▼: Allows you to navigate the OSD menu and adjust the system settings to your preference. OK: Confirm changes in the TV menu. Display a list of channels saved in the TV tuner memory.
- MENU: Display the TV settings menu.
- EXIT: Exit the OSD (On Screen Display) menu.
- VOL + / -: Adjust the volume.
- P.MODE: Select picture mode. S.MODE: Select sound mode.
- CH + / - : Select a channel.
- 0-9 Number Button: Select a programme or Select numbered items in a menu.
- TV.RADIO Select TV program or Radio program (DTV mode).
- 5: Return to previous viewing channel.
Note:
Remove battery during storage or when you are not using the device for a long time.
To control the device using the remote control, point the remote control at the device and then press the button with the required function.
The maximum range of the remote control is about 5 meters with a deviation of up to +/-30° from the perpendicular direction to the reception sensor of the remote control on the front side of the device. The falling capacity of the batteries gradually reduces the remote control range.
There must be no solid obstacles in the area between the remote control and the device when the remote control is being used.
During standard use the lifetime of batteries in the remote control is about 1 year.
When the effective range of the remote control is substantially reduced, or when there are problems with its use, change both the batteries in the remote control.
If you will not be using the remote control for a longer period of time, take out both batteries from it - in this in this way you will prevent potential damage caused by their leakage.

flowchart
graph TD
    A["PC AUDIO VGA SCART DTV/TV COAXIAL"] --> B["Headphone"]
    A --> C["PC Audio Cable"]
    A --> D["VGA Cable"]
    A --> E["Scart Cable"]
    A --> F["Coaxial Cable"]
    A --> G["RF Cable"]
    H["Audio System"] --> I["Coaxial IN"]
    J["Antenna or Cable Box / Wall Jack"] --> K["Computer"]
    J --> L["Audio/Video device with Scart socket"]
    M["AC outlet"] --> N["HDMI 4.1 Cable"]
    O["DVD or Blu-ray Player, Satellite Receiver, Cable Box or Game Console"] --> P["COMPONENT OUT"]
    O --> Q["AV Cable"]
    R["CI Module"] --> S["Mini YPBPR Cable"]
    R --> T["Mini AV Cable"]
    U["Mini YPBPR"] --> V["USB"]
    W["Mini AV Cable"] --> X["HDMI 1 HDMI 2 HDMI 3"]
→ Note: The power cord is the only cable which is included with the TV set.
Initial Setup
→ Connect one end of the RF coaxial cable (not included) to the aerial socket on the wall and the other end of the cable to the RF (75) socket at the rear right bottom view of your TV.
→ Connect the mains cable to the mains socket after you have completed all the connections.
→ Switch on the POWER ON/OFF switch which is located at the front right side under the frame. At this stage, the TV switches to standby mode. The red LED indicator will illuminate on the front panel of the TV.
→ In standby mode, press the button on the front right side panel of the TV or the button on the remote control to turn the TV on. The red LED indicator will turn blue.
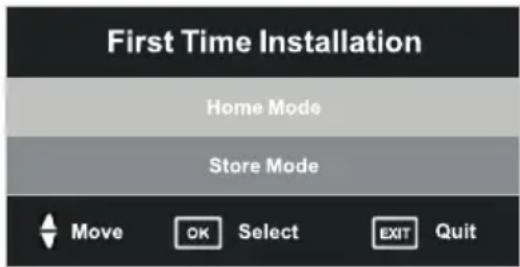
→ The first time you turn the TV on, it will go straight into the First Time Installation menu. Press the ▲/▼ buttons to select your desired mode setting.
→ Press the ◀/▶/▲/▼ buttons to navigate the menu and change the settings.
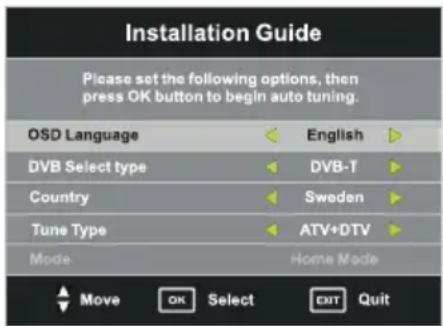
| OSDLanguage | Selects your desired language to be displayed on the menu. The default on-screen menu language is set to English. | |
| DVB Select Type Select DVB Type | ||
| Country Selects the country where you will operate the TV. The default country is set to Sweden. | ||
| Tune Type Selects the tune type: ATV+DTV/DTV/ATV. | ||
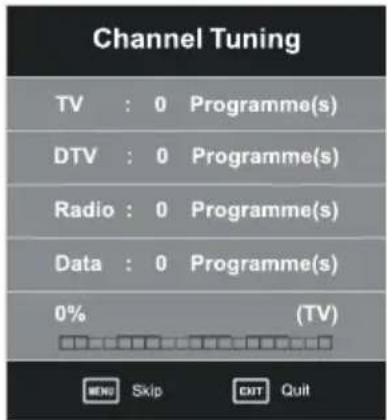
| OK Press the OK button to start auto tuning.Channel Tuning will commence. This operation may take up to several minutes.The display will show the progress of the tuning and the number of channels found. | Channel TuningTV : 0 Programme(s)DTV : 0 Programme(s)Radio : 0 Programme(s)Data : 0 Programme(s)0% (TV)----Menu Skip Exit Out | |
Selecting Input Source

- Press the SOURCE button on the front right side panel of the TV or the SOURCE button on the remote control to display the Input Source list.
- Press the ▲/▼ buttons to select the input source that you want: DTV / ATV / AV / SCART / YPBPR / HDMI1 / HDMI2 / HDMI3 / PC/ USB.
- Press the OK button to confirm your selection.
Channel Selection
Press the CH + / - buttons on the remote control repeatedly or the 0-9 buttons to select the channel.
→ Alternative:
Press the CH.LIST button to enter the Channel List. Then use the ▲/▼ buttons to highlight and select the channel. Press the OK button to view the selected channel.
Display program information
Press INFO on the remote control to display information.
Volume Adjustment
Press the VOL + / - buttons on the side panel of the TV or on the remote control to adjust the volume. If you wish to switch the sound off, press the ✗ button. Press the ✗ button again or the VOL + / - buttons to resume audio listening.
Customizing TV Settings
Channel Settings
Antenna
Press the MENU button to display the main menu. Press the ▲/▼ buttons to select CHANNEL and then press the OK button. Press the ▶ button and then press the ▲/▼ buttons to select Air or Cable, then press OK.

Auto Scan
Press the ▲/▼ buttons to select Auto Scan and then press the OK button.
In the Auto Scan menu. Press the ◀/▶/▲/▼ buttons to select the country where you will operate the TV and the Tune Type: ATV+DTV/DTV/ATV. Press the OK button to start auto tuning. (Note: If you select DVB-C in the Installation Guide Menu you can select the option: scan type/Frequency/Network Symbolks.)

Channel tuning will commence. This operation may take up to several minutes. The display will show the progress of the tuning and the number of channels found.
If you want to skip the ATV tuning, press the MENU button to interrupt the tuning half way. A pop-up screen will be displayed, press the ◀ button to select YES to confirm. You will then go straight to DTV tuning. You may repeat the above step if you also want to skip the DTV tuning. An installation reminder will appear the next time you turn on the TV.
ATV Manual Tuning (ATV Mode)
Press the MENU button to display the main menu. Press the ◀/▶ buttons to select CHANNEL and then press the OK button. Press the ▲/▼ buttons to select ATV Manual Tuning and then press the OK button. The ATV Manual Tuning screen will pop up. Use the ▲/▼ buttons to select the following options and the ◀/▶ buttons to adjust the setting.

| Storage To Selects a channel number. | |
| System Selects the sound system: I / DK / L / BG. | |
| Current CH Displays the current channel number. | |
| Search Press the buttons to start the manual tuning. | |
| Fine-Tune Press the buttons to make manual fine tuning adjustments |
After finishing the manual tuning adjustment of a channel, press the RED button to save your channel before tuning the next channel.
DTV Manual Tuning
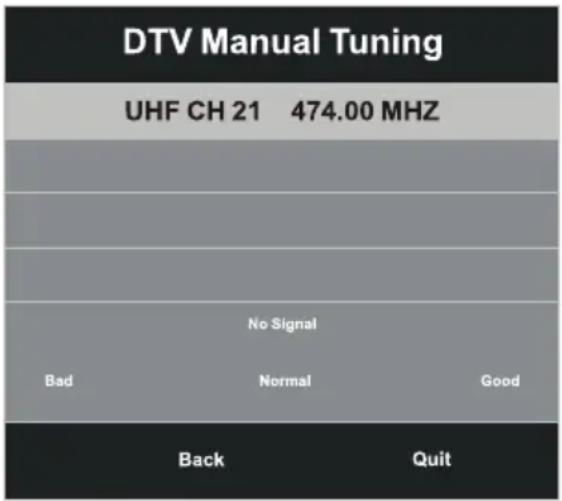
- Press the MENU button to display the main menu. Press the ◀/▶ buttons buttons to select CHANNEL and then press the OK button. • Press the buttons to select DTV Manual Tuning and then press the OK button.
- In the DTV Manual Tuning menu. Press the ◀/▶ buttons to select the desired UHF channel and then press the OK button to commence the search of that channel. When the signal has been tuned, the picture and signal strength will be displayed on the screen.
Programme Edit
- Press the MENU button to display the main menu. Press the ◀/▶ buttons to select CHANNEL and then press the OK button.
- Press the ▲ /▼ buttons to select Programme Edit and then press the OK button.
- A Programme Edit screen will pop up. Press the ▲ /▼ buttons to select the programme you want to edit.
ATV Mode

DTV Mode

→ Delete
Press the RED button to delete the selected channel.
→ Skip
Press the BLUE button to select the channels that you want to skip when you are selecting channels. Press the BLUE button again to undo it.
→ Rename (For ATV mode only)
Press the GREEN button to rename the selected channel. Press the ▲ /▼ buttons to select the characters to represent the station name. Press the ◀ /▶ buttons to move to the next character and then press the OK button again to confirm the new name.
→ FAV (Favorite)
Press the FAV button to set the selected channel as one of the favorite programmes. Press the FAV button again to undo it.
Signal Information (DTV Mode)
- Press the MENU button to display the main menu. Press the ◀/▶ buttons to select CHANNEL and then press the OK button.
- Press the ▲/▼ buttons to select Signal Information and then press the OK button to view the signal information.
CI(Common Interface) Information (DTV Mode)
The common interface allows the use of a Common Access Module to enable you to view scrambled (pay to view) service. These services are provided by TopUp TV (UK only) and others.
The Common Access Module and viewing card can be obtained from the service provider.
Note: Do not repeatedly insert or remove the Common Access Module as this may damage the interface and cause a malfunction.
This feature is not available in all countries.
To insert the Common Access Module
- Before you insert the Common Access Module, ensure that the TV is switched off and the viewing card is inserted in accordance with the Service Provider's Instructions.
- Insert the Common Access Module into the slot. Flip the Common Access Module to another side and try again if you feel resistance.
- Switch the TV on.
To remove the Common Access Module
- Before you remove the Common Access Module, ensure that the TV is switched off.
- Pull the Common Access Module from the slot.
- Switch the TV on.
To view the module information
- Press the MENU button to display the main menu. Press the ◀/▶ buttons to select CHANNEL and then press the OK button.
- Press the ▲/▼ buttons to select CI Information and then press the OK button.
- A CI Information main menu will pop up. Press the ▲/▼ buttons to select the options and then press the OK button to view.
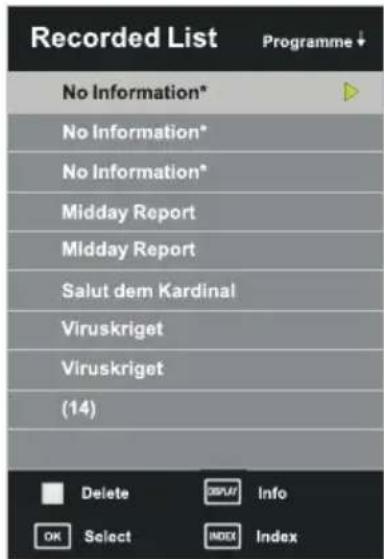
| Delete Press the | RED button to delete the selected programme. |
| Info | Press the INFO button to display detailed information of the selected programme. (If available) |
| Select | Press the OK or PLAY button to play the selected programme. |
| Index Press the | INDEX button to select the category type:Programme / Channel / Time. |
Recorded Mode
- Press the MENU button to display the main menu.
- Press the ◀▶ buttons to select CHANNEL and then press the OK button. Press ▲▼ the buttons to select Recorded Mode and then press the OK button. A Programme Schedule menu will pop up.
- Press the ◀▶▲▼ buttons to adjust the settings and then press the OK button to save. (See "Timer Programming" for details)
Schedule List
- Press the MENU button to display the main menu. Press the ◀▶ buttons to select CHANNEL and then press the OK button. Press the ▲▼ buttons to select Schedule List and then press the OK button to view the preset reminders or scheduled recordings in the schedule list.
PVR File System
- Press the MENU button to display the main menu. Press the ◀▶ buttons to select CHANNEL and then press the OK button.
- Press the ▲▼ buttons to select PVR File System and then press the OK button.
- Press the ▲▼ buttons to select the following PVR File System options and press the OK button.

| Select Disk Select the disk | where you want to store your recorded content. |
| Check PVR File System | Press the OK button, the system will now check your USB device's suitability for PVR. The system will show “Checking”. Upon the completion the system will show either “Success” or “Fail”. |
| USB Disk If no USB storage | device is connected, it will show “No USB Disk”. If the Check PVR File System has a “Success” it will show “Pass”. |
| Format | Press the OK button, a File System Size menu will pop-up. Press the ◀▶ buttons to select your preferred file type between FAT32 and HiSpeed FS. If you select HiSpeed FS, press the ▼ button and then press the ◀▶ buttons to select your preferred file size. Press the OK button to confirm and then press the ◀▶ button to start formatting. |
| Time Shift Size After formatting | the Time Shift Size menu will appear if you have selected HiSpeed FS in PVR File System Type. Press the buttons to select your preferred file size. Press the OK button to confirm. This option cannot be chosen if you have selected FAT32 in PVR File System Type. |
| Speed This shows you the transfer rate of your USB storage device. | |
| Free Record Limit Press the buttons to set the recording time limit from 1-4 hours. | |
Picture Settings

- Press the MENU button to display the main menu.
- Press the ◀▶ buttons to select PICTURE and then press the OK button.
- Press ▲▼ the buttons to select the option you want to adjust in PICTURE menu.
- Press the ◀▶▲▼ buttons to adjust each option's setting.
- Press the EXIT button to exit the menu.
| Picture Mode Cycles | among picture mode: Standard / Mild / User / Dynamic. Alternative: you may press the P.MODE button to select the picture mode directly. |
| Contrast Adjusts the difference between light and dark levels in the picture. (For User mode) | |
| Brightness Increases or decreases the amount of white in the picture. (For User mode) | |
| Color Controls the color intensity. (For User mode) | |
| Sharpness Adjusts the level of crispness in the edges between light and dark areas of the picture. (For User mode) | |
| Tint (For NTSC format) | Adjust the balance between red and green levels. (Tint is only available for NTSC signal input via the SCART or AV IN.) |
| Color Temperature | Cycles among color temperatures: Medium / Warm / Cool.Adjusts the color components independently to achieve a warm or cool. (For User mode) • Warm: increase red tint • Medium • Cool: increase blue tint |
| Aspect Ratio | Allows you to watch the screen in various picture formats: 16:9/ Zoom1 / Zoom2 / Just Scan(Only HDMI Mode) / Auto / 4:3. |
| Noise Reduction | Reduces the noise level of the connected device: Middle/ High/ Off/ Low. |
| PC Setup | Adjusts the PC desktop content. |
Sound Settings
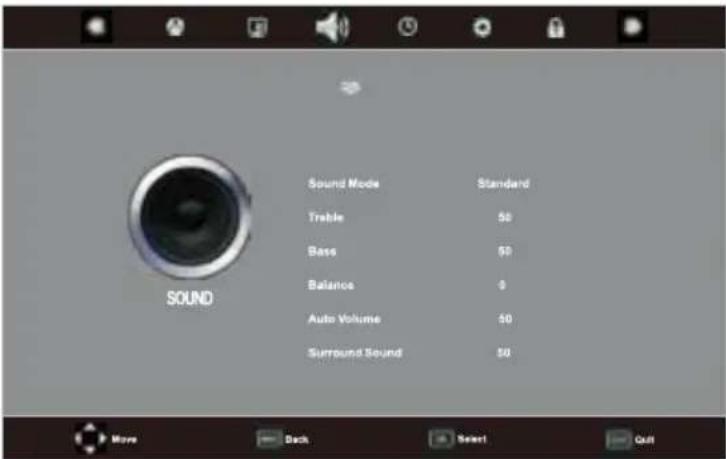
- Press the MENU button to display the main menu.
- Press the ◀▶ buttons to select SOUND and then press the OK button.
- Press ▲▼ the buttons to select the option you want to adjust in SOUND menu.
- Press the ◀▶▲▼ buttons to adjust each option's setting.
- Press the EXIT button to exit the menu.
| Sound Mode | Allows the selection of an audio-enhancement technique: Standard / Music / Movie / Sports / User. Alternative: you may press the S.MODE button to select the sound mode directly. |
| Treble | Controls the relative intensity of higher-pitched sounds. (For User mode) |
| Bass | Controls the relative intensity of lower-pitched sounds. (For User mode) |
| Balance | Adjusts the relative volume of the speaker in a multiple speaker system. |
| Auto Volume | Volume levels are automatically controlled (e.g., advertisements tend to be louder than the programmes). |
| Surround Sound | Selects the surround sound mode: On/Off. |
| AD Switch(For DTV mode) | Audio Description is an auxiliary audio function that provides an additional audio track for visually challenged persons.This function handles the Audio Stream for the AD(Audio Description),when it is sent along with the main audio from the broadcaster.• set to “Off”for normal broadcasting sound coming out from speakers.• set to “On”to activate the description sound track if available. |
| AD Volume | Set the volume of the description sound track. |
| SPDIF Mode | Selects the digital audio output mode: Off/PCM/Auto. |
Time Settings

- Press the MENU button to display the main menu.
- Press the ◀▶ buttons to select TIME and then press the OK button.
- Press ▲▼ the buttons to select the option you want to adjust in TIME menu.
- Press the ◀▶▲▼ buttons to adjust each option's setting.
- Press the EXIT button to exit the menu.
| Clock (DTV mode) The clock is set automatically when receiving a digital signal. | |
| Off Time The unit will turn off automatically at specified me that you have set. | |
| On Time The unit will turn on automatically at specified me that you have set. | |
| Sleep Timer | Press the ◀▶ buttons to select a period of time after which the TV automatically switches to standby mode:Off / 10 / 20 / 30 / 60 / 90 / 120 / 180 / 240 min.Alternative: You may press the SLEEP button repeatedly to select the number of minutes directly. |
| Auto Sleep Selects to turn | On/Off Auto Sleep function. |
| No Action Auto Standby | The unit will automatically switch to standby mode 2/3/4/5/6 hours after the last time the remote control was used. If you want to operate the TV for a longperiod of time, turn off the auto standby function. (default setting: 4 hours) |
| Time Zone (DTV mode) Selects your desired Time Zone city. | |
| Daylight saving Selects to turn on/off the Daylight saving function. | |
Option Settings
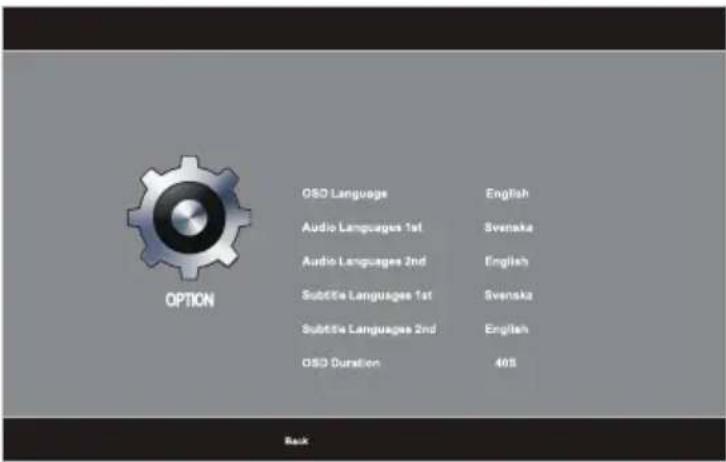
- Press the MENU button to display the main menu.
- Press the ◀▶ buttons to select OPTION and then press the OK button.
- Press ▲▼ the buttons to select the option you want to adjust in OPTION menu.
- Press the ◀▶▲▼ buttons to adjust each option's setting.
- Press the EXIT button to exit the menu.
| OSD Language Allows you to select your desired on-screen menu language. | |
| Audio Languages 1st / 2nd | Allows you to select your desired primary or secondary audio language.(Available for digital channels if multiple audio languages are broadcast.) |
| Subtitle Language 1st / 2nd | Allows you to select your desired primary or secondary subtitle language.(Available for digital channels if multiple subtitle languages are broadcast.) |
| OSD Duration Displays time of the on-screen menu: 5s / 10s / 15s / ... / 35s / 40s. | |
| Blue Screen | Allow the blue background to turn on/off during weak or no signal conditions. |
| Country Selects the country where you will operate the TV. The default country is set as Sweden. | |
| MEMC (Motion Estimate and Motion Compensation) | The function control the MEMC of the picture, press the button to select the MEMC mode: Off/Low/Middle/ High. |
| Energy Mode SETTING | Selects your desired mode setting.Home Mode: Viewing at home.Store Mode: For store demo, the brightness is higher than home mode. |
| Restore Factory Default | Resets all settings to the factory defaults. |
Lock Settings

- Press the MENU button to display the main menu. Press the ◀▶ buttons to select LOCK and then press the OK button.
- Use the 0-9 buttons to input a 4-digit password to enter the LOCK menu. Enter the default password "0000" for the first time use.
- Press ▲▼ the buttons to select the option you want to adjust in LOCK menu.
- Press the ◀▶▲▼ buttons to adjust each option's setting.
- Press the EXIT button to exit the menu.
| Enable Locks The Enable Locks is designed to prevent accidental returning of the TV / losing channels and prevent children watching unsuitable programme.The Enable Locks must be set to On for this function to operate. If the Enable Locks is set to On, a valid password must be entered when you access Auto Scan / Manual Tuning / Programme Edit / Restore Factory Default. | |
| Set Password Use the 0-9 buttons to input the old password and then input the new 4-digit password. Re-enter new password for confirmation.Note: the default password is “0000”.If you change the password, be sure to remember the new password. If you forget the new password, enter the master password “8899”. | |
| Block Program | Block Program is designed to prevent children watching unsuitable programmes. When a channel is blocked, a valid password must be entered. |
| Parental Guidance | This function allows you to set up blocking schemes to block specific channels and ratings. Press the ◀▶ buttons to select an age rating: Off, 4-18. |
EPG (Electronic Programme Guide) (DTV Mode)
This system has an Electronic Programme Guide (EPG) to help you navigate through all the possible viewing options.
The EPG supplies information such as programme listings, start and end times for all available services. In addition, detailed information about the programme is often available in the EPG (the availability and amount of programme information will vary, depending on the particular broadcaster).
This function can be used only when the EPG information is broadcast by broadcasting companies.
The EPG displays the programme details for the next 7 days.
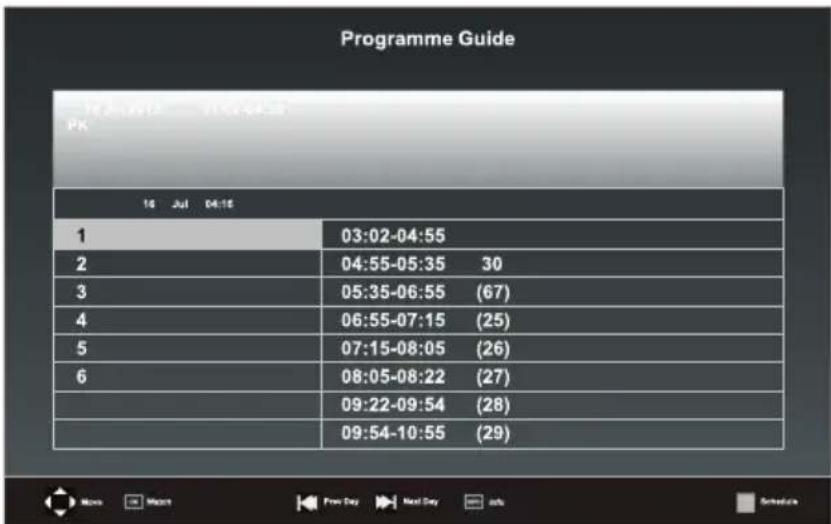
Switch On/Off EPG
Press the EPG button to switch on EPG.
Press the EPG button or the EXIT button again to switch off EPG and return to normal TV viewing.
Select a Programme
Press the ▲▼ buttons to select the desired channel, press the ▶ button and then press the ▲▼ buttons to select the desired programme.
Using the Remote Control
| Remote Control Button | Function |
| Press the ◀ button to view the schedule of the previous day. | |
| Press the ▶ button to view the schedule of the next day. | |
| INFO Press to display detailed information of the selected programme (if available). | |
| • REC | Press the • REC button while on the selected programme to set the scheduled recording. The TV will automatically record the selected programme when it starts.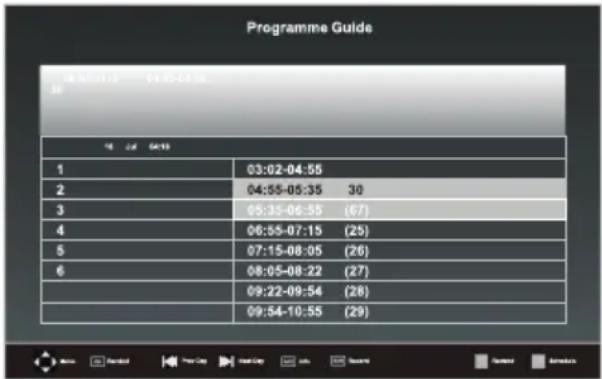 |
| GREEN (Remind) | Press the GREEN button while on the selected programme to set the reminder. Press the GREEN button again to turn off reminder. The TV will automatically tune to the selected programme when it starts. |
| YELLOW (Schedule) | Press the YELLOW button to view the preset reminders or scheduled recordings in the schedule list. Press the MENU button to return to the EPG.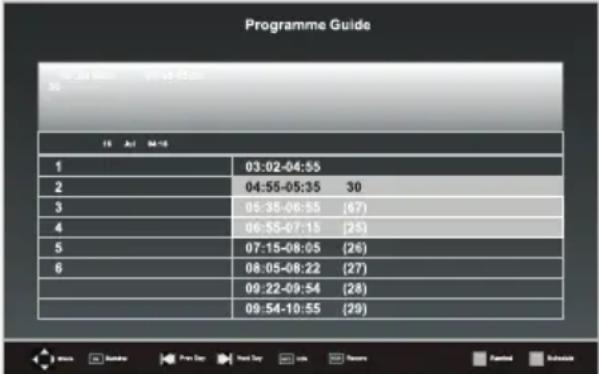 |
Time Shift Function (DTV Mode)
This function allows the TV to virtually record the live viewing broadcast programme. Before using Time Shift fuction, please make sure the USB device is inserted.
Notes:
→ Time Shift Mode and Recording functions may not work if the signal strength is weak.
→ Stop the time-shift function before switching to another input source.
→ If the transfer rate of the USB storage device is too slow for recording or time shiftfunction, a warning statement will be shown on the screen. If this happens, please upgrade your USB storage device.
During normal TV viewing, you may press the TIMESHIFT button to virtually pause the live viewing broadcast programme if you want to go out for a while (e.g. going to the bathroom / kitchen). “||” will show on the screen and the LED indicator flash red and blue alternately.
When you have returned, press the ▶ button to play the missed broadcast programme. “||” will show on the screen.
Alternative: Press the TIMESHIFT button to display the PVR Time Shift progress bar and then press the ◀▶ buttons to select "Play" on the bar. Press the OK button to confirm.
The video and sound may have a little bit of delay or be out-of-sync for a few seconds when the unit starts to playback the missed broadcast programme. It will soon switch to normal.
![SUMMER SCENE VARIETY PAGE MAGIC HAT NEW THE SCENE THE STORY FIND ME !!! Shift Time/Max Shift Time [-00:00:09/01:20:00] Play FB FF Prev. Next Pause Stop 04:20](/content/2026/05/1003803/images/8e754dbfc3105d482f1e76b444a47c187275fb0d45422c6803f43f75e2aa9233.jpg)
Using the Remote Control
You can shift playback to any point of the virtually recorded programme. The PVR Time Shift progress bar will be displayed on the screen for 5 seconds. Press the TIMESHIFT button to display the PVR Time Shift progress bar again.
| TIMESHIFT | During playback, press the TIMESHIFT button to display a still screen. |
 | When playing:Press the ◀ button repeatedly to speed up backward x2 / x4 / x8 / x16Press the ▶ button repeatedly to speed up forward x2 / x4 / x8 / x16.During fast forward / fast backward state, press the PLAY button to return to normal playback. |
 | Press the ◀ button to jump about 10% forward.Press the ▶ button to jump about 10% back. |
| ### | During playback, press the button to display a still screen and then press the button again to resume playback. |
| ### | If you want to exit the PVR Time Shift and return to the current live broadcast, press the ■ button and then press the ■ button to confirm. |
Recording DTV Programme onto a USB Storage Device
Use this function to record the DTV programme you are watching on the main screen and save it for future viewing. The recording from timer programme or direct recording may have a little bit of delay when it starts to record the broadcast programme. Please make sure the USB device is inserted. If not, a warning message will pop up.
- Press the ● button to record the programme that you are currently watching. Note: The recoding progress bar will disappear after 5 seconds. To display the recording progress bar again, press the ● button. The LED indicator will flash red and blue alternately when recoding.
- Press the ■ button to stop recording. Note: Recording will stop automatically when the disk is full.
![04:20 Recording Time [00:00:09] Max Recording Time [8911:19:53] Play FS TF Prev. Next Pause Stop 04:20](/content/2026/05/1003803/images/82314cfa182e81571fd9752812d0e5db48061f43b6bd1235ec2a6f96a057440a.jpg)
Timer Programming
This function is used for scheduled recording. The recording from timer programme or direct recording may have a little bit delay when it starts to record the broadcast programme. Please make sure the USB device is inserted. If not, a warning message will pop up.
- Press the MENU button to display the main menu. Press the ◀▶ buttons to select CHANNEL and then press the OK button.
- Press ▲▼ the buttons to select the Recorded Mode and then press the OK button.
- A Programme Schedule menu will pop up. Press the ◀▶▲▼ buttons to adjust the settings and then press the OK button to save.

| Channel Selects the channel that you wanted to record. | |
| Start Time/ Start Date Adjusts the start time and start date. | |
| End Time/ End Date Adjusts the end time and end date. | |
| Repeat Selects the frequency: Once / Weekly / Every Day. | |
| Mode Selects the mode: Recorder / Reminder. |
→ After finishing the adjustments, press the OK button to confirm your settings. A Timer Save Success/Reminder was saved Successfully screen will display. The Schedule List will then be displayed with your preset recorders and reminders shown.

Press the EXIT button to exit EPG.
Notes:
→ When the preset time is reached, the TV will start recording automatically.
→ If a programme recording starts when the TV is in standby mode, the LED indicator will flash red and blue alternately.
Play Recorded Programme
This function is used for scheduled recording. The recording from timer programme or direct recording may have a little bit delay when it starts to record the broadcast programme. Please make sure the USB device is inserted. If not, a warning message will pop up.
-
Press the SOURCE button on the front right side panel of the TV or the SOURCE button on the remote control then press the ▲▼ buttons to select USB mode and then press the OK button.
-
Press ◀▶ buttons to select MOVIE.

-
Press the ▲▼ buttons to select your storage device and then press the OK button
-
Press the ▲▼◀▶ buttons to select the “_MSTPVR” folder and then press the OK button.
-
Press the ▲▼◀ ▶ buttons to select the recorded programme. A preview window will pop up.

-
Press the ▶ button to view the movie in full screen.
-
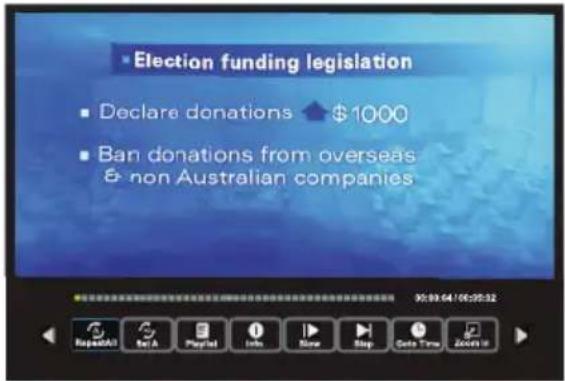
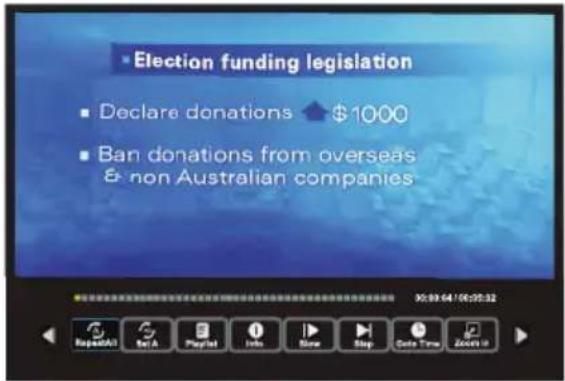
Press the OK button or the INFO button to display the function bar. Press the ◀▶ buttons and then press the OK button to select the function: Repeat / Set A / Playlist /Info. / Slow / Step / Goto Time / Zoom In / Zoom Out / Aspect Ratio / Move View.
![C:\MSTPVR 1 / 2 Windows, Windows Applications <|vision_start|> 20130708_015 20130708_014 20130708_013 20130708_012 20130708_011 20130708_010 20130708_017 20130708_016 20130708_019 20130708_023 SPT_1 (ABC) [MyBlock Report] in Specifications: 7PE > 276 Audio Player: 1.2 Audio Ratio: -1.9 Program: 1:1 Size: 100% Options Delete Content in Add Performance and Add Performance to playset](/content/2026/05/1003803/images/4ae92941726f4fb5625247794dc82463182fb6be09530dc4f37f9c8af3b22b0b.jpg)
- Press the EXIT button to return to the previous menu.
Connecting a USB Storage Device
- Switch off the TV before connecting any USB storage device.
- Connect your USB storage device to the USB port of your TV.
- Plug the connected devices into the mains socket before switching on the
- POWER ON/OFF switch which is located at the front right side under the frame.
- Press the ⏻ button on the front right side panel of the TV or the ⏻ button on the remote control to turn on your TV and your USB storage device.
- Press the SOURCE button on the front right side panel of the TV or the SOURCE button on the remote control to display the Source List. Use the ▲▼ buttons to select USB and then press the OK button to confirm.
Note:
→ Some versions of portable hard disk may require more power than the TV USB socket can provide. To ensure correct operation please use power adapter for that device.
→ If a USB hub is used make sure its mains adapter is connected to the mains supply as the total current consumption exceed 500mA.
→ The maximum supported storage space of the hard disk is 1 TB.
→ The file system only support FAT32 format.
→ If you want to store the video streaming of a DTV programme, the transfer rate of the USB storage device must not be less than 5MB/s, otherwise the picture and sound of the programme will be affected and a warning statement will be shown on the screen. If this happens, please upgrade your USB storage device.
→ The TV screen will be blank temporarily as it will take time to start up and stabilize the connected hard disk. This is normal and the starting time may vary depending on the brand and the memory size of the connected hard disk.
→ Disconnect the USB storage device if it is not in use.
Viewing Photos
-
Press the SOURCE button on the front right side panel of the TV or the SOURCE button on the remote control then press the ▲▼ buttons to select USB mode and then press the OK button.
-
Press ◀▶ buttons to select PHOTO.
-
Press the ▲▼ buttons to select your storage device and then press the OK button
-
Press the ▲▼◀ ▶ buttons to navigate in the picture folder folder and then press the OK button.
-
Press the ▲▼◀▶ buttons to select a specific picture. A preview window will pop up.
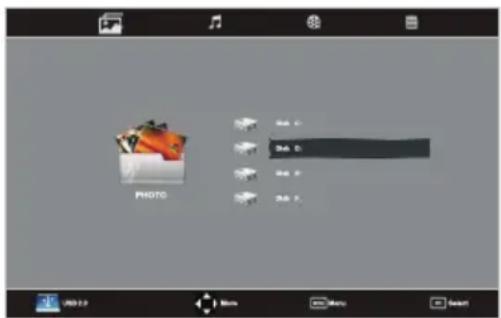
Note: File format supported: JPG.
→ Press the ▶ button to view the picture in full screen.
→ Press the OK button or the INFO button to display the function bar. Press the ◀▶ buttons and then press the OK button to select the function: Repeat / Music / Playlist / Info. / Rotate Clockwise / Rotate Anticlockwise / Zoom In / Zoom Out / Move View.
→ If this folder also contains music files, you can select a music track to play at the same time you view your photos.
Press the EXIT button to return to the previous menu.
Listening to Music
- Press the SOURCE button on the front right side panel of the TV or the SOURCE button on the remote control then press the ▲▼ buttons to select USB mode and then press the OK button.
- Press ◀▶ buttons to select MUSIC.
- Press the ▲▼ buttons to select your storage device and then press the OK button
- Press the ▲▼◀ ▶ buttons to navigate in the music folder folder and then press the OK button.
- Press the ▲▼◀▶ buttons to select a specific music track. A preview window will pop up.
Note: Some audio file formats will not be supported. Supported File format: MP3
→ Press the ▶ button to play the music in full screen.
→ Press the OK button or the INFO button to display the function bar. Press the ◀▶ buttons and then press the OK button to select the function: Repeat / Goto Time.


Press the EXIT button to return to the previous menu.
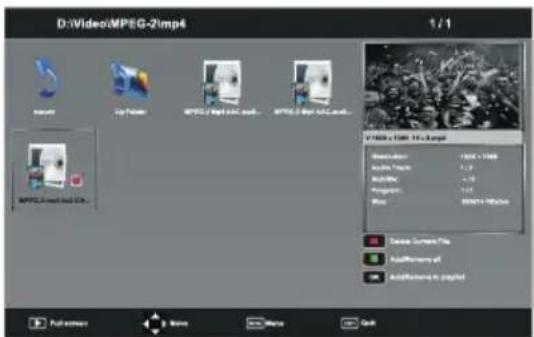
Viewing Movies
- Press the SOURCE button on the front right side panel of the TV or the SOURCE button on the remote control then press the ▲▼ buttons to select USB mode and then press the OK button.
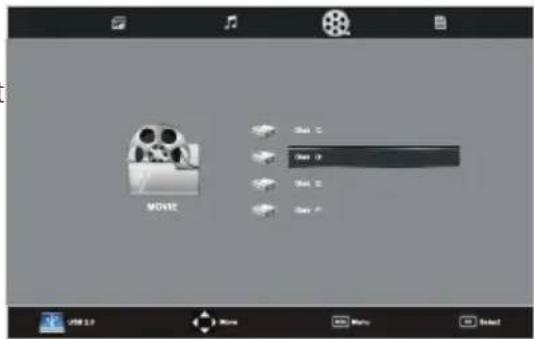
- Press ◀▶ buttons to select MOVIE.
- Press the ▲▼ buttons to select your storage device and then press the OK button
- Press the ▲▼◀ ▶ buttons to navigate in the movie folder folder and then press the OK button.
- Press the ▲▼◀ ▶ buttons to select a specific movie. A preview window will pop up.
Note: Some video file formats will not be supported. Supported File format: MPEG 1/2.
→ Press the ▶ button to view the movie in full screen.
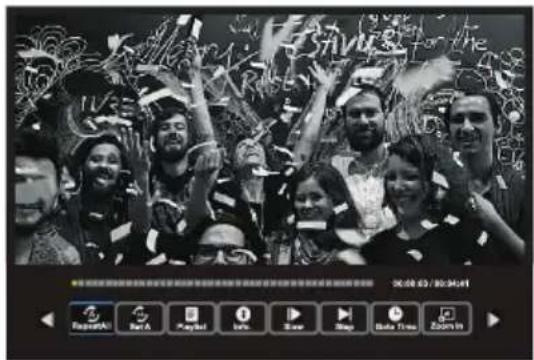
→ Press the OK button or the INFO button to display the function bar. Press the ◀▶ buttons and then press the OK button to select the function: Repeat / Set A / Playlist / Info. / Slow / Step / Goto Time / Zoom In / Zoom Out / Aspect Ratio / Move View.
Press the EXIT button to return to the previous menu.
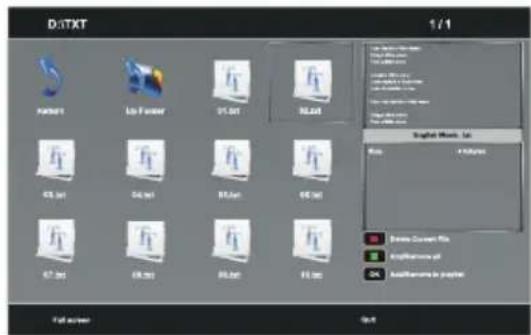
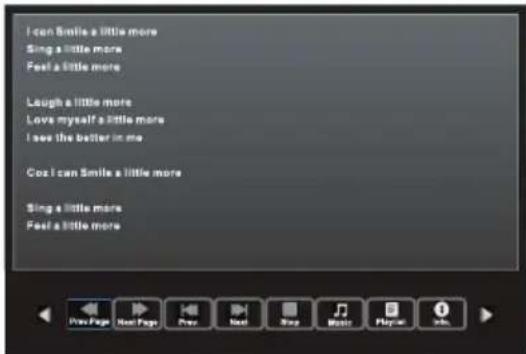
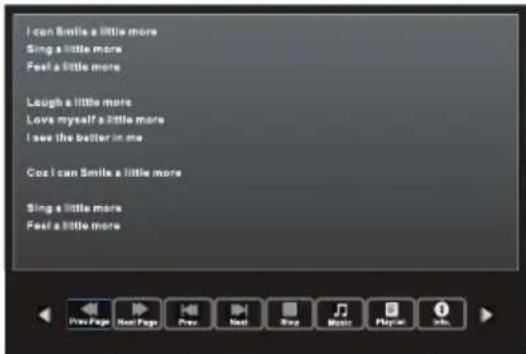
My Text
-
Press the SOURCE button on the front right side panel of the TV or the SOURCE button on the remote control then press the ▲▼ buttons to select USB mode and then press the OK button.
-
Press ◀▶ buttons to select TEXT.
-
Press the ▲▼ buttons to select your storage device and then press the OK button
-
Press the ▲▼◀ ▶ buttons to navigate in the movie text folder and then press the OK button.
-
Press the ▲▼◀ ▶ buttons to select a specific text. A preview window will pop up.
→ Press the ▶ button to view the text in full screen.
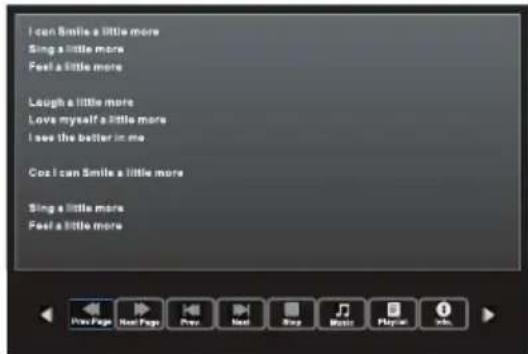
→ Press the OK button or the INFO button to display the function bar. Press the ◀▶ buttons and then press the OK button to select the function: Prev. page / Next page / Prev. / Next / Stop / Music / Playlist / Info.
Note: If this folder also contains music files, you can select a music track to play at the same time you view your texts.
Press the EXIT button to return to the previous menu.

| Panel Size | 50 inch diagonally |
| Display Type | LED |
| Panel Technology | TFT |
| Panel 60 Hz Vs. 120 Hz | 120 Hz |
| HD Compatible | 3840 x 2160 |
| Panel Resolution | 3840 x 2160 |
| Aspect Ratio | 16:9 |
| Dynamic Contrast Ratio-Panel | 4000~5000:1 |
| Brightness (Centre Typ.) Cd/M2 | 350~400 |
| Response Time (G To G) | 6.5 ms |
| Lamp Life (Typ. Hours) | 30,000 hours |
| Horizontal Viewing Angle (At CR>20) | 176 |
| Vertical Viewing Angle (At CR>20) | 176 |
| Wall-mount(LxW-mm) | 400x400mm |

WARNING
RISK FÖR ELEKTRISK STÖT ÖPPNA INTE
WARNING: FÖR ATT MINSKA RISKEN FÖR ELEKTRISK STÖT,
TA INTE BORT HÖLJET (ELLER BAKSIDAN). DET FINNS INGA REPARERBARA DELAR INUTI. KONTAKTA BEHÖRIG VERKSTAD

natural_image
Line drawing of a flat-screen monitor with blank screen area and a small logo at the bottom (no text or symbols on screen)TV

natural_image
Line drawing of a remote control with two batteries (no text or symbols)natural_image
Simple line drawing of a rectangular object with three small dots above it (no text or symbols)1. Strömindikator
natural_image
Technical line drawing of a laptop chassis showing internal components and an open panel (no text or symbols)natural_image
Diagram of a device layout with labeled components and an arrow indicating a component or connection point (no text or symbols present)SUBPAGE: Visa undersida i text-TV.
| Språkinstälningar Välj | önskat språk som ska visas i menyn. Standardinställningen är på engelska. | |
| DVB Select Type Välj | DVB-typ:DVB-T/DVB-C. | |
| LAND Välj i vilket land du kommer att använda TV:n Den förvalda landet är satt till Sverige. | ||
| Tune Type Välj kanaltyp ATV+DTV/DTV/ATV. | ||
| OK Tryck på OK-knappen för att starta Automatisk kanalsökning. Kanalinställning påbörjas. Denna process kan ta upp till flera minuter. Skärmen visar hur hur långt den har kommit och antalet hittade kanaler. | Channel TuningTV : 0 Programme(s)DTV : 0 Programme(s)Radio : 0 Programme(s)Data : 0 Programme(s)0% (TV)□ □ □ □ □ □ □ □ □ □ □ □ □ □ □ □ □ □ □ □ □ □ □ □ □ □ □ □ □ □ □ □ □ □ □ □ □ □ □ □ □ □ □ □ □ □ □ □ □ □ □ ▢ ▢ ▢ ▢ ▢ ▢ ▢ ▢ ▢ ▢ ▢ ▢ ▢ ▢ ▢ ▢ ▢ ▢ ▢ ▢ ▢ ▢ ▢ ▢ ▢ ▢ ▢ ▢ ▢ ▢ ▢ ▢ ▢ ▢ ▢ ▢ ▢ ▢ ▢ ▢ ▢ ▢ ▢ ▢ ▢ ▢ ▢ ▢ ▢ ▢ ▩ ▢ ▢ ▢ ▢ ▢ ▢ ▢ ▢ ▢ ▢ ▢ ▢ ▢ ▢ ▢ ▢ ▢ ▢ ▢ ▢ ▢ ▢ ▢ ▢ ▢ ▢ ▢ ▢ ▢ ▢ ▢ ▢ ▢ ▢ ▢ ▢ ▢ ▢ ▢ ▢ ▢ ▢ ▢ ▢ ▢ ▢ ▢ ▢ ▢ □ □ □ □ □ □ □ □ □ □ □ □ □ □ □ □ □ □ □ □ □ □ □ □ □ □ □ □ □ □ □ □ □ □ □ □ □ □ □ □ □ □ □ □ □ □ □ □ □ △ △ △ △ △ △ △ △ △ △ △ △ △ △ △ △ △ △ △ △ △ △ △ △ △ △ △ △ △ △ △ △ △ △ △ △ △ △ △ △ △ △ △ △ △ △ △ △ △ △ ▩ △ △ △ △ △ △ △ △ △ △ △ △ △ △ △ △ △ △ △ △ △ △ △ △ △ △ △ △ △ △ △ △ △ △ △ △ △ △ △ △ △ △ △ △ △ △ △ △ △ ▲ △ △ △ △ △ △ △ △ △ △ △ △ △ △ △ △ △ △ △ △ △ △ △ △ △ △ △ △ △ △ △ △ △ △ △ △ △ △ △ △ △ △ △ △ △ △ △ △ △ ▸ △ △ △ △ △ △ △ △ △ △ △ △ △ △ △ △ △ △ △ △ △ △ △ △ △ △ △ △ △ △ △ △ △ △ △ △ △ △ △ △ △ △ △ △ △ △ △ △ △ ▴ △ △ △ △ △ △ △ △ △ △ △ △ △ △ △ △ △ △ △ △ △ △ △ △ △ △ △ △ △ △ △ △ △ △ △ △ △ △ △ △ △ △ △ △ △ △ △ △ △ ▝ △ △ △ △ △ △ △ △ △ △ △ △ △ △ △ △ △ △ △ △ △ △ △ △ △ △ △ △ △ △ △ △ △ △ △ △ △ △ △ △ △ △ △ △ △ △ △ △ △ ▽ △ △ △ △ △ △ △ △ △ △ △ △ △ △ △ △ △ △ △ △ △ △ △ △ △ △ △ △ △ △ △ △ △ △ △ △ △ △ △ △ △ △ △ △ △ △ △ △ △ ▶ △ △ △ △ △ △ △ △ △ △ △ △ △ △ △ △ △ △ △ △ △ △ △ △ △ △ △ △ △ △ △ △ △ △ △ △ △ △ △ △ △ △ △ △ △ △ △ △ △ ▹ △ △ △ △ △ △ △ △ △ △ △ △ △ △ △ △ △ △ △ △ △ △ △ △ △ △ △ △ △ △ △ △ △ △ △ △ △ △ △ △ △ △ △ △ △ △ △ △ △ ▼ △ △ △ △ △ △ △ △ △ △ △ △ △ △ △ △ △ △ △ △ △ △ △ △ △ △ △ △ △ △ △ △ △ △ △ △ △ △ △ △ △ △ △ △ △ △ △ △ △ ▎ △ △ △ △ △ △ △ △ △ △ △ △ △ △ △ △ △ △ △ △ △ △ △ △ △ △ △ △ △ △ △ △ △ △ △ △ △ △ △ △ △ △ △ △ △ △ △ △ △ ▞ △ △ △ △ △ △ △ △ △ △ △ △ △ △ △ △ △ △ △ △ △ △ △ △ △ △ △ △ △ △ △ △ △ △ △ △ △ △ △ △ △ △ △ △ △ △ △ △ △ ▵ △ △ △ △ △ △ △ △ △ △ △ △ △ △ △ △ △ △ △ △ △ △ △ △ △ △ △ △ △ △ △ △ △ △ △ △ △ △ △ △ △ △ △ △ △ △ △ △ △ ▦ △ △ △ △ △ △ △ △ △ △ △ △ △ △ △ △ △ △ △ △ △ △ △ △ △ △ △ △ △ △ △ △ △ △ △ △ △ △ △ △ △ △ △ △ △ △ △ △ △ ▣ △ △ △ △ △ △ △ △ △ △ △ △ △ △ △ △ △ △ △ △ △ △ △ △ △ △ △ △ △ △ △ △ △ △ △ △ △ △ △ △ △ △ △ △ △ △ △ △ △ ▅ △ △ △ △ △ △ △ △ △ △ △ △ △ △ △ △ △ △ △ △ △ △ △ △ △ △ △ △ △ △ △ △ △ △ △ △ △ △ △ △ △ △ △ △ △ △ △ △ △ ▮ △ △ △ △ △ △ △ △ △ △ △ △ △ △ △ △ △ △ △ △ △ △ △ △ △ △ △ △ △ △ △ △ △ △ △ △ △ △ △ △ △ △ △ △ △ △ △ △ △ ▭ △ △ △ △ △ △ △ △ △ △ △ △ △ △ △ △ △ △ △ △ △ △ △ △ △ △ △ △ △ △ △ △ △ △ △ △ △ △ △ △ △ △ △ △ △ △ △ △ △ ▱ △ △ △ △ △ △ △ △ △ △ △ △ △ △ △ △ △ △ △ △ △ △ △ △ △ △ △ △ △ △ △ △ △ △ △ △ △ △ △ △ △ △ △ △ △ △ △ △ △ ▷ △ △ △ △ △ △ △ △ △ △ △ △ △ △ △ △ △ △ △ △ △ △ △ △ △ △ △ △ △ △ △ △ △ △ △ △ △ △ △ △ △ △ △ △ △ △ △ △ △ ▨ △ △ △ △ △ △ △ △ △ △ △ △ △ △ △ △ △ △ △ △ △ △ △ △ △ △ △ △ △ △ △ △ △ △ △ △ △ △ △ △ △ △ △ △ △ △ △ △ △ ▬ ▸ ▸ √ √ √ √ √ √ √ √ √ √ √ √ √ √ √ √ √ √ √ √ √ √ √ √ √ √ √ √ √ √ √ √ √ √ √ √ √ √ √ √ √ √ √ √ √ √ √ √ √ √ ∞ √ √ √ √ √ √ √ √ √ √ √ √ √ √ √ √ √ √ √ √ √ √ √ √ √ √ √ √ √ √ √ √ √ √ √ √ √ √ √ √ √ √ √ √ √ √ √ √ √ ∖ √ √ √ √ √ √ √ √ √ √ √ √ √ √ √ √ √ √ √ √ √ √ √ √ √ √ √ √ √ √ √ √ √ √ √ √ √ √ √ √ √ √ √ √ √ √ √ √ √ ∜ √ √ √ √ √ √ √ √ √ √ √ √ √ √ √ √ √ √ √ √ √ √ √ √ √ √ √ √ √ √ √ √ √ √ √ √ √ √ √ √ √ √ √ √ √ √ √ √ √ ∯ √ √ √ √ √ √ √ √ √ √ √ √ √ √ √ √ √ √ √ √ √ √ √ √ √ √ √ √ √ √ √ √ √ √ √ √ √ √ √ √ √ √ √ √ √ √ √ √ √ ∪ √ √ √ √ √ √ √ √ √ √ √ √ √ √ √ √ √ √ √ √ √ √ √ √ √ √ √ √ √ √ √ √ √ √ √ √ √ √ √ √ √ √ √ √ √ √ √ √ √ ∕ √ √ √ √ √ √ √ √ √ √ √ √ √ √ √ √ √ √ √ √ √ √ √ √ √ √ √ √ √ √ √ √ √ √ √ √ √ √ √ √ √ √ √ √ √ √ √ √ √ ∟ √ √ √ √ √ √ √ √ √ √ √ √ √ √ √ √ √ √ √ √ √ √ √ √ √ √ √ √ √ √ √ √ √ √ √ √ √ √ √ √ √ √ √ √ √ √ √ √ √ ∇ √ √ √ √ √ √ √ √ √ √ √ √ √ √ √ √ √ √ √ √ √ √ √ √ √ √ √ √ √ √ √ √ √ √ √ √ √ √ √ √ √ √ √ √ √ √ √ √ √ ∥ √ √ √ √ √ √ √ √ √ √ √ √ √ √ √ √ √ √ √ √ √ √ √ √ √ √ √ √ √ √ √ √ √ √ √ √ √ √ √ √ √ √ √ √ √ √ √ √ √ ∤ √ √ √ √ √ √ √ √ √ √ √ √ √ √ √ √ √ √ √ √ √ √ √ √ √ √ √ √ √ √ √ √ √ √ √ √ √ √ √ √ √ √ √ √ √ √ √ √ √ ∮ √ √ √ √ √ √ √ √ √ √ √ √ √ √ √ √ √ √ √ √ √ √ √ √ √ √ √ √ √ √ √ √ √ √ √ √ √ √ √ √ √ √ √ √ √ √ √ √ √ ∶ √ √ √ √ √ √ √ √ √ √ √ √ √ √ √ √ √ √ √ √ √ √ √ √ √ √ √ √ √ √ √ √ √ √ √ √ √ √ √ √ √ √ √ √ √ √ √ √ √ ∆ √ √ √ √ √ √ √ √ √ √ √ √ √ √ √ √ √ √ √ √ √ √ √ √ √ √ √ √ √ √ √ √ √ √ √ √ √ √ √ √ √ √ √ √ √ √ √ √ √ ∧ √ √ √ √ √ √ √ √ √ √ √ √ √ √ √ √ √ √ √ √ √ √ √ √ √ √ √ √ √ √ √ √ √ √ √ √ √ √ √ √ √ √ √ √ √ √ √ √ √ ∫ √ √ √ √ √ √ √ √ √ √ √ √ √ √ √ √ √ √ √ √ √ √ √ √ √ √ √ √ √ √ √ √ √ √ √ √ √ √ √ √ √ √ √ √ √ √ √ √ √ ∦ √ √ √ √ √ √ √ √ √ √ √ √ √ √ √ √ √ √ √ √ √ √ √ √ √ √ √ √ √ √ √ √ √ √ √ √ √ √ √ √ √ √ √ √ √ √ √ √ √ ∨ ∨ ∨ ∨ ∨ ∨ ∨ ∨ ∨ ∨ ∨ ∨ ∨ ∨ ∨ ∨ ∨ ∨ ∨ ∨ ∨ ∨ ∨ ∨ ∨ ∨ ∨ ∨ ∨ ∨ ∨ ∨ ∨ ∨ ∨ ∨ ∨ ∨ ∨ ∨ ∨ ∨ ∨ ∨ ∨ ∨ ∨ ∨ ∨ ∨ ∩ ∩ ∩ ∩ ∩ ∩ ∩ ∩ ∩ ∩ ∩ ∩ ∩ ∩ ∩ ∩ ∩ ∩ ∩ ∩ ∩ ∩ ∩ ∩ ∩ ∩ ∩ ∩ ∩ ∩ ∩ ∩ ∩ ∩ ∩ ∩ ∩ ∩ ∩ ∩ ∩ ∩ ∩ ∩ ∩ ∩ ∩ ∩ ∩ ∩ ∪ | | | | | | | | | | | | | | | | | | | | | | | | | | | | | | | | | | | | | | | | | | | | | | | | | | | | | | | | | | | | | | | | | | | | | | | | | | | | | | | | | | | | | | | | | | | | | | | | | | | | | | | |
Välj signalkälla

→ Radera
Timer-programmering


| Panelstorlek | 50 tum diagonalt |
| Skärmtyp LED | |
| Panelteknologi | TFT |
| Panel 60 Hz Vs. 120 Hz | 120 Hz |
| HD-kompatibel | 3840 x 2160 |
| Panelens upplösning | 3840 x 2160 |
| Bredd-höjd-förhållande | 16:9 |
| Dynamisk kontrast | 4000~5000:1 |
| Ljusstyrka (Center.) Cd/M2 | 350~400 |
| Responstid (G To G) | 6.5 ms |
| Lampans livstid | 30,000 timmar |
| Horisontell visningsvinkel (CR>20) | 176 |
| Vertikal visningsvinkel (CR>20) | 176 |
| Väggfäste (LxB-mm) | 400x400mm |

CAUTION: TO REDUCE THE RISK OF ELECTRIC SHOCK, DO NOT REMOVE THE COVER (OR BACK). NO USER SERVICABLE PARTS INSIDE. REFER SERVICING TO QUALIFIED SERVICE PERSONNEL.

natural_image
Front view of a blank flat-screen computer monitor (no text or symbols visible)TV-sett

natural_image
Line drawing of a remote control with two batteries (no text or symbols)natural_image
Simple line drawing of a rectangular object with three small dots above it (no text or symbols)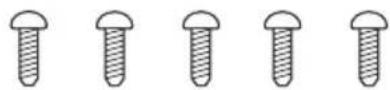
Fem skruerTV-sokkel
User Manual
Quick Start Guide
1. Strømindikator
natural_image
Technical line drawing of a laptop chassis showing internal components and mounting bracket (no text or symbols)natural_image
Diagram of a device layout with labeled components and an arrow indicating a component or connection point (no text or symbols present)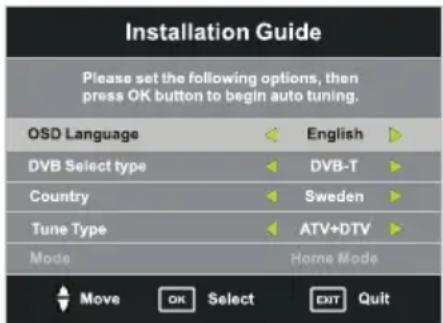
→ Slette
Programmere timer
![C:\MSTPVR 1 / 2 Matsam Up Printer 20130708_011 20130708_012 20130708_015 20130708_014 20130708_019 20130708_019 20130708_020 SPT_1 (ABC) [Mybox Report] in Specifications: 7PE > 276 Audio Player: 1.2 Audio: -1.9 Program: 1:1 Size: 100% Options Delete Content File Add Performance and Add Performance to playset Full screen More Menu Out](/content/2026/05/1003803/images/03ccefbc57eb298f2b7bbcfb64ebea23af8aa374421bc97f8b29d290a1da2ab4.jpg)
Koble til en USB-lagringsenhet
| Panelstørrelse | 60 tommer diagonalt |
| Displaytype LED | |
| Panelteknologi | TFT |
| Panel 60 Hz vs. 120 Hz | 120 Hz |
| Skjermoppløsning | 3840 x 2160 |
| Paneloppløsing | 3840 x 2160 |
| Bildeformat 16:9 | |
| Panel for dynamisk kontrastforhold | 4000~5000:1 |
| Lysstyrke (Centre Typ.) Cd/M ^2 | 350~400 |
| Responstid (G To G) | 6.5 ms |
| Lampelevetid (vanligv. timer) | 30,000 timer |
| Horisontal synsvinkel (ved CR>20) | 176 |
| Vertikal synsvinkel (ved CR>20) | 176 |
| Veggmontering (LxW-mm) | 400x400mm |
andersson
Bockasjögatan 12
50430 Borås
Sweden
- A NOTE ABOUT RECYCLING
- Copyright
- Statement
- ANGÅENDE ÅTERVINNING
- Svenska
- What's Included
- Front View
- POWER Indicator
- IR (Infrared Receiver)
- POWER
- SOURCE
- MENU
- CH
- VOL +/-
- Headphone Socket
- PC AUDIO Input
- VGA Input
- SCART socket
- DTV/TV Input
- COAXIAL Digital Audio Output
- Common interface slot
- MINI YPBPR
- MINI AV
- USB port
- HDMI Inputs
- Installing the Stand
- Removing the Stand for Wall-Mounting
- Understanding the remote control buttons
- Note:
- Initial Setup
- Selecting Input Source
- Channel Selection
- → Alternative:
- Display program information
- Volume Adjustment
- Customizing TV Settings
- Channel Settings
- Antenna
- Auto Scan
- ATV Manual Tuning (ATV Mode)
- DTV Manual Tuning
- Programme Edit
- → Delete
- → Skip
- → Rename (For ATV mode only)
- → FAV (Favorite)
- Signal Information (DTV Mode)
- CI(Common Interface) Information (DTV Mode)
- To insert the Common Access Module
- To remove the Common Access Module
- To view the module information
- Recorded Mode
- Schedule List
- PVR File System
- Picture Settings
- Sound Settings
- Time Settings
- Option Settings
- Lock Settings
- EPG (Electronic Programme Guide) (DTV Mode)
- Switch On/Off EPG
- Select a Programme
- Time Shift Function (DTV Mode)
- Notes:
- Using the Remote Control
- Recording DTV Programme onto a USB Storage Device
- Timer Programming
- Play Recorded Programme
- Connecting a USB Storage Device
- Viewing Photos
- Note: File format supported: JPG.
- Listening to Music
- Note: Some audio file formats will not be supported. Supported File format: MP3
- Viewing Movies
- My Text
- WARNING
- RISK FÖR ELEKTRISK STÖT ÖPPNA INTE
- Strömindikator
- Välj signalkälla
- Timer-programmering
- Strømindikator
- → Slette
- Programmere timer
- Koble til en USB-lagringsenhet
Brand : Andersson
Model : LED5062UHD PVR
Category : Television